SEARCH FINESCALE.COM

Enter keywords or a search phrase below:

Japanese GB 2011-2012

202814 views
2250 replies
1 rating 2 rating 3 rating 4 rating 5 rating
  • Member since
    July 2007
  • From: Southern New Jersey
Posted by troublemaker66 on Tuesday, October 4, 2011 4:59 AM

TREYZX10R

Len ,Eric thanks I did it freehand using a 20/0 atlas brush with model master japanese amy green. I thin the paint 10 %with Nason mid temp base coat reducer it really helps it flow without cutting down the coverage.

Herchmech,Jason thankls really appreciate the kind words

Carlos wow,outstanding detail work !!!

bsyamato coming along nicely good luck with the decals

Wow! You did that freehand? I would`ve guessed you used some sort of stencil to get the mottle`s edges so crisp looking, which is my only hope of getting similar results. That`s very impressive brush skills!

Len Pytlewski

  • Member since
    November 2009
  • From: SW Virginia
Posted by Gamera on Tuesday, October 4, 2011 7:44 AM

Hey guys, sorry I haven't been around. Hopefully I'll get my computer back sometime this week. I meant to post Monday but things got a little crazy here at work. A pleasant surprise to see how much everyone has gotten done over the weekend. Bow Down

JailCop: Welcome Sign Good lookin' work so far!

Bsyamato: Wow, the engine is about the size of the end of your thumb I'd think? Again, you have much sharper eyes and better with you hands than I am to wire something that small.

Trey: Guess I shouldn't be surprised with the fantastic mottling you did on those German nightfighters on the Nightfighters GB but still wow, your mottling on the Shoki is fantastic!

Helo John: Lookin' good! Looking forward esp to the trucks and the diorama.

Big-Z: Very nice work! Even if you can't see it at least you know all the detail is down in there. And who knows if at a show some judge will have to check things out with a penlight.

Rob: Both of those look like they'd be really cool. Looking forward to either one. Heck you've got 11 months left- no reason you can't do both. Wink

Hope I didn't leave anyone out, my fault if I did. I sprayed the yellow leading edges on the Suisei this weekend, masked them off, and sprayed the primer coat on the underside last night. Will get photos up when I've got painting done.

"I dream in fire but work in clay." -Arthur Machen


  • Member since
    October 2008
  • From: italy
Posted by bsyamato on Tuesday, October 4, 2011 5:55 PM

thanx for comment guys, decals can improve really a model.

This day i decalled two aircraft (lots of decals Crying ) one of two had a better decal sheet with all decals workin good, no breaks and following perfect the surface details....

but was the other decalled kit Whistling .. the icm decals (the other was a revell kit with cartograph decals) goes good on hinomaru ( fiuu) wih really hot water. The others with less hot water gone break in some point the worst was  the yellow stripe on the visible wing above.

I choice this one to reproduce (decals for 4 aircraft) just for these stripes Sad

and for the sign on the rudder. really bring me back in the later '30 

Waiting tomorrow to try some repair on stripes with spares decals in the same sheet.

  • Member since
    September 2011
  • From: Watertown, NY
Posted by JailCop on Tuesday, October 4, 2011 9:38 PM

Made a bit more progress tonight, running into a problem though, I can't get the two colors I need most from Tamiya I guess due to the earthquake and such in Japan.  I had to go to companies in Taiwan and Hong Kong to order, so it may be some time before I get them.


Glued the landing gear panels on, glued and sanded the fuselage drop tank, also drilled the hole for the drop tank.

Finished the pilot figure, going to try using a toothpick to add some eyebrows and eyes, don't know how well that'll go!  lol Tongue Tied

Finished painting and assembling the engine/prop assembly.  May try to add some brass or copper detail.


Now, if I could just get the IJN Gray-Green and the Cockpit Green, I could make some real progress!

  • Member since
    August 2011
  • From: Perth, WA
Posted by NeedBeer on Wednesday, October 5, 2011 5:07 AM

Here's my progress, just a few bits to tidy up , decide whether to open/close cockpit , final wash & dullcoat

DSC_0168.jpg

Can now start thinking about Dinah.  George, Frank, Shoki & Jack ...

WiP

1/24 Hawker Hurricane Mk I

1/48 F-22 Raptor; F-22 Idolmaster,  DH Vampire, Saab Gripen 

1/72 C-130 Hercules; Vulcan 

1/350 Bismarck


  • Member since
    October 2008
  • From: italy
Posted by bsyamato on Wednesday, October 5, 2011 5:23 AM

Gamera , i'll put after some comparing picture, the whole aircraft is really little Big Smile not so sharp eyes on the engine , just pointed the cilinders with a needle before to drill, so the process was mere easy to complete .. and one of cilinder have 3 holes instead of two Whistling

JailCop the pilot is really nice Yes why don't try to mix some paint for the ijn gray? is really light, an adjust between white and a light gray can work Yes

NeedBeer great zero i see, like the chippin on decals Beer


  • Member since
    September 2003
  • From: Australia
Posted by Helo H-34 on Wednesday, October 5, 2011 5:39 AM

WOW great work everyone , especially the pilot figure .

I recently painted some 1/72 figures for the Korean War GB and found by using a small amount of thinned model master enamel gloss black paint as a wash it went nicely into the eyes , nose and mouth recesses quite well . The figures were painted with Gunze Acrylics first then a few light coats of Gunze H-30 clear so as to get the enamel wash to flow nicely . I finished the figures with a couple of light coats of Gunze H-20 Flat clear .

I noticed on the instruction for the Isuzu fuel truck that there are two paint options ;

So seeing the Starter truck will be sitting beside the Nakajima Ki-84 and it's Khaki all over , I've decided to paint the fuel truck Navy Blue (H-54) and have her sitting beside the Zero .

A support vehicle for each aircraft .

Cliff , Sorry to here about your computer issue's , I hope it works out okay buddy .

                      John


  • Member since
    November 2009
  • From: SW Virginia
Posted by Gamera on Wednesday, October 5, 2011 7:45 AM

Bsyamato: She's looking good, good luck with getting the broken decals repaired.

Jailcop: Nice work and great looking pilot. To my eyes Mitsubishi interior green looks almost like US zinc chromate/interior green and Nakajima interior green looks very close to RAF interior grey-green. Frankly if you're tired of waiting around I'd go ahead and use one of them, it's not going to show that much down inside the cockpit and I doubt any judge can tell the difference.

Needbeer: Wow, fantastic job! I think you nailed the right colour for the Zero, nice chipping on the decals, and the figures look good too. Is the first photo ok by you for the front page?

John: I agree- the blue navy truck is just more attractive to me than the khaki army one and more eye-catching to boot.

Well, I got the computer back from the shop, plugged it in and it's still doing the same friggin' thing. I'm beginning to wonder if something funny is going on with the power in the house.

"I dream in fire but work in clay." -Arthur Machen


  • Member since
    August 2011
  • From: Perth, WA
Posted by NeedBeer on Wednesday, October 5, 2011 8:58 AM

Gamera: My pleasure - no problem with the pics

WiP

1/24 Hawker Hurricane Mk I

1/48 F-22 Raptor; F-22 Idolmaster,  DH Vampire, Saab Gripen 

1/72 C-130 Hercules; Vulcan 

1/350 Bismarck


  • Member since
    November 2009
  • From: SW Virginia
Posted by Gamera on Wednesday, October 5, 2011 9:06 AM

Needbeer: Updated the front page. Congrads again, she's a beautiful model.

"I dream in fire but work in clay." -Arthur Machen


  • Member since
    September 2011
  • From: Watertown, NY
Posted by JailCop on Wednesday, October 5, 2011 9:35 AM

Thanks for the suggestions on the paint guys.  I've never mixed paint before so that would be a challenge.  You can't mix acrylic with enamel can you?  I'm about to go back to work after a months vacation, so I may just wait for the Tamiya paint to come, depending on the shipping time.


Painting the figure was MUCH easier than in the past, thanks to this forum!  I don't remember who's thread it was where I read it, so I can't give them full credit, but they suggested drilling a small hole in the butt of cockpit figures and using a bit of glue and a toothpick to hold them.  GREAT IDEA!  Its worked amazingly.  I just picked up a block of floral foam for when I'm ready for them to dry.

  • Member since
    October 2008
  • From: italy
Posted by bsyamato on Wednesday, October 5, 2011 10:03 AM

i mixed two different color brands ,and one glossy and one mat, both enamel : to mix enamel and acrylics i think is tecnically impossible (or not ? Hmm)

the nate was corrected on decals, not perfect result but good.

surfin between my vendors i found this little one as second built ,the 1/72 Tachikawa IDA "Ki55 / Ki36" from fujimi, someone never see a box of it? 

http://www.mblmodellismo.it/dettaglio_articolo.asp?id=21378

other possible are (from fujimi) the val or the Aichi B7A2 Grace .

what's the opinion about these subjects?

fujimi have a good line of " never seen on a forum "jap planes 


  • Member since
    November 2009
  • From: SW Virginia
Posted by Gamera on Wednesday, October 5, 2011 1:02 PM

Well, you can mix acrylic and enamel paint but you'll end up with a unusable mess SadOops

You were lucky Bsyamato- I mixed some Tamiya and Polly-S acrylic years ago and the paint wouldn't even blend - when I sprayed it the Polly-S went down with blobs of the Tamiya splattered in the middle of it.

Rule of Thumb: don't ever mix different brands/types of paint.


Bsyamato: I built a few Fujimi kits back in the late '80s - early '90s and liked them. They're not Hasegawa/Tamiya quality but not at all bad kits. I'd put them close to the quality of Academy kits in my opinion.

"I dream in fire but work in clay." -Arthur Machen


  • Member since
    March 2003
  • From: Rain USA, Vancouver WA
Posted by tigerman on Wednesday, October 5, 2011 1:50 PM

The thing I didn't like about the Fujimi kit I had, was there were no English painting instructions.

   http://i7.photobucket.com/albums/y269/wing_nut_5o/PANZERJAGERGB.jpg

 Eric 

  • Member since
    July 2003
  • From: Pennsylvania
Posted by jay12472 on Wednesday, October 5, 2011 4:35 PM

wow don't get to the computer for a couple of days and it's amazing how much has happened!

Bsyamato nice work on the decals

needbeer great  job on the zero

if I missed anyone sorry

Gamara could you make a change to my roster?  I'm not gonna the 72nd jake right away i need a break from masking those small canopys!

I have a ki-45 Nick and c6n Myrt  what would you guys like to see next

Jason

  • Member since
    October 2008
  • From: italy
Posted by bsyamato on Wednesday, October 5, 2011 4:59 PM

jay12472

wow don't get to the computer for a couple of days and it's amazing how much has happened!

Bsyamato nice work on the decals

needbeer great  job on the zero

if I missed anyone sorry

Gamara could you make a change to my roster?  I'm not gonna the 72nd jake right away i need a break from masking those small canopys!

I have a ki-45 Nick and c6n Myrt  what would you guys like to see next

Jason

wow! the myrt from fujimi? Whistling was between the strange/never seen subjects during the web surf.

Gamera and Tigerman thanx for reply, actually i seen between my hand only a 1/700 battleship and a 1/24 porsche, and the E-2c hawkeye (i cannot show the finished hawkeye for decency Embarrassed) . Read some good review about latest kit (about later 90) . The jap subject unfortunately are between 80 as i read.

For the tachikawa "IDA" the only choice is the fujimi kit Sad need to think about the good subject to put in the gb.

Gamera, between differents brand enamel mixing i never had problems, the only tip is to mix even between the paint session.. then with airbrush effectively... some problem can come out. No great experience with acrylics.

....

just sealing decals with second glossy layer: the nate is near the finish line.

  • Member since
    July 2003
  • From: Pennsylvania
Posted by jay12472 on Wednesday, October 5, 2011 5:40 PM

bsyamato My Myrtr is a hasegawa

Jason

  • Member since
    August 2009
  • From: Borlando Fla home of the rat
Posted by TREYZX10R on Wednesday, October 5, 2011 7:52 PM

Needbeer great job on the Zeke,really like the suttle chipping on the hinimura and the exhaust and gun stains are perfect!

Thanks for all the positive comments ,finished up the mottle

I did thin the paint 10% with a base reducer made by Nason

I'm not sure how authentic the mottle really is ,I could only find one artist rendering to go by so the rest is a geuss but it works for me. I'll need to go back over it and touch it up and even it a bit here and there. Next I'll start adding some decals and weathering

  • Member since
    August 2011
  • From: Panhandle Fl
Posted by Noah T on Wednesday, October 5, 2011 9:09 PM

That. Looks. Great.


On the bench: 72nd scale P51D, P47D Razorback

---Everything Is What It Is, And Not Another Thing.---

  • Member since
    February 2011
  • From: Sedona AZ
Posted by AZKevin on Wednesday, October 5, 2011 9:48 PM

Trey, your mottle looks fantastic!  I've always shied away from mottle camo because I though my air-brushing skills and equipment were not up the task.  I did do the old Nichimo 1/48 Ki-45 and hand brushed a larger mottle pattern, but your work makes me want to try this type of finer mottle.

Did you thin your paint at all?  Add any retarder?? or just use straight enamel??

Once again fantastic work!

Kevin

Kevin A. Lawton

Dept. of History

Dept. of Quaternary Sciences

Northern Arizona University

Flagstaff, AZ

  • Member since
    March 2003
  • From: Rain USA, Vancouver WA
Posted by tigerman on Wednesday, October 5, 2011 10:44 PM

jay12472

wow don't get to the computer for a couple of days and it's amazing how much has happened!

Bsyamato nice work on the decals

needbeer great  job on the zero

if I missed anyone sorry

Gamara could you make a change to my roster?  I'm not gonna the 72nd jake right away i need a break from masking those small canopys!

I have a ki-45 Nick and c6n Myrt  what would you guys like to see next

Jason

Ki-45 Nick!

   http://i7.photobucket.com/albums/y269/wing_nut_5o/PANZERJAGERGB.jpg

 Eric 

  • Member since
    February 2011
  • From: Sedona AZ
Posted by AZKevin on Wednesday, October 5, 2011 11:51 PM

Hello Everyone,

To start with - the kit is the RS Models 1/72 Tachikawa Ki-94-II.  It is lowpressure injection plastic with 2 resisn parts (engine & intake) and a photo etched fret.

There are some very large ejection pin 'towers', good detail, good engraved panel lines, very little flash, and, so far, good fit (but vert few location pins).

The cockpit peices with photo etched peices added and paint.


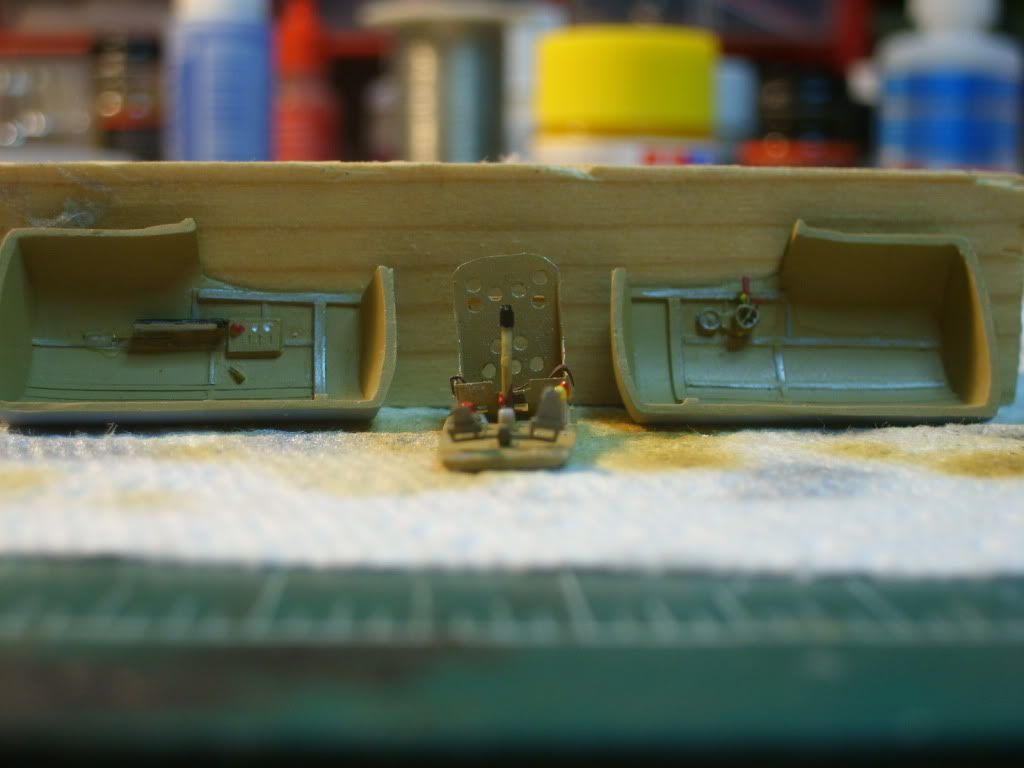
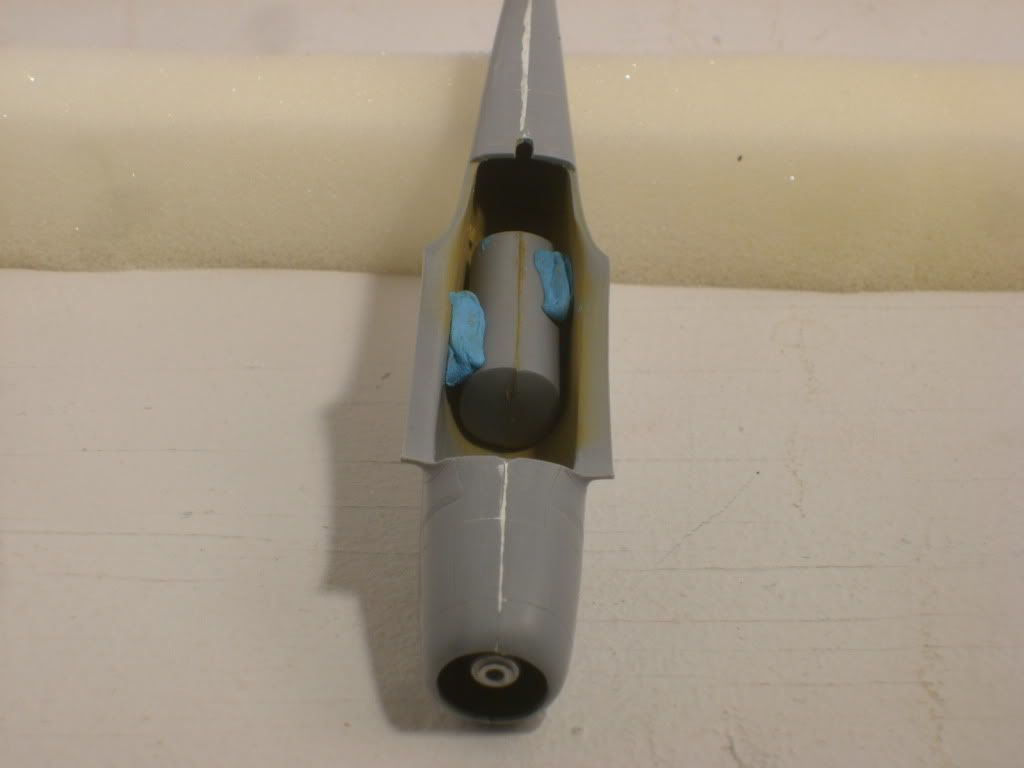
The cockpit tub - literally!

Before closing up the fuselage halves the engine need to be added as it cannot be installed later. Did I mention that there is no propellor shaft included in the kit?  I'll make it out of telescoping brass tube (more on that later).  Also I cut down the engine cooling fan just a bit so I can install it through the cowl at a later time.

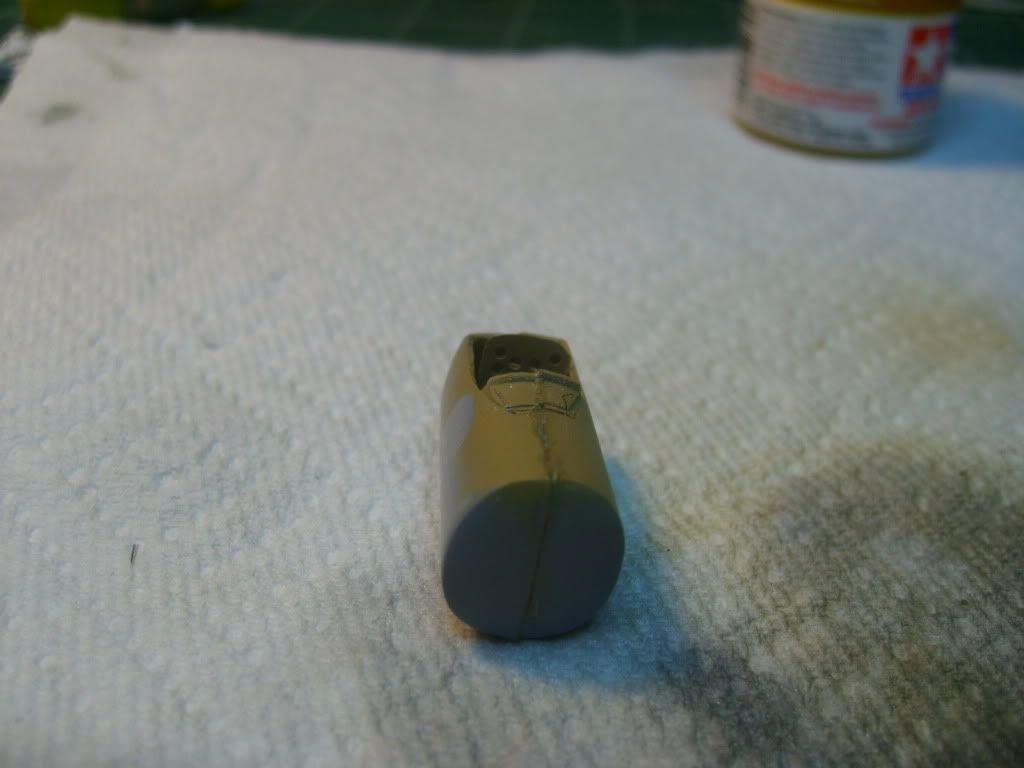
 With no locating pins the cockpit tub is held in place with Blu-Tack (poster putty).  I later added some peices of sprue and CA to hold it in place. 

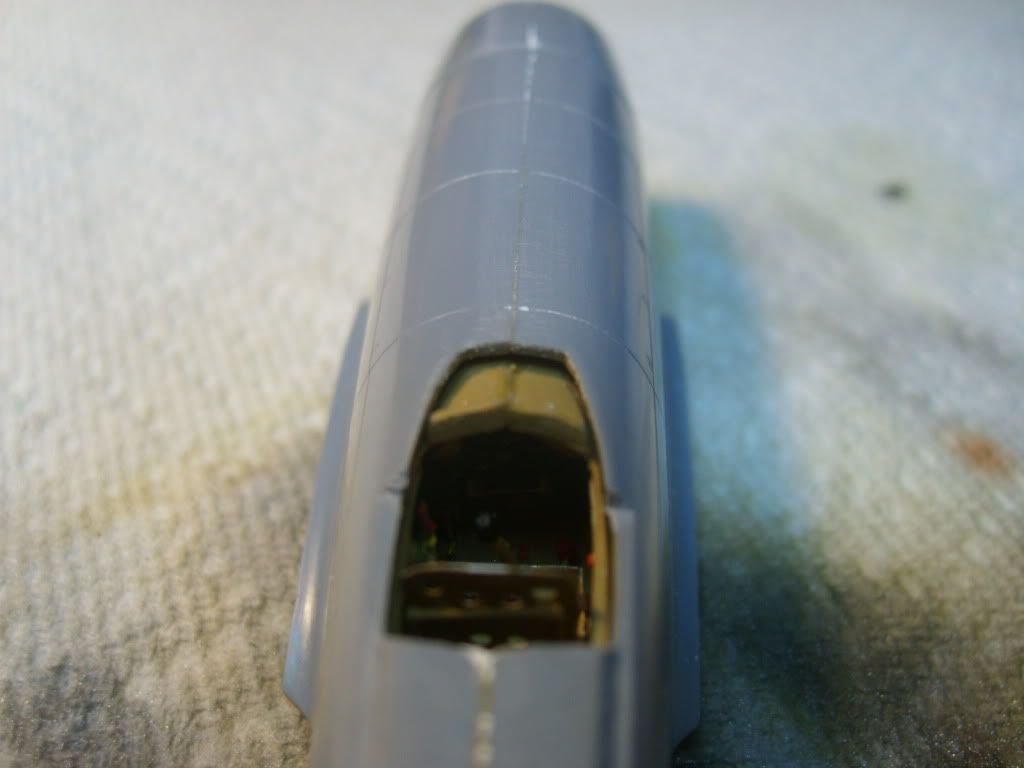
The cockpit tub installed and some work done on the fuselage seams.

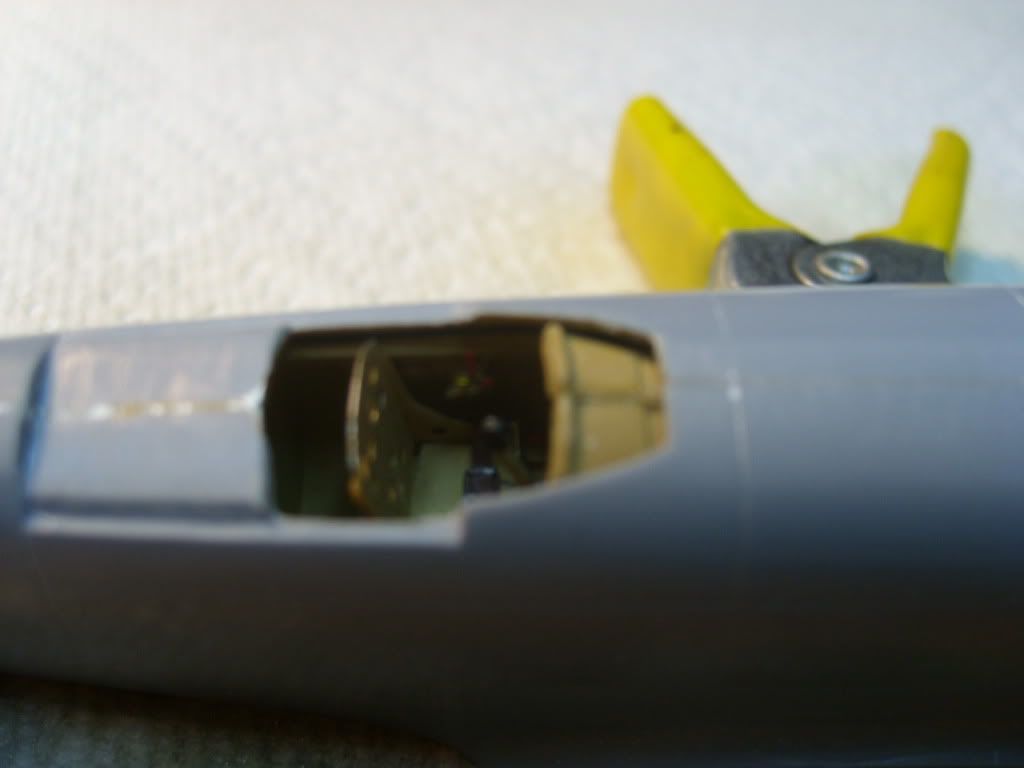
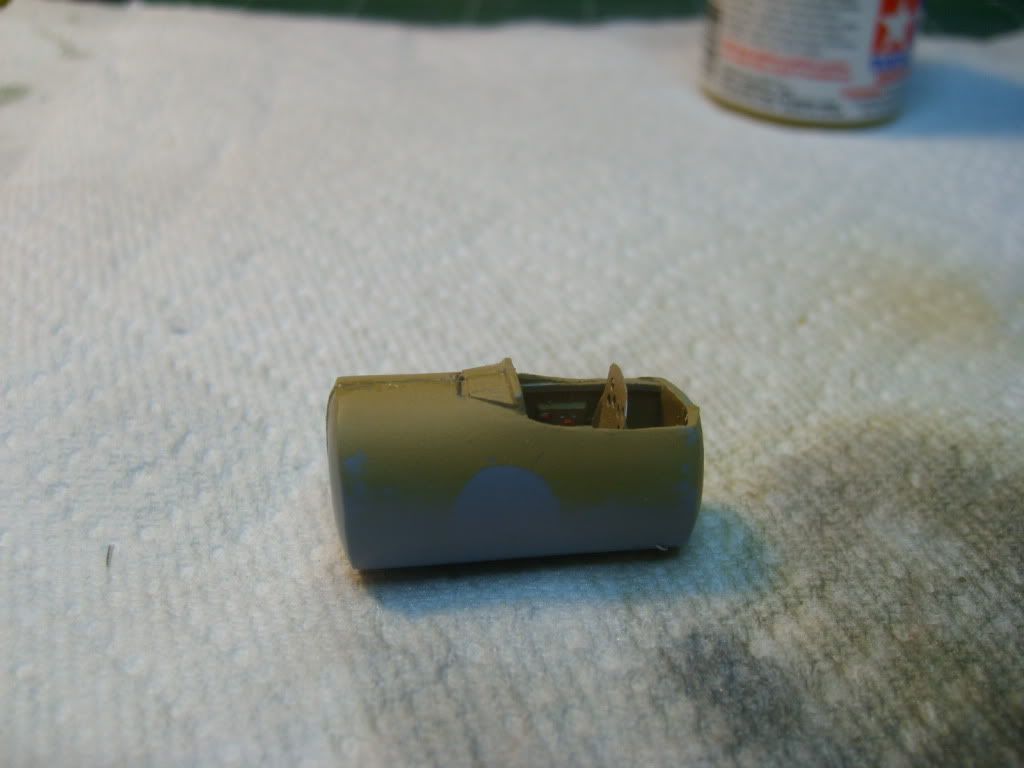
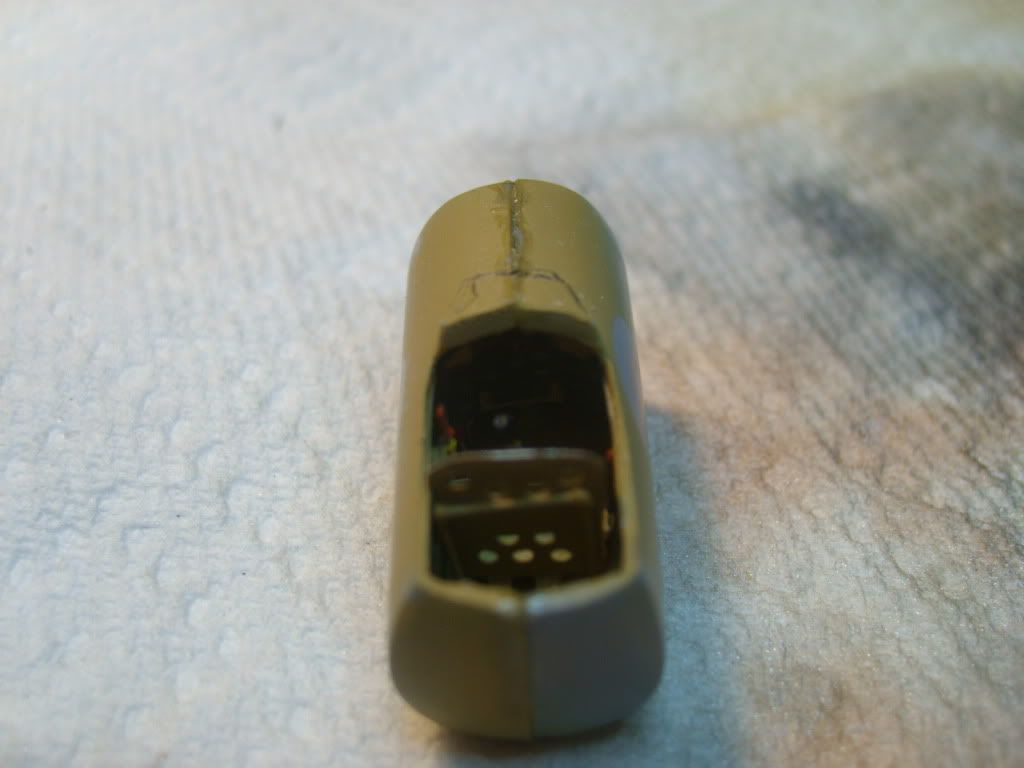
A lot more sanding of the cockpit tub and a little more adjusting and the cockpit is as close as it is going to get.  Since there are no plans of the airplane and no photos of the cockpit I have no idea if the cockpit coaming should be smooth with the top of the fuselage, but I plan on filling it and smoothing it out anyway.  The airplane did have a pressurized cockpit so maybe the step should be there?

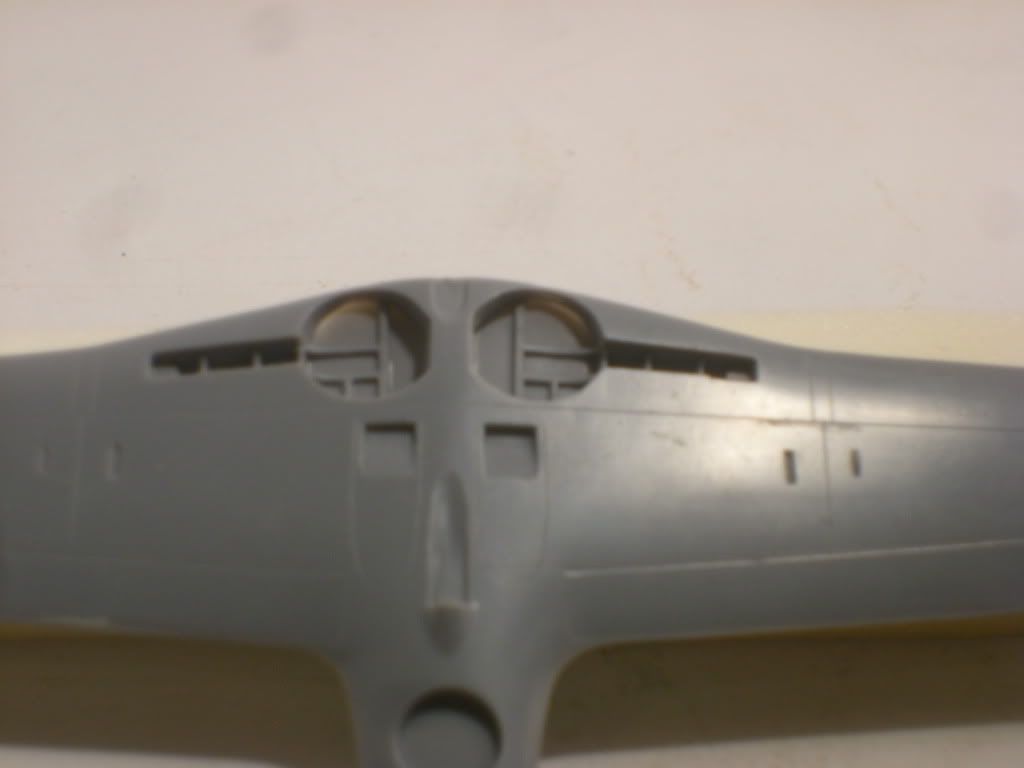
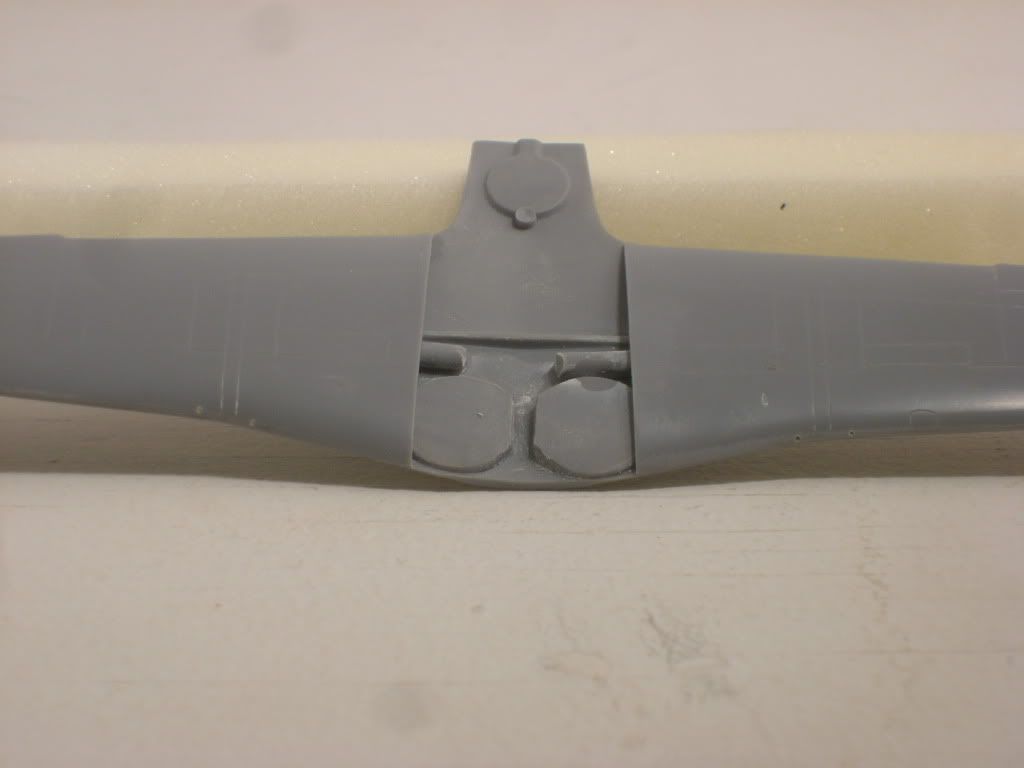
On to the wings.  Initaillyy the top and bottom parts had ejection pin marks that held the two surfaces 1/4 inch (7-8 mm) apart.  Then the landing gear bay inserts were added.  These were much to thick to fit between the wing halves so the tops and fronts of the inserts were filed until they were almost paper thin.Finally I found the fit of the wings to be about 1mm below the wing root on the fuselage so I added some sprue to hold the top and bottom halves apart.

Landing Gear bay insert detail.


Lastly the wings glued together showing the sprue peices added to hold the wing halves apart at the wing root and the wheel bay inserts.

I also drilled out the wing cannon holes at this point just so their locations would not get lost in claening up the leading edge.

That's it for now.  More in couple of days - if my PhD work allows me some modelling time...OK I'll TAKE the time.

Comments & suggestions are always welcome.

Kevin

Kevin A. Lawton

Dept. of History

Dept. of Quaternary Sciences

Northern Arizona University

Flagstaff, AZ

  • Member since
    October 2008
  • From: italy
Posted by bsyamato on Thursday, October 6, 2011 4:47 AM

jay12472

..

I have a ki-45 Nick and c6n Myrt  what would you guys like to see next

Jason

i'm for the myrt, just becaue more rare than the nick, both was perfect Whistling


Trey what great patience Beer waiting for the hinimaru

AZ good work on the ki-94 Yes it seems litter than the ki-27 Tongue Tied


  • Member since
    July 2003
  • From: Pennsylvania
Posted by jay12472 on Thursday, October 6, 2011 9:00 AM

az gr eat start 

Jason


  • Member since
    November 2009
  • From: SW Virginia
Posted by Gamera on Thursday, October 6, 2011 10:28 AM

Jason: No problem, I'll go change the roster when we decide on one or the other. Seems to me though that the Nick and the Myrt have a pile of windows to mask don't they?

Bsyamato: Thanks, I don't use enamel paint much anymore so I'm pretty ignorant on the subject.

Trey: Yes, you are the Mottle Master! I tried hand painting the mottling on a Ki-61 Tony some years ago and made a mess out of it - I think I didn't thin the paint enough though.

Kevin: Great start, she's coming along great!

"I dream in fire but work in clay." -Arthur Machen


  • Member since
    September 2011
  • From: Watertown, NY
Posted by JailCop on Thursday, October 6, 2011 10:45 AM

Well here is my work as of last night...


Pilot figure finished, rough I know but the best I've ever done.  Used a toothpick for the face.

Cowling with engine installed, note the brass detail on the engine, not sure if that's accurate, but I wanted some detail in there.

Cockpit.  I ended up using Tamiya Dark Green instead of the cockpit green.  Won't be seen much hopefully.

Canopy taped off for the first part of the framing when the IJN Gray-Green comes in.

I got most the rest of the assembly done last night.  This is going to be hung so I made the landing gear stowed.

  • Member since
    November 2009
  • From: SW Virginia
Posted by Gamera on Thursday, October 6, 2011 10:52 AM

Jailcop: She's lookin' good! Love how the engine came out.

"I dream in fire but work in clay." -Arthur Machen


  • Member since
    December 2002
  • From: NYC, USA
Posted by waikong on Thursday, October 6, 2011 11:15 AM

You guys are doing such great work in this GB, I've been lurking since day one.  Just too much other started build to join another GB for now.

Jailcop, If I can offer one advise regarding the figure, instead of using red for the lips, just add a touch of red to your flesh color. Use that as the color for the lips - you'll get the defintiion without making them pop out so much.  Here's an example I did with figures from the Tamiya a6m5 kit - not a great figure painter myself, but you get what I mean.  I used a pin to scratch the paint in for the eyes and eyebrow.

My website: http://waihobbies.wkhc.net


  • Member since
    October 2008
  • From: italy
Posted by bsyamato on Thursday, October 6, 2011 11:27 AM

Gamera

Jailcop: She's lookin' good! Love how the engine came out.

Ditto

Out of lips correction ( can ruin the whole finished kit reaputation LOL) the engine looks really good, just the inside covers seems not painted . The zero gray looks really good , was a mix or you used the correct gray?

Wikong these pilots looks dam.. good to me 

  • Member since
    July 2003
  • From: Pennsylvania
Posted by jay12472 on Thursday, October 6, 2011 12:18 PM

Jailcop great job on that> also love the engine

Gamara they both have alot of glass but I have masks for them

Jason


JOIN OUR COMMUNITY!

Our community is FREE to join. To participate you must either login or register for an account.

SEARCH FORUMS
FREE NEWSLETTER
By signing up you may also receive reader surveys and occasional special offers. We do not sell, rent or trade our email lists. View our Privacy Policy.