SEARCH FINESCALE.COM

Enter keywords or a search phrase below:

Japanese GB 2011-2012

202619 views
2250 replies
1 rating 2 rating 3 rating 4 rating 5 rating
  • Member since
    February 2011
  • From: Monterey Bay,CA-Fort Bragg, NC
Posted by randypandy831 on Friday, September 23, 2011 2:36 PM

NeedBeer

Ok sorted out my airbrush problem now i need to resolve the colour for my A6M3 I want to do the all grey (?) color for the Tainan Fighter Group (1st)

Kit recommends XF76 IJN Grey Green - I put a couple of light coats on but too green!

I've just put a coat of XF12 JN Grey over this but still too green/dark when comparing to pics & illustration on box - it has a yellow/brown tinge

any suggestions?

http://i1234.photobucket.com/albums/ff412/NeedBeer/A6M3/DSC_0109.jpg


http://i1234.photobucket.com/albums/ff412/NeedBeer/A6M3/DSC_0106.jpg


read this. real good info.

http://s362974870.onlinehome.us/forums/air/index.php?showtopic=172153

tamiya 1/48 P-47D $25 + shipping

tamiya 1/48 mosquito $20+ shipping

hobby boss 1/48 F-105G. wings and fuselage cut from sprue. $40+ shipping. 

  • Member since
    November 2009
  • From: SW Virginia
Posted by Gamera on Friday, September 23, 2011 3:26 PM

Thanks for the link Randy!

Don't understand what all the argument is about- everyone knows early Zeros were painted bright lemon yellow- the Aurora box showed them this way!!! Stick out tongue

http://img.photobucket.com/albums/v233/HansvonHammer/Aircraft%20Profiles/Box%20Art/Aurora2088-6920ZeroCar.jpg


Photo borrowed from Hans von Hammer.

"I dream in fire but work in clay." -Arthur Machen


  • Member since
    July 2003
  • From: Pennsylvania
Posted by jay12472 on Friday, September 23, 2011 6:13 PM

Oh MY  it's work like that just makes me wonder why I do this

Jason


  • Member since
    July 2003
  • From: Pennsylvania
Posted by jay12472 on Friday, September 23, 2011 6:15 PM

Try tamiya sky it works really nice

Jason

  • Member since
    October 2008
  • From: italy
Posted by bsyamato on Friday, September 23, 2011 6:36 PM

The aurora box seems more right for candies Big Smile 

the zero on the box art seems inspired by the sci-fi black tiger fighter from space battleship yamato that from the real zero

then return on my nate, i win with the d*** cockpit-wing/fuselage  fittings !!! (ok it's more a 1 to 1)

also i risked to lost the finished ip Black Eye i forget it after cut out from sprue.

to avoid future problems i fix it with an extra piece on the back

Added also the black little switch consolle on the left

on the cockpit also added the handbrake on the right (good to perform acrobatics) and the hood opener on the left ( Hmm or these the right use of these sticks?)

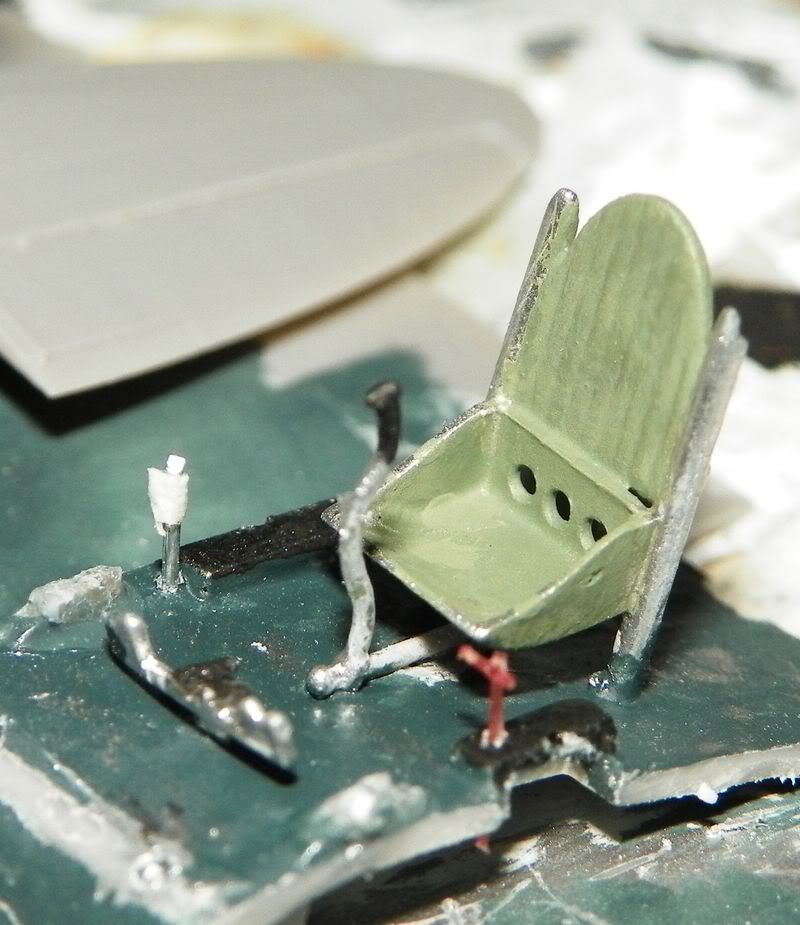
The finished cockpit with seat belts as ever did with coachbuilder maskin tape and electric wires


the quarter dollar was left with some american friend this summer. 

The problem of the cockpit was that even after lots of sanding and cuts the front parts pull out the back from the fuselage, at the end i gently glued the wing/cockpit and lightly stretched the tape on the back and the two pliers on the front, then finally i get the main assembly (the sanded area on the front of rudder pedals are the zone to glue the front bulkeads... icm really had enginereed this kit in a strange way)

the tail zone, another particular solution, the vertical ruddet is a single piece with the tail gear, and is fixed by the tail end

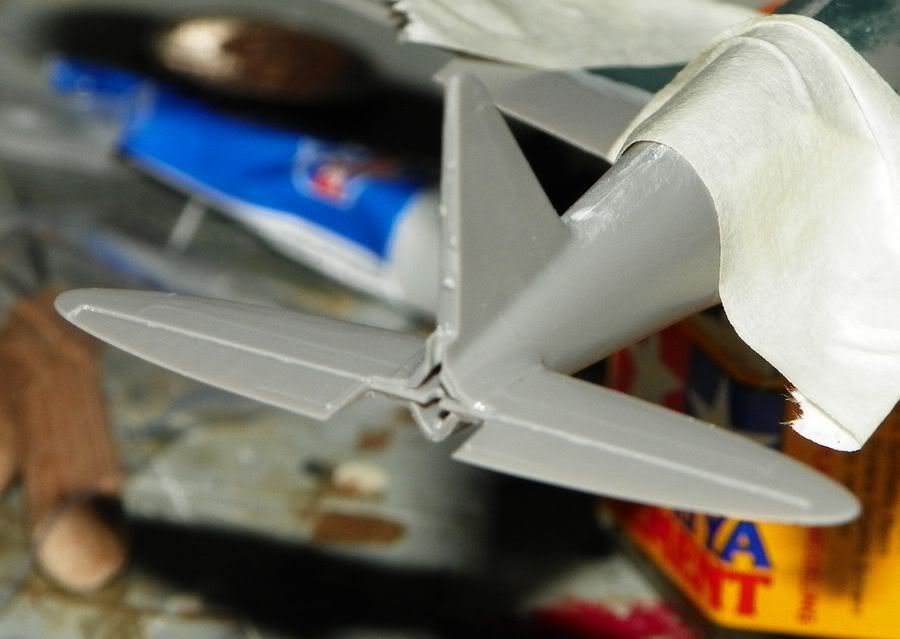
i retouched a little the orizontal rudders using the back of the x-acto blade.

that's all, just waiting the glue dry to put the top of wings

  • Member since
    August 2009
  • From: Borlando Fla home of the rat
Posted by TREYZX10R on Friday, September 23, 2011 9:59 PM

Great looking pit Bsyamato

I got the pin wash done ,just some exhaust stains to add next

  • Member since
    August 2009
  • From: Borlando Fla home of the rat
Posted by TREYZX10R on Saturday, September 24, 2011 9:53 AM

Sprayed the exhaust stains and a light dirt overspray ,I'll fix all the gun barrels and antenae on before a dullcoat  application

  • Member since
    March 2003
  • From: Rain USA, Vancouver WA
Posted by tigerman on Saturday, September 24, 2011 2:13 PM

Looking good on the Hayate. How long is it safe to leave the mask on the canopy before you worry about it peeling paint off?

   http://i7.photobucket.com/albums/y269/wing_nut_5o/PANZERJAGERGB.jpg

 Eric 

  • Member since
    March 2010
  • From: Democratic Peoples Republic of Illinois
Posted by Hercmech on Saturday, September 24, 2011 3:26 PM

Tiger,


I have left my masks on for a long time a few months or more and have not had issues other than it sometimes leaves a residue on the clear which is easy to clean off if you have futured the clear.


13151015

  • Member since
    March 2003
  • From: Rain USA, Vancouver WA
Posted by tigerman on Saturday, September 24, 2011 4:46 PM

Did you use alcohol or something to remove the residue? I would think thinner would be a no-no.

   http://i7.photobucket.com/albums/y269/wing_nut_5o/PANZERJAGERGB.jpg

 Eric 

  • Member since
    March 2010
  • From: Democratic Peoples Republic of Illinois
Posted by Hercmech on Saturday, September 24, 2011 7:50 PM

The future is actually pretty resilient and as long as you dont soak it a little oderless thinner works just fine. But since i switched to parafilm no issues at all


13151015

  • Member since
    August 2011
  • From: Perth, WA
Posted by NeedBeer on Sunday, September 25, 2011 1:30 AM

Randyp: Thanks for the input. There is a lot of debate about this. Gamera sent an article where the consensus was grey green but after weathering “ash grey” with green tints which is what I have aimed for


I have now put four coats on my zero– one coat IJN Grey Green, one coat JN Grey, two coats sky grey/white (50/50) – it has the chalky ash colour now with shades of green – don’t think it can take much more so I’m leaving it as is now

In the final straight now - hoping to have this finished in next week


WiP

1/24 Hawker Hurricane Mk I

1/48 F-22 Raptor; F-22 Idolmaster,  DH Vampire, Saab Gripen 

1/72 C-130 Hercules; Vulcan 

1/350 Bismarck


  • Member since
    July 2003
  • From: Pennsylvania
Posted by jay12472 on Sunday, September 25, 2011 4:12 PM

Need very nice color on the zero

Jason

  • Member since
    October 2008
  • From: italy
Posted by bsyamato on Sunday, September 25, 2011 6:04 PM

well done Trey, like these smokes on Yes

NeedBeer the grey layer on the zero is about a perfect!!

on the nate tail, good details on but covered with the tail cone.

under pressure

the zones that needed putty

with the dremel i thinned the engine zones, with high risk of melt plastic

with the opened engine these walls will be too false with original plastic thickness

i used the 147 light grey high thinned  as primer, to avod too many details lost

The two holes on the wings are the housing for gears top.

the two guns fixed with ca glue

some pieces painted, and the castle finally glued, lots of retouches needed (and some wire too)

the almost finished engine

that's all

  • Member since
    August 2009
  • From: Borlando Fla home of the rat
Posted by TREYZX10R on Sunday, September 25, 2011 7:16 PM

Needbeer color is looking great,nicely done!

bsyamato thanks,great dremel skills and the engine is looking awesome. Your build is coming to life!

I tried something new with the prop.Using a CD case cover I scribed it with a compas cutter then using a cut off wheel on a high speed grinder I shaped it. Then cut the props off the hub and fitted it in the drilled out center with ca glue

airbrushed

spinner attached

  • Member since
    August 2009
  • From: Borlando Fla home of the rat
Posted by TREYZX10R on Sunday, September 25, 2011 7:19 PM

I'm calling it finished

  • Member since
    July 2007
  • From: Southern New Jersey
Posted by troublemaker66 on Sunday, September 25, 2011 9:11 PM

TREYZX10R

I'm calling it finished

http://img.photobucket.com/albums/v710/treyzx10r/KI84%20Hayate/Hayateflag007.jpg

http://img.photobucket.com/albums/v710/treyzx10r/KI84%20Hayate/Hayateflag2001.jpg

http://img.photobucket.com/albums/v710/treyzx10r/KI84%20Hayate/Hayateflag2002.jpg

http://img.photobucket.com/albums/v710/treyzx10r/KI84%20Hayate/Hayateflag2003.jpg

http://img.photobucket.com/albums/v710/treyzx10r/KI84%20Hayate/Hayatesky005.jpg

http://img.photobucket.com/albums/v710/treyzx10r/KI84%20Hayate/Hayatesky005-1.jpg

Trey, great job! Good idea with the cd case prop blur too. My only suggestion would be to use a little thinner plastic next time for the prop blur, the cd case looks a little too thick to my eyes but the paint job is very convincing. I hope you don`t mind if I "borrow" that idea in a future build!

Len Pytlewski

  • Member since
    August 2007
  • From: n/w indiana
Posted by some assembly required on Sunday, September 25, 2011 9:19 PM

thats some fine work there!! i dont know what i like more - the prop or the paint. Eats

  • Member since
    October 2008
  • From: italy
Posted by bsyamato on Monday, September 26, 2011 6:16 AM

TREYZX10R

I'm calling it finished

http://img.photobucket.com/albums/v710/treyzx10r/KI84%20Hayate/Hayateflag2001.jpg

Great finish Trey YesYes nice to see another have the rising sun flag !


  • Member since
    July 2003
  • From: Pennsylvania
Posted by jay12472 on Monday, September 26, 2011 7:05 AM

Trey great job on this and the prop looks great too

Jason


  • Member since
    March 2003
  • From: Rain USA, Vancouver WA
Posted by tigerman on Monday, September 26, 2011 8:52 AM

Echo the others Trey. Fine job. At the rate you're knocking them off, you could build the whole air force by the end of the this GB.

   http://i7.photobucket.com/albums/y269/wing_nut_5o/PANZERJAGERGB.jpg

 Eric 

  • Member since
    November 2009
  • From: SW Virginia
Posted by Gamera on Monday, September 26, 2011 9:02 AM

Trey: Wow, what can I say? Yet another fantastic model. Love the model, love the 'spinning' prop and love the flag! An all around winner. Do have any preference to which photo I put up on the front page?

Bsyamato: Wow, she's coming right along. Very nice.

Needbeer: What I see looks good to me! As I said as long as people argue about the correct colour there isn't any definate 'right' shade you're looking for. Frankly it looks 'right' to me and if it looks 'right' to you IMHO it is 'right'. Very sharp job.


Meanwhile I got the Suisei together over the weekend, still masking the canopy. When done I'll have to spray a primer coat to check the seams. Will see about getting some more photos up then.

"I dream in fire but work in clay." -Arthur Machen


  • Member since
    August 2009
  • From: Borlando Fla home of the rat
Posted by TREYZX10R on Monday, September 26, 2011 3:33 PM

Thanks everyone really appreciate the kind words! Len feel free to use that ,yea its a tad thick on the edge maybe I'll 'knife edge' the next one. Cliff any pic you decide to post is fine and could you put me down for a 1/46 Otaki Ki44 Shoki 'Tojo' thanks. Looking forward to some pics of the Suisei!

  • Member since
    October 2008
  • From: italy
Posted by bsyamato on Monday, September 26, 2011 3:45 PM

Trey are you trying to replicate the whole japanese ww2 aviation Indifferent ?

  • Member since
    July 2003
  • From: Pennsylvania
Posted by jay12472 on Monday, September 26, 2011 4:26 PM

i got to work a little today. gloss coated the george for decals and started on the pit for the raiden

Got to bowl tonite so will get pics asap

Jason

  • Member since
    August 2011
  • From: Panhandle Fl
Posted by Noah T on Monday, September 26, 2011 5:52 PM

I'm actually impressing myself as I commited to the pe parts and the endless fitting. I guess this is what it feels like to be a modelor! Too bad when I put the fuselage together you cant see any of those tiny pe parts in the 'pit.

First model I ever cared about pedals and belts about before.

So I went to my local shop and was told that Jap trainer hasn't been bottled except for Gunze H24 which I cant seem to find. As mine is a two seater I'd rather have a more unique look. Any suggestions?


On the bench: 72nd scale P51D, P47D Razorback

---Everything Is What It Is, And Not Another Thing.---

  • Member since
    March 2003
  • From: Rain USA, Vancouver WA
Posted by tigerman on Monday, September 26, 2011 6:26 PM

Are you going NMF with the Tojo Trey? I should be bookmarking this thread for future reference.

   http://i7.photobucket.com/albums/y269/wing_nut_5o/PANZERJAGERGB.jpg

 Eric 

  • Member since
    August 2009
  • From: Borlando Fla home of the rat
Posted by TREYZX10R on Monday, September 26, 2011 8:04 PM

bsyamato yea I'm going for multiple fighters not the whole Japanese air arm lol but who knows time allowing..........

Eric yes going NMF with this one,just not sure which one but probably this one

but this one with the mottle over the NMF is pretty eye catching

some progress ,the dry fit is decent except the top wing on both sides has been molded short at the root

The kit has a very basic interior ,again a closed canopy build so not a major issue. Sprayed the interior RAF interior green with transparent blue over the top


  • Member since
    March 2003
  • From: Rain USA, Vancouver WA
Posted by tigerman on Monday, September 26, 2011 8:38 PM

I can't say with conviction Trey, but the wing root was the same on my Hasegawa kit. I've since sold it, but I do recall it, maybe not as pronounced.

I like the mottle scheme with the home defense bands. Always have, and would do it for all my planes except some didn't use them.

   http://i7.photobucket.com/albums/y269/wing_nut_5o/PANZERJAGERGB.jpg

 Eric 

  • Member since
    November 2009
  • From: SW Virginia
Posted by Gamera on Tuesday, September 27, 2011 7:42 AM

Trey: Looking good! Always liked those Arii/Otaki kits.

Roster updated.

"I dream in fire but work in clay." -Arthur Machen


JOIN OUR COMMUNITY!

Our community is FREE to join. To participate you must either login or register for an account.

SEARCH FORUMS
FREE NEWSLETTER
By signing up you may also receive reader surveys and occasional special offers. We do not sell, rent or trade our email lists. View our Privacy Policy.