SEARCH FINESCALE.COM

Enter keywords or a search phrase below:

Steel Cats (Sept. 2012-Aug. 2013)

321823 views
3330 replies
1 rating 2 rating 3 rating 4 rating 5 rating
  • Member since
    April 2013
Posted by SchattenSpartan on Monday, August 19, 2013 4:19 AM

Impessive looking tracks, Dave!

Mike: I just had a look a t page 96 and I like what I see!

I ran into a problem and I hope you guys can help me out:

I want to use Eduard's PE fenders on my kitten and I had a look at the instructions. Nothing special. I have to sand/cut off all the mounting points for the fenders on the hull and fill some gaps at the rear of the vehicle. That makes painting my KT impossible before I get my fenders (which could take another weeek!) Should I just use the molded on mounting points for the PE fenders (I don't know if they are going to fit) or should I simply wait for the fenders to arrive?

  • Member since
    February 2010
  • From: Berkeley CA/St. Paul MN
Posted by EBergerud on Monday, August 19, 2013 5:23 AM

Hi gents,

Wonderful build going on here. I got started on my entry a few weeks back only to be badly disturbed by the real world. But, things are going forward finally. I've never made a tiger before so I'll help make everyone else look better than they already are.

I've chosen the new Cyber Hobby Kursk Tiger I. A few weeks back I forwarded some sob stories about it and when done I'll give a detailed build log in the armor section. Suffice it to say, the kit is very new and appears to me to be a dumbed down version of the CH “Wittmann Tiger Kursk.” The kit has little PE, DS tracks, plastic cables etc. I don't think this was Dragon's finest hour and it proved a tricky build. But here it is:

No reason to go into construction now. It's done. Because of some spectacular driver error I was forced to strip the tank of its original base coat. That's okay because I didn't have a photo of it before painting. (Found simple ISP Alcohol worked great on water based acrylics: a little messy but I stripped the whole thing in about a hour. Doubt it would have been that easy with Tamiya or Gunze.) Anyway, you can see that I followed Adam Wilder's advice on his “Real Metal” DVD and tried to alter the surface with a combination of glue and slow drying plastic cement. The effect is actually accurate to my eyes: however, with all the “modulation” and weathering, I'm not sure how much of that will still show up. Perhaps the effect should be laid on a little more heavily.

I used the AK Dunkelgelb Modulation set. I think it worked pretty well. Here's the beast after a base coat of dunkel has been applied to the primer and preshade:

Here are a couple after the light, highlight and shine dunkelgelb has been put on:

There are a lot of photos of Kursk tigers and some very good modelers have built them. Kursk was fought before the “3 color” camo scheme became standard. From what I can see the Tigers were painted with stripes that followed no particular rhyme or reason in position, thickness. Some had lots of little thin stripes, others looked more like late war tanks with large panels painted green. As the kit's instructions dispensed with a view from the top, I looked at some other kits online and gave a fair approximation of what I think the kit was looking for. Wasn't sure, however, what color it should be. The call from Dragon was for Gunze khaki green. I saw some terrific work from excellent modelers that applied the kind of green-grey seen on some Afrika Korps vehicles – almost reminded me of a khaki olive drab. Most modelers used some shade of olive green. I had also picked up the AK “Green/Brown” modulation set to go with the dunkelgelb. I don't know about later tanks but the AK colors were much too green. So I made my own brew out of Vallejo Model Color olive green, reflective green and Model Air olive gray. All the camo schemes I saw were very soft – I'm sure the tanks were painted dunkel and given stripes on the field. So soft and irregular. I'm a C+ hand with an airbrush but this could only be handled free hand. So I drew thin lines of Revell Aqua Color olive green so I could think about keeping the airbrush working right and not where it was going. It did stress my skills. A hard pattern is much easier – so is dappling an aircraft with little dots and squiqqles. So there were errors in lare number, especially at first. (I was using a new HS Infinity with a .15 tip and it was a real help.) But as I got the hang of things the situation settled down. It did mean, however, that the stripes ended up a bit thicker than planned – that was the easiest way to fix errant spray. Also added some extra stripes to cover sins. No accuracy issue really as putting stripes on Tigers seemed to have been an exercise in individual whim at Kursk. Overall I think it worked out okay. Please note that weathering has not yet begun and the finished model will look quite different. Anyway, here's the striped tiger awaiting a full scale assault of tints, washes, pigments and dry mud:

More later. If there's no earth quake I should get it done under the deadline. Or so I hope.

Eric


A model boat is much cheaper than a real one and won't sink with you in it.

  • Member since
    November 2009
  • From: SW Virginia
Posted by Gamera on Monday, August 19, 2013 7:41 AM

Great stuff there guys, nice to see things in the last two weeks going out with a BANG!

"I dream in fire but work in clay." -Arthur Machen


  • Member since
    April 2013
Posted by SchattenSpartan on Monday, August 19, 2013 10:34 AM

Excellent work, Eric! I really like those stripes on your kitten as well as the color modulation on the Dunkelgelb!

  • Member since
    May 2011
  • From: Illinois
Posted by armor86 on Monday, August 19, 2013 10:12 PM

Complete photos - taken early evening so let me know if you want some more photos with more lighting. Its been a fun year getting this one done. A lot of great work on steel cats GB. Armor86


Dan

  • Member since
    November 2009
  • From: SW Virginia
Posted by Gamera on Monday, August 19, 2013 10:31 PM

Wow, really nice job! Love the weathered washed-out paint!

"I dream in fire but work in clay." -Arthur Machen


  • Member since
    February 2010
  • From: Berkeley CA/St. Paul MN
Posted by EBergerud on Tuesday, August 20, 2013 1:20 AM

Armor

I like that kit a lot. I'm keen on the "Spanish School" of armor heavy weather but think too often it's used to show rust, mega chipping etc. Certainly appropriate for some tanks in service - heaven knows combat was hard on machines. But considering the relatively short "shelf life" of a WWII AFV of any type, I'd look for fading, dust, grime and a lot of dust which I think would be picked up very quickly. So heavy on the fading, dust, grime, streaking and oil stains is just the ticket and that's what you've got. Thumbs up in my humble.

Eric


A model boat is much cheaper than a real one and won't sink with you in it.

  • Member since
    March 2003
  • From: Rain USA, Vancouver WA
Posted by tigerman on Tuesday, August 20, 2013 1:20 AM

Eric, glad you made it to the party. That camo is striking and will look even better when weathered.

Dan, thank you for sharing your amazing Tiger build. Some great detailing and weathering on it. I will get pictures posted soon.

   http://i7.photobucket.com/albums/y269/wing_nut_5o/PANZERJAGERGB.jpg

 Eric 

  • Member since
    February 2010
  • From: Berkeley CA/St. Paul MN
Posted by EBergerud on Tuesday, August 20, 2013 3:28 AM

I've got both volumes of Mike Rinaldi's "Tank Art" which are large, very sweet to look at, and crammed with interesting "Spanish School" weathering techniques. (The volumes are widely available now and a steal for about $25.) 

I was going to let Rinaldi be my weathering muse on this project but like an idiot I thought the deadline was the end of September and not the beginning. So I doubt I'll be able to use some of his techniques which I think would be pretty time consuming. (Lots of oils, but used almost like enamels and actively combined with pigments. Lots of things to try.)

Below is one of them. Rinaldi calls it "thinner chipping." If you have more than one coat of acrylic on your model (which you will if your using any of the modulation techniques made popular by Mig Jimenez and Adam Wilder) Rinaldi advises taking some kind of thinner (he uses Vallejo Airbrush Cleaner - it's probably ideal for any water based paints: might need something stronger on Tamiya - I'm sure ISP would also work on water based paints you'd have to be careful) , moisten a stiff brush in it and gently remove a little of the top coat of paint. The contrast doesn't really look like a chip to my eyes (Rinaldi's better at it than I am - of course he gets paid for modeling and I don't) but is an excellent emulation of a kind of grimy area that would result from lots of boots crawling around. You move slowly until you get the hang of it. But if it goes down to primer the area will be small and you've got a place to put a normal chip. This doesn't replace chipping, but is a very interesting addition to it. Look on the hatches below and the discolored areas on and near them comes from this technique - it's pretty evident.

Eric


A model boat is much cheaper than a real one and won't sink with you in it.

  • Member since
    April 2006
  • From: ON, Canada
Posted by jgeratic on Tuesday, August 20, 2013 4:32 AM

Dan - great job on this GB's third Tunisian Tiger.  I was a bit concerned early on when I saw how light you went with the yellow ocher (RAL8000?)  part of the tropen camou, but it all came together in the end.   Love the blotchy look you achieved. Beer

-------------------------------------------

Eric B - you seem to be quite busy this year with builds, or is this your normal pace?  Look forward to what you will throw at the Kursk Tiger.  

Dave - epremium job on those tracks!

Ernest - welcome back, what have you planned with the remaining 2 weeks till deadline?

IBuildOne48 - if the base is any indication, you should have one heck of build to show us.

regards,

Jack

  • Member since
    November 2003
  • From: Nashville, TN area
Posted by bobbaily on Tuesday, August 20, 2013 4:42 AM

Dan-Outstanding, to say the least-very impressive build all the way around   Bow Down.

Eric-you're off to a great start-looking forward watching the build progress.

Bob


  • Member since
    April 2005
Posted by Thunderbolt379 on Tuesday, August 20, 2013 7:26 AM

Hi all, back from a hard day's grind at the uni -- well, a couple of classes. I'm delighted to say that earlier I got the KT underway again, I fired up the AB for some fineline spraying and went over the camo I did last year. It has always seemed too dark and drab, as if the balances were off, so I firmed up the DY component, increased the relative proportion of DY, then went over the green to clean up overspray and splotches. It "feels" better now, and I'll inspect it in daylight tomorrow before, hopefully, going on to the fade and shade coats -- an ultra-thin application of buff for the top aspect, and dark earth for the underside and behind the running gear. All being well, that should conclude spraying for the project and get me to the wash and drybrush stage.

Pictures soon!

Mike/TB379

http://worldinminiature.blogspot.com/

  • Member since
    April 2013
Posted by SchattenSpartan on Tuesday, August 20, 2013 10:41 AM

I have plenty of bench time today, so you guys can expect an update of some sort tonight (finally)!

  • Member since
    July 2004
  • From: Sonora Desert
Posted by stikpusher on Tuesday, August 20, 2013 12:22 PM

Well I cant stop looking in to tis GB now. Still some gorgeous work going on!

A86, your finished Tiger looks just the part! Perfect for a North Africa vet.

EB, You are making fast work of that kit. I want to do another early Tiger somewhere down the road here, GrossDeutschland division at Kursk.... one day. That kit looks tempting.

Sparten, I look forward to yout progress pics here of your build.

And I thought you guys here would appreciate this tidbit of information- the Tiger Group Build that Southern California AMPS Chapter (mine was part of that) entered at IPMS Nationals this past weekend took first place in the "Chapter/Group" entry catagory. The Tigers won another battlefield.


F is for FIRE, That burns down the whole town!

U is for URANIUM... BOMBS!

N is for NO SURVIVORS...

       - Plankton

LSM


  • Member since
    April 2013
Posted by SchattenSpartan on Tuesday, August 20, 2013 5:56 PM

Ok gents, here's the update I promised you:

First of all, look what I found in the mail today:

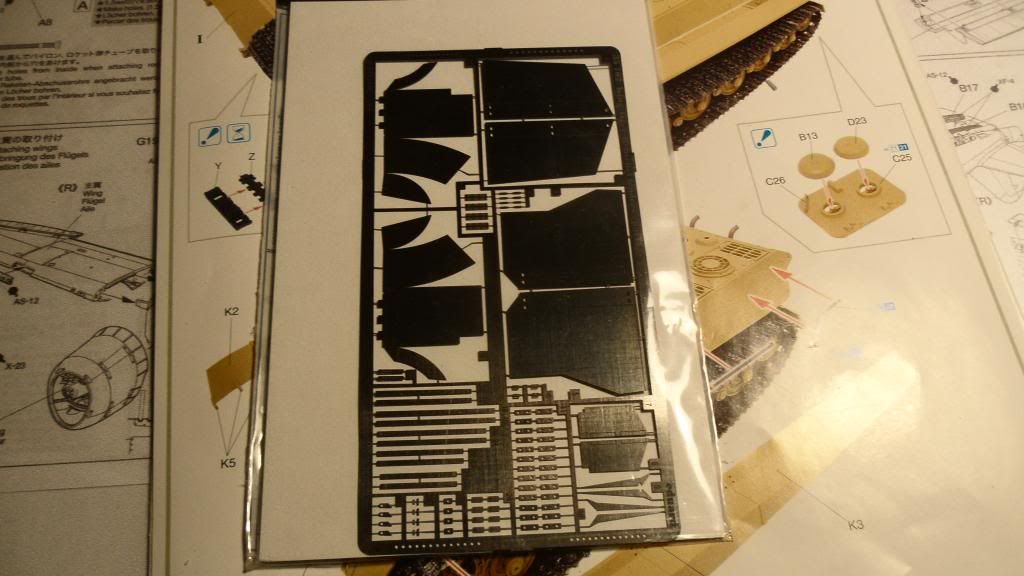
The fenders are here!!! Now I just have to make some changes to the hull to mount them...

But now to the update itself:

I glued all the suspension arms to the lower hull:

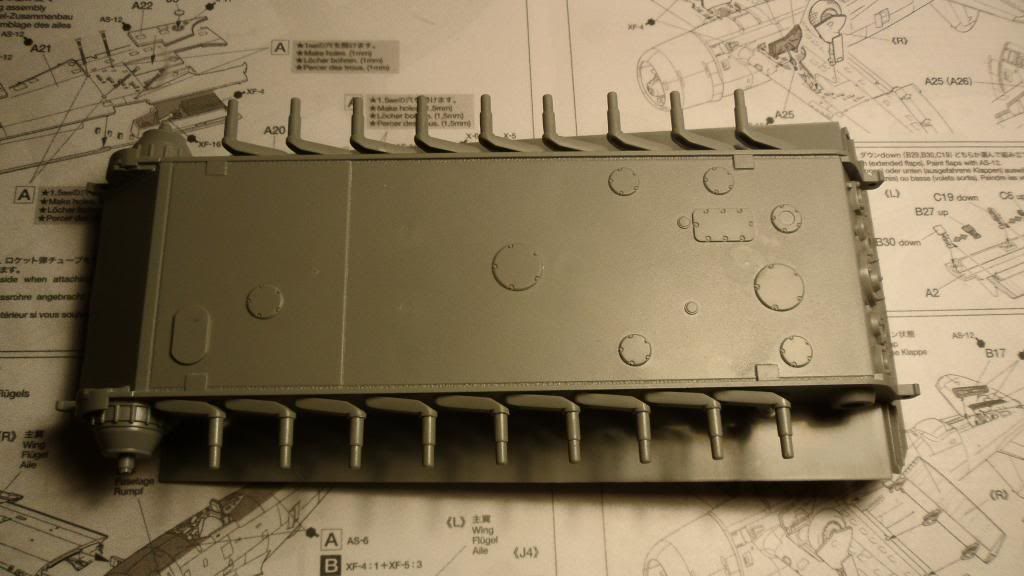
I had a lot of trouble lining them all up, but I think I got them to look right. I won't know for sure untill the model is completely assembled though...

I love every aspect of this kit. It has a great fit, really nice details and includes a really small amount of parts for a Dragon kit. There is one thing I utterly dislike though: The suspension arms. They are really hard to line up when attaching them to the hull (no big problem though), but there is one thing that makes them really bad IMO. The way they are attached to the sprue makes them a pain to clean up:

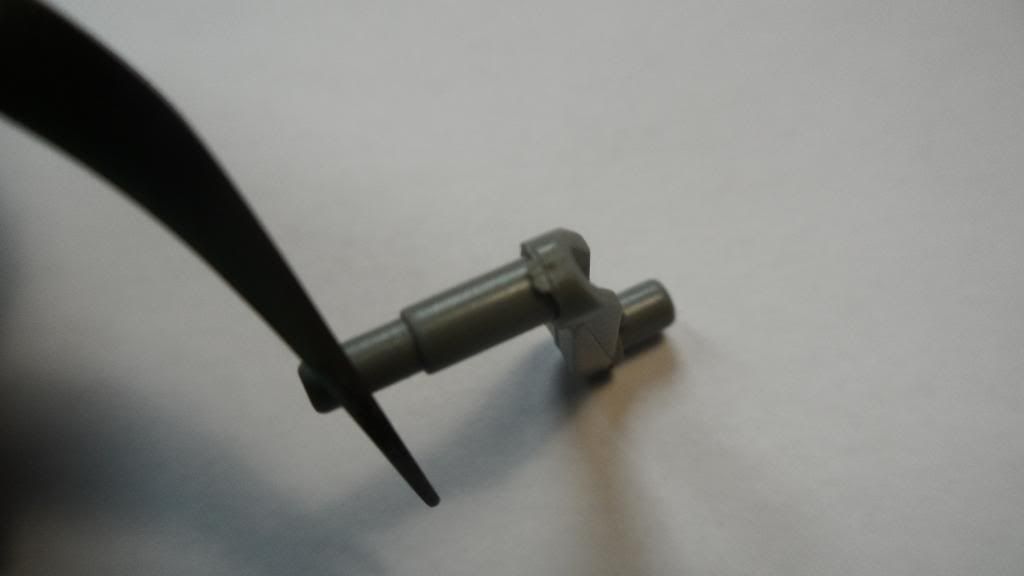
You can't really tell by looking at the pics, but the sprue gates are right where the steps on the parts are...

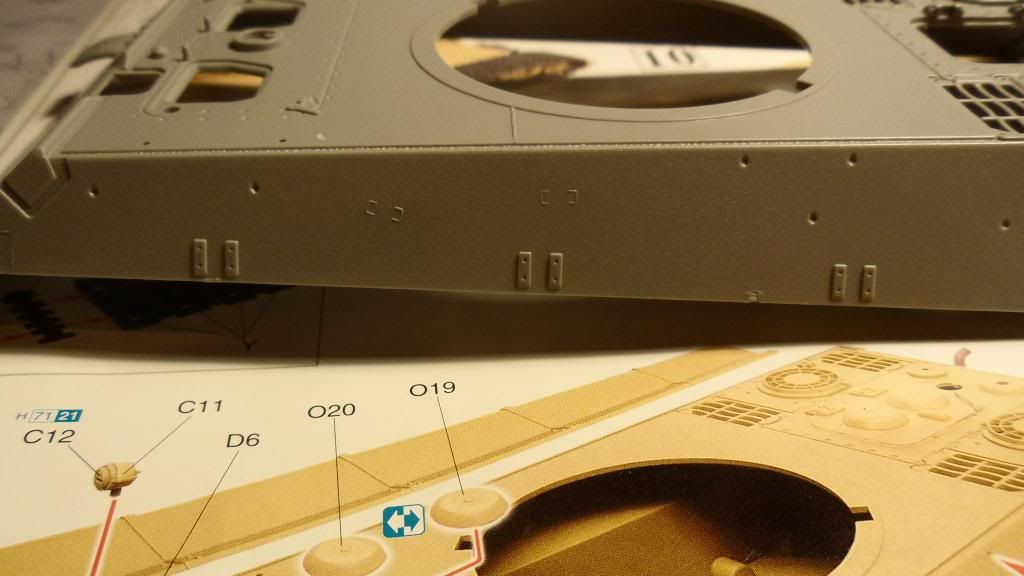
I also started to modify the hull according to Eduard's instructions, so I am able to mount the PE fenders:

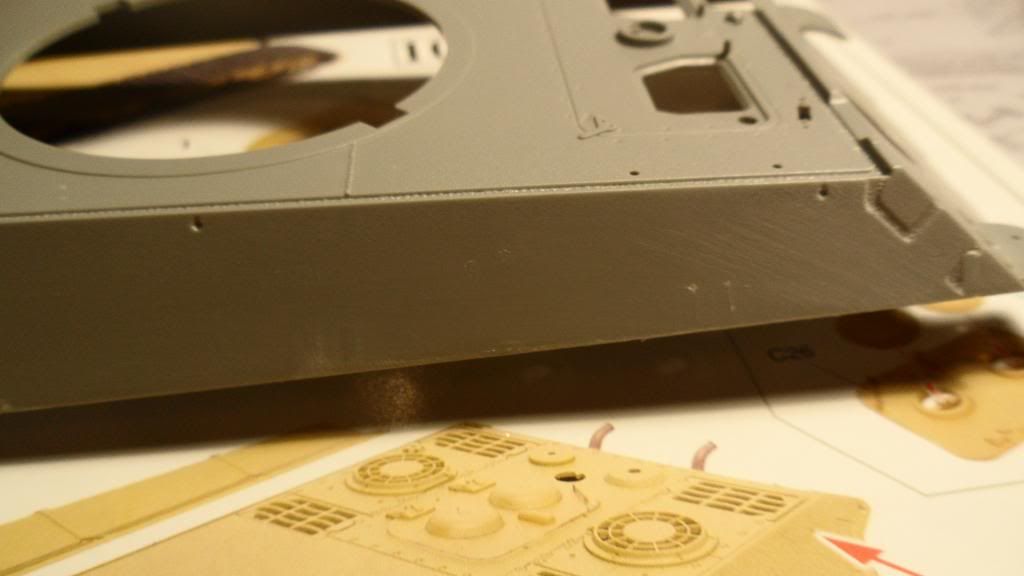
I sanded the mounting points off, but left just a wee bit of the raised plastic, soI know where to mount the PE brackets later on.

This pic shows the other side of the hull (I didn't remove the brackets on that side yet):

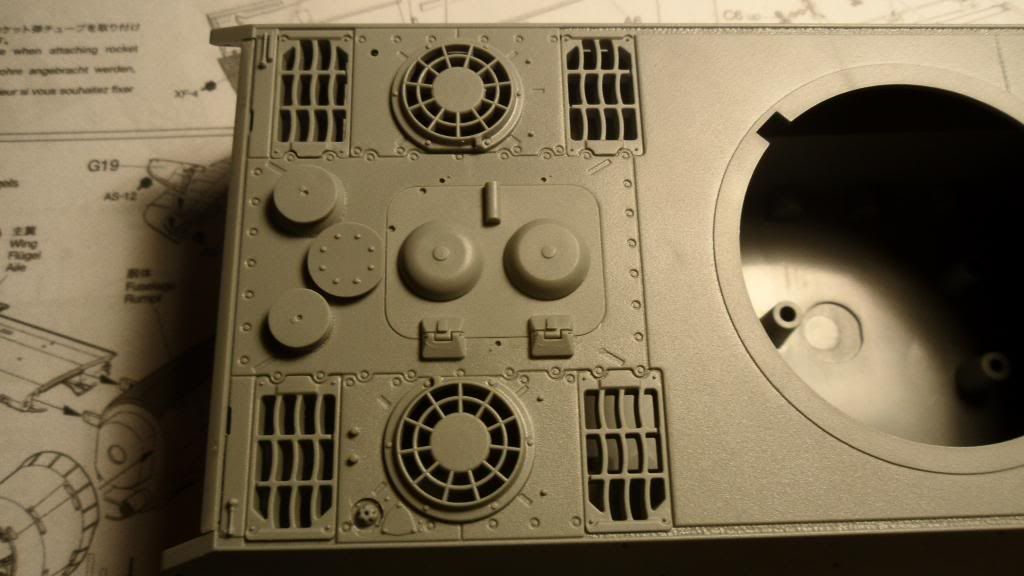
Then I started work on the hull roof and front:

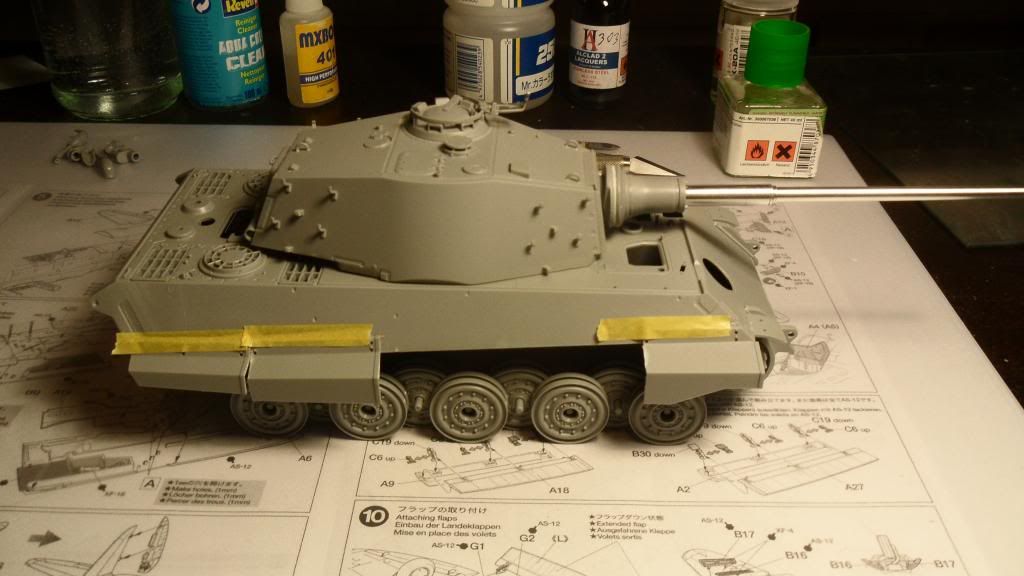
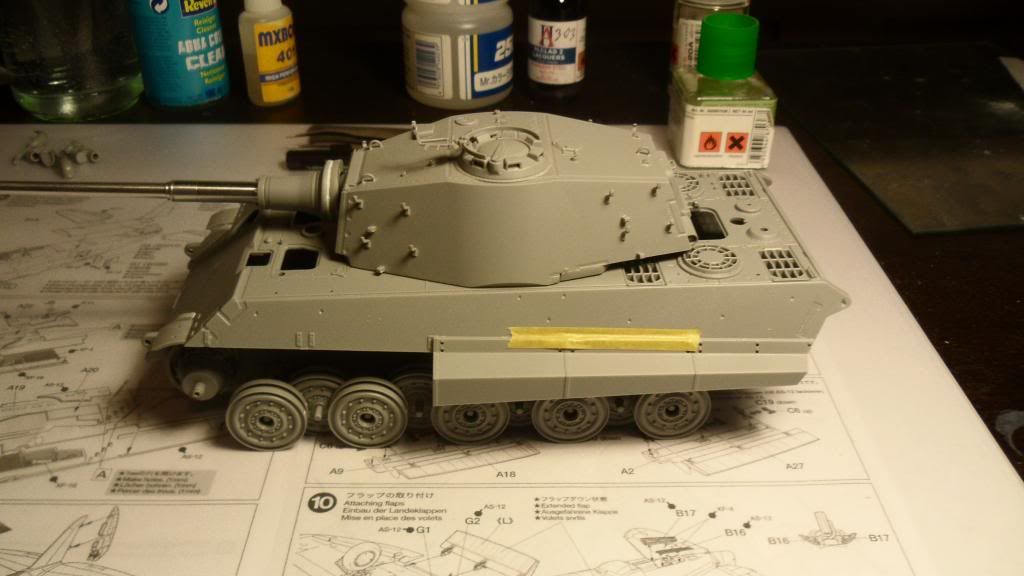
I also taped/stuck the tank model together to give an Impression on how it's going to look when everything is in place:

I think I can finish most of the construction work tomorrow. Here's a list of the tasks that are left:

  • add PE engine grills
  • add a few tiny parts to the hull
  • make some handles out of wire and attach them to the model
  • attach muzzle brake
  • glue the upper hull and rear plate to the lower hull
  • add missing weld seams to the rear plate
  • modify the hull for PE fenders
  • bend PE fenders
  • sand roadwheels

All of this should be done untill Saturday, so I can apply all the paint this weekend and still have the next week for weathering...

I hope you like it.

Cheers. Clemens


  • Member since
    April 2005
Posted by Thunderbolt379 on Tuesday, August 20, 2013 7:17 PM

SS -- you're a modelling machine! I look at that list and think maybe a week! Excellent work, BTW, she'll be a beauty. I must try my hand at busted up fenders one day too!

Mike/TB379

http://worldinminiature.blogspot.com/

  • Member since
    March 2003
  • From: El Dorado Hills, CA
Posted by IBuild148 on Tuesday, August 20, 2013 9:43 PM

I like the camo and your off-ed piece on camo.

Its always interesting on all the differant takes on how the gemans did things with paint.

IBuildOne48

Teach modeling to youth!

Scalefinishes.com

http://i712.photobucket.com/albums/ww122/randysmodels/NMF%20Group%20build%20II/Group%20Badge/NMFIIGBbadgesmall.jpg


  • Member since
    July 2004
  • From: Sonora Desert
Posted by stikpusher on Tuesday, August 20, 2013 10:38 PM

You are a madman Sparten!  11 days to go... this is gonna be good!!!


F is for FIRE, That burns down the whole town!

U is for URANIUM... BOMBS!

N is for NO SURVIVORS...

       - Plankton

LSM


  • Member since
    April 2005
Posted by Thunderbolt379 on Wednesday, August 21, 2013 1:42 AM

Hi all, pics as promised, or the refined/cleaned up camo. First in natural light, then properly set up. Lighting conditions are a bit tricky in our new place, I might have to shoot after dark with artificial light only. Also, I'm not sure about the fluoro tube, I think it's daylight strength but that's no guarantee at this point.

I know it might not seem like it, but I'd say it's some of my most tightly controlled airbrushing ever, on a par with the camo on my Panzer Lehr StuG IV.

The shade and fade coats come next, then the wash and drybrush which should hopefully tie it all together.

Right, I better get the AB fired up...

Mike/TB379

http://worldinminiature.blogspot.com/

  • Member since
    April 2005
Posted by Thunderbolt379 on Wednesday, August 21, 2013 3:07 AM

And here she is with the shade and fade coats. The former was a 5% mix of Buff misted onto the upper surfaces, lightening them progressively to accept the darkening effect of the washes to come, while the latter was a 60% mix of Dark Earth applied to the underside, behind the running gear and under the bow and transom (doesn't show in the pics...)

M/TB379

http://worldinminiature.blogspot.com/

  • Member since
    November 2003
  • From: Nashville, TN area
Posted by bobbaily on Wednesday, August 21, 2013 4:48 AM

Clemens-your KT is coming along nicely-gonna be fun to watch this one.

Mike-great job on the camo-I like it!

Bob


  • Member since
    February 2010
  • From: Berkeley CA/St. Paul MN
Posted by EBergerud on Wednesday, August 21, 2013 5:07 AM

Looked into Rinaldi's book more closely and there's no way I could go into that much foreign territory and meet the deadline. (Real world will be annoying next week.) So I had to fall back on more familiar techniques. Anyway, filters, washes and chipping are done. Still to come are the tools, some serious fading, wheels/tracks and pigments. Should get it done though.

Eric


A model boat is much cheaper than a real one and won't sink with you in it.

  • Member since
    April 2013
Posted by SchattenSpartan on Wednesday, August 21, 2013 6:11 AM

Thanks a lot guys! I'm glad I didn't choose my Panther for this GB. That kit has 2-3 times as many parts...

Mike: Very nice work on that camo!

Eric: Your tiger is looking really impressive! You make me want to start mine as well...

  • Member since
    November 2009
  • From: SW Virginia
Posted by Gamera on Wednesday, August 21, 2013 7:44 AM

Clemons: Yeah, week and a half to go but at the rate you're going you can make it! Nice work on all that PE!

Eric: Looks cool! I picked up those books too and am a bit over my head. I started a little work on the techniques on a cheapie kit. Your results look waaaaaaayyyyyy better than mine!

Mike: Great looking camo there too, the mist coats really help tone things down and give her a battle-weary look.

"I dream in fire but work in clay." -Arthur Machen


  • Member since
    April 2005
Posted by Thunderbolt379 on Wednesday, August 21, 2013 7:59 AM

Thanks, guys! I'm hoping to start the wash process tomorrow evening, after I get home from work.

Technical question for those who have worked with zimmerit before -- do you apply a wash over the zim to let the colour gather in the recesses between the ridges? Does that even work?

Cheers, Mike/TB379

http://worldinminiature.blogspot.com/

  • Member since
    April 2013
Posted by SchattenSpartan on Wednesday, August 21, 2013 8:23 AM

Cliff, would you mind ansering a question re Dragon's Tiger 2 kit?

I saw your Porsche King Tiger on the front page and I really like it (it was actually inspiring me to do a Tiger 2 instead of the Panther I have in my stash).

Dryfitting of the hull parts revealed a noticeable gap where the upper hull attaches to the lower hull (above the tracks). How did you solve that problem on your kit?

  • Member since
    November 2009
  • From: SW Virginia
Posted by Gamera on Wednesday, August 21, 2013 8:52 AM

Mike: I generally just put a thin dark brown wash over zimmerit to accentuate the shadows and I figure dirt would accumulate in the cracks making it darker. I'd use a heavier wash on the rest of the tank for any pin washes.

Clemons: This was their 'Smart Kit' and didn't really have any gaps anywhere. Being a brand new version they may have fixed any problems. Do you mean the gap under the hull side overhang just above the tracks? I've had kits that didn't fit well there, you can tape or use rubber bands to hold it together and then run a little bead of cement down the seam.

"I dream in fire but work in clay." -Arthur Machen


  • Member since
    April 2013
Posted by SchattenSpartan on Wednesday, August 21, 2013 9:03 AM

Yep, I was talking about the hull overhang. Thanks a lot for answering my (stupid) question!

My Tiger is the original release of the "Battle of the Bulge" kit. I got it really cheap at my LHS (prepare for a kinda long story):

One of my friends wanted to build a diorama with that kit about half a year ago, but couldn't find it anywhere (it got re-released now, but was OOP when he wanted to get one). I went to my LHS after he told me about his problem and told him about that lone Bulge KT I saw there. After buying it, he had a look at the parts and found out that all the figures were missing. We brought the kit back to the shop and the owner gave my friend a refund. He couldn't sell the kit anymore because of the missing parts and I simply decided to buy it. He gave it to me for half the price! (25€ instead of 50€).

  • Member since
    November 2009
  • From: SW Virginia
Posted by Gamera on Wednesday, August 21, 2013 9:46 AM

Ah ok, no problem. The nice thing about that is that's where dirt and mud accumulate so you can cover any seam with whatever you use for dirt so you don't even have to sand it out.

For 25 euros - half price I'd say you really got a great deal. The figures won't be that expensive to replace assuming you want to use them.  

"I dream in fire but work in clay." -Arthur Machen


  • Member since
    April 2013
Posted by SchattenSpartan on Wednesday, August 21, 2013 10:17 AM

Yep, that's one of the advantages of my project:

I want to build my Tiger with winter camo and a lot of mud on the lower hull...

25€ is a great deal indeed! Most HobbyBoss/Trumpeter kits are more expensive Big Smile

I didn't build many armor models before (only two Tamiya Shermans), but I like it a lot! I got some more Dragon kits already: a Pz.IV Ausf.J and a Pz.III Ausf.M

JOIN OUR COMMUNITY!

Our community is FREE to join. To participate you must either login or register for an account.

SEARCH FORUMS
FREE NEWSLETTER
By signing up you may also receive reader surveys and occasional special offers. We do not sell, rent or trade our email lists. View our Privacy Policy.