SEARCH FINESCALE.COM

Enter keywords or a search phrase below:

Fw 190 Butcher Bird 2013 (extended to June 2014) Group Build

564334 views
5865 replies
1 rating 2 rating 3 rating 4 rating 5 rating
  • Member since
    April 2013
Posted by SchattenSpartan on Sunday, September 14, 2014 2:53 PM

Mike, I'm sorry to hear about you having airbrush troubles again. The camo turned out great though!

Unfortunately I didn't get an great amount of bench time this weekend, so I don't have anything worth showing to you.

  • Member since
    April 2005
Posted by Thunderbolt379 on Sunday, September 14, 2014 10:54 PM

Thanks, my friend!

Today I've already completed the panel accents and sealed them with clear, and am about to begin the decals, here's hoping they behave! Photos tonight, hopefully!

M/TB379

http://worldinminiature.blogspot.com/

  • Member since
    April 2005
Posted by Thunderbolt379 on Monday, September 15, 2014 12:50 AM

Okay, half a dozen decals into the job and the Superscales are behaving very nicely. Fingers crossed there's no silvering!

M/TB379

http://worldinminiature.blogspot.com/

  • Member since
    March 2012
  • From: Corpus Christi, Tx
Posted by mustang1989 on Monday, September 15, 2014 2:36 AM

Man I know what that's like Clemens! I skipped over a couple of days myself and that sucks! I'm on a roll with my current project and hate to miss build days!


 Forum | Modelers Social Club Forum (proboards.com) 

  • Member since
    April 2005
Posted by Thunderbolt379 on Monday, September 15, 2014 7:18 AM

Update -- the decals are pretty much done other than the upper wings, and I need to decide if I'm using the wing walk stripes, I've seen this plane finished both ways. The decals have behaved well, the only silvering observed so far is on the open crosses on the underside, so I'm not too fussed.

I'll get some more decals done tonight, including the white crosses so they have until tomorrow to dry and show up any silvering so I can attempt to do something about it before sealing the decals.

Target for tomorrow -- decals completed and sealed, detail painting underway, final assembly underway, including the prop and bombs.

M/TB379

http://worldinminiature.blogspot.com/

  • Member since
    March 2010
  • From: MN
Posted by Nathan T on Monday, September 15, 2014 7:46 AM

Wow. Paint and decals came out great Mike. You have pics of Rudels bird to go off of?


  • Member since
    April 2005
Posted by Thunderbolt379 on Monday, September 15, 2014 8:15 AM

Not really, Nathan -- one photo, very indistinct, then I'm using the interpretations others have gone with. It seems there are two major interpretations of the scheme, this is Superscale's, while there is another that has been done as a digital model, featuring the camo reversed dark to light, plus RLM 84 on the fuselage sides. It may be the plane was repainted at some time and the scheme varied, or perhaps the old orthochromic B&W film's handling of shades and hues is being interpreted more than one way. It would certainly be interesting to do the other interpretation at some point.

Cheers, M/TB379

http://worldinminiature.blogspot.com/

  • Member since
    March 2012
  • From: Corpus Christi, Tx
Posted by mustang1989 on Monday, September 15, 2014 10:30 AM

That sure is a purdy paint job!!!!!!!!!!!!! Really nice!!


 Forum | Modelers Social Club Forum (proboards.com) 

  • Member since
    May 2013
  • From: Indiana, USA
Posted by Greg on Monday, September 15, 2014 11:31 AM

That is looking extremely good, Mike.

  • Member since
    April 2005
Posted by Thunderbolt379 on Tuesday, September 16, 2014 9:03 AM

Thanks, Mustang and Greg! Well, I made some progress before going out to work earlier. I completed the decals (54 items in total, there might be one or two stencils I missed), washed the surface to remove the decal fluids, then sealed with a final clearcoat. I also airbrushed the prop in a mixed RLM 70, touched up the spinner and clear coated both. Here she is:

And with the wheel wells unmasked:

This is my first time using Superscales in some years and I could not be happier, they performed a lot better than the Aeromasters I cannibalised on the last one.

Targets for tomorrow, assemble the prop, get the landing gear underway (final touch-ups, remove parts from the trees and tidy up) assemble the bombs (possibly paint them) and take a shot at the fine detail painting. Hopefully the details will be done and the final assembly either complete or nearly so. Whichever way, this one is closing in on the finish line now.

Cheers, M/TB379

http://worldinminiature.blogspot.com/

  • Member since
    April 2005
Posted by Thunderbolt379 on Wednesday, September 17, 2014 1:11 AM

Latest -- before work today I got the prop assembled, and the landing gear separated, cleaned up and touched up. Now to install it and get to grips with the detail painting and assembling the bombs. I'm thinking the next shots you see may very well be the gallery pictures.

M/TB379

http://worldinminiature.blogspot.com/

  • Member since
    March 2012
  • From: Corpus Christi, Tx
Posted by mustang1989 on Wednesday, September 17, 2014 5:06 AM

Man that's a tightly wound spiral on that prop spinner! It's gonna sit right at home on the nose of that thing Mike.


 Forum | Modelers Social Club Forum (proboards.com) 

  • Member since
    May 2013
  • From: Indiana, USA
Posted by Greg on Wednesday, September 17, 2014 11:01 AM

Mike, you surely don't mess around when you get to building!

That spinner looks amazing.

  • Member since
    April 2013
Posted by SchattenSpartan on Wednesday, September 17, 2014 3:04 PM

Mike: The camo and the subtle weathering look really nice! The spinner looks amazing too!

  • Member since
    August 2009
  • From: MOAB, UTAH
Posted by JOE RIX on Wednesday, September 17, 2014 11:17 PM

Mike: Your D-9 is turning out fantastic. I did a spectacular job on painting the "salad" camo. It came out great. I'm looking forward to the finished product.

Clemens: My lord! Now that is one fabulous haul of AM booty. No wonder you were bent when the package went wayward. So, what did you do to bankroll that large bounty, roll an armored truck?Lol.

"Not only do I not know what's going on, I wouldn't know what to do about it if I did". George Carlin

  • Member since
    March 2012
  • From: Corpus Christi, Tx
Posted by mustang1989 on Thursday, September 18, 2014 3:56 AM

JOE RIX
roll an armored truck?

Umm....Joe......I think he's trying to keep that one on the down low................Zip it!


 Forum | Modelers Social Club Forum (proboards.com) 

  • Member since
    April 2005
Posted by Thunderbolt379 on Thursday, September 18, 2014 7:24 AM

Many thanks Mustang, Greg, Clemens and Joe Rix!

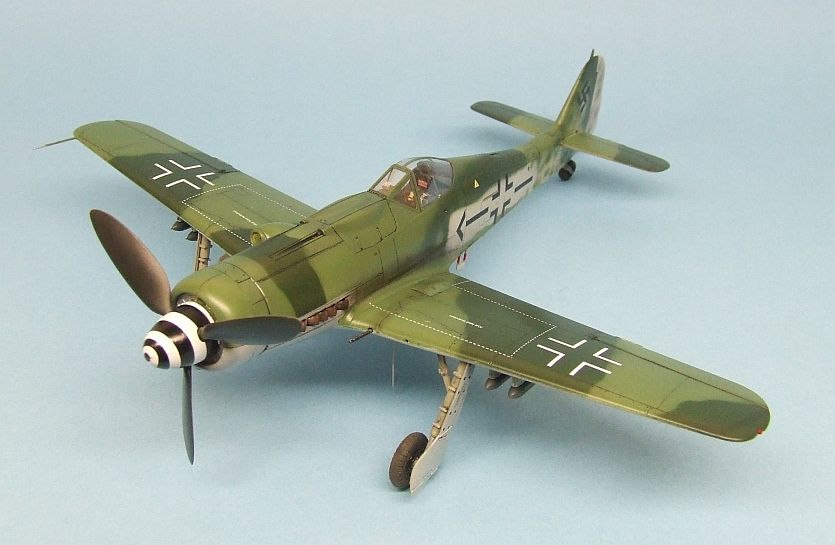
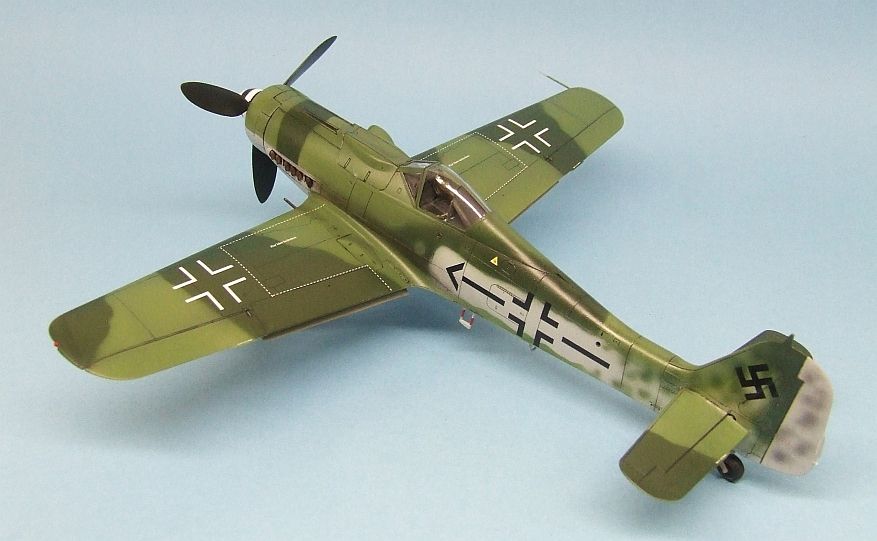
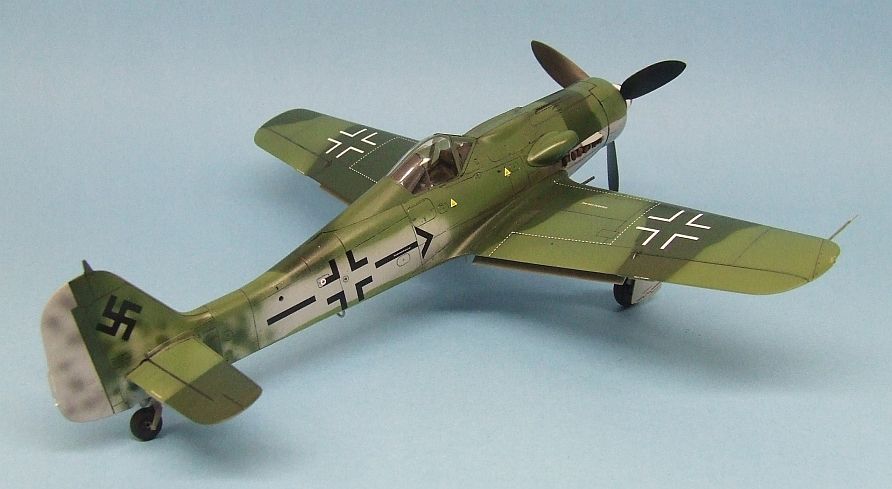
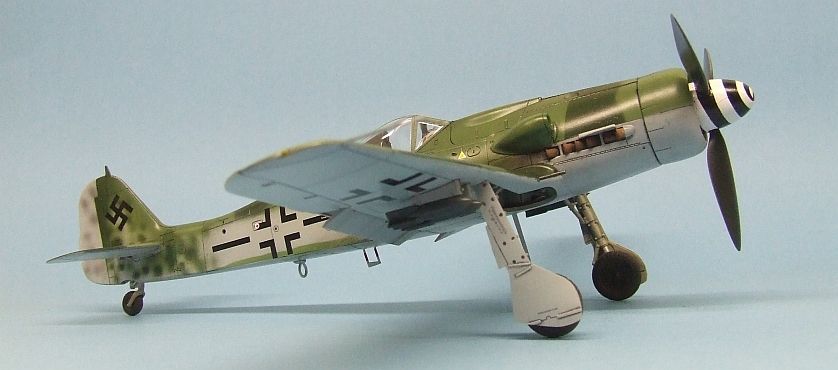
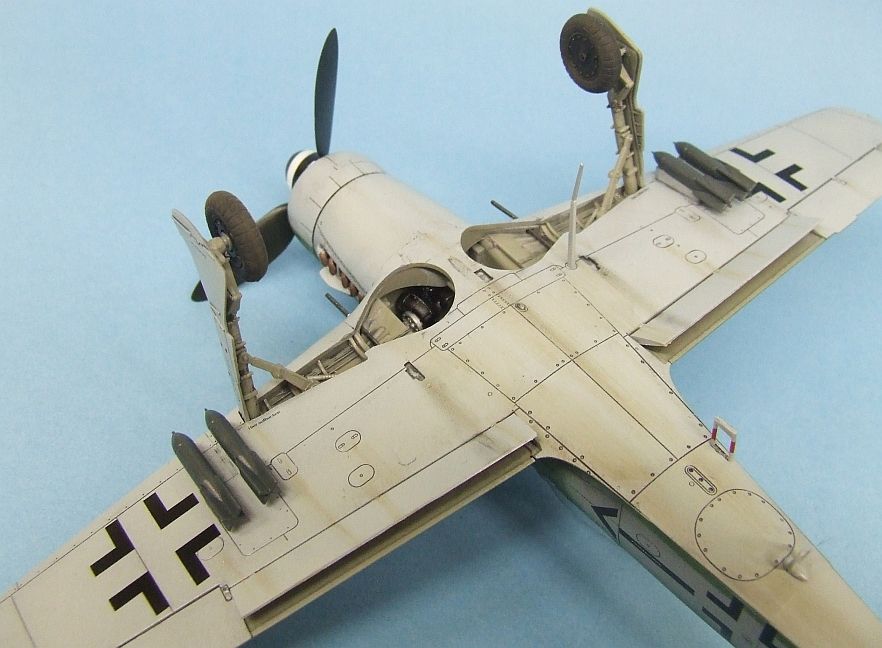
Right then, as promised, the gallery photos. I'm calling her done. Sure there are one or two things more I could do, like bare metal scuffing, or red stripes on the bombs to indicate they're fragmentation type... I could open the canopy but as yet I haven't figured out how to do a slack antenna wire. I'll come back to that when I know how, and also touch up the canopy sills in 66 so I can pose her open.

I missed two parts, a tiny intake that goes on the forward starboard side, and that stub antenna under the fuselage which again required a hole opening or drilling. Hey ho, I'll catch it next time! For now, I'm delighted to say I've finished my first Hobby Boss kit, she was a great pleasure to do and looks real proud next to the Hasegawas and Tamiyas in the display case.

So, here's the evidence. My light source is not daylight/5000K these days, so colours are slightly warmer than they should be:

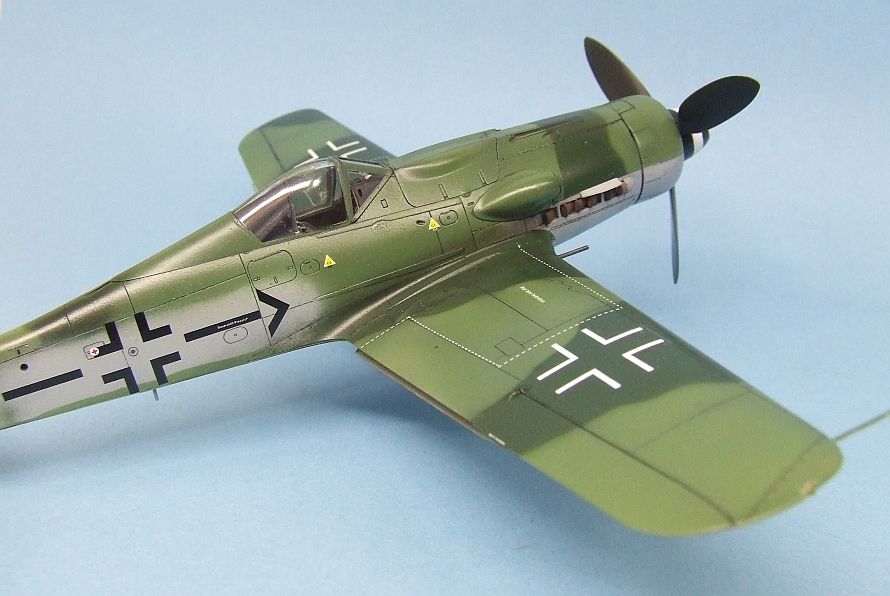
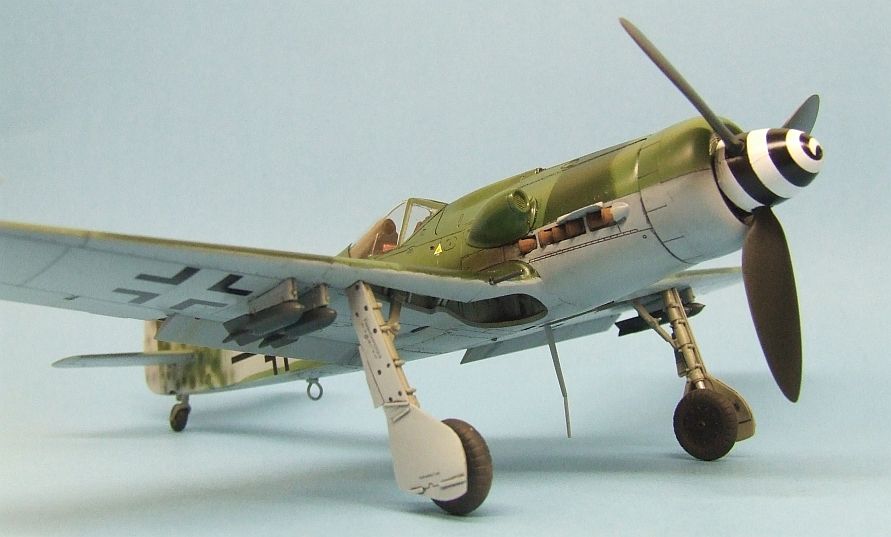
Mustang, for a shot to use on p1, how about either the last one above, or the second from the top?

Cheers, thanks for looking, all comments welcome, and I'll get on with the A-8 as soon as I can!

Mike/TB379

http://worldinminiature.blogspot.com/

  • Member since
    March 2012
  • From: Corpus Christi, Tx
Posted by mustang1989 on Thursday, September 18, 2014 8:32 AM

First off I want to tell you that the paint on this bird is outstanding!! Secondly I want to take this opportunity to thank you for being a good part of this GB Mike. It's been a true pleasure having you here. I'll get your pics posted soon.

 Lastly, I'll show you my antenna on my D-9 and how I did it:

The piece that I ran from the canopy to the tail was stretched sprue. Now it took me about 30 minutes practice and about 10 pieces of straight sprue to get mine this thin but it paid off. The vertical piece is made of E-Z line that freely lends itself to the shape that it has.


 Forum | Modelers Social Club Forum (proboards.com) 

  • Member since
    April 2005
Posted by Thunderbolt379 on Thursday, September 18, 2014 8:43 AM

Thanks, Mustang -- that's a great compliment, especially in view of the awesome parade of talent there's been in this amazing GB -- and I'd like to thank you for being such an active and omnipresent host! I confess I was a bit worried about this one with the AB woes, but in the end it all came together and I'm very happy with this paint.

Stretched sprue -- interesting, it's a technique I was never able to make work for me, no matter how careful I am, the sprue just snaps. But it's always worth having another try, and if I can get some pieces that are thin enough to take on the shape, I'd be most interested in rigging the wire. Thanks for the tip!

Well, I have the decals in hand for the A-8 now, so I'll see how they go tomorrow!

Cheers, Mike

http://worldinminiature.blogspot.com/

  • Member since
    March 2012
  • From: Corpus Christi, Tx
Posted by mustang1989 on Thursday, September 18, 2014 10:18 AM

Thunderbolt379

Stretched sprue -- interesting, it's a technique I was never able to make work for me, no matter how careful I am, the sprue just snaps. But it's always worth having another try, and if I can get some pieces that are thin enough to take on the shape, I'd be most interested in rigging the wire. Thanks for the tip!

Just get out a good candle and hold the sprue above it like you've been doing. When you see the sprue get to where its shiny at the heated portion just continue holding it (without stretching it yet) for a little longer and then stretch it slowly. It's an art that will yield endless possibilities. Stuff like control rods, cigarettes for small figures, antenna wire and all.


 Forum | Modelers Social Club Forum (proboards.com) 

  • Member since
    October 2008
  • From: Georgia
Posted by Rigidrider on Thursday, September 18, 2014 1:39 PM

Excellent finish Mike!  Beautiful work... hope to see you in the 109 build!

Doug

When Life Hands You A Bucket Of Lemons...

Make Lemonade!

Then Sell It Back At $2 Bucks A Glass...

  • Member since
    April 2005
Posted by Thunderbolt379 on Thursday, September 18, 2014 9:06 PM

Doug -- I'll definitely be in the 109 GB, I've already picked out kits in three scales, can't wait to rip into them!

Well, the A-8 is back on the bench, I've applied the first ten decals and this sheet is behaving itself nicely! (SS, thanks for the help out, I owe you bigtime!) I'm pacing myself through the day, doing batches of ten, and hope to have the burnt metal areas behind the exhausts masked and sprayed either today or Sunday (I'll be out Saturday).

Cheers, Mike/TB379

http://worldinminiature.blogspot.com/

  • Member since
    August 2009
  • From: MOAB, UTAH
Posted by JOE RIX on Thursday, September 18, 2014 11:09 PM

Absolutely marvelous Mike. Your top notch skills have pulled off a 4 star effort. Beautifully done my friend. Beautifully done indeed.

"Not only do I not know what's going on, I wouldn't know what to do about it if I did". George Carlin

  • Member since
    April 2005
Posted by Thunderbolt379 on Friday, September 19, 2014 3:32 AM

Thanks, Joe! Coming from you, it means a lot -- all you guys are absolutely top notch! I wrote a review of the kit for my blog, I'll get it up when I can, hopefully over the weekend.

Right, I spent most of today decaling the A-8. the day is about done, I have a stiff neck and a headache., so I'm calling it for now. By my calculations there's about 14 decals to go. I also sprayed some clear earlier, doing the lower flaps, droptank, gear bay doors, prop blades and spinner cone. Here she is as of this moment:

I'll be away tomorrow, so back on the bench the day after, hopefully finishing the decals and sealing them, then on with detail painting and getting the undercarriage ready.

You might notice something odd going on with the wing walkways and the gun covers -- I'm not sure what happened but either I or Hasegawa got the covers in the wrong place, they should be a scale foot or so further back, which I did not notice until looking at the walkways to go round them. So to make the walkways look realistic, I've had to patch some strips and cut others -- a couple of pieces to go. I'll make sure I get that right next time!

Cheers, M/TB379

http://worldinminiature.blogspot.com/

  • Member since
    March 2012
  • From: Corpus Christi, Tx
Posted by mustang1989 on Friday, September 19, 2014 5:56 AM

That's weird about the gun covers on that A8 Mike . I'm sure you're going to overcome that obstacle though. Your pic is posted in the intro. Can you scrounge up a pic of your 1/32nd scale build so I can post that one too. Looks like that one appears to have slipped through the cracks.


 Forum | Modelers Social Club Forum (proboards.com) 

  • Member since
    April 2005
Posted by Thunderbolt379 on Friday, September 19, 2014 7:46 AM

The A-8 is the 32! I'll have her done in a few days!

Cheers, M/TB379

http://worldinminiature.blogspot.com/

  • Member since
    March 2012
  • From: Corpus Christi, Tx
Posted by mustang1989 on Friday, September 19, 2014 6:53 PM

Well.....that just shows how much I was with it. 

lol


 Forum | Modelers Social Club Forum (proboards.com) 

  • Member since
    April 2013
Posted by SchattenSpartan on Saturday, September 20, 2014 5:56 AM

You're welcome, mate! I'm just glad the new decals work as intended!

Both the D-9 and the A-8 are absolute beauties!

  • Member since
    May 2013
  • From: Indiana, USA
Posted by Greg on Saturday, September 20, 2014 11:29 AM

Mike, that Hobbyboss came out great!

Super cool scheme, really like your subtle weathering on the underside, et al. A very clean and attractive model.

Sure like the detailing of the landing gear struts and gear bay. May I ask which wash technique you use?

I notice there is no aircraft number. I'm only just learning about Luftwaffe a/c and curious why that is on this particular bird if anyone can tell me.

  • Member since
    October 2008
  • From: Georgia
Posted by Rigidrider on Saturday, September 20, 2014 3:00 PM

Greg... sometimes (usually) the group commanders, staffle kapitains, adjutants, etc... used chevrons, bars, circles and various other markinge, in just about any configuration or arrangement, to ID themselves to the rest of the staffle while in the air. I guess it was a quick way to ID their leaders in the confusing and hectic coures of combat, specially dog fighting.

When Life Hands You A Bucket Of Lemons...

Make Lemonade!

Then Sell It Back At $2 Bucks A Glass...

JOIN OUR COMMUNITY!

Our community is FREE to join. To participate you must either login or register for an account.

SEARCH FORUMS
FREE NEWSLETTER
By signing up you may also receive reader surveys and occasional special offers. We do not sell, rent or trade our email lists. View our Privacy Policy.