SEARCH FINESCALE.COM

Enter keywords or a search phrase below:

Pearl Harbor '13 build thank you

25157 views
206 replies
1 rating 2 rating 3 rating 4 rating 5 rating
  • Member since
    September 2003
  • From: AandF in the Badger State
Posted by checkmateking02 on Sunday, November 10, 2013 9:24 PM

Once I got most of the pesky PE pieces done, I could start on the kit itself.

Construction step 1 consists of the main gun batteries, the fore and aft decks and the hull.  The issue is that numbers 1 and 3 gun turrets have to be assembled to the decks and held in place with a little bushing.  So that means assembling the turret and painting the decks, then placing the turrets, followed by gluing the decks to the hull. 

The unpainted turret pieces.

The painted and unassembled turret pieces.

The decks dry-fitted to the hull, after painting.

The turrets assembled to the decks.  Since I didn't want to knock off the barrels, I didn't add them to the fore and aft guns, but I did add them to the second turret.  Hopefully they'll stay on when I get to construction step 8.

Finally, the finished step one.  I added the hull number decals at this point, so I don't have to fiddle with that when I get to the point of adding the ship's rails.

Thanks for looking.


  • Member since
    September 2011
Posted by fightnjoe on Sunday, November 10, 2013 10:14 PM

looks very good from here.  someday i will pull out the arizona i have.  wont be soon but someday.

joe

Veterans,

Thank You For Your Sacrifices,

Never To Be Forgotten

Where you can find me:

Workbench on FaceBook  Google Plus  YouTube

  • Member since
    September 2011
Posted by fightnjoe on Sunday, November 10, 2013 10:15 PM

missed the post on the catapults.  your work looks very clean.  very nice.  

joe

Veterans,

Thank You For Your Sacrifices,

Never To Be Forgotten

Where you can find me:

Workbench on FaceBook  Google Plus  YouTube

  • Member since
    September 2003
  • From: AandF in the Badger State
Posted by checkmateking02 on Monday, November 11, 2013 12:20 PM

Thanks, Joe.  I've accomplished a few more things since the first photos.  I'm about ready to try the ship's rails along the deck edges.


  • Member since
    September 2003
  • From: AandF in the Badger State
Posted by checkmateking02 on Monday, November 11, 2013 8:33 PM

Construction step 2 on the instruction sheet involved all these little bits and pieces.  In most cases, I'm going to wait till much later before I attach them.  Too much risk that they'll break or drop off.

A close up of one part I will install.  When I built the NO boat the first time, I was told this was an air intake.

Finally a closer shot of the secondary battery weapons.  I lightened some 5-N and applied it with a toothpick for highlights, then added a wash of black acrylic craft paint. 

Progress will be a little slower now, since I'm moving into adding some PE rails, and they are kind of fiddly.

Thanks for looking.


  • Member since
    December 2012
Posted by PeteG on Saturday, November 16, 2013 7:07 AM

Hi-

I have been inactive for a long time due to new responsibilities at work. I've got my head above water and am getting ready to get back on the kit. I haven't applied paint yet and am very interested in the OD over Gray scheme. Can you or anyone else in the build point me towards some websites? I've looked and found nothing. I've also grabbed some old publications off scribD but had no luck there either.

Thanks-

Pete

Pete Gottfried
Buffalo, NY 


  • Member since
    September 2003
  • From: AandF in the Badger State
Posted by checkmateking02 on Saturday, November 16, 2013 10:15 AM

Hi, Pete:  I did a search and also found almost nothing except for the Wings Palette website below.  They show a profile for the 18 Pursuit Group at Wheeler Field.  Maybe it will help.  Good luck.


http://wp.scn.ru/en/ww15/f/746/3/


  • Member since
    September 2011
Posted by fightnjoe on Saturday, November 16, 2013 10:39 AM

pete what kind of things are you looking for?  i have some scans that were sent to me awhile back.  

joe

Veterans,

Thank You For Your Sacrifices,

Never To Be Forgotten

Where you can find me:

Workbench on FaceBook  Google Plus  YouTube

  • Member since
    September 2011
Posted by fightnjoe on Saturday, November 16, 2013 10:43 AM

Veterans,

Thank You For Your Sacrifices,

Never To Be Forgotten

Where you can find me:

Workbench on FaceBook  Google Plus  YouTube

  • Member since
    September 2011
Posted by fightnjoe on Saturday, November 16, 2013 10:49 AM

Veterans,

Thank You For Your Sacrifices,

Never To Be Forgotten

Where you can find me:

Workbench on FaceBook  Google Plus  YouTube

  • Member since
    February 2012
  • From: Olmsted Township, Ohio
Posted by lawdog114 on Wednesday, November 20, 2013 12:35 AM

I just got caught up here.  There's great work going on in here folks.  Perhaps I can jump in here with the 1/48 Hasegawa B5N Kate torpedo bomber I recently won off Ebay.  I may even build the wooden modification to the torpedo fins for the shallow harbor. 

Joe

 "Can you fly this plane and land it?...Surely you can't be serious....I am serious, and don't call me Shirley"


  • Member since
    September 2011
Posted by fightnjoe on Thursday, November 21, 2013 11:10 AM

joe can you finish by dec 7?

joe

Veterans,

Thank You For Your Sacrifices,

Never To Be Forgotten

Where you can find me:

Workbench on FaceBook  Google Plus  YouTube

  • Member since
    September 2011
Posted by fightnjoe on Thursday, November 21, 2013 11:15 AM

joe

Veterans,

Thank You For Your Sacrifices,

Never To Be Forgotten

Where you can find me:

Workbench on FaceBook  Google Plus  YouTube

  • Member since
    December 2009
Posted by ww2psycho on Thursday, November 21, 2013 1:03 PM

I just started my Val this week, Totally lost track of time. I'm waiting on canopy masks that come in tomorrow to be able to work on the cockpit.

  • Member since
    September 2011
Posted by fightnjoe on Thursday, November 21, 2013 1:49 PM

folks we have just over two weeks until end date.  i look forward to seeing more and more work on your projects but please remember the spirit of this build is to remember.  please do not let your builds hit the never to be completed pile.  

joe

Veterans,

Thank You For Your Sacrifices,

Never To Be Forgotten

Where you can find me:

Workbench on FaceBook  Google Plus  YouTube

  • Member since
    April 2013
Posted by SchattenSpartan on Thursday, November 21, 2013 3:10 PM

I'll try to finish the cockpit this weekend and assemble the rest of my zero during the next week, but I'm really busy atm....

  • Member since
    December 2009
Posted by ww2psycho on Saturday, November 23, 2013 1:24 AM

Im in a push to get this Val done, I'm waiting on paint in the mail but the cockpit should be done this weekend and then from there on it shouldn't be too bad.

  • Member since
    February 2012
  • From: Olmsted Township, Ohio
Posted by lawdog114 on Saturday, November 23, 2013 4:29 AM

fightnjoe

joe can you finish by dec 7?

joe

No...I wish.  Maybe next time eh?....

Joe

 "Can you fly this plane and land it?...Surely you can't be serious....I am serious, and don't call me Shirley"


  • Member since
    September 2011
Posted by fightnjoe on Saturday, November 23, 2013 10:18 AM

this is the bad part of hosting a build with a deadline.

for those who have started your kits, please finish.  remember what the spirit of this build is.  whether you make the deadline or not, please finish.

for those who havent started or want to join now, you have two weeks left to complete your builds.  those who have signed up it is up to you see the above comment.  those who wish to join, no more entries will be allowed.

joe

Veterans,

Thank You For Your Sacrifices,

Never To Be Forgotten

Where you can find me:

Workbench on FaceBook  Google Plus  YouTube

  • Member since
    September 2003
  • From: AandF in the Badger State
Posted by checkmateking02 on Saturday, November 23, 2013 8:46 PM

Further progress on the NO Boat.

Construction step three is the seaplane hanger.  There are four wall piece plus the roof, then at the rear an elevated gun deck with 20mm's.  I left off the 20's till later, but did add railings and stairs.

Construction step four consists of the details for the hanger.  Final fittings include the mast, which interferes with the boat layout when installed per the instructions.  So I used the shortest boat in the middle and placed the other two around it.  The mast was ungraded with PE footropes.  The radar and ladders are also PE, both from WEM.  The tall part in front of the radar is from the kit.  I think it is a gun director, but am not sure.

Although the PE set is designed for Trumpeter's New Orleans class cruisers, I didn't think that the rails and steps always fit very well, in some cases being too long, in others, too short.  Overall, I suppose they still look OK.

I added the rigging from stretched sprue.  The flag came from the kit decal sheet.

Construction step five is the searchlight tower, which I reported on earlier.

Thanks for looking.


  • Member since
    December 2012
Posted by PeteG on Sunday, November 24, 2013 9:41 AM

Wow! I completely lost track of the deadline! I got this mixed up with another group build and thought I had until the summer. Big oops on my part. I am going to try my best to finish this by the deadline. I was going to take some time and try and change the color scheme over to OD and gray but will stick with the original blue and yellow. I have a second kit and maybe some day I'll try it in the OD scheme. IN the meantime, I'll post some pics as I make headway.

Pete

Pete Gottfried
Buffalo, NY 


  • Member since
    September 2003
  • From: AandF in the Badger State
Posted by checkmateking02 on Sunday, November 24, 2013 12:24 PM

Construction step 6 on the instruction sheet deals with the forward superstructure.  Here is the assembly in pieces.

I added PE railings, SC radar antenna and Mk 3 fire control radar.  I added the 20mm's on the lower level, since they would be difficult to put into place once the various layers were completed.

According to WEM's instructions for the PE, the SC radar "was fitted to the foremast platforms of all of the ships of the class as a first radar fit prior to the outbreak of World War II."  So that's what I went with, although the radar from the kit didn't really look the same.

The rigging is stretched sprue.

Thanks for looking.


  • Member since
    June 2008
Posted by lewbud on Sunday, November 24, 2013 8:14 PM

Joe,

The P-40 will most likely make it, but the Zero won't.

Buddy- Those who say there are no stupid questions have never worked in customer service.

  • Member since
    September 2011
Posted by fightnjoe on Monday, November 25, 2013 10:14 AM

lewbud

Joe,

The P-40 will most likely make it, but the Zero won't.

you are good to go them my friend.  

checkmate you are moving right on through.  i like the rigging. you might have given me an option for my arizona.

pete looking forward to your update.

joe

Veterans,

Thank You For Your Sacrifices,

Never To Be Forgotten

Where you can find me:

Workbench on FaceBook  Google Plus  YouTube

  • Member since
    September 2003
  • From: AandF in the Badger State
Posted by checkmateking02 on Monday, November 25, 2013 4:38 PM

Joe:  

I've read that some people use thread or monofilament, but personally, I don't know how I could possibly use anything else but stretched sprue for rigging.  I'd never be able to get it nearly snug enough!  Even the sprue was a challenge for the ham-handed!

Probably will post some more progress photos tonight.


  • Member since
    September 2003
  • From: AandF in the Badger State
Posted by checkmateking02 on Monday, November 25, 2013 10:36 PM

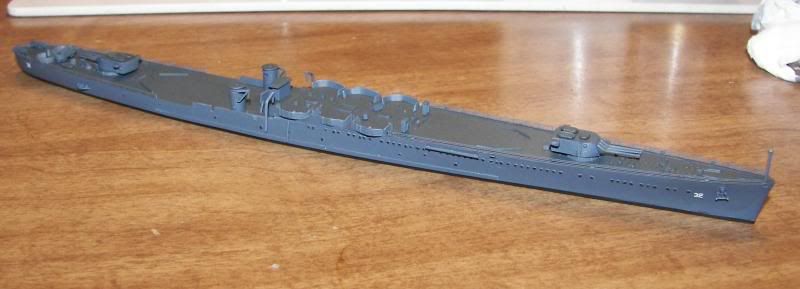
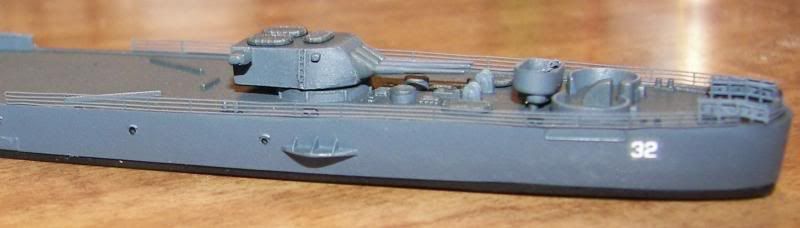
First, an overall photo of progress so far.

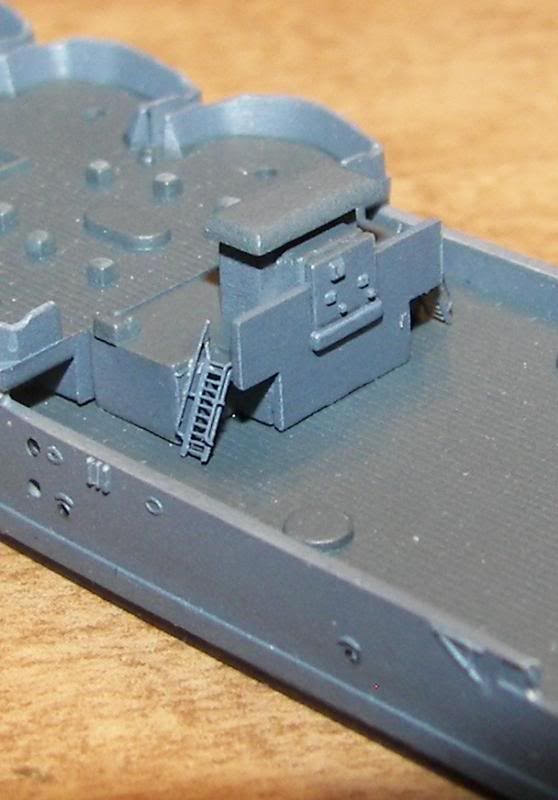
Construction step 7 includes adding ladders to the air intake assembly, so I did that first, using PE parts.

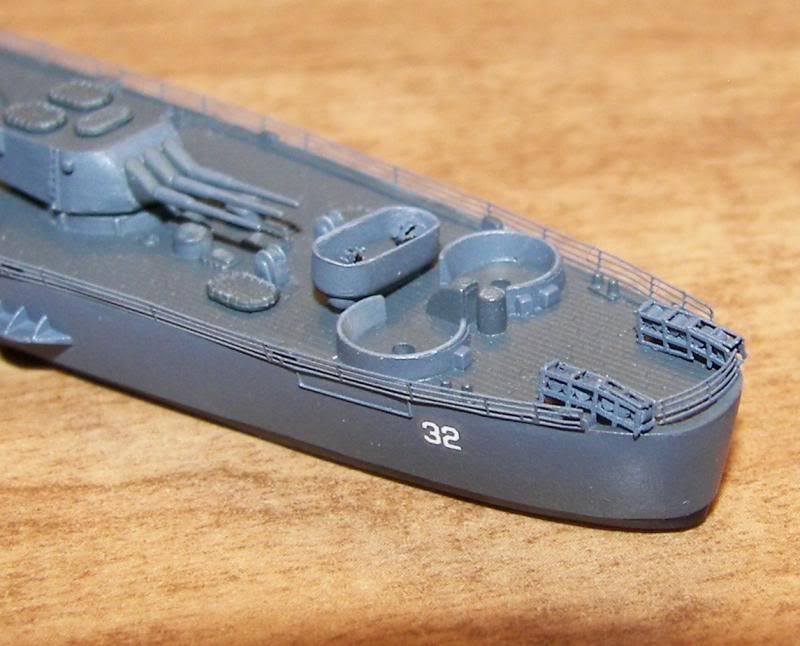
The aft deck parts come next, including life rafts, 1.1 guns, and gun director tubs.  The directors in the tubs are PE, and very tiny.  Actually, I regret not using the kit parts, which were more visible.

I replaced the kit depth charge racks with PE.  The charges themselves have to be made out of 1mm long .030 plastic rod.

I also installed the PE deck rails at this point.  The fore rails:
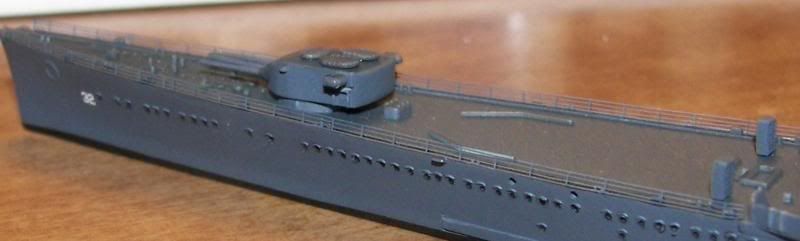
 And the aft rails:

Also during the phase, the pillars for the catapults and some little block-like pieces go on amidship. I also put on the little pieces that were called for in construction step two, hoping I wouldn't knock them off during the rest of the build.  I did knock the jack staff off the bow, so I'm not going to replace it till later.


  • Member since
    September 2003
  • From: AandF in the Badger State
Posted by checkmateking02 on Monday, November 25, 2013 10:59 PM

Construction step eight starts out with the deck for the second turret.  I added PE rails first.

Then installed the gun.


The rest of step eight involves attaching this part and the hanger deck to the hull, but I don't have photos of that up on photobucket yet.


  • Member since
    September 2003
  • From: AandF in the Badger State
Posted by checkmateking02 on Monday, November 25, 2013 11:44 PM

The remainder of construction step 8.

Number two gun deck installed.

The seaplane hanger installed.

I started installing the secondary batteries at this point.

And some of the 20mm's.

At this point, there are only two construction steps left, so I expect to finish up here in a day or so.  If I don't knock off too many pieces, I should be able to get her in well under the deadline.


  • Member since
    December 2009
Posted by ww2psycho on Tuesday, November 26, 2013 12:00 PM

I had to order paint and it hasn't said its shipped yet, I may not finish on time.

  • Member since
    September 2003
  • From: AandF in the Badger State
Posted by checkmateking02 on Tuesday, November 26, 2013 6:42 PM

Construction steps 9 and 10 are the final stages of building for the waterline version of New Orleans.  I didn't precisely follow the sequence, since it seemed clumsy to me.

Anyway, I added the forward superstructure, then the first funnel, then the searchlight tower, then the second funnel.  That only left the catapults and the cranes.  I didn't take separate photos of these, since they'll be evident in the finished photos.

The rest of the guns need to be added, but I did this, and completed the build last night.

I'll post the finished shots shortly.


JOIN OUR COMMUNITY!

Our community is FREE to join. To participate you must either login or register for an account.

SEARCH FORUMS
FREE NEWSLETTER
By signing up you may also receive reader surveys and occasional special offers. We do not sell, rent or trade our email lists. View our Privacy Policy.