SEARCH FINESCALE.COM

Enter keywords or a search phrase below:

The Mustang and Corvette Group Build

38804 views
354 replies
1 rating 2 rating 3 rating 4 rating 5 rating
  • Member since
    February 2013
  • From: Podunkville, USA
Posted by rommelkiste on Tuesday, December 17, 2013 5:33 PM

Thanks Tony and Dale!  Tony, anyone that can get the Silk Cut Jag decals on like you don't need any lessons!  LOL!  Dale, the paint on the Vette is testors gloss white applied with an air brush.  I did not rub out this one and it has no clear.  The final prep on the grey primer was a wet sanding with 3200 grit, washed in Dawn and air dried.  I did wipe the body with a tack rag before painting.

Nothing ever fits……..and when it does, its the wrong scale.

To make mistakes is human.  To blame it on someone else shows management potential. 


  • Member since
    April 2005
  • From: Australia
Posted by taxtp on Monday, December 16, 2013 10:28 PM

George - your Vette looks absolutely spot on. You could give me lessons. I'll use the first photo unless you tell me otherwise. I like the Corvair too.

Dale - thanks, terrific work again, I went back for another look.

It would be great if you can squeeze another Vette or Stang in.

Fantacmet - take it easy, we'll still be here when you've got the time. Let us know how you progress with the vacuum forming.

Cheers

Tony

I'm just taking it one GB at a time.

  • Member since
    February 2005
  • From: Proctor. MN
Posted by 65ss on Monday, December 16, 2013 6:56 PM

Thanks Tony, use witch ever picture you would like.

Rommel, thanks. your Vette looks great. I really like the engine, and paint. Did you wet sand the paint to get it that smooth.

Fan I hope thing slow down for you soon. Good luck with the wheels.

Dale

  • Member since
    February 2013
  • From: Podunkville, USA
Posted by rommelkiste on Monday, December 16, 2013 5:56 PM

This is as far as I am gonna go with the Vette, I am calling this one done.  This one was fun but really gave my eyes a workout!  I think I test fit parts 100's of times and still found fit problems later.  Thats just part of the process I guess.  Here are a few pics.

  I will display this one with its little playmate and team member a 69 Corvair D/Production racer.

Nothing ever fits……..and when it does, its the wrong scale.

To make mistakes is human.  To blame it on someone else shows management potential. 


  • Member since
    January 2005
  • From: Portland, Oregon
Posted by fantacmet on Sunday, December 15, 2013 10:55 PM

Sorry I haven't been posting, haven't gotten much progress with working on the 7 days a week thing right now.  I don't know if I have another weekend of doing that or not.

So what I have been trying to do is get a couple of these wheel I'm casting to come out right without a vacuum machine of some kind and it's not working so great.  Tried the vacuum cleaner but it's not enough.  I'm thinking maybe one of them Foodsaver things, the handheld units that I can set on top of a rigid container they sell for like 4 bucks.  I had a seal a meal with an external hose on it that'd do well but I don't know if I still have it or not.  I have more then enough vent holes in the molds, and have added more, but still no dice.


  • Member since
    February 2013
  • From: Podunkville, USA
Posted by rommelkiste on Sunday, December 15, 2013 8:49 PM

Nice looking Vette, Dale!  Your paint looks great and I see you chose not to use the decal for the rear!  I have tried two of them and I never could get them to lay down right.  I think it looks great just as it is.  If you should do another one of these, I think I have stumbled on to a way that takes some of the problem out of the chassis/interior assembly.  Give me a PM and I can fill you in when you are ready.  Again, nice looking vette and paint.  I like it.      

George

Nothing ever fits……..and when it does, its the wrong scale.

To make mistakes is human.  To blame it on someone else shows management potential. 


  • Member since
    April 2005
  • From: Australia
Posted by taxtp on Sunday, December 15, 2013 8:14 PM

Really nice Dale, I love the paintwork and chrome. IT certainly has a muscular and aggressive stance. Which photo should I use for the front page ?

Cheers

Tony

I'm just taking it one GB at a time.

  • Member since
    February 2005
  • From: Proctor. MN
Posted by 65ss on Sunday, December 15, 2013 6:41 PM

Well I got around to taking some pictures of the 69 Vette.

As you can see I gave up on the BMF.

I think that's torque from the launch off the line lifting the right tire.Embarrassed

I was pretty happy with the fit of this kit. The only issues I had were on final assembly. When I installed the interior tub I placed it where it seemed to want to be, but then the dashboard was under the cowl. So I slid it back to where the dashboard was lined up with the cowl, and the interior door panels seemed to be lined up with the body, so I glued it there. After that I glued the fire wall in and that lined up, and fit nicely.

Next came the chassis. Well that didn't want to fit any more since I slid the tub back a little. So I cut 1/4 inch out of the chassis right in front of the rear suspension, and glued the two pieces to the tub. A little sheet styrene, and some black paint and you can hardly tell.

  Also the front of the model sat up about as high as the back. So I cut the front spindles off and raised them as much as I could.(1/8 inch?) By cutting the spindles and sanding them flat it tucked the tires inside the fender well I think pretty nice. If I had it to do again I would lower the rear end as well.

Dale

  • Member since
    February 2013
  • From: Podunkville, USA
Posted by rommelkiste on Thursday, December 12, 2013 8:31 PM

I built the Owens-Corning Vette about 10 years ago out of box.  The headers were trouble then so I made sure I test-fit them all through this build.  The fit perfect, I painted them with a THIN coat of flat white and sure enough, problems on both.  If you had issues with your Vette, I can guess what it was, both kits are pretty much the same except for a few parts.  Cant wait till you post it up, I'm ready to give it a look and hear your views of the assembly.  

Rommel----George

Nothing ever fits……..and when it does, its the wrong scale.

To make mistakes is human.  To blame it on someone else shows management potential. 


  • Member since
    February 2005
  • From: Proctor. MN
Posted by 65ss on Thursday, December 12, 2013 6:51 PM

Rommel, the Vette is looking good. Why is it that nothing fits on the final assembly. I finished the my 69 Vette last weekend, and will have more to say about that when I post the pics of the finished model.

Dale

  • Member since
    April 2005
  • From: Australia
Posted by taxtp on Wednesday, December 11, 2013 4:47 PM

I like it a lot Rommelkiste. Your update made me smile, it is so true of this hobby. Never fits in the end.

Cheers

Tony

I'm just taking it one GB at a time.

  • Member since
    February 2013
  • From: Podunkville, USA
Posted by rommelkiste on Wednesday, December 11, 2013 12:33 PM

It's getting closer.  This is the final mock up before everything goes together the last time.  The hardest part of this, other than keeping my eyes working, was the side exit headers.  All through the build they fit perfect on every test fit and step.  When I attached them this last time NOTHING would line up, never fails!  After some tweaking and modifications along with lots of words I can't print here I got em on.  Still have some work to do so I will add finished photos later.

Nothing ever fits……..and when it does, its the wrong scale.

To make mistakes is human.  To blame it on someone else shows management potential. 


  • Member since
    April 2005
  • From: Australia
Posted by taxtp on Tuesday, December 10, 2013 11:46 PM

I'm still getting my Jaguar XJR-9 done, over in the 2013 Automotive GB.

BTW, I've opened up the 2014 Automotive GB, if you have anything you want to enter.

Cheers

Tony

I'm just taking it one GB at a time.

  • Member since
    April 2005
  • From: Australia
Posted by taxtp on Tuesday, December 10, 2013 11:35 PM

They're good Rommelkiste, very very good.

I'm just taking it one GB at a time.

  • Member since
    November 2013
Posted by MRME on Tuesday, December 10, 2013 7:36 PM

hey rommelkiste hello sorry it took too long to get back to you thanks for the welcome over here, lots nicer, and I haven"t ran into the dreaded forum police over here yet.  (thank god for small favors)  Real nice Vette still trying to figure something out to do with the zip lock baggy 53 vette I have thinking maybe a gasser/ or possibly a road racer/rally type car any suggestions ??? I know about the group build any kind of entry deadline things like that PS I"m a very slow builder lucky to get 2/3 done in a year 

anyone needing/wanting info about me contact me a richduddy@gmail.com. I only give info about myself on a need to know basis.

  • Member since
    February 2013
  • From: Podunkville, USA
Posted by rommelkiste on Tuesday, December 10, 2013 5:08 PM

Well, two days of work and all I have to show for it is seat belts.  These used to not be too bad to do but the eyes and hands just don't hold up well to this sort of thing now days.  I think I made each one twice and maybe three times before I got good ones-----or should I say, ones I could use.  Its not there was a problem with the PE sets, its the old fart trying to use em!  When my eyes recover, I will get to work with the fuel cell and decals.  Sure do wish I was 30 again.

Nothing ever fits……..and when it does, its the wrong scale.

To make mistakes is human.  To blame it on someone else shows management potential. 


  • Member since
    November 2013
  • From: Jerseyville, ON
Posted by elass0wyp0 on Monday, December 9, 2013 8:11 AM

Thanks for the PE info Ktkrow, it will be cool to try some PE belts-they look so good.  I'll also go back and re-read the 15 pages were up too :)

Rommel, that Vette is really well done. Keep atter.

I haven't achieved much this past week/weekend to report.

Gordy

  • Member since
    March 2011
Posted by ewheeler454 on Sunday, December 8, 2013 10:27 PM

That's some mighty fine engine work Rommel. I wasn't able to get out to the shop this weekend due to the weather. Hopefully I can make some headway later this week.

L8TR.

  • Member since
    February 2013
  • From: Podunkville, USA
Posted by rommelkiste on Sunday, December 8, 2013 5:23 PM

Due to the snow and ice I have been stuck in the house and spent some time on the Vette.  I have found that my eyesight and heavy-handedness that comes with age has limited me in my building and detail work.  I had lots of plans for this build that I now will leave off because I just can't seem to do them anymore.  Enough of me whining about getting old, here are a couple of update pics.   I think I am pretty well done at the front, now I have to finish the fuel cell and some small interior details.  I think after this one, I will do something box stock and maybe the eyes will thank me.

Nothing ever fits……..and when it does, its the wrong scale.

To make mistakes is human.  To blame it on someone else shows management potential. 


  • Member since
    March 2011
Posted by ewheeler454 on Thursday, December 5, 2013 9:10 PM

Rommel,

That is sharp! I really like the wheels.

Man, there's some nifty builds going on. I'm trying to get the Chevelle done by Christmas so I can get back to the Vette. :)

L8TR.

  • Member since
    February 2013
  • From: Podunkville, USA
Posted by rommelkiste on Thursday, December 5, 2013 6:34 PM

Being stuck in the house during the nasty weather I couldn't stand it any longer and had to see how the Vette was gonna look painted with some graphics.  The decals fought me some but I think I can live with it.  For the first time everything still fits but its not over till its over.  More later.

Nothing ever fits……..and when it does, its the wrong scale.

To make mistakes is human.  To blame it on someone else shows management potential. 


  • Member since
    February 2005
  • From: Proctor. MN
Posted by 65ss on Thursday, December 5, 2013 6:04 PM

Gordy, that chassis is looking good!

Ken I really like what you did with the dash. I have to back up a few pages to remind myself how you did the wood grain.

Dale

  • Member since
    February 2013
  • From: Podunkville, USA
Posted by rommelkiste on Thursday, December 5, 2013 4:05 PM

Gordy & Ken, I will do my best with some answers.  When I do gauge faces, I will paint the whole molded gauge face black, when dry I rub paint off the detail (numbers, dials) with a sharp toothpick and sometimes have used a pencil eraser when the gauges were large enough.  I then pick out all the dials or small warning lights in the color I want with a 0000 brush.  I mix a small amount of the epoxy on a file card or paper with a toothpick and flow it into the face with that.  I have a small amount on the toothpick and touch the center of the dial and it will slowly flow.  If you need more, just touch the same area with more epoxy.  The more you do, the easier it is to judge how much epoxy each time.

There is a product out there called Rustall.  Its a 4 part system and goes on like a wash which has black, rust, dead flat and some dusty-grunge powder.  I usually pick it up from Micro-Mark and I think they have other systems.  This one is the only one I have used and I like the results.  I have a couple of rusty trucks in the Autos section of this forum, if you get time, look em up and you can see some of the results of using Rustall.  I can PM you with some pics and some explanations of how I did some of the things if you want, be happy to.  The way I do it is not the only way or even the best way but it is as good as any I guess.  I am sure the Armor guys have some ways I don't know about.  I have picked up most of my tips over the last 30+ years from others, Don Emmons, Tim Bongard, Terry Jesse just to name a very few.  The credit goes to them.  There are many others.  

Some of the things I tried the first time didn't work but I just tried again.  Keep at it and develop your own way, sometimes it works even better!   Keep Glooin' guys, I like all of it!

Nothing ever fits……..and when it does, its the wrong scale.

To make mistakes is human.  To blame it on someone else shows management potential. 


  • Member since
    August 2013
Posted by Ktkrow on Thursday, December 5, 2013 3:20 PM

Gordy - the straps, as well as the PE buckles/hardware are from Model Car Garage. Part #s

MCG-2089    seatbelt hardware 1/24 & 1/25 scale

MCG-701     Seat Belt Material (new colors)

I goofed and didn't buy them in BLACK, so I took 2 of the white strips and really thin Semi-Gloss Black (about the same mix ratio for your A/B) and the black soaked right into the white.  Just know that it makes the belts a little stiff when it dries. CE glue worked great for the folds and attaching to the car.

I am sure they have a part # for straight black belt material, but I'd have to search for it.

Thanks for the peer review as well.  I dig the feedback.  If I get the opportunity, I will do a tutorial, but LIKE YOU (LOL), I got it from reading other articles and forums and what not...My step by step is back on page 12 :)

Ken

On the bench: Dragon's 1/35 M1A1 AIM   &    Revell '69 Ford Mustang Mach I Cobra Jet

  • Member since
    November 2013
  • From: Jerseyville, ON
Posted by elass0wyp0 on Thursday, December 5, 2013 3:04 PM

Ktkrow

I did miss Gordy!!!  Love the weathering.  Any rust tips???  What product did you use?

Good lord, from me?  My advice would be to read all the posts of all the amazing work done by others here and try to replicate what they did.  lol  

Thanks for the compliments, I feel better about my work having it reviewed by my peers.  :)

I still would like to get another rust colour in there, some lighter orange for fresh rust.  I wasn't sure how to go about it.  I guess a second layer of chipping medium between rust coats.   I just used a wet tooth brush to reinvigorate(?) the chipping stuff, in sort of a dabbing and scraping action.  I had to replace some black paint in areas where I got too much release and it washed away on me.  I've never used it before and didn't know how exactly to go about it.  Cotton swabs took too much with it for me.  I was probably doing it wrong.

I'm sure someone will be better able to advise and expand on my noobie technique of trial and error.

That wood grain dash and wheel look great tho.  I'm going to have to attempt a wood grain interior some day.  You should post a tutorial on that skill.  Well done.

Also a question.  Are those pe seat belts or part of the kit?  They really make that interior complete.  Any detail that will help me explain it to my LHS guy would be great.  :) -thanks.

Gordy

  • Member since
    August 2013
Posted by Ktkrow on Thursday, December 5, 2013 2:25 PM

I did miss Gordy!!!  Love the weathering.  Any rust tips???  What product did you use?

Ken

On the bench: Dragon's 1/35 M1A1 AIM   &    Revell '69 Ford Mustang Mach I Cobra Jet

  • Member since
    August 2013
Posted by Ktkrow on Thursday, December 5, 2013 2:23 PM

Hi all.  Been working on bits over the holiday and this week, but didn't have time to post.

Comments:

Rom - Great work and I am loving the customizations.  Looks awesome and I agree with other on the flared fenders. I'd have thought it came that way, so that is a testament to the great body work you do.  Another fine job on the dials!  I struggled with mine, so below I have a couple questions for you.

Dale - Great recovery on the roof job.  Nice work.  Great shade of BLUE!!!

Tony and Eric - good luck finishing off your other GBs.  Look forward to more of your work here, but I completely understand.  I have put my M1A1 build on hold (not intentionally) but think about it a lot.

Questions:

Rom - What do you use to pipe in the 5 min epoxy?  I used a disposable pipette.  1st 2 dials went great, 3 and 4 gave me some fits, but I know it is because I didn't work fast enough.  Fortunately, it's pretty hidden once it's all together.  You will likely see it in the update pics below.  If there is a better tool for this, I'd love the tip.  I was thinking a disposable syringe would be a quicker tool to inject the epoxy into the well, but I look forward to hearing from you.

Rom (or anyone) - any good pointers to wheel decal suppliers?  I am getting ready to get some Vette details and thought some tire lettering would be great too.  I don't think I am going to worry about it for the Stang.

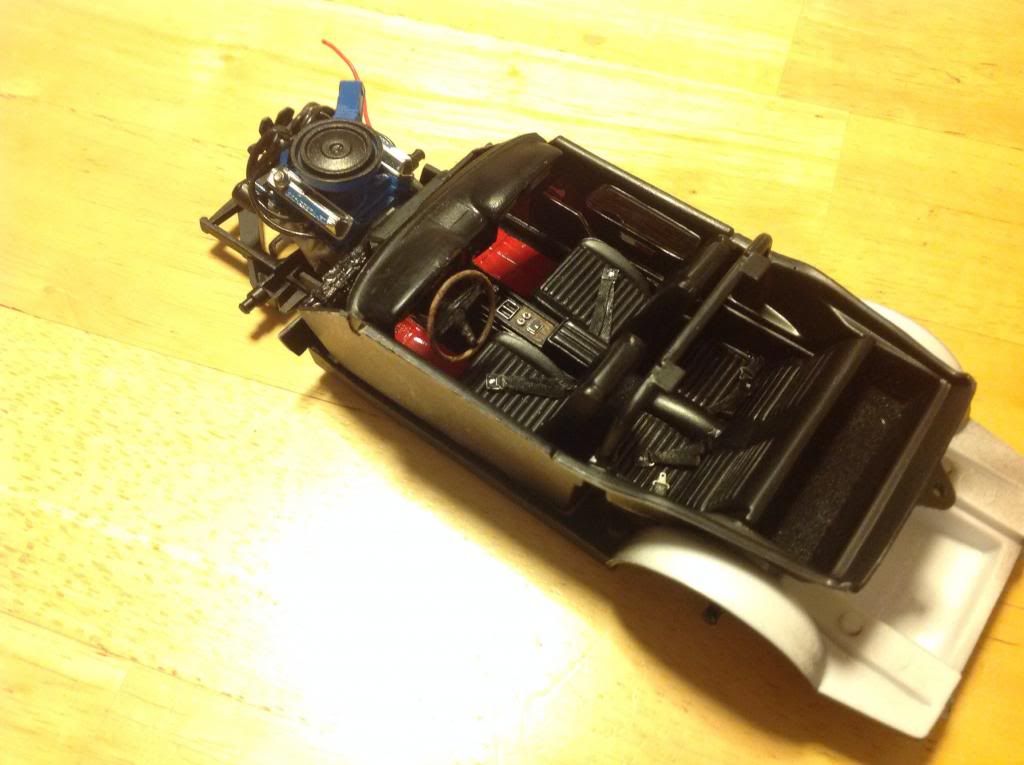
Here is my update.  It is starting to come together, but haven't done the body yet.  I got really wrapped up in the other details.

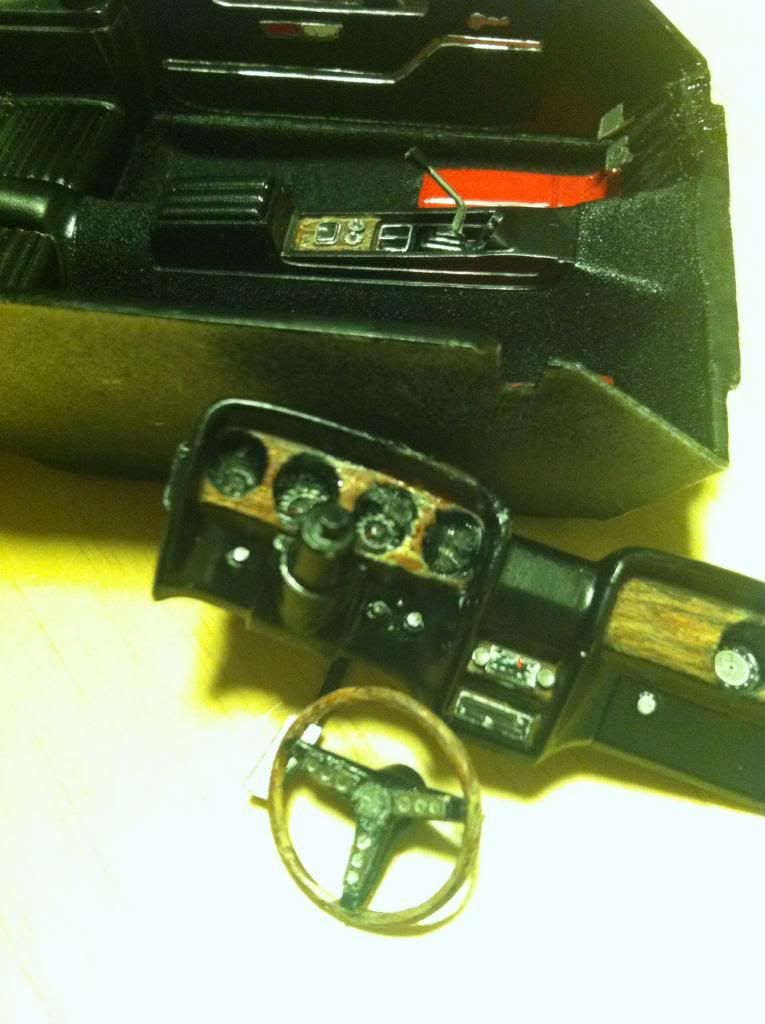
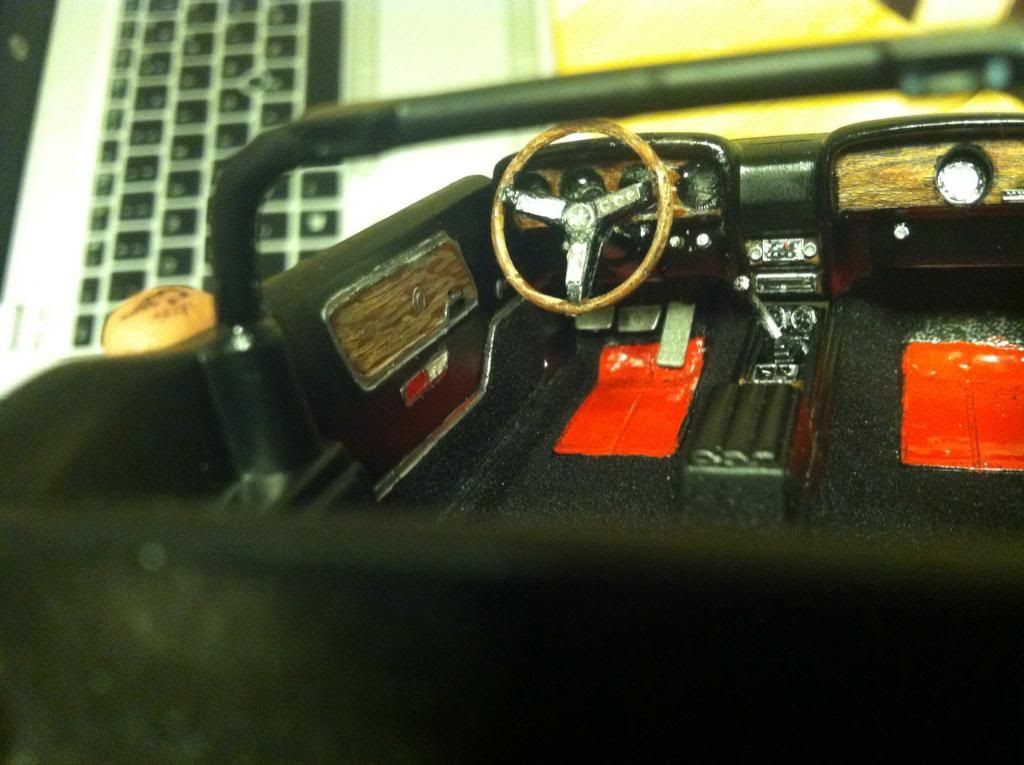
Here is the dash with the interior showing the pedals.  You can see where I bunged up a couple of the dials, but the other detail came out decent.  I did PE pedals, knobs, dial centers and the glove box lock. I also got the PE on the steering wheel a little messed up.  I since got some of the crud off and it looks a bit better in other pics.  I am learning the difficulties of working with micro parts and having big fat polish fingers!!!! LOL
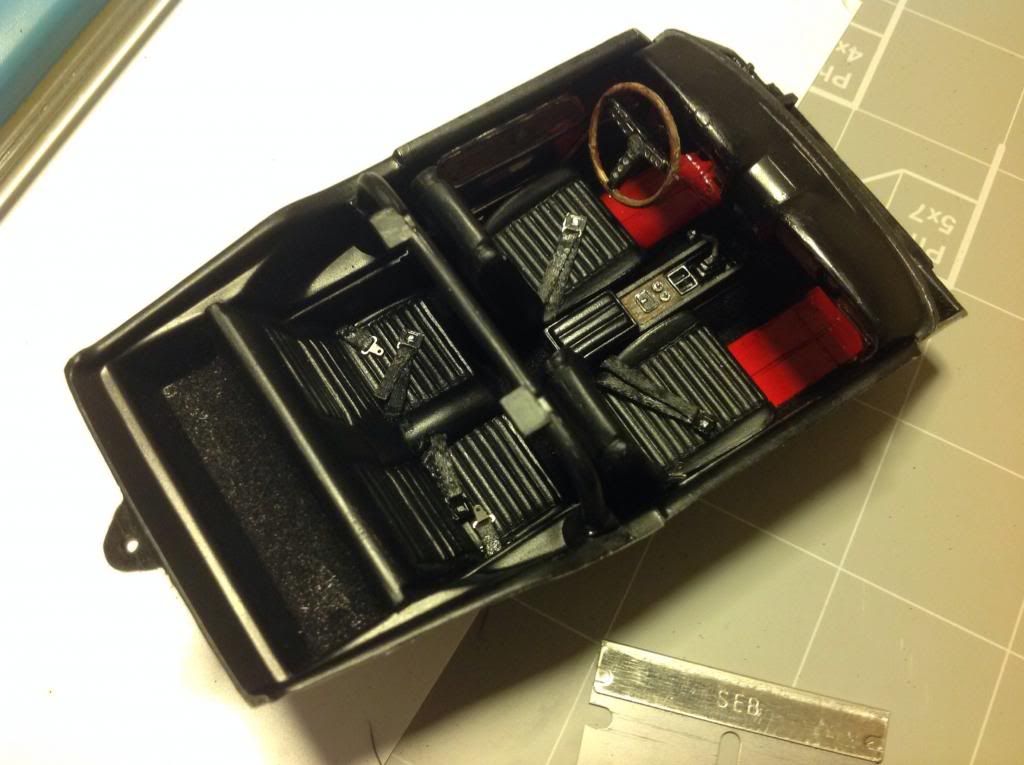
Coming together:

With seats and belts, I think I am calling it done:

Undercarriage with the beginnings of wear/weathering. I'll likely do a bit more when finishing up:

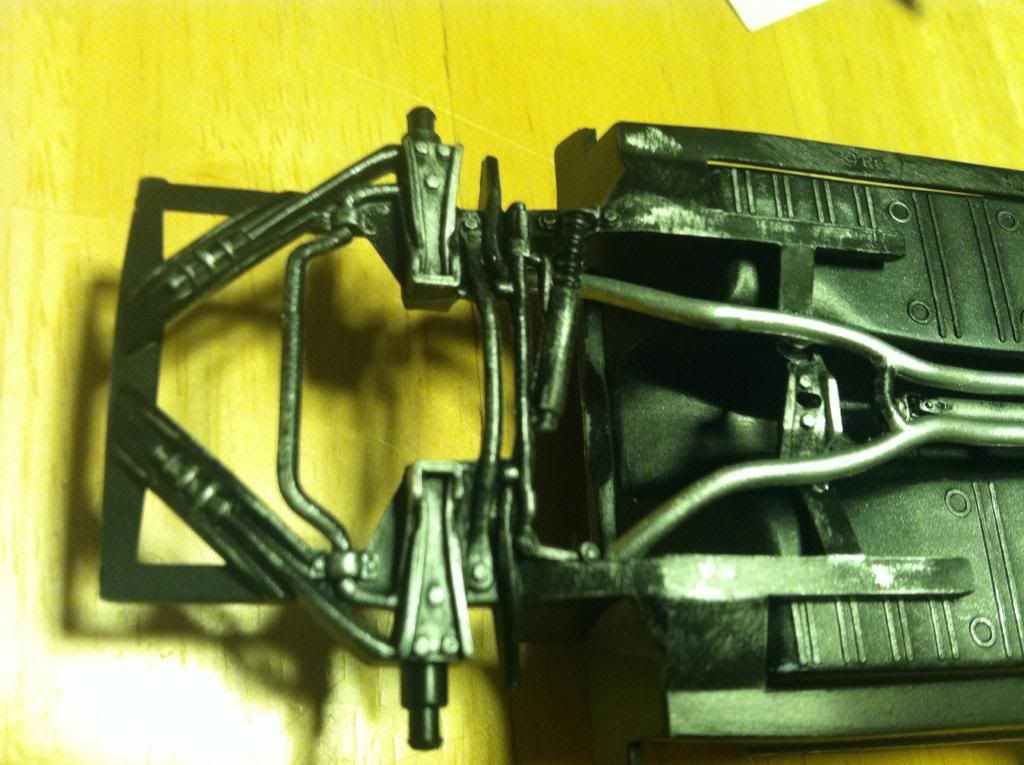
That is just dry brushed Tamiya Fl Aluminum.  I am thinking some small amount of rust and grime later, but not yet.

With the engine (last one):

Anyway, That is it for now.  

Keep up the great work everyone and sorry if I missed anyone's good work, as I am a few days behind.

Ken

On the bench: Dragon's 1/35 M1A1 AIM   &    Revell '69 Ford Mustang Mach I Cobra Jet

  • Member since
    February 2013
  • From: Podunkville, USA
Posted by rommelkiste on Thursday, December 5, 2013 12:08 PM

Gordy, the rusted up chassis looks pretty darn good!  Even if you roll under a good looking vette that is what you will find most of the time.  Good weathering job.  Try some solder in .062 Dia.  Most of what you get when you buy street headers is 1.675 and maybe 2.00 in 1:1.  The .062 solder is pretty close in 1/25 and 1/24 and I think you will find it a little easier to work with.  I tried it and found that a piece of heat shrink tube makes a nifty collector when attaching to the exhaust system.

I once again have freezing rain and ice so I am indoors and bashing on the Vette.  I got the body painted before the weather moved in and will add the graphics in a day or so.  I got the chassis painted in flat gull grey and FINALLY have it on all fours. I have a start on the racing dash and can now start plumbing and wiring up for the end.  I have only one pic for an update but will add more later.  

Nothing ever fits……..and when it does, its the wrong scale.

To make mistakes is human.  To blame it on someone else shows management potential. 


  • Member since
    November 2013
  • From: Jerseyville, ON
Posted by elass0wyp0 on Thursday, December 5, 2013 10:40 AM

I apologize for the crap pics, but an update just isn't the same without them.

The kit box;

This is my brother's 1:1 '78 Corvette engine bay for reference.

The photoetch parts.  I've never done PE before and I think it's for a big block but I'll make it work.

My fail-headers.  I got some crimp marks from the pliers I used and I'm going to have to get creative to make them look like they attach to the exhaust pipes but I did learn quite a bit and have picked up some smooth pliers for the next time.  I won't give up.     

So this is my frame weathering.  I assumed that the rails were metal and the floors were fibreglass coated wood but my brother tells me that most of the panels and coverings under the '78 are actually metal and that he has "way more rust than that".  I think the 'rusty' sections seem appropriate enough to get the point across. 

So that's me up to date.  Keep glooin!

Gordy

  • Member since
    February 2013
  • From: Podunkville, USA
Posted by rommelkiste on Tuesday, December 3, 2013 9:15 PM

Eric, the kit comes with some gloo on flares for the rear.  I had an extra set and found if you swapped em side for side and glooed em on the front they fit.  I just molded em in with some putty.  I wasn't sure if I was gonna flare them at all but all the pics I have of the really cool ones are.   Soooo… thats what I ended up with.  Hope all this still fits when I get to the last part!!!

Nothing ever fits……..and when it does, its the wrong scale.

To make mistakes is human.  To blame it on someone else shows management potential. 


JOIN OUR COMMUNITY!

Our community is FREE to join. To participate you must either login or register for an account.

SEARCH FORUMS
FREE NEWSLETTER
By signing up you may also receive reader surveys and occasional special offers. We do not sell, rent or trade our email lists. View our Privacy Policy.