SEARCH FINESCALE.COM

Enter keywords or a search phrase below:

Rommel vs Monty (North African GB 1941-43) Jan. 1 - Aug. 31 2014

137117 views
1455 replies
1 rating 2 rating 3 rating 4 rating 5 rating
  • Member since
    April 2013
Posted by SchattenSpartan on Wednesday, July 2, 2014 3:30 PM

Those figures look very nice. I might have to look around for Alpine stuff... Your little tank is looking better and better, Jack! I really like the color you decided on!

  • Member since
    November 2009
  • From: SW Virginia
Posted by Gamera on Thursday, July 3, 2014 7:39 AM

Jack: Base coat looks great! I don't know how you normally do it but I'd be tempted to pre-shade with the darker colour and then highlight with the lighter one.

And yes those Alpine figures look great, I love their stuff but am generally too cheap!

"I dream in fire but work in clay." -Arthur Machen


  • Member since
    May 2011
  • From: Illinois
Posted by armor86 on Sunday, July 6, 2014 12:56 AM

Jack - base coat looks good, I plan on having several hatches and access panels open and will need to cover / close off before air brushing primer and base coat. Finished assembling hatches. Test fitting engine access hatches. Any suggestions?

Updated Photos on Pz IV 'D', finish interior paint and weathering. Jointed lower and upper hull with fenders. Next up mounting tools and turret main gun with interior details. Will use a couple after market PE clasps / tool holders Griffon and Eduard sets.  Armor86


Dan

  • Member since
    April 2013
Posted by SchattenSpartan on Sunday, July 6, 2014 8:49 AM

Looking good, Dan!

  • Member since
    April 2006
  • From: ON, Canada
Posted by jgeratic on Sunday, July 6, 2014 12:24 PM

Dan, looking great.  

By suggestions, if you mean how to cover up the openings before going to the spray booth, the guys gave some ideas on the previous page.  I also cut a foam sponge  to fit in the turret hole.    Cut oversized so that it fits snugly.

On hatch openings that have a lip, I found trimming some cardboard from the kit box works great.  Here you want to achieve an exact fit, snug enough so that no tape or other adhesive is required to hold in place.    

----------------------------------------------------------------

Thanks again guys, glad you approve of the sand colour choice.

Here I've done some colour modulation with just the two paints I had posted earlier.  The overall look is dark now due to the gloss surface.  Turret decals are from an old Italeri M13/40 kit.   Only the white eagle crest is from the actual kit.  

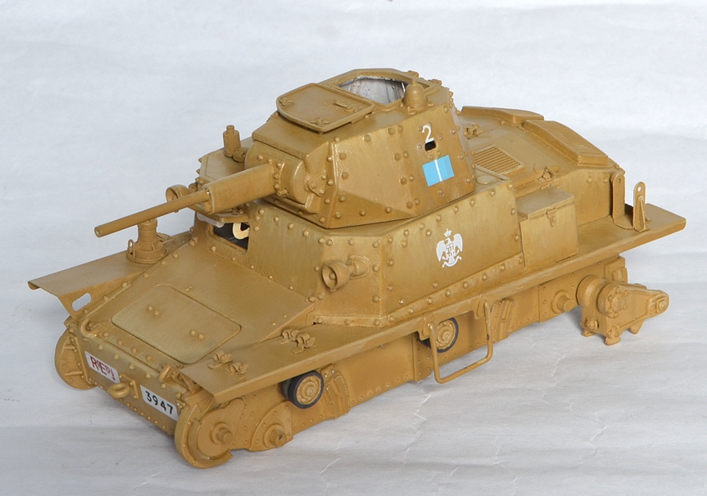
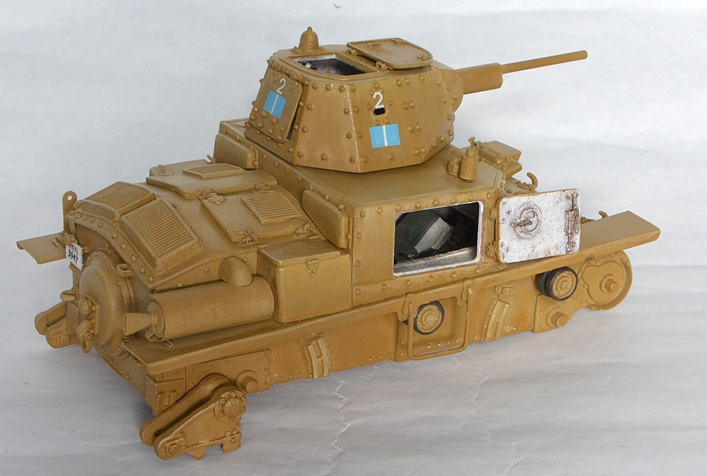
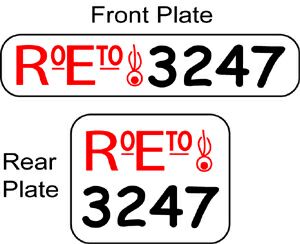
The plate numbers I made myself on white decal paper, using the graphic below as a basis.  I could of just used the kit ones, but the style is in stencil form, while period photos show a solid font.  Also, to keep things honest, I felt I needed to change the sequence  a bit as those on the decal sheet were supposedly from a company command tank.

The markings I've cobbled together indicate this vehicle is no.2 from the 2nd company (blue rectangle), first platoon (single white stripe).

regards,

Jack

  • Member since
    December 2002
  • From: Bury St Edmunds, Suffolk, England
Posted by Bish on Sunday, July 6, 2014 1:03 PM

Dan, that's coming along really nice.

Jack, great work there. I like the eagle decal. At first glance I thought it was Polish.

I am a Norfolk man and i glory in being so


On the bench: Airfix 1/72nd Harrier GR.3/Fujimi 1/72nd Ju 87D-3

  • Member since
    November 2009
  • From: SW Virginia
Posted by Gamera on Monday, July 7, 2014 7:38 AM

Yeah Dan & Jack those are coming along great!

"I dream in fire but work in clay." -Arthur Machen


  • Member since
    January 2013
  • From: Athens, Greece
Posted by Zvezda1980 on Wednesday, July 9, 2014 5:30 AM

Bish, the Pz.III  diorama is awesome!!!  Bow Down

Not only the vehicle is perfect, also the posture of figures and overall scenery is ingenious.

Please allow me to ask, this is a one or two color camouflage you applied?

My little Pz.III has just started, I post a couple of photos just to catch up, More will be posted the folowing days.

  • Member since
    December 2002
  • From: Bury St Edmunds, Suffolk, England
Posted by Bish on Wednesday, July 9, 2014 5:36 AM

Thanks Zvezda. This is a two colour scheme. But the colours were quite close even before weathering. I tried to weather it so as to retain at least some of it and you can just about make it out on top of the turret mostly.

Which kit are you doing again, I don't see your name on the roster. I know Eric has been away for a bit. I am guessing its a Tamiya kit, is that 48th scale.

I am a Norfolk man and i glory in being so


On the bench: Airfix 1/72nd Harrier GR.3/Fujimi 1/72nd Ju 87D-3

  • Member since
    November 2009
  • From: SW Virginia
Posted by Gamera on Wednesday, July 9, 2014 7:35 AM

Wow that is small Zvezda but looks pretty nicely detailed.

"I dream in fire but work in clay." -Arthur Machen


  • Member since
    January 2013
  • From: Athens, Greece
Posted by Zvezda1980 on Friday, July 11, 2014 4:17 AM

This is the Revell Panzer III Ausf.M in 1/72 scale and my first attempt in building anything without wings

i1281.photobucket.com/.../134879-11185_zps70468896.jpg

  • Member since
    January 2013
  • From: Athens, Greece
Posted by Zvezda1980 on Friday, July 11, 2014 4:18 AM

  • Member since
    December 2002
  • From: Bury St Edmunds, Suffolk, England
Posted by Bish on Friday, July 11, 2014 4:29 AM

72nd, now don't I feel silly. But looking again, I can see what I thought were clamps are pegs.

I am a Norfolk man and i glory in being so


On the bench: Airfix 1/72nd Harrier GR.3/Fujimi 1/72nd Ju 87D-3

  • Member since
    April 2005
Posted by Thunderbolt379 on Friday, July 11, 2014 7:45 AM

Zvezda -- a "palmtop" Panzer! I look forward to seeing how it goes together!

Guys, the Verlinden accessory set for the Pz.IV D is finally on its way from the States, I'm expecting it maybe the end of next week. This contains what I'm sure is the actual type of jerry can rack that Tony Greenland used 25 years ago in his build, and if that's the case then I'll probably use it instead of the rack I built from scratch. It'll be good to get back to armour, I've been slogging away on planes for quite a while!

M/TB379

http://worldinminiature.blogspot.com/

  • Member since
    April 2006
  • From: ON, Canada
Posted by jgeratic on Saturday, July 12, 2014 12:40 AM

Gamera and Bish, thanks! - now that you mention it, for sure the white eagle crest does remind one of the Polish eagle, quite prominent in the later half of the war.

I'm nearing the home stretch now, the only item not painted are the tracks (and figures).  Past week been tackling the extra details:

Muffler all done up, the white area represents a section of asbestos.  This is a much nicer and detailed piece from the resin aftermarket.

On the other side at the rear, a resin knapsack.   I like how I got sort of a painterly look to it. Cool

regards,

Jack

  • Member since
    December 2002
  • From: Bury St Edmunds, Suffolk, England
Posted by Bish on Saturday, July 12, 2014 6:13 AM

Nice, that rucksack tucks in there just right. How did you do the exhaust, I like the look of that.

I am a Norfolk man and i glory in being so


On the bench: Airfix 1/72nd Harrier GR.3/Fujimi 1/72nd Ju 87D-3

  • Member since
    April 2013
Posted by SchattenSpartan on Saturday, July 12, 2014 11:53 AM

Jack: Great color modulation and nice, subtile weathering! I lovehow the exhaust and that backpack look!

Zvezda: Holy moly, that tank is tiny! Nice work so far!

  • Member since
    November 2009
  • From: SW Virginia
Posted by Gamera on Saturday, July 12, 2014 3:14 PM

Again looks great Jack, love the rusted out muffler- didn't even know they used asbestos like that but it makes a great deal of sense.

"I dream in fire but work in clay." -Arthur Machen


  • Member since
    April 2006
  • From: ON, Canada
Posted by jgeratic on Saturday, July 12, 2014 11:08 PM

Thanks guys.

The muffler is pretty straight forward.  Already painted in the vehicle sand colour, a brown wash was added.  Once dry, weathering powders were applied, starting with light rust, standard rust, dirt brown and finally black.

The muffler shield is is a PE piece.  More weathering rust powder here, particularly the back lip edge.  I did wet the brush with water to smear a small bit of powder overall.  Then reintroduced the vehicle colour by dabbing in a couple shades of the sand paint.

regards,

Jack

  • Member since
    January 2013
  • From: Athens, Greece
Posted by Zvezda1980 on Sunday, July 13, 2014 9:24 AM

Hello folks

A brief update.

The little Panzer's hull and turret were assembled, sanded, some filling, etc.

Also,cannon tip was drilled with a small drill bit so as to look more like a barrel.

This kit is a pleasure to build.

Sorry for the cell-phone pics, I will post better ones when I retrieve my camera.

Next will be wheels preparation and an overall primer before painting ( I have to go purchase the colors).

Just for a verification, what colors would you suggest for the 2 tone camo?

Friendly regards to all

  • Member since
    April 2006
  • From: ON, Canada
Posted by jgeratic on Sunday, July 13, 2014 10:39 AM

Zvezda1980,

There were two official camouflage schemes created for Africa.  The first one, introduced in March 1941, still seems to be the popular choice for Tunisia, which could possibly indicate the requirement to use up old stocks first.  

The two colours you want are RAL 8000 and RAL 7008.

This site lists some possible paint brands:

http://www.miniatures.de/colour-ral-farben.html

hth

regards,

Jack

  • Member since
    December 2002
  • From: Bury St Edmunds, Suffolk, England
Posted by Bish on Sunday, July 13, 2014 10:54 AM

I will second jack on that, those colours would still work for Tunisia. The other scheme, introduced in march 42 is the one I used, RAL 8020 and 7027.

Another option would be a single colour. I believe this was usually the base colour, namely 8000 or 8020.

jack, have you come across the use of a single colour.

I am a Norfolk man and i glory in being so


On the bench: Airfix 1/72nd Harrier GR.3/Fujimi 1/72nd Ju 87D-3

  • Member since
    April 2006
  • From: ON, Canada
Posted by jgeratic on Sunday, July 13, 2014 12:34 PM

Hi Bish...

As far as I'm aware, no official order/documentation has been unearthed that indicates German vehicles destined for Africa left factories in a single colour.  The only exception is early 1941 when they arrived in their European scheme of panzer grey.

There is always the possibility that their finish was purposely altered once in the field.  So it's up to the individual to decide what they are seeing in period photos.  Even the more recent special publications on the subject depict artwork with both single and dual camou schemes.   Again, they have based it on what they can interpret from photos.

regards,

Jack

  • Member since
    December 2002
  • From: Bury St Edmunds, Suffolk, England
Posted by Bish on Sunday, July 13, 2014 12:53 PM

I have not seen any official order for that either. I have seen colour plates which give one colour, but I am not sure if this is just an error caused by using B&W photo's of vehicles covered in dust and sand. I just wasn't sure if anyone had come across proof that vehicle were painted in only one colour.

I am a Norfolk man and i glory in being so


On the bench: Airfix 1/72nd Harrier GR.3/Fujimi 1/72nd Ju 87D-3

  • Member since
    April 2006
  • From: ON, Canada
Posted by jgeratic on Monday, July 14, 2014 5:39 PM

Switching attention over to the figures now while  I let the vehicle simmer ...

regards,

Jack

  • Member since
    February 2006
  • From: Cincinnati Ohio
Posted by DantheMan85 on Monday, July 14, 2014 7:02 PM

Thanks: SchattenSpartn, Gamera.

Bish: Thanks, excellent work on your Panzer III and figures.

Armor86: Thanks nice work on your interior.

Jgeratic: Great work on the L6/40

Zvezada1980:  Nice work on your little Panzer III.

Been doing some touch up work on my Tiger !, many the tools, tow cables, track cable, the gluing them on one by one.  Some part's I could use Testors cement, others had to use some CA glue.  Also glued on the inside wheels, I did not paint the side facing out, your not going to see them when the rest of the wheels get glued on.  And finished up on airbrushing the tracks flat black, there still drying so no pictures.  ;)   And and hand painted the hull MG gunmetal.

On my Work Bench: Tamiya Ford GT 1/24

Up Coming: ?


  • Member since
    December 2002
  • From: Bury St Edmunds, Suffolk, England
Posted by Bish on Tuesday, July 15, 2014 1:12 AM

Jack, now that's sweet. Looking forward to seeing your figures.

Dan, thanks. Tiger is looking really good.

I am a Norfolk man and i glory in being so


On the bench: Airfix 1/72nd Harrier GR.3/Fujimi 1/72nd Ju 87D-3

  • Member since
    November 2009
  • From: SW Virginia
Posted by Gamera on Tuesday, July 15, 2014 7:28 AM

Jack: Very nice work there- I love how the dust came out. Looking forward to those figures.

Dan: Ah, now she's starting to look like a Tiger!

"I dream in fire but work in clay." -Arthur Machen


  • Member since
    November 2012
Posted by udel09 on Wednesday, July 16, 2014 11:16 PM

The completed Matilda.  Tamiya acrylic paints were used with MIG products for wash/weathering.  Congrats to everyone who completed and are still in progress, the builds are fantastic. 


  • Member since
    November 2009
  • From: SW Virginia
Posted by Gamera on Thursday, July 17, 2014 11:07 AM

Udel90: Very nice job there! Would love to see her from a few more angles though if it's not too much trouble though.

"I dream in fire but work in clay." -Arthur Machen


JOIN OUR COMMUNITY!

Our community is FREE to join. To participate you must either login or register for an account.

SEARCH FORUMS
FREE NEWSLETTER
By signing up you may also receive reader surveys and occasional special offers. We do not sell, rent or trade our email lists. View our Privacy Policy.