SEARCH FINESCALE.COM

Enter keywords or a search phrase below:

Rommel vs Monty (North African GB 1941-43) Jan. 1 - Aug. 31 2014

137126 views
1455 replies
1 rating 2 rating 3 rating 4 rating 5 rating
  • Member since
    November 2009
  • From: SW Virginia
Posted by Gamera on Thursday, December 11, 2014 7:11 AM

Wow, great job there SP! I need you to teach me about washes since I always seem to make a mess out of them!

"I dream in fire but work in clay." -Arthur Machen


  • Member since
    July 2004
  • From: Sonora Desert
Posted by stikpusher on Thursday, December 11, 2014 10:47 AM

I am no expert on washes. But I do prefer enamels or oils for washes. I have only used oils a couple of times so far. Those give you more "play time" for lack of a better term regarding the clean up phase in removing excess wash. Acrylics are far less forgiving. One big thing is to use dissimilar layer surfaces. Apply your enamel/oil wash over either an acrylic base or sealant layer. Otherwise the thinners in the wash will attack any enamel base.


F is for FIRE, That burns down the whole town!

U is for URANIUM... BOMBS!

N is for NO SURVIVORS...

       - Plankton

LSM


  • Member since
    November 2009
  • From: SW Virginia
Posted by Gamera on Thursday, December 11, 2014 1:03 PM

Hmm, I've been using oils so far, guess I should give enamels a try. Lately I've been doing the ,spot wash' thing and had much better results with it than 'the flood the whole model' method.

"I dream in fire but work in clay." -Arthur Machen


  • Member since
    July 2004
  • From: Sonora Desert
Posted by stikpusher on Thursday, December 11, 2014 3:52 PM

I work on a section at a time and mostly do pin washes. First I dampen the area with thinner to help the wash flow, then apply the pin wash. Let it dry and go back and clean up later. I am still very new to oils, and while I do like their forgiving nature, there are times I do not care for their extended drying times. Enamels are a happy in between compared to acrylics and enamels.


F is for FIRE, That burns down the whole town!

U is for URANIUM... BOMBS!

N is for NO SURVIVORS...

       - Plankton

LSM


  • Member since
    July 2004
  • From: Sonora Desert
Posted by stikpusher on Thursday, December 11, 2014 8:17 PM

Drybrushing of highlights done... tracks on... antennas added....

almost there...


F is for FIRE, That burns down the whole town!

U is for URANIUM... BOMBS!

N is for NO SURVIVORS...

       - Plankton

LSM


  • Member since
    July 2006
  • From: San Francisco Bay Area
Posted by bufflehead on Thursday, December 11, 2014 9:07 PM

"Its ALIVE!!""  

Man I thought this GB was over, but I see that there are still a couple still working on their builds!    Great work there Stik and Gamera!!  Maybe I should resurrect the two Pz. 1 builds that are about ready for paint....?!?!?!

Ernest

Last Armor Build - 1/35 Dragon M-26A1, 1/35 Emhar Mk.IV Female


Last Aircraft Builds - Hobby Boss 1/72 F4F Wildcat & FW-190A8


  • Member since
    July 2004
  • From: Sonora Desert
Posted by stikpusher on Thursday, December 11, 2014 10:21 PM

Yes you should Ernest... misery enjoys company...

"I don't feel tardy..."


F is for FIRE, That burns down the whole town!

U is for URANIUM... BOMBS!

N is for NO SURVIVORS...

       - Plankton

LSM


  • Member since
    April 2005
Posted by Thunderbolt379 on Thursday, December 11, 2014 10:33 PM

Lookin' good, Stik!  Buff, join the last wave of action! Yep, we have a final stir of finishing going on, so join in!

I'm in from work at mid0-afternoon and am going to do my best to finish the airbrushing on the Pz. IV, though the stowage will take a few more shots. I got the tracks done in yesterday's session, including the tracks for the Jagdpanther for the tank hunters GB, which is also due by the end of the month.

I'm hoping to be onto final assembly and stowage after this weekend.

cheers, M/TB379

http://worldinminiature.blogspot.com/

  • Member since
    July 2004
  • From: Sonora Desert
Posted by stikpusher on Thursday, December 11, 2014 10:54 PM

TB, your Mk.IV's RAL 8020 looks really good. Interesting mix to get there.... Flesh and Red Brown? Very simple. I eyeballed a mix of Tamiya colors 2 summers ago on a project, but have no idea of colors or ratios anymore... probably Desert Yellow, Buff, and Deck Tan, but... go figure...


F is for FIRE, That burns down the whole town!

U is for URANIUM... BOMBS!

N is for NO SURVIVORS...

       - Plankton

LSM


  • Member since
    April 2005
Posted by Thunderbolt379 on Thursday, December 11, 2014 11:04 PM

Thanks, Stik. It's one of those odd cases where first guesses prove out. From the first time I thought of the project, that was the mix I had in mind, and though I tried a few variations and ratios, that was what I came back to and my anticipated ration was close to right in the end.

I'm getting the return rollers ready for spraying their hubs, plus the smoke grenade discharger rack, and there's a bit more 8020 needed on the idlers, then I can take a crack of the fade and shade coats. I'm looking at an ultra-thinned Buff for the fade effect, and can dust the tracks with the same mix (though I think after they have been rust-washed, to suggest dust on top of rust.)

M/TB379

http://worldinminiature.blogspot.com/

  • Member since
    April 2005
Posted by Thunderbolt379 on Friday, December 12, 2014 12:24 AM

Okay, shade and fade done, For the fade effect, I used a 10% glaze of Buff, and for the shade I mixed a darker version of 8020 and again thinned it 90% so it went on as a mist and built up on behind the running gear. It's subtle, I'm not sure how well the effect will photograph, but I'm happy with it at the moment, and oil wash and dry brush should go okay over it. I'll be into those rounds tomorrow, and as this is not a heavily rusted subject, I'm hoping single rounds will do the trick. If so, I could be into final assembly by Sunday, and if I can get the rust wash done on the tracks i'll put the dust coat through in the same round of work as spraying the stowage. I need to do some experimental mixing to develop the shade for the faded wooden crates, and decide what I'm doing with the rest. German helmets and gasmask cases sure look grey in pictures, and the shade Tamiya sells as "Field Grey" is, to my eye, definitely a green -- in fact colour charts list it as an acceptable match for Russian aircraft "factory green!"

M/TB379

http://worldinminiature.blogspot.com/

  • Member since
    July 2004
  • From: Sonora Desert
Posted by stikpusher on Friday, December 12, 2014 1:37 AM

For the tracks I would not suggest rust so much as a burnished metal look. Rust only is on tank tracks that do not and are not moving for prolonged periods of time. As soon as a tank starts moving, the dirt, dust, sand, etc. of local terrain scours the rust off. But they do tend to pick up the hue of the local terrain, even when scoured clean by sand and such.


F is for FIRE, That burns down the whole town!

U is for URANIUM... BOMBS!

N is for NO SURVIVORS...

       - Plankton

LSM


  • Member since
    November 2009
  • From: SW Virginia
Posted by Gamera on Friday, December 12, 2014 7:31 AM

SP: Looks great to me! Even got the gonzometer setting right up there!

I meant to say pin wash when I spot wash, it looks ok but I still think yours looks better than what I've been getting.

Ernest: Lol thanks, but I finished my lil Crusader some months back, one of the few GBs I finished with time to spare!

Mike: That sounds really cool, looking forward to some photos.

"I dream in fire but work in clay." -Arthur Machen


  • Member since
    July 2004
  • From: Sonora Desert
Posted by stikpusher on Friday, December 12, 2014 2:41 PM

TB, Testors makes the proper paint Field Gray in their new Model Master releases, Feldgrau RAL 6006, in both Acrylic and Enamel. It is a different shade than their Uniform Feldgrau.

Gamera, it's strictly trial and error on my washes. If I take off too much or did not put on enough in the first place, I go back and do it some more.

But I am quite happy with how this one is coming together finally....


F is for FIRE, That burns down the whole town!

U is for URANIUM... BOMBS!

N is for NO SURVIVORS...

       - Plankton

LSM


  • Member since
    July 2004
  • From: Sonora Desert
Posted by stikpusher on Friday, December 12, 2014 6:14 PM

Stowage added to rear deck...

Just gotta add decals and final weathering now...


F is for FIRE, That burns down the whole town!

U is for URANIUM... BOMBS!

N is for NO SURVIVORS...

       - Plankton

LSM


  • Member since
    April 2013
Posted by SchattenSpartan on Friday, December 12, 2014 6:17 PM

Stik: The wash looks great. It really makes all those surface details pop!

  • Member since
    November 2009
  • From: SW Virginia
Posted by Gamera on Saturday, December 13, 2014 10:45 AM

Yeah, storage looks good SP, looking forward to seeing her all done up.

"I dream in fire but work in clay." -Arthur Machen


  • Member since
    July 2004
  • From: Sonora Desert
Posted by stikpusher on Saturday, December 13, 2014 11:16 AM

I airbrushed on a gloss coat last night after dinner. Today will be decals, flat coat, and final dust coat.... Then another long drawn out "quick project" will be done!


F is for FIRE, That burns down the whole town!

U is for URANIUM... BOMBS!

N is for NO SURVIVORS...

       - Plankton

LSM


  • Member since
    July 2004
  • From: Sonora Desert
Posted by stikpusher on Saturday, December 13, 2014 5:01 PM

Today's updates...
this morning I applied the decals...

and then after lunch I applied a flat coat followed by a dusting coat....

Looking at these photos, I think I will add a dusting of pigments either later this evening or tomorrow morning, and then call this one done...

Well it's time for AMPS, so I am off for now....


F is for FIRE, That burns down the whole town!

U is for URANIUM... BOMBS!

N is for NO SURVIVORS...

       - Plankton

LSM


  • Member since
    April 2005
Posted by Thunderbolt379 on Sunday, December 14, 2014 2:26 AM

Stik -- thanks for the tips, I dropped rust from the track finish, and I'm looking around for the 6006 helmet colour.

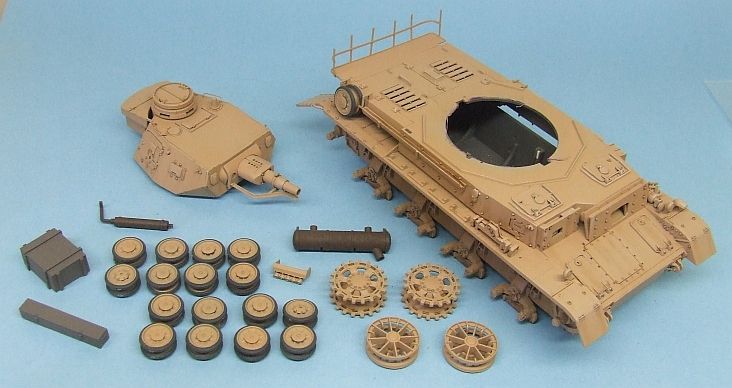
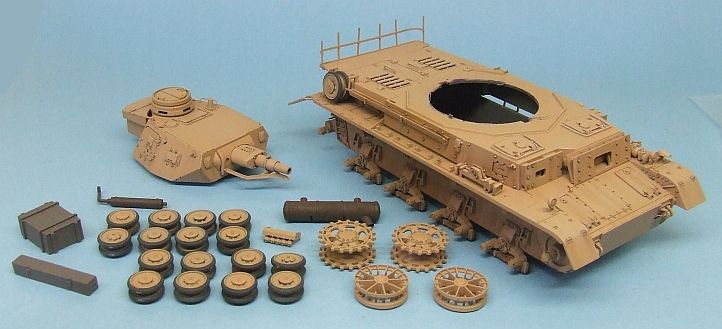
I got some done today. I did another round of oil wash on the hull and turret, sprayed a dust coat on the tracks, assembled the wheels, and got an experimental base coat onto a couple of items of stowage. Here she is:

I'm not sure how much I'll get done in the next few days, I have work, but my objectives are to wash and dry brush the wheel hubs, do the bare metal dry brushing, touchup the wheel rims and start painting fine details as necessary. Decals and tools are not far away.

Cheers, M/TB379

http://worldinminiature.blogspot.com/

  • Member since
    July 2004
  • From: Sonora Desert
Posted by stikpusher on Sunday, December 14, 2014 11:43 AM

That is taking shape quite nicely there TB! I am looking forward to the dry brushing and seeing how much that will bring out in the raised details.


F is for FIRE, That burns down the whole town!

U is for URANIUM... BOMBS!

N is for NO SURVIVORS...

       - Plankton

LSM


  • Member since
    April 2005
Posted by Thunderbolt379 on Sunday, December 14, 2014 3:42 PM

It is dry brushed, Stik -- all edges are done with white oils... It is subtle! The bare metal will hopefully be more prominent, especially if I mess some dirt and rust into the treadplate areas so it creates contrast...

M/TB379

http://worldinminiature.blogspot.com/

  • Member since
    November 2009
  • From: SW Virginia
Posted by Gamera on Sunday, December 14, 2014 4:19 PM

SP: Again, looks good, as you said a little more dust and you're done.

Mike: Looks fantastic, I didn't really notice the drybrushing either till you pointed it out. Very subtle nice sun-bleached look there.

"I dream in fire but work in clay." -Arthur Machen


  • Member since
    November 2003
  • From: Nashville, TN area
Posted by bobbaily on Sunday, December 14, 2014 5:33 PM

Nice job Stik-very nice build.

TB-your build is coming along nicely too-looking forward to seeing more progress pics.

Think I'll pull the SAS Jeep out of storage and give it an oil wash and try to darken up the color this week.

Bob


  • Member since
    July 2006
  • From: San Francisco Bay Area
Posted by bufflehead on Sunday, December 14, 2014 10:28 PM

Wow!  Nice work Stik and TBolt!  Nice to see both of these builds nearing completion! 

I read TBolt's thread on his paint mix.  What about yours' Stik?  I'm trying to figure out a good Tamiya paint mix for DAK armor around 1941/42.  That way I can get started on the two DAK Pz. Is that are just sitting around.

Oh, and sorry Gamera to get you mixed up with TBolt!  I must have read the last couple of pages too fast and got the names mixed up!  I do remember the sweet Mk.1 Crusader that you built! 

Ernest

Last Armor Build - 1/35 Dragon M-26A1, 1/35 Emhar Mk.IV Female


Last Aircraft Builds - Hobby Boss 1/72 F4F Wildcat & FW-190A8


  • Member since
    July 2006
  • From: San Francisco Bay Area
Posted by bufflehead on Sunday, December 14, 2014 10:56 PM

Hmmmm.  I decided to go back and find out when I posted my last WIP update.....

April 2...!!!!!SurpriseTongue TiedEmbarrassed

wow

I suck

Ernest

Last Armor Build - 1/35 Dragon M-26A1, 1/35 Emhar Mk.IV Female


Last Aircraft Builds - Hobby Boss 1/72 F4F Wildcat & FW-190A8


  • Member since
    July 2004
  • From: Sonora Desert
Posted by stikpusher on Sunday, December 14, 2014 10:58 PM

Thanks guys! I am still gonna add a little more to this project in the next few days. I stumbled across a photo of one of these with some sandbags on the glacis, so I am working on prepping a few for addition there. Then it will be pigments and finito!

Ernest, for DAK colors, I just use the Model Master colors, they make all of them. Although I did mix up a batch of Tamiya by eyeball just to see if I could. It pretty much matched the MM colors spot on. I used their Desert Yellow, Buff, and Deck Tan, but I did not record at what ratios. I just kept adding drops of the different colors until it looked close enough...


F is for FIRE, That burns down the whole town!

U is for URANIUM... BOMBS!

N is for NO SURVIVORS...

       - Plankton

LSM


  • Member since
    April 2006
  • From: ON, Canada
Posted by jgeratic on Sunday, December 14, 2014 11:09 PM

Hey guys, great looking vehicles heading to the finishing line.

Ernest, I'd go with the first tropen scheme containing RAL 8000/7008 for both vehicles, unless the Panzer II is the later F version, then you have the option of the second set of tropical colours for that particular vehicle.

I've never mixed my own yet, but some ideas here:

http://www.network54.com/Forum/47207/thread/1411764643

regards,

Jack

  • Member since
    April 2005
Posted by Thunderbolt379 on Monday, December 15, 2014 12:07 AM

Thanks, Gamera! Yep, it may be too subtle, but I'm trying to follow closely Tony Greenland's build, and he seemed to be pretty restrained with the weathering on this project.

I'm about to get some wash onto the wheels. I didn't get to the hobby shop today, so I'll mailorder the paint -- I'm out of NATO Black, which I use as a basic tire black.

Cheers, M/TB379

http://worldinminiature.blogspot.com/

  • Member since
    April 2013
Posted by SchattenSpartan on Tuesday, December 16, 2014 2:35 PM

I really like the weathering on your Panzer, Mike!

JOIN OUR COMMUNITY!

Our community is FREE to join. To participate you must either login or register for an account.

SEARCH FORUMS
FREE NEWSLETTER
By signing up you may also receive reader surveys and occasional special offers. We do not sell, rent or trade our email lists. View our Privacy Policy.