SEARCH FINESCALE.COM

Enter keywords or a search phrase below:

The 2014 Automotive Group Build

62988 views
717 replies
1 rating 2 rating 3 rating 4 rating 5 rating
  • Member since
    January 2012
  • From: Hatfield
Posted by Misty on Saturday, July 26, 2014 7:21 PM

damn nice tyrrell tony!!

  • Member since
    January 2014
Posted by Seabe on Sunday, July 27, 2014 12:46 AM

Goodness, I have a serious headache now. Nothing to do with waking up after Saturday evening! ;) Just completed the last (I could see) decals on the front and rear wings of the Jordan. Decals still wet and will take pics later.

Studying the decals and the assemblies, I realised that the snake is going to be a challenge ito timing. I prefer to do the major decals afterwards, since I fear handling will damage them. But the snake has to be added before the fron suspension, since it goes into those decals. (Horror of it's own!) Yet... it must be applied AFTER the front wing (or at the very least the front wing supports) are attached. This usually happens after front suspension has been sorted for ease of access, etc. Reason for that is the fangs running down the front wing support. But will just align and set up those support before front suspension, decal, then hope and pray (a lot) during front suspension attachment.

Progress on the Brabham is painfully slow. Did the main white sections and cleared them. And very slowly working on rear suspension there as well and hoping to get some attaching done during the day. I must confess, not the best fitting Tamiya kit I've built of late. Some of the parts does not go together very solidly and with that bit of play, there's always room for misalignment in the end product.

  • Member since
    February 2005
  • From: Proctor. MN
Posted by 65ss on Sunday, July 27, 2014 1:41 PM

Nicely done tony, It looks great.

I've been working on getting the Vette finished. Here a some progress pictures:

It's hard to see in this picture but the head lights are behind the grill.

I can tell by this picture I need to touch up the tail lights.

I have also been gluing the louvers on. I've been using future to attach them to the body, I figured that would be easier to clean if I made a mess.

As you can see from this picture I still need some help detail painting interiors. If anyone has some ideas or know of some good tutorials please let me know. Thanks.

Dale

  • Member since
    April 2005
  • From: Australia
Posted by taxtp on Sunday, July 27, 2014 6:42 PM

Hi Dale,

Looks pretty good to me actually. I'll let one of the experts offer their advise. What brand/color paint did you use ? Good idea on the Future. As far as using it as an adhesive, I've only used it for etched metal logos and badges so far, and even decals. Worked Ok for both.

Thanks to everyone for their comments on the Tyrrell. Towards the end of that project, as I waited for things to dry, I started the Ferrari F93A conversion. It turns out to be a little bigger than I thought, but it's been fun so far. I'll post progress photos in the next post.

Cheers

Tony

I'm just taking it one GB at a time.

  • Member since
    April 2005
  • From: Australia
Posted by taxtp on Sunday, July 27, 2014 6:45 PM

Here's my F93A update.

I started with a base kit of the Modeller's Ferrari F92A. The kit was re-released by Fujimi many years after Modellers went out of business, but this is one of the originals. Having recently built the Fujimi one, I'd say that this ones seems much cleaner.

Here is the first thing I am working on. The intakes at the front of the side pod.
This is a photo of an F92A that I built earlier this year.
Image
and this is how it needs to look like on an F93A
Image

I'm just taking it one GB at a time.

  • Member since
    April 2005
  • From: Australia
Posted by taxtp on Sunday, July 27, 2014 6:46 PM

So I started cutting plastic.
It started like this:
Image
Image
Image

Then I thought I could use the intake from a Lotus 107 to give me the right shape around the intake itself. I butchered the only one in my stash, but the decals had crumbled anyway.
Image

After cutting back the side pods, and modifying the Lotus 107 bits, I was able to tape it together to see how it looked. It's very rough, but
Image

You can see how much I'm going to have to extend the sides of the sidepod down to the chassis.

I'm just taking it one GB at a time.

  • Member since
    April 2005
  • From: Australia
Posted by taxtp on Sunday, July 27, 2014 6:49 PM

Now making good the big holes in the side of the cockpit. It needs to look ok inside and out, although the seat will obscure a lot of it on the inside.
Image
Image
Image

I'm just taking it one GB at a time.

  • Member since
    March 2011
Posted by ewheeler454 on Sunday, July 27, 2014 8:08 PM

Hey all,

Builds are looking great.

Dale,

That interior looks better that what I can do hehehehe.

Ill, be in and out over the next week or two as I am building a 1/48 UH-1N as a birthday present for my brother and need to have it done by Sept.. I found a pic of the actual bird he flew on in the 70's/ early 80's and plan to paint it to match.

L8TR,

Eric

  • Member since
    April 2005
  • From: Australia
Posted by taxtp on Monday, July 28, 2014 12:07 AM

Good luck with the Huey Eric. It's an iconic subject, for sure. These last few months, I've managed to get myself unhooked from all of the armor and aircraft modelling that I was doing, so that I could concentrate on F1 cars. I'm sure it's a temporary state, and at some time I'll feel the urge to build one of  them again.

Cheers

Tony

I'm just taking it one GB at a time.

  • Member since
    January 2012
  • From: Hatfield
Posted by Misty on Monday, July 28, 2014 3:18 AM

taxtp - is that just pure filler? if so what type is it? or did you skin the inside with plasticard to give it a base to build on?

  • Member since
    July 2014
Posted by ENS. "Bones" on Monday, July 28, 2014 7:54 AM
Can I get in on this? I just started a 72' Chevy Nova by AMT.
  • Member since
    April 2005
  • From: Australia
Posted by taxtp on Monday, July 28, 2014 3:14 PM

Sure Bones, I've added you to our Build Roster on page one. Enjoy the build and post as often as you like.

Misty - I cut plastic card to fit the shape, then filled anys gap between the card and the kit plastic with CA to strengthen it. The putty you can see is Tamiya putty, and then I finished with Mr Surfacer 1000. I've recently sprayed the interior semi gloss black, and it's nice and smooth.

Cheers

Tony

I'm just taking it one GB at a time.

  • Member since
    February 2005
  • From: Proctor. MN
Posted by 65ss on Monday, July 28, 2014 8:58 PM

Thanks for the kind words, but if I was to take a close-up of the dash you would see what I mean.Embarrassed

Tony - That is looking like quite an undertaking. But it looks good so far!

The color on the Vette is Testors Fiery Orange Lacquer in the spray can. It looked pretty close to the color of the 1:1 car to me.

Dale

  • Member since
    April 2005
  • From: Australia
Posted by taxtp on Thursday, July 31, 2014 8:05 PM

I've decided to use the sidepods from the Tyrrell 020 after all, so the cowl on the F93A is going to cost me three kits !!! However, they're such a good match for shape that I can't go past it. I'll have t odo some works for a complex NACA inlet, and also the side vents, which I think were used in 4 different forms during the season. The one used at Monaco is basically the same shape as the F92A vents, but in a different place, so I'll hack those into the Tyrrell 020 sidepods.

I'm also contemplating whether to partly fill the air box with resin, as it needs some pretty heavy re-shaping I'm worried that the kit plastic will be too thin afterwards.

Hopefully I can get a lot of the conversion work done this weekend, and be left with a straight build up after that. I think the project after will be a Fujimi Lotus 97T, which will complete my trio of Senna Lotuses, built over 24 years.

Cheers

Tony

I'm just taking it one GB at a time.

  • Member since
    April 2005
  • From: Australia
Posted by taxtp on Wednesday, August 6, 2014 12:50 AM

Hi again everyone,

Gee, it gets to page two quickly these days. We seem to be in a bit of a quieter phase at the moment, so maybe I should try to post updates more frequently.

Here is what I have done to my Ferrari F93A conversion..

Joined the cockpit halves, and then built a structure inside so that I can cut the front suspension halves in two, and glue them in after the model is painted. Looks a bit messy. but it's all square and snug fitting except for the offcuts I glued in for extra strength.

Sprayed the inside cockpit walls S-G Black. It came out pretty smooth following all of the filling and sanding.


Added the nose, filled and sanded all the joints.


Then decided to re-profile the nose a bit, coarse file (for me anyway) then smoothed out the surface again. You can see the beginnings of the new suspension bumps, but I forgot to photograph the completed look. Doing it the hard way...


I will need to add the fuel tank a bit later on, but I think I need to get the cowl changes done and it all sitting in place before I can locate it correctly, so that's it for the front part for now. I think I can use the F92A front wing without too much to change.

I moved on to the seat, this is the kit item.


I had to make several modifications to it, cut out the front, level off the molded bump in the middle of the seat, make holes in the sides, fill belt holes in the seat itself.

In progress shot:


Job done, I'll get to the harnesses and painting after all of the modifications are completed.


Now for the cowl, this is a big job for me.
I've done some of the work, but not photographed it yet. I'll try to do it shortly.

I hope you like it.

Cheers

Tony

I'm just taking it one GB at a time.

  • Member since
    January 2012
  • From: Hatfield
Posted by Misty on Wednesday, August 6, 2014 6:42 AM

looks like you have a real project on the go there. i was considering doin another motor, i have plenty stashed, but the flanker won out, mainly due to needing the space and its a big box

  • Member since
    April 2005
  • From: Australia
Posted by taxtp on Thursday, August 7, 2014 4:30 PM

Come back to the fold Misty, we need you !!!

Time for the next update. First up, there were two significant differences that I noticed on the few race day photos that I have. I've had to base my information on photo captions, so I'm a little shaky on it, but hopefully it's good.
The first is the uprights that support the front wing. It seems that the car had F92A supports until the Monaco GP, but after this they were replaced with a new style.
This photo shows the later style.

The second is the side vent/intake on the sidepods. I've seen 3 different shapes for the opening, as well as more recent photos where the intake is closed off. I've tried to match the style of intake and front wing supports to the Monaco race photo that I have.

Now to start work on the cowl.
I started by sawing off the sidepods from a Tyrrell 020, then grafting in the intakes from the F92A into the correct position. I then made subsequent modifcations to the shape of it until it looked like the Monaco intake to me. If I can find a better photo of it, I might have to do some more work.


The next step was to make the inlet that is seen at the top of the sidepod. I made it in a piece of plastic card, which worked well because I stuffed up the first one that I made. I'm learning with each step.


I wanted to reshape the airbox before seperating the sidepods, as I figured that the less force I have to put on it after the new sidepods are attached, the better. The F93A airbox is more narrow, slightly lower as it meets the roll bar, and has more of  'spine' towards the rear. There are two bumps at the rear that I haven't done yet, logically they have to be done after the new sidepods are attached and the new intake is put in, and, after I figure out how to make them :)

Lots of heavy filing and sanding here, I haven't restored the smooth surface yet, just given it a rub with 400 grade wet and dry.
Before
After
Before
After
Before
After

I'm just taking it one GB at a time.

  • Member since
    January 2014
Posted by Seabe on Thursday, August 7, 2014 10:35 PM

What an operation! Keep at it, Tony... you're doing it well! Haha, looking at that - call that opening an outlet and you'll have the forerunner of blown diffusers! Looking good...

I will continue building, hopefully soon! Just had a bad two weeks with schools thing for my daughter and this week a very ill dog, so... hopefully things will quiet down over the weekend! Life happens...

  • Member since
    February 2005
  • From: Proctor. MN
Posted by 65ss on Monday, August 11, 2014 8:42 PM

Tony-That sure looks like a lot of work, but it sure is looking good!

Some progress pictures of the Vette

Had some paint bleed along the masking tape when I painted the side marker lights, I cleaned them with a little laquer thinner.

I lost one of the side louvers putting the body onto the chassis I must have a hungry carpet monster, or maybe Pug, because I could not find it. I think that might be the largest piece I have ever lost! Since I took these pictures I have finished the model, minus one side louver. I'll try and take some pictures this week.

Dale

  • Member since
    April 2005
  • From: Australia
Posted by taxtp on Tuesday, August 12, 2014 2:19 AM

I hope the louvre shows up for you 65ss. Maybe look somewhere unexpected. I once found the windscreen surround from a Monogram ZZTop Eliminator 5 years later, after 3 house moves, buried in the front garden near the garage. Don't ask me, I don't know. I guess it fell out of something as we moved in.

Otherwise, your 'Vette looks grreat, I love that color, and it's come up really well.

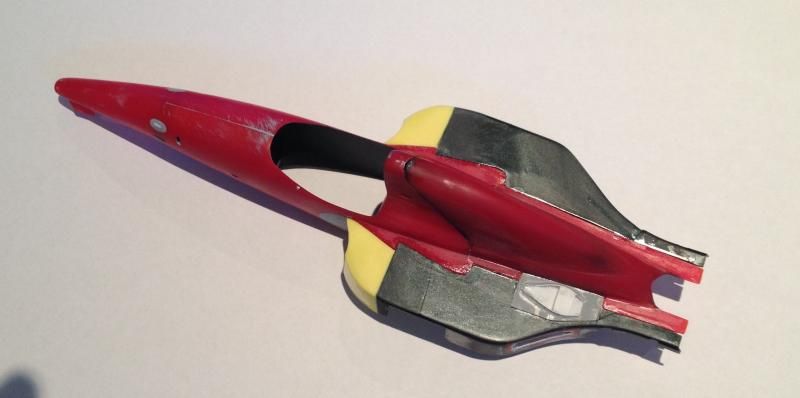
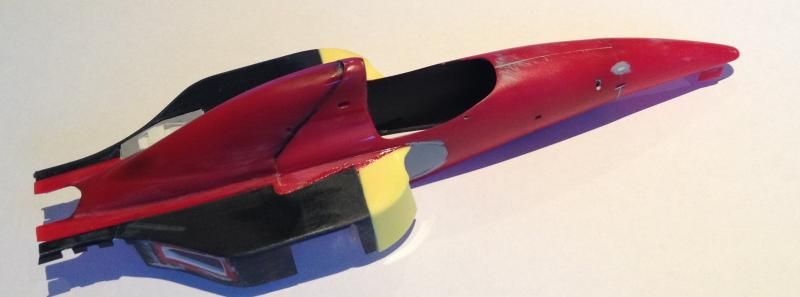
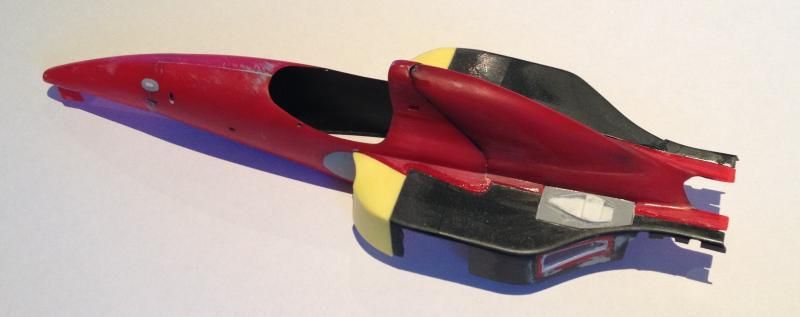
Here is another update to the Ferrari F93A, quite a lot of work since the last one.

I've finally got the side pods on. You can see the parts I cut from the Lotus 107 side pods (yellow), Tyrrell 020 (dark metallic grey) and Ferrari F92A (red). The light grey and white intake is scratchbuilt from plastic card.
Getting these on is a significant milestone, although there is a heap of cleaning up work and extension of the sidepods down to the chassis still to be done.
Next job is to make a fuel tank. It influences the curvature inside the front intakes but otherwise won't be seen in a kerbside. However, it will add a lot of strength to this structure so I'm going to make it before I do any sanding, and probably fill it with resin or epoxy putty for extra strength.
Hope you're enjoying this, I am having a ball....

Cheers
Tony
Image
Image
Image

I'm just taking it one GB at a time.

  • Member since
    April 2006
  • From: Denver, Colorado
Posted by waynec on Tuesday, August 12, 2014 4:16 PM

pulled out the revell germany UNIMOG in 1/24. older kit with harder plastic and lots of sink wells. guess i best get used to it as i have 4 fire trucks in the stash. 

frame is ace flat black which is a tad rough for smaller scales and aircraft but great for chassis. i painted up the engine for fun but none of it will be seen.exhaust is aluminum and not rusted. i will use real deal weathering dark rust followed by light rust in a LP mist to get the color i like and assemble the non black components before hitting the whole chassis with smokey oil and some dirt.

not sure when i will get to the top.

Никто не Забыт    (No one is Forgotten)
Ничто не Забыто  (Nothing is Forgotten)


  • Member since
    February 2005
  • From: Proctor. MN
Posted by 65ss on Tuesday, August 12, 2014 5:56 PM

Tony I'm glad your having fun because that is one heck of a project you got going there.

WYANEC That is a nice looking frame. looks well detailed. the engine also is looking good.

Dale

  • Member since
    March 2011
Posted by ewheeler454 on Tuesday, August 12, 2014 9:05 PM

Well I took a little hiatus from the huey and went to Florida for a week. :)

Tony, that's some awesome looking work there. You have more patience than me hehehe.

Dale, really like the color of the Vette. I know it's frustrating losing a part.

Waynec, to bad you can't display that engine, I think it's nifty. :)

I took a little break from the huey project and worked on the Dodge a little.

I finished up the engine and fabricated the alt. brackets. Then mounted the engine in the frame, installed the wheels and made sure the exhaust is lining up. Adding pins to the manifolds really help with this.

Finished the front grille and back-end and installed the headlight lens.

Here's a shot of the body. I'm going to start doing the chrome tonight and try to finish this one.

L8TR,

Eric.

  • Member since
    April 2006
  • From: Denver, Colorado
Posted by waynec on Tuesday, August 12, 2014 10:02 PM

it is too bad. at 1/24 it's a nice looking engine. the build doesn't lend itself to opening the hood without a lot of surgery. i built the 1/35 version of this as a UN truck and it took a first in commercial trucks at chili con 3 regionals last month. this builds the same just all the parts are bigger.

i am building a 1/35 URAL-4320 6X6 in the unarmed GB and planning on having the hood open and adding details to the engine and compartment.

Никто не Забыт    (No one is Forgotten)
Ничто не Забыто  (Nothing is Forgotten)


  • Member since
    April 2005
  • From: Australia
Posted by taxtp on Wednesday, August 13, 2014 9:42 PM

Eric, your hiatus is like my hernia...hahaha

I like your Dodge, next set of photos, I'd like to see the graphics at the rear end please. Let's get it done, it will be great addition to your collection.

Nice work Wayne, congrats on the awards. Can we see a photo of the award winning model please ?

Cheers

Tony

I'm just taking it one GB at a time.

  • Member since
    April 2006
  • From: Denver, Colorado
Posted by waynec on Wednesday, August 13, 2014 10:03 PM

"Nice work Wayne, congrats on the awards. Can we see a photo of the award winning model please ?

Cheers

Tony"

1st place commercial trucks REVELL GERMANY 1/35 UNIMOG (almost identical to the 1/24 i am doing for this.) weathered entirely with artist oils sitting on generic base.


2nd place softskins ITALERI 1/35 BEDFORD PORTEE W/ PEERLESS MAX 6LB AT GUN weathered entirely with artist oils sitting on dedicated base.

Никто не Забыт    (No one is Forgotten)
Ничто не Забыто  (Nothing is Forgotten)


  • Member since
    January 2014
Posted by Seabe on Wednesday, August 13, 2014 10:20 PM

Congrats Wayne, I can see the award is well justified! Those are both stunners.

  • Member since
    March 2011
Posted by ewheeler454 on Wednesday, August 13, 2014 11:15 PM

Hehehehe Tony.

Here's a shot of the graphic. It looks easy but is really a pain. It is in two parts. The problem is they overlap across the center of the trunk and is very noticeable. What I did was leave one end a little loose and then trimmed them in the side crease of the center ridge. I also have most of the chrome done. I plan to finish this one by the end of the week, then it's back to the huey as I am running out of time on it :)

  • Member since
    February 2005
  • From: Proctor. MN
Posted by 65ss on Thursday, August 14, 2014 7:06 PM

Eric-The Dodge is really coming along nicely!

Wayne congrats on the awards, those builds sure look good!

Dale

  • Member since
    March 2011
Posted by ewheeler454 on Thursday, August 14, 2014 8:54 PM

Hey all,

Has anyone used the CREATIX Wicked paints? How do they spray? I picked up the red today for the Monkeemobile and was wondering if there are any peculiarities using it.

Thanks.

JOIN OUR COMMUNITY!

Our community is FREE to join. To participate you must either login or register for an account.

SEARCH FORUMS
FREE NEWSLETTER
By signing up you may also receive reader surveys and occasional special offers. We do not sell, rent or trade our email lists. View our Privacy Policy.