SEARCH FINESCALE.COM

Enter keywords or a search phrase below:

The 2014 Automotive Group Build

62999 views
717 replies
1 rating 2 rating 3 rating 4 rating 5 rating
  • Member since
    January 2012
  • From: Hatfield
Posted by Misty on Wednesday, June 25, 2014 2:04 PM

first clearcoat on, inside painted flat black,,,luverly.

  • Member since
    February 2007
  • From: Bronze Squadron - Battlestar Cerberus
Posted by Lodni Kranazon on Wednesday, June 25, 2014 6:59 PM

 Wow guys! Very nice work all! I got the major parts fitted together and almost ready to paint. I couln't resist putting the figure in the photo! LOL Cool

[Admiring Starbuck's space fighter] Cassiopeia: It's a perfect machine! Born to dance amongst the stars! Starbuck: Yeah, it's bumping into them that has me worried.

  • Member since
    January 2014
Posted by Seabe on Wednesday, June 25, 2014 10:26 PM

That's a niiiice paintjob, Misty! It looks super smooth, well done! Looks like you're starting with some very neat panel lines as well, or is that just the lighting on the shot?

  • Member since
    December 2013
Posted by CodyJ on Thursday, June 26, 2014 1:03 AM

Killer finish on the Ferrari Misty!!!

Nice Progress Wiccan!

Well today I was asked to build a replica of the semi from the movie "Duel".  I built one along time ago and the fellow offered to buy it but I'd rather keep that one.  Plus I know I can do better than that old one.  I will be posting that soon.  I am using the California Hauler by AMT as a starting point.  The Tanker trailer will be a tanker from Italeri.  The entire skirting around the trailer will have to be scratch built.  The grill of the truck will have to be modified.  I will also have to find new wheels and tires for the trailer (the ones that come with it are single European ones not the duels from american rigs.

The first pic is my old build.  Second is the real truck.

  • Member since
    January 2012
  • From: Hatfield
Posted by Misty on Thursday, June 26, 2014 2:21 AM

thats a titchy little bugger Wiccan :-)

thats an impressive looking truck, cody, cant wait to see the new one.

  • Member since
    January 2012
  • From: Hatfield
Posted by Misty on Thursday, June 26, 2014 6:07 AM

the seats are made out of rubber and looked awful, even after a primer coat. the originals were covered in some type of cloth so i thought id have a go at making them look a bit better.

tissue paper soaked in diluted white pva glue.

a comparison. i have no idea what they will look like after painting though. 

rear....

...and front shocks are on.....

as is some of the internal bodywork.

couldnt resist seeing what it looks like on its wheels.

  • Member since
    April 2005
  • From: Australia
Posted by taxtp on Saturday, June 28, 2014 1:46 AM

Those 1/43 Indy Cars look great Cody. Very inspiring. I loved 'Duel', I'll look forward to the build. Should I add it to the roster ? Your first one looks great, I'll hope to see this one  too.

Nice progress again, Eric, I like your work and what I can learn from it.

Seabe - I've added a completed photo of your very nice Lotus 25 to the gallery on page one, and added the Jordan and Brabham to the build roster. I've had the brabham on my mind recently too.

Misty - lovely work on the Ferrari, I think I mentioned that I've got the Gunze version. The paint job is schmicko !

Wiccan - thats a nice looking little build. Love to see it completed now.

Apologies for the delay, and if I missed anything, I've was swamped with work (Australian Financial year end) until yesterday. Yesterday I managed to complete my Ferrari F92A. See next post !

Cheers

Tony

I'm just taking it one GB at a time.

  • Member since
    April 2005
  • From: Australia
Posted by taxtp on Saturday, June 28, 2014 2:03 AM

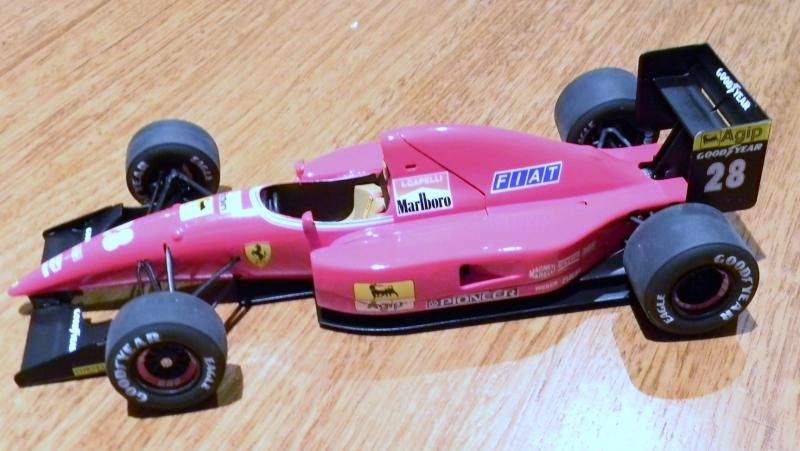
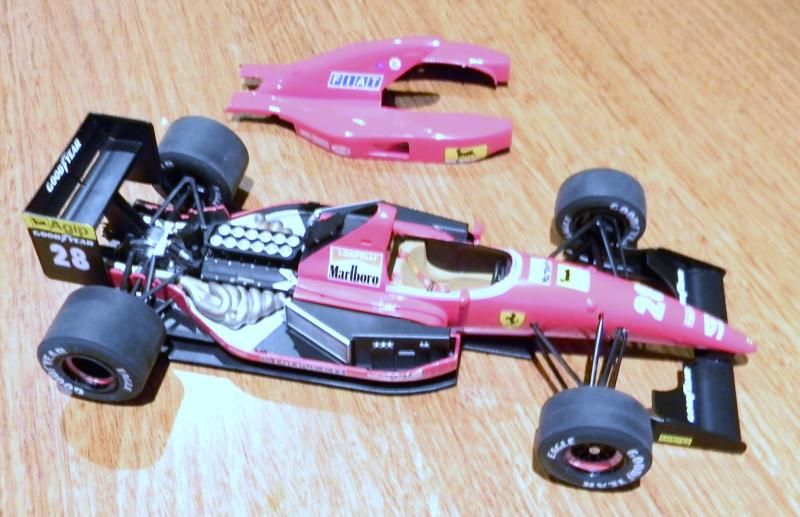
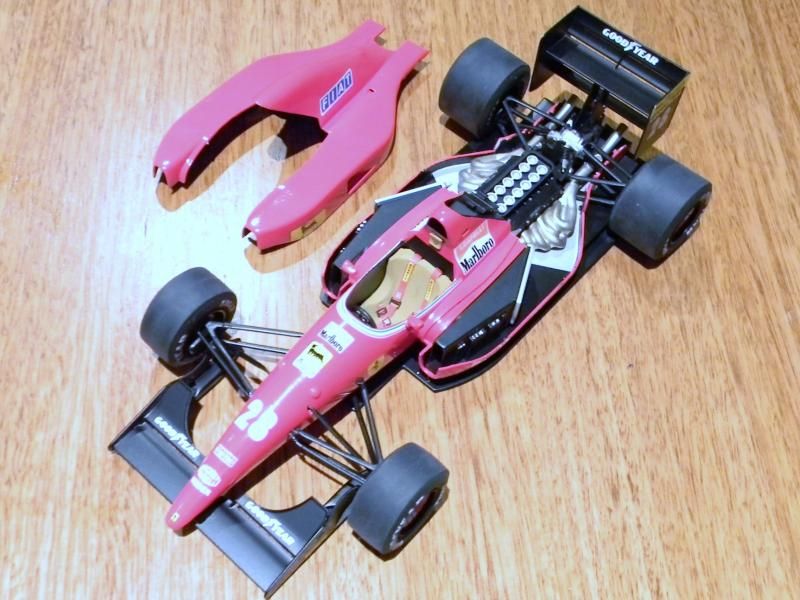
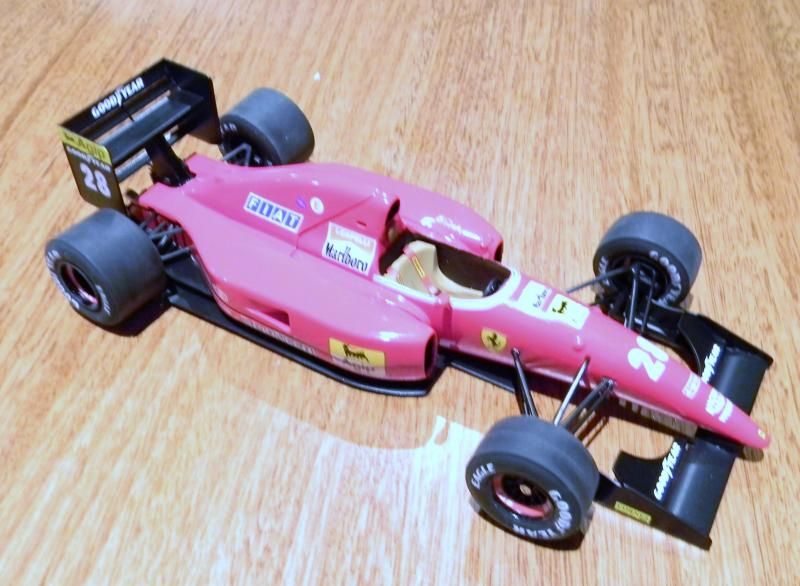
Here is my Ferrari F92A. It;s got quite a few flaws, not really proud of it, but I'm glad to put it on the 'Ferrari' shelf and move on. It's my 7th 1/20 F1 Ferrari and the most modern F1 car I have built (1992). In real life, it was a backmarker, and Ivan Capelli had a terrible time driving it, Jean Alesi did a little better. It is interesting as Ferrari tried a 'false floor' in the car, so I like it in my collection. You can see it in the photos.

As far as the kit goes, the detail is a little soft, the exhausts not much good, the fit less than average and the amount of cleanup extensive.

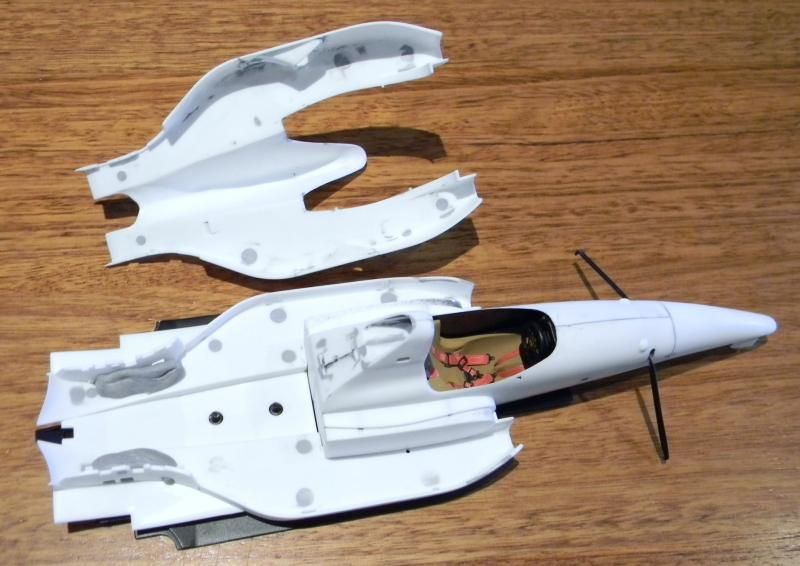
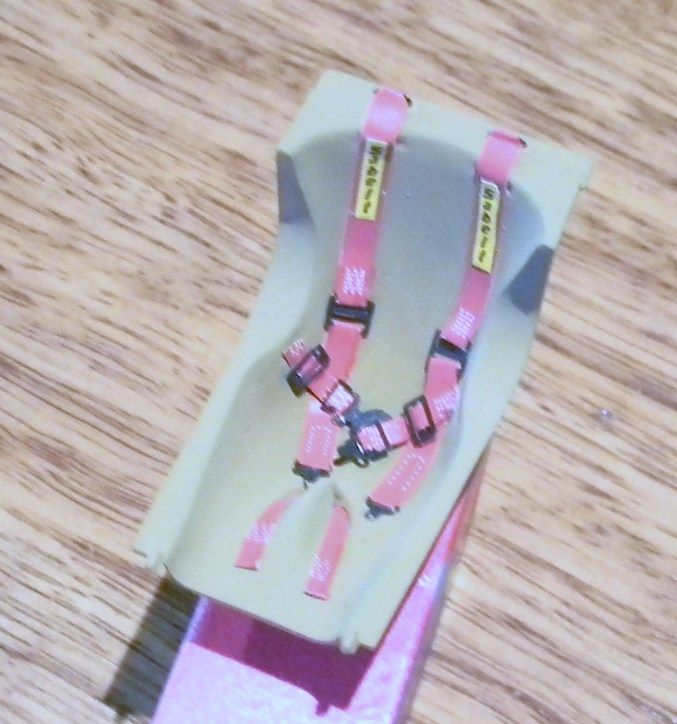
I cut the front suspension in half, and put in mounting points so I could add it after the thing was painted. nonetheless, I eventually broke it four or five times, and it's just too fragile. It's a serious limitiation on this model. I liked the trick of cutting the suspension, it's the big learning from this model for me. The harness is a Tamiya ftermarket one, it comes up OK after a coat of flat varnish. I lost the dashboard, so the one in it is from the spares box, don't look too closely. At least it's a Ferrari one from the same era :)

I've included one photo of the build, to show some of the clean up required. It doesn't show all the sanding that didn't need filler though.

At least it's done, in the collection, and after the therepeutic paragraphs above, I don't mind it at all :)

Have a good day everyone, and get some modeling done. I'm into my Tyrrell 020 now which is a whole new story.

Cheers

Tony

I'm just taking it one GB at a time.

  • Member since
    January 2012
  • From: Hatfield
Posted by Misty on Saturday, June 28, 2014 2:57 AM

Mmmmm ferrari! I love ferraris and f1 cars, put them both together and..... Heaven! I have done one, have two more stashed,  plus two other f1 cars. I may even live long enough to build them =-O

Dont you just love ejector pin mark cleaning up, one of the joys of the job B-)

  • Member since
    January 2012
  • From: Hatfield
Posted by Misty on Saturday, June 28, 2014 8:09 AM

inside is done, its not a particlarly flashy cockpit but the seats look nae bad, and i do like the wheel and dials.

put some BMF arounf the windows too.

  • Member since
    January 2014
Posted by Seabe on Saturday, June 28, 2014 11:50 PM

Misty, that's really coming together awesomely well!

Tony, good to see you starting to feel better about that F92A! See they really made it hard work for you (what were they thinking with those moldings and lines you had to get rid of afterwards?!) but you did well! That Tyrrell is a really nice kit, you'll enjoy it...

My Jordan is about ready to receive a blast of yellow. And on the Brabham I am still puttering along with the engine, gearbox, etc. I only realised yesterday I tend to also glue and prep the body at this time to at least get something else done as well... and then I don't have to wait for painting this riiight at the end. No rush then and can wait for paint to cure properly, etc. Where was my head?! Hope to start with that also today.

  • Member since
    December 2013
Posted by CodyJ on Sunday, June 29, 2014 4:34 PM

Nice work Tony & Misty!!!

Tony-  Yeah that would be great if you would like to add it to the build list!  I am having sooo much trouble finding the correct wheels for the trailer.  If anyone has a set of wheels and tires for a semi trailer  or knows where I can get some I'd really appreciate any info.  

  • Member since
    April 2005
  • From: Australia
Posted by taxtp on Sunday, June 29, 2014 9:11 PM

Your interior looks fantastic Misty, realistic and clean. You are making a good fist of this kit, and I know they're not that easy, having done a few of this range myself.

Cody, I've updated the Build Roster with your truck.

I'll try to post more WIP photos, my last few builds haven't shown that many.

Seabe - I'm glad the Tyrrell 020 is a nice kit, I've got plans for a few....Braun Tyrrell 020, Tyrrell 020 test version, Ferrari F93A, Tyrrell 020B, Tyrrell 020C, perhap Tyrrell 019, 021 and 022.

It's coming along pretty well, just doing the old clean up routine again. Any tips for grinding off molded on seatbelts ?

Cheers

Tony

I'm just taking it one GB at a time.

  • Member since
    February 2005
  • From: Proctor. MN
Posted by 65ss on Monday, June 30, 2014 7:40 PM

Misty that Ferrari is looking great, I really like the job you did on the interior!

Wiccan looks like things are coming along nicely.

Cody nice job on that truck! Can't wait to see the second one.

Tony that F1 car looks great! I would like to try one of those sometime.

Dale

  • Member since
    January 2012
  • From: Hatfield
Posted by Misty on Tuesday, July 1, 2014 1:26 PM

decals are on and second clearcoat is curing nicely, two days to wait  until polishing time.

  • Member since
    March 2011
Posted by ewheeler454 on Tuesday, July 1, 2014 7:41 PM

Hi all,

You guys are doing some fantastic work! Sorry I haven't posted in a while but I've been super busy at work, we were bought out by another company so a lot is going on. I hope to get some work on the Gremlin done this weekend though.

L8TR,

Eric

  • Member since
    December 2013
Posted by CodyJ on Tuesday, July 1, 2014 11:30 PM

Eric!  Good to hear from you.  I'm in the same boat.  Bust busy busy......  Hope all goes well and cools down at work.

Misty- The Finish looks great on it!

  • Member since
    April 2005
  • From: Australia
Posted by taxtp on Wednesday, July 2, 2014 8:46 AM

Yeah, welcome back Eric :) It must be the busy season, it's mad here.

started priming some of the parts for the Tyrrell today. I've also checked the spares folder for decals for my next project, the Ferrari F93A conversion. Happily, I've got all the decals I need t odo it :) I knew building all those ferrars would pay off one day.

Cheers

Tony

I'm just taking it one GB at a time.

  • Member since
    January 2012
  • From: Hatfield
Posted by Misty on Saturday, July 5, 2014 3:09 AM

didnt like the candy-apple finish of the clearcoat, it was beautifully shiny, but looked false and not dead smooth either. the decals were maddeningly thick and the edges were rough too  so,,, 8 hours of polishing with 6 grades of micromesh, 3 creams and carnauba wax and i am much happier

  • Member since
    January 2014
Posted by Seabe on Sunday, July 6, 2014 12:08 AM

I'm turn my back for a week (some holiday time with the family) and you do that with the finish?! Absolutely gorgeous, Misty!

  • Member since
    May 2005
Posted by pyrman64 on Sunday, July 6, 2014 4:39 AM

Misty: that finish is fabulous!

Greg H

"There is many a boy here today who looks on war as all glory, but, boys, it is all hell." Gen. Wm T. Sherman (11 April 1880, Columbus, Ohio)

  • Member since
    April 2005
  • From: Australia
Posted by taxtp on Sunday, July 6, 2014 7:03 PM

Wow Misty, that mirror smooth finish is a credit to you. It's amazing.

I would have rubbed through the paint at least 20 times.

Cheers

Tony

I'm just taking it one GB at a time.

  • Member since
    December 2013
Posted by CodyJ on Monday, July 7, 2014 1:49 AM

I should imagine your happy Misty.....  Its 100% Gorgeous!   Thumbs up man!

  • Member since
    January 2012
  • From: Hatfield
Posted by Misty on Monday, July 7, 2014 2:38 AM

taxtp

I would have rubbed through the paint at least 20 times.

thats the advantage of using zero paints clearcoat. it is hard as nails and builds up quite thick coats. as long as you watch sharp corners etc, you have a lot to play with. i wouldnt use this clearcoat for planes or tanks though as it will fill in all the panel lines and rivets etc, and is just too glossy.

thanks for all the thumbs up fro you guys, it made the long hours worth it. i am now trying to make replacement clear parts out of 0.005" clear acetate and waiting for new lenses to be delivered for the lights.

  • Member since
    January 2014
Posted by Seabe on Monday, July 7, 2014 9:06 AM

Which clear is that, Misty? I may have missed it earlier... sorry. Is it the zero 2-part?

  • Member since
    January 2012
  • From: Hatfield
Posted by Misty on Monday, July 7, 2014 12:33 PM

yup thats the one Seabe.  its great stuff for this sort of thing,

  • Member since
    May 2011
  • From: Bedford, Indiana
Posted by AceHawkDriver on Monday, July 7, 2014 7:49 PM

taxtp, any chance I could join you guys in this one?  Haven't been around for a little over a year.  I have a Revell Dodge Viper GTS Coupe that I need to complete.  Will be the first time in a long time for an auto (about 24 years or so).  

Peace through superior firepower.

Brian


  • Member since
    April 2005
  • From: Australia
Posted by taxtp on Tuesday, July 8, 2014 6:23 AM

Hi Brian,

You're in ! Welcome aboard. Please feel free to post WIP photos along the way.

Cheers

Tony

I'm just taking it one GB at a time.

  • Member since
    February 2005
  • From: Proctor. MN
Posted by 65ss on Tuesday, July 8, 2014 9:50 PM

Misty that finish is beautiful!Cool

I finished the Monti Carlo. The donor kit was a Monogram kit, and the decals were from Slixx.The kit went together nicely, the only part that was any trouble at all was the rear suspension, and that really was not to bad. Well here it is

Dale

  • Member since
    April 2005
  • From: Australia
Posted by taxtp on Tuesday, July 8, 2014 9:56 PM

That's looks great Dale, nice finish and an authentic looking race car. What paint did you use ?

I always love to look at NASCAR models. I'll use the first photo on page one.

Cheers

Tony

I'm just taking it one GB at a time.

JOIN OUR COMMUNITY!

Our community is FREE to join. To participate you must either login or register for an account.

SEARCH FORUMS
FREE NEWSLETTER
By signing up you may also receive reader surveys and occasional special offers. We do not sell, rent or trade our email lists. View our Privacy Policy.