SEARCH FINESCALE.COM

Enter keywords or a search phrase below:

The 2014 Automotive Group Build

62981 views
717 replies
1 rating 2 rating 3 rating 4 rating 5 rating
  • Member since
    March 2011
Posted by ewheeler454 on Tuesday, May 20, 2014 8:30 PM

Wiccan Warrior,

Have you used the purple stuff on enamel? if it works, even if it takes a while I may try it if it will strip enamel.

Tony, That is sharp.

L8TR,

Eric.

  • Member since
    February 2013
  • From: Podunkville, USA
Posted by rommelkiste on Tuesday, May 20, 2014 8:35 PM

Very nice Tony!  I did the Tamiya 1/20 in the Gerhard Berger version a few years ago.  I sure did enjoy F1 during the Mansell Senna wars,  If you have not read Nigel Mansell's book, I suggest that you do.  He tells some great stories about Senna.  They did have a great respect for each other, even though the media played it out differently.  Its great to see these F1 builds here, I just wish we had more detailed kits of the Moss-Fangio era.  What I wouldn't give for a Tamiya quality 1/20 Vanwall.

Nothing ever fits……..and when it does, its the wrong scale.

To make mistakes is human.  To blame it on someone else shows management potential. 


  • Member since
    February 2007
  • From: Bronze Squadron - Battlestar Cerberus
Posted by Lodni Kranazon on Tuesday, May 20, 2014 9:16 PM

Eric, I have used it to remove hobby enamels. I haven't tried it with automotive stuff but I do know it also works to remove Krylon! ;-) Worth a shot.

[Admiring Starbuck's space fighter] Cassiopeia: It's a perfect machine! Born to dance amongst the stars! Starbuck: Yeah, it's bumping into them that has me worried.

  • Member since
    April 2005
  • From: Australia
Posted by taxtp on Tuesday, May 20, 2014 9:24 PM

Thanks guys. Here's a photo of the cockpit of the F92A. You can see how I've added a plastic card insert to block out the 'wing root' (looks like one anyway) so that the cockpit wall is smooth. I've only done it partially as the rest is behind the seat and completely hidden.

Cheers

Tony

I'm just taking it one GB at a time.

  • Member since
    January 2014
Posted by Seabe on Tuesday, May 20, 2014 10:22 PM

Hey Tony, that Macca looks great! You can see it's an evolution of the MP4/4 - but yet quite different. Well done...

Eric, that stinks. I experimented with some auto clear in a recent build, specifically because I've heard the odds of it attacking the paint is so much smaller than with the TS13 I usually use. You have my sympathy, but cannot offer you any word of wisdom to sort out the problem.

About to add the second mirror on the Lotus. Let's hope for some form of symmetry!

  • Member since
    April 2005
  • From: Australia
Posted by taxtp on Tuesday, May 20, 2014 11:35 PM

aah yes TS-13. I can remember the first time I used it. I had sprayed a Jaguar XJR-8 with Humbrol enamels, spent ages decaling the complex scheme, then used TS-13 for the clear.

It totally destroyed the finish. To this day I am very careful with it, although I use it on most of my car models.

Cheers

Tony

I'm just taking it one GB at a time.

  • Member since
    February 2007
  • From: Bronze Squadron - Battlestar Cerberus
Posted by Lodni Kranazon on Wednesday, May 21, 2014 6:56 PM

Well, I realized this morning when I was finishing up giving the cars a bath that I must have misplaced/lost the instructions for my 1/32 Crown Patrol Car! All those years of being an automotive technician have finally paid off! LOL Only one part that I'm not quite sure what it is, but I think it is a type of two-way/CB radio. Got a few pics of the 'net to assist me. I need to put a back on the front bench seat and add an antenna but it should be a fairly trouble-free little build.

A clean-up & start photo:
 

[Admiring Starbuck's space fighter] Cassiopeia: It's a perfect machine! Born to dance amongst the stars! Starbuck: Yeah, it's bumping into them that has me worried.

  • Member since
    December 2013
Posted by CodyJ on Thursday, May 22, 2014 12:16 AM

Tony-  Sweet looking Mclaren! Glad to see one w/ the Marlboro Decals on it.

Wiccan-  Hope the start goes good for you!  Looks like a fun subject!

  • Member since
    April 2005
  • From: Australia
Posted by taxtp on Thursday, May 22, 2014 7:22 PM

Thanks Cody. Wiccan that looks interesting already.

I've made quite a lot of progress doing hack work on the Ferrari F92A, nothing really interesting to show yet. However I broke one of the suspension wishbones. Nasty, thin cross section just snapped as I was sanding and ejection pin mark. The only solution was to drill and pin it, then make the join good again. That being said, it was a very delicate job, and it will never be full strength again, so I'm going to have to be very careful of it when I put the wheels and brakes on.

Cheers

Tony

I'm just taking it one GB at a time.

  • Member since
    February 2005
  • From: Proctor. MN
Posted by 65ss on Thursday, May 22, 2014 7:29 PM

Tony the Mclaren looks good in those old school Marlboro colors!

Dale

  • Member since
    September 2013
Posted by Raven728 on Thursday, May 22, 2014 8:42 PM

Update on the Cobra. Chassis, interior, and engine are done and the body is primed, sanded and ready for paint. This is where I usually screw things up, so wish me luck. Wink

- Steve

  • Member since
    March 2011
Posted by ewheeler454 on Thursday, May 22, 2014 9:15 PM

Raven,

The Cobra is sharp! I like the engine detail.

Wiccan Warrior,

Thanks for the tip on the Purple Power. That stuff is amazing! I also threw the Mustang Funny Car in with the messed up decals and it took them off easily. I thought I was going to have to sand them off. It took the clear coat off in sheets hehehe. This just from it soaking overnight.

While I'm waiting for the 440 to strip, I started back up on the Gremlin. After I welded in the front end flush with the fenders, I noticed the hood had huge gaps on each side. Luckily, it came with 2 hoods so I started fabricating.

Here I put my drill press and used my wooden jigs to apply some slight pressure so when I put the solvent along the edge it would bead up. Hopefully I won't need any or very little filler. After it hardens, I'll mark the center front and back, then mark how much each side needs to be cut down. Then tape some sandpaper down on a piece of glass and start sanding until it fits :)

Also welded some other parts together.

L8TR,

Eric

  • Member since
    December 2013
Posted by CodyJ on Thursday, May 22, 2014 9:45 PM

Very adventurous Eric!  The most customizing I have done was chopping the top and sectioning a hot rod.  Took forever.... with the filling and sanding. Sad   

Looks like your Idea will work great!  Hope it goes nice & smooth for ya!

  • Member since
    February 2013
  • From: Podunkville, USA
Posted by rommelkiste on Thursday, May 22, 2014 9:58 PM

EW, I have faced that same problem before too.  Thats one way of fixing it.  I didn't have an extra hood so I laminated sheet plastic to the sides, trimmed and sanded to fit.  It worked out just fine.  Just another method to put in your box of fixing ammo.  That purple stuff is pretty good huh?  I still use the oven cleaner from time to time and when I really get a stubborn paint job, I cut it in the bead blaster on low air pressure with some super fine medium.  That is when all else fails.  I have even been able to save some fender badge detail that way.  Looks good to me Eric, keep building.  Me…..I gotta go feed the chickens.

Nothing ever fits……..and when it does, its the wrong scale.

To make mistakes is human.  To blame it on someone else shows management potential. 


  • Member since
    February 2007
  • From: Bronze Squadron - Battlestar Cerberus
Posted by Lodni Kranazon on Friday, May 23, 2014 2:34 AM

Tony - sorry to hear about that. Good luck!

Steve - looking good!

Eric - glad it worked out for ya!

I found some decent info on the Web, including a video in a Japanese museum showing just the chassis, drivetrain, wheels & steering components of a '55 Toyota Crown! So I know now where all the pedals go (there wasn't any any the kit) along with where the steering column goes. I just have to make some pedals and their mounting brackets. I also sanded away the mold lines on the seats and put a back on the front bench seat. I then got pretty lucky, since I lost my larger miter box going back and forth to Japan, the car's glass BARELY fit in my small one. I cut away the front and back. Fortunately, the plastic on this kit, including the clear ones, is pretty soft. the glass is a bit cloudy, but a dip in Future and maybe some polishing and should turn out all right! Cool

[Admiring Starbuck's space fighter] Cassiopeia: It's a perfect machine! Born to dance amongst the stars! Starbuck: Yeah, it's bumping into them that has me worried.

  • Member since
    May 2005
Posted by pyrman64 on Saturday, May 24, 2014 9:58 AM

Tony: could you add the 1/25 Lindberg Dodge Caravan to my "to do" list?

Ok, I was at a show earlier this year an picked up the aforementioned kit - I just wanted it for the lightbar and other police stuff (shotgun, radio console, etc.)  Well, I got to thinking I really can't let a kit go to waste so I thought I'd just build the darn thing.  Then I kept seeing Dodge Caravan's around the area where I work - in the form of taxi cabs.  Some of the cab companies have some really original names too - the ones painted green are with GREEN CAB, the ones painted orange are with Orange Cab, and there's even a blue one from....you guessed it....Blue Cab!   

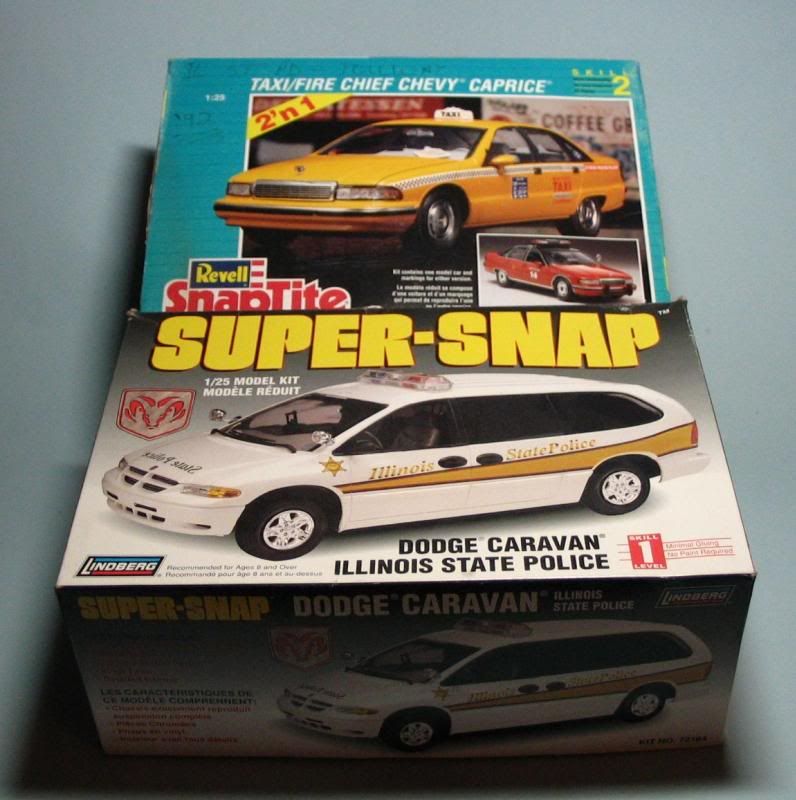
So I got this idea, (no, I didn't hurt myself thinking!) since I have the Revell Caprice Taxi/fire chief kit, of building the Caravan as a taxi cab.  When you guys get done laughing cuz I'm building a SNAP kit, feel free to read on.......Embarrassed

Anyways, I got started on it and now have the seats together, puttied and sanded.  The fron seats have been given a coat of MM/Fabric tan and the body haxs been primed.

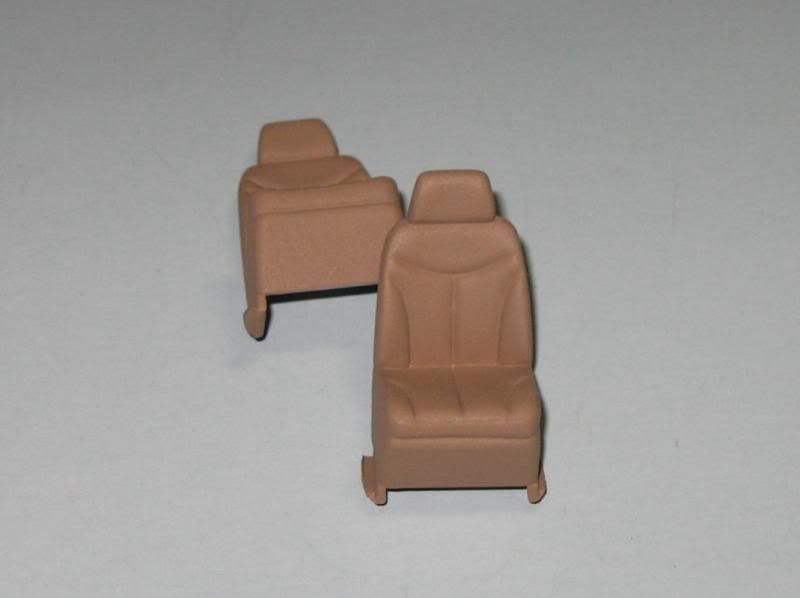
That's it so far.  Now I'm off to bed, as I volunteered to work tonight. Sad

Greg H

"There is many a boy here today who looks on war as all glory, but, boys, it is all hell." Gen. Wm T. Sherman (11 April 1880, Columbus, Ohio)

  • Member since
    September 2013
Posted by Raven728 on Saturday, May 24, 2014 6:45 PM

Eric: thanks, this is by far the nicest engine I've built yet. I liked the photos of the all-aluminum colored Cobra engines I saw online, but in hindsight I wish I had done it differently, as it turned out a bit monochromatic.

Greg: you won't catch me laughing at you for doing a snap kit. When I was just getting back into modeling last year I did a couple of snap kits just for fun, and they really helped boost my confidence, as well as turning out a couple of pretty nice models (Stingray and '10 Camaro). No shame there.

- Steve

  • Member since
    February 2007
  • From: Bronze Squadron - Battlestar Cerberus
Posted by Lodni Kranazon on Saturday, May 24, 2014 10:03 PM

Great job Greg!

[Admiring Starbuck's space fighter] Cassiopeia: It's a perfect machine! Born to dance amongst the stars! Starbuck: Yeah, it's bumping into them that has me worried.

  • Member since
    April 2005
  • From: Australia
Posted by taxtp on Sunday, May 25, 2014 8:58 PM

Hi Greg,

I'll add it now. I won't be sniffing at your snap kit. Nice start BTW.

In fact, I've built a whole of of Revell 1/32 'Easy kits', which are snap kits that are pre-painted. I even stripped some of them and refinished with aftermarket decals. I now a decent collection of racing Ferrari 360s in 1/32 based on this. I have decals for one more, I might even do it this year.

Cheers

Tony

I'm just taking it one GB at a time.

  • Member since
    February 2005
  • From: Proctor. MN
Posted by 65ss on Monday, May 26, 2014 7:50 PM

Steve the Cobra is really looking good!  I would like to do a Cobra one of these days.

Eric I would think the surgery you did on the hood should work great.

Greg that is an interesting subject, It's fun to see something a little different.

I finely had time to work on the Monte the frame and chassis is mostly together, I have a little touch up painting to do there.

The tires and wheels are also ready to go, I took a picture of one but for some reason I deleted it off my camera with some old pics. I also got the body shot with a gloss clear coat. So I think I'm ready for decals and just start putting everything together.

Dale

  • Member since
    April 2005
  • From: Australia
Posted by taxtp on Monday, May 26, 2014 9:09 PM

Looks like it's getting pretty close 65ss. I hope it all fits well during the final construction and goes together smoothly and cleanly for you.

I think it'll look great.

Cheers

Tony

I'm just taking it one GB at a time.

  • Member since
    January 2014
Posted by Seabe on Monday, May 26, 2014 10:47 PM

Looking good, Dale, almost there!

Slow progress on my side, was a bit shattered after a very tough mtb race Saturday. But, esp in the case of the Brawn, critical step! Both nearing completion, but think from here on in the Lotus will be done earlier. Some winglets and front and rear wings to be added on the Brawn. And much more decalling. So without further hesitation...

Body installed on the Lotus 25. Instructions calls for it not to be glued, but mine leaves a small gap if just placed. Might drop a bit in for that gap to be pulled shut on the corner. 
  

Brawn - one of my most feared steps in 43rds - but *phew* the wheels are attached. (The dirt on the sidepod is from handling, sorry... will be cleaned! Likewise some prints on the Lotus...)

  • Member since
    February 2007
  • From: Bronze Squadron - Battlestar Cerberus
Posted by Lodni Kranazon on Tuesday, May 27, 2014 1:17 AM

Wow guys!

[Admiring Starbuck's space fighter] Cassiopeia: It's a perfect machine! Born to dance amongst the stars! Starbuck: Yeah, it's bumping into them that has me worried.

  • Member since
    May 2005
Posted by pyrman64 on Tuesday, May 27, 2014 6:20 PM

Here's a couple of pics with the body primed

that's all for now....I did manage to pick up a can of paint, but I'm not sure it's what I want. 

Greg H

"There is many a boy here today who looks on war as all glory, but, boys, it is all hell." Gen. Wm T. Sherman (11 April 1880, Columbus, Ohio)

  • Member since
    February 2005
  • From: Proctor. MN
Posted by 65ss on Tuesday, May 27, 2014 7:06 PM

Those cars are looking good Seabe!

Looks good so far Greg!

Dale

  • Member since
    September 2013
Posted by Raven728 on Wednesday, May 28, 2014 8:32 PM

The paint actually turned out ok, either I'm improving or it was a fluke. Wink

Did the racing stripe decals tonight, that was a bit nerve-wracking. They turned out well for the most part; I wish they were just a tiny bit more opaque, but it's not worth complaining about.

- Steve

  • Member since
    February 2007
  • From: Bronze Squadron - Battlestar Cerberus
Posted by Lodni Kranazon on Wednesday, May 28, 2014 9:52 PM

Handsome Cobra you have there, Steve!

[Admiring Starbuck's space fighter] Cassiopeia: It's a perfect machine! Born to dance amongst the stars! Starbuck: Yeah, it's bumping into them that has me worried.

  • Member since
    May 2005
Posted by pyrman64 on Thursday, May 29, 2014 6:46 AM

Steve: nice looking Cobra.

Greg H

"There is many a boy here today who looks on war as all glory, but, boys, it is all hell." Gen. Wm T. Sherman (11 April 1880, Columbus, Ohio)

  • Member since
    December 2013
Posted by CodyJ on Thursday, May 29, 2014 7:38 PM

Nice job Steve.  Color combo is a classic!

  • Member since
    January 2014
Posted by Seabe on Thursday, May 29, 2014 10:22 PM

Getting there... the Brawn is nearly done. Wings and winglets on, camera on... now just decals (already started with that nose one) and antennae.

Lotus also nearing completion. Just a bit of a final step with the detail set to insert their injector plates and velocity stacks.

JOIN OUR COMMUNITY!

Our community is FREE to join. To participate you must either login or register for an account.

SEARCH FORUMS
FREE NEWSLETTER
By signing up you may also receive reader surveys and occasional special offers. We do not sell, rent or trade our email lists. View our Privacy Policy.