SEARCH FINESCALE.COM

Enter keywords or a search phrase below:

The 2014 Automotive Group Build

62981 views
717 replies
1 rating 2 rating 3 rating 4 rating 5 rating
  • Member since
    October 2009
  • From: Oil City, PA
Posted by greentracker98 on Monday, April 28, 2014 11:40 AM

ewheeler454

Greentracker,

I have a spray bottle that I use to wet down my paint booth before I start spraying. This keeps the airbrush (or rattle can) from kicking up dust. I also have a large plastic container (if you look at some of my posts you can see the cars covered). I leave them under the cover for about an hour to let them dry. After that I remove the cover to let the paint finish drying. Hope this helps.

L8TR,

Eric

Yes, I think this will help. Thank you

 i hadn't thought of the water. I should have. My Dad painted cars for a living. And I remember him hosing the floor of the garage before he would spray a car

Thanks,

Ken

A.K.A. Ken                Making Modeling Great Again

  • Member since
    April 2005
  • From: Australia
Posted by taxtp on Monday, April 28, 2014 7:17 PM

I wipe my area down with a wet sponge, but it's the same principle. I also don't spray if it's windy at all, as I'm in the garage.

Regards

Tony

I'm just taking it one GB at a time.

  • Member since
    February 2005
  • From: Proctor. MN
Posted by 65ss on Monday, April 28, 2014 8:05 PM

Tony the Ferrari looks great! Nice job on the paint. After reading the posts I'm going to have to clean up my painting area. Than it will just be a matter of the Pug hair I drag in on my clothes.Hmm

Seabe the progress is looking good. That steering wheel is crazy!Yes

Well it was another beautiful week end in Northern Minnesota, windy, rainy, and temps in the upper 30's F. So I got some work done on the Monte Carlo. I got the body painted- Gloss Gull Gray inside, Shneider Racing Orange, I got from Model Car World, and black on the outside.

I also got the roll cage/ chassis painted gloss gull grey.

As you can see from the pictures I also started painting the roll bar padding. I also painted the wheels when I painted the black boot(?) around the bottem of the body. I also painted the hood, that my need to be repainted because of said Pug hair. The fire wall had a coil molded on that I shaved off to make room for a coil I got from Pro Tech Models. I also got an ignition box from the same soarce.

Dale

  • Member since
    April 2005
  • From: Australia
Posted by taxtp on Tuesday, April 29, 2014 7:28 PM

Nice work on the Monte Carlo, it looks good in orange. It should be an eye catcher when done.

Here's a progress report on my Mclaren MP4/5.

Cheers

Tony

I'm just taking it one GB at a time.

  • Member since
    March 2011
Posted by ewheeler454 on Tuesday, April 29, 2014 7:31 PM

Tony and Dale,

Those are looking sharp. Ya almost got me convinced to try one of them hehehehe.

Tony,

Here's the completion photo for the 40 Ford.

Thanks,

Eric

  • Member since
    January 2012
  • From: Hatfield
Posted by Misty on Wednesday, April 30, 2014 4:32 AM

looks very sharp , Eric!!

  • Member since
    February 2005
  • From: Proctor. MN
Posted by 65ss on Wednesday, April 30, 2014 7:17 PM

Eric I really like the sedan delivery,  you did a nice job on it, those 40 Fords look good in any configuration.

Dale

  • Member since
    March 2011
Posted by ewheeler454 on Wednesday, April 30, 2014 7:37 PM

Thanks MIsty.

Thanks Dale. I have someone wanting me to build them a 59 Impala after seeing the 40 Ford. I think I'll take him up on his offer just for the challenge hehehe.

Well I finally broke the Chevelle curse (for those who may remember, I started it in last years GB). It's not perfect but looks ok. I messed up and used a cheap rattle can clear and the stuff will not get hard. Oh well. :) P.S. I know the 396 emblem on the breather is in the wrong place, decals were from a different kit and would only fit there :)

Tony,

Here's the Completion photo for the Chevelle and a shot of the completed engine.

L8TR,

Eric

  • Member since
    April 2005
  • From: Australia
Posted by taxtp on Thursday, May 1, 2014 12:02 AM

Eric, man, you are on a big week ! Great work on both builds, you always manage to choose a great color, and both are finished immaculately. The engine on the Cuda looks great, jammed in between those huge wheel arches. I guess the Boss 429 will be next to be finished ?

I've updated both on to page one. Well done  !

Cheers

Tony

I'm just taking it one GB at a time.

  • Member since
    December 2013
Posted by CodyJ on Thursday, May 1, 2014 12:24 AM

Dale- Good looking color choice!

Eric- Nice looking panel there as well as a really good choice of colors for that Chevell!  

Tony-  Nice start.  What brand is that Mclaren?  I think I read it earlier in the posts but cant remember.  

 I'd like to enter a new car here soon.  Not sure which one but absolutely will.  I have been working on 2 planes.  Both for group builds.  I remember why I never did many planes.....  sooo much clean up.  I have been a major WWII vehicle enthusiast whether it be planes or tank, but usually built model cars and didn't venture into military models.  Its been fun doing both but I am definitely more comfortable with Autos and it will be nice when the birds are finished.  

  • Member since
    April 2005
  • From: Australia
Posted by taxtp on Thursday, May 1, 2014 2:11 AM

Hi Cody, it's a Fujimi kit, it was nice of them to fill in many of the gaps that Tamiya left. I've built a few of these Fujimi's now, this is one of the better ones, quite smooth so far...which probably means I'll drop the model or someone will sit on it.

I don't have a dog at the moment, but I'm not ruling out the possibility that one will come along and chew it up.

Cheers

Tony

I'm just taking it one GB at a time.

  • Member since
    January 2014
Posted by Seabe on Thursday, May 1, 2014 12:17 PM

It's so apt to see that McLaren colourscheme today. I can't believe it's been 20 years.

Eric, those are some great results, you can be very happy.

Some very boring progress my side. Only progress on the Lotus was fixing the exhausts, never as easy as the manual make it look! I did some GM under the matt black, in the hope that it will liven it up a bit, but it did not... my imagination and my skill levels aren't compatible! Will add some weathering to them to hopefully get away from the dull black. It does look in line with reference pics... but just... so dull!

Basecoated a LOT of parts on the Brawn today. Mostly to become SGB, very few white. Patience...

  • Member since
    January 2014
Posted by Seabe on Thursday, May 1, 2014 12:22 PM

Oh... PS: Tony, I've got a Ridgeback and a Lab you could borrow! But I don't want to see any damage to that model...

  • Member since
    April 2005
  • From: Australia
Posted by taxtp on Thursday, May 1, 2014 7:29 PM

Seabe, either of those beasts could make short work of it, I doubt the lab would even have to chew it. Keep going with the hack work, I've had a few days of that myself, but it's coming together pretty quickly now.

I did the gloss white coat on the body yesterday, using a Tamiya rattle can - Pure White. All of the inside work is close to completion, will be done for sure over the weekend. Hopefully I can mask and spray the fluoro pink on the weekend too.

I've already started a Ferrari F92A from Fujimi too, I find the design of it quite intriguing with the false floor. However I'm not sure that it will be my next model, or whether I'm just doing the clean up prior to assembly now, I'll decide that when I run out of things to do on this Mclaren. The Ferrari is the old Modellers kit, re-released by Fujimi. It's not of the same quality as original Fujimi F1 kits, but at least it's acceptable.

Cheers

Tony

I'm just taking it one GB at a time.

  • Member since
    April 2005
  • From: Australia
Posted by taxtp on Thursday, May 1, 2014 8:36 PM

68GT - I've added your 7-Eleven Mustang Funny Car to the build roster. Welcome aboard !

Cheers

Tony

I'm just taking it one GB at a time.

  • Member since
    March 2011
Posted by ewheeler454 on Thursday, May 1, 2014 9:44 PM

Hi all,

Tony, on the completion page, you have the 69 Chevelle listed as the Cuda hehehe.

Also I need to add a REVELL 59 Impala to my build list.

I bumped the 66 Impala down to do the 59 first. While I'm waiting for the goodies to arrive (photo etch, M.A.D wires etc..) I started prepping the Gremlin. I'm thinkin' Metallic Lime Green on this one hehehehe.

I'm gonna put fat tires on it to make it go faster hehehehe.

And I have the chrome soaking.

L8TR,

Eric

  • Member since
    January 2014
Posted by Seabe on Thursday, May 1, 2014 11:28 PM

Eric, what do you use for your chrome soaking? I've just left mine as is on the Lotus, but looking for a good remover.

Tony, 92A was a good-looking car - and hat's about where the good things ended! Well, I think it at least got some podiums. Which makes it on par with this year's car! I still want to get the 412T1 - that thing was also non-stop curves, a stunner! (Early-season, before they started putting barge boards on, etc.)

Yeah, it's not pretty and it's not fun, but the grunt work needs to be done...

  • Member since
    December 2013
Posted by CodyJ on Friday, May 2, 2014 12:41 AM

Neat choice Eric!  The lime green color idea sounds absolutely perfect for that car!!!

  • Member since
    March 2011
Posted by ewheeler454 on Friday, May 2, 2014 11:26 PM

Seabe,

I use regular Clorox bleach to strip the chrome. The time varies from a few hours to a few days, depending on the chrome.

Cody,

I agree, that thing just screams lime green hehehe.

L8TR,

Eric

  • Member since
    September 2013
Posted by Raven728 on Saturday, May 3, 2014 10:31 AM

I just stripped chrome parts for the first time ever last night. I used store brand oven cleaner (US $1) and although I didn't have high hopes, it stripped the parts completely in about 10 minutes. Looking forward to the Gremlin, it reminds me of my childhood. Wink

- Steve

  • Member since
    December 2013
Posted by CodyJ on Sunday, May 4, 2014 12:40 AM

Same here Raven, I use oven cleaner.  Careful to those who may try it.  It burns if you get it on your hands or breathe it in.  I just fill a glass jar with it because you can reuse it for months.

  • Member since
    April 2005
  • From: Australia
Posted by taxtp on Monday, May 5, 2014 1:14 AM

I mix a spoonful of drain cleaner into a container (about lunch box sized) of warm water. It's good paint stripper too. The active ingredient is Sodium Hydroxide, the same as Over Cleaner I think.

Whilst we're at it, if you ever need to strip acrylic paint, mix up a solution of your laundry detergent, like Omo and warm water. Strip the acrylic like you won't believe, and isn't as nasty as some paint strippers.

Cheers

Tony

I'm just taking it one GB at a time.

  • Member since
    January 2014
Posted by Seabe on Tuesday, May 6, 2014 10:39 AM

Little progress, but progress nonetheless. Lotus engine is mounted and working on rear suspension of both cars. Heck, I spent quite a couple of mins to add 6 decals for the bottom suspension arms on the Brawn. And I've always skipped those decals with a notion of "who's going to see this anyways". Now that I've done it, it gives a warm and fuzzy feeling to have done it... but I think the carbon effect is too strong for the scale. Mind you, just looked at it with the Sol having dried through the day... it sort-of looks better. May still tone it down a bit.

The suspension assembly (rear) for the Brawn has been greatly changed from others and I like it. Hopefully feel the same when I've completed the entire structure! Also started work on the Brawn seatbelts. Another area I usually wonder how much the effort is worth it - I tend to cheat a bit on these...Embarrassed esp in my earlier models.

  • Member since
    April 2005
  • From: Australia
Posted by taxtp on Tuesday, May 6, 2014 7:34 PM

Seabe - I tend to skip the CF decals on my models, I think they are often overstated, and I'm not motivated to spend the time on them anyway. On the other hand, at least in the larger scales, seat belts are quite obvious in an open cockpit F1 car, as is the seat. I usually do a bit there.

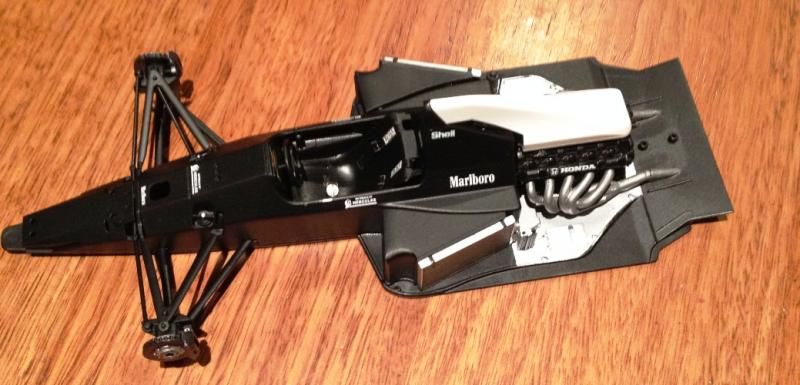
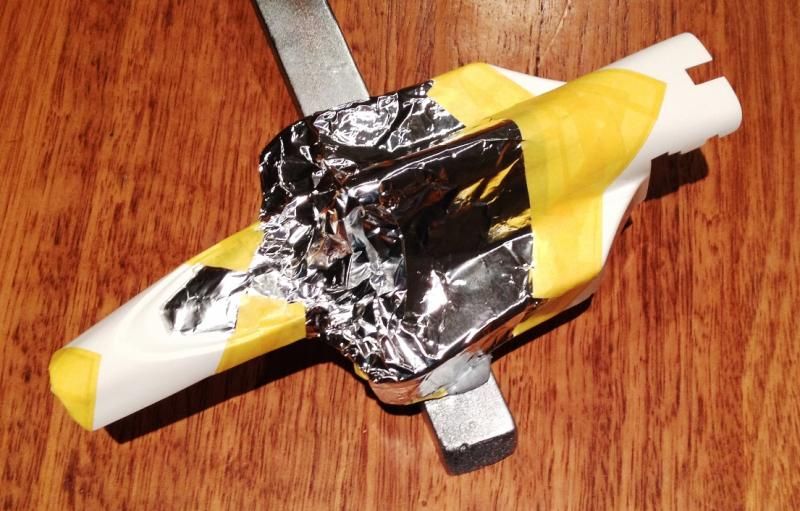
I've made some progress on my MP4/5, and since taking the photos have sprayed the fluoro pink, so it will get some decals tonight. I may even get this thing completed in the next week if all goes well.

I think I'm committed to the Ferrari F92A as my next model too, the kit needs a lot of clean up that I've been progressing in between times.

I really want to get to a Ferrari F93A, which will be a conversion, sometime later this year (I hope). The word is that either the Tyrrell 020 (Tamiya) or Ferrari F92A (Fujimi) is the best base kit for the conversion, so I think I'll do the F92A, then a Tyrrell 020, and by then I'll be pretty familiar with both kits and can plan out the conversion.

Studio 27 did release a resin Ferrari F93A years ago. It's almost unobtainable outside of Japan, and the examples I've seen are going for more than I will pay when a relatively straightforward conversion will cover it.

I'm just taking it one GB at a time.

  • Member since
    January 2014
Posted by Seabe on Tuesday, May 6, 2014 10:38 PM

Very crisp build there, Tony! Good luck with the fluo red... fun times! Had to mask those chevrons a while ago in 43rd when the decals were totally unusable on my MP4/1.

Hard for me to believe that somebody is chasing a 93A - personally never liked the car, all because of that white stripe! But those could be interesting conversion attempts. I do know Tameo has it covered in 43rd, if you're really lost. But I do think it's before the 194 release number, which means it's not as good a casting and there's only one decal sheet.

  • Member since
    December 2013
Posted by CodyJ on Tuesday, May 6, 2014 11:25 PM

Nice progress Tony!  

  • Member since
    January 2014
Posted by Seabe on Tuesday, May 6, 2014 11:33 PM

Lazybones actually got the camera out... some pics.

The Lotus 25 - engine installed, rear suspension also done. Next up, the cockpit...

Brawn's nameplate also done, together with the bottom rear suspension. Driveshaft next here, plus completion of the seat, before all of these are added in the chassis and the body encloses it... but that's getting way ahead of myself!

  • Member since
    April 2005
  • From: Australia
Posted by taxtp on Wednesday, May 7, 2014 6:56 PM

Nice work Seabe, I think the Brawn suspension looks pretty good with the CF, and it must have been a delicate job in that scale.That Lotus 24 looks pretty good too. I've been thinking about doing an Ebbro Lotus 49 to go with mine.

It's not that I am particularly interested in the Ferrari F93A, but I am trying to do each Ferrari model in (almost) chronological order, so it's just a problem I have to solve to get through 1993. That being said, all of the Ferrari's so far are in the same scheme, Red (or scarlet, as Murray used to say), with black front and rear wings. The white stripe will be a good contrast. Otherwise, they are all similar in color with just minor sponsorship changes.

Cheers

Tony

I'm just taking it one GB at a time.

  • Member since
    December 2013
Posted by CodyJ on Wednesday, May 7, 2014 11:04 PM

Lookin' good Seabe!

  • Member since
    March 2011
Posted by ewheeler454 on Thursday, May 8, 2014 10:32 PM

Tony,

I need to add a 1969 Monogram Dodge 440 Six Pack.

I took my wife shopping in Nashville today and found a nice little hobby shop in an out of the way place. He had this kit on his shelf (It's a 1983 release) molded in metallic blue. The color on the body is great with one mold line running through the driver's door, which I think I can sand out. Then all it will need is some clear coat. Needless to say the traffic coming back did not bother me hehehehe.

Tony, Seabe,

Progress is looking great. I think after I get a few more muscle cars done, I may try one of those with a Mario Andretti theme.

L8TR,

Eric

JOIN OUR COMMUNITY!

Our community is FREE to join. To participate you must either login or register for an account.

SEARCH FORUMS
FREE NEWSLETTER
By signing up you may also receive reader surveys and occasional special offers. We do not sell, rent or trade our email lists. View our Privacy Policy.