SEARCH FINESCALE.COM

Enter keywords or a search phrase below:

The 2014 Automotive Group Build

62981 views
717 replies
1 rating 2 rating 3 rating 4 rating 5 rating
  • Member since
    February 2005
  • From: Proctor. MN
Posted by 65ss on Sunday, March 30, 2014 8:50 PM

Eric the Chevelle is looking good.

John that work is cool I really like the seat, and the cf!

I got some work done this weekend, mostly sanding, sanding, sanding, and painting. Did I mention that this truck has a LOT of flash.

Dale

  • Member since
    March 2011
Posted by ewheeler454 on Sunday, March 30, 2014 10:12 PM

Hi all,

Here's some more updates on the Chevelle.

I finished wiring the engine. I think the liquid rubber works great on the boots. Next time I will wrap something around the wire to get some cleaner lines on the boots. I found this stuff (liquid tape) at Walmart in the wiring and fuse area  Also got the wheels mounted and the SS stripes on the car. Everything is done except the final clear coats and chroming the outside trim.

  • Member since
    March 2011
Posted by ewheeler454 on Sunday, March 30, 2014 10:21 PM

Tony,

The 'Cuda is finished. The completed pic is on page 15.

Thanks.

  • Member since
    January 2014
Posted by Seabe on Sunday, March 30, 2014 10:48 PM

Quite a productive weekend - even if little actual assembly happened. The Lotus 25 starts off with a step requiring some masking and... some of the green used on the body. Therefore I did the alu on the tub and section to be masked. I then proceeded to do all the green panels in one go. Last layer done last night.

On the Brawn, I cleaned the body up a bit and drilled holes. Added the air intake section behind driver as well as the front wing supports and the mirrors.

The thing I dread most about this kit will be the front wing - that's going to be a bit of an assembly. Also somewhat in two mind whether I should not actually complete and attach that before spraying all body colour or stick to the instructions, which only wants it attached on the very last step. Maybe it'll interfere with the rest of assemblies, e.g. front suspension... Might be best to pre-build and paint separately, then attach as instructed.

  • Member since
    April 2005
  • From: Australia
Posted by taxtp on Sunday, March 30, 2014 11:55 PM

Thanks Eric, I'll get that done now. Must have missed it in all my travels. The 'Cuda is looking brilliant. I love the green.

It was a productive weekend Seabe, if it was me  I would attach the wing late, because I know I would damage it

Cheers

Tony

I'm just taking it one GB at a time.

  • Member since
    February 2005
  • From: Proctor. MN
Posted by 65ss on Monday, March 31, 2014 11:52 AM

Eric the engine, and interior are looking good. I really like that green.

Spending more time sanding, and painting today.

Dale

  • Member since
    February 2005
  • From: Proctor. MN
Posted by 65ss on Monday, March 31, 2014 10:02 PM

Tony could you add a 1998 Shneider Racing Monte Carlo to my build roster? Thanks.

Dale

  • Member since
    April 2005
  • From: Australia
Posted by taxtp on Wednesday, April 2, 2014 1:49 AM

Hi Dale,

Good to hear, I've added it. Whilst I was there I added a Fujimi 1/20 Mclaren MP4/5 F1 car for myself. It's the car the Alain Prost won his 3rd World Drivers Championship in, although I will depict Ayrton Senna's car.

Cheers

Tony

I'm just taking it one GB at a time.

  • Member since
    January 2014
Posted by Seabe on Thursday, April 3, 2014 10:24 PM

What felt like a slow week thusfar, now that I start listing it to myself seems more than the time I spent! But actually very little got done.

The Lotus - I have basically completed step 1 and most of step 2, just have to add that to the main construction (from step 1). Semi livid, since the new glue I just opened has a needle nossle that simply does not work! Sad I went without it and... of course too much glue, spillage, you name it. I just hope that that section gets hidden in the end - strongly suspect so. I am seriously considering using that entire bottle just for pre-painted assemblies and using a new one with a working nozzle (I hope!) for detailed glueing. Step 2 had the first interaction with the detail set. Replaced the pedals with the white metal ones. Cleaned off with rotary tool and the scratched the pedals themselves a bit to emulate a bit of wear, not much. Just now threw some Future (or the closest to that we have around here) over it to seal it.

Next to no progress on the Brawn. Simply cleared any of the bits of seepage that did occur in my initial assembly and smoothed out the airbox assembly a little. Took out front and rear wings and cleaned them up. That front wing is staring at me... The rear for once seems like and easy assembly - all things are relative!

  • Member since
    January 2014
Posted by Seabe on Friday, April 4, 2014 1:09 PM

...and now all the holes are drilled into the front wing as well.

  • Member since
    February 2013
  • From: Podunkville, USA
Posted by rommelkiste on Saturday, April 5, 2014 10:07 AM

I don't have much of an update on the V8, Farm work has kept me kinda busy.  I do have the crank installed and everything spins up really nice.  The hardest part was getting the end play worked out on the crank.  I played with the idea of rings on the pistons but the cylinder walls have a HUGE taper in them so I will live with some piston slap.   More as I have time to play with this.

Nothing ever fits……..and when it does, its the wrong scale.

To make mistakes is human.  To blame it on someone else shows management potential. 


  • Member since
    March 2011
Posted by ewheeler454 on Sunday, April 6, 2014 8:55 PM

Hi all,

Rommelkiste, That is looking great.

I did make quite a bit of progress this weekend. I would have been able to finish 3 this week, but ran out of Alclad  Chrome paint.

The Chevelle is pretty much done, I'm doing the chrome trim around the windows and stuff and it's done.

Here's some of the progress I made on the 40 Ford. I also painted a lot of the little parts. Everything will be done this week except finishing the chrome.

L8TR,

Eric

  • Member since
    February 2005
  • From: Proctor. MN
Posted by 65ss on Sunday, April 6, 2014 9:32 PM

Rommel the engine is looking good. It will sound like a first gen Z-28, they had a little piston slap until they warmed up.

Eric, I missed you were doing a 40 Ford, It's looking good!

Dale

  • Member since
    March 2011
Posted by ewheeler454 on Sunday, April 6, 2014 10:04 PM

Thanks Dale,

It's kinda on hold until my Alclad gets here hehehe.

L8TR,

Eric

  • Member since
    February 2005
  • From: Proctor. MN
Posted by 65ss on Monday, April 7, 2014 8:53 PM

I finished the Monster Truck this last weekend. If I thought the frame and roll cage was kind of tricky, that had nothing on the suspension.The front suspension stared by gluing the front shocks on. The shocks had one little attachment point each that was pretty sloppy, so I had to take my best guess as to if the were  lined up properly. Of coarse with a Monster Truck the tires are so far away from the wheel well opening that being a little bit off might not be to bad. Next came the front axle, drive shaft, and upper, and lower control arms. All had to be glued on at the same time to make sure every thing lined up. The drive shaft didn't need to be glued and it was a pretty tight fit int the transfer case, so the other end could just be slid into the differential. This is where it gets tricky,  the remaining assembly is three parts. The axle and lower control arms are one, and then you have the two upper control arms. Each of the upper arms attach to the top of the differential, which is right under the fuel cell and battery, and then goes forward to about the middle of the frame and that is where the transfer case is in the way.Crying

After I got that done the rear was almost a piece of cake. Next were the decals. The first one was the flames for the roof. That one folded in on it's self, and tore when I tried to fix it. The rest of the decals went pretty good, although once on the model they did not want to move, and they tore rather easy.

Then it was time for the lights for the light bar. I messed one up painting, lost one, and broke the first one I put on. Done with them.Angry

It was finely time to attach the cab, and box to the frame. The gap between them was to large in my mind, so I started to look and see how I could close it up a little........That is when the transfer case came loose, It didn't fall out, (not enough room) and the drive shafts stayed put. I tried for about 15 minutes to get it back in place, but every time I would get it close to being lined up it would just slip off whatever tool I would be trying next to reach through the frame.

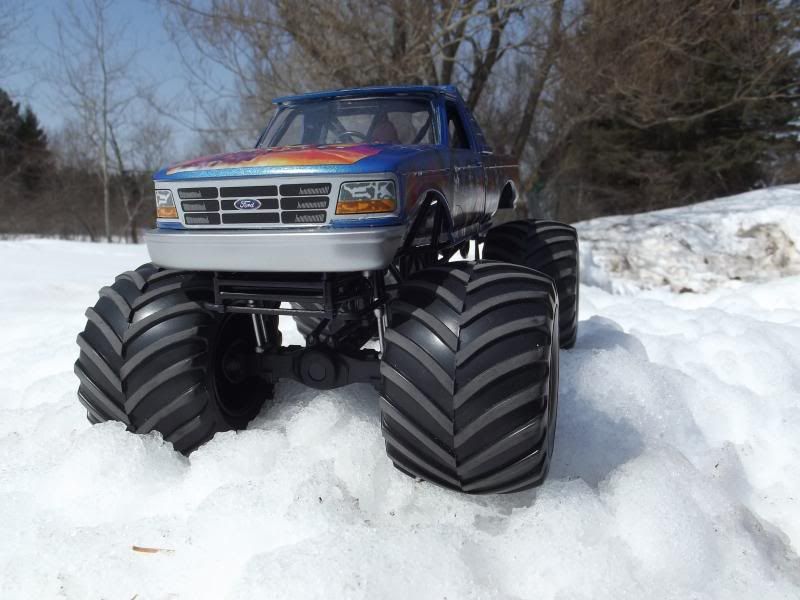
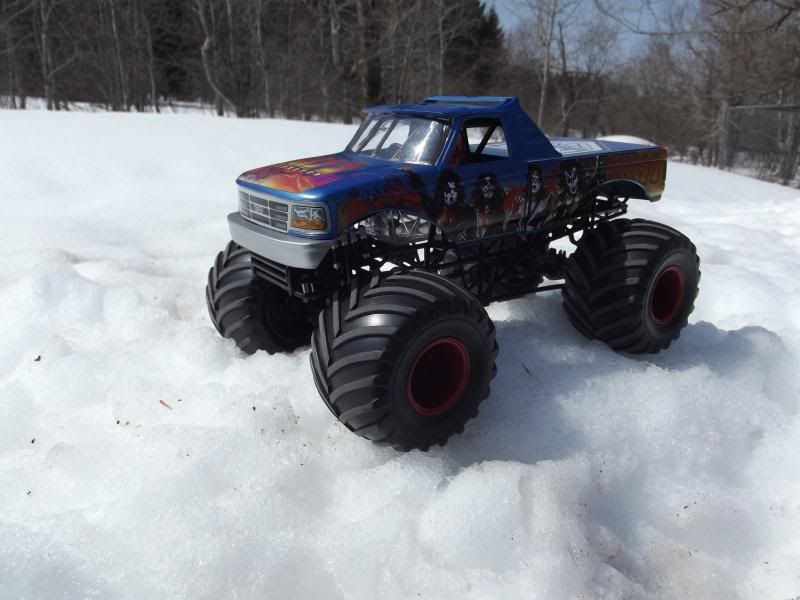
At that point I called it done, took a couple pictures, and will stick it in the back of the closet never to see the light of day.

I may have to go back to building nothing but armor models. Wink This Automotive stuff is kind of hard, if you want to end up with a nice looking model when you are done.

Any way here's a couple pictures I took.

Dale

  • Member since
    January 2014
Posted by Seabe on Monday, April 7, 2014 10:32 PM

Hey Dale, I often said (and experienced it myself) that we're our own worst critics - and enemies! We tend to get so fixated on the fact that not everything went according to plan that we don't see what we've produced. Things taking a detour on a route we did not plan - well, that's just part of the hobby. (Easy for me to say now...) There's always something we're unhappy about that nobody else even notices. Take the learnings from this build, pick a new one and go for it!

You've produced a great build of an unusual subject (for me). And you win the prize for the most kick-azz livery to date! I can imagine that one gave you some headaches. Love the fact that it's pictured in the snow - it suits the subject perfectly.

Me... I took on that front wing challenge on the Brawn. And spend most of the evening rebuilding one mini section 3 times before adding it to the front wing itself. The section is "simple" in that it's simply two supports and the winglets inbetween. One side's looked perfect and installed perfect. The other side... not so! It's still not perfect, but at this stage I feel I'm not going to get it any better. Phase one of this front wing is done, some more additions to come, hopefully tonight some more progress. Of course, I now can only hope I do not break these already installed section off in the progress of adding the rest. Trust me, I have exceptional skill sets - undoing my own progress is just one of them! ;)

  • Member since
    March 2011
Posted by ewheeler454 on Monday, April 7, 2014 11:45 PM

Dale,

I like it, I like it a lot!

One trick with decals is to use a small spray bottle, I picked mine up in the cosmetic section at Walmart, blue of course hehehe). Set it to spray a real fine mist (large drops just roll off and the decal will stick to soon) and soak the area with it. When you place your decal it will give you a little wiggle room and let you move it around until you start squeezing the water out. Also, when they fold over on themselves, I very gently put them back in the water bowl to get them straightened out and lay them back on the paper to start over. It's also a good idea to use non-powdered nitrile gloves and wet the finger tips. Decals have a tendency to stick to your fingers and tear. :)

L8TR,

Eric

  • Member since
    January 2012
  • From: Hatfield
Posted by Misty on Tuesday, April 8, 2014 6:09 AM

i lovveeee the monster 65ss it looks friggin awesome

  • Member since
    March 2011
Posted by ewheeler454 on Wednesday, April 9, 2014 10:45 PM

Hi all,

I was able to squeeze in a couple of hours today.

I sprayed the final coat of clear on the 40 Delivery. I also started putting the drive-train together. I have a lesson learned. When inserting steel axles into hubs that are being stubborn, "DON'T USE A HAMMER". I'll leave the rest to your imagination lol. I just have to find a different set to use hehehehe. Hopefully my Alclad will be here by the weekend so I can finish it

I fabricated the heater hose for the Chevelle out of solder. The rest of the time was used on the Mustang for the other GB.

L8TR,

Eric

  • Member since
    January 2014
Posted by Seabe on Thursday, April 10, 2014 11:01 AM

Presume I have to post some pics between all this rubbish I talk.

First off, the Lotus 25 after steps 1 and 2. Step 3 requires some more WM parts (rotor/calipers) and I want to prime them together with the Brawn initial sections, so... I had to finish the Brawn wings first. 

So, Lotus 25 after steps 1 and 2. (Also started pre-emtively to assemble engin block. Going sequentially never appealed to me!)

<iframe src="https://www.flickr.com/photos/100620461@N03/13751663633/player/" width="500" height="375" frameborder="0" allowfullscreen webkitallowfullscreen mozallowfullscreen oallowfullscreen msallowfullscreen></iframe>

Oh bugger, I see Flikr has changed it's formatting again, hope this works! Bang Head Okay, will try posting this one first and see what gives before adding the rest.

  • Member since
    January 2014
Posted by Seabe on Thursday, April 10, 2014 11:07 AM

Okay, take two for the Lotus:

mXbSuR

  • Member since
    January 2014
Posted by Seabe on Thursday, April 10, 2014 11:09 AM

Argh!!!!

<a href="https://www.flickr.com/photos/100620461@N03/13751663633" title="WIP models Lotus 25 by Sea Bee, on Flickr"><img src="https://farm3.staticflickr.com/2815/13751663633_2d4cd162d8.jpg" width="500" height="375" alt="WIP models Lotus 25"></a>

  • Member since
    January 2014
Posted by Seabe on Thursday, April 10, 2014 11:10 AM

Noooo!!!! Stuff this, sorry guys. I will look for another solution, this is nuts.

  • Member since
    January 2014
Posted by Seabe on Thursday, April 10, 2014 12:10 PM

Okay, trying Dropbox as possible solution...

Obviously this also did not work. Can somebody PLEASE tell me how to upload photos now?! Hate having to upload it first to other sites and then only link it in here. But now even that's up the creek. Flikr changed it's format, export options, the works... so I get that I may have messed up there. But DropBox?! I get the "share url in clipboard, then "insert image", paste that URL, and it just displays a broken image link?! Heeeeeeeelp!

  • Member since
    December 2013
Posted by CodyJ on Thursday, April 10, 2014 2:49 PM

Sorry to have to ask guys...  I'm new and would like to join the build.  Do I just start posting some WIP pics when I begin?  Do I have to register or something?  Thanks and sorry for the newbie questions. Embarrassed

  • Member since
    February 2005
  • From: Proctor. MN
Posted by 65ss on Thursday, April 10, 2014 7:24 PM

Thanks for the encouragement Guys. After finishing the Monster Truck I realized I did learn a few tricks.And that I need to study instructions a little more carefully.

Seabe I wish I could help but my computer skills are not very could. And my in house tech guy (Son) moved out about three years ago.

CodyJ This is only my 2nd GB, but I think if you just post what you are planning to build you're all set to start having fun. I'm sure Tony will be by to welcome you aboard shortly.

Dale

  • Member since
    March 2011
Posted by ewheeler454 on Thursday, April 10, 2014 10:26 PM

Seabe,

I use dropbox as it is easier for me. The photos have to be placed in the public folder in dropbox. I create separate folders for each build to help keep track. Right click on the dropbox icon in the lower right toolbar and open the dropbox website, select the photo you want and right click, then click copy public link. Now, in the forum, along the bottom of the text box select "Use Rich Text Formatting". This will give you a lot of new options. Along the second row of icons close to the middle, there is a button to add images. Just paste the copied link and click insert and it will do everything else. Let me know if you still have problems.

L8TR,

Eric

  • Member since
    March 2011
Posted by ewheeler454 on Thursday, April 10, 2014 10:31 PM

Welcome aboard CodyJ.

As Dale said Tony will be along to add you. Also post again with your build list so Tony can add them to the build roster on the front page, preferably pre-72 Muscle cars hehehehe j/k.  :)

L8TR,

Eric

  • Member since
    March 2011
Posted by ewheeler454 on Thursday, April 10, 2014 10:36 PM

Tony,

Can you add a REVELL 1966 Impala and an AMT 1976 Gremlin to my list? I'm hoping to clear my benches this weekend. :)

Thanks.

  • Member since
    December 2013
Posted by CodyJ on Thursday, April 10, 2014 11:18 PM

I was planning on doing the 1986 Indy winner.  The Budweiser Special driven by Bobby Rahal.  I have a kit that will work and decals for it too.  Thanks for the help guys.  And thanks in advance Tony!

JOIN OUR COMMUNITY!

Our community is FREE to join. To participate you must either login or register for an account.

SEARCH FORUMS
FREE NEWSLETTER
By signing up you may also receive reader surveys and occasional special offers. We do not sell, rent or trade our email lists. View our Privacy Policy.