SEARCH FINESCALE.COM

Enter keywords or a search phrase below:

Ju 87 Stuka GB

173278 views
2599 replies
1 rating 2 rating 3 rating 4 rating 5 rating
  • Member since
    March 2012
  • From: Corpus Christi, Tx
Posted by mustang1989 on Friday, August 15, 2014 6:58 PM

Thanks Scott. Colors are 70, 71 for the initial camo and (I goofed on this one but left it the way it was. It was just too late to turn back) 65 on the bottom. The tan is 79 and the yellow on the spinner is 04. That would be totally cool to find a snake scheme in 24th!!!!!!!!!


 Forum | Modelers Social Club Forum (proboards.com) 

  • Member since
    May 2013
  • From: Indiana, USA
Posted by Greg on Friday, August 15, 2014 7:10 PM

Thanks for the info on your fantastic panel lines, Joe. Been meaning to try Mig washes one of these days.

Don't mean to interrupt Joe's walk down the runway (that ended up being a pun, didn't it?), however .....

Proof of start and a question:

Are Stuka seat belts supposed to be green? I spent most of the week doing this resin seat, (which as it turns out is for the Hasegawa kit, not my Zvezda and I hope  it is ok) and I really don't want to change the color but I reckon I will if this is just wrong.I ask cuz the Svezda cartoon calls out flat green, and I think I saw a green belt or two earlier on in this GB??

In any case, my belts look too dark to me (using the various luftwaffe a/c I've seen here. And they looked so good last night. Sigh.
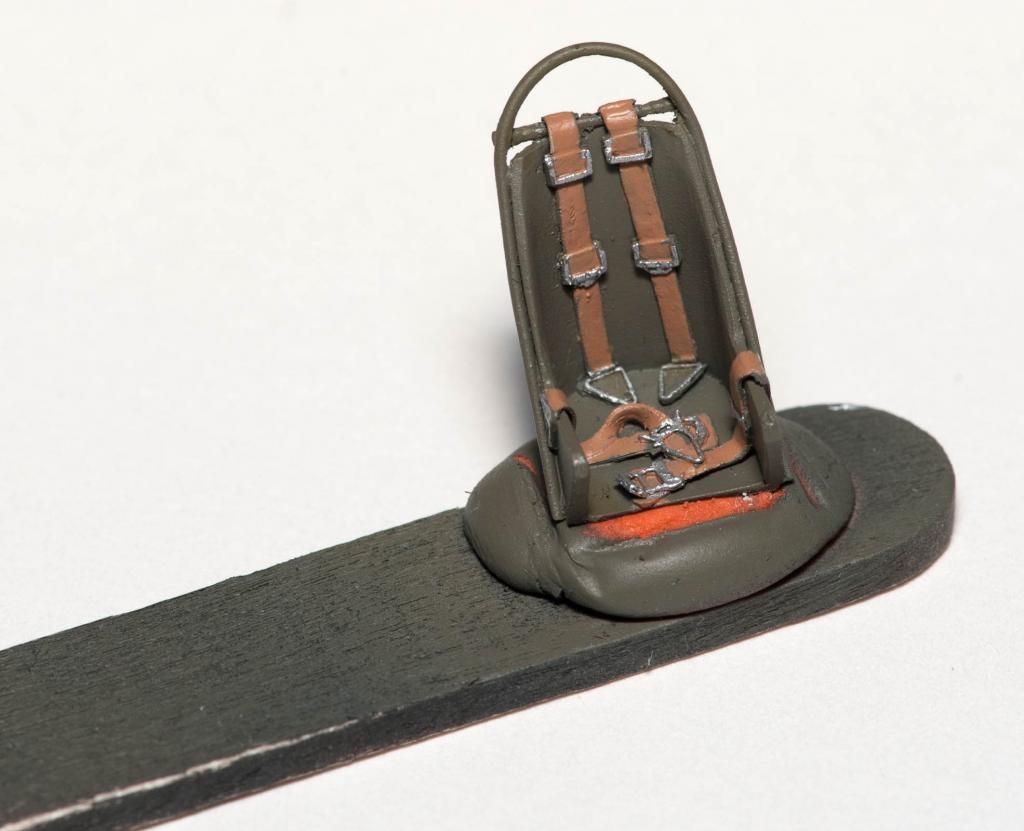
Input?

At the rate I'm going, might have this Stuka done by Christmas. Of 2015 that is.

PS, are resin seats avail for 1/72nd? If so, how do you guys paint those things?????

  • Member since
    December 2002
  • From: Bury St Edmunds, Suffolk, England
Posted by Bish on Saturday, August 16, 2014 2:06 AM

Greg German seat belts are normally a light tan colour, not sure where they got green from. If you look at shooters RB belts, that's the usual colour. As far as the resin set, you should be ok fiting that one in there. Most are designed for specific kits, but can be fitted in others, it might just need a bit of extra trimming and plenty of test fitting.

And yes, they do come in 72nd. Sometimes thee seat belts are moulded on, in others, such as Aires, they come as separate PE parts. As for painting, a steady hand and fine paintbrush. I paint the PE ones on the fret, I find that much easier.

I am a Norfolk man and i glory in being so


On the bench: Airfix 1/72nd Harrier GR.3/Fujimi 1/72nd Ju 87D-3

  • Member since
    March 2012
  • From: Corpus Christi, Tx
Posted by mustang1989 on Saturday, August 16, 2014 6:20 AM

I'm with Bish on the fact that I don't know why your instructions called out green for the seat belts. I can't find any research to support that. I usually go with Humbrol "linen" color (which produces a light beige color he was talking about) airbrushed on after forming the seatbelts the way I want em.

 Then I apply a really light brown wash *and I have to make sure the linen color is cured out really good because it is enamel based and the wash has to be a light one for this to work) to the belts to break up the monotony of the single color, then paint the buckles an aluminum color and finally grate some black or brown pastel across somoe really rough grit sandpaper to get a powder out of it and dry brush it onto the belts with a worn out paint brush to give them that "dirty" look. It's been workin' for me so far.Big Smile


 Forum | Modelers Social Club Forum (proboards.com) 

  • Member since
    March 2012
  • From: Corpus Christi, Tx
Posted by mustang1989 on Saturday, August 16, 2014 7:56 AM

Now we're legitimately finished with the exhaust soot and rear gun sight.  Yesterday was a nasty combination of my camera, this site and PB giving me fits and I just threw the pics on there. I felt like this build deserved more than that so I did another photo shoot session and re posted here.

You know that's something that I forgot to post on the first pic posting. The snake motif decals where too short just in front of the cross on the sides so I had to splice in a section of the aging snake decals I had and pray that it worked. I was surprised that it came out ok.Indifferent


 Forum | Modelers Social Club Forum (proboards.com) 

  • Member since
    May 2013
  • From: Indiana, USA
Posted by Greg on Saturday, August 16, 2014 10:10 AM

Bish, thank for the info re the belts. Knowing what Luftwaffe belt colors are, basically, I don't know why I let a bad color call out on instruction sheet throw me for a loop. Nor do I know why I chose the color I painted. Re-do time, I reckon.

BTW, all I can say on the 1/72nd resin and PE is Oh My Goodness.

Joe, thanks for the refresher on how you do your belts. I will probably attempt your method.

Those two finishing touches add a lot. I'm surprised how that rear-gunner sight stands out. A really neat finishing touch!

  • Member since
    February 2011
  • From: Bent River, IA
Posted by Reasoned on Saturday, August 16, 2014 4:05 PM

Joe, that really pops!  Very nice, clean build and great work on the canopy.

Science is the pursiut of knowledge, faith is the pursuit of wisdom.  Peace be with you.

On the Tarmac: 1/48 Revell P-38

In the Hanger: A bunch of kits

  • Member since
    March 2012
  • From: Corpus Christi, Tx
Posted by mustang1989 on Saturday, August 16, 2014 4:46 PM

Thanks Greg and Reasoned! I'll tell you, this build certainly took long enough for me but I'm happy with the results. I've been wanting to build a Stuka , particularly this scheme, now for 18 years now. Oh well, better late than never. lol


 Forum | Modelers Social Club Forum (proboards.com) 

  • Member since
    October 2008
  • From: Georgia
Posted by Rigidrider on Saturday, August 16, 2014 7:54 PM

Belts look great Greg. Very nice job...

Joe, as alwaws a beautiful finish by you!

Doug

When Life Hands You A Bucket Of Lemons...

Make Lemonade!

Then Sell It Back At $2 Bucks A Glass...

  • Member since
    April 2005
Posted by Thunderbolt379 on Saturday, August 16, 2014 10:20 PM

Joe, AWESOME finish, man! the bird looks good enough to eat! I'm blown away by the result -- I confess in the early stages I couldn't quite visualise how she was going to look, but this is stupendous! the snake looks painted on! VERY impressed!

You finish inspires me to grab my own kit and kick that cockpit along!

Cheers, Mike/TB379

http://worldinminiature.blogspot.com/

  • Member since
    March 2012
  • From: Corpus Christi, Tx
Posted by mustang1989 on Saturday, August 16, 2014 10:42 PM

Thanks again Doug and thank you Mike. I took my sweet time with this build to try and pull this whole operation off. I had/ have a couple of gliches with it but I moved on as it was too late in the build to go back and correct them. As lawdog mentioned , the flap actuators have that glob of plastic look to them and I guess I could have spent a little extra time or money and fixed that but it would have prolonged a build alot longer. As far as you grabbing your kit and geting it going , I can only say that I look forward to the pleasure of watching your build come together.


 Forum | Modelers Social Club Forum (proboards.com) 

  • Member since
    December 2002
  • From: Bury St Edmunds, Suffolk, England
Posted by Bish on Sunday, August 17, 2014 3:29 AM

We are about half way through the GB and have some amazing completed builds. I know we have some builds underway, looking forward to seeing some more great work. Hopefully we will get some more builds underway soon.

I am a Norfolk man and i glory in being so


On the bench: Airfix 1/72nd Harrier GR.3/Fujimi 1/72nd Ju 87D-3

  • Member since
    October 2013
Posted by ajd3530 on Monday, August 18, 2014 12:45 AM

Been super budy the past few days and haven't been able to put any bench work in. But tonight I got the ol' Monogram Stuka out of the stash to take a sneak peek. I must say, aside from the sparteness of the cockpit, I am very impressed with the with what I see. I might have to bump this sucker up a few notches on the "to do" list. If I have as much fun putting her together as I think I'm going to, I just might have to put together another Ju 87.. anybody have much to say about the Airfix B/R kit?

  • Member since
    December 2002
  • From: Bury St Edmunds, Suffolk, England
Posted by Bish on Monday, August 18, 2014 4:43 AM

Look forward to seeing you start aj. You should be able to get some good ideas from the other mono kits on here.

I am a Norfolk man and i glory in being so


On the bench: Airfix 1/72nd Harrier GR.3/Fujimi 1/72nd Ju 87D-3

  • Member since
    April 2013
Posted by SchattenSpartan on Monday, August 18, 2014 2:27 PM

Greg: Looks like you're off to a good start!

Scott: Nice work on that cockpit!

Joe: Another masterpiece from you! She really looks great with all the extra details! The weathering is perfect as well, not too little but also not overdone! I hope my big one comes close to your results!

  • Member since
    December 2002
  • From: Bury St Edmunds, Suffolk, England
Posted by Bish on Monday, August 18, 2014 2:40 PM

Well hopefully SS, we will see that big one soon. Wink I'm certainly looking forward to it.

I am a Norfolk man and i glory in being so


On the bench: Airfix 1/72nd Harrier GR.3/Fujimi 1/72nd Ju 87D-3

  • Member since
    January 2013
  • From: Athens, Greece
Posted by Zvezda1980 on Monday, August 18, 2014 6:21 PM

Joe I think you restored a real Stuka to its wartime painting, inside a huge white room and you are just pulling our legs here with scales and stuff. Confess!!! Man these snakes look scary!

This is PERFECT!!!

Also, I think some idiot in the Junkers factory painted my seatbelts green.  

Not much time devoted in my Merkur Stuka past month. Only some engine and stabilizers work. Pics will be posted when there is some 'juice' of progress.

BTW I had the chance to visit the airfield area (now a modern civil airport) of Karpathos(Scarpanto) island where several StG.77 Stukas used to operate from during the Battle of Crete (I admit I focused on the nice beaches nearby). Quite impressive airfield.

  • Member since
    December 2002
  • From: Bury St Edmunds, Suffolk, England
Posted by Bish on Tuesday, August 19, 2014 3:48 AM

Look forward to seeing some pics Zvezda.

Are there any remains of the old airfield.

I am a Norfolk man and i glory in being so


On the bench: Airfix 1/72nd Harrier GR.3/Fujimi 1/72nd Ju 87D-3

  • Member since
    March 2012
  • From: Corpus Christi, Tx
Posted by mustang1989 on Tuesday, August 19, 2014 4:11 AM

Thanks Clemens and Zvezda! I built a Stuka as a kid and it turned out like a kid built it and have been wanting to build a Stuka in this scheme now for 18 years. I guess it's better late than never!! lol


 Forum | Modelers Social Club Forum (proboards.com) 

  • Member since
    October 2013
Posted by ajd3530 on Tuesday, August 19, 2014 10:55 PM
Well I couldn't help myself. I went the Hobbytown today and got a bunch of Luftwaffe RLM colors, and started on my Monogram Stuka tonight. Putting this one together OOB aside from decals. There is really not much to this thing at all. Getting the interior painted up tonight, and I might be able to get the fuselage together tonight or tomorrow. I almost feel like I'm doing it half ***, but its really THAT simple. Pictures will be coming before I button her up. Right now I'm waiting for some paint to dry, and cruising through these hundred and some pages seeing how you guys that did the Monogram bird delt with the backside of the radiator. I feel like I should really put something else back there.
  • Member since
    October 2006
  • From: Tucson, AZ
Posted by Archangel Shooter on Wednesday, August 20, 2014 12:08 AM

I'm still working on detailing the cockpit, sure am going to hate to close up the fuselage on this one. Unlike the Airfix FW-190 cockpit, this one is a lot of fun, so much so that eventually I'm going have to force myself to say enough is enough and move on to the rest of the kit or I will never get done.

Does anyone know a shop that still carries 1/48th JU-87D decals? Will need to get a set for the Monogram kit which I set aside for the time being to work on the AIrfix bird.

 Your image is loading...

 On the bench: So many hanger queens.


  • Member since
    December 2002
  • From: Bury St Edmunds, Suffolk, England
Posted by Bish on Wednesday, August 20, 2014 3:17 AM

That's good news aj, look forward to seeing the pics.

Shooter, when I checked Hannants, allof the Ju 87D decals in 48th were for aircraft operated by Eastern European nations. I couldn't find anything on SB. But there must be some out there some where.

I am a Norfolk man and i glory in being so


On the bench: Airfix 1/72nd Harrier GR.3/Fujimi 1/72nd Ju 87D-3

  • Member since
    October 2006
  • From: Tucson, AZ
Posted by Archangel Shooter on Wednesday, August 20, 2014 9:45 AM

Bish...I seen the Eastern European sets, hard to believe the manufacturers stop printing Luftwaffe sets.

 Your image is loading...

 On the bench: So many hanger queens.


  • Member since
    December 2002
  • From: Bury St Edmunds, Suffolk, England
Posted by Bish on Wednesday, August 20, 2014 9:59 AM

Ye, I know. Its not any better in 72nd either, especially for the D/G variants. Super/Micro scale used to do some, its just a shame their decals are so hard to get hold of.

I am a Norfolk man and i glory in being so


On the bench: Airfix 1/72nd Harrier GR.3/Fujimi 1/72nd Ju 87D-3

  • Member since
    October 2013
Posted by ajd3530 on Wednesday, August 20, 2014 10:50 AM

Print scale makes a sheet that has a couple of Luftwaffe D's. Now there are some questions about the quality of them though. I am going to try to use them on mine, so in a few weeks I could let you know how it goes.

  • Member since
    May 2013
  • From: Indiana, USA
Posted by Greg on Wednesday, August 20, 2014 11:06 AM

Clemens, the suspense is killing me......

Zvezda, looking forward to some pics. It's too quiet here.

AJD, same as above. Looking forward to some progress shots.

Shooter, please keep the pics coming. I'm using your cockpit as a Stuka reference!!!

Question: On my Italeri 1:48 kit, at the aft right cockpit sidewall (sort of to the left of the gunner's seat if he is facing aft), there are two rows of 5 oblong shaped somethings. Can anyone tell me what these are? (If this isn't clear I can post a pic)

  • Member since
    December 2002
  • From: Bury St Edmunds, Suffolk, England
Posted by Bish on Wednesday, August 20, 2014 11:12 AM

Greg, just behind the gunners on his left side as he faces read should be a couple of box's which are connected to the radio's. If they are further back, next to where his knees might be, these could be the spare ammo drums for the MG 15.

I am a Norfolk man and i glory in being so


On the bench: Airfix 1/72nd Harrier GR.3/Fujimi 1/72nd Ju 87D-3

  • Member since
    May 2013
  • From: Indiana, USA
Posted by Greg on Wednesday, August 20, 2014 11:28 AM

Ammo boxes sound right. They seem to have handles on them which suggests they were meant to be removed from the sidewall.

So they could reload ammo from the cockpit? I had no idea. So the MG 15 was the rear facing gun then?

Thanks, Bish!

  • Member since
    May 2013
  • From: Indiana, USA
Posted by Greg on Wednesday, August 20, 2014 12:03 PM

Since I've been whining about pics, here's where I'm at. Nothing comment-worthy, just show and tell.

BTW, this is the second time I've tried to emulate Lawdog Joe's cockpit method, and the second time I've laid on the interior color too heavy and lost the benefit of the black primer. Sigh.

Still plenty to do. Oh, and I repainted the belts. :)

One of the parts I was asking about above is the brighter green one on the craft stick at the right. There are two of them. They mount on the four squares on the side panel directly left.

  • Member since
    December 2002
  • From: Bury St Edmunds, Suffolk, England
Posted by Bish on Wednesday, August 20, 2014 12:12 PM

Greg, ye, on these early aircraft, they were armed with a single gun at the rear, which used twin drum magazines. The same things were used on most of the twin engine bombers.

they only used belt feed ammo when the MG 81Z was introduced on the D variants. 

I am a Norfolk man and i glory in being so


On the bench: Airfix 1/72nd Harrier GR.3/Fujimi 1/72nd Ju 87D-3

JOIN OUR COMMUNITY!

Our community is FREE to join. To participate you must either login or register for an account.

SEARCH FORUMS
FREE NEWSLETTER
By signing up you may also receive reader surveys and occasional special offers. We do not sell, rent or trade our email lists. View our Privacy Policy.