SEARCH FINESCALE.COM

Enter keywords or a search phrase below:

Ju 87 Stuka GB

173263 views
2599 replies
1 rating 2 rating 3 rating 4 rating 5 rating
  • Member since
    November 2008
  • From: Central Florida
Posted by plasticjunkie on Saturday, February 21, 2015 7:03 PM

Well Clemens, looks like the Austrian Postal Service is following the US Postal Service foot steps in screw-ups. Don't feel bad. I once had a package mailed from Florida to Virginia via Seattle! Indifferent

 GIFMaker.org_jy_Ayj_O


Too many models to build, not enough time in a lifetime!!

  • Member since
    October 2006
  • From: Tucson, AZ
Posted by Archangel Shooter on Saturday, February 21, 2015 7:59 PM

Zvezda...Nothing wrong with how that bird looks, those are some great looking pics!

 Your image is loading...

 On the bench: So many hanger queens.


  • Member since
    September 2003
  • From: AandF in the Badger State
Posted by checkmateking02 on Sunday, February 22, 2015 3:11 PM

Great looking Stuka, Zvezda!  You accomplished a great effect with the weathering.


  • Member since
    November 2003
  • From: Naples, FL
Posted by tempestjohnny on Sunday, February 22, 2015 7:59 PM

Here are my final final pics. 


  • Member since
    November 2008
  • From: Central Florida
Posted by plasticjunkie on Monday, February 23, 2015 6:11 AM

Looks great TJ

 GIFMaker.org_jy_Ayj_O


Too many models to build, not enough time in a lifetime!!

GAF
  • Member since
    June 2012
  • From: Anniston, AL
Posted by GAF on Monday, February 23, 2015 7:17 AM

Zvezda & TempestJohnny,

A couple of very nice builds, guys.  Well done!

  • Member since
    November 2008
  • From: Central Florida
Posted by plasticjunkie on Monday, February 23, 2015 8:01 AM

Thought I post a couple of pictures as I started last night to decal my Stuka.

I brushed on about 4-5 coats of Future to get a very smooth and glossy finish about 3 evenings ago. The Future has to cure otherwise the decal setting solution will cloud it. I like to hand brush it better than air brushing it. No puddles, drips or streaks. Just a glass smooth finish.

The snake went on first. The decal is divided in three sections to make application a bit more manageable. The port side was no biggie but the starboard side with the air scoop needed some careful measuring and cutting to make the snake's head fit around and over the bulky air scoop. With the help of Solvaset, the decals snugged very well into place. I still have to touch up some parts with white paint to line up things in this scoop area. The tongues will be applied later tonight.

I also added the top wing crosses. That snake artwork is just too cool not to model. That's it for now till I can continue decal application.

 GIFMaker.org_jy_Ayj_O


Too many models to build, not enough time in a lifetime!!

  • Member since
    May 2013
  • From: Indiana, USA
Posted by Greg on Monday, February 23, 2015 10:23 AM

Johny, good going on that Stuka. Looks sweet. And good on you for finishing this GB (on time).

Can you (or anyone) tell me what are the long tubes sticking out? I've been meaning to ask for a long time.

PJ, that sheen over your complex camo looks so cool it's almost a shame it'll have to be matted over. Stick out tongue

NIce job on the snake, I had no idea that decal is so challenging, but I can certainly see it now.

You're on the home stretch now, mate.

  • Member since
    November 2008
  • From: Central Florida
Posted by plasticjunkie on Monday, February 23, 2015 10:28 AM

Thanks Greg. Some Dullcote will eventually dull things out.

The tubes you are asking about are underwing cannons converting the old Stuka into an aerial tank buster.

 GIFMaker.org_jy_Ayj_O


Too many models to build, not enough time in a lifetime!!

  • Member since
    October 2008
  • From: Georgia
Posted by Rigidrider on Monday, February 23, 2015 10:39 AM

TJ & PJ... excellent work by both! Bravo...

When Life Hands You A Bucket Of Lemons...

Make Lemonade!

Then Sell It Back At $2 Bucks A Glass...

  • Member since
    May 2013
  • From: Indiana, USA
Posted by Greg on Monday, February 23, 2015 11:22 AM

plasticjunkie

The tubes you are asking about are underwing cannons converting the old Stuka into an aerial tank buster.

That's interesting, thanks PJ. Toast

  • Member since
    March 2010
  • From: MN
Posted by Nathan T on Monday, February 23, 2015 11:53 AM

37 MM Tubes!!Cool  Very nice John. Still can't imagine masking a 1/72 scale Stuka canopy...Bow Down


  • Member since
    December 2002
  • From: Bury St Edmunds, Suffolk, England
Posted by Bish on Monday, February 23, 2015 12:41 PM

Johnny, really nice job there. Great to see this wrapped up. Th Ju 87G is my favourite variant of all, and not just because Rudel had so much to do with it. Always a pleasure to see such a nice one/

Greg, indeed, as the guys have said these are 3.7cm cannon. They were originally Anti Aircraft guns, Flak 18's. The idea is said to have come from Hans Rudel and he helped develop the tactics for their use and was part of the unit which evaluated them in combat.

I am a Norfolk man and i glory in being so


On the bench: Airfix 1/72nd Harrier GR.3/Fujimi 1/72nd Ju 87D-3

  • Member since
    December 2002
  • From: Bury St Edmunds, Suffolk, England
Posted by Bish on Monday, February 23, 2015 12:42 PM

PJ, that looks really nice and you did a great job getting it round the intake.

I am a Norfolk man and i glory in being so


On the bench: Airfix 1/72nd Harrier GR.3/Fujimi 1/72nd Ju 87D-3

  • Member since
    November 2008
  • From: Central Florida
Posted by plasticjunkie on Monday, February 23, 2015 12:58 PM

Bish and Doug

Thanks.

Greg

Rudel even sank a battleship but using bombs, not the underwing cannons! Read up here:  en.wikipedia.org/.../Hans-Ulrich_Rudel

 GIFMaker.org_jy_Ayj_O


Too many models to build, not enough time in a lifetime!!

  • Member since
    November 2003
  • From: Naples, FL
Posted by tempestjohnny on Monday, February 23, 2015 1:02 PM

Thanks everyone. Still working on my photography skills but will get it eventually.   Nathan masking that canopy was tedious to say the least


  • Member since
    September 2003
  • From: AandF in the Badger State
Posted by checkmateking02 on Monday, February 23, 2015 4:41 PM

Fine looking Stukas, PJ and TJ.  Outstanding results!


  • Member since
    September 2003
  • From: AandF in the Badger State
Posted by checkmateking02 on Monday, February 23, 2015 5:07 PM

Been making some progress--although slow.  It's Airfix 1/72.

The landing gear assembly:

wheels are in two parts each

I used tube glue and squished them together

the "spats"--I eventually painted the interiors RLM 02, since you can, barely, see inside once they're assembled.

finished landing gear; after sanding down the tire seams, I re-cut the treads

I applied a black acrylic pin wash to the raised details, but it doesn't show too well


  • Member since
    September 2003
  • From: AandF in the Badger State
Posted by checkmateking02 on Monday, February 23, 2015 5:20 PM

Next item was to fix the propeller.  Airfix's instructions call for the prop to be installed and then the engine cowl attached, trapping the prop shaft in place.  Foolishly, I did this.  I think I mentioned earlier that I then broke the assembly loose during masking.  Here are the original kit parts.


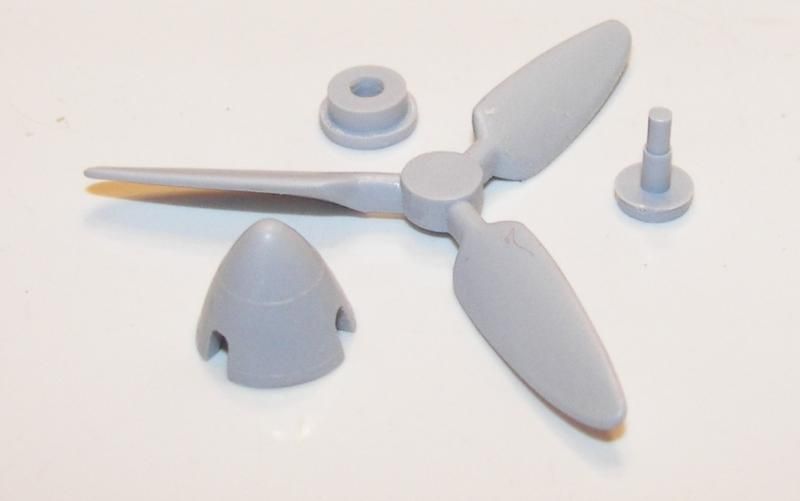
Giving it some thought later, I believe the prop can be installed from the front, after some surgery, and after the fuselage and engine cowling is glued together; but that wasn't going to work at this stage.

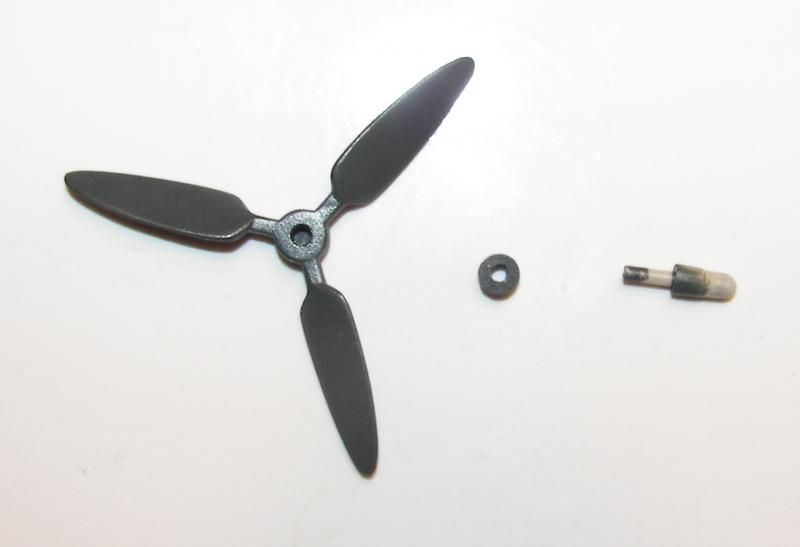
So I reamed out the hole in the front of the fuselage, then went to the parts box and took a broken prop from a Hasegawa B-17 along with two retaining rings.  I glued two rings together and filed down the prop hub to fit through the enlarged whole in the fuselage.  Then I stuck the prop shaft through the rings and glued the shaft to the Stuka prop.

This is the backside view.  Now I can push the whole prop assembly into the fuselage and glue it from the front.

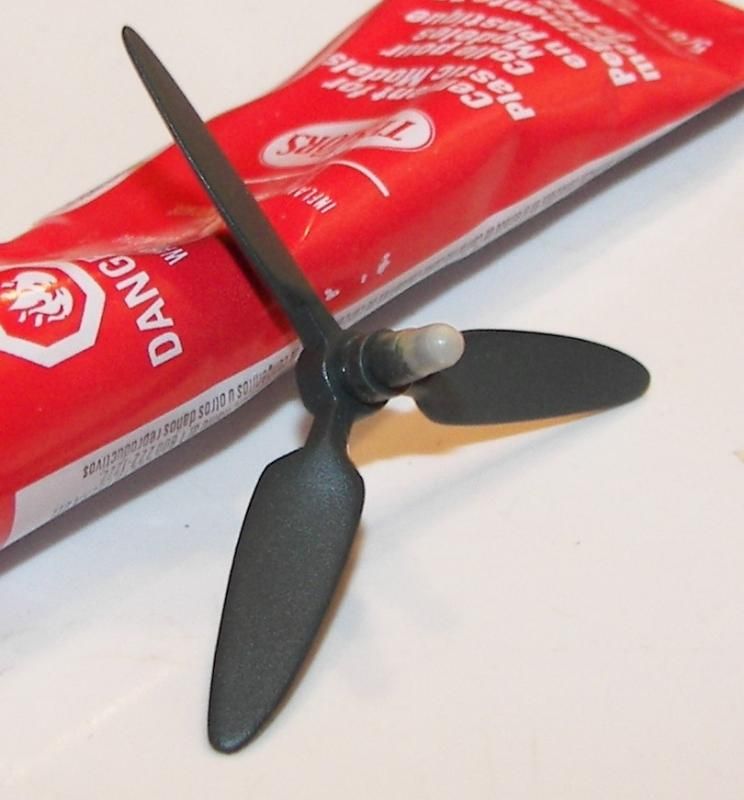
The two rings-glued-together will secure the assembly to the fuselage, and the prop will still turn freely.  I'll probably use white glue, so I can pull it all out and fix the thing later, if it falls out again.


  • Member since
    September 2003
  • From: AandF in the Badger State
Posted by checkmateking02 on Monday, February 23, 2015 5:24 PM

So this is where things currently stand; got the decals on this weekend.


Still have to paint the large bomb, mask the canopy and figure some way to paint stripes of three different colors on the spinner.  Another thread on the subject suggested using a circle template, so I'm going to try to look up one.  Nearest office supply store is forty miles away.


  • Member since
    November 2003
  • From: Naples, FL
Posted by tempestjohnny on Monday, February 23, 2015 6:43 PM

Nice work on the splinter. Good save on the prop


  • Member since
    April 2005
Posted by Thunderbolt379 on Monday, February 23, 2015 6:45 PM

CMK02 -- that's brilliant work! You're doing great justice to this subject! Is this a new-tool Airfix kit? I don't think the old one had any interior at all! I like the way the landing gear assembles exactly the same way as the larger kits -- form follows function! Nice save on the prop too -- one thing that irks me about even the new tool Airfix range is they preserve the 1950s idea of trapping a spinning prop shaft at the point of closing the fuselage, and that truly does not fly.

So many great build still happening here!!!

Cheers, M/TB379

http://worldinminiature.blogspot.com/

  • Member since
    September 2003
  • From: AandF in the Badger State
Posted by checkmateking02 on Monday, February 23, 2015 7:17 PM

Thanks, TJ and TB.  I appreciate it.

TB:  it's the old Airfix kit.  The cockpit is there; might be an upgrade from somewhere along the line if it wasn't in the original kit offering.  It's pretty crude and basi.

I understand Airfix is going to do a new-mould Stuka later this year.  

I agree that trapping the prop shaft is pretty outdated and inconvenient.  It's not at all helpful if you're going to mask and spray paint.  Probably worked OK when all there was to use was a paint brush and a bottle.


  • Member since
    December 2002
  • From: Bury St Edmunds, Suffolk, England
Posted by Bish on Tuesday, February 24, 2015 12:49 AM

That's some nice progress there Check.

You are right, Airfix are due to release a new tooled Stuka late in the year, Nov I believe. That will be a B-1, not a variant that's well covered with I think only Fujimi producing that variant.

I am a Norfolk man and i glory in being so


On the bench: Airfix 1/72nd Harrier GR.3/Fujimi 1/72nd Ju 87D-3

  • Member since
    April 2013
Posted by SchattenSpartan on Tuesday, February 24, 2015 2:35 PM

Very nice looking decal and weathering work, Checkmate!

  • Member since
    September 2003
  • From: AandF in the Badger State
Posted by checkmateking02 on Tuesday, February 24, 2015 5:03 PM

Thanks, Bish and SS!  Very kind of you.

I don't know much about Stukas, Bish, but is the B-1 variant suitable for Dunkirk or the Battle of Britain?

And what specifically is this current Airfix Stuka supposed to represent?


  • Member since
    November 2008
  • From: Central Florida
Posted by plasticjunkie on Wednesday, February 25, 2015 6:56 AM

CM

The paint and decals look outstanding. Goes to show you sometimes can't follow the building sequence of the instructions so good recovery on fixing the prop issue.

I finally made progress with the snake  decals that Mustang so generously provided. Had to raid the spares for the tail Swaz as none are included in the kit. Some of the smaller stencils are from the kit decal sheet and had a tendency to silver so I had to apply them over wet Future to kill the ugly silvering. Works every time.

Next will be some pin washes then clear flat and then more weathering. 

 GIFMaker.org_jy_Ayj_O


Too many models to build, not enough time in a lifetime!!

  • Member since
    March 2012
  • From: Corpus Christi, Tx
Posted by mustang1989 on Wednesday, February 25, 2015 8:10 AM

Those snakes sure look a lot better on the bird than they did on the decal paper! lol

Good lookin' bird you got yourself there Ernie!


 Forum | Modelers Social Club Forum (proboards.com) 

  • Member since
    November 2008
  • From: Central Florida
Posted by plasticjunkie on Wednesday, February 25, 2015 8:31 AM

Thanks Mustang. What a difference between your decals and Revell's. The Cartograph decals were a joy to apply while the crosses and smaller stencils from Revell were thick and hard to apply even with tons of Solvaset.

 GIFMaker.org_jy_Ayj_O


Too many models to build, not enough time in a lifetime!!

  • Member since
    November 2003
  • From: Naples, FL
Posted by tempestjohnny on Wednesday, February 25, 2015 9:46 AM

PJ. What an awesome looking machine. I agree wet future cures all silvering. John


JOIN OUR COMMUNITY!

Our community is FREE to join. To participate you must either login or register for an account.

SEARCH FORUMS
FREE NEWSLETTER
By signing up you may also receive reader surveys and occasional special offers. We do not sell, rent or trade our email lists. View our Privacy Policy.