SEARCH FINESCALE.COM

Enter keywords or a search phrase below:

Ju 87 Stuka GB

173263 views
2599 replies
1 rating 2 rating 3 rating 4 rating 5 rating
  • Member since
    October 2006
  • From: Tucson, AZ
Posted by Archangel Shooter on Wednesday, February 25, 2015 10:37 AM

That snake scheme looks great! I wish there was a decal set for it in 1/24. There's a mask set out there but with the problem I'm having with my air brush I didn't want to attempt painting one on.

And now I learn something new here about applying silvering decals to wet Future.

 Your image is loading...

 On the bench: So many hanger queens.


  • Member since
    May 2013
  • From: Indiana, USA
Posted by Greg on Wednesday, February 25, 2015 11:09 AM

CMK, looking very good mate.

I like your idea about using tube glue on the tire halves then sanding and re-notching the grooves, thanks for that. Great save on the propeller issue.

Ernie, that bird just keeps looking better and better. Great job on the snake. Yes

Your camo scheme is one of favorites from this GB. I really like it a lot.

Thanks for the tip about wet Future under a stubborn, silvering decal. Hadn't heard that one before. i would think that would adversely effect underlying detail, such as panel lines? Yes? No?

  • Member since
    December 2002
  • From: Bury St Edmunds, Suffolk, England
Posted by Bish on Wednesday, February 25, 2015 12:24 PM

Check, yes, the B-1 would certainly be suitable for that period. Yours is a B-2, the main visual differences are the exhausts and the cowling over the oil cooler underneath the engine.

Looking at the images of the Airfix B-1, it looks like a later version with improvements made in late 1939 and my guess is the markings will be for a 1940 era aircraft.

I am a Norfolk man and i glory in being so


On the bench: Airfix 1/72nd Harrier GR.3/Fujimi 1/72nd Ju 87D-3

  • Member since
    December 2002
  • From: Bury St Edmunds, Suffolk, England
Posted by Bish on Wednesday, February 25, 2015 12:25 PM

Looking very nice there PJ, looks like another one nearly finished.

I am a Norfolk man and i glory in being so


On the bench: Airfix 1/72nd Harrier GR.3/Fujimi 1/72nd Ju 87D-3

  • Member since
    November 2008
  • From: Central Florida
Posted by plasticjunkie on Wednesday, February 25, 2015 3:33 PM

TJ, Cmate , Shooter and Greg. Thanks for the kind d words.

Greg

I only use the wet Future method if there are little or no surface details as you said. The Future will make the silvering vanish but will not snuggle the decal down into recessed or protruding details as when using Solvaset that will melt down even thick decals. I have used it over some panel lines and after 10 or 15 minutes after application, I will lightly use a toothpick to press the decal into the recessed line. I do several light passes till it looks good then let it cure overnight.

 GIFMaker.org_jy_Ayj_O


Too many models to build, not enough time in a lifetime!!

  • Member since
    May 2013
  • From: Indiana, USA
Posted by Greg on Wednesday, February 25, 2015 4:40 PM

Thanks for taking the time to confirm my suspicions about the wet Future, Ernie.

  • Member since
    October 2006
  • From: Tucson, AZ
Posted by Archangel Shooter on Wednesday, February 25, 2015 5:01 PM

Here's a few progress pics. I started slapping on some of the decals which makes an improvement in appearance. Running into issues with a couple of the Cam decal slivering as I apply them, one was the R/H fuselage national insignia which the the lower left portion of the cross broke up. I fixed that by cutting part of the Airfix decal which it did match up to the broken decal and is nearly unnoticeable The CAM sheet didn't have a lot of panel markings, Sprue Bros is out of stock on a markings decal sheet so I may wind up having to use the old Airfix sheet. Can't really complain since both sheets are some 13 plus years old.

Looking at the below pic I thought I had overspray of the blue on the flaps but it must be the light of the flash bouncing.

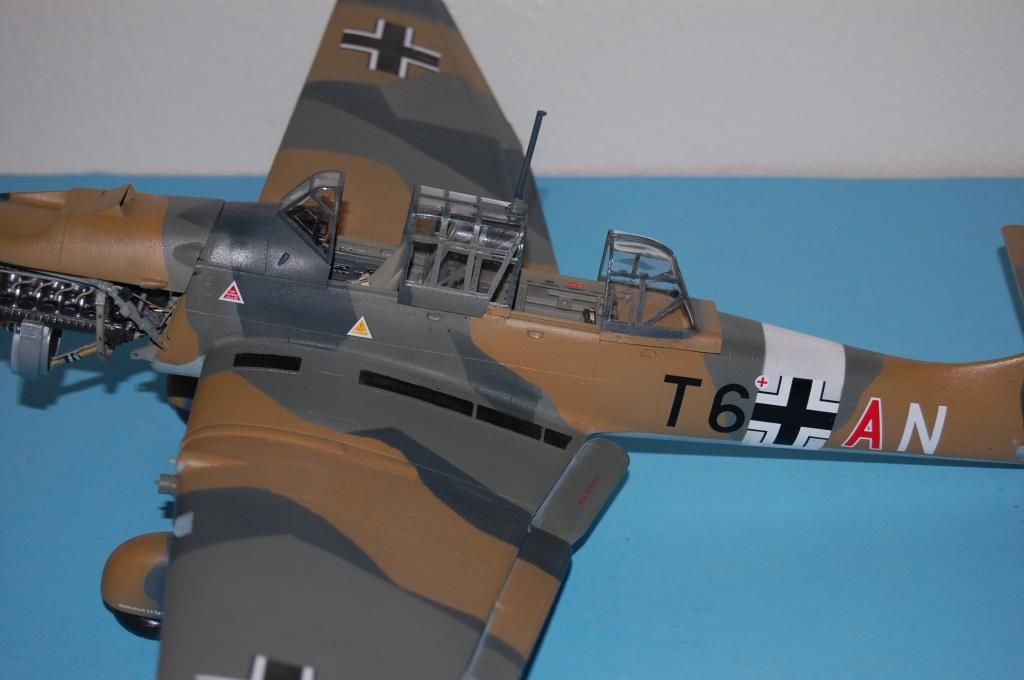
For the walkway I used thinned MM acrylic flat black, letting it flow in and around the edges.

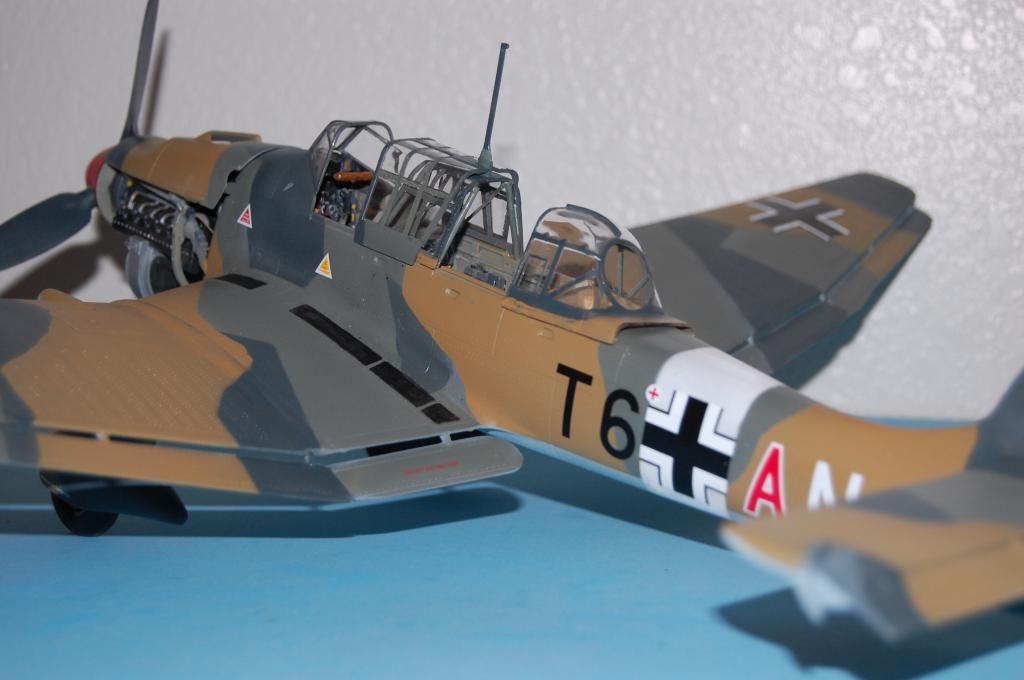
Only have a couple more of the major decals to apply then work on paint touch up's, gluing on the remaining parts, add more wiring to the engine area and attach the shoulder belts to the pilot seat. Now if I can just keep my fingers from knocking off the r/h inboard flap. Sure would be nice if there were an AM pilot/gunner set to sit in the cockpit, the Airfix crew is modeled after the BOB with the oversize lift vests. Hmmm....wonder if I can photoshop myself into the cockpit? Hmm


 Your image is loading...

 On the bench: So many hanger queens.


  • Member since
    November 2008
  • From: Central Florida
Posted by plasticjunkie on Wednesday, February 25, 2015 8:22 PM

Shooter

She's looking very good from here.

Greg

You are most welcome.

 GIFMaker.org_jy_Ayj_O


Too many models to build, not enough time in a lifetime!!

  • Member since
    May 2013
  • From: Indiana, USA
Posted by Greg on Wednesday, February 25, 2015 8:28 PM

Shooter, can't get enough of watching this one come together.

Thanks for all the great progress pics.

  • Member since
    September 2003
  • From: AandF in the Badger State
Posted by checkmateking02 on Wednesday, February 25, 2015 9:34 PM

Thanks, PJ.  Your snaky Stuka looks really good.  What an appealing outfit it's wearing!

Thanks, Greg.  First time I've tried re-grooving tires.  I was apprehensive about it, and relieved that it worked as well as it did.

Thanks for the info on Stukas, Bish.  I'm looking forward to picking up the new moulding, but this GB piqued my interest enough to buy two more of these old ones.  Old Jedi mind-trick again.

Great-looking Stuka, too, Archangel.  Another attractive outfit.  Makes a real "fashion statement."  Good work on the three-color prop spinner.  I hope I can do as well in that area.  I got a circle template yesterday and will make the attempt this weekend.


  • Member since
    December 2002
  • From: Bury St Edmunds, Suffolk, England
Posted by Bish on Wednesday, February 25, 2015 11:48 PM

Shooter, looks really nice, always good to se the markings going on.

I am a Norfolk man and i glory in being so


On the bench: Airfix 1/72nd Harrier GR.3/Fujimi 1/72nd Ju 87D-3

GAF
  • Member since
    June 2012
  • From: Anniston, AL
Posted by GAF on Thursday, February 26, 2015 5:10 PM

CMK02>  Nice save on the prop.  It's looking great.  Someone suggested using straws or tubing also for painting.

PJ>  Snake!  This is a well done example.  Good work!

Shooter>  My eye is drawn to the prop hub, having had so much trouble with my own.  Excellent work overall.

Enjoy seeing what others do with their builds.  :)

  • Member since
    November 2008
  • From: Central Florida
Posted by plasticjunkie on Thursday, February 26, 2015 7:39 PM

Check, Gaf and Bish

Thanks all for your positive comments.

I have been busy building pullouts for the kitchen cabinets so it's been taking a lot of my time but I managed to do some work on my Stuka today. I found an old thread  where Bish posted a very useful link: www.warbirdsresourcegroup.org/.../index.html

Yesterday I mixed some raw umber and payne's gray artists oils  to make a panel  line wash that was applied with a brush. I let it sit for an hour or two then use a thinner dampened Q Tip to clean up the excess.

My Instructions were listing the bomb color as RLM66 which I suspected to be incorrect then I found the above link. I painted the 250 kg dark Alclad steel and the SC1000 RLM65 as described in the link. I still need to weather it just a bit and add a wash to pop some of the details. I wish the instructions would be more accurate but then we know better. I also shot the spinner tip RLM04 and the props RLM70.

I also attached the dive brakes and applied the thin decal strips on the bakes.

 GIFMaker.org_jy_Ayj_O


Too many models to build, not enough time in a lifetime!!

  • Member since
    December 2002
  • From: Bury St Edmunds, Suffolk, England
Posted by Bish on Friday, February 27, 2015 12:43 AM

Glad you found that link PJ. She is looking good.

I am a Norfolk man and i glory in being so


On the bench: Airfix 1/72nd Harrier GR.3/Fujimi 1/72nd Ju 87D-3

  • Member since
    April 2013
Posted by SchattenSpartan on Friday, February 27, 2015 2:18 AM

She's looking great, Ernie! I love the snakes on hte fuselage sides!

Shooter: Those decals turned out really nicely!

  • Member since
    March 2012
  • From: Corpus Christi, Tx
Posted by mustang1989 on Friday, February 27, 2015 5:37 AM

plasticjunkie
Revell were thick and hard to apply even with tons of Solvaset.

I hear ya on that

Scott: That's a nice looking plane so far bud. Can you stick something in the pic like a coffee cup or even your hand so we can see just how big this thing is? I can only imagine at this point.


 Forum | Modelers Social Club Forum (proboards.com) 

  • Member since
    May 2013
  • From: Indiana, USA
Posted by Greg on Friday, February 27, 2015 9:26 AM

Ernie, looking good. Was that you who was out buying a circle template a wk or so back for the spinner? The masked tip looks very good. I'm curious because a template has been on my buy list and I've not tried this yet.

BTW, I missed the link to Rudel you posted for me a few pages back until now, interesting stuff, thanks!

GAF
  • Member since
    June 2012
  • From: Anniston, AL
Posted by GAF on Friday, February 27, 2015 11:44 AM

A circle template is good for a lot of things, including cutting out curved masking for complex curves.

Maybe even doing your own insignia!  Big Smile

  • Member since
    May 2013
  • From: Indiana, USA
Posted by Greg on Friday, February 27, 2015 12:06 PM

What a great tip, I'd never have thought of that!

Thanks, GAF.

  • Member since
    December 2002
  • From: Bury St Edmunds, Suffolk, England
Posted by Bish on Friday, February 27, 2015 12:19 PM

I must remember to get one of those this month for my armour wheels, but that would certainly be another good use for it.

I am a Norfolk man and i glory in being so


On the bench: Airfix 1/72nd Harrier GR.3/Fujimi 1/72nd Ju 87D-3

  • Member since
    November 2008
  • From: Central Florida
Posted by plasticjunkie on Friday, February 27, 2015 1:14 PM

Thanks guys. Still a few more things to do before reaching the finish line.

Greg

No I did not use a circle template even though I have one which I use for painting tank wheels. I used masking tape that I lay down on my bench and using a sharp blade, cut at a steep inside curb to match the spinner line. Took me about three attempts  to get the correct shape but that works out every time.

 GIFMaker.org_jy_Ayj_O


Too many models to build, not enough time in a lifetime!!

  • Member since
    September 2003
  • From: AandF in the Badger State
Posted by checkmateking02 on Friday, February 27, 2015 1:25 PM

'Twas me who--maybe among others--was obtaining a circle template for the Stuka nose cone.

My first attempt last night was a failure.  I'll try it again today.

One thought-provoking issue I'm having is how to ensure that the spinner goes through the template hole at a 90 degree angle so the rings run true, and not all whopper-jawed.

If I can't make that work, I'll probably try PJ's method and cut a curved piece of tape, or maybe try cutting a curved decal for the white center stripe.


GAF
  • Member since
    June 2012
  • From: Anniston, AL
Posted by GAF on Friday, February 27, 2015 2:53 PM

I think another suggestion was using tubing or soda straws for creating circles or painting props.  I've got a selection of brass tubing I cut short lengths off of to use as hole punches (not for metal, tho).  Yes, it works.  Just put what you want to punch on a soft piece of wood (such as pine) or a piece of matte board.

Painting the prop one color, then placing the tube over the tip to protect it while painting the other color should work.  If you have tubing of close sizes you can even do rings.  Big Smile  Sealing the edge or using some clear glue or Future to secure the prop in place would probably be advisable.  If you've already installed the prop in the model, this method will probably not work.

Your mileage may vary.  Wink

PS> How did I do the spiral on my Stuka model?  By hand, of course!  I did lay it out with a felt tip pen first, tho.

  • Member since
    May 2013
  • From: Indiana, USA
Posted by Greg on Friday, February 27, 2015 2:57 PM

Thanks for all the neat idea, gents.

CMK, I'm telling you, my memory.......... (if something isn't on the most recent page or two I get so lost).

Maybe secure the spinner with a few spots of blu-tack on the unpainted side? Just a random thought since I've never done it and have also pondered how to hold the template on square.

  • Member since
    September 2003
  • From: AandF in the Badger State
Posted by checkmateking02 on Friday, February 27, 2015 3:35 PM

Thanks, Greg.  Blu-tack--yup, that's what I think I'll do.  I'll also try and remember (my memory is about like yours!) to post photos, so whether it's a success or not, I can get some feedback and suggestions.

I just now finished painting the whole spinner white.  My next plan is to use the template and paint the lower part black green; then do the red on the tip, leaving a narrow white ring in the middle.

Of course, there's a time issue of letting each color dry for a day.  One thing I discovered yesterday with the circle template is that it will chip paint if you're not real careful.


  • Member since
    November 2008
  • From: Central Florida
Posted by plasticjunkie on Friday, February 27, 2015 3:36 PM

The circle template I find a bit fiddly as it needs to be affixed at the correct angle on the spinner and I spray away from the mask to avoid build up, something that can't be done using the template.

Tape laid and curve cut out. It may take you a couple of tries to get the right radius.

Tape applied around the spinner line. The tape broke when I lifted it from the cutting mat but it can be applied as one piece. It only took me a couple of minutes to demonstrate this. I find this a very easy and effective masking technique.

 GIFMaker.org_jy_Ayj_O


Too many models to build, not enough time in a lifetime!!

  • Member since
    September 2003
  • From: AandF in the Badger State
Posted by checkmateking02 on Friday, February 27, 2015 3:58 PM

Great!  Thanks PJ.

Is that Tamiya tape you're using?  Or regular ol' masking tape?


  • Member since
    November 2008
  • From: Central Florida
Posted by plasticjunkie on Friday, February 27, 2015 4:00 PM

CM

Cheap Dollar store tape. Nice and tacky for a super strong grip.

 GIFMaker.org_jy_Ayj_O


Too many models to build, not enough time in a lifetime!!

  • Member since
    September 2003
  • From: AandF in the Badger State
Posted by checkmateking02 on Friday, February 27, 2015 4:02 PM

Good!  Thanks again, PJ.  I think I'm going to try out your method before I go messing with the template again.  I appreciate it!


  • Member since
    November 2008
  • From: Central Florida
Posted by plasticjunkie on Friday, February 27, 2015 4:19 PM

You are welcome and good luck.

 GIFMaker.org_jy_Ayj_O


Too many models to build, not enough time in a lifetime!!

JOIN OUR COMMUNITY!

Our community is FREE to join. To participate you must either login or register for an account.

SEARCH FORUMS
FREE NEWSLETTER
By signing up you may also receive reader surveys and occasional special offers. We do not sell, rent or trade our email lists. View our Privacy Policy.