SEARCH FINESCALE.COM

Enter keywords or a search phrase below:

Armour in the West GB (D-Day to Berlin)

47478 views
560 replies
1 rating 2 rating 3 rating 4 rating 5 rating
  • Member since
    September 2006
  • From: Dripping Springs, TX, USA
Posted by RBaer on Monday, August 25, 2014 10:01 AM

Jack, looking mighty good! Those are some tiny links.

Shivi, what do you think of the AK burnishing fluid?

Apprentice rivet counter.

  • Member since
    April 2003
Posted by shivinigh on Monday, August 25, 2014 1:55 PM

the burnishing fluid works goods. Just make sure that you use a dish where the track can lay flat let it sit about 10 mins than flip it over. the longer it sits the darker the brown will become. I have another set of tracks for my stug IV that I am build for the defense of the rhine GB and going to see if the fluid can be used a second time.


  • Member since
    September 2006
  • From: Australia
Posted by Blitzwing on Saturday, August 30, 2014 5:27 AM

Finally got around to the decals on the Cromwell. Pretty straight forward affair really, except for the circle and star on top of the turret, although I'm not sure what I can do to it now except for painting white on the circular thing on top of the turret. 

I'll put on some light dirt and dust on the lower hull and work on the tracks tomorrow. 

URL=http://picasion.com/]

  • Member since
    November 2010
  • From: Florida-West Central
Posted by Eagle90 on Saturday, August 30, 2014 5:58 PM

Hey Blitz!  She's looking great!  Awesome work!

Eagle90


  • Member since
    April 2013
Posted by SchattenSpartan on Sunday, August 31, 2014 8:49 AM

Those decals look very nice, Blitz! The turret one really must've been a PITA to get on there, but it looks like you got that solved very nicely! Just a few touch-ups with white paint and it should look great!

Jack: Good going on your Stuart!

Shiv: Those tracks look great! Thanks for showing us that burnishing fluid (I didn't even know AK made that stuff). I've ordered a bottle to give it a try because the results are quite convincing!

  • Member since
    April 2006
  • From: ON, Canada
Posted by jgeratic on Tuesday, September 2, 2014 1:37 AM

Shiv - aye up on those tracks, what's the labelling like on the burnishing fluid, quite toxic I'm guessing?

Blitz - liking the look of your Cromwell.  The star on the turret top looks good, and touching it up with a paint brush should do it.

-------------------------------------------------------

Still working on the tracks for the Stuart V, while switching back and forth with some colour modulation via LifeColor olive 3 bottle set.

regards,

Jack

  • Member since
    November 2009
  • From: SW Virginia
Posted by Gamera on Tuesday, September 2, 2014 8:19 AM

BW: Looks great! Love the restrained chipping and weathering.

Jack: Great work on the colour modulation there! Those tracks look to be a pain but seems you've got the matter in hand.

"I dream in fire but work in clay." -Arthur Machen


  • Member since
    April 2013
Posted by SchattenSpartan on Tuesday, September 2, 2014 2:50 PM

I love the the color modulation! As always your attention to detail is truly amazing!

My burnishing liquid just arrived this morning (very fast delivery from Spain to Austria) and it got all kinds of nasty labels on there. I guess modelling aint the best hobby when trying not to pollute mother nature with chemicals... Stick out tongue Back to serious though: That liquid definitely isn't something I'd just pour down the sink...

  • Member since
    April 2006
  • From: ON, Canada
Posted by jgeratic on Saturday, September 6, 2014 6:10 PM

Thanks RBaer, Gamera and Schatt!

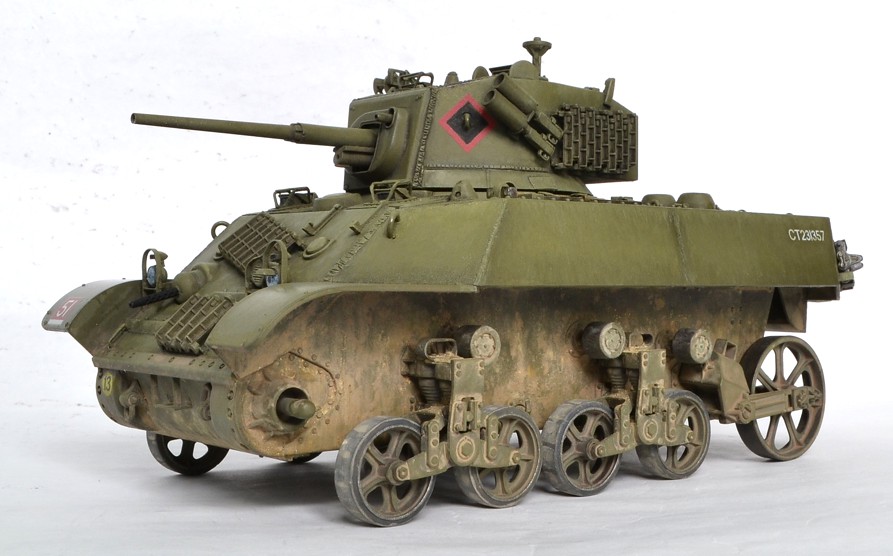
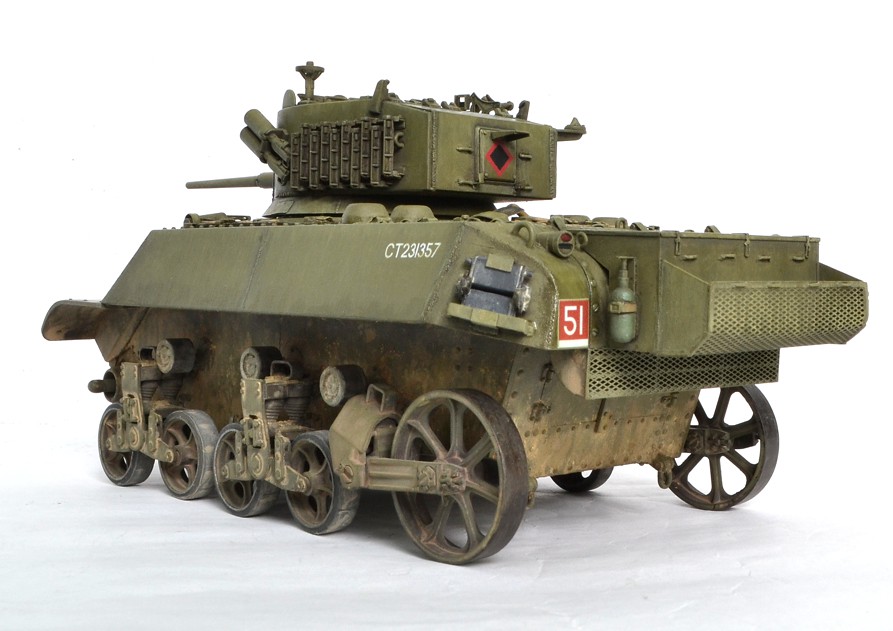
Track construction continues, with about two thirds now done.   I've also started weathering up the lower hull area, particularly where the running gear is.  Road wheels and rear idlers are now attached. 

I've also filled in the HQ squadron symbols with black.  The sister regiments of the 1st Hussars seemed to have this  characteristic style when viewed in early Normandy photos, so am assuming all three regiments of 2nd Canadian Armoured Brigade,  were the same.


14973775837_cd7a6e7196_b.jpg


15137323486_3be2da1b29_b.jpg


Was originally going with a full compliment of crew figures, but after reading an excerpt from 'Holding Juno', am switching to just the lone commander figure. 


On the second day of landing, Canadian troops found the area to be infested with snipers.  A Lieutenant W.E.P. Smith was ordered to recon the area, and being unable to see much in the buttoned up turret, he opened his hatch to get a better view.  With half his body exposed, a sniper struck him in the arm, with another round also hitting the side of his helmet.  Luckily, that one exited through the top without injury.  He was quickly rushed back to HQ, but refused medical aid until he could relay the sniper positions he had spotted just before being hit.  For this and several earlier acts of bravery, he was awarded the Military Cross.


So Ultracast provides the starting point for a bit of figure conversion.  Also exchanged the head form Hornet, adding a lot more expression to the scene described above:


Ultracast_35047_View2.jpg  Ultracast_35047_Contents.jpg


15157375611_1b65e9d50c_b.jpg


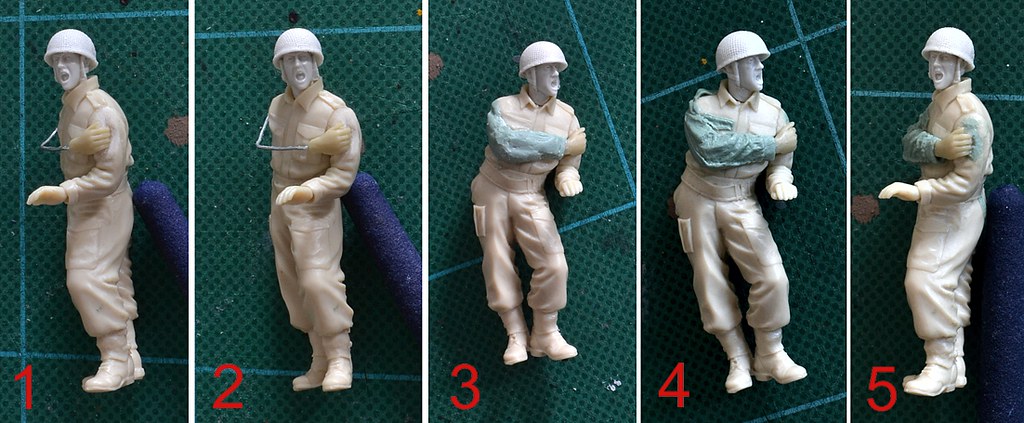
1.) and 2.) are the beginnings  with wire armature and resin replacement hand in position.


3.) basic shape sculpting putty in place.


4.) and 5.) more refined with added folds.  Also note shoulder strap and chest pocket flap sculpted to help convey his right arm reaching over to nurse his wound


This will now dry for 24 hrs, then will brush on some surfacer, followed with some final sanding.


regards,

Jack

  • Member since
    February 2014
  • From: Michigan
Posted by silentbob33 on Saturday, September 6, 2014 7:02 PM

Great work on that figure, and a great story to go with it. Thanks for showing the different stages of work, helps guys like me that are not so good with figures

On my bench: Academy 1/35 UH-60L Black Hawk

  • Member since
    September 2006
  • From: Dripping Springs, TX, USA
Posted by RBaer on Monday, September 8, 2014 11:27 AM

Jack: Lovely!  It's pretty much impossible to say how much figs can enhance a build, excellent start.

So while I was piddling with my Merkava and adding a couple of bits to the other two models going to SuperCon this weekend, I got some time in on the "Super". I went ahead and put the rest of the shocks together, mounted a few more road wheels and set the nose-down rake I need by gluing the front two swing arms in position at about 1/2 travel, and also made sure it all sat flat. I then assembled two tuns of 83 links, may have to add one link on the "long" side, but looks like a good fit so far. I also added two missing weld beads to the lower rear hull and some texture to the rear in general after glueing the rear plate to the rear lower, necessary to blend the parts as fit wasn't great.

So far:

We'll see waht this week brings, but I'm probably not going to get back on this one for a few days.

Thx!

Apprentice rivet counter.

  • Member since
    April 2013
Posted by SchattenSpartan on Tuesday, September 9, 2014 7:13 PM

Jack: It's always great to have a build tell a story and  I really like where you are going with that figure!

Your Pershing is looking very nice as well, RB!

  • Member since
    November 2009
  • From: SW Virginia
Posted by Gamera on Tuesday, September 9, 2014 7:15 PM

Yeah Jack, the mods on that figure look great and add a great deal of animation there!

RBaer: Those Fruils look fantastic- maybe one day I'll have to spring for a set. If only I wasn't so cheap.  

"I dream in fire but work in clay." -Arthur Machen


  • Member since
    April 2013
Posted by SchattenSpartan on Tuesday, September 9, 2014 7:51 PM

Don't do it, mate! There ain't no way back once you start using them. I swear I try to, but I can't build armor without them anymore, unless the kit has some truly amazing Magic tracks or those Modelkasten-style tracks already included. That's a rare exception though...

  • Member since
    February 2006
  • From: Cincinnati Ohio
Posted by DantheMan85 on Tuesday, September 9, 2014 7:57 PM

Nice work everyone,  getting closer and closer to finishing my US Cargo Truck.  I've decided to add some drum's that 'll go in the bed.  And started on my M4 Sherman.

On my Work Bench: Tamiya Ford GT 1/24

Up Coming: ?


  • Member since
    September 2006
  • From: Dripping Springs, TX, USA
Posted by RBaer on Thursday, September 11, 2014 10:20 AM

Looking good, Dan. Trucks deserve a load, no two ways around it.

I, in the meantime, have been rapidly depleting my new jar of MrSurfacer. I joined the upper and lower hulls last night after installing the hull MG mount and building a box for the hull blower, still working around lots of small fit issues, nothing major, just pesky. I then installed the first piece of added hull armor and made weld beads, probably a waste of time since they'll be largely covered up by the second piece, but what the heck. Speaking of which, that second piece will need it's back-side filled- it's visible when installed and HB molded it "hollow", same as the added turret armor. Gonna need some more Aves when this one's done for sure.

And as an experiment, I took the "broken" HB drive sprocket and did some mods to it to make it look like what the Super actually used by filling in the open portions of the teeth, forming the filler with the back-side of a drill bit to get the half-circle shape, and then sanded it all flush. A coat of enamel, more sanding, and I like it except that the Vallejo acrylic filler is too soft, so I took the"good" HB sprocket, and started the same process using Aves instead of the Vallejo, which is drying now. I think it'll work nicely. If I manage to score another one of these kits this weekend, I'll do both sides this way and satisfy my AMS.Stick out tongue

Pics:

^ Hull armor, 1st layer

^ Box for blower, to prevent daylight from being visible once hull is closed up.

^ And sprocket, after painting and sanding. Shape is good, all it would need if I were to be using this one is 13 slices of hex-rod to replace the drive ring attachment bolt heads.

Easy-peasy.Tongue Tied

As soon as I've gotten past the "technical" problems I've discovered/created, I can get on my Sherman for the Orphaned Armor GB, since I'm not happy unless I have two projects going at once, whee!

Apprentice rivet counter.

  • Member since
    November 2009
  • From: SW Virginia
Posted by Gamera on Thursday, September 11, 2014 10:33 AM

Rbaer & Dan: Those look great, please keep the photos coming!!!

"I dream in fire but work in clay." -Arthur Machen


  • Member since
    November 2009
  • From: SW Virginia
Posted by Gamera on Friday, September 12, 2014 11:09 AM

Those are some sexy sprockets!

"I dream in fire but work in clay." -Arthur Machen


  • Member since
    September 2006
  • From: Dripping Springs, TX, USA
Posted by RBaer on Friday, September 12, 2014 2:52 PM

Big Smile

Apprentice rivet counter.

  • Member since
    April 2013
Posted by SchattenSpartan on Sunday, September 14, 2014 3:33 PM

RBaer: Lovely work on your "Super". Those sprockets look damn good indeed!

Dan: Good call on adding some stowage. It should add a whole lot of interest to your already great looking truck! Nice start on the Sherman!

  • Member since
    April 2006
  • From: ON, Canada
Posted by jgeratic on Sunday, September 14, 2014 9:41 PM

RBaer - very interesting and dedicated detailing there.  The size of that Sherman really takes advantage of those Fruils  to good effect.

Dan - excellent work on the cargo truck.  Any extra stowage you can add  will give it even more character.

----------------------------------------------------

Thanks everyone for the positive feedback on the Stuart.  

Lieutenant smith is all painted up, and positioned in the turret:

One side of the tracks are done, with about a dozen or so links remaining on the other.  The original kit  vinyl tracks had 66 guide teeth, but I found with these individual links 64 was enough, and adding more would not give the right tension.  Due to the intricate constructon of each track pad/link, I decided to make a continuous joined run, which I'm hoping won't be a problem to paint:

To dry fit the track, the drive sprocket is first lined up with the guide teeth.  Then it is placed near it's axle location, resting on the road wheel while the opposite end is looped around  the large idler and everything else.  Then the drive sprocket is pressed onto it's proper place.  Seems  the tracks are strong enough to hold the sprocket steady, and that piece won't require gluing as I had thought earlier.

regards,

Jack

  • Member since
    July 2014
Posted by modelcrazy on Sunday, September 14, 2014 10:36 PM

Your Lt looks fantastic Woody, and oh, the Stuart looks pretty good too.

Steve

Steve

Building a kit from your stash is like cutting a head off a Hydra, two more take it's place.


http://www.spamodeler.com/forum/

  • Member since
    September 2006
  • From: Australia
Posted by Blitzwing on Monday, September 15, 2014 5:01 AM

Jack: I really like that figure in the turret. You did a great job on it and the Stuart is great as well. I hope to do figures as well as yours one day. 

I finally got to finishing off my Cromwell and here it is. I hope you like it and comments and feedback welcome. 

URL=http://picasion.com/]

  • Member since
    November 2009
  • From: SW Virginia
Posted by Gamera on Monday, September 15, 2014 8:48 AM

Jack: Lt. Smith looks fantastic and gee when you finish painting those tracks you should be almost done.

BW: Super job there on the Cromwell! The fading and the mud/grime looks perfect.

"I dream in fire but work in clay." -Arthur Machen


  • Member since
    September 2006
  • From: Dripping Springs, TX, USA
Posted by RBaer on Tuesday, September 16, 2014 9:59 AM

Jack: I like it a lot, and admire the effort you've put into the tracks. Superb!

BW: Very nice Cromwell, weathering is spot-on.

Apprentice rivet counter.

  • Member since
    April 2013
Posted by SchattenSpartan on Wednesday, September 17, 2014 2:24 PM

Jack: The Leutenant looks terrific! Another great figure paint job from you! You really make me want to work on my figure painting skills... Those fiddly tracks sure were worth the effort!

Blitz: The weathering on your Cromwell is fantastic! The fading, mud, chipping and dust all blend in perfectly!

  • Member since
    April 2003
Posted by shivinigh on Thursday, September 18, 2014 6:53 AM

BW- that Cromwell looks great. The shading turned out really nice.

I posted this in the FSM GB by accident so figured I should post here where it belongs. An update on my Chaffee. The seam at the front of the turret is where a weld seam is suppose to be.

so I am trying a technique to make welds seams using enamel paint.

going to try a couple more times to refine the technique.


  • Member since
    November 2010
  • From: Florida-West Central
Posted by Eagle90 on Thursday, September 18, 2014 3:50 PM

Blitzwing!  Awesome looking Cromwell!  The weathering is great! 

Which pic would you like to see on the front page?

Eagle90


  • Member since
    November 2010
  • From: Florida-West Central
Posted by Eagle90 on Thursday, September 18, 2014 3:54 PM

modelcrazy
I finally finished my M4A1, and here it is. I decided not to put the side armor on, it distracted from the subject and besides, there wasn't a lot of photo evidence to support them.

It depicts a Sherman slugging thru a muddy field in Germany, April 1945.

Please tell me what you think.

Steve

Steve, my apologies for not getting this on the front page sooner.  Things have been crazy around here, but please let me know which pic you would like to see posted.

Awesome job! Super detailing!

Eagle90


JOIN OUR COMMUNITY!

Our community is FREE to join. To participate you must either login or register for an account.

SEARCH FORUMS
FREE NEWSLETTER
By signing up you may also receive reader surveys and occasional special offers. We do not sell, rent or trade our email lists. View our Privacy Policy.