SEARCH FINESCALE.COM

Enter keywords or a search phrase below:

"Century series Jets" GB 2014-2015 * CLOSED *

64888 views
891 replies
1 rating 2 rating 3 rating 4 rating 5 rating
  • Member since
    October 2010
  • From: Rockford, IL
Posted by AlanF on Friday, July 18, 2014 6:55 PM

I just received my KittyHawk F-101 A/C Voodoo.  Here is my first impression of the kit contents.

The instruction manual has a nice glossy cover with colored painting/decal callouts, but the actual instructions on on regular paper and in B&W.

I'm liking this scheme...

The plastic molding is a mixed bag. There are some nice crisp details and almost no flash but it's marred by a lot of white "push" marks on the opposite side of the injector marks. For the price of this kit and only NMF painting schemes given, this is a crime.  Take a look:

At first I thought the cockpit detail was lacking as all of the instrument surfaces are smooth with no detail, but this may actually be a good thing.  The detail is provided by decals and photo etch so it saves some work in having to sand off those areas.

The decals do look nice. 

All in all, my feelings about this kit are mixed. The engraved detail and panel lines are very good as are the decals and there is next to no flash; but, this has to be balanced by inexcusable "push" and injector pin marks along visible surfaces.  This may mean looking for a non-NMF scheme if some fine sanding and a coat of primer can't hide them.  The big unknown right now is the fit of the kit.  KittyHawk has a reputation for making some really bad fitting kits.  I may have to get the Revell kit and do a comparison build just for fun! 

Alan

  • Member since
    January 2014
  • From: Toronto
Posted by Rob S. on Friday, July 18, 2014 8:54 PM

So, a Kitty Hawk, eh? first time I see one. I'm not thrilled either to see those injector pin marks like that. I've done some super el-cheepo kits and have never seen those marks before. I'm confused why doing NM would be an issue?

______________________________________________________________________________


On the Bench: Nothing on the go ATM

  • Member since
    April 2014
Posted by B_one fixer on Saturday, July 19, 2014 8:52 PM

The kit looks pretty good aside from the push marks.

  • Member since
    October 2010
  • From: Rockford, IL
Posted by AlanF on Saturday, July 19, 2014 9:36 PM

1:48 Kitty Hawk F-101 Voodoo

I spent a few hours on the kit today and I hate to say it, but I think I'm going to have a real love/hate relationship with this kit. Right now, hate is ruling. The plastic is extremely brittle and fragile. Taking parts off the sprue can easily fracture them or have those wonderful white "push" marks show up.  Now I understand what they are as any stress in the plastic will easily cause them. I've never experienced that before.There are some very small and detailed parts but getting them off the thick sprue without damage and sanding without damage will be a challenge. In putting together the cockpit, the seat almost came apart in my hands!

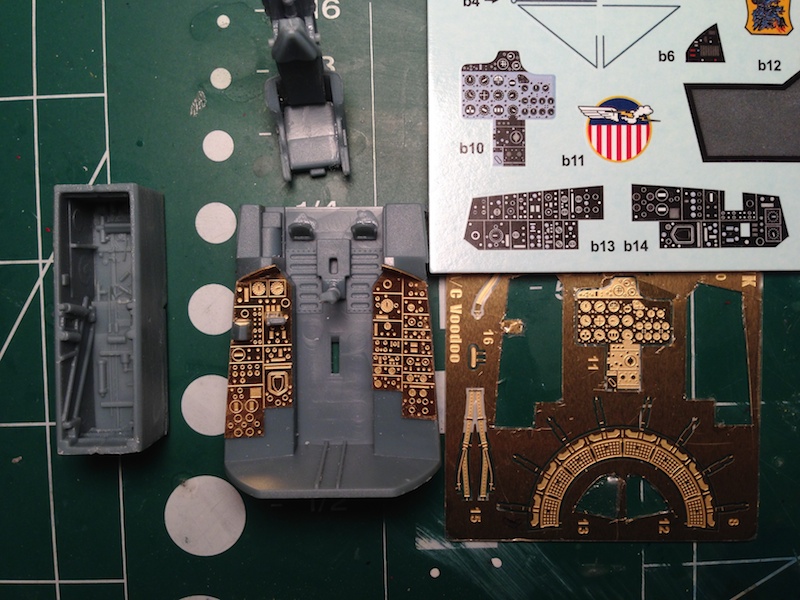
The cockpit is very basic. When looking at the kit yesterday, I assumed the PE instrument displays would go over the decals, like other kits I've done.  Not so.  You have the choice - a flat decal on a flat cockpit surface OR the PE instrument panel. I did the PE but the detail is very fine and the PE isn't colored, so I'm really not sure what I can bring out of it after painting.  I'm going to give it a shot.  I figure, at worst, I can place the decals over the PE and get a reasonable effect. Even with the PE, the cockpit is sparse with injector pin marks all along the bottom and the ejection seat isn't much better. I've seen worst but not in a kit at this price.

Thinking ahead, I'm getting more and more concerned about a NMF on this, given the nature of this plastic. NMF shows every flaw and while the fine detail is nice and suited to NMF, the easily fractured plastic is not. I might try a more forgiving Aluminum paint such as Tamiya instead of Alcad.  I understand that some of these where painted Aluminum to protect from corrosion and that might give that effect. 

For a kit with a list price of some $75 and an online retail price somewhere in the $50s, this is one major disappointment.  To spend the time and energy to engineer the fine tooling this kit took and then use a crappy grade plastic is a crime. Maybe things will get better?

  • Member since
    July 2004
  • From: Sonora Desert
Posted by stikpusher on Sunday, July 20, 2014 1:20 AM

Oh this is some great stuff!

Alan, no offense against you and Kitty Hawk models, but I think I prefer the raised detail of Monogram's F-101 cockpit to the KH PE or decals. The floorboards and rudder pedals look superb, but the side consoles I think were done better by Monogram.


F is for FIRE, That burns down the whole town!

U is for URANIUM... BOMBS!

N is for NO SURVIVORS...

       - Plankton

LSM


  • Member since
    May 2013
  • From: From the Mit, but live in Mason, O high ho
Posted by hogfanfs on Sunday, July 20, 2014 7:30 PM

Alan,

I agree, seems like a lot of shortcoming for a kit in that price point.

I hope you have better luck with it.

 Bruce


 On the bench:  1/48 Eduard MiG-21MF

                        1/35 Takom Merkava Mk.I


  • Member since
    November 2008
  • From: Central Florida
Posted by plasticjunkie on Monday, July 21, 2014 7:08 AM

I have to agree with stilk and Bruce. Monogram did one heck of a job with their Voodoo,  IMO you can still make it work into a good looking model as this is the only C version in 1/48. I read somewhere that a C conversion was made for the Monogram so I may try to get that for the other Voodoo I have.

Depending on where the sink marks are located and how they are filled will complicate things for an Alclad NMF.

 GIFMaker.org_jy_Ayj_O


Too many models to build, not enough time in a lifetime!!

  • Member since
    April 2010
Posted by Theuns on Monday, July 21, 2014 1:08 PM

I am rather surprised at the "questionable" quality of the Kittyhawk kit......I was under the impresion that they were very good.....hmmm.

As for my 104, I have completed most of the filling and sanding on the fuselage, I will have to re-do some of the very nice detail I have lost in the process.

We had our IPMS nationals over the weekend and I got hold of a 1/48 Hobbyboss F-105 Thud D. I just couldn't help myself, at round UD$ 25 I recon even the " ugly looks" of the mud mover can be overlooked. Sorry to all the Thud lovers out there LOL!

Theuns

  • Member since
    January 2014
  • From: Toronto
Posted by Rob S. on Monday, July 21, 2014 9:39 PM

Speaking of Thuds, watched a great YouTube documentary on this iconic plane. Didn't realize how badly they got mauled in 'Nam. I am pretty sure, my Century jet will be either a Thunderchief or a Wild Weasel. I know the hobby shop near me has a Trumpy of either one (I can't remember). Kinda hoping for the WW version with the double cockpit.

______________________________________________________________________________


On the Bench: Nothing on the go ATM

  • Member since
    April 2014
Posted by B_one fixer on Monday, July 21, 2014 11:32 PM

A little progress on the 106

Got the halves together and sanded. I ended up have to shim the air refueling recepticle since it sat low when put into place. Since I ended up sanding off some of the detail on the back bone, I went ahead and Re-scribed the entire upper fuselage. I will most likely end up rescribing the whole kit as I go.

I ended up with a step I will have to fix, but it's no biggie.

Got the main wheel well painted up

I think I am going to do this jet in the landing phase with the drag chute deployed. I am currently trying different ways to make a drag chute from scratch. There is one that is promissing. If it works out that will be another how-to thread all on its own.

  • Member since
    April 2010
Posted by Theuns on Monday, July 21, 2014 11:55 PM

Wow that wheel well detail is stunning!

Theuns

  • Member since
    January 2014
  • From: Toronto
Posted by Rob S. on Tuesday, July 22, 2014 6:28 AM

Great progress, B1, on that 106!

______________________________________________________________________________


On the Bench: Nothing on the go ATM

  • Member since
    March 2010
  • From: Boston
Posted by mach71 on Tuesday, July 22, 2014 7:45 AM

B1, I love your idea of having your Dart in the landing roll! Have you considered vac-forming the drag chute? Some .010 thick sheet styrene would form a nice, stiff chute that would look good.

Great job on the -106 so far.

  • Member since
    May 2013
  • From: From the Mit, but live in Mason, O high ho
Posted by hogfanfs on Tuesday, July 22, 2014 8:12 AM

mach71

B1, I love your idea of having your Dart in the landing roll! Have you considered vac-forming the drag chute? Some .010 thick sheet styrene would form a nice, stiff chute that would look good.

Great job on the -106 so far.


I was going to suggest the same thing! But, I have never performed a vacuum forming procedure before!


B1, the 106 is looking great!


 Bruce


 On the bench:  1/48 Eduard MiG-21MF

                        1/35 Takom Merkava Mk.I


  • Member since
    April 2014
Posted by B_one fixer on Tuesday, July 22, 2014 11:11 AM

Thanks all, I have considered vacuforming a chute. Right now I am waiting on styrene sheets. I don't want to use what I have on hand because I know I will go thru a lot doing some trial and error. I also am trying making one from resin while I wait for the sheets. Thanks for the suggestions guys.

  • Member since
    October 2004
  • From: Northern Virginia
Posted by ygmodeler4 on Tuesday, July 22, 2014 11:11 PM

B1 your 106 is looking great....

Here's some progress on mine, got the top and bottom halves glued together, that was a real chore, I don't remember it being that difficult the last two times I built it.

-Josiah

  • Member since
    April 2014
Posted by B_one fixer on Tuesday, July 22, 2014 11:53 PM

YG I am right there with you. I fought to get it to fit around those tabs without it popping back off

  • Member since
    October 2004
  • From: Northern Virginia
Posted by ygmodeler4 on Wednesday, July 23, 2014 1:05 AM

I tried doing it back to front and taping as I went along...got all the way to the intakes and discovered the bottom was about 1 mm too short and it screwed up the whole thing so I had to redo it all and started from the front and worked my way back.

I like what you did to the wheel wells, hopefully I can get mine looking that good...I plan on doing all the detail painting towards the end of the build after all the sanding and general painting is done.

-Josiah

  • Member since
    November 2008
  • From: Central Florida
Posted by plasticjunkie on Wednesday, July 23, 2014 8:38 AM

 GIFMaker.org_jy_Ayj_O


Too many models to build, not enough time in a lifetime!!

  • Member since
    May 2013
  • From: From the Mit, but live in Mason, O high ho
Posted by hogfanfs on Wednesday, July 23, 2014 8:48 AM

Plasticjunkie, I'm really liking how this Tenax works. Anywhere special it has to be purchased? Or, can I find it my LHS?

And great job on the 101! All these builds are looking fantastic!


 Bruce


 On the bench:  1/48 Eduard MiG-21MF

                        1/35 Takom Merkava Mk.I


  • Member since
    November 2008
  • From: Central Florida
Posted by plasticjunkie on Wednesday, July 23, 2014 9:10 AM

Thanks Bruce. You should be able to get it at your LHS. It's usually near the paints. I use both Tenax and Plast I Weld with the Touch N Flow applicator for better control, great products.

 GIFMaker.org_jy_Ayj_O


Too many models to build, not enough time in a lifetime!!

  • Member since
    March 2010
  • From: Boston
Posted by mach71 on Thursday, July 24, 2014 6:19 PM

I actually started work on the -102 today.

I got the base paint down and some of the photo etch.

  • Member since
    October 2010
  • From: Rockford, IL
Posted by AlanF on Thursday, July 24, 2014 7:14 PM

1:48 Kitty Hawk Voodoo F-101C

Nice job ygmodeler4 and Mach71.

Plasticjunkie, your Voodoo is starting to look good. I may have to pick up the Revell kit after I finish the Kitty Hawk one.

--

Well I managed to finish the cockpit. I don’t think it came out all that bad with using the PE. It is better than going the decal route. A nice wash and some dry brushing worked wonders. The seat looks a little bit too forward to my eye as the controls to the rear would be hard to reach or look at, but maybe it’s just me and that’s how the real one was.


Sadly, I’m not sure how much will be visible once it is placed inside the bird.

  • Member since
    March 2010
  • From: Boston
Posted by mach71 on Thursday, July 24, 2014 7:59 PM

Alan, That's nice looking job on cockpit. The PE looks great.

  • Member since
    November 2008
  • From: Central Florida
Posted by plasticjunkie on Friday, July 25, 2014 7:51 AM

mach and Alan

Great job on both pits and gez unfortunately most will be kind of hard to see once the pit is buried in the fuselage.

 GIFMaker.org_jy_Ayj_O


Too many models to build, not enough time in a lifetime!!

  • Member since
    March 2010
  • From: Boston
Posted by mach71 on Friday, July 25, 2014 9:01 AM

Yup, I just spent 15 min painting the molded in emergency O2 bottles and piping on the side of the

ejection seat. I test fit the seat, and they are impossible to see. I also used PE for the rudder pedals and I'm guessing they will never be seen once I seal the fuselage.

Oh well, I know the detail is there.  

  • Member since
    May 2013
  • From: From the Mit, but live in Mason, O high ho
Posted by hogfanfs on Friday, July 25, 2014 9:40 AM

Alan and Mach71, those cockpits look great! I have to agree with stick, it's a shame any of the beautiful detail will not be seen!

Keep up the great work!

 Bruce


 On the bench:  1/48 Eduard MiG-21MF

                        1/35 Takom Merkava Mk.I


  • Member since
    January 2014
  • From: Toronto
Posted by Rob S. on Friday, July 25, 2014 7:31 PM

Alan...spectacular pit!! Great PE work!

______________________________________________________________________________


On the Bench: Nothing on the go ATM

  • Member since
    March 2010
  • From: Boston
Posted by mach71 on Friday, July 25, 2014 8:04 PM

I'm just about done the cockpit.

  • Member since
    October 2004
  • From: Northern Virginia
Posted by ygmodeler4 on Saturday, July 26, 2014 8:47 PM

Wow, everyone's builds are looking fantastic.

Here's a small update of mine...

and I took a page from PJ's book and decided to try the stretched sprue/ tenax method.

-Josiah

JOIN OUR COMMUNITY!

Our community is FREE to join. To participate you must either login or register for an account.

SEARCH FORUMS
FREE NEWSLETTER
By signing up you may also receive reader surveys and occasional special offers. We do not sell, rent or trade our email lists. View our Privacy Policy.