SEARCH FINESCALE.COM

Enter keywords or a search phrase below:

"Century series Jets" GB 2014-2015 * CLOSED *

64890 views
891 replies
1 rating 2 rating 3 rating 4 rating 5 rating
  • Member since
    January 2014
  • From: Toronto
Posted by Rob S. on Sunday, August 3, 2014 6:51 PM

Made some progress on the opening of my two builds. Being a Meng and a Trumpeter, NO challenges thus far. I am doing them each a step at a time. Build a step, set it aside and move to the other while the other sets up or dries.

Here's the pits for both. The Meng has raised side control details and a decal over a raised detailed IP. The Trumpy has the usual flat IPs with decals. Harnesses are scratched from BareMetal foil.

Here is steps 2-3 of the Meng. The engine nozzle and the landing gear. the nozzle is well detailed and so is the LG. LG was done with Vallejo silver and oil washed:

Here's steps 2-3 for the Thud. Basic engine nozzle and front LG tub. The LG was quite complex with multiple fiddly parts, but, went together well. Painted with Vallejo white, but, have not washed yet as that paint is taking forever to dry. The engine was done with Vallejo gungrey and lightly dusted with flat brown and washed:

Fuselages start tomorrow Smile

______________________________________________________________________________


On the Bench: Nothing on the go ATM

  • Member since
    November 2008
  • From: Central Florida
Posted by plasticjunkie on Sunday, August 3, 2014 8:41 PM

Thanks Alan, glad you like my Voodoo. Your has some issues but you are doing a great job. Incredible how dimpled those brake doors are. It's going to take some filler to smooth out the surface and they should look fine.

Rob

Great work on the pits!

 GIFMaker.org_jy_Ayj_O


Too many models to build, not enough time in a lifetime!!

  • Member since
    March 2010
  • From: Boston
Posted by mach71 on Tuesday, August 5, 2014 7:16 PM

Those Voodoo's are looking nice guys.

Rob your jets are looking very nice!. What do you think of -102 so far?

I'm liking the Meng kit so far.

  • Member since
    January 2014
  • From: Toronto
Posted by Rob S. on Wednesday, August 6, 2014 8:04 AM

Mach, here`s my take on the MENG. VERY good so far. I really appreciated the way the fuselages were molded to the sprues. Normally, when you clip off a fuselage from a sprue there is sometimes a burr or spot that has to be worked on, but, MENG molds the fuselage pins on the side of the rim, which is far superior when removing it. Very nice touch. Everything is crisp and the fit is great. Do have to do the normal amount of work sealing the spine, but, no gaps. I do notice, however, underneath the rear, just at the engine exhaust port, the plastic doesn`t sit flush, so, I will have to fill that to level it off. The plastic is nice and hard and takes sanding and polishing well too.

______________________________________________________________________________


On the Bench: Nothing on the go ATM

  • Member since
    January 2014
  • From: Toronto
Posted by Rob S. on Wednesday, August 6, 2014 3:39 PM

The fuselage on the MENG 102 went together ok. I still have to go through the sealing and sanding of the spine, but, that's normal on all kits. I mentioned above that there was a bit of a leveling issue in the rear, but, easy to remedy.

______________________________________________________________________________


On the Bench: Nothing on the go ATM

  • Member since
    January 2014
  • From: Toronto
Posted by Rob S. on Wednesday, August 6, 2014 3:42 PM

The fuselage of the Trumpy 106 kicked off today. I opened the vents on the cannon bay door to start off the construction and that's it so far. Will seal the halves together tonite (bit of minor clean up on each hole, but, didn't go to bad with the ole pinvice.

______________________________________________________________________________


On the Bench: Nothing on the go ATM

  • Member since
    April 2014
Posted by B_one fixer on Wednesday, August 6, 2014 7:28 PM

Wow every ones builds are looking fantastic. I got the chance to tinker with the 106 for a bit today. I got to lay down the colors that are needed for the scheme. I still have the undercarriage to do.

I find I am having a hard time squeezing in the 106 due to the fact I am building up some WWII aircraft for our IPMS show we are having down at pearl harbor on Dec 7th. Since I have never built up a single WWII era aircraft ever I am having to do alot of research on the subjects.

  • Member since
    January 2014
  • From: Toronto
Posted by Rob S. on Wednesday, August 6, 2014 8:33 PM

Looks good B1...what colour is the gray? What brand paint and colour, I should say?

______________________________________________________________________________


On the Bench: Nothing on the go ATM

  • Member since
    June 2008
Posted by lewbud on Wednesday, August 6, 2014 8:37 PM
Started work on the 106 last night. The kit is a product of it time, and the only game in town if you want a divine scale F-106. Found a build up on Britmodeler and am following some of his advice. The wings have no support in the center so I glued some strip stock where the wings meet the fuselage, flexing ended. To make it easier to paint the engine, he engineered a stop so he could insert the engine after he was through painting. I followed his advice and did the same. He then proceeded to scratch build a cockpit. Here's where we part company because this is to be a low stress build after rushing to get kits finished to go to the Nats in Hampton. Primered the pit white so I could see where I was painting.  photo CenturySeriesBuild001.jpg  photo CenturySeriesBuild002.jpg  photo CenturySeriesBuild003.jpg Got a little bit of clean up under the wing, but she's far from unbuildable.

Buddy- Those who say there are no stupid questions have never worked in customer service.

  • Member since
    April 2014
Posted by B_one fixer on Wednesday, August 6, 2014 10:16 PM

Hey Rob I use tamiya acrylics. I used tamiya sky grey x-19 mixed with white and added tamiya clear x-22  to get the right tone of grey.

  • Member since
    January 2014
  • From: Toronto
Posted by Rob S. on Thursday, August 7, 2014 5:10 AM

B1..thanks, I am going with a Model Master enamel grey that is supposed to be an exact colour match, so, I don't have to mix.

Lewbud..give that Hasegawa 106 a good go! I'm going to be interested in how you tackle this one. I got too stressed out with it, so, moved on to the two current projects on the go now.

______________________________________________________________________________


On the Bench: Nothing on the go ATM

  • Member since
    November 2008
  • From: Central Florida
Posted by plasticjunkie on Thursday, August 7, 2014 7:03 AM

Great job on those Delta winged birds!  My buddy is at the Nats sent me a picture of the new 1/48 Kitty Hawk Cougar in USMC markings and it looks fantastic. I wonder if it has the same issues as their Voodoo?  

Not much to photograph at this time but just a short update about my Voodoo. I finally got rid of the nasty join lines along the bottom wing running just a bit behind the leading edge. Don't understand why they put a join line there since there is no panel line there to begin with. It also had a narrow valley where they met that required multiple applications of thick CA smoothed out with a toothpick. Took about 4 application to fill in the valley but it's invisible now after sanding and polishing and re scribing some minor details.

Getting ready to attach the nose cone and masked canopies prior to  shooting  multiple black and grey panel color variations in prep for the Alclad polished aluminum that I will be using. I have experimented in the past with this method which gave subtle variations in panel colors using one Alclad shade.

Will post some pictures once I get there.

 GIFMaker.org_jy_Ayj_O


Too many models to build, not enough time in a lifetime!!

  • Member since
    March 2010
  • From: Boston
Posted by mach71 on Thursday, August 7, 2014 12:18 PM

Well, I made a rookie mistake. I glued the engine to the bulkhead upside down. It was a quick fix.

I got the fuselage glued together.

I'm loving the 106 goodness in this thread! looking great.

  • Member since
    May 2013
  • From: From the Mit, but live in Mason, O high ho
Posted by hogfanfs on Thursday, August 7, 2014 1:18 PM

Gentleman,


Very impressive work! I'm glad I jointed this GB, lots of fantastic WIP pictures!


I'm hoping to get started on my Thud soon. Just need to make the time.

 Bruce


 On the bench:  1/48 Eduard MiG-21MF

                        1/35 Takom Merkava Mk.I


  • Member since
    March 2010
  • From: Boston
Posted by mach71 on Friday, August 8, 2014 1:03 PM

Plugging along. I attached the wing and peripheral's today.

I'm liking the engineering on this kit. Much thought went into the way

parts go together. I particularly like the way the wings are glued to the weapons

bay. That assembly is then pivoted into the fuselage, and snapped down in the back.

It makes for a nice fit.

I never build a jet with ordinance showing so I closed up the weapons bay.

  • Member since
    January 2014
  • From: Toronto
Posted by Rob S. on Friday, August 8, 2014 7:25 PM

Mach...looking awesome. I too got some progress on both the 102 and 105. The MENG pretty much snaps together perfectly. The engineering on this is so perfect that everything is tight and requires no fill. I am very pleased with it. I added some precautionary weight to both nose cones of both planes just in case. I fear that massive 105 will be a tail sitter....though, the nose cone is so tiny, I don't know if I could get enough weight in the nose. We'll have to see. The Trumpter kit is extremely well engineered as well. The plastic is finer than the MENG, but, nonetheless, it's a superior kit Yes Yes.

Here's the fuselages sealed and polished at the spines:

Starting to look like planes....the Thud's wings were deliciously complex with multiple parts making up the ailerons Big Smile:

Here's the MENG..next step will be installing the rear brake and landing gear. I think I may do this one with the canopy up as it provides the parts to pose it that way. The Case XX wing parts were a nice touch with the slight droop in the wing tips:

And the Thud...actually gotta stop calling it that as it's a G model, thus, a Wild Weasel, but, love the name Thud for this classic plane!! The lines on this plane were so unique and quite beautiful, I must say:

______________________________________________________________________________


On the Bench: Nothing on the go ATM

  • Member since
    March 2010
  • From: Boston
Posted by mach71 on Friday, August 8, 2014 9:07 PM

Rob, those sure are pretty planes! I love the looks of a Thud, I know it's a Weasel, but it's always a Thud to me. I've seen a few up close and its a big bird.

I put a nose weight in the 102, I don't think it needed it with the big delta wing but better safe than sorry.

I need to get a new touch-n-flow applicator, I used a fine paintbrush to apply the ten-x and it wandered a bit. I also had small gaps at the wing/fuselage join. The left side was small enough to fix with ten-x and pressure but the right one was a bit to big. I used baking soda and c/a on that side.

  • Member since
    April 2010
Posted by Theuns on Saturday, August 9, 2014 1:02 AM

Rob, any issues or fit problems to look out for with the 1/48 Trump Thud?

Theuns

  • Member since
    January 2014
  • From: Toronto
Posted by Rob S. on Saturday, August 9, 2014 6:18 AM

Theuns...actually, it's the 1/72 version. Thus far, I can say I have had no fit problems. Fixing the wings to the fuselage, I had to hold the wings in place individually to avoid a very small .5mm potential gap, but, in the end, success on both sides.

True, Mach, I love the ole moniker: Thud... very classic!!

______________________________________________________________________________


On the Bench: Nothing on the go ATM

  • Member since
    January 2014
  • From: Toronto
Posted by Rob S. on Saturday, August 9, 2014 6:23 AM

Just a comment...the F-102 was a massive plane too. That Thud was massive and I'm just realizing with them side by side, that Delta Dagger was truly gargantuan. WW was 20.4m long, DD was 21m long...wow!! A B-17 Bomber was 23m long just to compare.

______________________________________________________________________________


On the Bench: Nothing on the go ATM

  • Member since
    January 2014
  • From: Toronto
Posted by Rob S. on Saturday, August 9, 2014 3:08 PM

I'm thinking this is impossible to see from the pic, but, first coat of enamel gray FS16473 done on F-102. I like that I don't have to lay down a clear coat cuz it's already glossy:

______________________________________________________________________________


On the Bench: Nothing on the go ATM

  • Member since
    January 2014
  • From: Toronto
Posted by Rob S. on Saturday, August 9, 2014 7:50 PM

Thud tri-colour Nam era cam pattern freehanded:

______________________________________________________________________________


On the Bench: Nothing on the go ATM

  • Member since
    January 2014
  • From: Toronto
Posted by Rob S. on Sunday, August 10, 2014 7:59 AM

Here it is clear coated and oil washed. Big delay on F-102 due to enamel paint use. Longer drying time.

______________________________________________________________________________


On the Bench: Nothing on the go ATM

  • Member since
    March 2010
  • From: Boston
Posted by mach71 on Sunday, August 10, 2014 12:32 PM

Wow, your moving right along. They look great!

I've never done an oil wash like that before, I'll have to look into

how to do it. It looks great!

Are you leaving the 102 grey? I thought they were painted in

aluminum paint?

  • Member since
    January 2014
  • From: Toronto
Posted by Rob S. on Sunday, August 10, 2014 1:39 PM

Hey Mach..the oil wash is just artist oil paint thinned to a fine consistency using odourless turpentine. As for the 102..they went from NM to Aircraft Grey to tri-colour Nam cam. I'm going with the grey. I want  the massive "US AIR FORCE" markings.

______________________________________________________________________________


On the Bench: Nothing on the go ATM

  • Member since
    January 2014
  • From: Toronto
Posted by Rob S. on Sunday, August 10, 2014 1:42 PM

Here's the Thud all dressed up:

______________________________________________________________________________


On the Bench: Nothing on the go ATM

  • Member since
    October 2010
  • From: Rockford, IL
Posted by AlanF on Sunday, August 10, 2014 7:02 PM

plasticjunkie

Thanks Alan, glad you like my Voodoo. Your has some issues but you are doing a great job. Incredible how dimpled those brake doors are. It's going to take some filler to smooth out the surface and they should look fine.

Rob

Great work on the pits!

Thanks Rob.  After a bunch of putty and sanding, I think they came out ok but I won't know until it's primed.

  • Member since
    October 2010
  • From: Rockford, IL
Posted by AlanF on Sunday, August 10, 2014 7:17 PM

Kitty Hawk 1:48 F-101 Voodoo

I love the progress here.  These are classic jets.  I'm amazed at how big they are.

I've made a bit more progress, but the going is slow. Last week my wife was diagnosed with oral cancer, a big surprise since she is not in any risk group (non-smoker, non-drinker). It's taking a toll on us, but I find building somewhat therapeutic. So bear with me everyone, we find out Wednesday what treatment course she will be on.

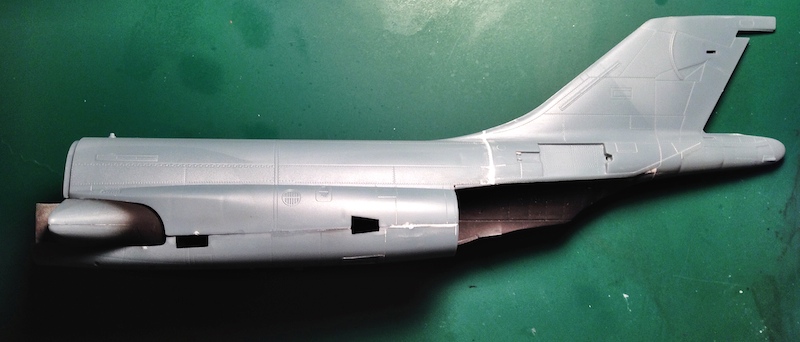
The main body seams have had a coat of putty. For a modern kit, the fit is terrible in some areas and amazingly good in others.  A real mixed bag.

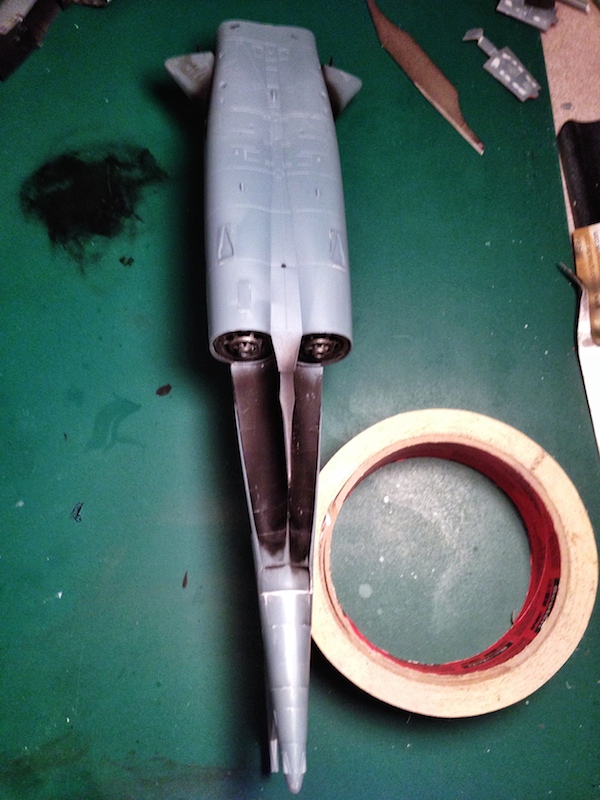
The wings are also ready to put on.

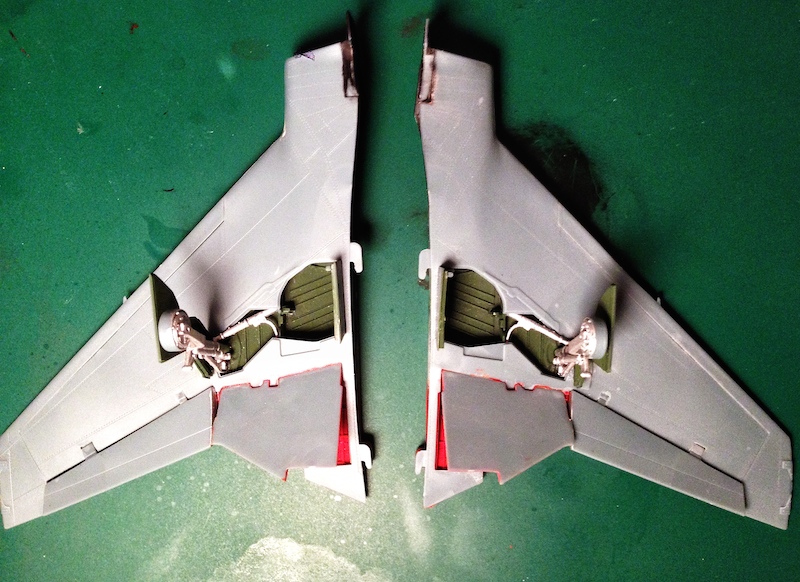
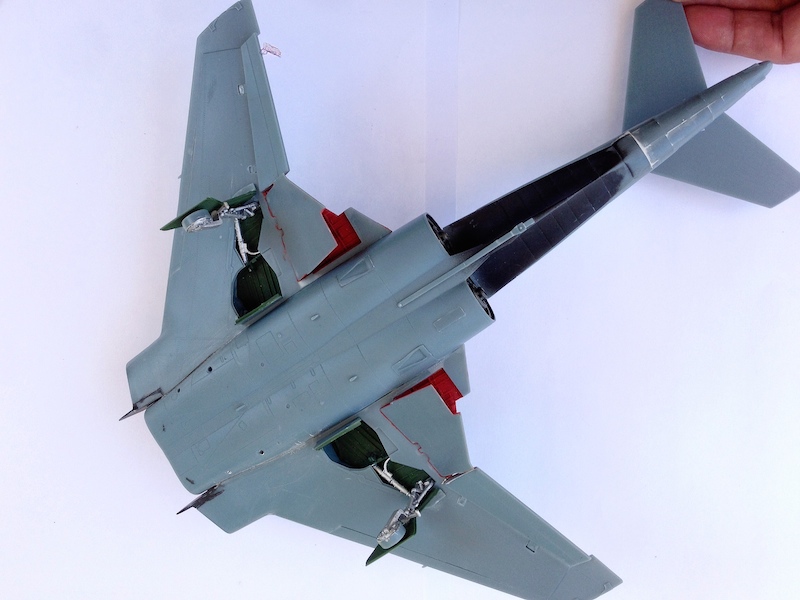
Here is what it looks like after the wings have been placed.  There were some deep gaps in some areas.  Instead of putty I decided to use a 1:1 mixture of talc powder and medium super glue so it can be applied easier than putty. The talc makes it much easier to sand. You can see the mold stress marks all over the body and wings. I'm hoping a coat of primer will hide them.

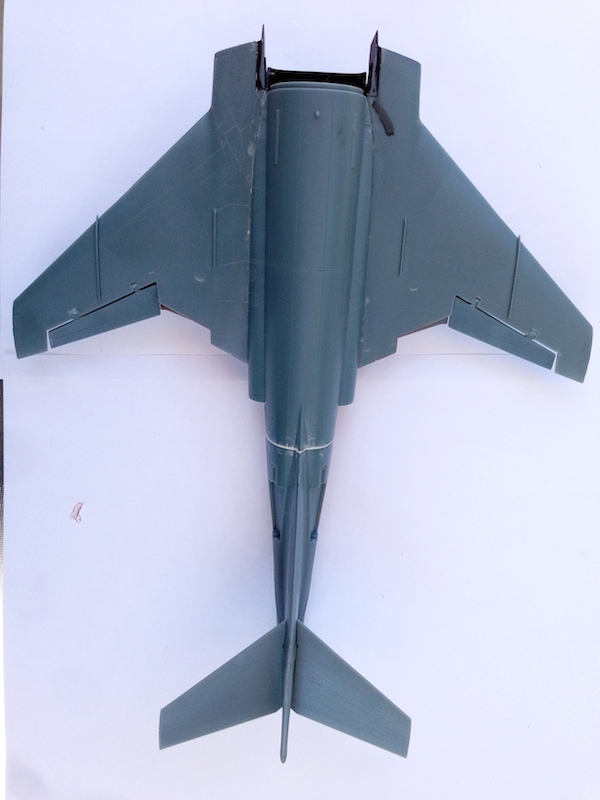
I'm getting there.  I need to assemble the rudder, stabilizers and front nose and then it will be ready for some primer.  From there, I will decide how to paint it.

That's it for now.

  • Member since
    March 2010
  • From: Boston
Posted by mach71 on Sunday, August 10, 2014 8:14 PM

Alan, I'm very sorry to hear about your wife. She will be in my prayers. I completely understand how your building can be therapeutic.

Your VooDoo is looking very nice so far. You use of talc and superglue is interesting. I've been using

baking soda and superglue for years with very good results. I always thought it was a chemical reaction between the baking soda and CA, but I guess its just any fine powder as a filler.

I think I've got the 102 ready for priming. I'll have some more photos soon.

  • Member since
    October 2004
  • From: Northern Virginia
Posted by ygmodeler4 on Monday, August 11, 2014 10:29 AM

Great looking builds everyone, Rob, you're really blitzing on those two.

Alan, she'll be in my prayers as well.

-Josiah

JOIN OUR COMMUNITY!

Our community is FREE to join. To participate you must either login or register for an account.

SEARCH FORUMS
FREE NEWSLETTER
By signing up you may also receive reader surveys and occasional special offers. We do not sell, rent or trade our email lists. View our Privacy Policy.