SEARCH FINESCALE.COM

Enter keywords or a search phrase below:

GROUND ATTACK GB

29010 views
368 replies
1 rating 2 rating 3 rating 4 rating 5 rating
  • Member since
    May 2014
Posted by Nomad53 on Monday, January 26, 2015 8:32 PM

Wow! I saw the forecast up the west coast. You all are in for a big hit. Good luck all.

Hey all there are some great looking builds going on in here. I really like what everyone is doing. Rob, good luck with the blades on that great looking Hind. that is a beast.

Here are some update photos of my F-105D T-Stick II. I have the lower paint on and the first of the three color camo scheme. Tje lower part is light grey and the top is tan, green and dark green. The instructions call for sharp lines but I think I am going to make soft edges and not mask just freehand.

Doug

Nomad53


  • Member since
    July 2014
Posted by modelcrazy on Monday, January 26, 2015 3:09 PM

While I'm sure the forecasts will be correct, how can it be a "record snowfall" before the snow even flies?

Steve

Building a kit from your stash is like cutting a head off a Hydra, two more take it's place.


http://www.spamodeler.com/forum/

  • Member since
    February 2003
  • From: Rothesay, NB Canada
Posted by VanceCrozier on Monday, January 26, 2015 1:02 PM

lol, yes, everywhere you look & listen, it's ANOTHER end-of-the world storm. Meanwhile I'm looking outside thinking, uhh yeah, it's called WINTER!!!  (In their defence, it looks like some parts of New England are REALLY going to get pounded today & tomorrow.) Good potential bench day.  :)

On the bench: Airfix 1/72 Wildcat; Airfix 1/72 Vampire T11; Airfix 1/72 Fouga Magister

  • Member since
    July 2014
Posted by modelcrazy on Monday, January 26, 2015 11:23 AM

Yeah, I saw on the news, you north eastern guys are going to get slammed. Sorry. We have been having a very mild winter in the northwest, except for that first cold snap mid November. It's going to be in the mid to upper 40's this week. I just know it's going to come back to bit us at some point.

Steve

Building a kit from your stash is like cutting a head off a Hydra, two more take it's place.


http://www.spamodeler.com/forum/

  • Member since
    April 2010
Posted by Theuns on Monday, January 26, 2015 10:53 AM

You can also put the blades in hot water to soften them a little.

Theuns

  • Member since
    January 2014
  • From: Toronto
Posted by Rob S. on Monday, January 26, 2015 9:44 AM

yeah, big weather brewing. We south of Montreal are in the freezer for sure!!

______________________________________________________________________________


On the Bench: Nothing on the go ATM

  • Member since
    February 2003
  • From: Rothesay, NB Canada
Posted by VanceCrozier on Monday, January 26, 2015 9:42 AM

modelcrazy

Vance,

Oooo, I like the painted over markings.

Thanks!! Next up, some weathering, coat of Future etc etc. Making pretty good time on this actually.

Also, rumours of a decent snowstorm heading my way tomorrow, I may find myself working from home.... a little work, a little bench time, a little work.... Whistling

On the bench: Airfix 1/72 Wildcat; Airfix 1/72 Vampire T11; Airfix 1/72 Fouga Magister

  • Member since
    July 2014
Posted by modelcrazy on Monday, January 26, 2015 9:28 AM

Rob S.
Any advise, Steve, on drooping blades on the main prop?

I did what Theuns suggested, however I did hit it with a heat gun, just a touch, prior to bending. I was working with 1/48 scale though.
  

Steve

Building a kit from your stash is like cutting a head off a Hydra, two more take it's place.


http://www.spamodeler.com/forum/

  • Member since
    July 2014
Posted by modelcrazy on Monday, January 26, 2015 9:22 AM

Vance,

Oooo, I like the painted over markings.

Steve

Building a kit from your stash is like cutting a head off a Hydra, two more take it's place.


http://www.spamodeler.com/forum/

  • Member since
    January 2014
  • From: Toronto
Posted by Rob S. on Monday, January 26, 2015 7:48 AM

Theuns

Remember that the blades will bend more at the roots because of the weight causing a greater bending moment than nearer the tips where the weight is less.

I simply form the blades between my fingers, one at a time to a line on paper so they are all the same.

Here is my 1/72 MiL i did some time ago .Look at where the blades bend the most.

Theuns

Ok, Theuns, I'll try that...knowing my fat fingers, I'll prob break one!!!

______________________________________________________________________________


On the Bench: Nothing on the go ATM

  • Member since
    February 2003
  • From: Rothesay, NB Canada
Posted by VanceCrozier on Monday, January 26, 2015 7:29 AM

Ahhhhhh - walking into work like THIS:

Posted Image

Means I must've had fun this weekend.

My interpretation of faded Italian Olive Green for the topside colour…

Posted Image

After I had applied that & checked it under my bench likes, it looked too gray, so I added a few drops of Tamiya GREEN, went back & hit it in a bunch of random spots. Subtle, but you can see some variations in person.

Posted Image

Annnnd then the over-painting, which I did do as an over-paint. Now wondering if I probably should've reversed that, then masked off the darker areas. May have been easier. Still not happy with the tail, do I do some touch-ups, or blame it on hurried groundcrew?

Posted Image

Posted Image

Posted Image

After I had the over-painting applied, it looked to be too much of a contrast to me, so I loaded up the faded colour & did some over-spraying to blend things a little bit.

Underside - note the wraparound on the leading edges...
Posted Image

On the bench: Airfix 1/72 Wildcat; Airfix 1/72 Vampire T11; Airfix 1/72 Fouga Magister

  • Member since
    February 2003
  • From: Rothesay, NB Canada
Posted by VanceCrozier on Monday, January 26, 2015 7:26 AM

Rob S.

Bow Down  LOVE that camo Rob!!!

On the bench: Airfix 1/72 Wildcat; Airfix 1/72 Vampire T11; Airfix 1/72 Fouga Magister

  • Member since
    April 2010
Posted by Theuns on Monday, January 26, 2015 6:17 AM

Remember that the blades will bend more at the roots because of the weight causing a greater bending moment than nearer the tips where the weight is less.

I simply form the blades between my fingers, one at a time to a line on paper so they are all the same.

Here is my 1/72 MiL i did some time ago .Look at where the blades bend the most.

Theuns

  • Member since
    January 2014
  • From: Toronto
Posted by Rob S. on Monday, January 26, 2015 5:39 AM

Thanks guys..it's getting' there. Any advise, Steve, on drooping blades on the main prop? I remember guys talking on another thread on ways to do it but it has been too long ago to remember Embarrassed

______________________________________________________________________________


On the Bench: Nothing on the go ATM

  • Member since
    December 2012
Posted by flyerduke on Sunday, January 25, 2015 9:21 PM

Rob, that Hind looks sweet!

  • Member since
    July 2014
Posted by modelcrazy on Sunday, January 25, 2015 9:14 PM

That look fantastic Rob! Yes

Most of the pics I've seen of Hinds don't show a whole lot of weathering. Mostly exhaust staining.

Steve

Building a kit from your stash is like cutting a head off a Hydra, two more take it's place.


http://www.spamodeler.com/forum/

  • Member since
    January 2014
  • From: Toronto
Posted by Rob S. on Sunday, January 25, 2015 6:20 PM

Yup...let's go with that Steve!!! Anyway, all the nitpicking aside, I got quite the bit of progress on the Hind today. Principle painting's done and even some minor drybrushing. I am not going to weather this Hind much. My ref photo:

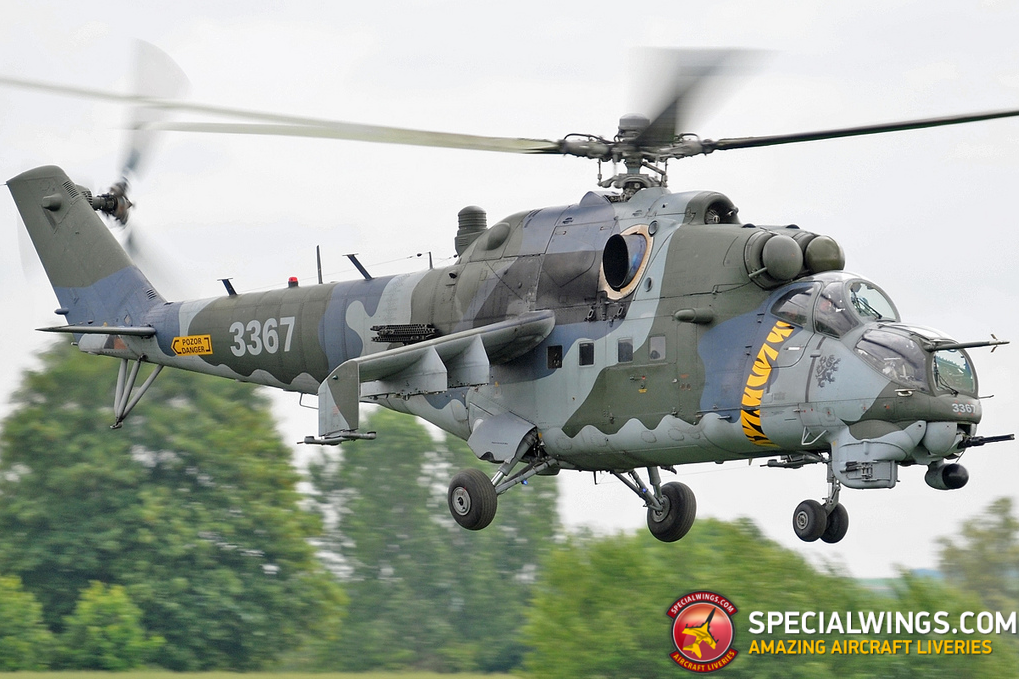
The paint job is solid and the cam is very clearly hard edged. Very little if any indication of any type of wear, AND, I imagine if the Cz Rep is sending their Hind to an international military meet, the paintjob would be near perfect, so, I'm dispensing with my normal weathering regime.

Anyway, now that I've sullied my modelling skills by showing a live photo of the subject, I'll get to my update.

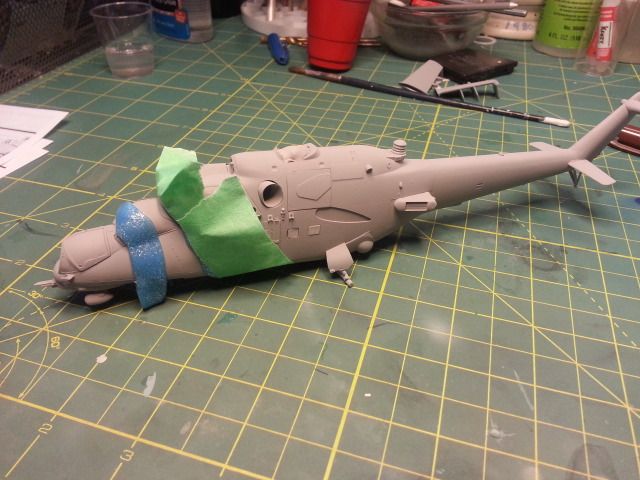
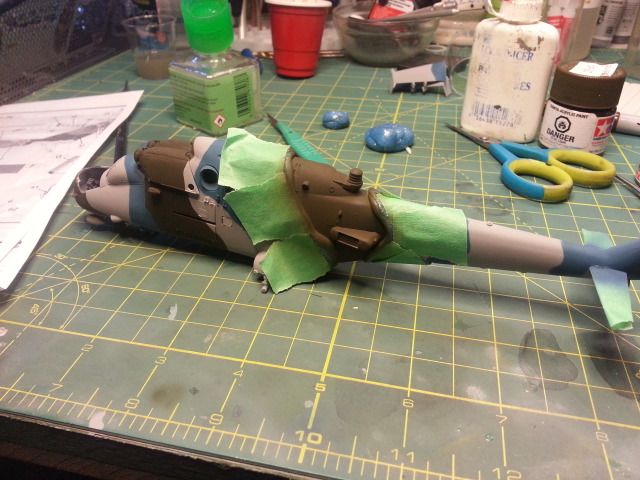
Here's my forgetting to take photos, so, here's a shot of the entire airframe painted light grey and the start of masking for the upcoming blue/grey. I used a combo of silly putty and tape:

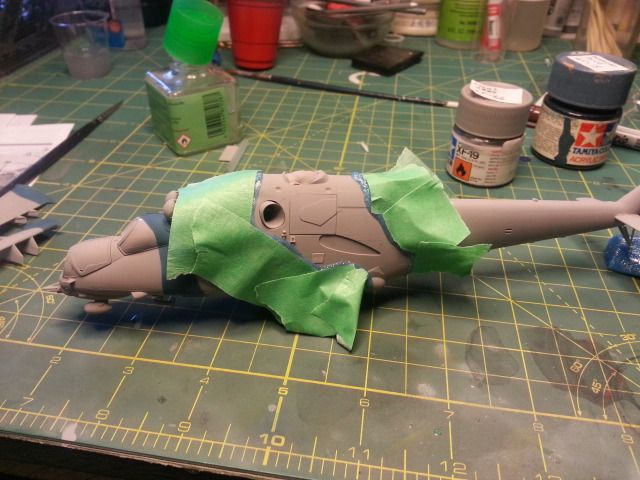
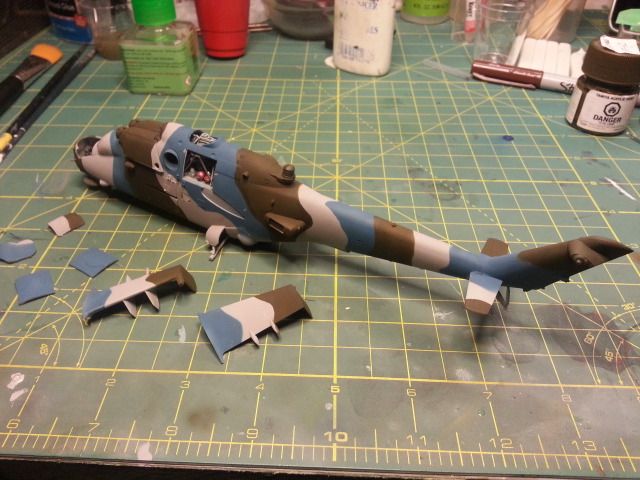
Blue applied. Too dark, but, too late to do anything about it Embarrassed:

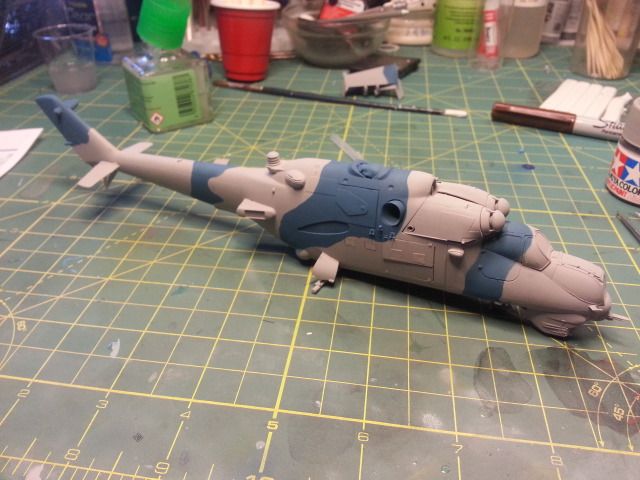
And, now the OD green:

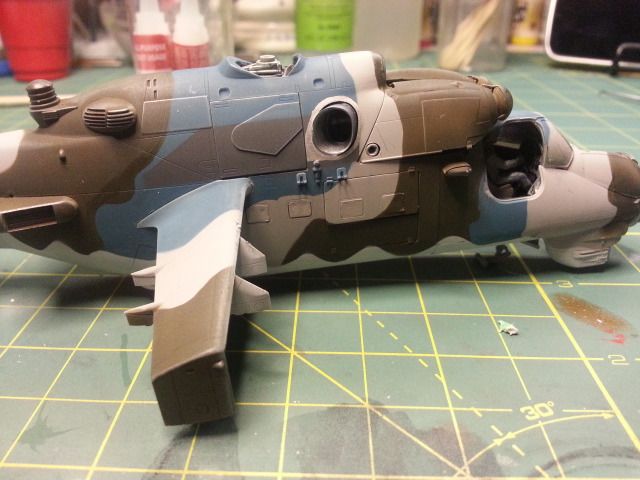
ALL three colours applied (I wonder if any shrewd looker will notice that the tail vert stabilizer changed colours Oops:

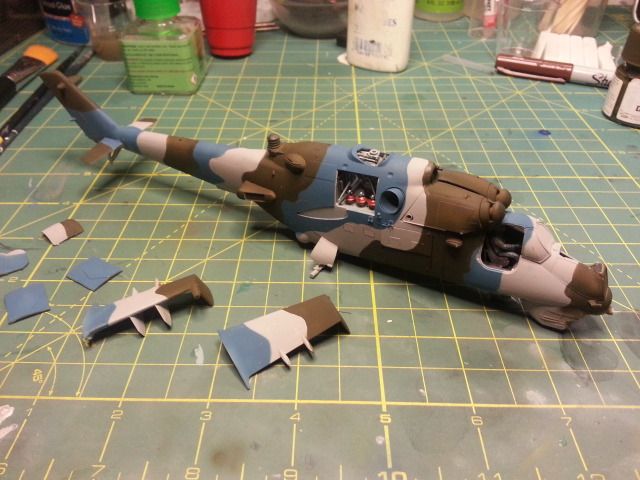
Here's the funky wavy demarcation line between the bottom of the fuselage and the tri-colour cam job, also, added the dark grey zone coming back from the massive exhaust nozzles:

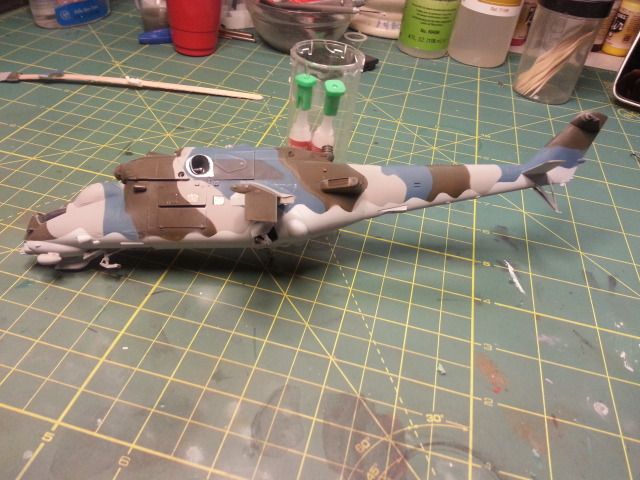
Wings dry fitted. Still not going to glue them on until I clear coat and pin wash the whole thing:

That's it for now, sorry for the long, drawn out post!!

______________________________________________________________________________


On the Bench: Nothing on the go ATM

  • Member since
    July 2014
Posted by modelcrazy on Sunday, January 25, 2015 4:19 PM

Rob S.
Now, as a nitpick, why would the crew be sitting in full flight position with every hatch and door open? I think

Actually, I thought about that as well. I guess the guys are going through the mission in there head while the mechanics are working on it????

Steve

Building a kit from your stash is like cutting a head off a Hydra, two more take it's place.


http://www.spamodeler.com/forum/

  • Member since
    May 2014
Posted by Nomad53 on Sunday, January 25, 2015 6:56 AM

Wow Rob,

Good luck with those gaps. I know you will get it figured out. Still looking great as usual. Keep up the good work.

Doug

Nomad53


  • Member since
    January 2014
  • From: Toronto
Posted by Rob S. on Sunday, January 25, 2015 5:56 AM

Yup..u are forced to pose the helo parked and all opened up..and that's fine. I suppose if u skipped ALL the engine componentry..the panels would fit better. Now, as a nitpick, why would the crew be sitting in full flight position with every hatch and door open? I think I'm being too critical Stick out tongue

Oh..and Steve..this is a blue box Revell Germany kit..and..I read somewhere that this was a Zvezda reboxing. That would explain some of my grief! I've done a few Zvezdas and was not overly impressed.

______________________________________________________________________________


On the Bench: Nothing on the go ATM

  • Member since
    July 2014
Posted by modelcrazy on Saturday, January 24, 2015 10:24 PM

Eee gad those are serious gaps! I wonder if Revellogram does that on purpose so that all their engineering and detail doesn't go to waste.

Steve

Building a kit from your stash is like cutting a head off a Hydra, two more take it's place.


http://www.spamodeler.com/forum/

  • Member since
    January 2014
  • From: Toronto
Posted by Rob S. on Saturday, January 24, 2015 8:28 PM

Here's what I've been contending with. Now, keep in mind, the hatches will ALL be posed open. I needed to pin them temporarily closed for the big paint job. Like I said earlier, if you wanted to pose them all closed, it would be a serious fight. Fortunately, they'll be removed after painting, then CA'd into place at the hinges. Still, it was not a fun afternoon mucking with these PIA parts.

Even the doors don't meet in the centre. The engine cowling leaves a massive gap:

Other side, just a bad:

Gaps, gaps and more gaps:

And on top, the cowlings didn't meet in the middle:

All clear parts masked and ready for paint:

Chaff dispensers and rear skid:

Landing gear was fun. All components rely only on cement to fix in place. No real guide pins to speak of. Oh, and one of the Y arms was broken on the sprue: one if the bars was gone!! I had to scratch build a rod to match the other side:

I really don't feel like I got much done today, but, I think I'm close to principle painting after a bit of filling and sanding, tomorrow...finally!!

______________________________________________________________________________


On the Bench: Nothing on the go ATM

  • Member since
    January 2014
  • From: Toronto
Posted by Rob S. on Saturday, January 24, 2015 7:34 PM

Spent all afternoon taming these hatches..almost there and then installed the flimsiest landing gear i think ive ever worked with....

______________________________________________________________________________


On the Bench: Nothing on the go ATM

  • Member since
    January 2014
  • From: Toronto
Posted by Rob S. on Saturday, January 24, 2015 3:07 PM

Ok, so, I'm starting to really struggle with this Hind. IF you wanted to seal up all the hatches and doors, you'd certainly go out of your mind. Very few of them actually fit. I'm trying to fit all hatches in place then tack them in place with a dot of white glue just to hold them in place for painting. WELL, that ain't happening. Nothing fits. Not having a good time.....Bang Head

______________________________________________________________________________


On the Bench: Nothing on the go ATM

  • Member since
    January 2014
  • From: Toronto
Posted by Rob S. on Friday, January 23, 2015 10:28 PM

modelcrazy

I'll bet the Star Wars guys patterned the Low Altitude Assault Troop Carrier after that Hind beastie.

You know, I never thought of that...they twin 'bubble' cockpits and downturned wings are VERY 'Hind Like'...thanks for that!!

______________________________________________________________________________


On the Bench: Nothing on the go ATM

  • Member since
    May 2014
Posted by Nomad53 on Friday, January 23, 2015 5:46 PM

Hey all I'm back,

Trying to get back into the swing of things. Got some painting done. I have some touch-ups to do.

Doug

Nomad53


  • Member since
    July 2014
Posted by modelcrazy on Friday, January 23, 2015 4:35 PM

I'll bet the Star Wars guys patterned the Low Altitude Assault Troop Carrier after that Hind beastie.

Steve

Building a kit from your stash is like cutting a head off a Hydra, two more take it's place.


http://www.spamodeler.com/forum/

  • Member since
    February 2003
  • From: Rothesay, NB Canada
Posted by VanceCrozier on Friday, January 23, 2015 4:25 PM

Rob S.

With the wings on (not glued yet, later) she takes on that sinister 'Hind' shape that makes me all warm inside!!! Devil

Glad to see the pilot in there, this is actually a smaller machine that I had thought?

On the bench: Airfix 1/72 Wildcat; Airfix 1/72 Vampire T11; Airfix 1/72 Fouga Magister

  • Member since
    January 2014
  • From: Toronto
Posted by Rob S. on Friday, January 23, 2015 12:35 PM

With the wings on (not glued yet, later) she takes on that sinister 'Hind' shape that makes me all warm inside!!! Devil

______________________________________________________________________________


On the Bench: Nothing on the go ATM

  • Member since
    February 2003
  • From: Rothesay, NB Canada
Posted by VanceCrozier on Friday, January 23, 2015 12:33 PM

modelcrazy

Are you going to do do some camo or just green?

Question for me? I'm doing the 2nd marking option:

...which is overall green, but the green has faded a great deal, and then the original markings have been overpainted with a fresh coat of green prior to the new markings going on. It's an interesting look.

On the bench: Airfix 1/72 Wildcat; Airfix 1/72 Vampire T11; Airfix 1/72 Fouga Magister

JOIN OUR COMMUNITY!

Our community is FREE to join. To participate you must either login or register for an account.

SEARCH FORUMS
FREE NEWSLETTER
By signing up you may also receive reader surveys and occasional special offers. We do not sell, rent or trade our email lists. View our Privacy Policy.