SEARCH FINESCALE.COM

Enter keywords or a search phrase below:

World at War 1939-1940 Group Build

65525 views
1023 replies
1 rating 2 rating 3 rating 4 rating 5 rating
  • Member since
    December 2002
  • From: Bury St Edmunds, Suffolk, England
Posted by Bish on Saturday, November 7, 2015 1:05 PM
Thanks check. Rob, after I posted that, I gave it some thought. I don't so much think its an error by Eduard, more a lack of knowing how to do these hinges well. I think this could be one of their early PE sets. I recalled that other I have done the hinges come in 2 pieces, each with a thin strip that is curled and wire inserted to form the hinge. As Jack says, PE does have its limitations. One thing I have learned is that its just as important knowing which bits not to use as knowing what to use.

I am a Norfolk man and i glory in being so


On the bench: Airfix 1/72nd Harrier GR.3/Fujimi 1/72nd Ju 87D-3

  • Member since
    February 2006
  • From: Cincinnati Ohio
Posted by DantheMan85 on Saturday, November 7, 2015 5:01 PM

Thanks Checkmateking & Bish.

Armor86: Nice start to your field kitchen, this will be a unique build.

Lostagain: Looking forward to your 7TP Polish tank build.

I can see there is a light at the end of the tunnel for my Ju52. Got the wings filled in a sanded, canopy glued on, main landing gear, and first of three antenna’s. The yellow tamiya tape is there to remind me not to pick up the model around the windows, I went to pick up the fuselage and touched the rear door window. Was lucky it did not break completely off, and was able to put some testors clear parts glue on and tapped the other side of the model until the window went back into place. Hoping in the next few days to start work on masking for primer.  Can't wait to get my Iron Annie airbrushed in RLM colors.


On my Work Bench: Tamiya Ford GT 1/24

Up Coming: ?


  • Member since
    September 2003
  • From: AandF in the Badger State
Posted by checkmateking02 on Saturday, November 7, 2015 9:33 PM
Nice work there, Dan. Looking sharp!


  • Member since
    January 2008
  • From: Limoges
Posted by Rob.H on Sunday, November 8, 2015 9:58 AM

Bish
As Jack says, PE does have its limitations. One thing I have learned is that its just as important knowing which bits not to use as knowing what to use.


Yes I am only just starting to realise this is the case.  As I said, I don't have much experience with PE, and I went gung-ho figuring all of it was applicable.  Lesson learned. 
 
Thanks again guys!

on the bench: Moebius Battlestar Galactica, Tamiya 1/35 M13/40

 photo PacificCarrierBuild2014small_zps595053a9.jpg

  • Member since
    December 2002
  • From: Bury St Edmunds, Suffolk, England
Posted by Bish on Sunday, November 8, 2015 10:07 AM
We have all been there Rob and we all have to learn as we go along. One thing I would suggest, especially when using Eduard PE is to check there site before buying. They have there full instructions for every set and I always look at these to determine if its worth buying the set at all.

I am a Norfolk man and i glory in being so


On the bench: Airfix 1/72nd Harrier GR.3/Fujimi 1/72nd Ju 87D-3

  • Member since
    December 2002
  • From: Bury St Edmunds, Suffolk, England
Posted by Bish on Sunday, November 8, 2015 10:11 AM
Dan, Annie is really coming on nicely, looking forward to some paint.

I am a Norfolk man and i glory in being so


On the bench: Airfix 1/72nd Harrier GR.3/Fujimi 1/72nd Ju 87D-3

  • Member since
    April 2006
  • From: ON, Canada
Posted by jgeratic on Wednesday, November 11, 2015 12:24 AM

Dan, I like how your Ju52 is comging along, and looking forward to the paint.

----------------------

Well, going to try and squeeze one in here before the year is out.  So small scale and ease of build calls up a 1/72 Tamiya kit from the stash.   It will be the Spitfire Mk. I, Bish's favourite aircraft Stick out tongue

I'll get into the specifics later, but it will be based on a photo of one of these fighters that made it to Canada during the summer of 1940, but was still carrying pre-war style markings.

The past weekend spent working on the cockpit and fuselage.

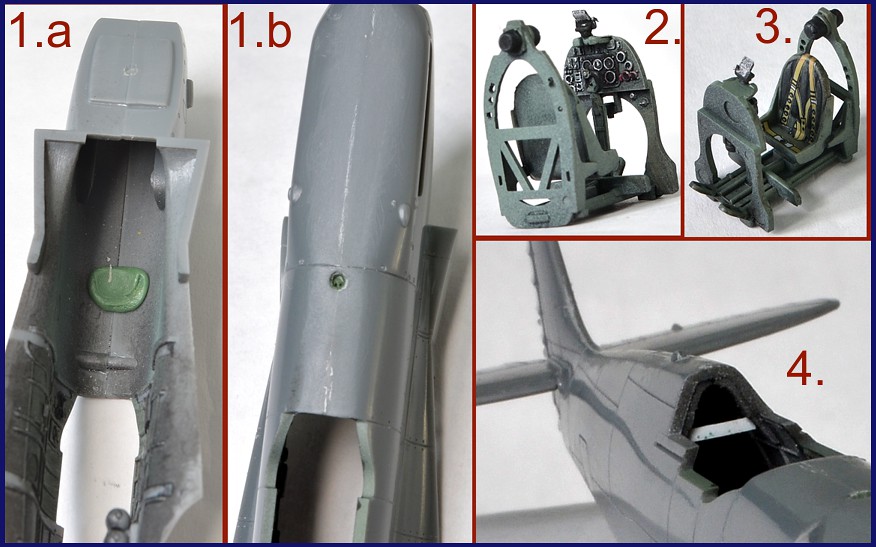
1.a/1.b  With the halves together, there is a seam located where the fuel cap is, but being recessed it's difficult to get at.  So after drilling out the hole, some putty is pushed into place from underneath -followed by tamping down from the top with the flat end of an appropriate size drill bit.

2.  Instrument panel is just basic stuff, but I did opt to use the edge of a silver  (as well as red) pencil crayon to catch the details of raised edges.

3.  Tamiya does provide a decal for the seatbelts (but not the IP).  Their decals do tend to be thick, so I didn't bother fighting them to drape over the top edge of the seat - that detail was later just painted in.  To be correct, the harness should continue to run to the back of the fuselage, but I'm trying to not get too complicated with this one.

4.  There is a cross brace at the rear of the seat, but wasn't a clean joint when the fuselage halves were glued together.  So that detail was snipped off and replaced with a strip of sheet plastic.

regards,

Jack

  • Member since
    September 2003
  • From: AandF in the Badger State
Posted by checkmateking02 on Thursday, November 12, 2015 6:41 PM

Good to see your start-up, Jack. I've had the Tamiya Spitfire for several years and never started it; haven't even opened the box. So: I'll be looking forward very much to seeing how it builds up.

Nice fix on the fuel cap.  The Airfix Mk I has the same problem.  I like the way you addressed the issue.


  • Member since
    April 2006
  • From: ON, Canada
Posted by jgeratic on Friday, November 13, 2015 1:11 AM

Thanks Cmk02.  Being a 72 scale builder yourself, I'm surprised you haven't built this one yet (2000 release date).  I bought this one maybe three years ago when I was on a Spitfire kick.

------------------------

Being an earlier version, my subject required the simple pole mast:

1.  A brass rod was cut, long enough to sit at the bottom of the fuselage where it was embedded with putty (no pic taken of the interior set up). 

2.  Putty was also used on top to plug the hollow rod.  On the bottom, an attempt to replicate the insulator at the base of the mast pole.

3.  Couldn't leave the interior alone, and proceeded with scratch building the remainder of the harness trailing into the rear of the fuselage.

----------------------

The overall fit is near perfect, and only one coat of primer and it's ready for colour paints.  There was some prior use of surfacer/sanding on the fuselage seams.  Some heavier putty was required on a few places around the canopy and the port wing root. 

regards,

Jack

  • Member since
    September 2003
  • From: AandF in the Badger State
Posted by checkmateking02 on Friday, November 13, 2015 4:55 PM
That's looking really good, Jack. I think one reason I've postponed the Tamiya Spitfire is that I read that they missed the slight gullwing feature, which Airfix managed to capture. Have you noticed this to be true or not? So I've stuck with Airfix for all Spitfires so far--both the old mold and the new. I'll get around to it sometime in the future, cuz I do love a good Spitfire.


  • Member since
    April 2006
  • From: ON, Canada
Posted by jgeratic on Friday, November 13, 2015 7:46 PM

checkmateking02
That's looking really good, Jack. I think one reason I've postponed the Tamiya Spitfire is that I read that they missed the slight gullwing feature, which Airfix managed to capture. Have you noticed this to be true or not? So I've stuck with Airfix for all Spitfires so far--both the old mold and the new. I'll get around to it sometime in the future, cuz I do love a good Spitfire.
 

Yeah, the gull wing feature is there on the Tamiya kit, but only if you compare to Airfix (or even a Mk V Sword kit) do you notice something is slightly off in shape.  The fairing of the wingroot that extends from the rear of the wings isn't quite curved enough, and it also needs to curve a bit more upwards.  As a result, there is not as pronunced bulge on the bottom of the fuslage in this area.  In the end though, it still looks like a Spitfire.

--------------------------

Closer inspection in daylight did reveal a few points that required a few more passes of sandpaper.  I've cropped those photos, and super imposed them over the background photo to show better the fuel cap and antenna areas:

regards,

Jack

  • Member since
    September 2003
  • From: AandF in the Badger State
Posted by checkmateking02 on Friday, November 13, 2015 10:22 PM
Thanks for the information, Jack. And very nice work.


  • Member since
    April 2014
  • From: Australia
Posted by lostagain on Thursday, November 19, 2015 2:35 PM

Jack, just said the same over in the 109 GB, but wow - your attention to detail is great. Looking forward to seeing this build.

Dan, the Annie is coming along very nicely. The inside build was really good - and a nice save with getting that window back. There was, however, something disturbing me about all your photos, but I could not work out what it was. Then it struck me - your work area is neat and clean and tidy - everything mine is not...

So the 7TP comes along slowly. First step was to make up all 18 pairs of wheels and get them painted - so I made up a wheel tree, which seemed to work OK. Also got the muffler painted - a restrained rusty, heat affected look:

  • Member since
    December 2002
  • From: Bury St Edmunds, Suffolk, England
Posted by Bish on Thursday, November 19, 2015 2:46 PM

Lovely work again Jack, indeed, great attention to detail.

And ye, I love a good Spit me.


Whistling

I am a Norfolk man and i glory in being so


On the bench: Airfix 1/72nd Harrier GR.3/Fujimi 1/72nd Ju 87D-3

  • Member since
    September 2003
  • From: AandF in the Badger State
Posted by checkmateking02 on Thursday, November 19, 2015 7:47 PM

Very creative problem-solving, lostagain.  Nice invention!  Looking forward to seeing more.

Bish:  that hurts!Boo Hoo


  • Member since
    April 2006
  • From: ON, Canada
Posted by jgeratic on Thursday, November 19, 2015 10:39 PM

Thanks guys.


lost, good to see some progress and appears you are having some fun with the build.  I think the only thing worse than a tank with a lot of road wheels is one with a lot of small road wheels.  Should go quick once the lowers are done.

Bish, careful now, that could be considered as heresy in some circles. Propeller

--------------------

I've no photo updates, but should have the last of the solid colours sprayed on sometime tomorrrow.  In the meantime, here is the reference my build is based on:


Taken during the summer of 1940, the markings though are still of the type seen in the months just prior to war breaking out.   No roundels on the underside, recognition being based on black and white undersides.  The remaining roundels are quite smaller than normal.

regards,
Jack

  • Member since
    September 2003
  • From: AandF in the Badger State
Posted by checkmateking02 on Friday, November 20, 2015 9:18 AM
It looks like the roundel has been muted, and no tri-colo(u)r flash on the fin.


  • Member since
    April 2006
  • From: ON, Canada
Posted by jgeratic on Friday, November 20, 2015 10:06 AM

checkmateking02
It looks like the roundel has been muted, and no tri-colo(u)r flash on the fin.
 

Yes,  Spitfire L1090 was from the very first production batch as ordered in June 1936.

It looks to have the undersides repainted at a workshop.  The July 1939 order introduced the black/white undersides and were to run the whole length of the aircraft, but clearly in the photo it can be seen both the nose and fuselage were left in their orginal aluminum finish. 

The roundels too, at this time, had the yellow surround eliminated as well as the white.   These were painted over with the surrounding camou colours.   Likely for expedience sake, the white portion became the new blue, creating a much smaller roundel - I think this is what you are referring to?

The fin stripes were introduced in May 1940, by which time this particular aircraft was already stateside (29-8-39 shipped to USAAC Wright Field Dayton Ohio).

regards,

Jack

  • Member since
    December 2002
  • From: Bury St Edmunds, Suffolk, England
Posted by Bish on Friday, November 20, 2015 11:59 AM
I have never seen RAF markings like that before, very low viz. Jack, you mention that the tail markings were not applied until May 40, was this just on Spits or RAF wide.

I am a Norfolk man and i glory in being so


On the bench: Airfix 1/72nd Harrier GR.3/Fujimi 1/72nd Ju 87D-3

  • Member since
    April 2006
  • From: ON, Canada
Posted by jgeratic on Friday, November 20, 2015 1:50 PM

Bish
I have never seen RAF markings like that before, very low viz. Jack, you mention that the tail markings were not applied until May 40, was this just on Spits or RAF wide.
 

The May Ist 1940 signal was for all RAF aircraft.  The Air Ministry  actually first brought up the notion of tail markings with Coastal Command on April 3rd.   It was deemed best not to have the rudder itself painted (though some aircraft based in France had already done this) due to problems with mass balance.   The only other stipulation was for the blue stripe to be nearest the rudder, but not touching the hinge.  The result was a variety of sizes until further amendments were passed.

I see what you guys mean by low viz roundel.  I'm thinking it has something to do with the film type (yellow filter?).  There are photos where the yellow portion of the roundel is quite dark.   In this case there is no yellow to compare to, but the blue portion does appear muted.

Similar effect in these samples:

regards,
Jack

  • Member since
    December 2002
  • From: Bury St Edmunds, Suffolk, England
Posted by Bish on Friday, November 20, 2015 2:32 PM
Thanks for that info jack. I asked mai9nly because I have a Blenheim I and some pre war markings for it, I think 1938. I have a feeling it includes the rudder markings, but I will be sure to check that.

I am a Norfolk man and i glory in being so


On the bench: Airfix 1/72nd Harrier GR.3/Fujimi 1/72nd Ju 87D-3

  • Member since
    December 2002
  • From: Bury St Edmunds, Suffolk, England
Posted by Bish on Friday, November 20, 2015 2:35 PM

I just checked and no they don't. So its handy i saw this otherwise i would have waisted time trying to get the info. Thanks.

I am a Norfolk man and i glory in being so


On the bench: Airfix 1/72nd Harrier GR.3/Fujimi 1/72nd Ju 87D-3

  • Member since
    April 2006
  • From: ON, Canada
Posted by jgeratic on Friday, November 20, 2015 11:27 PM

Glad to be of help, Bish.  My reference is mainly from a publication authored by Paul Lucas, but the link below might serve well in the future.  The title says it's for Coastal Command, but the dates and particulars all seem to coincide with said book:

http://www.hrmtech.com/sig/articles/coastal_cam.asp

-------------------------------------------

Main colours now applied, but did end up with a few blemishes to be fixed with the hairy stick:

By far the worst is the upper surface of the tail plane.  Some how paint mist spread there while spraying the aluminum sections underneath.  Will try some light sanding, but suspect some repaint will be required.

regards,

Jack


  • Member since
    December 2002
  • From: Bury St Edmunds, Suffolk, England
Posted by Bish on Saturday, November 21, 2015 12:43 AM
Thanks jack, I have added that site to the favourites list. Bummer about that overspray, but at least its only a small area.

I am a Norfolk man and i glory in being so


On the bench: Airfix 1/72nd Harrier GR.3/Fujimi 1/72nd Ju 87D-3

  • Member since
    September 2003
  • From: AandF in the Badger State
Posted by checkmateking02 on Saturday, November 21, 2015 11:58 AM

Nice looking paint, Jack. What Lucas book are you using? I bought the Camouflage and Markings book for the RAF during the Battle of Britain. I thought it was very informative. A lot of things I didn't know about.


  • Member since
    April 2006
  • From: ON, Canada
Posted by jgeratic on Saturday, November 21, 2015 12:54 PM

Thanks Chm8k, and yes, that is exactly the Lucas book I'm referring to, I consider my bible for that period.

There was another book published about ten years later that I have considered but yet to pull the trigger on.  It looks to encompass a lot more subjects (including the Luftwaffe, French, Dutch, Belgian, and Italian aircraft), but I'm not sure the text is as exhaustive as the Lucas book.  Anyone here have it?  The review posted at Amazon.UK looks very positive:

http://www.amazon.co.uk/Battle-Britain-Camouflage-Markings-Anniversary/dp/1904643361

regards,

Jack

  • Member since
    May 2011
  • From: Illinois
Posted by armor86 on Sunday, November 22, 2015 12:49 AM

Update with German Kitchen (Feldkuche) - assembly almost done and ready for paint, going through extrea details to add and figures are next.

Kitchen and cart

Paint Bench - little details to prepard and paint


Dan

  • Member since
    December 2002
  • From: Bury St Edmunds, Suffolk, England
Posted by Bish on Sunday, November 22, 2015 1:40 AM

Nice to see this Dan, looks good.

I am a Norfolk man and i glory in being so


On the bench: Airfix 1/72nd Harrier GR.3/Fujimi 1/72nd Ju 87D-3

  • Member since
    September 2003
  • From: AandF in the Badger State
Posted by checkmateking02 on Sunday, November 22, 2015 3:03 PM
That is looking really good, Dan. Probably will be able to smell the sausage soon. Jack: Thanks for the info. I thought the Lucas book very informative--especially about the development of Sky and the use of the "Duck eggs--blue and green." Since I really like Battle of Britain aircraft, I think I'll check out the other title you've posted.


  • Member since
    April 2006
  • From: ON, Canada
Posted by jgeratic on Sunday, November 22, 2015 6:32 PM

Dan, I like how your field kitchen is shaping up.  It's actually cool to see something out of the ordinary being put together at the bench.

Chm8k02, the second title does look good, but does not appear to be in stock at the usual places, nor can I find one at a reasonable price.

----------------------

Difficult to tell with all the gloss sheen, but I have 27 decals applied (including 4 home made for the serial number 'L1090').  I will need to touch up the decal number on the night wing, as well as a roundel where the center had shattered while coaxing into position.

I did end up respraying the tailplanes to fix overspray from previous update.  Also the black walkway lines on the wings were masked and sprayed, just to avoid chances of silvering.  It was easier to lay the tape straight than the actual decals.

Still have the gun ports to address, so likely more home made decals, might even throw in a gas detection patch while I'm at it.  Something small like the one seen in the pic below:

regards,

Jack

JOIN OUR COMMUNITY!

Our community is FREE to join. To participate you must either login or register for an account.

SEARCH FORUMS
FREE NEWSLETTER
By signing up you may also receive reader surveys and occasional special offers. We do not sell, rent or trade our email lists. View our Privacy Policy.