SEARCH FINESCALE.COM

Enter keywords or a search phrase below:

IRON RAILS 2015 GB

46597 views
586 replies
1 rating 2 rating 3 rating 4 rating 5 rating
  • Member since
    April 2006
  • From: Denver, Colorado
Posted by waynec on Saturday, March 14, 2015 12:43 PM

biggeoff

Hey guy's. Is it too late to join this GB. I model 1/25 German railways . I've been modelling in the "wilderness" for a while now .My entry would be the Trumpy high sided wagon with modifications, the "load" being the Revell  L400 Maultier. I'm building the Trumpy BR86 at the moment and I'm also building the Baluard Ko1 diesel shunter,

welcome. post some box art here and i will add you to the roster. what is a Baluard KO1?

BTW picked up a Cyberhobby 1/35 Schwerer Panzerspahwagen on sale. as if i need another tarin model.

Никто не Забыт    (No one is Forgotten)
Ничто не Забыто  (Nothing is Forgotten)


  • Member since
    January 2013
Posted by jibber on Saturday, March 14, 2015 3:34 PM

Isn't the KO1 the mini loco used for yard work?

  • Member since
    April 2006
  • From: Denver, Colorado
Posted by waynec on Saturday, March 14, 2015 6:11 PM

jibber

Isn't the KO1 the mini loco used for yard work?

I've never hears it called that. I know i am big on not obsessing about color BUT i have had a color dilemma. I have Vallejo Air Dark Yellow and Vallejo Ait Panzer Ocher 1943 which has a distinct green tint. Even though the journal boxes are already painted ocher i picked up 2 more bottles of dark yellow> by tyhe time i oil wash and add the leaking oil and general dirt it won't show. 

I pulled a a shelf queen Italeri schwimwagen that was so old i had cobwebs on the sprue. It's being primed fot the ocher and an Italeri kubelwagen is being built as a test bed too. I need a break from K-5 and these will be quick builds and i can use them of my oils pin wash and filters demo. I could add them to the K-5 dio but already have the gun and one ammo carrier plus the diesel and don't want to get too carried away.

I looked at the 1/72 K-5 and the entire 6 leaf springs w/ journal boxes is 1 piece. Rough estimate on the 1/35 is 90 pieces.

Никто не Забыт    (No one is Forgotten)
Ничто не Забыто  (Nothing is Forgotten)


  • Member since
    July 2014
Posted by modelcrazy on Sunday, March 15, 2015 12:59 AM

OK,I believe I'm finished, at least for now as It's only part of the whole. But the little C12 is done.

Again, I'm not showing it  on tracks as I still have to make them for the diorama.

I'm leaving the cab unglued until I can get and engineer to put in it.

Steve

Steve

Building a kit from your stash is like cutting a head off a Hydra, two more take it's place.


http://www.spamodeler.com/forum/

  • Member since
    January 2013
Posted by jibber on Sunday, March 15, 2015 1:28 AM

Steve, it wasn't to long ago you seemed a little apprehensive about building this little guy, but you've built this into a real nice locomotive. I haven't decided on a final look for mine but the way you've used dirt and weathering its a very close model of a real workhorse, he's dirtied up and ready for some rail work. The C12's were usually assigned to artillery units moving rail guns in place almost always in pairs,    they were also found in rail yards and given other duties.  

Wayne will get you up on the front page, we're starting to fill up nicely.

I haven't felt well lately but I will get an update in tomorrow and should finish up next week. I hate missing the party.

Nice job again Steve, looking forward to see it on some tracks.

T.  

  • Member since
    January 2013
Posted by jibber on Sunday, March 15, 2015 1:58 PM

Steve what did you use for a base color? It looks like a touch of German Grey and a Darker Green?

  • Member since
    April 2006
  • From: Denver, Colorado
Posted by waynec on Sunday, March 15, 2015 2:05 PM

i have never primed with black. i am going to have to try it.getting ready to touch up prime one and base coat second german wagens. while they are drying will ad another 20 parts or so to each truck.

Никто не Забыт    (No one is Forgotten)
Ничто не Забыто  (Nothing is Forgotten)


  • Member since
    January 2013
Posted by jibber on Sunday, March 15, 2015 2:25 PM

Wayne I always had issues with primers. Sprays, AB everything, seems like there was always an issue but I stopped in at the Toy Soldier shop in Royal Oak, Mi and they told me to try the Army Painter brand. Its used mainly for miniatures and after my first model I don't think I'll very switch to anything else unless theres a certain color they don't have. One spray and I get the smoothest coat and not once have I ever had to sand after the application. It dries in minutes that allows me to prime and keep working without a long wait. If you look close at the primed frame, you can see that its a little glossy but also very smooth, i almost like a leveling paint. They come in large spray cans about $14 w/shipping on Ebay and that'll do quite a bit, I also have some other colors but for what we do black seems right. Thats my 2 cents, I know everybody has their favorites but I know this works.  

  • Member since
    January 2013
Posted by jibber on Sunday, March 15, 2015 2:28 PM

400 ML, acrylic matte.

Terry

  • Member since
    April 2006
  • From: Denver, Colorado
Posted by waynec on Sunday, March 15, 2015 4:15 PM

jibber

400 ML, acrylic matte.

Terry

Never heard of it. I use ACE Hardware NOW at maybe $3 a can.jsut do multiple passes from distance and its fine. i notice you are like me, all sorts of different brands for different things. KUBELWAGEN is primed SCHWIMWAGEN has first base coat of panzer ocher 1943 and the couplings on the K-5 are 8 pieces. one of my hand wheels had a broken handle so had to fix that. The couplers will get primed, painted tamita metallic gray and all the connectors and holes thicked up with paint so they stay together but work.

Никто не Забыт    (No one is Forgotten)
Ничто не Забыто  (Nothing is Forgotten)


  • Member since
    January 2013
Posted by jibber on Sunday, March 15, 2015 7:18 PM

Did you think the K5 would be so much work?

  • Member since
    March 2015
Posted by biggeoff on Sunday, March 15, 2015 7:35 PM

gidday jibber.Yep its a yard shunter. The full box description is 1/35 esc  Locomotora diesel Ko-1. the model is manufactured by Baluard models Spain. It's a very basic kit that consists of thick slabs of resin with no detail moulded in, and some  basic white metal parts and a small decal sheet. I've searched the web for more info but theres not a lot out there . It has no cab detail except for a dodgy instument panel and a couple of white metal control ?wheels but no indication of where to install them. I've purchased the Micro mark "0" gauge 3D rivet sheet and a whole lot of other detailing stuff. I think I'll build this instead of the trumpy gondola. Being part of this GB is just the motivation I need to get it built. It's been in my stash far to long. Not sure how to upload pics. Can you help. Cheers

  • Member since
    April 2006
  • From: Denver, Colorado
Posted by waynec on Sunday, March 15, 2015 7:43 PM

jibber

Did you think the K5 would be so much work?

hey Terry yes i did. i have studied the instructions for a while. what surprised me is how hard it is to figure out when to paint. i'm not used to having to plan out my paint schedule to this extent

Никто не Забыт    (No one is Forgotten)
Ничто не Забыто  (Nothing is Forgotten)


  • Member since
    July 2014
Posted by modelcrazy on Sunday, March 15, 2015 9:01 PM

jibber
Steve what did you use for a base color? It looks like a touch of German Grey and a Darker Green?


I used Vallejo German Gray, with a Burnt Umber oil wash and finished off with pastel dusting. Looking at the pictures, it looks like a little too much weathering, but I can knock it down since it was done with pastels.

Steve

Building a kit from your stash is like cutting a head off a Hydra, two more take it's place.


http://www.spamodeler.com/forum/

  • Member since
    April 2006
  • From: Denver, Colorado
Posted by waynec on Sunday, March 15, 2015 10:24 PM

interesting colors  Vallejo Air Kubelwagen is dark yellow, Schwimwagen is panzer ocher 1943. as you can see the ocher has a definite green tint. this color will change based on type of lightening, brightness, computer monitor etc. this was a test for the gun and i'm going with the dark yellow.

couplers are 8 pieces. these are together with white glue for priming and i will work them as the paint dries. the objective is having a tight but functional fit like on the Gondola. also the air hoses will not be attached until the diorama building phase. i will paint with Tamiya metallic gray.

Никто не Забыт    (No one is Forgotten)
Ничто не Забыто  (Nothing is Forgotten)


  • Member since
    June 2003
  • From: Rowland Heights, California
Posted by Duke Maddog on Monday, March 16, 2015 8:31 AM

Well get used to scheduling your painting. When you start Dora, you'll be doing ten times that kind of scheduling. I actually just painted her up in one go; I just left her separated into about 24 subassemblies that were all painted at once.

Keep plugging Wayne. This is looking good.

  • Member since
    April 2006
  • From: Denver, Colorado
Posted by waynec on Thursday, March 19, 2015 10:02 PM

Karl over in ARMOR gave me some good painting suggestions given the size of this thing. got a bit done on it today. added another 20 pieces. still have other end which isn't as complicated and after that the top and than the other truck.

Никто не Забыт    (No one is Forgotten)
Ничто не Забыто  (Nothing is Forgotten)


  • Member since
    January 2013
Posted by jibber on Friday, March 20, 2015 7:38 AM

Wayne its looking great, those carriers by themselves are a handful.

  • Member since
    March 2011
  • From: Ohio
Posted by Taps88 on Friday, March 20, 2015 3:54 PM

I would very much like to join this GB. I have just begun (maybe 3 days worth of building) on my subject before Waynec suggested I come here and would be honored to join. I started a build thread in the Armor section but can post in both.

I am doing:

Tamiya's 1/35 Panther G Early & Dragon's 1/35 Schwerer Plattformwagen Typ SSy.

If so, thanks for having me be a part of the GB!

Eric / Formally known as Erock68

On the Bench:

Academy: 1/72 B17 Memphis Bell

Tamiya: 1/35 Panther G

Dragon: 1/35 Platformwagen SSy


  • Member since
    January 2013
Posted by jibber on Friday, March 20, 2015 4:01 PM

Eric good to see you here,  we have a lot of photos if you need any more reference.  

Terry

  • Member since
    March 2011
  • From: Ohio
Posted by Taps88 on Friday, March 20, 2015 4:16 PM

I am adding Verlinden's Engine compartment, Lion Roar Barrel & Lion Roar extra PE, to the Panther G.

Here is my progress thus far:

Eric / Formally known as Erock68

On the Bench:

Academy: 1/72 B17 Memphis Bell

Tamiya: 1/35 Panther G

Dragon: 1/35 Platformwagen SSy


  • Member since
    January 2013
Posted by jibber on Friday, March 20, 2015 4:19 PM

Wayne I'm still a little under but I've managed to get a few more things done and will post up some pics tomorrow.  I've decided to do a small dio with the C12 pulling a Schienenwolf ripping up track.  I have both of them primed and I'm also working on the track. The Schienenwolf is a slightly different wheel width from the loco so a little adjustment is necessary.

This is the photo I'm working from.

Terry

  • Member since
    March 2011
  • From: Ohio
Posted by Taps88 on Friday, March 20, 2015 4:21 PM

My add ons:

Eric / Formally known as Erock68

On the Bench:

Academy: 1/72 B17 Memphis Bell

Tamiya: 1/35 Panther G

Dragon: 1/35 Platformwagen SSy


  • Member since
    January 2013
Posted by jibber on Friday, March 20, 2015 4:52 PM

Eric its going along nicely, I didn't know Dragon made such a nice platform. With all the Trumpeter items I totally forgot about this one.  

  • Member since
    March 2011
  • From: Ohio
Posted by Taps88 on Friday, March 20, 2015 9:52 PM

Progress from this evening...I finished the couplers - linkage and the railings. Next is to get a few more tie down hooks on the side. I also started getting the railroad ties ready. Airbrushing and weathering will be next.

Eric / Formally known as Erock68

On the Bench:

Academy: 1/72 B17 Memphis Bell

Tamiya: 1/35 Panther G

Dragon: 1/35 Platformwagen SSy


  • Member since
    June 2003
  • From: Rowland Heights, California
Posted by Duke Maddog on Saturday, March 21, 2015 1:02 PM

Eric, looking great! It's also great to see you again. Welcome to this Group Build. I should be starting on my train subjects soon.

  • Member since
    April 2006
  • From: Denver, Colorado
Posted by waynec on Saturday, March 21, 2015 9:42 PM

jibber

Eric its going along nicely, I didn't know Dragon made such a nice platform. With all the Trumpeter items I totally forgot about this one.  

Eric - welcome to the GB. I'll add you to the roster on Sunday.Your railcar is looking good. I pulled out mine i started 8 years ago. so far i broke 6 brake shoes and had the to end of the platform on upside down so i had to saw them off. I'm now determined to finish this. BTW the wheelbase is the same as the Trumpeter kits. 

Никто не Забыт    (No one is Forgotten)
Ничто не Забыто  (Nothing is Forgotten)


  • Member since
    April 2006
  • From: Denver, Colorado
Posted by waynec on Saturday, March 21, 2015 9:45 PM

DIY RAILROAD TRACK

I have done a railroad build or two and I find the plastic rails that come with the kits really not worth the effort to make them look good. For a little bit more time and a small additional expenditure, you can make a quality railroad track base. This tutorial will demonstrate how I do that.
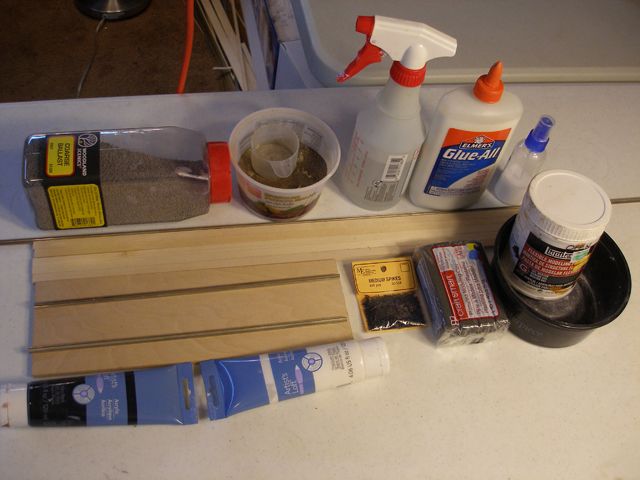
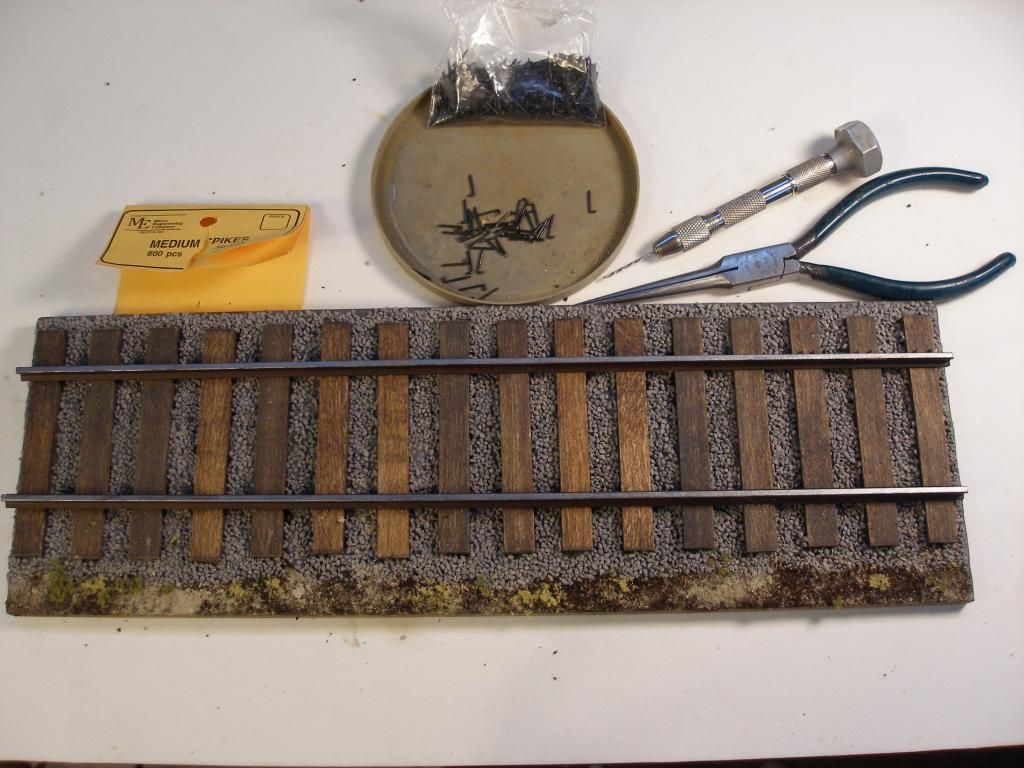
Parts List 

Wood for Base. Since railroad builds tend to be long but not wide pre-cut basswood works well.

Basswood strips 3/8:Wide x 3/16:Thick (not as important as the width)

Rails Aluminum CODE 205 N.S. (i get mine at Caboose Hobbies in Denver)

Pack of Medium Spikes

The following picture shows just about everything I used but obviously there are other options.

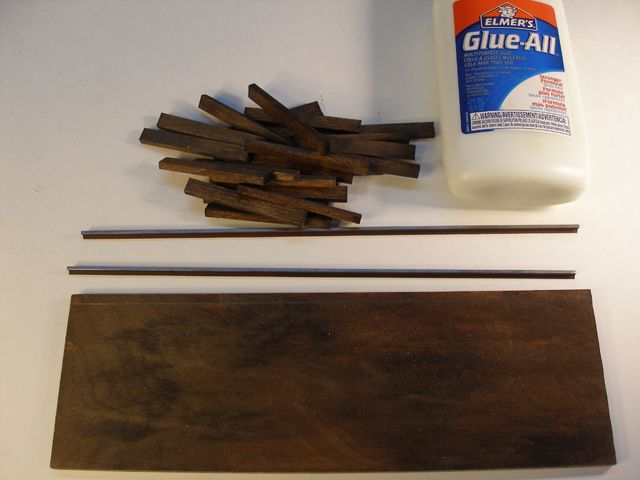
I stained the basswood strips for the ties and the base. Any medium stain like driftwood looks nice but i also use walnut. I buy the small reject cans at the local paint store as they tend to be discounted. It is fastest to stain the basswood strips before cutting into ties. I found it took about 2 days for them to dry. I tried washing one side with payne gray oils but it darkened the wood too much.

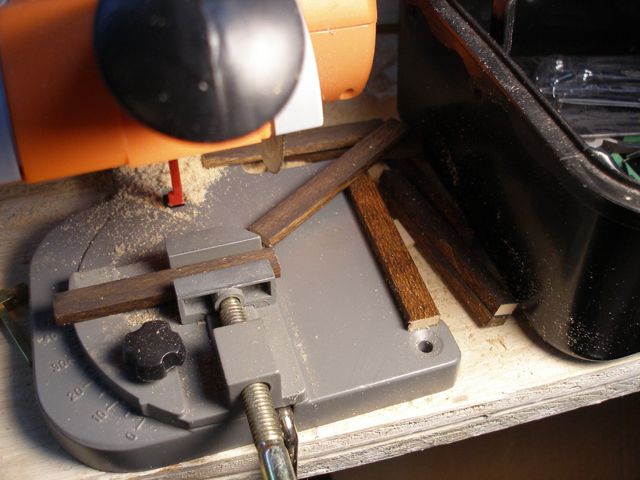
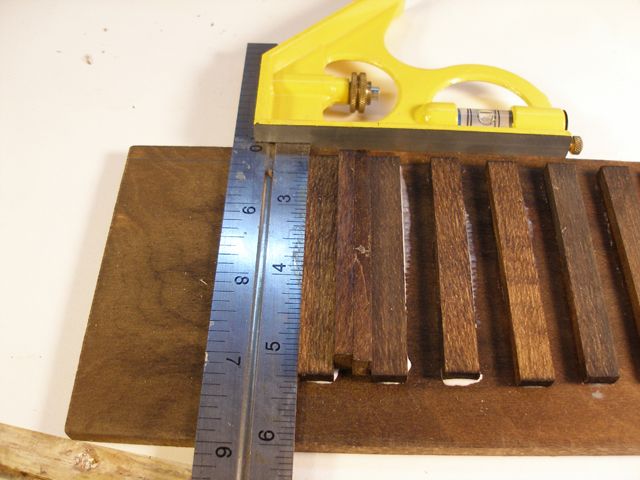
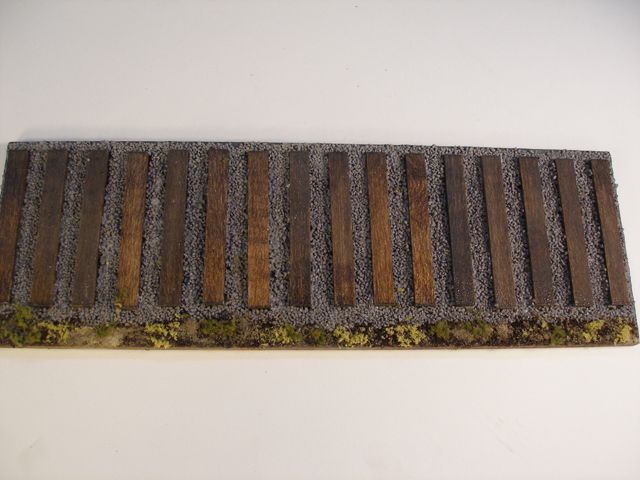
I cut the basswood strips into 3" lengths to create the ties. A miter saw works great for this.After the ties (or sleepers as they are called in the UK) were cut i dipped the ends in the stain, wiped them down, and set them aside. I do all of the basswood strips which means i will have leftovers for future projects. There will be 16 per foot but you may need an extra one or two ties for longer bases. 

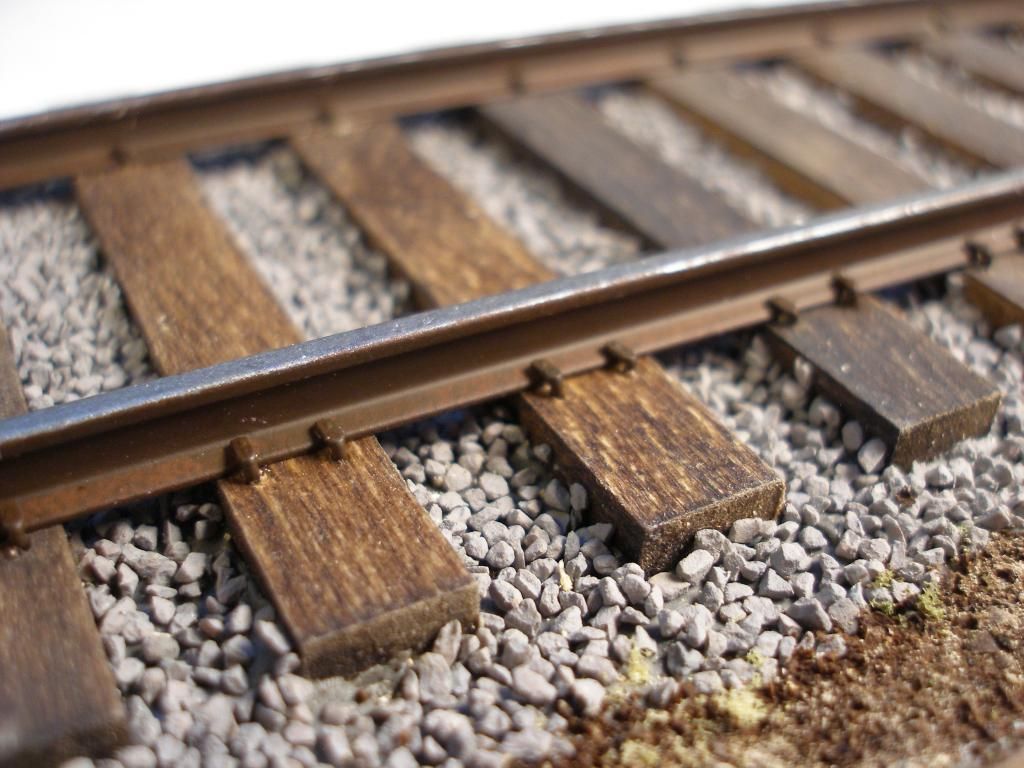
I used a hacksaw to cut the rails, primed them (I use ACE Hardware NOW gray primer) and airbrushed with Vallejo Air German red brown. I like this color better than the Vallejo rust which as a metallic element to it. The top of the rails are painted shiny silver if they are in use or can be left rusty if this section of track hasn't been used for a while.

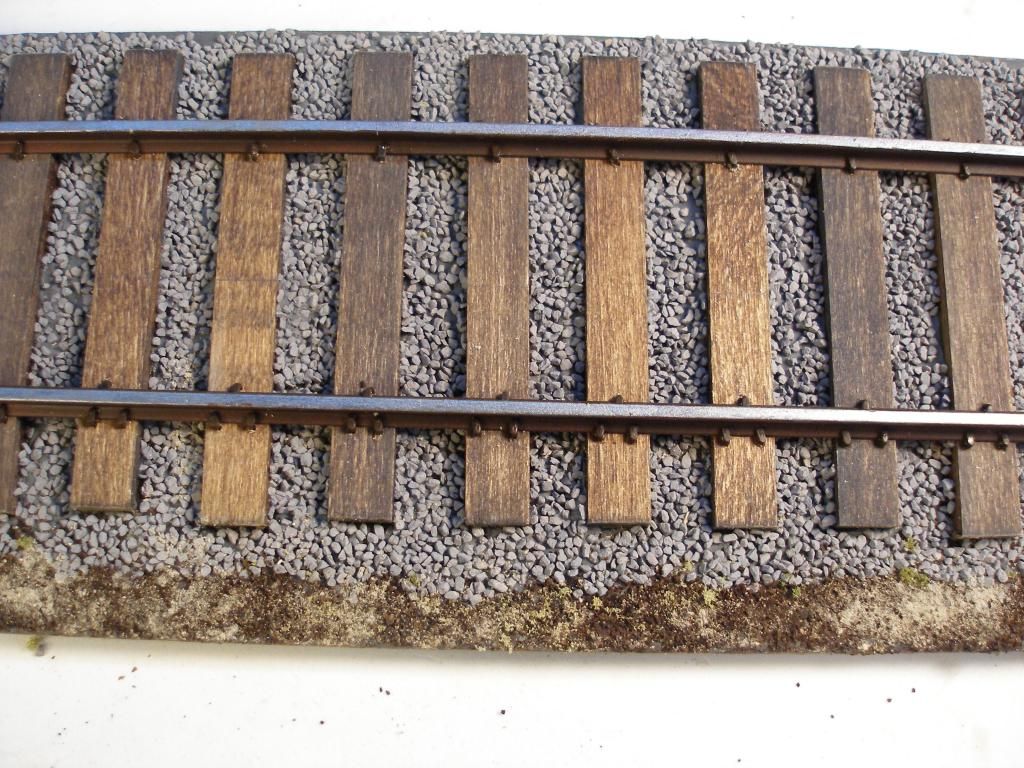
The next step is laying the ties. I drew a line to represent the left side of the ties so they would be even. I also offset the ties from the center to avoid too much symmetry. Using the Trumpeter rails as a guide I glued two spare ties together and turned them sideways. This will be used as the spacer between rails.

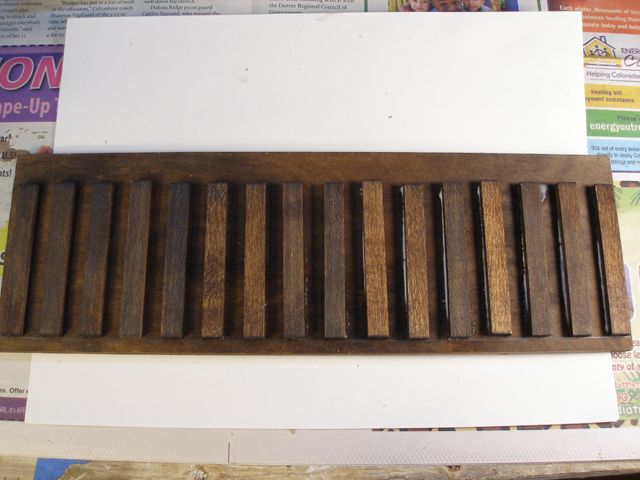
Using white glue or wood glue, I glued the first tie to the base one spacer in from the edge. A square ensures the ties are perpendicular to the edge of the base and parallel to each other. I continued to the end for a total of 16 ties. some of the ties are the darker ones i oil washed to add some contrast. Also the pencil line is a guide so if a tie or two is a millimeter off it is fine. The tracks are suppose to represent hastily laid tracks, not high speed rail lines.

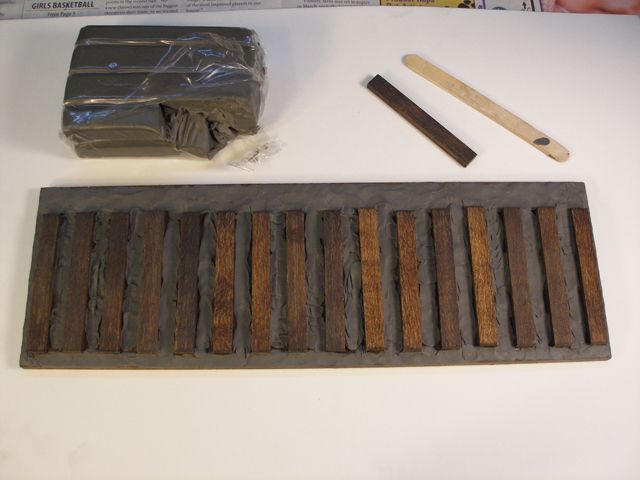
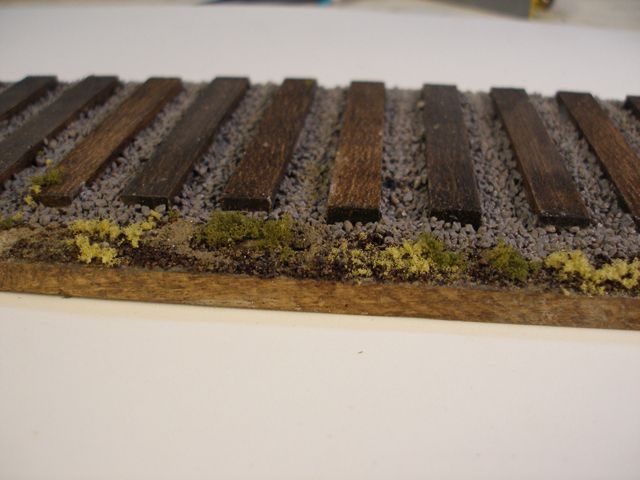
I used modeling clay to create the terrain. It isn't as messy as Liquidtex A key factor here is to have the clay very close to the color of the turf on top. If that isn't possible I will use cheap artist acrylic to paint the clay a suitable color.

Putting the base in a clean box or a large sheet of clean paper, i spread white glue diluted with water between the the first 5-6 ties and start adding the turf. For 1/35 track I used medium gray ballast. After adding the ballast and pressing down i turn the base over and tap on the bottom letting the loose ballast fall on the paper so i can use it again. There will probably be some areas that need additional glue and ballast.

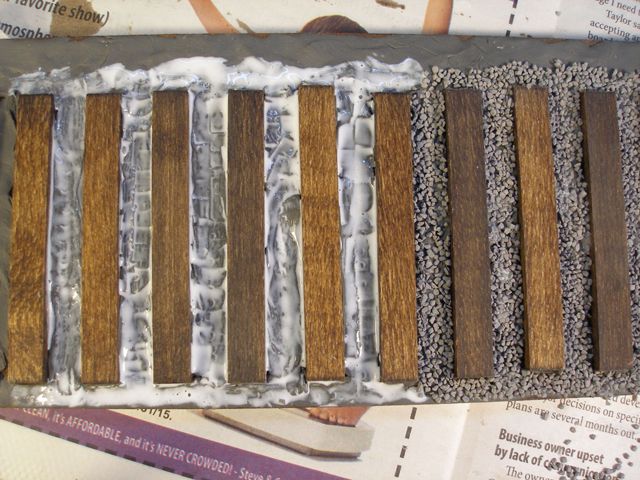
I did the same procedure along the edge with dirt and added some vegetation.

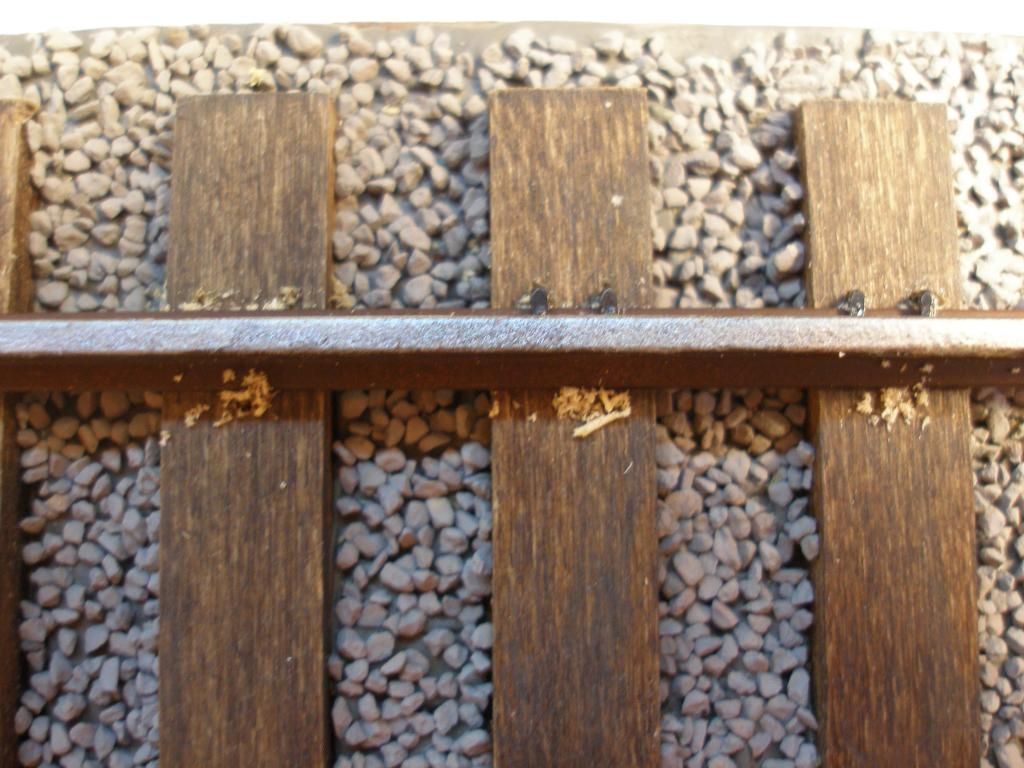
The next step is adding the rails. This is the tricky part though much easier than 1/72 using HO scale rails because the tolerances are tight. I measured in ½” from the end of the tie and used the square to draw lines on random ties from one end to the other. I laid one painted rail on the line and checked to ensure it was parallel to the ends of the ties. If so, using superglue I attached it to the ties.

These rails are wide enough to sit on the ties. I laid the other rail on the ties the approximate distance for the wheelbase and set my railcar on the rails, shifting the second rail so it was the correct distance. I amde some pencil marks on the outside of the second rail and measured the distance between the rails at their base. It turns out to be 39mm. I made a number of spacers using popsicle sticks, laid them along the ties, added superglue and attached the second rail.
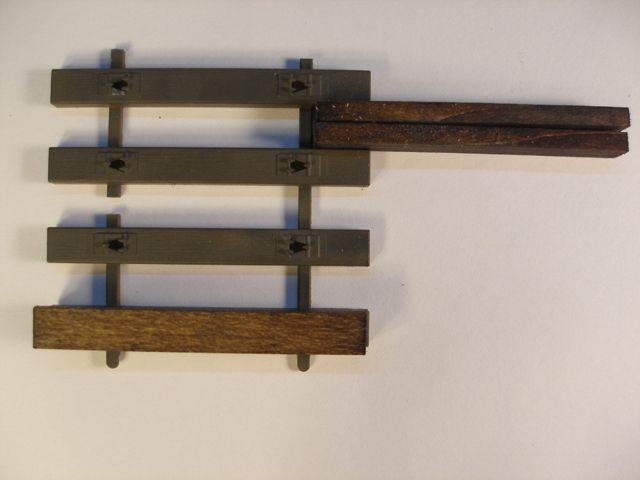
The rails.

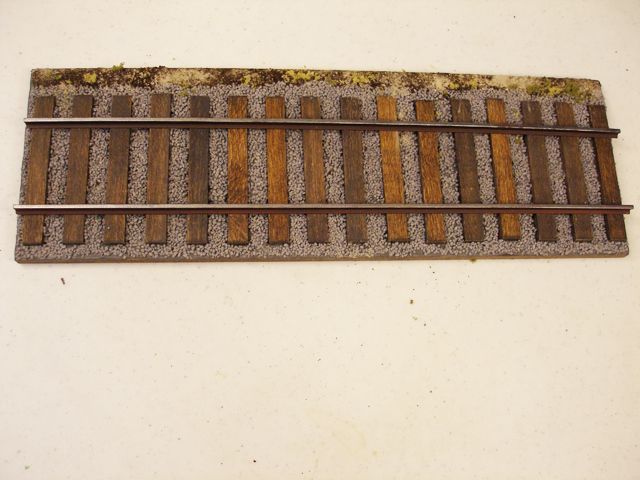
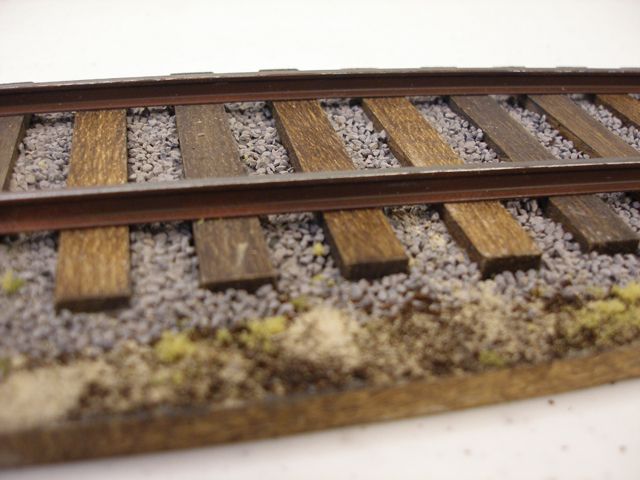
While a lack of spikes isn't noticeable in 1/72, it is at 1/35. This turned out to be surprisingly easy. I decided on two spikes on the outside and one on the inside. I didn't have rail attachment plates so I assumed hastily laid rails wouldn't use them and spiked the rails directly to the ties. It was difficult to push the spikes into the ties but I remembered these spikes are not needed to hold the rails.

Using a pin vise I drilled holes where i wanted the spikes and used needle nose pliers to insert the spikes. When all the spikes where in i painted them rust and touched up any scrapped paint on the rails.

It took me an hour to spike and touch up one foot of track.

This technique will work with 1/72 track too. Thank you fdor looking at this tutorial. Any comments and suggestions are welcome.

Никто не Забыт    (No one is Forgotten)
Ничто не Забыто  (Nothing is Forgotten)


JOIN OUR COMMUNITY!

Our community is FREE to join. To participate you must either login or register for an account.

SEARCH FORUMS
FREE NEWSLETTER
By signing up you may also receive reader surveys and occasional special offers. We do not sell, rent or trade our email lists. View our Privacy Policy.