SEARCH FINESCALE.COM

Enter keywords or a search phrase below:

1945 GB

95389 views
1851 replies
1 rating 2 rating 3 rating 4 rating 5 rating
  • Member since
    December 2002
  • From: Bury St Edmunds, Suffolk, England
Posted by Bish on Wednesday, April 29, 2015 11:46 AM

Eric, that Super Trees looks exactly like the Sea Moss we get here. It is quite pricey here to, about £15 for a god sized box, but I find it lasts ages.

Really nice looking build there.

I am a Norfolk man and i glory in being so


On the bench: Airfix 1/72nd Harrier GR.3/Fujimi 1/72nd Ju 87D-3

  • Member since
    April 2014
  • From: Australia
Posted by lostagain on Thursday, April 30, 2015 9:13 AM

Okay, I have a dodgy internet connection here at the motel I'm in during the week. Recent photos include:

Masking out for the red spots

And the result: loads of overspray and bleed which has to be painted over. Didn't have the right grey in the first place anyway, so I wasn't too upset. Okay that's a lie, I was well peeved, but had learnt a lesson.

So I masked them over and resprayed the grey - and the result was not too bad, all things considered.

And in the motel room I have been able to spend time painting up the pilot ready to fly.

Hmmmm... he looks pretty gruesome up close. Next photo will have to be from further away.

  • Member since
    January 2013
Posted by jibber on Thursday, April 30, 2015 5:33 PM

Just a quick update on my WR360 Locomotive and German Schienenwolf in action. Unfortunately i've been slowed down but this is almost ready to put together. The Schienenwolf is complete, the track is about 90% complete and the loco is almost finished. Here are a few preview shots showing how the Germans destroyed railroads in the last months of the war. As you can see, it was a plan that worked rather easily.

 [/URL[URL=http://s1346.photobucket.com/user/kingtiger11/media/Schienenwolf/DSC01606_zps1mr27zup.jpg.html] [/URL[URL=http://s1346.photobucket.com/user/kingtiger11/media/Schienenwolf/DSC01613_zpsjrsjy5fg.jpg.html] [/URL[URL=http://s1346.photobucket.com/user/kingtiger11/media/Schienenwolf/DSC01612_zps0uz5gdt5.jpg.html]

Terry

  • Member since
    September 2003
  • From: AandF in the Badger State
Posted by checkmateking02 on Thursday, April 30, 2015 7:14 PM

Nicely done, Terry!


  • Member since
    June 2014
Posted by BrandonK on Thursday, April 30, 2015 11:27 PM

Terry,

I am truly impressed with your skill on this build. Very nice work, Sir !!

On the bench:

A lot !! And I mean A LOT!!

2024 Kits on deck / in process / completed   

                         14 / 5 / 2  

                              Tongue Tied

  • Member since
    January 2015
Posted by BrandonD on Friday, May 1, 2015 12:39 AM

Wow, Terry,

That is really well-done, and a piece of history I never knew about before. Thanks for sharing with us.

I really like the way you scratched the device to show its use, and the way the rails bend up. It looks really natural.

-BD-

  • Member since
    January 2015
Posted by BrandonD on Friday, May 1, 2015 12:40 AM

Ok, I got the main assembly done, painted the insides of the scoops and masked them, then added most of the small parts - cannon, PE hooks on the undercarriage, underwing lights, etc.

The horizontal stabilizers and the rudder are on, but not glued yet. I'm going to take them off after shooting the underside for ease of masking, since they fit so well that they won't need filling at the underwing seam (and hopefully not the upper side, either).

After applying the masks and shooting it black, I realized the hood seam was still visible, so it currently has a 1mm-wide strip of white going down the nose that will be sanded off tomorrow. I contrasted the photo a bit here so you can see it. It wasn't too bad, but it was definitely there, and I'd rather lose some rivets than have an extra seam, if that's the end result (fingers crossed that it isn't).

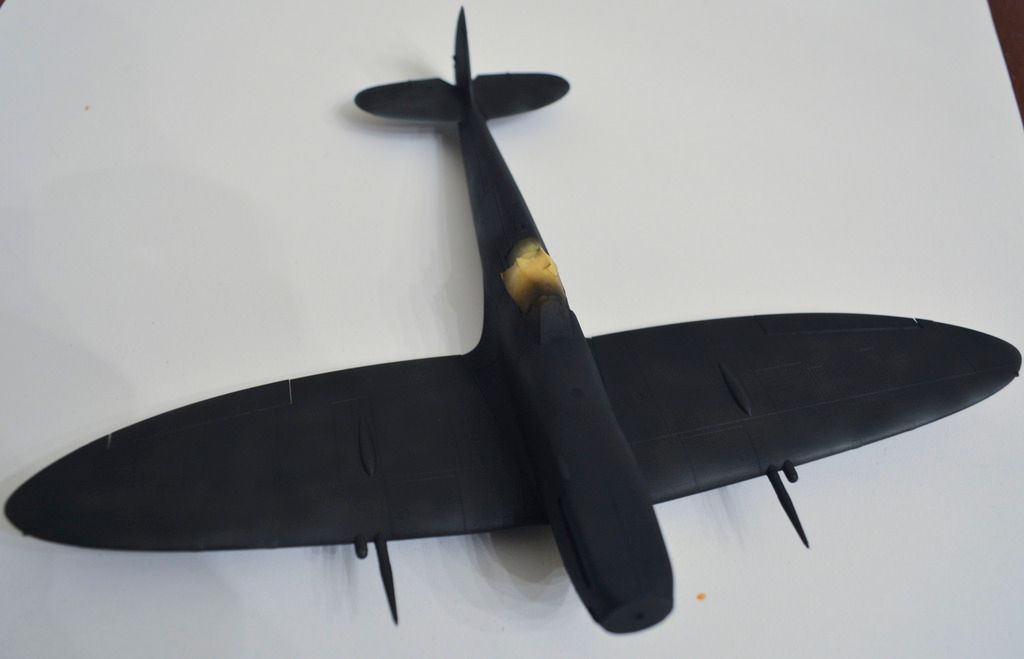
Now I hope I get the seam dialed this time, because it just looks weird in black. Can't wait to get it into the medium sea gray/dark green/ocean gray Gibbes' plane wore.

-BD-

  • Member since
    January 2013
Posted by jibber on Friday, May 1, 2015 8:10 AM

Thank you for the nice comments, I just misted an adhesive on the base and on closer look it wasn't completely dry yet and I still have to add some small grass and weeds to the base and finish up the loco thats almost completed.

Terry

  • Member since
    December 2002
  • From: Bury St Edmunds, Suffolk, England
Posted by Bish on Sunday, May 3, 2015 7:05 AM

Lost, nice work on those meatballs, I do like the look of that aircraft.

I am a Norfolk man and i glory in being so


On the bench: Airfix 1/72nd Harrier GR.3/Fujimi 1/72nd Ju 87D-3

  • Member since
    December 2002
  • From: Bury St Edmunds, Suffolk, England
Posted by Bish on Sunday, May 3, 2015 7:07 AM

Terry, that's really nice. The carriage itself looks great and I really like how you have done the damage to the rails, that looks spot on.

I am a Norfolk man and i glory in being so


On the bench: Airfix 1/72nd Harrier GR.3/Fujimi 1/72nd Ju 87D-3

  • Member since
    December 2002
  • From: Bury St Edmunds, Suffolk, England
Posted by Bish on Sunday, May 3, 2015 7:08 AM

BD, spit is coming on well, look forward to seeing some colour on it.

Some great work here guys. Sorry I haven't been around for a couple of days, been a little busy with current build and a few other things.

I am a Norfolk man and i glory in being so


On the bench: Airfix 1/72nd Harrier GR.3/Fujimi 1/72nd Ju 87D-3

  • Member since
    July 2014
Posted by modelcrazy on Sunday, May 3, 2015 11:44 PM

Here's this weekends nightmare PE work. The aft superstructure, mast and radar. I feel like a jeweler.
I still have quite a bit more to add. More AA guns, treterary guns, gun director hanger doors etc.

Steve

Steve

Building a kit from your stash is like cutting a head off a Hydra, two more take it's place.


http://www.spamodeler.com/forum/

  • Member since
    January 2013
Posted by jibber on Monday, May 4, 2015 7:37 AM

Steve thats unbelievable, what great skill and patience.

  • Member since
    December 2002
  • From: Bury St Edmunds, Suffolk, England
Posted by Bish on Monday, May 4, 2015 9:53 AM

Steve, you must have nerves of steel for that. I would like to get some 350 ships, but not sure I could cope with all that PE. Looks bloody amazing.

I am a Norfolk man and i glory in being so


On the bench: Airfix 1/72nd Harrier GR.3/Fujimi 1/72nd Ju 87D-3

  • Member since
    January 2014
  • From: Toronto
Posted by Rob S. on Monday, May 4, 2015 11:34 AM

Bloody fantastic work Steve!!

______________________________________________________________________________


On the Bench: Nothing on the go ATM

  • Member since
    September 2003
  • From: AandF in the Badger State
Posted by checkmateking02 on Monday, May 4, 2015 11:58 AM

Exceptional, Steve.  Like a fine sculpture.


  • Member since
    July 2014
Posted by modelcrazy on Monday, May 4, 2015 12:34 PM

Thanks guys, I should have some more done on it tonight. It was quite the bugger to get together without breaking off other items, and I still have a second deck to install to it.

I'm excited to complete this phase and move onto the base and water scene.

I was going to build the Yamato for the Japanese build....but now kinda want to take a break from the PE for a while.

Steve

Steve

Building a kit from your stash is like cutting a head off a Hydra, two more take it's place.


http://www.spamodeler.com/forum/

  • Member since
    January 2015
Posted by BrandonD on Monday, May 4, 2015 3:57 PM

Lostagain - I really like the way that Shinden is coming out. I don't know how I missed it the other day. I love the painted-on markings. I might do that with a Tamiya Spitfire Vb I've got in the stash. I am kind of scared to, though.

Steve - I can't even imagine working with that much PE. A cockpit is more than enough for me, I think. Great job!

-BD-

  • Member since
    January 2015
Posted by BrandonD on Monday, May 4, 2015 3:58 PM

Ok, I got some time to work on my Spitfire VIII over the weekend, which means I finally got some color on the underside.

It's Tamiya medium sea gray acrylic applied in the three-layer method. After the base coat, I took the stabilizers off, removed the elevators and shot both mating joints with color since they will be displayed in the lowered position and I wanted to make sure they came out well. I'm debating whether I leave them unglued for the upper portion to ease the masking process.

The photo below is after the lightened coat has been sprayed over the base.

The photo below is after the blend coat. This is my fist time using the lacquer thinner with my acrylics instead of Tamiya's X-20, so getting the ratios right was a bit difficult at first. The bond coat ended up being 35 drops of thinner to 12 drops of paint, and that was about the perfect amount.

Now to let it dry and get on with the masking so I can shoot the topside ocean gray.

-BD-

  • Member since
    December 2002
  • From: Bury St Edmunds, Suffolk, England
Posted by Bish on Monday, May 4, 2015 4:02 PM

That's a really nice job there Bandon, nice finish and good definition of the panel lines.

I am a Norfolk man and i glory in being so


On the bench: Airfix 1/72nd Harrier GR.3/Fujimi 1/72nd Ju 87D-3

  • Member since
    September 2003
  • From: AandF in the Badger State
Posted by checkmateking02 on Monday, May 4, 2015 4:13 PM

The effect you've achieved on the Spitfire looks great, Brandon.  Nice and subtle.


  • Member since
    August 2012
Posted by AndrewW on Monday, May 4, 2015 8:03 PM

That is some nice shading,  Brandon!

Life is hard, it's even harder when you're stupid - John Wayne.


  • Member since
    July 2014
Posted by modelcrazy on Monday, May 4, 2015 8:58 PM

Another outstanding preshading job BD,

Steve

Building a kit from your stash is like cutting a head off a Hydra, two more take it's place.


http://www.spamodeler.com/forum/

  • Member since
    January 2013
Posted by jibber on Tuesday, May 5, 2015 11:59 AM

Nearing the end of WWII the Germans wanted to destroy rail lines heading into the Motherland as part of a scorched earth policy. The quickest and easiest way to destroy these rail lines was the use of a Schienenwolf (rail wolf). They had a very strong hooked end attached to a plough mounted on a rather simple platform, it was pulled by a locomotive that destroyed wooden ties and bending rails at a speed of about 7mph operated by a small crew. There were a few versions of these ploughs and photos show different were used. From photos, more than likely yard locomotives that were probably not in very good condition were used leaving others to haul troops and materials in their war effort.   

When I approached this build, I wanted to show how they used the plough and how really effective it really was. The WR360 locomotive and plough I think are aged appropriately, showing a lot of wear. To build the track I used scale pieces of basswood for the ties that were glued to a cork board and the cleats and rails were taken from the provided track and cut to size. On the damaged end of the base, I broke the ties in half and used some steam to mildly warp the rails. I left a few cleats in place to the damaged rails and cut tiny RR spikes fitting them underneath to look like they were yanked right out of the ties. Once everything was in place course ballast in a mix grey color was added and sprinkles of real dirt over the entire area. Everything was held in place by some thinned spray adhesive. I thought of adding a couple figures but I didn’t want to take anything away from the plough and its devastating effect on the track.

Bish I wish I had better photos for you, i'm really not set up for a large build like this. I'd like to call this one finished, please choose whatever photo you deem best. Thanks for hosting another great GB.

Terry 

  • Member since
    April 2006
  • From: ON, Canada
Posted by jgeratic on Tuesday, May 5, 2015 12:35 PM

Terry - a very well thought out and executed build! Yes 

I believe you have perfectly illustrated how and what the Schienenwolf was designed to do.  As for crew figures, they probably scattered off for cover upon hearing/seeing an approaching aircraft.

regards,

Jack

  • Member since
    February 2010
  • From: Berkeley CA/St. Paul MN
Posted by EBergerud on Tuesday, May 5, 2015 2:37 PM

Terry: flat out dynamite. Great build. Wish it was mine.

Eric


A model boat is much cheaper than a real one and won't sink with you in it.

  • Member since
    June 2014
Posted by BrandonK on Tuesday, May 5, 2015 2:56 PM

Terry,

That is simply jaw dropping. It looks like a slice of time sitting on your mantle. Absolutely top notch work.

On the bench:

A lot !! And I mean A LOT!!

2024 Kits on deck / in process / completed   

                         14 / 5 / 2  

                              Tongue Tied

  • Member since
    January 2013
Posted by jibber on Tuesday, May 5, 2015 3:39 PM

Eric, Jack and Brandon, those are very nice comments and much appreciated. It's such a cool subject where the setting really wrote itself. Thanks again. Terry

  • Member since
    December 2002
  • From: Bury St Edmunds, Suffolk, England
Posted by Bish on Tuesday, May 5, 2015 3:53 PM

Terry, that is really impressive. I think you have captured the use of this device perfectly. I think its something that's little known about but certainly deserves modelling, and you have done it perfect justice. Thank you for showing it here.

I know what you mean about taking pics of bigger models, I have the same problem.

I am a Norfolk man and i glory in being so


On the bench: Airfix 1/72nd Harrier GR.3/Fujimi 1/72nd Ju 87D-3

  • Member since
    July 2014
Posted by modelcrazy on Tuesday, May 5, 2015 11:13 PM

Terry,

That's amazing work....again.

Got some more done on the aft superstructure, added the second deck, crane, quad bofors and the 5" guns (not glued yet). Tomorrow night I'll paint it and maybe get some time to install the halyards. Once this is added to the hull deck, I'll add the hanger doors, which will be closed with the scout planes stowed securely inside due to the moderate to heavy seas she will be sailing through.

Steve

Steve

Building a kit from your stash is like cutting a head off a Hydra, two more take it's place.


http://www.spamodeler.com/forum/

JOIN OUR COMMUNITY!

Our community is FREE to join. To participate you must either login or register for an account.

SEARCH FORUMS
FREE NEWSLETTER
By signing up you may also receive reader surveys and occasional special offers. We do not sell, rent or trade our email lists. View our Privacy Policy.