SEARCH FINESCALE.COM

Enter keywords or a search phrase below:

1945 GB

95389 views
1851 replies
1 rating 2 rating 3 rating 4 rating 5 rating
  • Member since
    January 2013
Posted by jibber on Wednesday, May 6, 2015 7:45 AM

If I ever had a fleeting thought of doing some 350 ships, Steve you've changed my mind. I think your setting the benchmark with all that PE and I KNOW you still have rails left to do, then you finally get down to the last few frets of metal. Thats crazy good.

Terry  

  • Member since
    December 2002
  • From: Bury St Edmunds, Suffolk, England
Posted by Bish on Wednesday, May 6, 2015 12:06 PM

I am having second thoughts as well Terry.

That crane looks amazing Steve, is that all PE.

I am a Norfolk man and i glory in being so


On the bench: Airfix 1/72nd Harrier GR.3/Fujimi 1/72nd Ju 87D-3

  • Member since
    November 2003
  • From: Nashville, TN area
Posted by bobbaily on Wednesday, May 6, 2015 12:09 PM

Brandon-I'm enjoying watching your build of the Spitfire-very nice paint work-I need to add an Eduard Spitfire to my stash soon.

Terry-WOW! That is one impressive build-I especially enjoy the 'off the beaten track' builds-and you nailed the quality.

Steve-I get the shakes just looking at the PE work you've done-it's all top notch-I am envious.

Bob


  • Member since
    July 2014
Posted by modelcrazy on Wednesday, May 6, 2015 12:57 PM

Thanks Terry, Bish and Bob,

Bish, yes it's all PE, as you can probably see, there is interior bracing that was installed as well. I believe, with the exception of the catapults, this is the last of the heavy PE work. Everything else are small parts added to the deck and hull.

I should be attaching all the sub-structures to the hull soon and working on the finishing touches. After that, I'll work on the base and sculpting the water.

Steve

Building a kit from your stash is like cutting a head off a Hydra, two more take it's place.


http://www.spamodeler.com/forum/

  • Member since
    December 2002
  • From: Bury St Edmunds, Suffolk, England
Posted by Bish on Wednesday, May 6, 2015 1:02 PM

Steve, will you be painting all those sub structures once they are fitted.

I am a Norfolk man and i glory in being so


On the bench: Airfix 1/72nd Harrier GR.3/Fujimi 1/72nd Ju 87D-3

  • Member since
    July 2014
Posted by modelcrazy on Wednesday, May 6, 2015 1:11 PM

Bish,

No, I'm painting them as I go. I'll paint the aft structure tonight. I'll weather the ship as a whole though.

Steve

Building a kit from your stash is like cutting a head off a Hydra, two more take it's place.


http://www.spamodeler.com/forum/

  • Member since
    July 2004
  • From: Sonora Desert
Posted by stikpusher on Wednesday, May 6, 2015 1:43 PM

Boy, it sure has been a busy week on here! EB and Jibber, your completed builds have been added to the front page photo roster. Very well done sirs!

Jibber I gotta say that the track destroying device is honestly something I had never though that I would see in a 1/35 model. Talk about unique subject!

EB, the foliage on your final set up display really takes that build up a notch!

Brandon, your Spit is really coming along nicely! Your pre shading is quite effective for giving subtle yet pronounced appearance to the underside details. I am looking forward to the topside work.

MC, words really are hard to find for what you are doing with that kit/project... Wow! When she is all finished, you are going to have a real show stopper there!


F is for FIRE, That burns down the whole town!

U is for URANIUM... BOMBS!

N is for NO SURVIVORS...

       - Plankton

LSM


  • Member since
    September 2003
  • From: AandF in the Badger State
Posted by checkmateking02 on Wednesday, May 6, 2015 1:56 PM

Nice effect, Terry!  Well-done!


  • Member since
    September 2003
  • From: AandF in the Badger State
Posted by checkmateking02 on Wednesday, May 6, 2015 1:58 PM

Astounding level of detail, Steve!  Very nice.


  • Member since
    January 2013
Posted by jibber on Wednesday, May 6, 2015 2:43 PM

Thanks guys, I thought it was so unique it had to be built and the display idea was so obvious.  It took a lot of planning and working on the little things, that worked out in the end.

Thanks again,  Terry

  • Member since
    February 2010
  • From: Berkeley CA/St. Paul MN
Posted by EBergerud on Wednesday, May 6, 2015 2:50 PM

Bish

It has been a pretty good GB so far.  Still a few months to go and I think we'll see some more worthy projects. Thanks for hosting.

Eric


A model boat is much cheaper than a real one and won't sink with you in it.

  • Member since
    December 2002
  • From: Bury St Edmunds, Suffolk, England
Posted by Bish on Wednesday, May 6, 2015 3:11 PM

Ye, I think its doing pretty good. Not even half way through and we already have a good number of really nice completed builds. Its certainly doing better than a lot of the other GB's which seem to dyeing on there butts.

I am a Norfolk man and i glory in being so


On the bench: Airfix 1/72nd Harrier GR.3/Fujimi 1/72nd Ju 87D-3

  • Member since
    July 2014
Posted by modelcrazy on Wednesday, May 6, 2015 11:47 PM

Here's tonight work. I painted the structure and antennas and installed the guns and halyards. Next, I'll work on a minor structure aft of this one and install all the sub assemblies onto the hull.

I was thinking of making some tarps for the guns since she will be in some spray. I saw some pictures of her in the Mare Island drydock in '45 with tarps over the guns. I suppose they were to keep foreign matter and welding slag off, but it got me to thinking. What do you guys think?

Steve

Steve

Building a kit from your stash is like cutting a head off a Hydra, two more take it's place.


http://www.spamodeler.com/forum/

  • Member since
    January 2013
Posted by jibber on Thursday, May 7, 2015 7:21 AM

Steve i'm impressed, thats what I think..One question, are the decks wood?

  • Member since
    July 2014
Posted by modelcrazy on Thursday, May 7, 2015 7:40 AM

Terry,

No, they were steel.

Steve

Building a kit from your stash is like cutting a head off a Hydra, two more take it's place.


http://www.spamodeler.com/forum/

  • Member since
    January 2015
Posted by BrandonD on Friday, May 8, 2015 1:53 AM

Happy VE Day everyone!

I still can't believe how well that track destroyer came out. Amazing...

Modelcrazy - I wanted to post an in-progress shot on my ocean gray painting, but I wanted your ship to have time to get the praise it deserves - absolutely stunning work! I'm envious of your patience and skills.

-BD-

  • Member since
    January 2015
Posted by BrandonD on Friday, May 8, 2015 1:54 AM

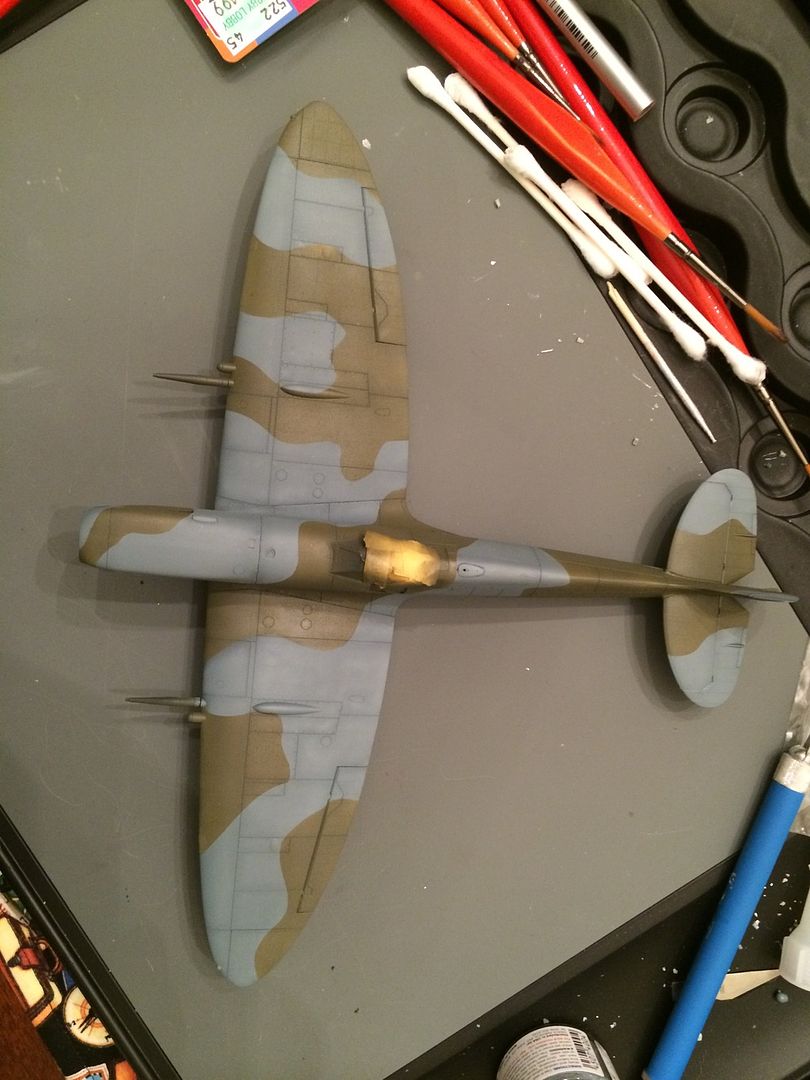
Well, it's been a few days since I posted, but I've got the top colors on. The masking still looks a little sharp on some edges (see port wing), but overall I'm happy with it. One of the reasons I chose this build is that it's an RAAF bird, and I hadn't done any Commonwealth planes yet. The other was that the camouflage had sharp demarcations, and not the blurred/feathered lines where the colors joined. I've got another Spitfire I want to try out the softer edges on, but this one I wanted to take it easier.

As you can see, I've got the ocean gray and dark green atop the medium sea gray. I'm happy with how it came out save for one spot on the starboard wing where I didn't hit it enough with the green blend coat, leaving too much of the lightened shade peeking through. This would be a problem if it wasn't covered by a roundel :D

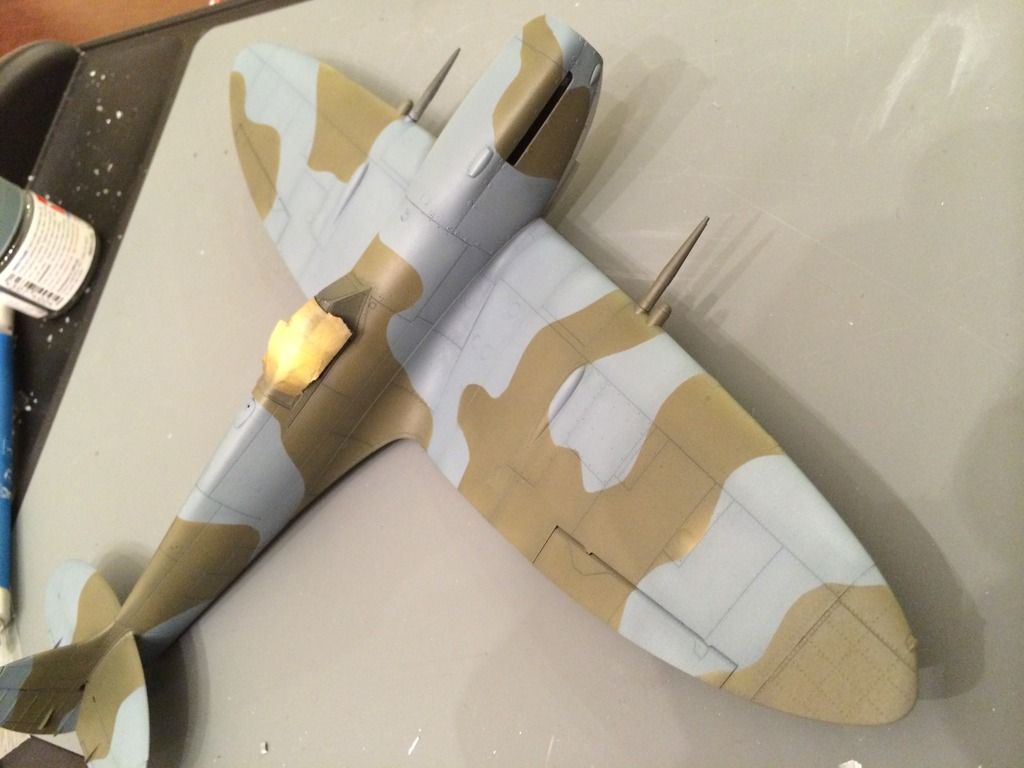
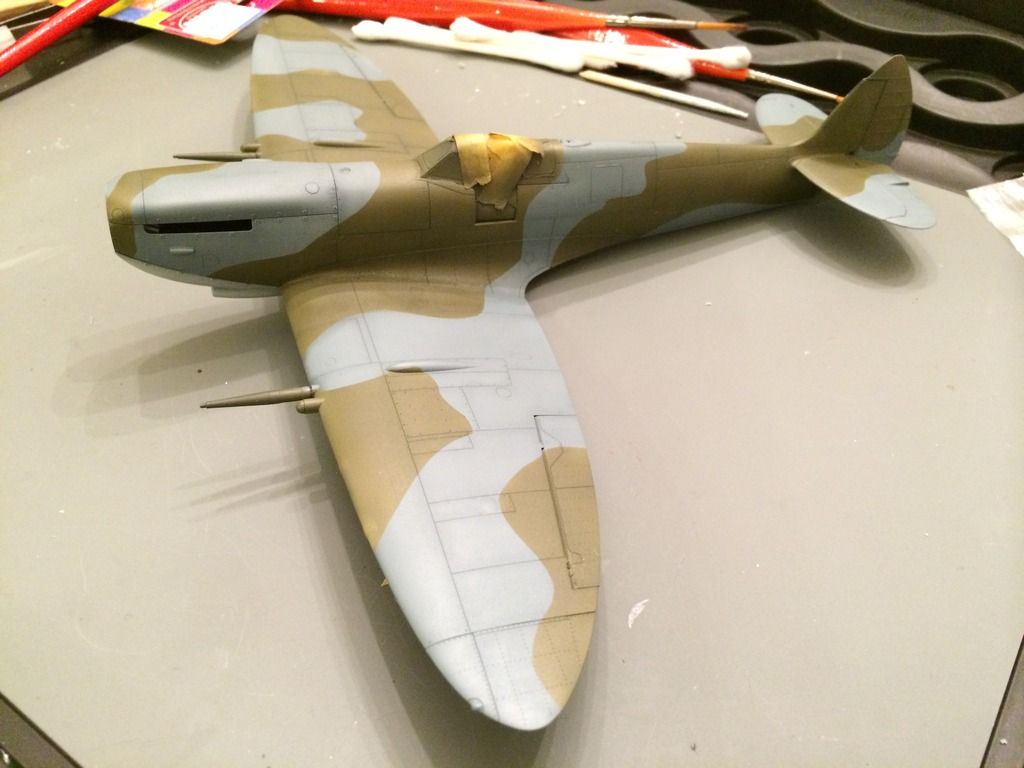
A couple of side shots

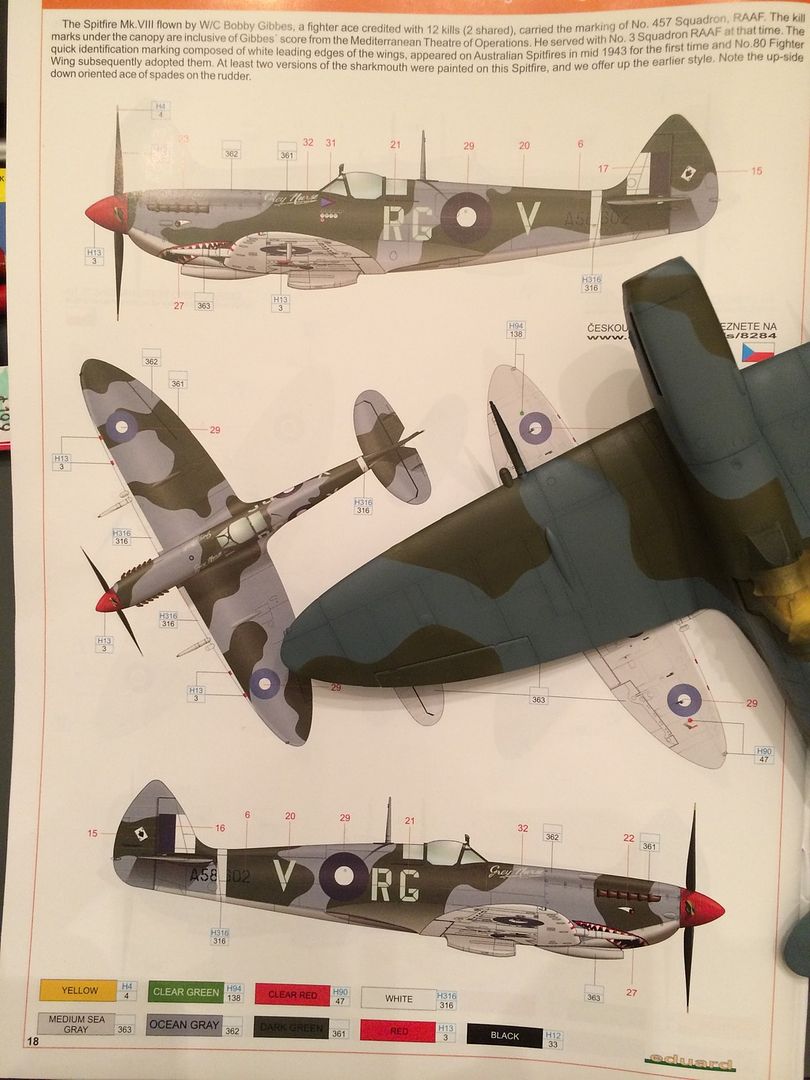
And you can see the color scheme on the Eduard instructions. The gray on my plane is much more blue than the color drawing, but I think the bluer tint is actually more correct, and it will probably tone down a bit when I clear coat it anyway. (Also, the white balance in this photo is totally off, and I didn't take the time to fix it).

Now I get to basically mask the whole thing again to paint the leading edges of the wings and the cannon barrels white. I suppose I should do the fuselage band at that time, too.

-BD-

  • Member since
    January 2015
Posted by BrandonD on Saturday, May 9, 2015 3:23 PM

I've finished the leading edges, the fuselage stripe and, while I was at it, painted the vertical stabilizer markings because I have yet to get decals for those to work right.

They'll need a tiny bit of touch-up, but after that I can finally glue the elevators and rudder in place. I'm really glad I opted to leave them off until the end, since it's really simplified masking.

I oversprayed the white with a mist coat of Tamiya buff to tone it down. I'm hoping it matches the decals once they're over the paint. If not, I'll have to mist them for uniformity.

I messed up on the blue on the tail, since I used X-4 instead of XF-4 and now have a nice glossy sheen. I'll just have to make sure I hit it well with the flat coat at the end.

-BD-

  • Member since
    December 2002
  • From: Bury St Edmunds, Suffolk, England
Posted by Bish on Saturday, May 9, 2015 3:28 PM

That's looking really good Brandon. I am not a Spit fan myself, but I do like the schemes on these and they look good in it.

I am a Norfolk man and i glory in being so


On the bench: Airfix 1/72nd Harrier GR.3/Fujimi 1/72nd Ju 87D-3

  • Member since
    September 2003
  • From: AandF in the Badger State
Posted by checkmateking02 on Saturday, May 9, 2015 4:16 PM

Exceptional work, both Brandon and Steve.  Both projects look outstanding.


  • Member since
    February 2010
  • From: Berkeley CA/St. Paul MN
Posted by EBergerud on Saturday, May 9, 2015 7:00 PM

Steve,

I've wondered into the weird world of ships before and never feel "safe" until rigging is done. (For one thing the chance of damaging that PE is real when you're handling the ship and looking through your most powerful reading glasses needed to rig.) What are you going to use for a rigging material?

Eric


A model boat is much cheaper than a real one and won't sink with you in it.

  • Member since
    October 2008
  • From: Georgia
Posted by Rigidrider on Saturday, May 9, 2015 7:18 PM

BD... Looking Great ! Like Bish I'm not a Spitfire fan, but I do have a couple in stash, And can only hope that when I get ready to do them they comes out as good as yours is.

Doug

When Life Hands You A Bucket Of Lemons...

Make Lemonade!

Then Sell It Back At $2 Bucks A Glass...

  • Member since
    January 2013
Posted by jibber on Saturday, May 9, 2015 7:20 PM

Brandon nice job on that camo, I've always loved those colors. Real nice. Terry

  • Member since
    July 2014
Posted by modelcrazy on Saturday, May 9, 2015 7:28 PM

EBergerud

What are you going to use for a rigging material?

Eric

Eric,

I've been using stretched sprue. I can get it smaller than a hair and tighten it with the slightest heat source if needed.

Your right about the PE, Once I'm finished with a section, I place it in a safe place away from any mishap until needed.

Steve

Steve

Building a kit from your stash is like cutting a head off a Hydra, two more take it's place.


http://www.spamodeler.com/forum/

  • Member since
    February 2010
  • From: Berkeley CA/St. Paul MN
Posted by EBergerud on Saturday, May 9, 2015 10:58 PM

I haven't been able to master sprue. I use Baumann's method and make the stuff on industrial scale. What I can't figure is how to attach it. Baumann uses a German plastic cement (Revel) but I always scratch my masts in brass and the plastic cement will melt the sprue. At present I use extremely fine European fly tying line - not to be confused with UniCaenis which is simply too fine for me to work with - I've also been trying to figure out the ultra light fishing line made by Berkeley - the 1lb break strength Nanofil line has a width of .005" or .13mm. That's thin and fairly easy to work with - but it is hard to cut with the scissors I've been using. Fishing line, although not uncoated tying line, also tightens up with heat delivered via incense although that's a good way to rub out a good hunk of rigging all at once. Ships are a real challenge - I can see why some people never build them. But when you get into one, it's very rewarding. And if things work even non-modelers will give a little whistle because they're so great for display. But as noted above you must have smart thumbs. I've damaged PE during rigging every time at bat - thankfully it's always been fixable.

Love to see you kit when finis.

Eric


A model boat is much cheaper than a real one and won't sink with you in it.

  • Member since
    July 2014
Posted by modelcrazy on Sunday, May 10, 2015 12:11 AM

Eric,

I used to have trouble until I found a different method on the Modelwarships,com forum. I made a post of it here, Stretching sprue. I use CA to attach it and yes I uses an incense punk to shrink it, although as you know, if your not careful...oops, there goes not only 1 line but several. I found just when you think it could use a little more heat, STOP.

The fly tying line sounds like a much better/stronger method though. I should look for some.
I agree with you about ships being a real challenge. I also build wood sailing ships, and there is just so much going on, that ships make for a very intriguing display. Kinda like a well decorated Christmas tree, there's just so much going on that you can't stop looking at it.

Mayflower

Steve

Building a kit from your stash is like cutting a head off a Hydra, two more take it's place.


http://www.spamodeler.com/forum/

  • Member since
    July 2008
  • From: Vancouver, the "wet coast"
Posted by castelnuovo on Sunday, May 10, 2015 1:26 AM

Some great builds here, love that Spitfire and the rail destroyer looks super, great idea. Here is my humble Sherman, still WIP.

Cheers...

  • Member since
    July 2014
Posted by modelcrazy on Sunday, May 10, 2015 9:33 AM

Nothin like a good ole Sherman. The right tank for the wrong war.

Steve

Building a kit from your stash is like cutting a head off a Hydra, two more take it's place.


http://www.spamodeler.com/forum/

  • Member since
    July 2008
  • From: Vancouver, the "wet coast"
Posted by castelnuovo on Sunday, May 10, 2015 11:59 AM

Why was Sherman the right tank for the wrong war?

  • Member since
    July 2004
  • From: Sonora Desert
Posted by stikpusher on Sunday, May 10, 2015 3:28 PM

Well last night at AMPS meeting they mentioned something about a contest next month regarding building something we had bought at last years fundraiser auction. I picked up several kits and in one of those rare spur of the moment build decisions I decided to build the DML/Alan 1/35 SU-76 that I bought last year.

and after doing some quick image searches I decided to do one as it would have appeared in the battle of Berlin in April 1945. For good measure (for here) I am going to throw in some Mini Art crew figures too

So last night I began construction. Step one assembling the hull- vury clunky thick parts, but not badly detailed

and step 2 the top engine deck

More to come during the week...


F is for FIRE, That burns down the whole town!

U is for URANIUM... BOMBS!

N is for NO SURVIVORS...

       - Plankton

LSM


JOIN OUR COMMUNITY!

Our community is FREE to join. To participate you must either login or register for an account.

SEARCH FORUMS
FREE NEWSLETTER
By signing up you may also receive reader surveys and occasional special offers. We do not sell, rent or trade our email lists. View our Privacy Policy.