SEARCH FINESCALE.COM

Enter keywords or a search phrase below:

The 2015 /16 Red Hot and Rollin Automotive Group Build--Ended

120477 views
2225 replies
1 rating 2 rating 3 rating 4 rating 5 rating
  • Member since
    March 2012
  • From: Corpus Christi, Tx
Posted by mustang1989 on Monday, July 20, 2015 4:22 AM

Joe: I like the look of that Millenium Falcon Glass as well as that superb van build you've pulled off. You should be proud of that one as there's a lot of detail and well executed weathering on it. Totally awesome stuff and can't wait to see what your next project'll be. (you're in BTW)

djjeavons: Real nice work on the Audi man! If there's a glue smudge on any decal I can't see it. Great finish. Got anything else coming down the pipeline here?

Bob: Good to see you back at it. I've used decals to hide blemishes several times and it does work. lol. Lookin' good so far!

Seems like this summer has found me busier than normal as I've been about everywhere lately. It's fun on one hand and frustrating from a workbench standpoint. I'll be resuming progress as of today but will be slow. I contracted a cold while I was out.


 Forum | Modelers Social Club Forum (proboards.com) 

  • Member since
    June 2015
  • From: UK
Posted by djjeavons on Monday, July 20, 2015 4:30 AM

Thanks Mustang. Yep, gonna start on a LaFerrari 1/24 scale. Will post some box art later.


  • Member since
    June 2015
  • From: UK
Posted by djjeavons on Monday, July 20, 2015 11:57 AM

Next build :)


  • Member since
    November 2003
  • From: Nashville, TN area
Posted by bobbaily on Monday, July 20, 2015 7:20 PM

Thanks for the encouragement guys-hopefully the next update will come sooner than the last one-in the meantime, I'll continue to enjoy everyone's great builds

Bob


  • Member since
    April 2005
  • From: Australia
Posted by taxtp on Wednesday, July 22, 2015 9:16 PM

That La Ferrari is a good looking car, I'll enjoy seeing it built.

I've realised that I forgot to post the completion photos of my Chevy Monte Carlo NASCAR. I hope you like them. In the context of just trying to build an attractive shelf model, I'm OK with it.

I think the first one will do for the main page guys.

Cheers

Tony

I'm just taking it one GB at a time.

  • Member since
    April 2005
  • From: Australia
Posted by taxtp on Wednesday, July 22, 2015 9:48 PM

My next build is a 1/20 Lotus 102 from the 1990 F1 season. It's a conversion from a Tamiya Lotus 102B kit utilising blood, sweat and tears for the conversion, and a decal sheet from Studio 27 and Shunko to reflect the different sponsorship.Here we go with the conversion bit.

Cheers

Tony

The base kit (1991 Lotus 102B) had a different nose to the 1990 Lotus 102 that I am building. There is an air scoop on top of the nose that needs to be filled, then a new nose is required. I started with a piece of plastic card in the scoop to fill it, then puttied it up.

This photo shows how I cut off the nose ready for a new one to be made and installed. Note the shovel nose profile of the base kit. You can also see the cockpit lip that has some paint on it. This originally had a shelf to fit a windscreen, however the Lotus 102 didn't have one, so I had filled it with Milliput, sanded, applied Tamiya putty, sanded, then applied Mr Surfacer. Here is how it looked with putty.

Next update soon ( I promise)

Cheers

Tony

I'm just taking it one GB at a time.

  • Member since
    January 2014
Posted by Seabe on Wednesday, July 22, 2015 10:35 PM

Yeah Tony, now THAT looks like fun! Enjoy that project...

  • Member since
    June 2015
  • From: UK
Posted by djjeavons on Thursday, July 23, 2015 1:37 AM

I look forward to seeing the Lotus build. I'm currently looking out for some good F1 kits to try my hand at, any recommendations?


  • Member since
    April 2005
  • From: Australia
Posted by taxtp on Thursday, July 23, 2015 7:55 AM

Of the ones that I've built, I loved the Tamiya Ferrari F189 and Tyrrell 020. The Fujimi Mclaren MP4/5 was pretty good too. I am sure there are plenty of good ones, but I haven't done them as yet.

Cheers

Tony

I'm just taking it one GB at a time.

  • Member since
    January 2014
Posted by Seabe on Thursday, July 23, 2015 12:25 PM

djjeavons, I haven't done the RB6 yet, but any of the Tamiya's are good builds, esp of late. Pick one with a simple colour scheme depending on painting/masking/decaling skill levels. Also... esp for a first go, rather pick something you WANT to build rather than a good kit. It will cary you through those "bad patches". I think the best F1 kit I've built yet was the Tamiya MP4/13. Think that goes together even better than the more recent F60. (And I have one of those "Japan version" ones in the cupboard for a rainy day... *evil grin* (Tony may know about them!)

So first question is - which F1 manufacturer(s) do you like?  

  • Member since
    April 2005
  • From: Australia
Posted by taxtp on Thursday, July 23, 2015 5:53 PM

Great advice Seabe...btw I have one too. :)

speaking of favourite teams,I was looking at my completed 1/20 F1 collection.

It looks like this:

8 Ferraris

4 Lotuses

2 Williams'

2 Mclarens

1 Tyrrell

Cheers

Tony

I'm just taking it one GB at a time.

  • Member since
    June 2015
  • From: UK
Posted by djjeavons on Thursday, July 23, 2015 11:27 PM

Thanks Tony and Seabe, appreciate the recommendations. Regarding F1 teams, I am not a massive follower so don't particularly have a team but I do like the technology that goes into the cars. I love Mercedes road cars so I would probably look for one of them or a McLaren.


  • Member since
    March 2012
  • From: Corpus Christi, Tx
Posted by mustang1989 on Friday, July 24, 2015 5:50 PM

djjeavons: That sir, is an excellent looking kit and I'm really looking forward to seeing the progress on that one. I'll get you entered in on the intro post buddy!

Tony: That's some great looking paint and decal work on that Monte Carlo!! Wow!!!! It must have taken a lot of patience with all those cals! I'll get your Lotus entered in on the intro. Nice body work on that one BTW!! I just love me some modifications.

Everybody:

Ok folks. I'm back from the dead with this one. I had to just back away from it for a little bit to regroup and come back. I started on the exhaust system yesterday and chose solder as the piping. The mufflers I got from a LHS in San Antonio last month that I like to frequent when I'm up there.

 One of my lighting fixtures when kaput on me so I only have one light for the time being so the picture quality isn't what I like but here it is so far............

2015-07-24%202015-07-24%20001%20001_zpsv

2015-07-24%202015-07-24%20001%20002_zpsc


 Forum | Modelers Social Club Forum (proboards.com) 

  • Member since
    April 2015
Posted by Scarecrow Joe on Friday, July 24, 2015 6:00 PM

Beautiful. Excellent use of solder wire!

  • Member since
    January 2015
Posted by MOPAR - D on Friday, July 24, 2015 9:37 PM

Joe nice work on the exhaust

I've been side tracked this past month with no real progress at the bench look to get back on this week end.

  • Member since
    June 2015
  • From: UK
Posted by djjeavons on Friday, July 24, 2015 10:55 PM

Mustang, that looks really good. Nice detail.


  • Member since
    June 2015
  • From: UK
Posted by djjeavons on Saturday, July 25, 2015 1:34 PM

Some progress pics of the LaFerrari, I haven't done much other than start the engine and mount it to the chassis.

Thanks

Dave


  • Member since
    March 2012
  • From: Corpus Christi, Tx
Posted by mustang1989 on Saturday, July 25, 2015 8:34 PM

Joe: Thanks for the encouragement buddy!!

Tony: Got you added to the roster and thanks for your kind words as well!

Dan: Dude it is really good to see you back around. I had to take a breather from mine as well as it was kicking my tail!! Lookin' forward to your continued build.

djjeavons: Thanks for your comments also and I have your Ferrrari on the roster now. That power plant looks great so far.Yes As a small reminder/ helpful hint, I always coat my exhaust with a very light dark wash. It'll pick out the details a little and give it a little depth.  Remember, just a subtle effect is all your after with this technique and it pays off.


 Forum | Modelers Social Club Forum (proboards.com) 

  • Member since
    June 2015
  • From: UK
Posted by djjeavons on Sunday, July 26, 2015 12:12 AM

Thanks Mustang. Can you explain what you mean by a "wash" please? I've heard many people say this but don't fully understand it.


  • Member since
    March 2012
  • From: Corpus Christi, Tx
Posted by mustang1989 on Sunday, July 26, 2015 4:09 AM

Sure thing dj. A wash is simply super thinned down paint....like 10 parts thinner to 1 part paint for a really thin wash or around 10 parts thinner to around 2-3 parts paint for a little heavier wash.

 A word of advice/ caution about washes though: If you are using enamel paints then you want to use a water based wash and vice versa with acrylic paints. Those of course will get an enamel based wash. Like based washes on base paint coats will result in damage to your base paint coat.

 Ideally the surface that is going to get the wash is smooth/ glossy. This will allow the wash to flow into the nooks and crannies easily. Washes tend to bring out detail and add depth to a model but its really easy to overdo it and make the model look less than realistic. Start off with a very light wash and add paint until you are satisfied with the result.

 For instance, I have a 1/48 scale Jumo 213 engine that I built for my Fw190 D-9 here. The first pic here shows it untouched with paint. I don't have any pics of it with a base coat of paint on it but lets just say for the sake of argument that it looks like this, only a darker shade of gray.

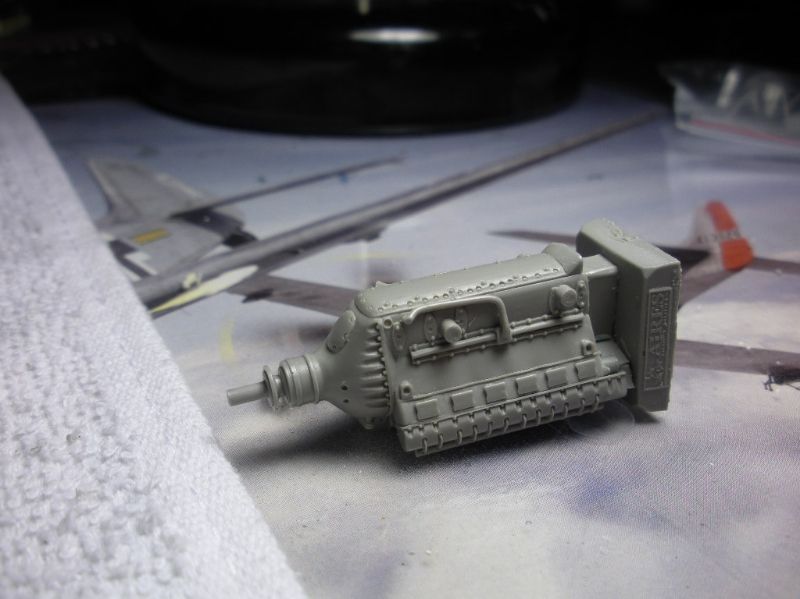
LOTS of molded detail on this one for a wash to take full advantage of. I went a little heavier on this wash since its a late war plane and the Germans were alot more concerned about getting the bird in the air than being neat and tidy at that stage of the war. Look at the difference a wash can make with bringing detail out....particularly with military stuff.

 In the automotive world you don't want to go too heavy on your washes though unless you are building something that is well used and abused. Most of your clean muscle car stuff you want to make look show quality so be careful not to overdo it. 

The finished product all detailed up and ready for the access panels and nose piece..

Additionally, panel line seams on cars get a shade or two darker than the body color to bring out the lines. NOT the black or dark wash. I almost messed up with that one on my Challenger by using a dark wash. It has its place on military builds but can be disastrous on a car model. Just take the tip of your brush and dip it into the wash and touch it to the seam. Capillary action will draw the wash out of the brush and into the seam. I hope I've answered you question concerning washes but If you've got any more questions on this technique I'll be happy to answer them.


 Forum | Modelers Social Club Forum (proboards.com) 

  • Member since
    June 2015
  • From: UK
Posted by djjeavons on Sunday, July 26, 2015 4:42 AM

Thanks Mustang, that is very detailed advice and assistance and is very much appreciated. I will try these techniques out. You can certainly see the effects in your pictures.

Thanks again.

Dave


  • Member since
    March 2012
  • From: Corpus Christi, Tx
Posted by mustang1989 on Sunday, July 26, 2015 5:36 AM

No problem there Dave! That's what we're all here for dude.

I got back on the exhaust again this morning after taking a day off from it. I got the passengers side exhaust lead pipe formed, the front of it pinned so it would fit into the exhaust manifold and then got the length trimmed off so that the muffler would sit nicely beside the other one. All I've got to do now is drill into the muffler so I can pin it to the lead pipe then I'll see about how I want to go about with the tail pipes. If I do tail pipes I'll most likely make them same side exits with chrome tips. If not , it'll be turn downs. We'll see..............
Image
Image


 Forum | Modelers Social Club Forum (proboards.com) 

  • Member since
    January 2015
Posted by MOPAR - D on Sunday, July 26, 2015 9:01 PM

Joe your exhaust look good. 

Summer got busy for me and not much time to work on this one.  I've was able to get some time on it today manly going over what I've done on it so far. I did attach the rear axel assembly to the frame and the hydraulic controls. 

  • Member since
    March 2012
  • From: Corpus Christi, Tx
Posted by mustang1989 on Monday, July 27, 2015 11:22 AM

Thanks Dan and it looks like the mock up is going well for you so far!!! Glad to see you back in action.


 Forum | Modelers Social Club Forum (proboards.com) 

  • Member since
    March 2012
  • From: Corpus Christi, Tx
Posted by mustang1989 on Thursday, July 30, 2015 5:15 AM

Progress on this thing is super slow due to my not wanting to get ahead of myself and have fit issues.  For instance, I glued the exhaust into place yesterday and I found a small glitch this morning when test fitting the cab onto the chassis. The rear of the cab contacted the mufflers so I had to trim the cab to fit onto the chassis correctly. So far it's coming along ok. I'm going to run the exhaust straight out the back and am going to start looking for some either AM exhaust tips or I'm going to fabricate my own and use a little chrome alclad on them. Anyways here are the beginnings of the tailpipes.......
Image
The stance is dead on so far in regards to how I wanted this to look overall. I keep getting closer and closer to having this thing done in time for the Austin show in October...............
Image
Image
Image


 Forum | Modelers Social Club Forum (proboards.com) 

  • Member since
    March 2012
  • From: Corpus Christi, Tx
Posted by mustang1989 on Friday, July 31, 2015 8:24 AM

Well I've got the beginnings of the tail pipe routings and am at another decision point as to where I'm going to go with the exhaust. First off here's todays progress...
Image
I have two options at this point and both will involve chrome exhaust tips. Option #1 is to drop one outlet per side which will look great from the top side but looks a little funny on the bottom side to me.
Image
Option #2  is to drop both outlets on the same side which looks more uniform to me on the bottom side but to me doesn't look as good from the top side. I never was too big of a fan of same side exhaust exits though.....
Image
I've still got to go pick up my aluminum exhaust tips today so I've got a little time to think about it. :hmm:


 Forum | Modelers Social Club Forum (proboards.com) 

  • Member since
    March 2012
  • From: Corpus Christi, Tx
Posted by mustang1989 on Saturday, August 1, 2015 6:34 AM

I'm slanting towards option #1 it looks like. I did go out yesterday and get the aluminum tubing I needed from HL.
Image
Here's how it looks right out of the package..
Image
So I cut a section and chucked it up in the Makita drill, grabbed some steel wool and went to town...........
Image
After the steel wool treatment I grabbed some Novus #2 and a polishing cloth. I dabbed some Novus on the polishing cloth and spun the drill up again on a low/ medium speed to polish the "tips" up. Here we are now with some nice exhaust tips. You can see the contrast between the side that was chucked up in the drill and the polished part. I'm happy! :yipee:
Image


 Forum | Modelers Social Club Forum (proboards.com) 

  • Member since
    March 2012
  • From: Corpus Christi, Tx
Posted by mustang1989 on Saturday, August 1, 2015 8:45 AM

I got one tail pipe formed and the exhaust tip mounted up this morning. Will be working on the other side tomorrow morning. After that I'll get everything secured in place and from there it's on to more engine detail.
Image
Image
Image


 Forum | Modelers Social Club Forum (proboards.com) 

  • Member since
    January 2014
Posted by Seabe on Saturday, August 1, 2015 10:03 PM

You're on a roll, Mustang! Looks great!

  • Member since
    April 2015
Posted by Scarecrow Joe on Saturday, August 1, 2015 10:07 PM

Looks great mustang.  Consider clear coating the aluminum tubing to keep the polished look.

JOIN OUR COMMUNITY!

Our community is FREE to join. To participate you must either login or register for an account.

SEARCH FORUMS
FREE NEWSLETTER
By signing up you may also receive reader surveys and occasional special offers. We do not sell, rent or trade our email lists. View our Privacy Policy.