SEARCH FINESCALE.COM

Enter keywords or a search phrase below:

Boeing Build

39485 views
832 replies
1 rating 2 rating 3 rating 4 rating 5 rating
  • Member since
    July 2004
  • From: Canberra, Australia
Posted by Aussie747 on Monday, January 4, 2016 3:26 AM

Not finished yet, some more small bits to add and finish decalling


Ray

  • Member since
    December 2013
Posted by CodyJ on Tuesday, January 5, 2016 2:50 AM

Awesome!  Thanks for the info!

  • Member since
    August 2015
  • From: the redlands Fl
Posted by crown r n7 on Thursday, January 7, 2016 10:15 AM

moving slow but making progress on B-52H 


 Nick.

  • Member since
    July 2014
Posted by modelcrazy on Thursday, January 7, 2016 10:24 AM

1/144 scale seem like a very workable scale for the B-52

Steve

Building a kit from your stash is like cutting a head off a Hydra, two more take it's place.


http://www.spamodeler.com/forum/

  • Member since
    December 2003
  • From: 37deg 40.13' N 95deg 29.10'W
Posted by scottrc on Saturday, January 9, 2016 9:59 AM

My weekend update on the B-17.  I am into the cockpit and interior. The kit has parts for three different models of B17 and I put the instrument decal on the wrong instrument panel.  I'm not going to stress over it.  I wanted to buy the zoom card and PE set but thought against it because at 1/72, it will never be seen but by the occassional spider.

  • Member since
    December 2003
  • From: 37deg 40.13' N 95deg 29.10'W
Posted by scottrc on Saturday, January 9, 2016 10:01 AM

The kit has you cut out the RH side gun position.  

  • Member since
    December 2003
  • From: 37deg 40.13' N 95deg 29.10'W
Posted by scottrc on Saturday, January 9, 2016 10:03 AM

Now the fun begins.  I will start closing up the fuselage, but before that, I need to mask up the ball turret.  Any ideas?  I have Frisket that I will try.

  • Member since
    July 2014
Posted by modelcrazy on Saturday, January 9, 2016 10:09 AM

That's intresting that you have to cut out waistgunner openings. I guess the positions moved from one model to another.
As far as the ball, personally I would hand paint it. I seem to mess things up worse when I mask.

Steve

Building a kit from your stash is like cutting a head off a Hydra, two more take it's place.


http://www.spamodeler.com/forum/

  • Member since
    December 2003
  • From: 37deg 40.13' N 95deg 29.10'W
Posted by scottrc on Saturday, January 9, 2016 10:20 AM

Hi Steve,

I just painted a section of the ball turret by hand, your right, thats the better way to go. Even thought it will take a few coats. The curves and details are just too tight to mask.  Its like painting a miniture Tie Fighter.  Keep thinking I'm staring at Darth Vader.

  • Member since
    December 2002
  • From: Bury St Edmunds, Suffolk, England
Posted by Bish on Saturday, January 9, 2016 12:18 PM

scot, some nice work on the B-17. How you finding the kit.

I am a Norfolk man and i glory in being so


On the bench: Airfix 1/72nd Harrier GR.3/Fujimi 1/72nd Ju 87D-3

  • Member since
    December 2002
  • From: Bury St Edmunds, Suffolk, England
Posted by Bish on Saturday, January 9, 2016 12:22 PM

modelcrazy

That's intresting that you have to cut out waistgunner openings. I guess the positions moved from one model to another.
As far as the ball, personally I would hand paint it. I seem to mess things up worse when I mask.


Steve, on most B-17, the waiste gun positions were directly opposite each other. this caused a probleml as the gunners would get in each others way. Part way through the 17G production, the right side position was moved so they were staggered. The Academy 17F and G share the same fuselage. So they block off both positions on the right and have you cut out the one you need. I rather like that idea rather than being fixed with what you get as in the Revell 17G.

I am a Norfolk man and i glory in being so


On the bench: Airfix 1/72nd Harrier GR.3/Fujimi 1/72nd Ju 87D-3

  • Member since
    July 2014
Posted by modelcrazy on Saturday, January 9, 2016 12:28 PM

Bish,
That's good info, I kina always wondered how the gunners keep from getting in each other’s way, and I guess they did until the G. That does make sense to be able to adjust from one model to another.

Steve

Building a kit from your stash is like cutting a head off a Hydra, two more take it's place.


http://www.spamodeler.com/forum/

  • Member since
    December 2002
  • From: Bury St Edmunds, Suffolk, England
Posted by Bish on Saturday, January 9, 2016 12:34 PM

I have managed to get the osprey finished. The main problem i had was with the large stripped decals on top. They are rather fragile, and while there was a little damage to the one son the fuselage, that was easy to fix. But the left wing decal completly fell apart. One of the guys on Brit modeller was kind enough to send me a couple of spares he had. But what i did not realise is that these came in two shades, and mine was the dark one and yes, you guessed it, the ones he sent were a lot lighter.

So after giving it some thought, i apllied the decal and then painted over the ligt strips with a darker colour that was a close match. Of course its not as neat as the decals, but after going over it a couple of times its better than just leaving it.

And afer a flat coat, i added the whels and engines and secured it to the base. I did say this build would not be weathered to match the pics, and i certainly meant that. A nice change for me.

But i am not calling this done quite yet. I have just got a set of Revell modern pilot figures so i should be able to get all i need now, but it just won't be complete until i can add some chocks, which will have to wait until next month.

I am a Norfolk man and i glory in being so


On the bench: Airfix 1/72nd Harrier GR.3/Fujimi 1/72nd Ju 87D-3

  • Member since
    July 2014
Posted by modelcrazy on Saturday, January 9, 2016 12:46 PM

Bish,
Great save with the decals. That had to be a nightmare trying to match those lines.
The build really looks good on the base. Did you make the apron or did you purchase it? I’m sure the Marines keep the mounts pretty clean so the lack of weathering is probably pretty accurate….it just came from a wash.
Just let us know when you finished with the dio and Cody will get you up on the wall.


Steve

Steve

Building a kit from your stash is like cutting a head off a Hydra, two more take it's place.


http://www.spamodeler.com/forum/

  • Member since
    December 2002
  • From: Bury St Edmunds, Suffolk, England
Posted by Bish on Saturday, January 9, 2016 1:16 PM

Thanks Steve. It does look better in the pics than in reallife, but its passable. I normally do my own tarmac, but i had some bits of a verlinden set left and just patched it together from bits and pieces. They do, or at least used to do, several differant aprons like this, and i kow there are a couple of other companies that do them now. They look nice, but don't have any texture to them.

From what otehr guys have said, this is a CAG bird, which means it is kept nice and clean at most times, and this is shown just ofter the unit was formed and recieved its Ospreys.

And will do. I am going to do the figures this week and then its juts a case of painting and adding the chocks once they come.

I am a Norfolk man and i glory in being so


On the bench: Airfix 1/72nd Harrier GR.3/Fujimi 1/72nd Ju 87D-3

  • Member since
    December 2003
  • From: 37deg 40.13' N 95deg 29.10'W
Posted by scottrc on Saturday, January 9, 2016 1:46 PM

Bish


modelcrazy

That's intresting that you have to cut out waistgunner openings. I guess the positions moved from one model to another.
As far as the ball, personally I would hand paint it. I seem to mess things up worse when I mask.


Steve, on most B-17, the waiste gun positions were directly opposite each other. this caused a probleml as the gunners would get in each others way. Part way through the 17G production, the right side position was moved so they were staggered. The Academy 17F and G share the same fuselage. So they block off both positions on the right and have you cut out the one you need. I rather like that idea rather than being fixed with what you get as in the Revell 17G.


Bish, so far, I really like the kit.  The instructions are so simple and the kit is well thought out.  Fit is really good.  The sprue gates are really thick though and care must be taken to cut the parts off the tree.

But oh oh Scooby Doo, I thought I may have cut the wrong opening, but nope, I cut the one directly in line from the opening on the other side.

I still have my old Hasaqawa G model I built some 30 years ago to reference any differences.  So hopefully I will not get any G features mixed in by accident.

  • Member since
    December 2003
  • From: 37deg 40.13' N 95deg 29.10'W
Posted by scottrc on Saturday, January 9, 2016 1:48 PM

Congrats Bish on finishing the Osprey, it looks fantastic, espcially showing the rotors in a semi tilt postion. 

  • Member since
    December 2002
  • From: Bury St Edmunds, Suffolk, England
Posted by Bish on Saturday, January 9, 2016 1:52 PM

scottrc
 
Bish


modelcrazy

That's intresting that you have to cut out waistgunner openings. I guess the positions moved from one model to another.
As far as the ball, personally I would hand paint it. I seem to mess things up worse when I mask.


Steve, on most B-17, the waiste gun positions were directly opposite each other. this caused a probleml as the gunners would get in each others way. Part way through the 17G production, the right side position was moved so they were staggered. The Academy 17F and G share the same fuselage. So they block off both positions on the right and have you cut out the one you need. I rather like that idea rather than being fixed with what you get as in the Revell 17G.


Bish, so far, I really like the kit.  The instructions are so simple and the kit is well thought out.  Fit is really good.  The sprue gates are really thick though and care must be taken to cut the parts off the tree.

But oh oh Scooby Doo, I thought I may have cut the wrong opening, but nope, I cut the one directly in line from the opening on the other side.

I still have my old Hasaqawa G model I built some 30 years ago to reference any differences.  So hopefully I will not get any G features mixed in by accident.


I was the same when i did mine. i spent ages checking and re checking which one to cut out.  I can't recal if that kit also includes the parts for the G chin mount.

Thnaks. I always thoguth they had the rotors vertical when on the ground. It wa sonyl when i saw some on the line at RAF Mildenhall that i realised they tilted them, and most of the pics also show that. It is a rather nice way to display it.

I am a Norfolk man and i glory in being so


On the bench: Airfix 1/72nd Harrier GR.3/Fujimi 1/72nd Ju 87D-3

  • Member since
    January 2014
  • From: Germany
Posted by MacLinus on Saturday, January 9, 2016 3:10 PM

Good afternoon,

here is hopeully a picture of the RB-66B Destroyer for the GB.

Could you reply to me if there is no picture?

Thank you 

MacLinus 

MacLinus

Man's flight through life is sustained by the power of his knowledge.

— Austin 'Dusty' Miller

  • Member since
    April 2006
  • From: ON, Canada
Posted by jgeratic on Saturday, January 9, 2016 6:21 PM

Bish, great job on the Osprey Yes  It really has unique look with the engines tilted like that.

--------------------------

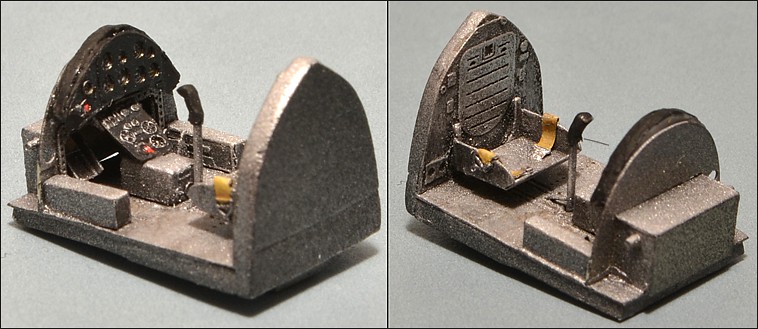
The Peashooter build has become a lot more entailed than I had thought it would be.  The Brengun PE set certainly brings  more detail into the cockpit:

I switched over to the engine next, and that's where the 'fun' really begins.  You might see that the kit provided one (on the left) is smaller than the resin replacement on the right.  Test fitting of the two part cowl shows  good 4mm gap results:

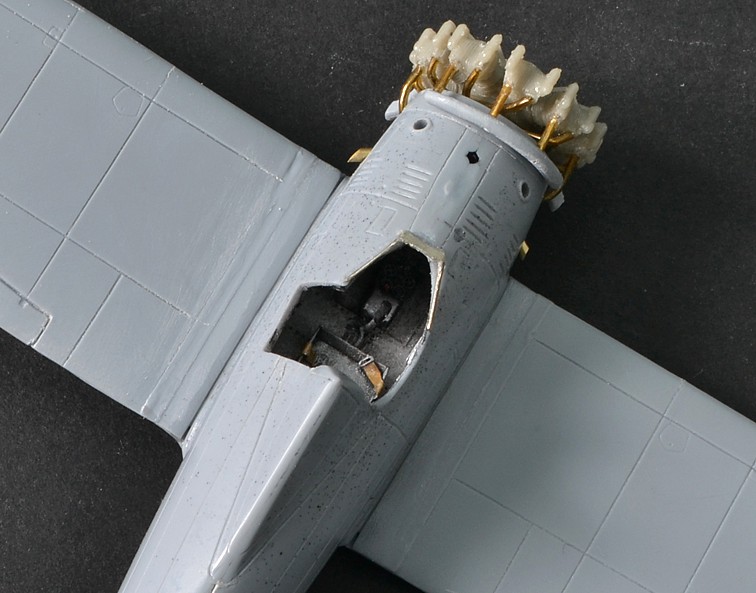
I might be able to carve out the insides with a dremel for a better fit, but right now I'm considering leaving the engine uncovered.  So that means adding some extra detail.

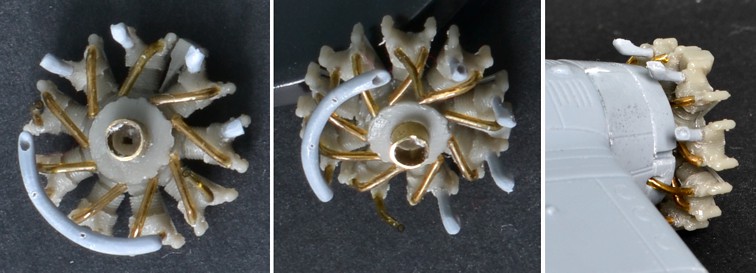
Should add a disclaimer here right now, that I'm not familiar with the Pratt & Whitney R-1340 Wasp engine.  Just going by what I've seen in photos, so if anyone spots an error on my part, I'd rather know about it now during the constructuion phase.  Still need to add ignition wires to the front, but not sure if they are also found on the rear??

The instructions also have you glue the individual exhaust centrally in the rear of each cylinder, but I was seeing differently in photos.

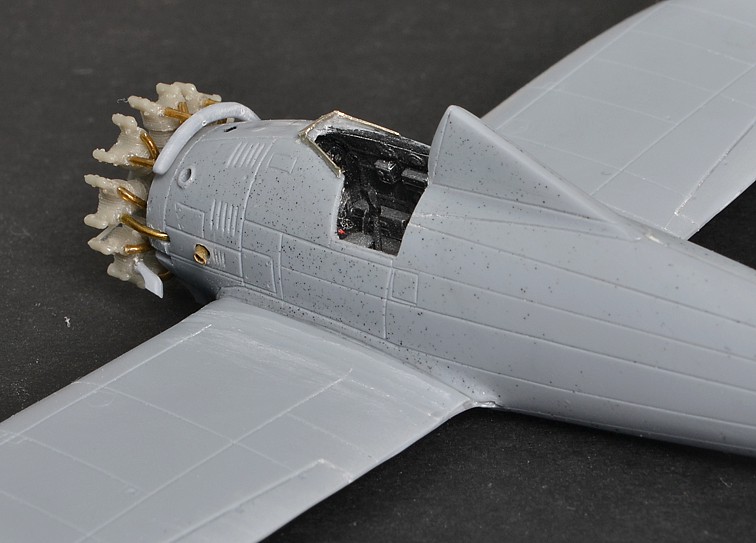
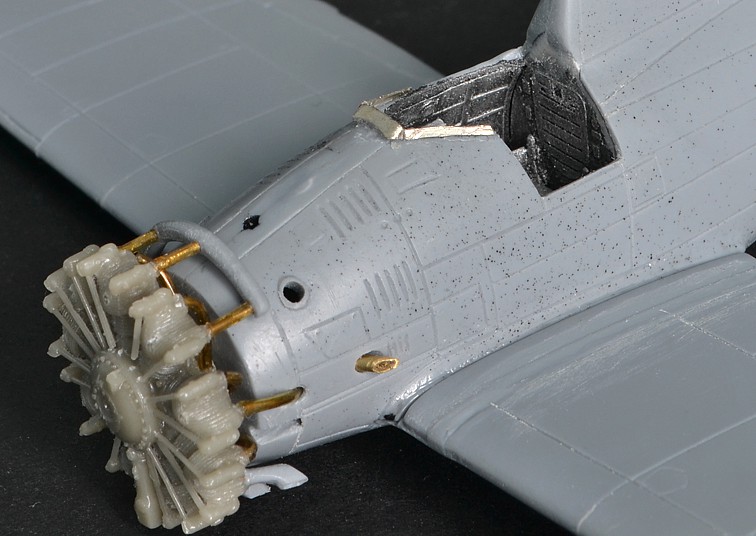
The wing, as stated in reviews, is a single piece with the dyhedral automatically set - the hobbyist just needs to attach them square to the fuselage.  This though, requires some sanding and test fitting to get them to fit.  As the photos show, some gaps need to be filled along the seams.

regards,

Jack

  • Member since
    July 2014
Posted by modelcrazy on Saturday, January 9, 2016 6:33 PM
Jack, aren’t those exhaust stacks fun? And gawd you doing this in 1/72! Wow, my hat's off to you my man that is some detailed work.
Steve

Steve

Building a kit from your stash is like cutting a head off a Hydra, two more take it's place.


http://www.spamodeler.com/forum/

  • Member since
    December 2002
  • From: Bury St Edmunds, Suffolk, England
Posted by Bish on Saturday, January 9, 2016 6:41 PM

Thnaks jack, and ye, i agree, i like the rotors like that.

Nice work on the pit and your doing a great job on the engine. I think you would be hard pressed to thin the cover enough to close that gap. Was the resin one dsigned for that kit.

I am a Norfolk man and i glory in being so


On the bench: Airfix 1/72nd Harrier GR.3/Fujimi 1/72nd Ju 87D-3

  • Member since
    June 2014
Posted by BrandonK on Sunday, January 10, 2016 11:28 AM

Nice work on that Peeshooter, Jack. Doing all that detail in 1/72 is amazing, I can't do it that small. Honestly, having that cowling off makes the shooter look better, IMPO. Pimp that engine out and show it to the world.

BK

On the bench:

A lot !! And I mean A LOT!!

2024 Kits on deck / in process / completed   

                         14 / 5 / 2  

                              Tongue Tied

  • Member since
    July 2014
Posted by modelcrazy on Sunday, January 10, 2016 7:06 PM

MacLinus
Could you reply to me if there is no picture?

Sorry budy, for some reason I missed this and I do not see a picture. What is the scale and manufacturer of the RB-66B?

Steve

Building a kit from your stash is like cutting a head off a Hydra, two more take it's place.


http://www.spamodeler.com/forum/

  • Member since
    April 2006
  • From: ON, Canada
Posted by jgeratic on Sunday, January 10, 2016 10:55 PM

Thank you Steve, Bish, and Brandon.

The resin engine instructions don't list which kit it was designed for,  but instead list over 40 different aircraft types that used the Pratt & Whitney R-1340 Wasp.

It's possible AZ Model made the cowl a bit small, but I think mostly is a problem due to scale limitations.  I would probably have to grind it down to paper thinness for it to work.  So going with the uncovered engine, also leaving off the face plate - just like the kit engine, it looks like it was a doggie's chew toy. 

regards,

Jack


  • Member since
    April 2006
  • From: ON, Canada
Posted by jgeratic on Monday, January 11, 2016 10:58 PM

Short update, ignition wires on.  There should be a set on the backside as well, but no room to get in there without ripping apart the previous detail work.  Wouldn't be that noticeable anyhow, unless one was specifically looking for them. 

Tail area, built up the base for ailerons with some sheet plastic.  This was to achieve a better square fit, and give more space to the rudder.  Also added control arms, and fixed the trim tab.

regards,
Jack

  • Member since
    July 2014
Posted by modelcrazy on Tuesday, January 12, 2016 9:12 AM

Jack, that is crazy detailed!

Steve

Building a kit from your stash is like cutting a head off a Hydra, two more take it's place.


http://www.spamodeler.com/forum/

  • Member since
    December 2003
  • From: 37deg 40.13' N 95deg 29.10'W
Posted by scottrc on Tuesday, January 12, 2016 8:41 PM

Great detail on the Peashooter Jack.

Here is my current update on the B17F.  Well, everything was going ducky until I put the wings and fuselage together and it appears there are some misalignment and gaps.  Not too bad, just a little unexpected on a kit of this nature.  The plastic is really soft and bends and warps, again, nothing too major.  Here is the picture album from the past few days.  The rest of the night will be spent sanding and then applying a thin layer of putty.

  • Member since
    April 2006
  • From: ON, Canada
Posted by jgeratic on Tuesday, January 12, 2016 9:17 PM

Thanks Scott and Steve.

Good progress on the B17, but I see what you mean about the uneven joints.  Shoud be straight forward clean up on that, but will take a bit of time.

regards,

Jack

  • Member since
    December 2003
  • From: 37deg 40.13' N 95deg 29.10'W
Posted by scottrc on Wednesday, January 13, 2016 8:14 AM

Thanks Jack,

After sanding on the seams last night, It was not all that bad, but more of an illusion of an uneven line.  This illusion is caused by the overspray from painting the interior.  It was driving my vision crazy until I shot the seam with some light gray primer.  

JOIN OUR COMMUNITY!

Our community is FREE to join. To participate you must either login or register for an account.

SEARCH FORUMS
FREE NEWSLETTER
By signing up you may also receive reader surveys and occasional special offers. We do not sell, rent or trade our email lists. View our Privacy Policy.