SEARCH FINESCALE.COM

Enter keywords or a search phrase below:

Boeing Build

39561 views
832 replies
1 rating 2 rating 3 rating 4 rating 5 rating
  • Member since
    March 2014
Posted by Lockon on Thursday, June 25, 2015 10:21 AM

Engine work has started.  The #2 engine exhaust on the Minicraft kit is a bit puzzling.  On the real airplane all three engine exhaust diameters are identical and yet on the Minicraft kit the center engine exhaust has a smaller exit diameter - and that's before you put part #32 on which makes it even smaller!

 2015-06-24 09.17.13 - annotated by Lockon Photo, on Flickr

 2015-06-24 09.20.22 - annotated by Lockon Photo, on Flickr

Next up: build the thrust reverser actuator fairings for all three engines.

  • Member since
    July 2014
Posted by modelcrazy on Wednesday, June 24, 2015 3:16 PM

Oops, typo, thanks for catching that.

Steve

Building a kit from your stash is like cutting a head off a Hydra, two more take it's place.


http://www.spamodeler.com/forum/

  • Member since
    March 2014
Posted by Lockon on Wednesday, June 24, 2015 2:42 PM

modelcrazy

That 's going to be a great looking 27 B1.

Are you sure?  It'll be a pretty bad looking 727, but a great looking 767! :)   

I worked on my 727 engines a bit last night. I'll post pics when I get a chance.

  • Member since
    July 2014
Posted by modelcrazy on Wednesday, June 24, 2015 1:47 PM

That 's going to be a great looking 27 B1.

Steve

Building a kit from your stash is like cutting a head off a Hydra, two more take it's place.


http://www.spamodeler.com/forum/

  • Member since
    April 2014
Posted by B_one fixer on Wednesday, June 24, 2015 1:25 PM

Well I have been slacking on taking pics but besides the usual steps of adding nose weights and gluing the halves together here is where I am at. I am currently doing seam work and smoothing out the surface in prep for primer.

I have some gouges to fill from sanding mistakes and level out the windows.

Still some serious sanding to do on the windscreen.

As she sits now.

Decals arrived yesterday, Still waiting on winglets from Contrails models. 

  • Member since
    July 2014
Posted by modelcrazy on Tuesday, June 23, 2015 1:15 PM

Love to have you garzonh. I'd personally go with the 29. A 1/72 scale would be a 24" WS, a respectable size. You can avoid all that Alclad by building the Academy "Old Battler" in OD.

Steve

Building a kit from your stash is like cutting a head off a Hydra, two more take it's place.


http://www.spamodeler.com/forum/

  • Member since
    March 2013
  • From: Puebla, Mexico
Posted by garzonh on Tuesday, June 23, 2015 10:31 AM

Hmmm..  Confused ... this looks interesting... I have never build a civilian plane...actually it would be my second plane... Geeked So if I join in, i will be building out of my comfort zone...which also would give some rest from the WWII armor.... 

I'm looking at the already in progress kits and I'm no way itsy bitsy skilled to you guys... Captain

If I do join, I'm betweeb the "SAS 747 cut away display plane" or the "B29 1/72 scale", that would be HUGE...probaly would need 3 bottles of Alclad....hmmmm... 

What do you think???

  • Member since
    July 2014
Posted by modelcrazy on Monday, June 22, 2015 11:24 PM

Craig

Not much to the pit, but I doubt you'd be able to see much in 1/144 scale anyway. Nice looking BUFF.

Steve

Building a kit from your stash is like cutting a head off a Hydra, two more take it's place.


http://www.spamodeler.com/forum/

  • Member since
    December 2012
Posted by flyerduke on Monday, June 22, 2015 10:30 PM

I finally found some time to get started on my B-52.  I washed the parts on the tree, seperated the parts from the trees, and began painting and glueing some of the parts together.  Things are progressing smoothly so far.

Craig

I added the rear cockpit bulkhead.  Not much to the office.

  • Member since
    June 2003
  • From: Cavite, Philippines
Posted by allan on Monday, June 22, 2015 8:48 PM

Coming along very nicely.  I follow the same technique.  Rather messy (especially when you do wet sanding), but actually a lot of fun.

No bucks, no Buck Rogers

  • Member since
    March 2014
Posted by Lockon on Monday, June 22, 2015 7:45 PM

RobGroot4
I have no idea how people work with white plastic, I just can't see it well enough!

Me neither! It's just part of getting older :) 

In reality the white plastic does make it very hard to see any flaws.  That's the reason I didn't do to much fine sanding until after getting a coat of Mr. Surfacer on it.  The previous photo I posted shows the primer with all the putty applied to the flaws... then, when you sand out the primer then you can really see where the previously invisible imperfections in the plastic were:

 2015-06-22 20.37.08 by Lockon Photo, on Flickr

I'm looking forward to the Super Hornet photos :)

  • Member since
    June 2013
Posted by RobGroot4 on Monday, June 22, 2015 5:39 PM

Lockon,

 Awesome work on that airliner.  I have no idea how people work with white plastic, I just can't see it well enough!

 I should have a small update here shortly on the 1/48 Hasegawa Super Hornet I'm doing.  It'll be in VFA-137 livery and I've started the AM cockpit but haven't gotten terribly far yet.

Groot

"Firing flares while dumping fuel may ruin your day" SH-60B NATOPS

  • Member since
    July 2014
Posted by modelcrazy on Monday, June 22, 2015 4:11 PM

Sounds good Jeremy. I am anxious to see them.

Steve

Steve

Building a kit from your stash is like cutting a head off a Hydra, two more take it's place.


http://www.spamodeler.com/forum/

  • Member since
    January 2014
  • From: Nampa, Idaho
Posted by jelliott523 on Monday, June 22, 2015 2:41 PM

I've gotten a start on my project for this build and as a crossover on another.  WIP pics to follow soon, I am biting the bullet on this and not doing just one F-15E, but two F-15E's.  I've got the offices of these birds started and will get some pics added shortly.  Going to be doing this as a simultaneous build, with each aircraft representing a different squadron from Mountain Home AFB.  One will be the 391st FS Bold Tigers, the other the 389th FS Thunderbolts.

On the Bench:  Lots of unfinished projects!  Smile

  • Member since
    July 2014
Posted by modelcrazy on Monday, June 22, 2015 1:40 PM

Oh I'm excited to see the finished product Stick out tongue. What a great job so far Lockon.

Steve

Building a kit from your stash is like cutting a head off a Hydra, two more take it's place.


http://www.spamodeler.com/forum/

  • Member since
    March 2014
Posted by Lockon on Monday, June 22, 2015 12:02 AM

Thank you modelcrazy and B_one_fixer :)

Back from the paint shop and getting some putty work done:

 2015-06-22 00.24.54 by Lockon Photo, on Flickr

Next up: engines and landing gear

  • Member since
    April 2014
Posted by B_one fixer on Sunday, June 21, 2015 4:01 PM

Great work on the intake re-shape !

  • Member since
    July 2014
Posted by modelcrazy on Sunday, June 21, 2015 1:48 AM

WOW! That's some incredible work lockon. Yes Holy smoke!

Steve

Building a kit from your stash is like cutting a head off a Hydra, two more take it's place.


http://www.spamodeler.com/forum/

  • Member since
    March 2014
Posted by Lockon on Sunday, June 21, 2015 1:12 AM

work continues with the shaping of the 727-100s oval #2 intake (vs round intake on 727-200)

Original round intake show below was heated and pinched into an oval using a C-clamp.  A thin strip was cut out of the top of the intake to make it appear more oval.

 2015-06-20 00.12.29 by Lockon Photo, on Flickr

Since the kit intake wasn't being used a substitute had to be found - luckily a bit of clear heat shrink tubing was the perfect size.  Shown inserted, glued and cut flush:

 2015-06-20 19.03.16 by Lockon Photo, on Flickr

 2015-06-20 19.05.35 by Lockon Photo, on Flickr

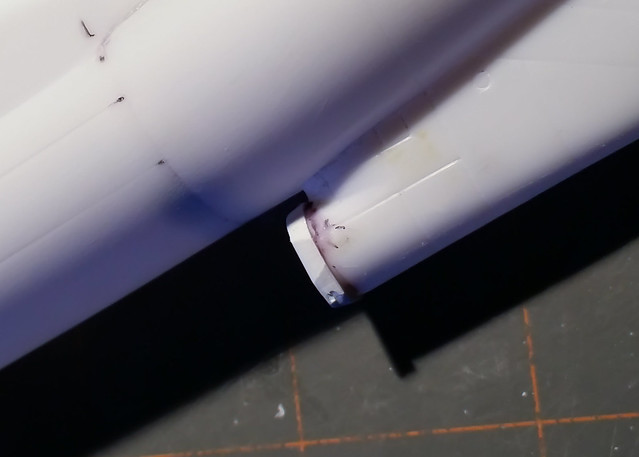
A new intake lip was made from scratch using thick Plastruct sheet:

 2015-06-20 22.44.51 by Lockon Photo, on Flickr

 2015-06-20 22.46.20 by Lockon Photo, on Flickr

 2015-06-20 23.24.26 by Lockon Photo, on Flickr

It is glued to the fuselage and shaped:

 2015-06-20 23.27.44 by Lockon Photo, on Flickr

 2015-06-20 23.35.45 by Lockon Photo, on Flickr

 2015-06-20 23.49.48 by Lockon Photo, on Flickr

The new oval intake for #2 engine. 

 2015-06-20 23.50.58 by Lockon Photo, on Flickr

Wings joined ready for 1st primer coat. The kit intake is visible in the background - aside from being round which is incorrect for the -100, it is far too small for a -200 - off to the scrap box it goes!

 2015-06-21 01.30.20 by Lockon Photo, on Flickr

The wings halves where also significantly thinned prior to gluing them together in order to reduce the leading edge thickness (no photos of that, sorry!)

  • Member since
    October 2009
  • From: Oil City, PA
Posted by greentracker98 on Saturday, June 20, 2015 1:22 PM

Thanks MC I should be getting on the B-52 this weekend. Yea, it looks like fun.

A.K.A. Ken                Making Modeling Great Again

  • Member since
    July 2014
Posted by modelcrazy on Friday, June 19, 2015 10:28 PM

Ken,

Like I posted in you're WIP thread, I'm interested in following your 47. The 52 looks like it should be some fun.

Alan,

That's really taking shape, and looking good.

Steve

Building a kit from your stash is like cutting a head off a Hydra, two more take it's place.


http://www.spamodeler.com/forum/

  • Member since
    June 2003
  • From: Cavite, Philippines
Posted by allan on Friday, June 19, 2015 10:16 PM

No bucks, no Buck Rogers

  • Member since
    October 2009
  • From: Oil City, PA
Posted by greentracker98 on Friday, June 19, 2015 9:31 PM

Great work Lockon. That would scare me too.

Anyway, here are my beginnings

The Mash Chopper

And the B-52

[

A.K.A. Ken                Making Modeling Great Again

  • Member since
    July 2014
Posted by modelcrazy on Friday, June 19, 2015 11:23 AM

That's unbelievable lockon. I can't even tell.  YesYesYes

Steve

Building a kit from your stash is like cutting a head off a Hydra, two more take it's place.


http://www.spamodeler.com/forum/

  • Member since
    April 2014
Posted by B_one fixer on Friday, June 19, 2015 2:38 AM
Great work lockon, cutting and rejoining fuselages scare me.

  • Member since
    March 2014
Posted by Lockon on Friday, June 19, 2015 2:29 AM

Fuselage cut and joined

 2015-06-19 01.29.33 by Lockon Photo, on Flickr

 2015-06-19 02.51.13 by Lockon Photo, on Flickr

 2015-06-19 02.52.10 by Lockon Photo, on Flickr

 2015-06-19 03.21.08 by Lockon Photo, on Flickr

  • Member since
    December 2013
Posted by CodyJ on Thursday, June 18, 2015 6:07 PM

Hey Steve, no I have not decided yet.  I'm trying to get a few things out of the way before I figure that out.  :/

  • Member since
    July 2014
Posted by modelcrazy on Thursday, June 18, 2015 10:14 AM

Man this is going to be interesting. I don't have the nerve to try a mod like that. Keep the pics coming.

Steve

Building a kit from your stash is like cutting a head off a Hydra, two more take it's place.


http://www.spamodeler.com/forum/

  • Member since
    March 2014
Posted by Lockon on Thursday, June 18, 2015 1:25 AM

Work has begun.  Cut marks for the -200 to -100 conversion:

 2015-06-18 02.08.22 by Lockon Photo, on Flickr

The staggered cut on the front is a trick I learned somewhere that helps keep the cut sections aligned better.

I'm not yet sure how I'll change the -200's round #2 inlet to the -100's oval inlet... it could be major surgery; however, I may just approximate it by thinning the sides and cutting out the top and bottom of the opening a bit.

  • Member since
    July 2014
Posted by modelcrazy on Wednesday, June 17, 2015 1:21 PM

Updated my friend.

Steve

Building a kit from your stash is like cutting a head off a Hydra, two more take it's place.


http://www.spamodeler.com/forum/

JOIN OUR COMMUNITY!

Our community is FREE to join. To participate you must either login or register for an account.

SEARCH FORUMS
FREE NEWSLETTER
By signing up you may also receive reader surveys and occasional special offers. We do not sell, rent or trade our email lists. View our Privacy Policy.