SEARCH FINESCALE.COM

Enter keywords or a search phrase below:

1946 What If GB

55240 views
1775 replies
1 rating 2 rating 3 rating 4 rating 5 rating
  • Member since
    May 2013
  • From: From the Mit, but live in Mason, O high ho
Posted by hogfanfs on Monday, August 15, 2016 8:20 PM

OK, Gentleman, I'm back on the Type 4. 

Here is the hull as it sits now:

And some of the PE brackets that were added:

I started to sand the road wheels, as soon as I'm done, I'm going to spray the ends with gun metal, then I'm going to try the quick wheel to spray the centers with primer.

And here are a few extras I bought for the diorama:

Hope to have more progress to show soon.

Sorry it took so long to get back to this build.

 Bruce


 On the bench:  1/48 Eduard MiG-21MF

                        1/35 Takom Merkava Mk.I


  • Member since
    April 2014
  • From: Australia
Posted by lostagain on Tuesday, August 16, 2016 3:14 AM

Moff

Wow, I love those metallics! Stick out tongue 


By the way, sorry for being MIA for almost two weeks. This has not been my year for model building, apparently. After a lot of procrastination, I'm almost done with the last set of tracks. 


Moff, that's terrible, I make it a rule to post every three months whether I have acheived anything or not, which I haven't really ;)

Given it has been three months, it is going to take me longer to go through you gentlemen's acheivements and get up to date. I have been keeping an eye on build progress all the time, don't worry.

Moff, the Waffentrager was looking very sharp. I do like a ridiculouly huge gun on a tiny chassis!

Hogfanfs (spell checker wants to say hog pants), looking forward to the Type 4 coming along.

Bish, the E100 is a real monster, and it's off to a flying start. Had to laugh when you said there just not enough cobbles to cope with it...

Trabi, the cockpit looks great on the Moskito, Dragon didn't do the wing so well. I may steal your idea to set the dihedral on my MB5 if and when the time comes.

And since it has been such a long time, I hadn't said anything about the Tiger either - great result with an unique scheme, I like the log protection too.

Tony, I am intrigued to see your spit in the Belgian colours. Nice touch with the PR version too.

Crown, the Meteor's engine has come up really shmick, looking forward to what you acheive with the rest of the model.

Dan, very impressed with the interior finish of the 110, hope you get over the fit issues and move forward.

Joe, looking forward to seeing the Corsair complete from the look of the cockpit.

Cliff, the Type 5 looks great in its setting, great detail and impressed with the geisha.

Mustang, the Arado cockpit looks amazing, looking forward to seeing it  being done up and in the bird. And don't worry about finishing times, I'll be keeping you company into 2018...

And while we are on Blitzes (Blitzens?) some great detail and painting from qlabs there.

Brandon, the completed Salamander looks very sweet - didn't relise there were 150 completed, did any get to fly in combat?

And last but not least, mc, the Prince really is the duck's nuts! The model and the lagoon setting, just fantastic.

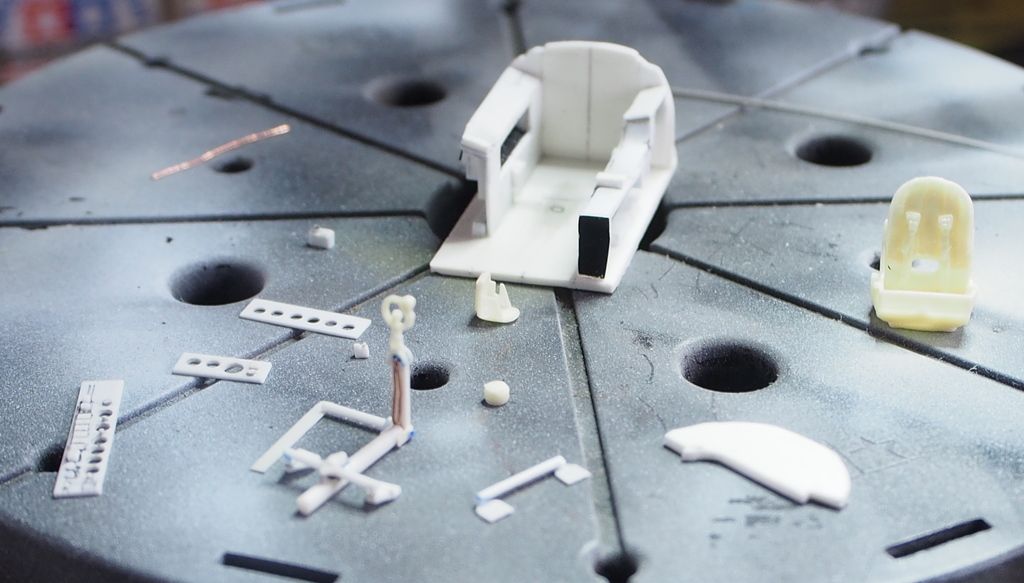
So, since we last spoke, not much has happened. I had cut out and sanded back all the pieces. I spent a lot of time looking at bits trying to figure a logical and foolproof build sequence. Think I have some of it figured but definitely not all. Ihave made some progress in the cockpit, on the second and a half attempt:

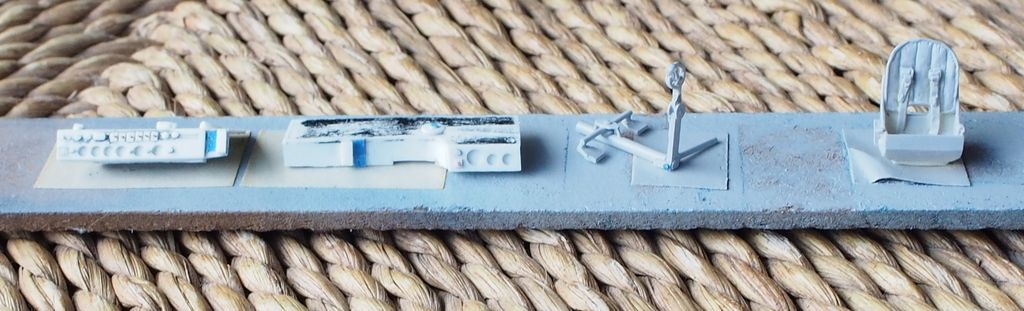
I got the seat, column top and compass from a Barracuda Cast Spitfire set. The rest is (and looks)scratch built.  Ready for paint:

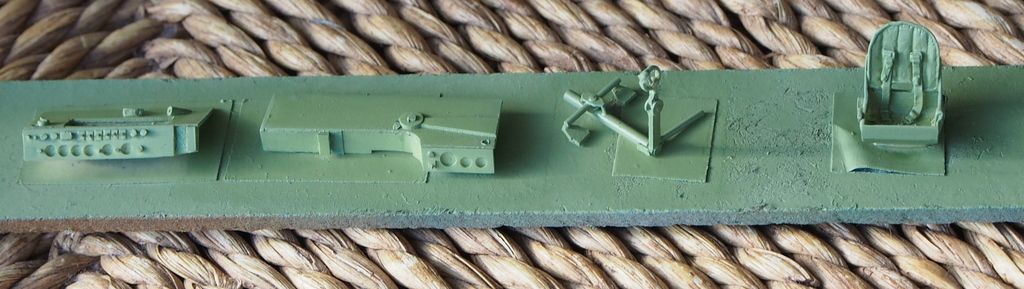
And with a coat of RAF Cockpit Green (Tamiya):

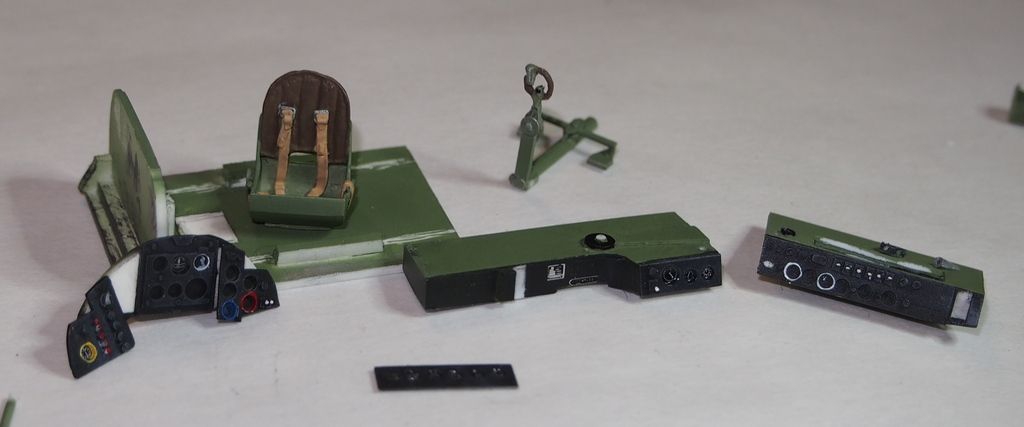
Put some NATO black on the IPs, and started painting some details and placing decals, including bezels from Mike Grant Decals:

So, some small progress in the cockpit. I have had a few days off so a bit more is being done now, but all the scratching is slow work.

So, slow work, but I am learning a lot about models and the limits of my patience.

  • Member since
    March 2012
  • From: Corpus Christi, Tx
Posted by mustang1989 on Tuesday, August 16, 2016 5:22 AM

Lostagain and Moff: I hear you on the slow progress. At times I think my Chevy is gonna be a cinch and it'll be done in a couple of weeks or so but one bad paint job later on the hood or interior trim panel on the rear door and it sets me back by at least a week.  That interior is lookin' sharp BTW.

hogfanfs: Lovin' the progress on your track so far. I'm a far cry from giving one of these puppies a shot. One day...............maybe.

everybody:  I just keep pressing ahead and take small breaks from the Chevy and work on the Arado. The seat and seat belts have taken me longer than I have wanted but I've got it to a point that I think I can show some progress now. I have to pick out some aluminum details on the seat belts with a toothpick but here's a pick just to show some progress anyways. I still have the armrests to go on this bad boy so I aint finished with the construction of the seat yet.


 Forum | Modelers Social Club Forum (proboards.com) 

  • Member since
    November 2009
  • From: SW Virginia
Posted by Gamera on Tuesday, August 16, 2016 7:23 AM

Mustang: That looks great, love those seatbelts. 

Lostagain: Thanks and I know exactly what you mean. I've hit some sort of modeling slump here, been getting very little done. What you posted of the cockpit looks great though. Really nice work. 

Bruce: Awesome, great to see you moving on that baby. And neat torii gate, Phoenix brand? I looked around the internet and that never came up. All I got was instructions on building your own and stuff for tropical fish aquariums! Guess I'm happy I went with the first, I did learn a bit about wood-working, hopefully it will come in useful in the future. 

"I dream in fire but work in clay." -Arthur Machen


  • Member since
    December 2002
  • From: Bury St Edmunds, Suffolk, England
Posted by Bish on Tuesday, August 16, 2016 10:45 AM

Bruce, nice collection of parts there, lok forwrad to seeing some more as you go.

I am a Norfolk man and i glory in being so


On the bench: Airfix 1/72nd Harrier GR.3/Fujimi 1/72nd Ju 87D-3

  • Member since
    December 2002
  • From: Bury St Edmunds, Suffolk, England
Posted by Bish on Tuesday, August 16, 2016 10:47 AM

Thanks lost. I will post some pics of the base later so you can see what i mean. I have been planning it out and i nee 2 more cobble sections and 2 more path sections.

Some nice work on the pit there.

I am a Norfolk man and i glory in being so


On the bench: Airfix 1/72nd Harrier GR.3/Fujimi 1/72nd Ju 87D-3

  • Member since
    August 2009
  • From: MOAB, UTAH
Posted by JOE RIX on Tuesday, August 16, 2016 12:38 PM

Bruce: Nice progress. Certainly looks like you've got the goods for sweet dio.

Lost: Just good to have you back in here building with us. Appears to me that you are moving along quite nicely.

Joe: Great work on the seatbelts. Good to see you're continuing to make progress.

"Not only do I not know what's going on, I wouldn't know what to do about it if I did". George Carlin

  • Member since
    February 2006
  • From: Cincinnati Ohio
Posted by DantheMan85 on Thursday, August 18, 2016 1:43 PM

Thanks Bish: Wish I had hidden treasure in them, those X's were a reminder not to set that side up. Before the engine cones were put on there are some parts that could break off if sat wrong side down. Great start to your Jagdpanzer E-100. Always love painting all those roads wheels that German armor has.

Thanks Joe Rix: Yeah that has been the only problem I've ran into so far.

Thanks Gamera.

Trabi: Nice start to your Moskito, looking forward to your build. Looks like Dragon got it wrong with the warped wings, using a metal rod to fix the warp is a nice solution.

Thanks Mustang1989: I went the putty way. If I would build this kit again I would remove plastic on the wing where the engine cones attach. Was going to do that but I went the putty way first. And great work on the Chevy. The seat looks great, nice seatbelts.

Crown r n7: Great work and painting on your Meteor engine, the weathering you've done is a nice touch.

Tony: The spitfire looks great, looking forward to the Belgian paint scheme.

Hogfanfs: Great work on your Type 4, the tank crew will add your build.

Thanks Lostagain: I'm happy at how well the Bf-110 has built up so far. Great detail painting on the cockpit.

Finally finished with the cockpit area, used Tamiya, Model Master & Testors paint's.

The engine exhaust are ready for paint. I plan to use a mix of Tamiya X-10 with XF-10, in a two to one ratio.


The fit with the cockpit area inside the fuselage was a tight fit, so first I glued the bottom together with taped wrapped tightly yesterday morning. Then later that evening I glued to the top half, from the back of the cockpit to the rear I used testors glue. In front of the pilot I used CA glue, that small section was a even more of a tight fit.


On my Work Bench: Tamiya Ford GT 1/24

Up Coming: ?


  • Member since
    December 2002
  • From: Bury St Edmunds, Suffolk, England
Posted by Bish on Thursday, August 18, 2016 2:19 PM

Well that makes sense Dan, and thanks for the comment. Its almost ready for painting.

Great work on the pit, really nice. Look forward to seeing how those exhausts come out.

I am a Norfolk man and i glory in being so


On the bench: Airfix 1/72nd Harrier GR.3/Fujimi 1/72nd Ju 87D-3

  • Member since
    February 2006
  • From: Cincinnati Ohio
Posted by DantheMan85 on Thursday, August 18, 2016 7:38 PM


Thanks Bish. I sanded down the fuselage this evening, starting with 400 grit and finishing with 2000 grit. The two half's went together well, very small gaps. After sanding I washed the sanded area's down with soap and water.


On Tuesday I started airbrushing parts to be added after the main camouflage is on. I used a circle template on the wheels, the outer part is XF-85 Rubber Black, middle is Testors Aluminum, and center is Model Master Flat Black. As you can see there was a little over spray of the Aluminum, I plan to airbrush a dust coating of XF-57 Buff on the landing gear when fully assembled, that should cover up that small amount.


With the propellers I used three toothpicks to hold the propellers for easy handling, I airbrushed four coats of XF-27 Black Green (RLM 70). I started out with using Pollyscale, put it just kept drying on the needle so I switched to Tamiya.


The Exhaust were painted with a mix of X-10 Gun Metal and XF-10 Flat Brown, at first it was a one to one ratio but I added another drop of X-10.


On my Work Bench: Tamiya Ford GT 1/24

Up Coming: ?


  • Member since
    November 2009
  • From: SW Virginia
Posted by Gamera on Thursday, August 18, 2016 9:04 PM

She's lookin' good Dan. Yes

"I dream in fire but work in clay." -Arthur Machen


  • Member since
    August 2009
  • From: MOAB, UTAH
Posted by JOE RIX on Thursday, August 18, 2016 9:53 PM

Excellent work so far Dan.  I like what you have done so far. That's a right sharp looking cockpit. Sounds as though you have those narly seams dealt with. 

"Not only do I not know what's going on, I wouldn't know what to do about it if I did". George Carlin

  • Member since
    August 2009
  • From: MOAB, UTAH
Posted by JOE RIX on Thursday, August 18, 2016 10:03 PM

I've actually managed some decent bench time here lately. It's better known as motivation.Wink. The fuselage halves are together. The seams were lightly sanded then touched up a bit with some Mr. Surfacer 500/1000. This was followed by some more light sanding and then the seams were checked with my trusty Testor's Silver Paint Marking Pen. Any further detectable blemishes were then dealt with and then finished up with finer grades of sanding & polishing. The wing halves were glued together and are in the same process as the fuselage seams. No, the wings are not glued on yet. Just some test fitting going on. 

"Not only do I not know what's going on, I wouldn't know what to do about it if I did". George Carlin

  • Member since
    December 2002
  • From: Bury St Edmunds, Suffolk, England
Posted by Bish on Friday, August 19, 2016 12:01 AM

Looks good there Dan. I like the look of those exhausts.

Corsair is looking nice Joe, i do like the look of that bird.

I am a Norfolk man and i glory in being so


On the bench: Airfix 1/72nd Harrier GR.3/Fujimi 1/72nd Ju 87D-3

  • Member since
    April 2014
  • From: Australia
Posted by lostagain on Friday, August 19, 2016 12:08 AM
Joe, Good to see the Corsair moving again, it is good to get some bench time isn't it. Dan, the 110 cockpit has come up a treat. Those wheels look great, no I can't see any overspray, looks great to me. I will be borrowing your exhaust recipe when I get to that stage.

  • Member since
    December 2002
  • From: Bury St Edmunds, Suffolk, England
Posted by Bish on Friday, August 19, 2016 3:03 AM

Progress has been good on the big guy. Its now all ready for some paint. The first thing i did after the tracks were done was stick the top on.

Then i started to add all the bits and pieces. Its been nice to get a chance to dig into the spares box, especially the Panther one which is a bit full after a few Dragon Panther. I replace the kits old style exhausts with some panther muffler ones which look a bit more meaty and i think much better suited to a vehicle this size.

Also, the kit provides an antenna mount for a Star Antenna. But the Voyager set provides a resin replacement. But as any good command vehicle should have 2 antenna's, I used the kit provided mount without the ceramic pot for the 2m antenna.

You can also see i sprayed some green along the bottom of the superstructer where the side skirts will go. I did the same to the inside of the skirts.

The skirts were then added and all the last bits fitted. The kit includes some unused parts clearly intended for the E-100 tank kit. These include the spare track holders and vehicle tools. I decided to use both these so the spare track holders were fitted and some PE brackets from the spares box as the Voyager PE does not include any.

And some with the barrel dry fitted so you can see what it will look like.

There are a few parts that will be painted seperat;y and fitted later. These include a nice resin night vision device from the AM set.


Overall, this has been a really nice kit. But there are a couple of really minor negatives. While the Trump AM tracks reminded me of the best of Dragon. Some otehr features made me think back to the Italeri panzerwerfer i recently built. This include location indicators on the outside. There are 4 locations, 2 on each side, for a device i have not yet fathomed out. Each location has two mounts, one above the other. Here you can see the upper one fitted after the raised area was removed. Below it the location of the lower piece.


And also there is lots of small flash especially around smaller bits. Its something i would expect from a small company not a big one like Trump. This, combined with things i have heard such as the issues with the 32nd Ju 87B, makes me think they are a company that can really produce great kits but get lazy when it comes to the finer detail.

Thats my view on it anyway.

And finally the base. You can see the one piece of cobble stone section i have laid down. On the right you can see the markings for the path and building. I need to build up that side to raise up thoose bit.


And thats all for now folks.


I am a Norfolk man and i glory in being so


On the bench: Airfix 1/72nd Harrier GR.3/Fujimi 1/72nd Ju 87D-3

  • Member since
    November 2009
  • From: SW Virginia
Posted by Gamera on Friday, August 19, 2016 7:36 AM

Joe: The Corsair is coming along nicely! Sharp work. 

Bish: Lookin' good! Love the work on the PE, that barrel cleaning rod drum on the engine deck must have been a bear to get right, I hate rolling up PE like that. And I can see why you need more cobblestones, looks like a honkin' big dio base.

Btw: I'm guessing no zimmerit on this vehicle? I know the Germans stopped using it reguarly around the end of the war. Was this intentional or did were they just throwing AFVs into action without time to paint the stuff on or ran out of supplies of it?  

"I dream in fire but work in clay." -Arthur Machen


  • Member since
    December 2002
  • From: Bury St Edmunds, Suffolk, England
Posted by Bish on Friday, August 19, 2016 9:24 AM

Thanks G. Fortuanatly, Voyager do the cleaning rod tubes as a tube, just got to fit the ends. Thats really handy because i am useless at rolling it up.

Yep, no Zimm. They stopped useing it around Sept 44. Main reason was it slowed down production, i believe it took about 2 days to apply, just at a time when they needed everything they could get and needed it now. There was also a view among crews that it could catch fire so probably was not very popular with the guys at the front. And to be honest, i think it was pointless anyway. The main user of magnetic AT weapons were the Germans ( the Russians may have had some but i am not sure about the western allies) and they are best suited for use by defenders against attacking enemy armour, and the Germans were not doing much attacking by that stage.

I am a Norfolk man and i glory in being so


On the bench: Airfix 1/72nd Harrier GR.3/Fujimi 1/72nd Ju 87D-3

  • Member since
    November 2009
  • From: SW Virginia
Posted by Gamera on Friday, August 19, 2016 11:53 AM

Thanks for the explanation Bish, the whole no zimmerit late-war thing confused me. You cleared it right up. 

"I dream in fire but work in clay." -Arthur Machen


  • Member since
    April 2005
  • From: Australia
Posted by taxtp on Friday, August 19, 2016 5:27 PM

I love the work you've done on the Jagdpanther Bish, the running gear looks excellent.

Dan, your 110 detail work is looking very sharp.

Joe - good to see that Corsair progressing.

I've made a little progress on my Spitfire XIV, here it is with primer and preshading. You might notice that I need to do a little repair work on one of the cannons.

Cheers

Tony

I'm just taking it one GB at a time.

  • Member since
    December 2002
  • From: Bury St Edmunds, Suffolk, England
Posted by Bish on Saturday, August 20, 2016 1:24 AM

Thanks Tony.

Good to see some paint going on the Spit. I had to look hard at the guns, but i can see it now. Did you manage to keep hold of the tip.

I am a Norfolk man and i glory in being so


On the bench: Airfix 1/72nd Harrier GR.3/Fujimi 1/72nd Ju 87D-3

  • Member since
    April 2005
  • From: Australia
Posted by taxtp on Saturday, August 20, 2016 6:37 AM

The tip was long gone by the time I noticed it Bish. I'll have to cast one, buy an aftermarket cannon or scratchbuild. At the moment I'm leaning towards the latter.

Cheers

Tony

I'm just taking it one GB at a time.

  • Member since
    March 2012
  • From: Corpus Christi, Tx
Posted by mustang1989 on Saturday, August 20, 2016 7:37 AM

Dan: Man those interiors are busy on those things. Great work so far on it and can't wait to see some paint start flyin' on this beauty.

Joe: I like what I'm seein' so far. Pre-shading on this one?

Bish: Excellent work on this one. All these details are really gonna make this one pop.

Tony: Looks like you're on your way to painting. Sorry 'bout the cannon. Is there an AM company that makes these cannon barrels so that both of 'em are uniform?

Everyone:I've been throwing a lot of time and energy at the Chevy as of late just trying to get it finished.

You know how it is when you want something finished and it just won't cooperate? That's what's happening with the wagon. It's one thing after another but I'm getting through it. I had an opportunity while paint was drying on that to switch back over to the Arado this morning. Pilots seat is done to include the armrests and installed. I'll be working on the back wall where the battery and other details are and working my way forward after I take care of the nose gear bay on the bottom side of this whole assembly. Here's the progress as of this morning though: ( The seat belts are actually dirtier than they look in the picture-here they look practically brand new....wow)

Image


 Forum | Modelers Social Club Forum (proboards.com) 

  • Member since
    September 2003
  • From: Northern hemisphere - most of the time-
Posted by blkhwkmatt on Saturday, August 20, 2016 1:29 PM

Everyone: tons of amazing work going on here.  I have not been much of an armor builder (ever) so am in awe of the builds going on here.  Might have to try my hand at a tank or two in the future.

The Corsair, spitfire and 110 are looking great, keep up the great work!

I have had very little bench time lately, with it being summer here and all the sports and traveling and all that.  I did manage some late last night, was able to get the cockpit complete, the fuel tank mounted and more work on the rear engine bay. encountered a bit of a problem last night as well, there is a large gap between the engine bay firewall and the fuel cell fire wall that is not there in the real aircraft.  Believe it is the product of multiple manufacturers and resin sets not designed to be used together.

The seatbelts are the new Eduard Super Fabric seatbelts, and are pretty nice.  They are really easy, as they glue on with white glue.

I believe I will look at removing the fire wall from the Fuel tank part and attaching it to the front side of the engine part, that should fix the issue well enough for my taste.

Quidquid latine dictum sit, altum videtur!!! - Anything said in Latin sounds profound!


  • Member since
    December 2002
  • From: Bury St Edmunds, Suffolk, England
Posted by Bish on Saturday, August 20, 2016 5:25 PM

taxtp

The tip was long gone by the time I noticed it Bish. I'll have to cast one, buy an aftermarket cannon or scratchbuild. At the moment I'm leaning towards the latter.

Cheers

Tony


Looks like it should not be to bad to scratch. I think i would go for that option as well.

I am a Norfolk man and i glory in being so


On the bench: Airfix 1/72nd Harrier GR.3/Fujimi 1/72nd Ju 87D-3

  • Member since
    December 2002
  • From: Bury St Edmunds, Suffolk, England
Posted by Bish on Saturday, August 20, 2016 5:26 PM

Thanks Joe, been getting into the painting today but taking my time with it.

Lovely work on that pit, some very nice dtail there.

I am a Norfolk man and i glory in being so


On the bench: Airfix 1/72nd Harrier GR.3/Fujimi 1/72nd Ju 87D-3

  • Member since
    December 2002
  • From: Bury St Edmunds, Suffolk, England
Posted by Bish on Saturday, August 20, 2016 5:29 PM

Looks good matt. I have not trie those Eduard belts yet, they do them in 72nd as well, going to have to get some.

And get yourself some armour, its nice not having to be all neat and tidy Big Smile

I am a Norfolk man and i glory in being so


On the bench: Airfix 1/72nd Harrier GR.3/Fujimi 1/72nd Ju 87D-3

  • Member since
    November 2009
  • From: SW Virginia
Posted by Gamera on Saturday, August 20, 2016 5:37 PM

Matt, Mustang, Tony: Those all look great guys, please keep the updates coming!

"I dream in fire but work in clay." -Arthur Machen


  • Member since
    April 2014
  • From: Australia
Posted by lostagain on Sunday, August 21, 2016 5:49 AM

Bish,
That’s a monster. With a gun that big, the Navy would want to take over!
Looking good with the PE details.
Tony,
Preshading has come up well, that’s a pain with the cannon.
Mustang,
The cockpit is looking great. Its got armrests? How about cupholders?
Matt,
The pfiel is coming along well, nice work in the cockpit. A lot of detail in there (no cupholders?), looking forward to seeing the rest.
The MB 5 cockpit has had a bit of work done on it whilst I had a week off. Got the detailing done on the panels, including Mike Grant dial decals with Crystal Clear for glass. The seat, column top and compass are from Barracuda. Rest is scratchbuilt.
 
First up was getting the side panels on, using braces to keep them square.
 
Next was the seat. It was stuck on with 5 minute epoxy, used the excess to strengthen the sides.
 
Then the control column. Like the original, it is all as one part. In the plane it could be removed as one piece to make maintenance easier.
Next is the front IP, but I have had difficulty fitting the cockpit tub into the fuselage, so need to get over that first.
And now it's back to living in a motel room for a week, try to get something done...

  • Member since
    February 2010
  • From: New Jersey
Posted by 68GT on Sunday, August 21, 2016 8:43 AM

I havnt completed anything in a while so this might help shake that monkey off my back.  Going to finally build that PM Ho-229 in 1/72.

On Ed's bench, ???


JOIN OUR COMMUNITY!

Our community is FREE to join. To participate you must either login or register for an account.

SEARCH FORUMS
FREE NEWSLETTER
By signing up you may also receive reader surveys and occasional special offers. We do not sell, rent or trade our email lists. View our Privacy Policy.