SEARCH FINESCALE.COM

Enter keywords or a search phrase below:

The official Submarine Warfare Group Build 2016 - 2017

25682 views
611 replies
1 rating 2 rating 3 rating 4 rating 5 rating
  • Member since
    September 2012
Posted by GMorrison on Wednesday, February 22, 2017 1:43 AM

Hey guys,

Sitting in my hotel room on a business trip, something has been perplexing me for a while about the Trumpeter 1/144 Gato kit.

The sail/ fairwater.

The two "familes" of Gatos were the commercial boats, from Electric Boat and Manitowoc yards, and the government boats, from Mare Island and Portsmouth.

While very similar, there are clear differences. Chief among those are the limber holes, and the sails.

I'm no Gato expert, but reading identifies some basic spotting features to differentiate the two basic types of sails.

EB boats had a graceful curve in the transition of the top of the fairwater side from the open lookout deck aft down to the cigarette deck. MI boats had a sharp 45 degree transition. Later that all disappeared along with the sheet metal.

Here's Gato, an EB boat:

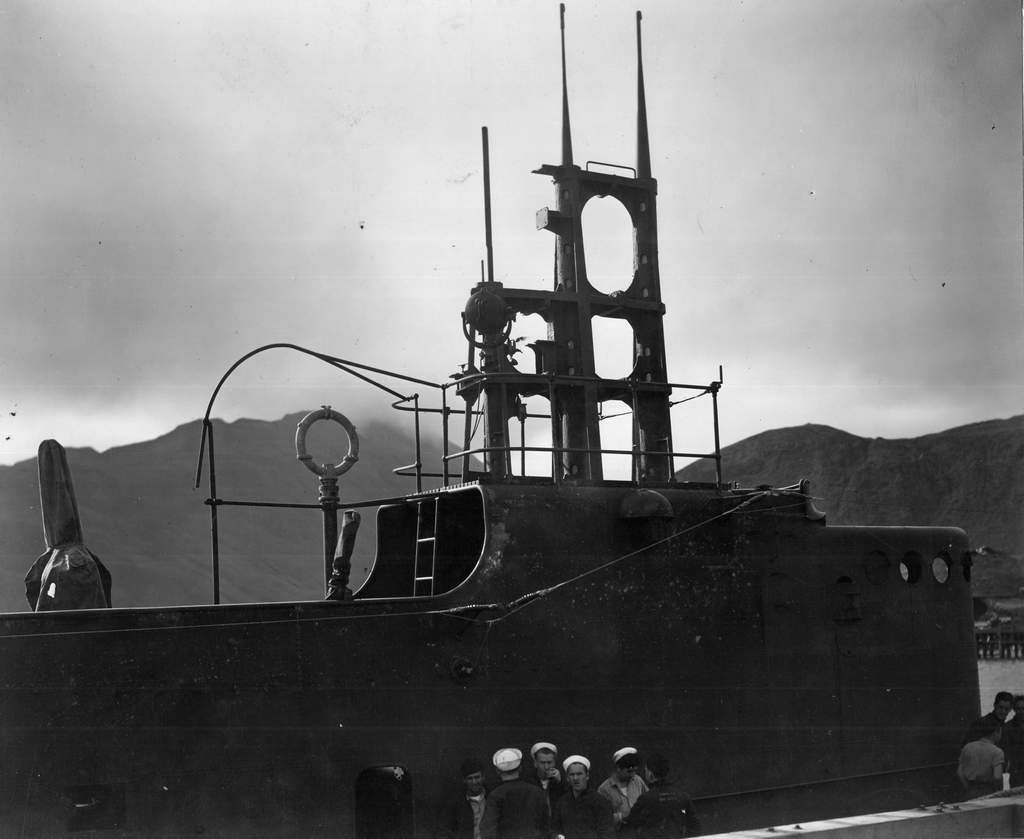
Here's Trigger, a MI boat:

Second, the EB boats have an inward slope on the sides as the fairwater rises above the top of the conning tower inside, then go straight up. The MI boats just go more or less straight up.

Here's Gato again:

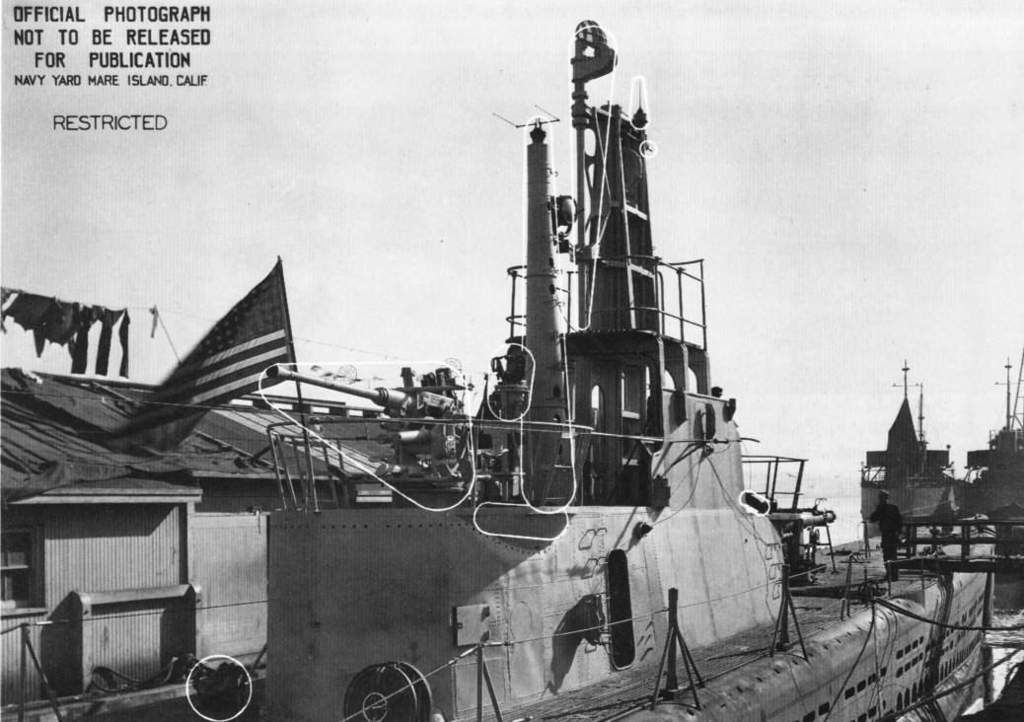
Here's Wahoo, a MI boat:

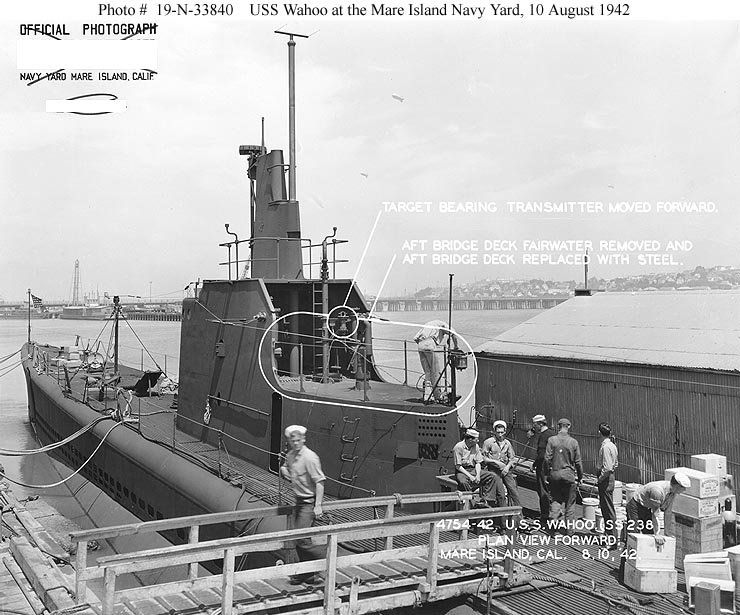
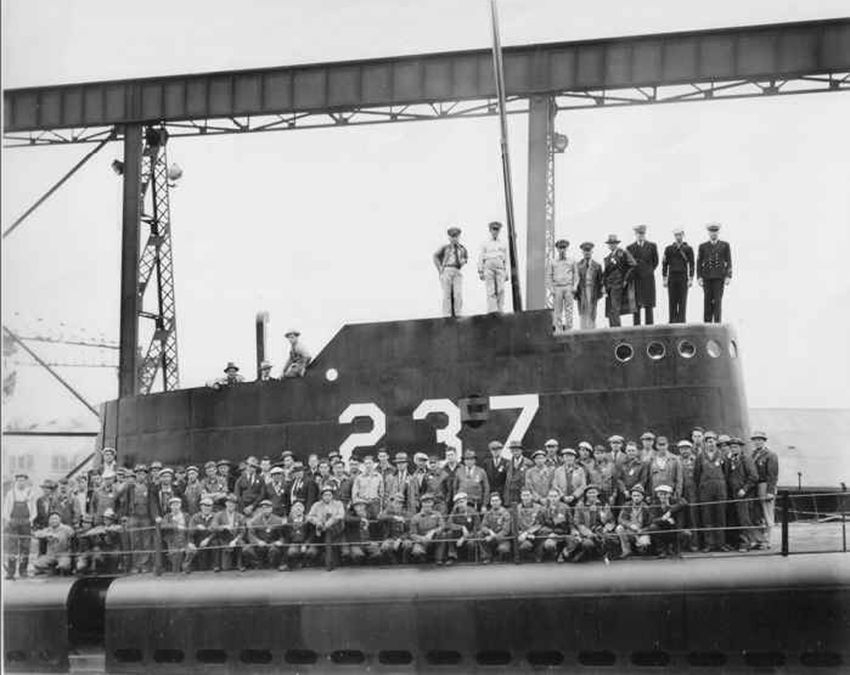
And third, the EB boats have a shorter length of fairwater, with a round aft end. The MI boats look to me to have a consistent faired aft end that comes to a point.

Here's SS 262 Muskallunge, an EB boat:

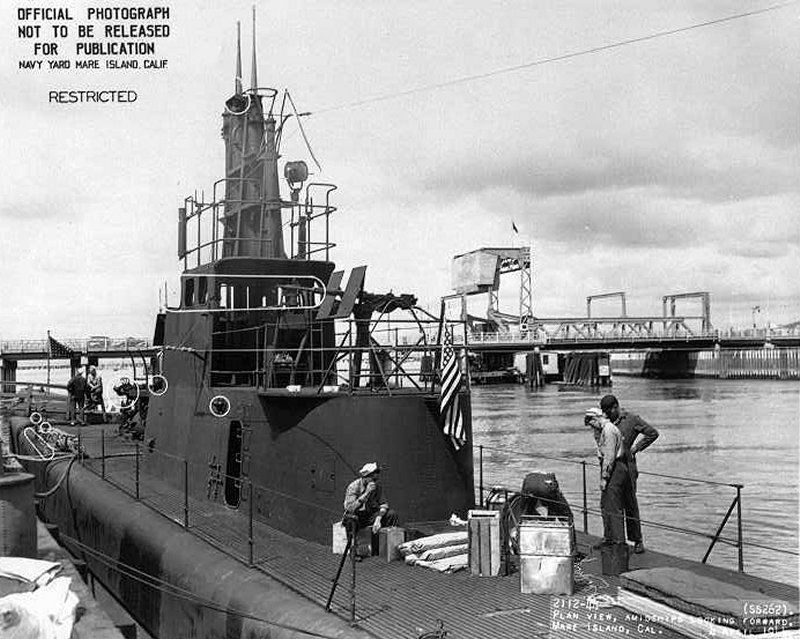
Compared to Wahoo above.

 All photos above are from Navsource.

I plan to build the 1941 Trumpeter kit as Trigger, a MI boat on eternal patrol. The galloping Ghost of the Japanese Coast. But, the kit is a EB boat. Here's what the fairwater looks like (not my build):

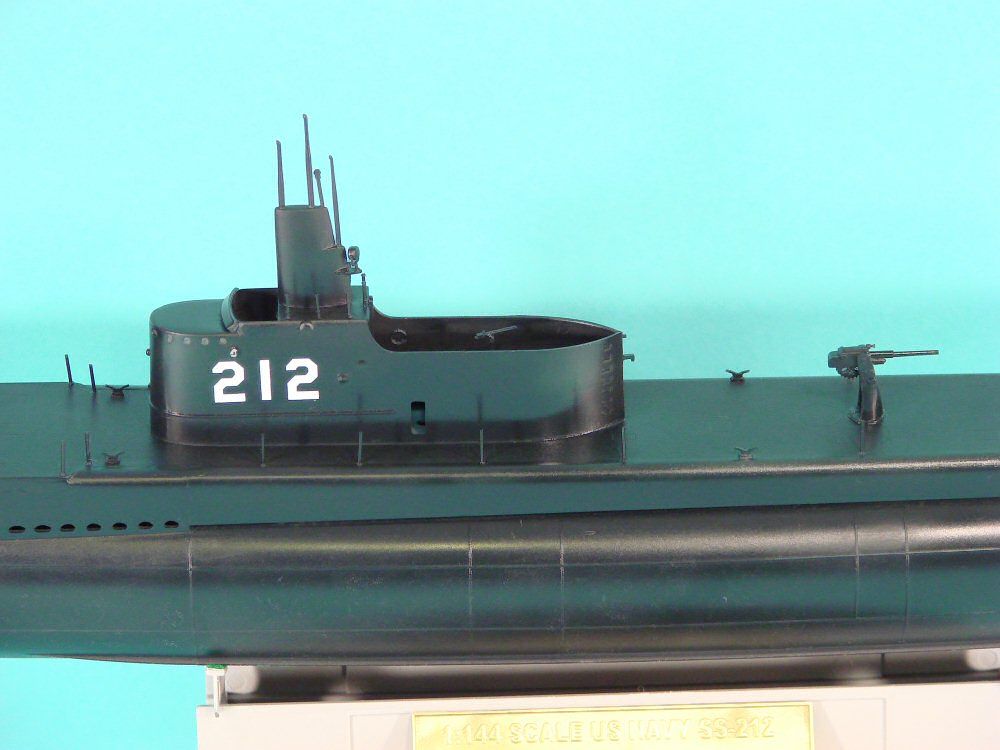
Well, from the looks of it there's more similarity to MI per items two and three above.


And here's the 1944 kit fairwater (again not my kit) built up:

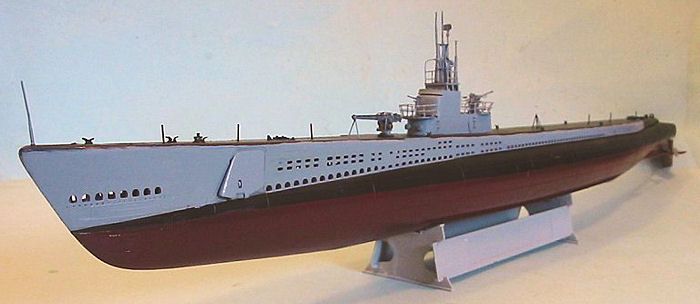
I see item three, the rounded end, but maybe the sides look a little more MI?

I really wish I could find the Floating Drydock Gato plan book, and I'm also really eager to hear what you all think. This may turn out easier than I thought, a MI boat in 1942 from the ealier gato kit.

 Modeling is an excuse to buy books.


  • Member since
    July 2014
Posted by modelcrazy on Tuesday, February 21, 2017 10:11 PM

Your HL must be way more stocked than ours.

Steve

Building a kit from your stash is like cutting a head off a Hydra, two more take it's place.


http://www.spamodeler.com/forum/

  • Member since
    November 2008
  • From: Central Florida
Posted by plasticjunkie on Tuesday, February 21, 2017 8:52 PM

I remember seeing the 1/72 Gato at HL a while back for $53 with the 40% coupon and left it there.

:scream:

 GIFMaker.org_jy_Ayj_O


Too many models to build, not enough time in a lifetime!!

  • Member since
    August 2014
  • From: Willamette Valley, Oregon
Posted by goldhammer on Tuesday, February 21, 2017 7:06 PM

Ahhhhhh, come on, only twice the length of the one you have, but 4'-4" still takes up a lot of shelf space.  On the up side, the PE is twice as big too.  Then you have the deck plate PE and tower PE in addition to the shears PE.   Can also get brass props for her.  I went whole hog on mine.  The deck plates are going to be a pain as you have to cut out all the deck detail on the kit parts, and put in 2x2mm styrene cross braces, ala what MC did on his Puffer launch build.

Looking good with the fixes.

  • Member since
    November 2008
  • From: Central Florida
Posted by plasticjunkie on Tuesday, February 21, 2017 3:43 PM

Thanks to GH who was so helpful in sending me a couple of pictures showing the lookout platform up to the fairwater walls. I actually found the book on Ebay for $10 with free shipping, Squadron did not have it on sale and I kick myself cause I almost bought it for $1.99 the last time. It will come in handy cause I eventually want to build another Gato class sub in the late War configuration. The Revell 1/72 Gato looks very tempting but it is HUGE, that's why I went with the 1/144 one.

The Riich 1/200 boat has some really nice details including excellently detailed guns and pe sheet but they would be again the 1943 configuration with the 3"/50 gun.

I added plastic card to the sides of the platform and once I have the inside of the fairwater painted, then I will glue in place the tower frame and sand flush the platform to the side walls. I do believe I got it this time thanks to GM and GH! Cheers fellas! Beer

I have spent more time working on this conning tower than what I usually spend building and OOB kit.


 GIFMaker.org_jy_Ayj_O


Too many models to build, not enough time in a lifetime!!

  • Member since
    August 2014
  • From: Willamette Valley, Oregon
Posted by goldhammer on Tuesday, February 21, 2017 9:53 AM

In Squadron's Gato in action, page 14, there is a pic of Gato at Mare Island on Aug 8, 1943 showing the lookout platforms solid with the fairwater sides.  The hatch in the fairwater to the front gun platform would be for access from the bridge hatch to the foward gun platform.  Shown open in the pic.

Just below that pic is one of Dorado (SS248), also Aug. '43 with the same structure, but shown from aft.


  • Member since
    September 2012
Posted by GMorrison on Monday, February 20, 2017 10:46 PM

Yes indeed!

i keep putting of starting mine because we are still moving in. Lucky I am going as built Mod 1. Still a couple of details to change but nowhere near the later amount like yours.

i don't know the answer to your question.

I wonder about that hatch onto the forward platform. Look at the earlier photo above. I can't tell.

Great work.


 Modeling is an excuse to buy books.


  • Member since
    July 2014
Posted by modelcrazy on Monday, February 20, 2017 10:07 PM

That is some superior PE work PJ.

Steve

Building a kit from your stash is like cutting a head off a Hydra, two more take it's place.


http://www.spamodeler.com/forum/

  • Member since
    November 2008
  • From: Central Florida
Posted by plasticjunkie on Monday, February 20, 2017 8:15 PM

Thank God I saved the parts I sliced off so they were Tenaxed on and some PPP was used to blend in the seams. Now it has the 43 fairwater. The tower frame is just set in place and not glued.

Would you know GM if the sides of the lookout deck extended to both sides closing them off?  I know the bridge was uncovered.

 GIFMaker.org_jy_Ayj_O


Too many models to build, not enough time in a lifetime!!

  • Member since
    November 2008
  • From: Central Florida
Posted by plasticjunkie on Monday, February 20, 2017 5:56 PM

Gm

I kept looking at those very same pictures and never noticed till today and you are right. The instructions show to cut off 5mm but the periscope arraingement is the 43 stile and the fairwater is the 44 refit. Got it fixed earlier today and will post pictures when I get home.

Thanks for catching my boo boo.


 GIFMaker.org_jy_Ayj_O


Too many models to build, not enough time in a lifetime!!

  • Member since
    September 2012
Posted by GMorrison on Monday, February 20, 2017 1:42 PM

You are definitely in 1944. The Mod 4 fair water shows up in photos of Gato 11/44 at Mare Island. That's the way cutdown bridge with the "covered wagon hoops".

Photos of her in August 1943 at MI show her as a Mod 3, with those covered up. In that one the deck gun is forward but still a 3".

Bill

 Modeling is an excuse to buy books.


  • Member since
    November 2008
  • From: Central Florida
Posted by plasticjunkie on Monday, February 20, 2017 11:55 AM

Yes I thought about that and setting the gun part aside to see what they look like once I receive them. There's a few things I need to the hull to make it correct.

I have made another discovery regarding the WEM pe sheet. I noticed a particular part, #20 listed as "Alternate Upper Framework Rear Brace". This part is found in the updated and last refit that was done to the Gato on November 1944. Most of the parts are there for both the refits of 1943 and 1944 but nothing is said in the instructions. I for one wanted to make the 1944 refit version but the instructions only cover the earlier refit. Some modifications and relocation of parts need to be made for the later version. As it is, the instructions are a bit vague about listing some of the parts as "alternate".

 GIFMaker.org_jy_Ayj_O


Too many models to build, not enough time in a lifetime!!

  • Member since
    December 2002
  • From: Bury St Edmunds, Suffolk, England
Posted by Bish on Monday, February 20, 2017 10:25 AM

Good to hear they got back to you, and as Steve says, the guns can always goon later.

I am a Norfolk man and i glory in being so


On the bench: Airfix 1/72nd Harrier GR.3/Fujimi 1/72nd Ju 87D-3

  • Member since
    July 2014
Posted by modelcrazy on Monday, February 20, 2017 10:12 AM

That's great news PJ.

We have plenty of time. Personally I won't spend anything on another set of guns.

The guns can one of the last things to go on, yes?

Steve

Building a kit from your stash is like cutting a head off a Hydra, two more take it's place.


http://www.spamodeler.com/forum/

  • Member since
    November 2008
  • From: Central Florida
Posted by plasticjunkie on Monday, February 20, 2017 9:08 AM

Well I have good and bad news. For the good news first, I shot Nautilus another email and it seems they never got my first one in the first place. They are sorry about the bad product quality and he will be sending me another set.

Now for the bad news.........the molds are being reworked to get sharper details but I have to wait weeks for the molds to be completed. Hopefully the casting will be of better quality.

I found a company that does 3D printing in plastic and they have these weapons with incredible details so that is another option but I hate to spend another $30 so lets see how the new resin weapons look like first.

 GIFMaker.org_jy_Ayj_O


Too many models to build, not enough time in a lifetime!!

  • Member since
    July 2014
Posted by modelcrazy on Sunday, February 19, 2017 9:45 AM

PJ,
That must have taken some serious research. Sometimes it's not easy to find and interpret reference pictures especially of subject that are constantly changing.

I'll have to remember WEM and their quick customer service as well as their concern for accuracy.


Steve

Building a kit from your stash is like cutting a head off a Hydra, two more take it's place.


http://www.spamodeler.com/forum/

  • Member since
    November 2008
  • From: Central Florida
Posted by plasticjunkie on Sunday, February 19, 2017 8:31 AM

Thanks guys. Not much progress because something has been bothering me and I had to get to the bottom of it. I have been searching about the Gato's conning tower configuration in the WEM sheet and finally arrived at the answer.

From the pictures and info I have been reading, the WEM sheet depicts the Aug. 1943 refit and not a later one. In Sept 1944, she reported to Mare Island and had her tower further modified by the addition of newer radar which changed the configuration. It could have been done with the WEM set but it's too late as I have most of the tower assembled as per the directions, making it a Sept. 43 refit. The lookout deck and railings are also missing from the WEM set and are not even mentioned. It is still a good detail set and worth the money. However I can't say the same for the Nautilus resin guns.

I emailed WEM about these issues and Richard Harden responded and is looking into the matter. It's comforting to know that the company listens to the customer and doesn't blow one's opinion off like Nautilus did with their poorly made weapons set.  

I'm working on that lookout deck and figuring out the railings so once I have some progress pictures will be posted at that time. 

 GIFMaker.org_jy_Ayj_O


Too many models to build, not enough time in a lifetime!!

  • Member since
    July 2014
Posted by modelcrazy on Monday, February 13, 2017 10:13 AM

Great work on that PE PJ. It really makes it pop.

Steve

Building a kit from your stash is like cutting a head off a Hydra, two more take it's place.


http://www.spamodeler.com/forum/

  • Member since
    August 2014
  • From: Willamette Valley, Oregon
Posted by goldhammer on Monday, February 13, 2017 9:06 AM

And the winner is.........PJ!!  Great work on that stuff.  2/3 of the way there.  More patience than I have.  Great idea on nailing down the fairwater to work on the rest of it.

  • Member since
    December 2002
  • From: Bury St Edmunds, Suffolk, England
Posted by Bish on Monday, February 13, 2017 8:59 AM

I've done some PE in my time PJ but that is really somthing. Testing your patience indeed.

I am a Norfolk man and i glory in being so


On the bench: Airfix 1/72nd Harrier GR.3/Fujimi 1/72nd Ju 87D-3

  • Member since
    November 2008
  • From: Central Florida
Posted by plasticjunkie on Monday, February 13, 2017 7:14 AM

I had to put this aside for a while cause this pe work is very time consuming and does quite a job at testing one's patience.

This is where I'm at after several hours work. I taped the entire conning tower to my state of the art pe cutting mat (left over bathroom tile) so I can super glue each tiny thin pe part at a time.

 closeup of the framework which is light years ahead of the included molded parts.

I also removed the molded ladder details and made my own from very thin copper wire, bending it to shape and inserted into drilled holes and super glued from inside the tower.

lots more tiny parts here and still on the fret

once the brass framework is completed, it will be super glued to the conning tower assembly. I still have to add some parts to the underside between the periscope tubes and railings for the lookouts. Still lots to do just here.


 GIFMaker.org_jy_Ayj_O


Too many models to build, not enough time in a lifetime!!

  • Member since
    June 2013
  • From: Jax, FL
Posted by Viejo on Sunday, February 12, 2017 2:04 PM

modelcrazy

Looks good Viejo. How was it to build up being a Linberg?

I put you on the wall.


Pretty easy build, not too much detail though.  A better modeler could do better than I did......

  • Member since
    July 2014
Posted by modelcrazy on Sunday, February 12, 2017 1:36 PM

Looks good Viejo. How was it to build up being a Linberg?

I put you on the wall.

Steve

Building a kit from your stash is like cutting a head off a Hydra, two more take it's place.


http://www.spamodeler.com/forum/

  • Member since
    June 2013
  • From: Jax, FL
Posted by Viejo on Sunday, February 12, 2017 12:40 PM

  • Member since
    June 2013
  • From: Jax, FL
Posted by Viejo on Sunday, February 12, 2017 10:14 AM

Viejo

I have completed  the 1/240 Gato.  I am taking it to Jaxon tomorrow   and will get some pics there.  I will post the best shot.


  " alt="" />

  • Member since
    November 2008
  • From: Central Florida
Posted by plasticjunkie on Saturday, February 11, 2017 7:57 PM

Thanks GH. I'm good up to now but will let you know if I mess up anything.

The needle applicator is really easy to make.

 GIFMaker.org_jy_Ayj_O


Too many models to build, not enough time in a lifetime!!

  • Member since
    August 2014
  • From: Willamette Valley, Oregon
Posted by goldhammer on Saturday, February 11, 2017 5:50 PM

Got to make one of those.......

If you destroy any of it, let me know and I can send you what you need from my WE sheet.  I'll probably only use the early SD and SJ antennas.

  • Member since
    November 2008
  • From: Central Florida
Posted by plasticjunkie on Saturday, February 11, 2017 5:45 PM

Thanks GH. I use a sewing needle with the end cut , having a Y at one end which hols a drop of thin ca and divers it with accuracy. Yes the pe adds tons to it and is worth the effort so I'm almost there.

 GIFMaker.org_jy_Ayj_O


Too many models to build, not enough time in a lifetime!!

  • Member since
    August 2014
  • From: Willamette Valley, Oregon
Posted by goldhammer on Saturday, February 11, 2017 5:37 PM

Looks good.  I spent 3 hours getting the outers on, and had more thin CA on me than it.  Another 3 hours fighting the inners before I gave it up as an exercise in frustration.  And I looked at the rest of the structure, and realized it got smaller as it went, and knew I wouldn't be able to do it with my skill set.  Just not my cup of Jack or John.

Perserve my friend, you are worlds ahead of me.  It will really add to the finished product.  Lot more realistic than the kit pieces and will be worth the effort.

  • Member since
    November 2008
  • From: Central Florida
Posted by plasticjunkie on Saturday, February 11, 2017 5:29 PM

GH

This is where I'm at. The inner lamination took me several hours to shape it and figure out how to mount it. I settled on using what looks to be an over size toothpick that I slid into one of the periscope holes to line things up. I then CAd each leg one at a time with tweezers to form the I structure. I still have to add the center dividing parts (25 & 25).


Once this thing is cured, then I have to carefully cut the bottoms of the inner lamination piece. You can see them sticking out a bit at the bottom where they will sit flush on the deck inside the tower walls.  

 GIFMaker.org_jy_Ayj_O


Too many models to build, not enough time in a lifetime!!

JOIN OUR COMMUNITY!

Our community is FREE to join. To participate you must either login or register for an account.

SEARCH FORUMS
FREE NEWSLETTER
By signing up you may also receive reader surveys and occasional special offers. We do not sell, rent or trade our email lists. View our Privacy Policy.