SEARCH FINESCALE.COM

Enter keywords or a search phrase below:

80 Years of Airfix GB

108339 views
1664 replies
1 rating 2 rating 3 rating 4 rating 5 rating
  • Member since
    December 2002
  • From: Bury St Edmunds, Suffolk, England
Posted by Bish on Sunday, January 6, 2019 11:09 AM

I have had this kit well over 20 years. It was bought with the aim of building it in German markings of a profile i saw in the frist referance book i got in the mid 80's. A number of years ago i found a set of Kora decals for that same aircraft, so no fancy Italian paint scheme on this (thankfully).

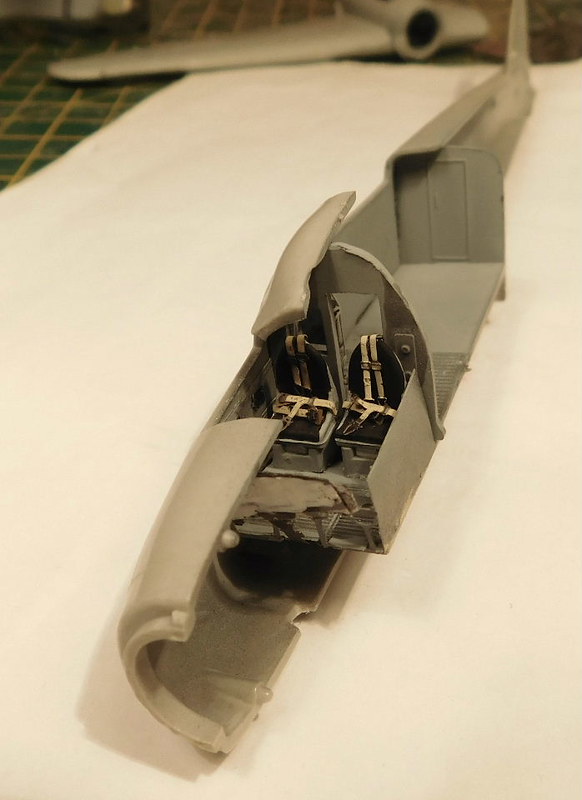
Ashide from the decals, i also have an old Eduard PE set which while rather basic, does fill out the spartan pit on the kit. The upper pieces is the pit and rear compartment and the gondola.The radio behind the pit is flat, but as the fuselage wilkl be closed up it won't be an issue, as long as there is somthing visible through the small side windows.

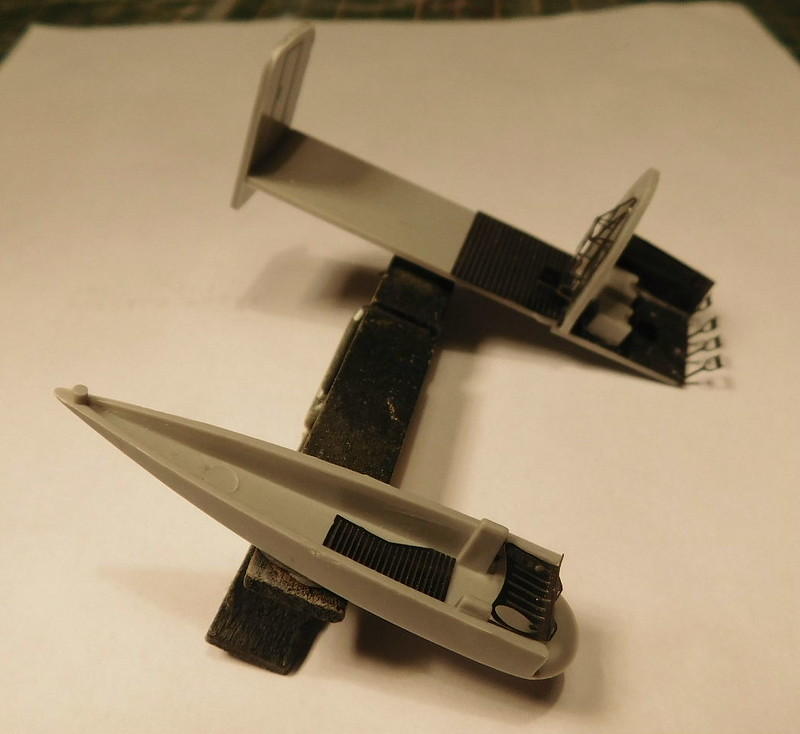
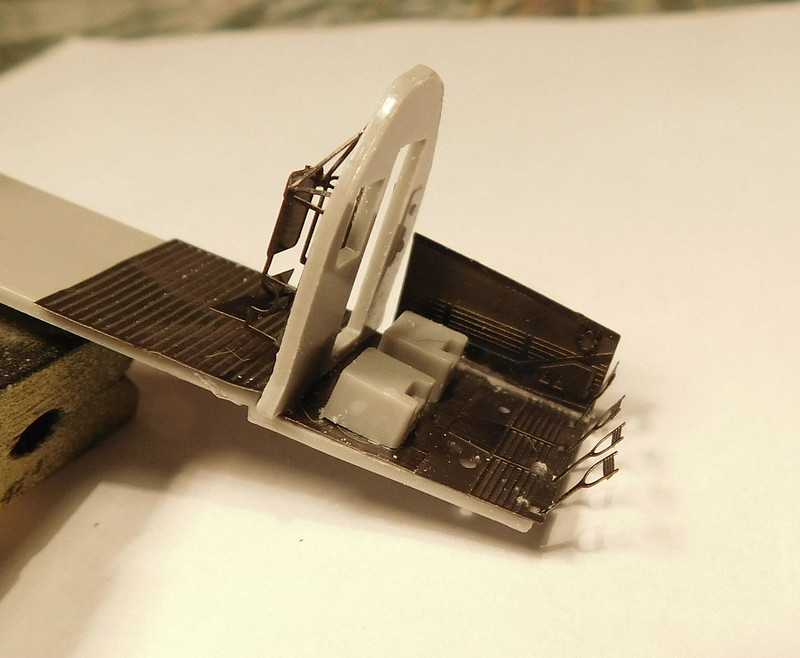
I found different info on the interiour colours. Airfix says light grey. many model sites said light green. But i found an old thread on the site on this same subject and somthing posted a link to Stormo, a site dedicated to modelling Italian aircraft. It says that while most Italian aircraft were indeed green, those made by this coimpany were grey, so thats what i went for. This was followed by a light flory wash and dry brushing, nothing to heavy.

The PE set didn't include seat belts, so i pulled a set from my Mutftwaffe spares box.

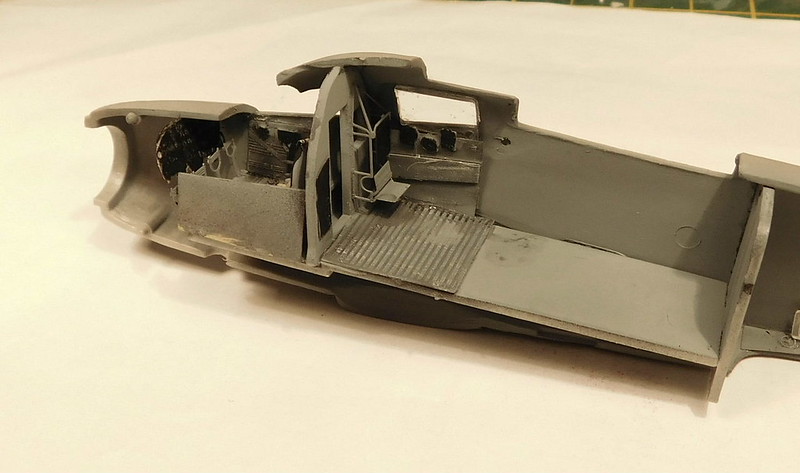
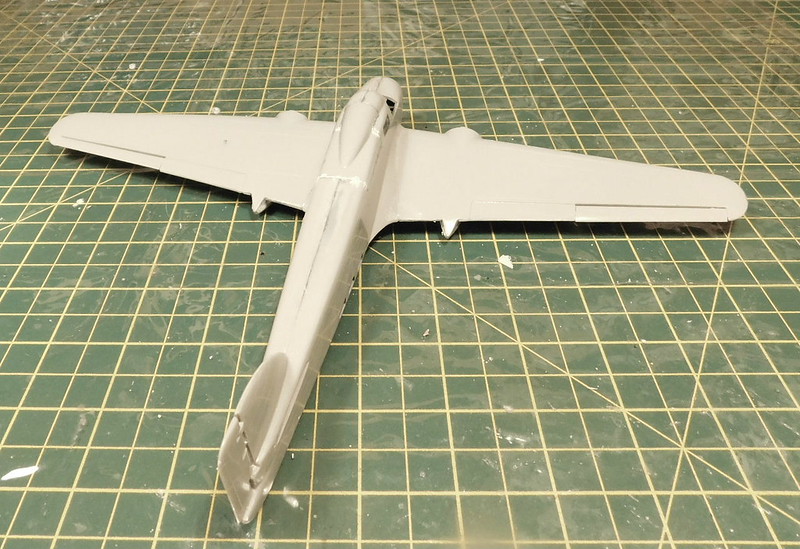
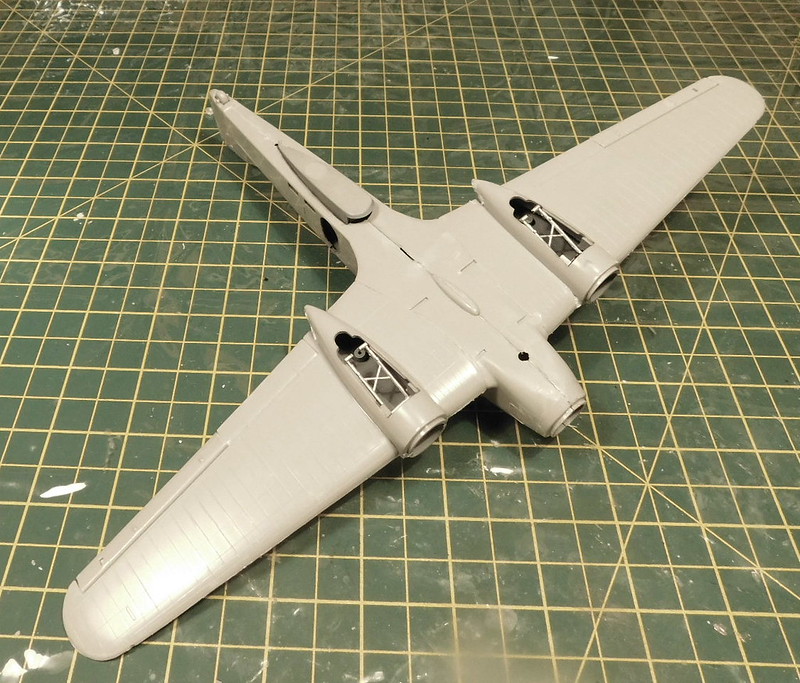
I then closed up the fuselage and fitted the wings. There is still more filling to do and clean up the seams, some large gaps around the dorsal hump.

The undercarrage legs have been left movable as Airfix designed them. This way i can fold them away and mask before painting. Once thats done i can add the rear braces and fix them in place.

Quite a bit of filling and clean up to do before i go on.


I am a Norfolk man and i glory in being so


On the bench: Airfix 1/72nd Harrier GR.3/Fujimi 1/72nd Ju 87D-3

  • Member since
    August 2009
  • From: MOAB, UTAH
Posted by JOE RIX on Sunday, January 6, 2019 10:31 AM

Really wonderful progress from everyone. I'm liking it.

kensar: Excellent detailing and painting on the cockpit. It looks really good as well as the pilot.

Steve: Bummer that the fuselage, bulkhead and canopy is giving you fits but, it sure appears that you are getting it all whooped into shape. Great demonstration of patience and ingenuity going on there. Bravo on the progress so far.

Frank: Very nice progress on the clipper. Glad to see that you got another kit and I hope it gives you the parts you need to fully top off your kit. Keep it coming.

Yeah, I'm not the biggest fan of Montex masks but, they do in a pinch if there is nothing available from Eduard. 

"Not only do I not know what's going on, I wouldn't know what to do about it if I did". George Carlin

  • Member since
    June 2017
  • From: Winter Park, FL
Posted by fotofrank on Sunday, January 6, 2019 10:08 AM

I ordered the "bug catcher" today for the WB-29 conversion today. The "bug catcher" sits in the space once occupied by the upper rear turret.

I found it quite by accident at Lone Star Models. The guy makes all sorts of obsure resin accessories for model builders.

I had been looking at and studying pictures of WB-29 and WB-50 aircraft with this device trying to figure out how I would scratch-build it. Then I stumbled onto this. Lone Star needs 4-6 weeks lead time so I won't see the part for a while but that will give me time to get other stuff done.

OK. In the stash: Way too much to build in one lifetime...

  • Member since
    December 2002
  • From: Bury St Edmunds, Suffolk, England
Posted by Bish on Sunday, January 6, 2019 6:15 AM

checkmateking02


Bish


checkmateking02


Bish

Nice progress Steve, good job you spotted that when you did.

I have tried Montex masks, for the same reason, cheaper than Eduard, and was not to keen. I find the are a bit thick and especially have issues with curved panels. I can see a couple of panels on yours where it curves close to the edge, and thats where i found the mask kept coming away. I hope yours are ok but i won't be buying any more unless theres no option.


How about Peewit?  I bought a set of their masks for the Blenheim canopy.  Also got a set of camouflage masks from AML.  Any thoughts about them?


I have not tried either of those, only Eduard and Montex. Be interested to see what you think of them, are the Peewit paper masks?


I don't know what they're made of.  I haven't opened them yet, but I'll let you know.


Thnaks, be interesting to find out what they are like.

I am a Norfolk man and i glory in being so


On the bench: Airfix 1/72nd Harrier GR.3/Fujimi 1/72nd Ju 87D-3

  • Member since
    June 2008
Posted by lewbud on Saturday, January 5, 2019 10:18 PM

Steve,

I used the AML masks on the Tempest I built for the RAF build last year. I loved them and will be purchasing a set for the Spits for this build. Since you've already ready purchased the set, making sure you purchased the correct pattern is a moot point (A or B). The second is make sure you've got everything lined up. I've got a nice straight edge on the nose of my Tempest.  I didn't have any problems with the paint bleeding under. They're a real time saver. 

Buddy- Those who say there are no stupid questions have never worked in customer service.

  • Member since
    September 2003
  • From: AandF in the Badger State
Posted by checkmateking02 on Saturday, January 5, 2019 9:40 PM

kensar:  that is excellent work; very nice painting of the pilot and cockpit.

Steve:  I had hoped the Blenheim would be a relatively painless endeavor.  Thanks for posting your experiences.  I'm sure you'll overcome the problems, though.  I'm glad to be forewarned.

There is a build review posted here on FSM about the fighter version of the Blenheim (with the different nose), and it describes some fit issues and points of particular difficulites.  

http://www.finescale.com/product-info/kit-reviews/2014/11/airfix-bristol-blenheim-mki

I hope things start to go better!  Yes


  • Member since
    September 2003
  • From: AandF in the Badger State
Posted by checkmateking02 on Saturday, January 5, 2019 9:29 PM

Bish


checkmateking02


Bish

Nice progress Steve, good job you spotted that when you did.

I have tried Montex masks, for the same reason, cheaper than Eduard, and was not to keen. I find the are a bit thick and especially have issues with curved panels. I can see a couple of panels on yours where it curves close to the edge, and thats where i found the mask kept coming away. I hope yours are ok but i won't be buying any more unless theres no option.


How about Peewit?  I bought a set of their masks for the Blenheim canopy.  Also got a set of camouflage masks from AML.  Any thoughts about them?


I have not tried either of those, only Eduard and Montex. Be interested to see what you think of them, are the Peewit paper masks?


I don't know what they're made of.  I haven't opened them yet, but I'll let you know.


  • Member since
    July 2014
Posted by modelcrazy on Saturday, January 5, 2019 8:34 PM

Kensar, nice job on the interior and good looking pilot.

I have the other half installed. There is a pretty good gap and I plan on giving my new Vallejo filler a try. I'm absolutly sure the problem began with me and it started with that bulkhead. You can see the gap in the bomb bay.

I'm not messing with it anymore, going to let everything dry overnight and continue on it when I get the masks, which should be Monday. All I have left is painting and then installing the flaps and bomb bay doors. I love the way the New Airfix kits allow the positionable flaps and control surfaces on some of their kits.

On the positive side, the landing gear went together very well. If fact, the entire kit has gone together well except for my goof up.

Steve

Building a kit from your stash is like cutting a head off a Hydra, two more take it's place.


http://www.spamodeler.com/forum/

  • Member since
    September 2017
  • From: western North Carolina
Posted by kensar on Saturday, January 5, 2019 7:50 PM

Kensar


  • Member since
    December 2002
  • From: Bury St Edmunds, Suffolk, England
Posted by Bish on Saturday, January 5, 2019 6:16 PM

You look to be having as much fun with that Blenheim as i had with the MPM Mk I.

I used Montex on the Tamiya 109 i did at the start of last year and found the same as you.

I am a Norfolk man and i glory in being so


On the bench: Airfix 1/72nd Harrier GR.3/Fujimi 1/72nd Ju 87D-3

  • Member since
    July 2014
Posted by modelcrazy on Saturday, January 5, 2019 6:11 PM

Check, There really wasn't a fit problem per say but more of the nose being extremely delicate issue. The side canopys fit to the sides of the nose and the top/half front nose canopy is then glues to the canopy sides which make the whole thing very delicate.


I didn't want to push and wiggle, which I had too, to get the thing on. I had to push, remove the rear bulkhead, fit it on to see why it wasn't matching, then trim and glue the bulkhead back on, then fit the nose back into place.

It still didn't match (notice the wing root), so I then took it apart and am trying one side at a time. I'm sure I have just made things far harder that they should have been.

Also, I think leaving the canopy off until everything is filled and sanded will protect me from marring it. I would suggest you test fit it before gluing the canopy together was well. 

I'l update once I get everything back together.

Bish, The masks are probably like the Hobby Boss masks in the 1/35 Storch. Thick and didn't stick well but worked. Since I'll be spraying acrylic, any paint that gets on the clear areas should be easy to remove.

I can't wait to get to the painting stage.

Steve

Building a kit from your stash is like cutting a head off a Hydra, two more take it's place.


http://www.spamodeler.com/forum/

  • Member since
    December 2002
  • From: Bury St Edmunds, Suffolk, England
Posted by Bish on Saturday, January 5, 2019 4:13 PM

Thats good to hear Frank. Look forward to seeing more.

And that reminds me, its our built night at the model club on Tues, i haven't been for a few months, will have to try and get there this week.

I am a Norfolk man and i glory in being so


On the bench: Airfix 1/72nd Harrier GR.3/Fujimi 1/72nd Ju 87D-3

  • Member since
    December 2002
  • From: Bury St Edmunds, Suffolk, England
Posted by Bish on Saturday, January 5, 2019 4:11 PM

checkmateking02


Bish

Nice progress Steve, good job you spotted that when you did.

I have tried Montex masks, for the same reason, cheaper than Eduard, and was not to keen. I find the are a bit thick and especially have issues with curved panels. I can see a couple of panels on yours where it curves close to the edge, and thats where i found the mask kept coming away. I hope yours are ok but i won't be buying any more unless theres no option.


How about Peewit?  I bought a set of their masks for the Blenheim canopy.  Also got a set of camouflage masks from AML.  Any thoughts about them?
 

I have not tried either of those, only Eduard and Montex. Be interested to see what you think of them, are the Peewit paper masks?

I am a Norfolk man and i glory in being so


On the bench: Airfix 1/72nd Harrier GR.3/Fujimi 1/72nd Ju 87D-3

  • Member since
    June 2017
  • From: Winter Park, FL
Posted by fotofrank on Saturday, January 5, 2019 3:36 PM

Got my back up/spares kit from Route62 today at our build day at the hobby shop. The box looks awful but the kit inside is still in a sealed bag. Of course the decals are toast after 55 years. I haven't checked inside yet to see how good or bad the propellers are. In the background is my Clipper with the horizontal stabilizers attached. Today at the build day I sanded and polished the Bondo and Tamiya surface primer on the seams. I'll fill the seams on the horizontals before I mate the main wings to the fuselage. I think the build is coming along nicely.


OK. In the stash: Way too much to build in one lifetime...

  • Member since
    September 2003
  • From: AandF in the Badger State
Posted by checkmateking02 on Saturday, January 5, 2019 10:29 AM

Bish

Nice progress Steve, good job you spotted that when you did.

I have tried Montex masks, for the same reason, cheaper than Eduard, and was not to keen. I find the are a bit thick and especially have issues with curved panels. I can see a couple of panels on yours where it curves close to the edge, and thats where i found the mask kept coming away. I hope yours are ok but i won't be buying any more unless theres no option.

 
How about Peewit?  I bought a set of their masks for the Blenheim canopy.  Also got a set of camouflage masks from AML.  Any thoughts about them?


  • Member since
    December 2002
  • From: Bury St Edmunds, Suffolk, England
Posted by Bish on Saturday, January 5, 2019 10:03 AM

Thats coming on nicely TWA, certainly got a better grasp of pre shading than i have.

I am a Norfolk man and i glory in being so


On the bench: Airfix 1/72nd Harrier GR.3/Fujimi 1/72nd Ju 87D-3

  • Member since
    December 2002
  • From: Bury St Edmunds, Suffolk, England
Posted by Bish on Saturday, January 5, 2019 10:01 AM

Nice progress Steve, good job you spotted that when you did.

I have tried Montex masks, for the same reason, cheaper than Eduard, and was not to keen. I find the are a bit thick and especially have issues with curved panels. I can see a couple of panels on yours where it curves close to the edge, and thats where i found the mask kept coming away. I hope yours are ok but i won't be buying any more unless theres no option.

I am a Norfolk man and i glory in being so


On the bench: Airfix 1/72nd Harrier GR.3/Fujimi 1/72nd Ju 87D-3

  • Member since
    September 2003
  • From: AandF in the Badger State
Posted by checkmateking02 on Saturday, January 5, 2019 9:15 AM

Steve:  the Blenheim looks like its building up nicely.  

Where was the fit problem with the nose?  In the cockpit tub or with the clear canopy parts?

I've got the same kit sitting around, so I'd like to be prepared.


  • Member since
    December 2002
  • From: Northern California
Posted by jeaton01 on Saturday, January 5, 2019 1:07 AM

Mopar Madness

 lewbud

The blue tint to the metal panels is one of two things. One possibility is that it's a protective film to help prevent dings during fabrication. The other is that they've coated the panel in machinist dye.  This is normally a blue color and allows marks on where to do any machining to be easily seen. You just take an awl or a punch and make a scribe mark where you want the hole be drlled. The scribing tool scratches the metal underneath giving you a highly visible mark. If you look at pictures, you can see the contrast between the blue and the natural metal where they've laid out the rivet patterns.


Buddy - I think you’re correct about the machinist die.


Kensar - Outstanding work on that front office.


It might be machinist's dye but that's not usually used on large aluminum panels.  It could be a chemical treatment for corrosion control such as alodining, or even an undyed chromate finish.

John

To see build logs for my models:  http://goldeneramodel.com/mymodels/mymodels.html


  • Member since
    July 2014
Posted by modelcrazy on Friday, January 4, 2019 10:11 PM

Mopar Madness

Steve, if those are Montex Masks you should be good to go.


Oh good, yes they are.

Nice work on the 51 TWA

Sorry 40

Steve

Building a kit from your stash is like cutting a head off a Hydra, two more take it's place.


http://www.spamodeler.com/forum/

  • Member since
    September 2016
Posted by TheWaggishAmerican on Friday, January 4, 2019 9:20 PM

I've established myself in my lodgings at the site for the night, so here's a quick update. 

Basically, I got done nothing I intended too. All I was able to finish today was the coat of earth on the upper surfaces. These came out alright, and the preshading is at least slightly visible, so I'm happy with this layer at least. Monday I'm planning on getting masking for the green, re-preshading for the green, and spraying the green all done. Maybe get the gloss coat on so that I can give it two days to dry and do decals before I've got to go work next weekend. 

Sadly, I'll be missing quiet a few weekends of bench time this winter, but the extra dough isn't anything to complain about.

(Sorry for subpar quality, it's a screenshot of the raw video. I don't have any normal pics today. This was the last part of painting the left wing, though, so imagine this pattern across the entire airframe.)

-TWA

youtube.com/c/thewaggishamerican

On the Bench- Tamiya 1/48 Raiden, Rufe, Buffalo, He 162; Academy 1/72 F-89, Eduard 1/48 F6F-3, Accurate Miniatures 1/48 F3F-2, Minicraft 1/48 XF5F, Academy 1/35 Hetzer, Zvezda 1/35 KV-2 (Girls Und Panzer)


Your image is loading...

 
  • Member since
    April 2015
Posted by Mopar Madness on Friday, January 4, 2019 6:16 PM

Steve, if those are Montex Masks you should be good to go.  Your really making great time on this one!

Chad

God, Family, Models...

At the plate: 1/48 Airfix Bf109 & 1/35 Tamiya Famo

On deck: Who knows!

  • Member since
    July 2014
Posted by modelcrazy on Friday, January 4, 2019 5:45 PM

I worked on the nose and learned some things. First, Airfix made the fuse in 4 parts to accommodate both the Mk.I nose and the Mk.IV nose. If I had looked closer to the trees I would have seen it right off the bat. Second, the instructions have you put in all of the office in the nose, which is fine, but then they want you to assemble the canopy prior to installing it on the rest of the fuse. I test fit the assembly prior to attaching any clear plastic and was glad I did. The fit wasn't quite right, and I had to do a little investigating, trimming and adjusting to get it to fit correctly. I glued the nose on the fuse and will attach the canopy later, this will also help in filling and sanding the join. Also, I just wasn't looking forward to masking that greenhouse, so I ordered some masks from Victory Models for half the price of Eduard. I hope I didn't do wrong by going less expensive.

Steve

Building a kit from your stash is like cutting a head off a Hydra, two more take it's place.


http://www.spamodeler.com/forum/

  • Member since
    December 2002
  • From: Bury St Edmunds, Suffolk, England
Posted by Bish on Friday, January 4, 2019 4:56 PM

Some great info there on the colours.

That is looking very nice kensar. I would imagine Airfix just use a standard pilot figure.

I am a Norfolk man and i glory in being so


On the bench: Airfix 1/72nd Harrier GR.3/Fujimi 1/72nd Ju 87D-3

  • Member since
    August 2016
Posted by Keyda81 on Friday, January 4, 2019 4:55 PM

Man I'm really going to have to step up my game on my P-40 if I want it to look anywhere as near as nice!  Everyone is off to a great start!  I'm still plugging away at "Mini Whiskey 7"  If I need a break I'll start on the P-40, if I have the room that is! 

  • Member since
    April 2015
Posted by Mopar Madness on Friday, January 4, 2019 4:44 PM

lewbud

The blue tint to the metal panels is one of two things. One possibility is that it's a protective film to help prevent dings during fabrication. The other is that they've coated the panel in machinist dye.  This is normally a blue color and allows marks on where to do any machining to be easily seen. You just take an awl or a punch and make a scribe mark where you want the hole be drlled. The scribing tool scratches the metal underneath giving you a highly visible mark. If you look at pictures, you can see the contrast between the blue and the natural metal where they've laid out the rivet patterns.


Buddy - I think you’re correct about the machinist die.

Kensar - Outstanding work on that front office.

Chad

God, Family, Models...

At the plate: 1/48 Airfix Bf109 & 1/35 Tamiya Famo

On deck: Who knows!

  • Member since
    September 2003
  • From: AandF in the Badger State
Posted by checkmateking02 on Friday, January 4, 2019 2:19 PM

Outstanding cockpit work, TWA and kensar.  Very nice!


  • Member since
    June 2008
Posted by lewbud on Friday, January 4, 2019 10:53 AM

The blue tint to the metal panels is one of two things. One possibility is that it's a protective film to help prevent dings during fabrication. The other is that they've coated the panel in machinist dye.  This is normally a blue color and allows marks on where to do any machining to be easily seen. You just take an awl or a punch and make a scribe mark where you want the hole be drlled. The scribing tool scratches the metal underneath giving you a highly visible mark. If you look at pictures, you can see the contrast between the blue and the natural metal where they've laid out the rivet patterns.

Buddy- Those who say there are no stupid questions have never worked in customer service.

  • Member since
    April 2006
  • From: ON, Canada
Posted by jgeratic on Friday, January 4, 2019 10:47 AM

Weren't Lend lease Warhawks/Tomahawks painted in British equivalent paints from Dupont?  Not exact matches, but some of the colours were very close as I understand.

Stik, nice factory photos there. Yes


regards,

Jack

  • Member since
    September 2017
  • From: western North Carolina
Posted by kensar on Friday, January 4, 2019 10:27 AM

Kensar


JOIN OUR COMMUNITY!

Our community is FREE to join. To participate you must either login or register for an account.

SEARCH FORUMS
FREE NEWSLETTER
By signing up you may also receive reader surveys and occasional special offers. We do not sell, rent or trade our email lists. View our Privacy Policy.