SEARCH FINESCALE.COM

Enter keywords or a search phrase below:

Japanese Group Build IX

33927 views
568 replies
1 rating 2 rating 3 rating 4 rating 5 rating
  • Member since
    November 2009
  • From: SW Virginia
Posted by Gamera on Sunday, December 8, 2019 7:28 PM

Roster:

Armor_Aficionado: Tamiya 1/35th Type 97 Chi-Ha

BrandonK: Hawegawa 1/48th Aichi D3A1 Type 99

Bsyamato: IBG 1/72nd 917t Truck

                  Italeri 1/72nd MH-53E Sea Dragon

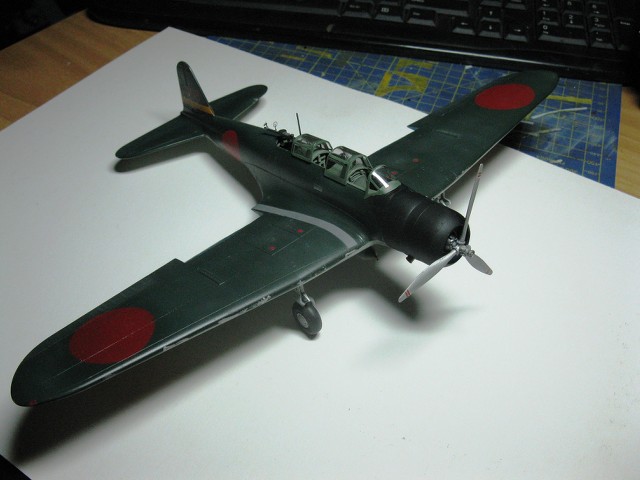
DantheMan85:  Tamiya 1/48 Mitsubishi A6M3/3a Zero

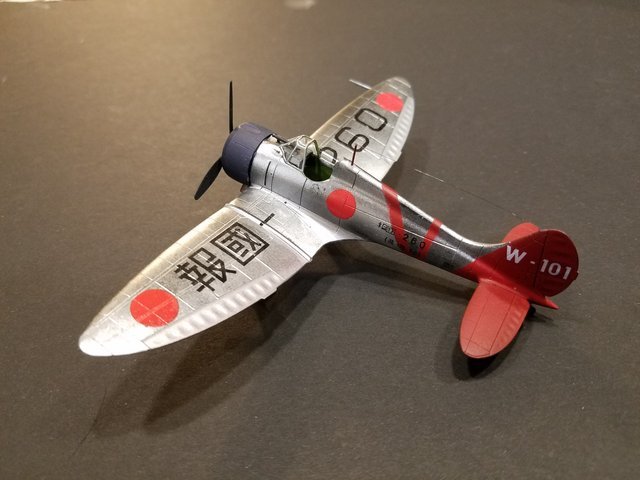
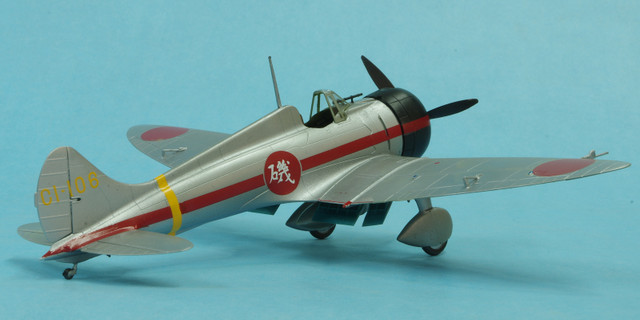
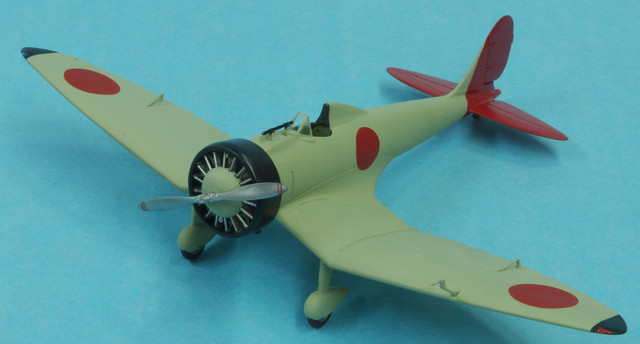
Falconmod: Hobbyboss 1/72nd A5M2 Claude

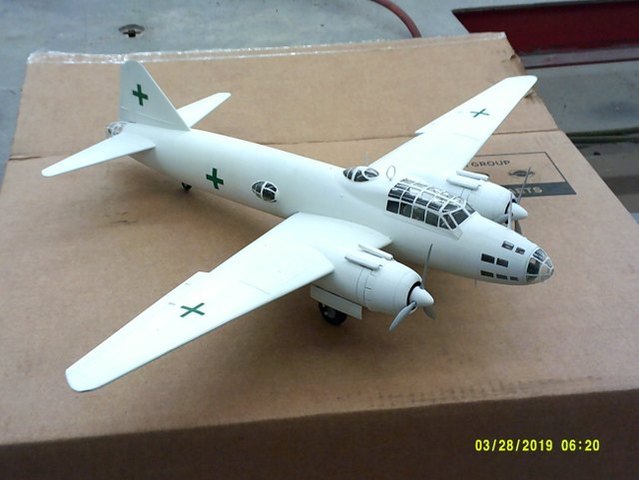
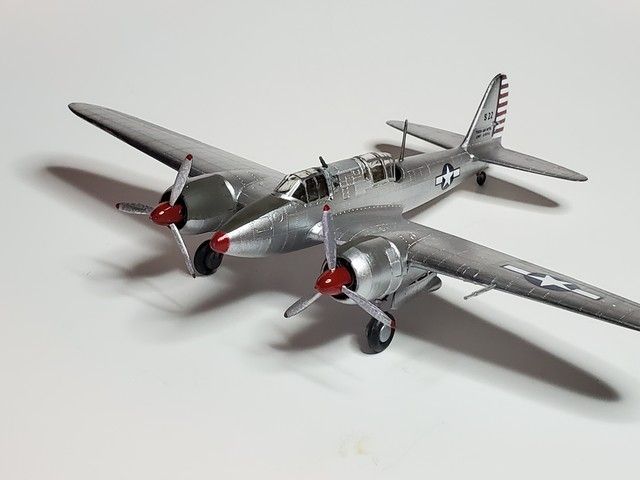
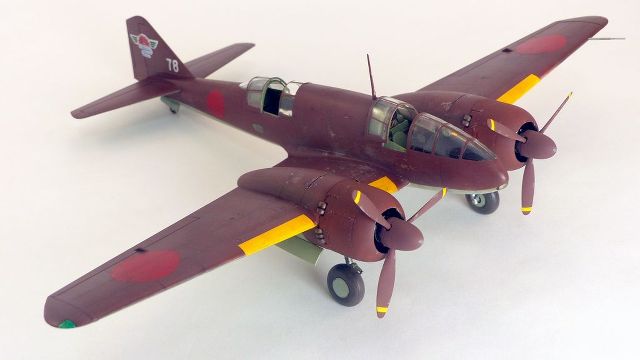
                  LS 1/72nd Mitsubishi Ki-67 Peggy

GAF: Hasegawa 1/48th Mitsubishi A6M2b Type 21 Zero

         Hasegawa 1/48th Mitsubishi A6M5 Zero Type 52

Gamera: Hasegawa 1/48th A6M Zero

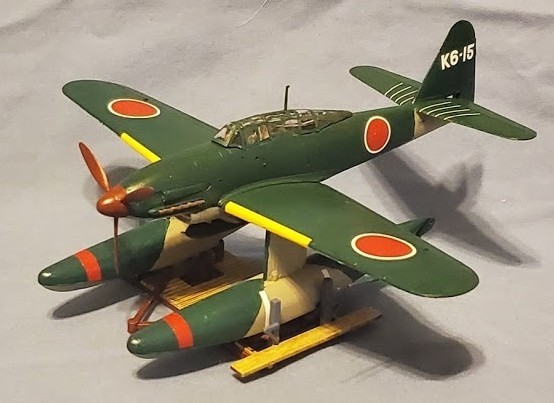
Glamdring Tamiya 1/72nd Aichi M6A1 Seiran

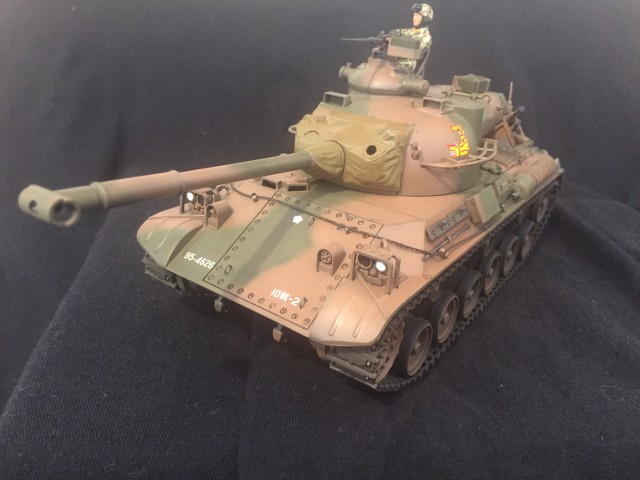
Greysnake: Tamiya 1/35th Type 61 MBT

GoldHammer:  Hasegawa 1/48th "Myrt"

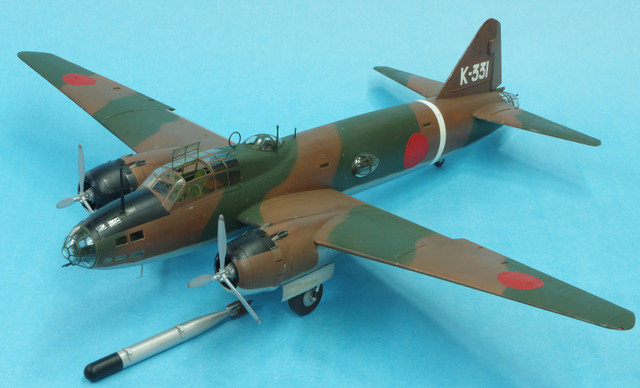
                        Tamiya 1/48th Mitsubishi G4M 'Betty'

Jeaton: Tamiya 1/48th Betty

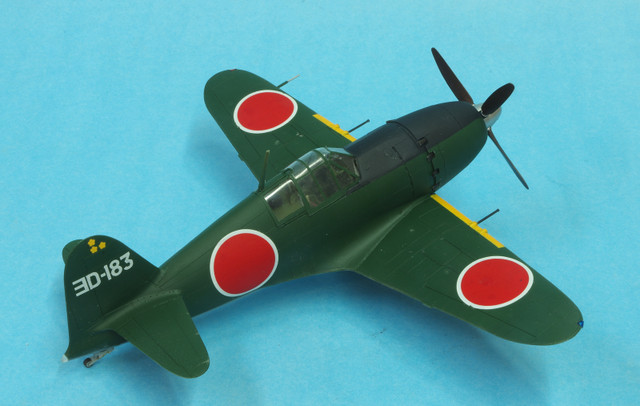
         Hasegawa 1/48th J2M6 Raiden 

          FineMolds 1/48th A5M4 Claude

          Finemolds 1/48th Ka-14

Linus: Zoukei Maru 1/32nd Ki-45 Toryu  

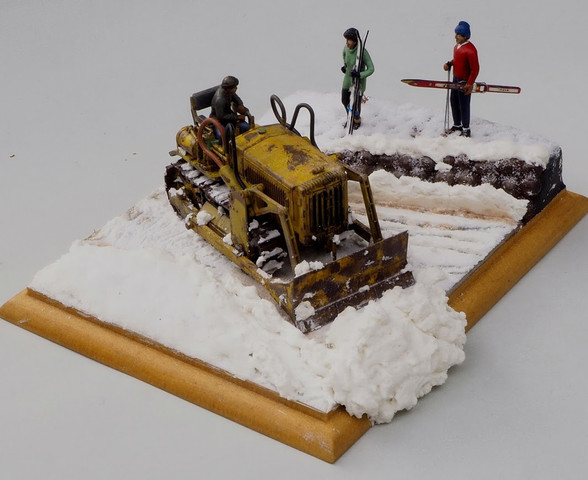
LostAgain: Tamiya /48 Komatsu G40 Tractor

ModelCrazy: Revell 1/72nd Ki-45 (Captured)

                     Hasegawa 1/350th Akagi

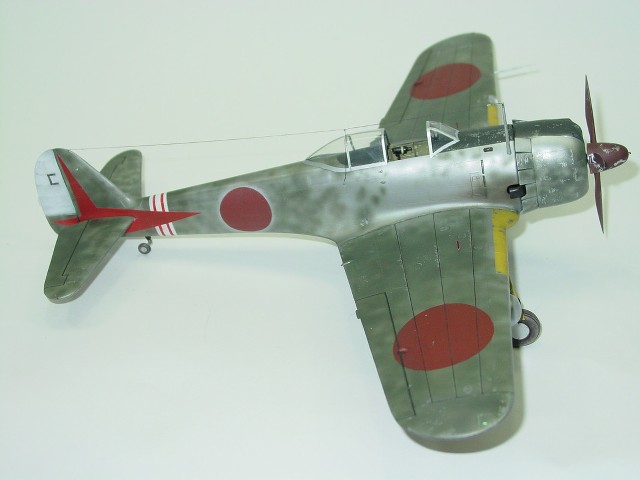
PlasticJunkie: Hasegawa 1/32nd Ki-43 Oscar

Real G: Doyusha 1/72nd T-6G Texan

Sigep Ziggy: Airfix 1/72nd Mitsubishi A6M2b Zero

Tempestjohny: Hasegawa 1/48th F-2B

Waikong: Tamiya 1/48th Hyakushiki Shitei III (Dinah)

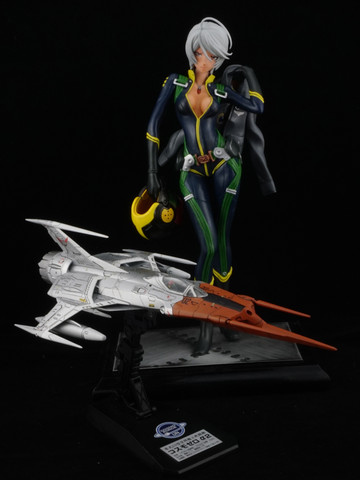
WrinkledM: Bandai 1/72nd Space Battleship Yamato Cosmo Zero Type 0 Model 52 Fighter

Zvezda: Tamiya 1/48th Hasegawa B5N1/2 (Kate)

"I dream in fire but work in clay." -Arthur Machen


  • Member since
    November 2009
  • From: SW Virginia
Posted by Gamera on Sunday, December 8, 2019 7:28 PM

BADGES

"I dream in fire but work in clay." -Arthur Machen


  • Member since
    November 2009
  • From: SW Virginia
Posted by Gamera on Sunday, December 8, 2019 7:34 PM

Steve: I went ahead and put you down with the Ki-45. You didn't tell me the scale or company though.


Probably going with a 1/48th Zero here. We do a little show at the National D-Day Memorial in Beford, Va and I've gotten some questions on why I have a bunch of Japanese aircraft but no Zero. Confused Just need to decide on which kit though - got about a dozen Zeros at this point...

"I dream in fire but work in clay." -Arthur Machen


  • Member since
    June 2014
Posted by BrandonK on Sunday, December 8, 2019 7:35 PM

Put me down for a Hawe Aichi D3A1 Type 99, 1/48. Its time to get that one going. Been wanting to build it for some time now.

BK

On the bench:

A lot !! And I mean A LOT!!

2024 Kits on deck / in process / completed   

                         14 / 5 / 2  

                              Tongue Tied

  • Member since
    November 2009
  • From: SW Virginia
Posted by Gamera on Sunday, December 8, 2019 7:45 PM

Brandon: Got ya! Nice choice!

"I dream in fire but work in clay." -Arthur Machen


  • Member since
    December 2002
  • From: Northern California
Posted by jeaton01 on Sunday, December 8, 2019 9:10 PM

Gamera, I'll carry over the Tamiya 1/48 Betty from the 2019 GB.

John

To see build logs for my models:  http://goldeneramodel.com/mymodels/mymodels.html


  • Member since
    November 2009
  • From: SW Virginia
Posted by Gamera on Sunday, December 8, 2019 10:38 PM

Sure John, you got it.

"I dream in fire but work in clay." -Arthur Machen


  • Member since
    July 2014
Posted by modelcrazy on Sunday, December 8, 2019 11:09 PM

Gamera
Steve: I went ahead and put you down with the Ki-45. You didn't tell me the scale or company though.

Thanks for doing that Gam,

1/72 Revell. The decals are off the same sheet I did the Ataiu-Sea Zero with a couple years ago. That build made the FSM mag reader gallery about 9 months back. This one probably won't though. Huh?

Steve

Building a kit from your stash is like cutting a head off a Hydra, two more take it's place.


http://www.spamodeler.com/forum/

  • Member since
    November 2003
  • From: Naples, FL
Posted by tempestjohnny on Monday, December 9, 2019 8:20 AM
I'd like to get in with something different. 1/48 Hasegawa F-2B


  • Member since
    March 2017
Posted by Armor_Aficionado on Monday, December 9, 2019 9:07 AM

I'm in, with a 1/35 scale Type 97 Chi-ha tank, from Tamiya.

  • Member since
    November 2009
  • From: SW Virginia
Posted by Gamera on Monday, December 9, 2019 9:42 AM

Hey Steve, TJ, AA got you guys all down. And nice choices! 

It's nice to see in less than 24 hours we've got enough members to move on this! 

"I dream in fire but work in clay." -Arthur Machen


  • Member since
    July 2014
Posted by modelcrazy on Monday, December 9, 2019 10:11 AM

Gamera
It's nice to see in less than 24 hours we've got enough members to move on this! 

Waaa? You mean you have a threshold?

Steve

Building a kit from your stash is like cutting a head off a Hydra, two more take it's place.


http://www.spamodeler.com/forum/

  • Member since
    November 2009
  • From: SW Virginia
Posted by Gamera on Monday, December 9, 2019 10:47 AM

modelcrazy


Gamera
It's nice to see in less than 24 hours we've got enough members to move on this! 


Waaa? You mean you have a threshold?


Lol, well no but still it's a nice vote of confidence! 

"I dream in fire but work in clay." -Arthur Machen


  • Member since
    January 2019
  • From: Perth, Australia
Posted by Linus on Monday, December 9, 2019 11:35 PM
I have this that would suit a 12 month build.
  • Member since
    November 2009
  • From: SW Virginia
Posted by Gamera on Tuesday, December 10, 2019 7:25 AM

Hey Linus welcome!!! 

And is that the Zoukei-Maru 1/32nd scale kit? Super cool!!! 

"I dream in fire but work in clay." -Arthur Machen


  • Member since
    May 2011
  • From: Honolulu, Hawaii
Posted by Real G on Tuesday, December 10, 2019 3:13 PM

Hey Gamera,

I'd also like to play, since I was already going to start this on New Year's eve:

For those who prefer to stay home on 12/31 instead of going out and getting smashed, I highly recommend the New Year's Eve Build.  My friend started doing it and I thought it sounded fun and have followed suit.  I even finished some within the same year!  Surprise

“Ya ya ya, unicorn papoi!”

  • Member since
    January 2019
  • From: Perth, Australia
Posted by Linus on Tuesday, December 10, 2019 6:02 PM

Gamera

Hey Linus welcome!!! 

And is that the Zoukei-Maru 1/32nd scale kit? Super cool!!! 


Thanks Gamera,


Yes it is.  I am pondering wasy of building and displaying it.

  • Member since
    November 2009
  • From: SW Virginia
Posted by Gamera on Wednesday, December 11, 2019 11:41 AM

Linus: Super cool! If you've seen Snapdragon's build over on the aircraft forum of this same aircraft I'm so tempted to buy myself one as a Christmas present. But I keep telling myself I need to finish up my 1/32nd Tamiya Zero first. I'm going to enjoy watching you build yours though! 

G: Very cool too. Doyusha is one of those companies I've never bought any of their models. And thanks for the invite but I can't get a friggin' model built in a year... Bang Head 

"I dream in fire but work in clay." -Arthur Machen


  • Member since
    January 2017
  • From: Colorado Springs
Posted by mawright20 on Wednesday, December 11, 2019 1:56 PM
BK, I just did this one for the weekend GB. It was a pretty good kit. Had a little issue with the underwing ordanance.
  • Member since
    June 2014
Posted by BrandonK on Wednesday, December 11, 2019 4:11 PM

mawright20
BK, I just did this one for the weekend GB. It was a pretty good kit. Had a little issue with the underwing ordanance.
 

I can't build anything in a weekend anymore. The last one I did left me with brain cancer from stressing out over the work in a short period of time. I'll take a tad more than 48 hrs to do this one. I have my health to consider.

BK

On the bench:

A lot !! And I mean A LOT!!

2024 Kits on deck / in process / completed   

                         14 / 5 / 2  

                              Tongue Tied

  • Member since
    January 2017
  • From: Colorado Springs
Posted by mawright20 on Wednesday, December 11, 2019 6:23 PM
I agree! It was a lot more challenging to accomplish than I thought.
  • Member since
    December 2002
  • From: Northern California
Posted by jeaton01 on Wednesday, December 11, 2019 10:59 PM

Here's the details on the Tamiya Betty I'm building:  Kit No. 61049.  I think that is the only number it has been issued under, and always as a G4M1.  I wish they would release it as a G4M2 also.  Often I make my own masks but for this one since there is time before the start I have some Eduard masks coming from Sprue Bros.


John

To see build logs for my models:  http://goldeneramodel.com/mymodels/mymodels.html


  • Member since
    July 2014
Posted by modelcrazy on Wednesday, December 11, 2019 11:15 PM

Nice John, I'd like to get that kit.

Steve

Building a kit from your stash is like cutting a head off a Hydra, two more take it's place.


http://www.spamodeler.com/forum/

  • Member since
    August 2014
  • From: Willamette Valley, Oregon
Posted by goldhammer on Wednesday, December 11, 2019 11:54 PM

That is the same one I did as a surrender bird on your GB III.  The masks are really needed for it.  The fit is good on the pieces,  typical Tamiya.

Once you get the glass masked, you might want to scuff the exposed framing with a scotchbrite pad.....mine wanted to peel paint when I pulled the masking.  That is where it still sits, waiting for me to brush paint all the frames.

Big bird when done.

  • Member since
    November 2009
  • From: SW Virginia
Posted by Gamera on Thursday, December 12, 2019 8:23 AM

Yeah, I'd almost consider a set of canopy masks a must for a kit like this. I HATE masking those gawd-awful greenhouse canopies. One of the reasons I don't build more bombers. 

GH: That's a good idea, next time I do build a bomber I'll try to keep that in mind. 


Well, I couldn't help myself... I broke down and ordered Zoukei-Maru's 1/32nd Ki-45. The same one Linus just entered. God help me it's an addiction... Bang Head 

"I dream in fire but work in clay." -Arthur Machen


  • Member since
    July 2014
Posted by modelcrazy on Thursday, December 12, 2019 10:19 AM

Gamera
Well, I couldn't help myself... I broke down and ordered Zoukei-Maru's 1/32nd Ki-45. The same one Linus just entered. God help me it's an addiction...  

Ya know, the longer I'm in the hobby the more I think it really is 

Steve

Building a kit from your stash is like cutting a head off a Hydra, two more take it's place.


http://www.spamodeler.com/forum/

  • Member since
    June 2014
Posted by BrandonK on Thursday, December 12, 2019 11:11 AM

goldhammer
mine wanted to peel paint when I pulled the masking.

I've often had this exact issue on my canopies. I found that running my knife around the frame before I pull the mask prevents this from happening and give a much sharper edge on the frame. I haven't had an issue since I started doing this.

BK

On the bench:

A lot !! And I mean A LOT!!

2024 Kits on deck / in process / completed   

                         14 / 5 / 2  

                              Tongue Tied

  • Member since
    December 2002
  • From: Northern California
Posted by jeaton01 on Thursday, December 12, 2019 8:29 PM

Yeah, well, at some level breathing is an addiction too, and I'm NOT giving that up either!

John

To see build logs for my models:  http://goldeneramodel.com/mymodels/mymodels.html


  • Member since
    December 2002
  • From: Northern California
Posted by jeaton01 on Thursday, December 12, 2019 8:34 PM

BrandonK
goldhammer
mine wanted to peel paint when I pulled the masking.

BK


That's why it's best to remove the masks as soon as the paint has skimmed over and it is still pliable.  Much less chance of the paint coming with the tape if you do it that way.  I find that keeping the paint buildup as thin as I can is also good.

John

To see build logs for my models:  http://goldeneramodel.com/mymodels/mymodels.html


  • Member since
    August 2014
  • From: Willamette Valley, Oregon
Posted by goldhammer on Thursday, December 12, 2019 8:57 PM

I actually pulled it off the shelf of doom today and finished pulling the masks off after 4+ years.....  Pulled very little paint.


As a body/paint guy for 40+ years, I know about unmasking asap, but didn't with this one.

Have to repaint nose and tail canopies and a little toothpick scraping on the rest.

Thanks for the incentive to get it back on the table.  May finish it up now.

  • Member since
    June 2014
Posted by BrandonK on Thursday, December 12, 2019 10:43 PM

I agree with getting that tape off asap. But, my building method is done with the canopy on till its totally weathered and sealed. So ripping it off right away won't work. I may start painting it seperate in the furture, but with some camos that makes things tricky.

BK

On the bench:

A lot !! And I mean A LOT!!

2024 Kits on deck / in process / completed   

                         14 / 5 / 2  

                              Tongue Tied

  • Member since
    December 2002
  • From: Northern California
Posted by jeaton01 on Thursday, December 12, 2019 10:51 PM

Since I'm waiting for paint to dry on the C-123 I thought I would work on what scheme to paint the Betty.  I had read that G4M's were part of the attack on the Prince of Wales and  the Repulse, I researched that for awhile, and found that the first paint scheme in the Tamiya instructions was for an airplane from the Kanoya Air Group that was part of the attack, flown by Lt. Haruki Iki.  Iki survived the war and I found an interview with him about the attack.  Another account is in a book by Jeffrey Cox, "Rising Sun, Falling Skies", which I liked well enough to buy. 

Still another resource about the attack is from an interrogation transcript of Captain Kameo Sonokawa, commander of the Genzan Air Group, also part of the attack.  The interrogation was in November 1945 during the US Occupation of Japan.

I have made a pdf of an excerpt from the Cox book, listed first, and of the interrogation transcript listed second.  Details of the Cox book are included, it is available as an eBook from Google Books for $10.00.

http://goldeneramodel.com/mymodels/g4m/1g4m/IkiAttackonRepulse.pdf


http://goldeneramodel.com/mymodels/g4m/1g4m/InterviewJavaSea.pdf


I found the book's detailed account of the attack on the Repulse (as well of that of the Prince of Wales) to be riveting reading.

Here's the paint scheme for K-310, Iki's Betty:


Haruki Iki:


G4M1's of the Kanoya Air Group.  I find it hard to see camouflage demarcations in the black and white photo.  It might be from a later date, or the colors are lost in the shadows.  The Air Group was based near Saigon at the time of the attack and had undergone extensive torpedo attack training in the time leading up to the attack.


John

To see build logs for my models:  http://goldeneramodel.com/mymodels/mymodels.html


  • Member since
    December 2002
  • From: Northern California
Posted by jeaton01 on Thursday, December 12, 2019 11:08 PM

Goldhammer, git 'er done and post pictures!Big Smile 

Painting strategies are endlessly entertaining, aren't they.  I always attach my canopies first and seal the edges before any painting.  Rain gets throught any crack and my eye goes right to those spots for some reason. 

If the scheme needs a lot of work post canopy painting I try especially hard to keep the paint layers thin and weathering away from the canopy, which seems a normal state to me.  I find my enamels build up less than my acrylics.  That's one advantage of a natural metal finish I guess, you get to rip the masking off very soon.

John

To see build logs for my models:  http://goldeneramodel.com/mymodels/mymodels.html


  • Member since
    November 2009
  • From: SW Virginia
Posted by Gamera on Friday, December 13, 2019 9:48 AM

John: That's very interesting. I swear the research is often as much fun as building the kit!! 

Personally I tend to leave my masking on for awhile, probably longer than I should. Thankfully I haven't had much in the way of peeling issues though. I do get raised lines sometimes on colour demarcation lines- if I took the masks off earlier I wouldn't have that problem. 

"I dream in fire but work in clay." -Arthur Machen


  • Member since
    February 2005
  • From: Nashotah, WI
Posted by Glamdring on Tuesday, December 17, 2019 9:25 PM
I enjoyed building my Zero so much this year, put me down for a Aichi M6A1 Seiran.

Robert 

"I can't get ahead no matter how hard I try, I'm gettin' really good at barely gettin' by"

  • Member since
    November 2009
  • From: SW Virginia
Posted by Gamera on Wednesday, December 18, 2019 7:30 AM

Hey Robert, glad to have you! Btw is that the 1/48th Tamiya kit? 

"I dream in fire but work in clay." -Arthur Machen


  • Member since
    December 2007
  • From: Beavercreek, Ohio
Posted by Wrinkledm on Tuesday, December 24, 2019 10:25 PM


 deleted

  • Member since
    November 2009
  • From: SW Virginia
Posted by Gamera on Wednesday, December 25, 2019 7:52 AM

Oh and I talked to Rock Baker the other day. He's started work on the badge. I told him I'd like it done by the end of January if he can pull it off. 

"I dream in fire but work in clay." -Arthur Machen


  • Member since
    February 2005
  • From: Nashotah, WI
Posted by Glamdring on Wednesday, December 25, 2019 8:59 PM

No, the 1/72 iteration.

Robert 

"I can't get ahead no matter how hard I try, I'm gettin' really good at barely gettin' by"

  • Member since
    November 2009
  • From: SW Virginia
Posted by Gamera on Thursday, December 26, 2019 11:27 AM

Glamdring

No, the 1/72 iteration.


Thanks, gotcha! 

"I dream in fire but work in clay." -Arthur Machen


  • Member since
    December 2007
  • From: Beavercreek, Ohio
Posted by Wrinkledm on Saturday, December 28, 2019 10:03 AM

Going Sci-Fi this year with the Space Battleship Yamato Cosmo Zero.   Type 0 Model 52 Fighter.  I'm also (not with this build) starting on the pilot bust in 1/7 scale resin. With luck next December I'll get them finished and posted here.    

  • Member since
    November 2009
  • From: SW Virginia
Posted by Gamera on Sunday, December 29, 2019 6:52 PM

Wrinkledm

Going Sci-Fi this year with the Space Battleship Yamato Cosmo Zero.   Type 0 Model 52 Fighter.  I'm also (not with this build) starting on the pilot bust in 1/7 scale resin. With luck next December I'll get them finished and posted here.    


Ohhhhhhhhhhh that's awesome!!!

Just put you down!

"I dream in fire but work in clay." -Arthur Machen


  • Member since
    November 2009
  • From: SW Virginia
Posted by Gamera on Wednesday, January 1, 2020 3:42 PM

Happy New Year guys!!!


I started on the Zero. And got some work done on Mech-G rocket backpack. Can't complain it's been a decently productive day modeling wise.

"I dream in fire but work in clay." -Arthur Machen


  • Member since
    December 2002
  • From: Northern California
Posted by jeaton01 on Thursday, January 2, 2020 1:08 AM

I think I've signed up for building the Betty for about 3 of these GB's now, and if what's on my workbench now is any indication, it might well happen this time!  Finally.  It's going well, I'm really enjoying the build.  I didn't think I could make a good job of painting the electrical panel below the cockpit so I made a decal for it, with no color where the dials and switches are.  I painted the dials and switches and of course the surrounding area, then applied the decals which are black.  I like the result.  I used the Tamiya instrument panel decal, which worked out pretty well, using the regimen of the heat gun and then Walthers.  I guess that's pretty much the nuclear option but since the panel is a separate piece it wasn't too risky.  Failure of course would entail an order to Sprue Brothers for the Eduard Panel.  I painted all the interior with Gunze 126 Mitsubishi cockpit color, my best guess based on all the raging arguments I found among modelers on the net.

I used the Eduard masks which fit pretty well although there were two or three that I had to redo with the Silhouette Cameo so far.  Close but it's easy enough to make little adjustments when you can see what you need to do.  I plan to build more of these so I'll use my corrections then as well.  In any event, I had to make masks for the inside of the fuselage so I could install those windows before painting.  Very nice clear parts so far.

Here is where it's at:


John

To see build logs for my models:  http://goldeneramodel.com/mymodels/mymodels.html


  • Member since
    September 2011
  • From: Milaca, Minnesota
Posted by falconmod on Thursday, January 2, 2020 6:48 AM

I have 2 roll overs I'd like to add to this GB

LS 1/72 Mitsubishi Ki-67 Peggy

Hobby Boss 1/72 A5M2 Claude

Thanks

John

On the Bench: 1/72 Ki-67, 1/48 T-38

1/144 AC-130, 1/72 AV-8A Harrier

  • Member since
    November 2009
  • From: SW Virginia
Posted by Gamera on Thursday, January 2, 2020 10:45 AM

Guys, I might be better off calling you by your callsigns- I'm going to get my Johns mixed up! 

Falcon: Sounds good, just moved you over. 

Jeaton: That looks good. I entered an AFV Club M40 SPG in about three GBs and still haven't finished the darn thing. He's hoping better luck for you! 


"I dream in fire but work in clay." -Arthur Machen


GAF
  • Member since
    June 2012
  • From: Anniston, AL
Posted by GAF on Friday, January 3, 2020 7:42 PM

Jeaton> Nice start on the Betty.  I really need to find one of those, or a B5N.

This is a roll-over from JGBVIII.  I almost had it finished, but there was just too much for me to tackle in a sitting on New Years.  I find I cannot sit at a desk as long as I used to.


Here's where she stood at the end of the year:


Since then, I've finished up the canopy framing, added the wing lights, did some minor weathering and staining.  At the moment, the aerial wire is drying.  When that is done, I'll trim it and touch up the antenna.  Then all I need to do is minor work on the engine exhaust stains and give a green sage wash on the framing.  Won't be done tomorrow as I'll be away from the desk.

That's it for now.

Gamera>  Go ahead and put me down for another Zero, this time a Hasegawa 1/48 A6M5 Type 52.  It's essentially the same model as the above, with some minor differences.  I guess I just want one that's green!  Big Smile

Gary

  • Member since
    August 2014
  • From: Willamette Valley, Oregon
Posted by goldhammer on Friday, January 3, 2020 9:16 PM

Gamera.. I'll join in with the 1/48 Hasegawa "Myrt" that is also in the Secret Santa GB.  Was my gift from the big guy.


With your approval I'd like to roll over the surrender Betty that was in the GB before clocks became household items.  Will post up pics of new and old early next week.

Betty has only front and rear canopies to paint and attach along with the props.

  • Member since
    December 2002
  • From: Northern California
Posted by jeaton01 on Saturday, January 4, 2020 12:16 AM

Yeah, G, you can call me anything but late for dinner!  Nice to see lots of activity here.

Two more pictures tonight.  I think I've used up 8 fighters worth of Mitsubishi interior green on this bird.   I've put some Epoxysculpt on the leading edge of the flaps, and cut the rudder free from the vertical fin and added some epoxy there as well.  The flaps have that annoying step on the leading edge so they can be put on in the up or down positions.  No good, too much drag!  Not enough lift!


John

To see build logs for my models:  http://goldeneramodel.com/mymodels/mymodels.html


  • Member since
    November 2009
  • From: SW Virginia
Posted by Gamera on Saturday, January 4, 2020 5:26 PM

Guys, I think I got everything down!

Gary: That looks great! Looking forward to you getting the remaining work done.

GH: The Myrt sounds cool and looking forward to seeing the finished Betty.

Jeaton: That looks great! You're making some real progress there!

"I dream in fire but work in clay." -Arthur Machen


  • Member since
    August 2014
  • From: Willamette Valley, Oregon
Posted by goldhammer on Saturday, January 4, 2020 6:00 PM

Thanks Gamera.  Will be starting the Myrt next week when the paint gets here.

  • Member since
    July 2014
Posted by modelcrazy on Saturday, January 4, 2020 10:35 PM

Gam, started the Nick yesterday, painted the interior, masked the canopy and assembled the fuse, wing and stabs. Going together very quickly. I just need work on the seams and assemble the engines.

Steve

Building a kit from your stash is like cutting a head off a Hydra, two more take it's place.


http://www.spamodeler.com/forum/

GAF
  • Member since
    June 2012
  • From: Anniston, AL
Posted by GAF on Sunday, January 5, 2020 12:07 PM

Steve> Nice work on the Nick.  Some people are just assembling machines!  Big Smile

I'll call the A6M2b finished.  I managed to get the aerial wire on and some minor touch-up done, including removing a blob of glue that somehow got on the left tire. Tongue Tied  In addition to breaking off the pitot tube.

The paint scheme represents an aircraft of 2nd section from the aircraft carrier Zuikaku, flown by Tetsuzo Iwamoto in the Pearl Harbor attack.  Nothing unusual about the build.  It was done with spray cans and brushes, so cannot be said to be anything but mediocre.

The build was straight forward, although I did have to guess at how some of the parts went on.  The instructions are not exactly clear when the part is supposed to be oriented in a certain way.  You have to reference outside images to determine that.  No real difficulty in fitting.  The decals were not easy to work with and the fuselage stripes came apart so I had to mask and paint those.  Chalk it up to Hasegawa decals or their age.

The only unusual technique I used was on the canopy.  I painted some decal paper the fuselage color, cut out strips of varying widths and used these to"frame" the canopy.  Worked fairly well, though the curves were more difficult than the straight pieces.

This took awhile, but it was an enjoyable build.  Thanks for looking, and thanks to Gamera for hosting these GBs!

I guess the first photo would be suitable for the front page.

Gary

GAF
  • Member since
    June 2012
  • From: Anniston, AL
Posted by GAF on Sunday, January 5, 2020 12:25 PM

Next up is another Zero, the 1/48th scale Hasegawa A6M5 Type 52.  Since I'm already familiar with this type of model, I'll go ahead and do another.  The only difference is this one will be green!  Big Smile

The wingspan on the A6M5 is supposed to be a meter shorter than the A6M2b.  We'll see if that's true.  Also, I'll probably be adding the pilot figure that came with the A6M2b to this one.  It's too nice not to use.  Smile

IMPORTANT NOTE: Unfortunately, the kit came without any decals.  It appeared sealed, but when I opened it I found the decal sheet had vanished.  Not sure if Hasegawa merely goofed, or if someone had opened the kit, removed them and then rewrapped the box.  Bummer!

I have enough decals left from the A6M2b and a Tamiya A6M kit to make up most of what I need, but I need tail codes for an A6M5 type.  IF anyone has a spare set of tail codes they're not using, I would appreciate a donation (rather than having to buy a complete set somewhere).  Thanks!

Take care!

Gary

  • Member since
    July 2014
Posted by modelcrazy on Sunday, January 5, 2020 2:27 PM

Nice Zuikaku Zeek. I love the Zero.

I might be able to help you on those decals. I just finished a 1/48 Hasegawa A6M5 for Gam's Japanese GB VIII and I never toss spare decals.

When I get home I'll take a look.

Steve

Building a kit from your stash is like cutting a head off a Hydra, two more take it's place.


http://www.spamodeler.com/forum/

GAF
  • Member since
    June 2012
  • From: Anniston, AL
Posted by GAF on Sunday, January 5, 2020 5:40 PM

Thanks, Steve!  I wanted a Pearl Harbor Zero to go along with the P-40, so mission accomplished!

Thank you for the offer for the tail code.  I will note that your last Zero is an A6M5c, while mine is either an "a" or "b" model, so I'm not sure about what air group used what type.  I can always use one of the left over tail codes from the A6M2s, but would not be sure they are the correct air group or color.  I'll do some more research.

Gary

  • Member since
    December 2002
  • From: Northern California
Posted by jeaton01 on Sunday, January 5, 2020 6:07 PM

Gary, nice work on the A6M2.  Looks real good.  If Steve can't help you I probably can.

John

To see build logs for my models:  http://goldeneramodel.com/mymodels/mymodels.html


  • Member since
    July 2014
Posted by modelcrazy on Sunday, January 5, 2020 6:40 PM

Gary, here they are.

Let me know if they'll help.

Steve

Building a kit from your stash is like cutting a head off a Hydra, two more take it's place.


http://www.spamodeler.com/forum/

GAF
  • Member since
    June 2012
  • From: Anniston, AL
Posted by GAF on Sunday, January 5, 2020 7:45 PM

Steve and John,

Thank you!  That's what I need.  I wish Hasegawa had supplied a series of numbers for the A6M2b like they did for yours!

However, after doing a bit of research on A6M5s and digging through my own decal sheets, I think I can cobble together some to do the tail code.  I would consider just printing them out on decal paper, but yellow is a hard color to print dense enough, so professional decals are a must.

Long time to go before I need anything, but right now I'll give you a rain check on those.

Thanks again!

Gary

  • Member since
    July 2014
Posted by modelcrazy on Sunday, January 5, 2020 9:00 PM

You sure? No problem just to stick the in an envelop and put them in our mailbox before tomorrow's mail. 

Steve

Building a kit from your stash is like cutting a head off a Hydra, two more take it's place.


http://www.spamodeler.com/forum/

  • Member since
    November 2009
  • From: SW Virginia
Posted by Gamera on Monday, January 6, 2020 11:52 AM

Steve: That looks good, you're making fantastic progress! 

Gary: Super nice work there, she looks fine to me! Going to put her down now. Hopefully I'll have a badge before much longer- again I wasn't expecting anyone to be finished this early. 

And cool looking A6M5. I've got a bunch of extra decals too but looks like Steve and Jeaton have you covered. 

Been making a good bit of progress here- I've got a Hasegawa 1/48th A6M3 Type 22. I'll post a photo of the box ASAP. I've ordered a new set of stencils and am using replacement hinomaru because I simply cannot ever get Hasegawa decals to work well for me.  

"I dream in fire but work in clay." -Arthur Machen


GAF
  • Member since
    June 2012
  • From: Anniston, AL
Posted by GAF on Monday, January 6, 2020 4:58 PM

Steve> Thanks!  If what I've got doesn't work out, I may hit you up for those.  I think I can make what I've got work after some research on Japanese tail codes.  Still got almost a full year.  Smile

Gamera> Thanks, sir!  I'm not worried about a badge as most of this model was done for JGB VIII!  Doesn't seem fitting to get one for an almost completed build.  Maybe after the A6M5 is done.  Smile

Gary

  • Member since
    December 2002
  • From: Northern California
Posted by jeaton01 on Tuesday, January 7, 2020 7:17 PM

Here's progress on the Tamiya G4M1.  Paintwork.  Seems like a lot of Tamiya's paint call outs in this kit are in dispute.  I went with Alclad ALC101 Aluminum on the bottom, instead of grey.  The upper colors are Tamiya XF-64 Red Brown and XF-13 Japanese Army Green.   Made some paper masks by scaling up the kit diagram and combined the two sides and the top to make wraparounds for the fuselage.  It was possible to do all the masking and painting without permanently attaching the wings, looks llike they are going to fit extremely well to the fuselage.  I haven't attached the nose and tail gun perspex yet because I'm waiting for the Gunze interior green which is supposed to get here on Friday.


John

To see build logs for my models:  http://goldeneramodel.com/mymodels/mymodels.html


GAF
  • Member since
    June 2012
  • From: Anniston, AL
Posted by GAF on Tuesday, January 7, 2020 7:39 PM

Jeaton> That's looking very nice.  Almost British.  Interesting call on the lower color.  Look forward to more!  Smile

Gary

  • Member since
    April 2005
  • From: Australia
Posted by taxtp on Tuesday, January 7, 2020 10:23 PM

Hi Cliff,

Congratulations on making it to the 9th episode. I feel that I should join you. I'll get back to you shortly with a subject.

Cheers

Tony

I'm just taking it one GB at a time.

  • Member since
    July 2014
Posted by modelcrazy on Wednesday, January 8, 2020 11:53 AM

John, looks good.

I never cared for the Japanese brown/green scheme while painting it, but it always looks good when done.

Steve

Building a kit from your stash is like cutting a head off a Hydra, two more take it's place.


http://www.spamodeler.com/forum/

  • Member since
    November 2009
  • From: SW Virginia
Posted by Gamera on Wednesday, January 8, 2020 11:56 AM

Jeaton: Looks good! Nice work masking, I've tried that with the photocopier like that- it seems the best way to get the masks right. 

Tony: Thanks! And thanks for reminding me- nine years- has it really been that long!?!?

"I dream in fire but work in clay." -Arthur Machen


  • Member since
    November 2009
  • From: SW Virginia
Posted by Gamera on Wednesday, January 8, 2020 12:01 PM

Anyway a couple of shots of my Zero. Boxtop: 

I finshed up the cockpit last weekend. Going to try to get it inside the plane tonight. Lawdog isn't going to lose any sleep to any challenge from me but it's good enough considering how little can be seen from the cockpit hole. 

"I dream in fire but work in clay." -Arthur Machen


  • Member since
    July 2014
Posted by modelcrazy on Wednesday, January 8, 2020 12:06 PM

 Yep, that's a Zero

The pit looks great Gam, I just love those belts.

Steve

Building a kit from your stash is like cutting a head off a Hydra, two more take it's place.


http://www.spamodeler.com/forum/

  • Member since
    December 2002
  • From: Northern California
Posted by jeaton01 on Wednesday, January 8, 2020 11:47 PM

Nice work on the Zero cockpit, Gamera.


Got the markings on the Betty, except for the white command stripe on the aft fuselage.  I thought I would need white under the hinomarous and all it did was put me through a lot of work to end up with a red that is brighter than I would have liked.  I guess the crew just touched them up.  I understand the the rising sun was a mark of pride and no matter the rest of the paint, the hinomarus were kept in good condition.  I made a stencil for the tail marking.  I'm betting that those who say that Haruki Ito's number was K-331 instead of K-310 as the kit decals depict are correct.  Going to let it set for a day or two, until the paints arrive for the nose and tail glasswork.

John

To see build logs for my models:  http://goldeneramodel.com/mymodels/mymodels.html


  • Member since
    November 2009
  • From: SW Virginia
Posted by Gamera on Thursday, January 9, 2020 7:49 AM

Thanks guys. The cockpit is a little sloppy, but again it's not all that visible. 

Steve: Just plain Eduard coloured PE seatbelts. I've got some more for the F-51 for the Korean GB. Love these things, so much easier to work with than the masking tape seatbelts. 

Jeaton: Not sure if I've ever seen a photo of an aircraft with badly chipped or beaten up hinomaru. I think as you said that the ground crews kept them freshly painted and in good repair. The camo looks really good, looking forward to some more work on her! 

"I dream in fire but work in clay." -Arthur Machen


  • Member since
    December 2002
  • From: Northern California
Posted by jeaton01 on Friday, January 10, 2020 10:18 PM

Well, Sprue Bros. came through again, the paint I needed came a day early and it was off to the races.  I even did some weathering on this one, some oils and a silver Prismacolor pencil, along with rubbed in aluminum powder in places.  The whole thing got rubbed down with a Q-tip followed by damp paper towels, all in the direction of airflow  That subdued the white some because the rubbings from the dark green and red brown carried across them.  I like that.  There are no clear coats on this model, as there are no decals. 

I had on hand some of the Uschi thread and I used the super fine on the antenna above the cockpit.  It's probably just about scale thickness, and therefore its also almost invisible.  I can only see it against the blue background in the photos, and I don't think anyone will be able to see it in the display case.

I think I will build a stand or a trolley for the torpedo, as no one will see it tucked up in the bomb bay.  Anyone know what that should look like?   Needs a Kurogane and some figures, too, I think.  Shudder, figures do not come easy in my workshop.


John

To see build logs for my models:  http://goldeneramodel.com/mymodels/mymodels.html


GAF
  • Member since
    June 2012
  • From: Anniston, AL
Posted by GAF on Saturday, January 11, 2020 12:40 AM

Wow, John!  That's impressive!  You're already finished and I haven't even started removing parts from the sprues yet!

Gary

  • Member since
    June 2014
Posted by BrandonK on Sunday, January 12, 2020 10:48 AM

There are nothing but nice builds in here so far, and you guys are screaming through them too. I hope to open my kit in the next few days. I don't think I'll get mine done quite this fast. Well done, gents.

BK

On the bench:

A lot !! And I mean A LOT!!

2024 Kits on deck / in process / completed   

                         14 / 5 / 2  

                              Tongue Tied

  • Member since
    August 2014
  • From: Willamette Valley, Oregon
Posted by goldhammer on Sunday, January 12, 2020 5:44 PM

Got the AK IJN paint set...only thing missing is what hasegawa only calls out as "propeller color".  Got a bottle of MM dunkel braun, in the neighborhood I think.  Unless someone has a thought.  Planning on starting the Myrt this week depending on workload at the shop.


Got the canopy frames done on the Betty, just some cleanup, attach them and install the props.

  • Member since
    November 2009
  • From: SW Virginia
Posted by Gamera on Sunday, January 12, 2020 7:28 PM

Jeaton: That looks fantastic! I'm not sure about the torpedo trolly? Maybe you could put her on a base like Lawdog does and leave the torpedo on the ground there? And I love Sprue Brothers, I ordered some stuff last Sat. and it was in hands Wed. Three business days- that's crazy fast- at least for me!

Brandon: Sounds cool. And no worries you've only got eleven and a half months to go... Wink

GH: Love the AK paint line. The propeller colour is a kinda rust red-brown. I wouldn't worry much beyond using something close to that.

"I dream in fire but work in clay." -Arthur Machen


  • Member since
    August 2014
  • From: Willamette Valley, Oregon
Posted by goldhammer on Sunday, January 12, 2020 8:10 PM

Also grabbed a bottle of Tamiya lino brown.  I'll see what both look like when dry.  Plenty of time to play with it.

  • Member since
    December 2002
  • From: Northern California
Posted by jeaton01 on Sunday, January 12, 2020 8:22 PM

I've heard the prop color described as Mahogany.  I use Gunze Mr Color 131.

John

To see build logs for my models:  http://goldeneramodel.com/mymodels/mymodels.html


  • Member since
    November 2009
  • From: SW Virginia
Posted by Gamera on Sunday, January 12, 2020 8:36 PM

Mahogany sounds about right. Thanks Jeaton and looking forward to how it comes out GH.

"I dream in fire but work in clay." -Arthur Machen


  • Member since
    December 2005
  • From: Goteborg / Sverige
Posted by Svenne Duva on Monday, January 13, 2020 10:26 AM

Hi,

My buddy didn't quite make it to the class of 2019.

Anyone who needs a Wingman in an A6M5 type 52 in 2020? 

With regards

Svenne

sic transit gloria mundi

  • Member since
    November 2009
  • From: SW Virginia
Posted by Gamera on Monday, January 13, 2020 11:40 AM

Svenne Duva

Hi,

My buddy didn't quite make it to the class of 2019.

Anyone who needs a Wingman in an A6M5 type 52 in 2020? 

With regards

Svenne


Looks like the poor guy has been 'dis-armed'... 


Sorry... Embarrassed


Svenne: Would love to have you join us!

"I dream in fire but work in clay." -Arthur Machen


  • Member since
    December 2005
  • From: Goteborg / Sverige
Posted by Svenne Duva on Monday, January 13, 2020 11:49 AM

Well he ain't no "Wingman" until I get his "Hayabusa" up  and armed again... Propeller

Thanks Gamera!

With regards
Svenne


sic transit gloria mundi

  • Member since
    June 2014
Posted by BrandonK on Monday, January 13, 2020 11:49 AM

jeaton01

I've heard the prop color described as Mahogany.  I use Gunze Mr Color 131.


Mr Color 131 Propeller color is the correct color. Tamiya XF-79 is a close match, a tad lighter, but very close.

BK

On the bench:

A lot !! And I mean A LOT!!

2024 Kits on deck / in process / completed   

                         14 / 5 / 2  

                              Tongue Tied

  • Member since
    November 2009
  • From: SW Virginia
Posted by Gamera on Wednesday, January 15, 2020 11:31 AM

Hey John/Jeaton just put your Betty up. If you want to add a trolly for the torpeto or anything yell at me and I'll change out the photo. 

"I dream in fire but work in clay." -Arthur Machen


  • Member since
    April 2005
  • From: Australia
Posted by taxtp on Wednesday, January 15, 2020 5:56 PM
Love that Zeke Cliff. Cheers Tony

I'm just taking it one GB at a time.

  • Member since
    December 2002
  • From: Northern California
Posted by jeaton01 on Thursday, January 16, 2020 1:12 AM

Gamera

Hey John/Jeaton just put your Betty up. If you want to add a trolly for the torpeto or anything yell at me and I'll change out the photo. 


Thanks, Cliff.  Maybe next week.  Working on painting a Tamiya F-84 right now.

John

To see build logs for my models:  http://goldeneramodel.com/mymodels/mymodels.html


  • Member since
    November 2009
  • From: SW Virginia
Posted by Gamera on Thursday, January 16, 2020 8:09 AM

Thanks Tony! 

Jeaton: And a beauty that F-84 is. 

"I dream in fire but work in clay." -Arthur Machen


  • Member since
    November 2009
  • From: SW Virginia
Posted by Gamera on Thursday, January 16, 2020 8:40 AM

I got the Zero sealed up. The joint line on the bottom where the wing joins the fuselage as usual is being a butt though... 


"I dream in fire but work in clay." -Arthur Machen


GAF
  • Member since
    June 2012
  • From: Anniston, AL
Posted by GAF on Friday, January 17, 2020 6:03 PM

Gamera,

The Zero's coming along fine.  I too had trouble with that seam, though the wings fit snuggly everywhere else.  I will try to watch that on this one and do a better job.  I've finally got the cockpit parts separated and have begun construction on that.  No different from the A6M2b, so should go together pretty quickly.

I also went by Lowes and picked up some IJN Green.  Well... it's actually Rust-Oleum "Dark Hunter Green" spray paint (since I cannot find any rattle can IJN Green), but I used my phone to bring up an image of IJN Green and this was so close as to be unnoticeable. We'll see what it looks like after I apply it over a light grey coat.

Gary

  • Member since
    November 2009
  • From: SW Virginia
Posted by Gamera on Sunday, January 19, 2020 8:34 PM

Gary: I have a lot of issues with those seams. They don't seem to fit well on a lot of kits. Oh well, I've been sanding and puttying all weekend. It's got to fit in the end.

Looking forward to seeing how your Zero looks. Hunter Green sounds close enough.

"I dream in fire but work in clay." -Arthur Machen


  • Member since
    July 2014
Posted by modelcrazy on Monday, January 20, 2020 6:42 AM

It's been a little while but I completed the initial construction on the captured Nick. Filled, masked and applied the black base. Next is the silver.

Steve

Building a kit from your stash is like cutting a head off a Hydra, two more take it's place.


http://www.spamodeler.com/forum/

  • Member since
    November 2009
  • From: SW Virginia
Posted by Gamera on Monday, January 20, 2020 7:54 AM

Steve: Looks good, perfect base for the NM. 

"I dream in fire but work in clay." -Arthur Machen


  • Member since
    March 2017
Posted by Armor_Aficionado on Friday, January 24, 2020 12:01 AM

Initial construction begun on the Chi-ha Type 97:


  • Member since
    November 2009
  • From: SW Virginia
Posted by Gamera on Friday, January 24, 2020 7:58 AM

AA: Ohhhhhh cool! Nice work! 

"I dream in fire but work in clay." -Arthur Machen


  • Member since
    December 2002
  • From: Northern California
Posted by jeaton01 on Sunday, January 26, 2020 4:59 PM

I've built both the Hasegawa and Tamiya Zero kits and they both had a little work to do at the lower wing to fuselage.  The irritating part is that the real airplane came apart there for ground transport because the wing was one piece tip to tip.  So you do need a clean panel line there.

John

To see build logs for my models:  http://goldeneramodel.com/mymodels/mymodels.html


GAF
  • Member since
    June 2012
  • From: Anniston, AL
Posted by GAF on Sunday, January 26, 2020 5:13 PM

AA> Good start on the Chi-ha.  Should be a nice one.

Not much to report here.  The temperature and weather have prevented painting, so all I've been able to do is test fit and glue a few pieces together.  Here's a test fit of the main body and wings.

The lower wing seam as discussed above seems okay, but the upper wings seems to have a slight gap.  I think I can correct this with some tape to pull them in closer to the fuselage.  I look forward to some nicer weather for painting.

I really need to get a basic airbrush so I can apply just base coats!  Oh, well.

Gary

  • Member since
    November 2009
  • From: SW Virginia
Posted by Gamera on Sunday, January 26, 2020 6:24 PM

Gary: That looks good!!! I had a bit of a gap in the wings too. I ended up adding some Perfect Plastic Putty, let it dry for about five mins or so and then wiped it with a moist cotton swab and it filled perfectly. It should work for about any sort of putty, just use whatever cuts the putty. 

I filled and sanded that blasted seam about a dozen times. I think it finally looks okay now, I went ahead and painted the fighter black today. Hopefully it will be dried enough to take photos soon. I'm going to try to paint the thing NM, and then chip her using the hairspray technique.

Jeaton: Thanks! At least I didn't sand and putty by poor mind away for nothing! 

"I dream in fire but work in clay." -Arthur Machen


  • Member since
    July 2014
Posted by modelcrazy on Tuesday, January 28, 2020 9:35 AM

A little more done on Nick. Bad lighting.

Steve

Building a kit from your stash is like cutting a head off a Hydra, two more take it's place.


http://www.spamodeler.com/forum/

  • Member since
    November 2009
  • From: SW Virginia
Posted by Gamera on Tuesday, January 28, 2020 12:06 PM

Even with the bad lighting that's a nice finish Steve! 

"I dream in fire but work in clay." -Arthur Machen


  • Member since
    March 2019
  • From: Post Falls, Idaho
Posted by Sigep Ziggy on Thursday, January 30, 2020 6:30 AM

Gamera,

I would like to join in, please put me down for the Airfix 1/72 Mitsubishi A6M2b Zero.

Yes, I know, I know, another Zero!?!

your shipmate,

Ziggy


  • Member since
    November 2009
  • From: SW Virginia
Posted by Gamera on Thursday, January 30, 2020 8:58 AM

Hey Ziggy, welcome. I just put you down. 

And there's always room for another Zero... Yes


BTW: Went to apply a coat of aluminum to the Zero last night with the intention to use the hairspray technique to apply the green/grey camo over it and then chip the camo away to reveal the aluminum underneath. Well the cap of the bottle of Alclad aluminum must not have been tight and most of the solvent had evaporated leaving me with some thick sludge. So I ordered some more Alclad aluminum from Sprue Brothers at about 10:30 last night EST. Got an email this morning at about 9:30 that the order had been filled and shipped. Sorry neither here or there but my complements to Sprue Brothers for fantastic customer service!  

"I dream in fire but work in clay." -Arthur Machen


  • Member since
    August 2014
  • From: Willamette Valley, Oregon
Posted by goldhammer on Thursday, January 30, 2020 6:31 PM

I can now report that the Surrender Betty is finally done.  It was an entry in the GB III or IV, got dragged out behind the hanger, and like most 1:1 aircraft, left to rot.

Prudence (that cold, dark, heartless, expensive woman) and Gamera finally talked me into searching the berry briars and finish it up.  Pics tomorrow, after blowing off the rest of an inch of dust and leaves. 

Taking the Myrt to model club tonight to continue working on the office, hoping to get the interior green painted tomorrow. Pics as well.

  • Member since
    November 2009
  • From: SW Virginia
Posted by Gamera on Friday, January 31, 2020 8:59 AM

GH: I'm looking forward to photos of the Surrender Betty. And the Myrt sounds really cool too! 

BTW: I've got the sketches for the badge and hopefully it'll be done in a week or so. Sorry, wish I'd had them sooner but the guy who does the sketches is finishing up a new comic book and been kinda on the busy side. 

"I dream in fire but work in clay." -Arthur Machen


  • Member since
    August 2014
  • From: Willamette Valley, Oregon
Posted by goldhammer on Friday, January 31, 2020 4:44 PM

Here is the start on the Myrt.  Still a few pieces to put on the sidewall before gluing it to the fuselage side, and painting the interior.  Will have some brush work for the different color callouts inside.

  • Member since
    August 2014
  • From: Willamette Valley, Oregon
Posted by goldhammer on Friday, January 31, 2020 4:57 PM

This is the "Surrender Betty", 1/48 Tamiya.  Started it about 6 years ago, for Gam's GB back then, first build after around 40 years away from modeling. Gave me something to do to pass time after the wife passed.  Has been sitting for 5 years behind the "hanger of doom".

Not the best work, canopy frame painting is rough, and I didn't fill and sand the seams around any of the glassworks. Does have PE belts and IP, though it's a strain to see it.

Paint is MM acrylic, green crosses are masked and painted after the decals went outhouse mouse on me and tore to shreds. Antenna behind the ADF loop went missing while it sat.

Represents one af two that were painted and marked to bring the surrender delegation to meet with the allies.

Although Gamera has it listed as an entry in this GB, I don't consider it a part of it, sat way to long to be considered for a "rollover".

GAF
  • Member since
    June 2012
  • From: Anniston, AL
Posted by GAF on Friday, January 31, 2020 10:10 PM

Steve> The finish on the Nick looks fine.  I guess all that's left are the decals?

Goldhammer> The Betty turned out nice.  You deserve a badge for the canopy work alone!

Gamera>  Look forward to seeing how the chipping turns out.  I haven't decided yet on what sort of weathering I will do on the A6M5, so show me how it's done! Smile

I managed to get the interior cockpit painted with a black base this week on a relatively nice day.  I'm currently painting "interior green" over that, so no pictures yet.  I'll post something up of the cockpit work when that and detailing instruments is finished.

On the decal problem I had earlier, I discovered I had forgotten about a Tamiya Shinden model I had in the closet.  I can sacrifice some of the decals from it (as I will probably never build that aircraft), so that problem is solved.

Gary

  • Member since
    August 2014
  • From: Willamette Valley, Oregon
Posted by goldhammer on Friday, January 31, 2020 11:20 PM

Thanks Gary.  I left the Eduard masks on for 5 years, so they pulled paint when removed.  Small brush and a toothpick made repairs.  Decided to leave well enough alone and live with it as is.

  • Member since
    October 2008
  • From: italy
Posted by bsyamato on Saturday, February 1, 2020 2:20 PM

So much good build already here :)


Cliff, I,'m I'm with this little ibg piece, 917t japanese version truck, also I'll try to continue the italeri sea dragon


Have a good GB to all!

  • Member since
    November 2009
  • From: SW Virginia
Posted by Gamera on Saturday, February 1, 2020 6:49 PM

GH: She looks pretty darn good to me! Nice work! You're sure you don't want to me to put her down as an entry? Esp nice considering the masks were on the canopy that long, I can imagine they would pull paint up with them.

The Myrt looks good, nice looking kit of the nice looking plane.

GAF: Well, it's still an experiment here. I'll be sure to let you profit from my mistakes.

Bsyamato: Cool, got both of them down. That truck looks like a really interesting kit.

"I dream in fire but work in clay." -Arthur Machen


  • Member since
    August 2014
  • From: Willamette Valley, Oregon
Posted by goldhammer on Saturday, February 1, 2020 8:47 PM

Thanks Gamera, I wouldn't feel right by the other entries to claim it after the time lapse.  If you want to put up the last pic, I'm OK with it.  Not wanting to claim anything.  Not fair to others who finish in the timeframe.  Appreciate the thought though.

  • Member since
    December 2002
  • From: NYC, USA
Posted by waikong on Sunday, February 2, 2020 10:40 PM

wait, Another Japanese GB started already? And some people already finished? Dont you guys sleep? Great looking builds so far by the way. Guess I am in too, will check the stash to see what I got.

My website: http://waihobbies.wkhc.net


  • Member since
    November 2009
  • From: SW Virginia
Posted by Gamera on Monday, February 3, 2020 7:14 AM

GH: You know I may just put the photo up. It's up to you if you want to take the badge or not. 

Waikong: As usual you're welcome to join us with whatever you find! 

"I dream in fire but work in clay." -Arthur Machen


  • Member since
    August 2014
  • From: Willamette Valley, Oregon
Posted by goldhammer on Monday, February 3, 2020 9:59 AM

I'll wait on a badge and see if I can get the Myrt done on time to claim one.Smile

  • Member since
    June 2014
Posted by BrandonK on Monday, February 3, 2020 11:07 AM

Art, that Betty is amazing. I would be super proud of it. Well done!!

BK

On the bench:

A lot !! And I mean A LOT!!

2024 Kits on deck / in process / completed   

                         14 / 5 / 2  

                              Tongue Tied

  • Member since
    December 2002
  • From: Northern California
Posted by jeaton01 on Monday, February 3, 2020 1:38 PM

GH, that antenna didn't make it to the finish line on my Betty either, it got tweezed into spaces unknown.  I replaced it with music wire.  I say put in on the completed roster!

John

To see build logs for my models:  http://goldeneramodel.com/mymodels/mymodels.html


  • Member since
    August 2014
  • From: Willamette Valley, Oregon
Posted by goldhammer on Monday, February 3, 2020 1:46 PM

Thanks guys.  May replace it and install antenna wire later on

  • Member since
    November 2009
  • From: SW Virginia
Posted by Gamera on Tuesday, February 4, 2020 11:37 AM

Bsyamato: That looks cool, and nice work the frame looks good. 


Guys: Put GH's surrender Betty up on the completed roster yesterday! 

"I dream in fire but work in clay." -Arthur Machen


  • Member since
    August 2014
  • From: Willamette Valley, Oregon
Posted by goldhammer on Tuesday, February 4, 2020 12:22 PM

Saw that...thank you sir.

  • Member since
    March 2019
  • From: Post Falls, Idaho
Posted by Sigep Ziggy on Friday, February 7, 2020 6:13 PM

Not much of an update on my Zero, but very exciting for me.  Got this from Micro-Mark today!

your shipmate,

Ziggy


  • Member since
    October 2008
  • From: italy
Posted by bsyamato on Saturday, February 8, 2020 7:59 AM

Heres the truck updates before the primer; the only modify, i drilled the front lights to fill at the end vith something clear to simulate lens


all subassemblies ready, only rearview mirror out


At the next!


  • Member since
    November 2009
  • From: SW Virginia
Posted by Gamera on Saturday, February 8, 2020 4:59 PM

Bsyamato: She's coming along great!

Ziggy: Ohhhh, nice! Tamiya makes some of the best paint!

"I dream in fire but work in clay." -Arthur Machen


  • Member since
    March 2017
Posted by Armor_Aficionado on Sunday, February 9, 2020 4:58 AM

Latest progress on the Chi-ha.  Got all the wheels on, ready to start hand-painting the camouflage pattern.


  • Member since
    August 2014
  • From: Willamette Valley, Oregon
Posted by goldhammer on Sunday, February 9, 2020 7:29 PM

Got the rest of the bits together on the office, the wing and engine together.  Hopefully get that painted late in the week and pics to follow that prior to closing the fuselage up.

  • Member since
    November 2009
  • From: SW Virginia
Posted by Gamera on Sunday, February 9, 2020 7:58 PM

AA: That looks good! Looking forward to seeing the camo go on.

GH: Sounds good, looking forward to the photos!

"I dream in fire but work in clay." -Arthur Machen


  • Member since
    November 2009
  • From: SW Virginia
Posted by Gamera on Sunday, February 9, 2020 8:05 PM

I got a good bit done on the Zero over the weekend...

I sprayed the whole aircraft NM but ended up with trash in the finish so I sanded the garbage out. But the wheel wells still looked okay so I went ahead and sprayed some translucent blue-green in there.

I then masked off the wheel wells with Silly Putty and added another coat of gloss black as primer for the NM. I did a F-51 Mustang for John 3:16's Korean War GB at the same time. 

I then sprayed on the Alclad NM finish doing the F-51 at the same time.

I'm going to let this dry for a couple of days just to make perfectly sure it's good and set and then apply a couple coats of hairspray and then the green/grey finish. Hopefully; it will come off properly to show the NM finish underneath.

"I dream in fire but work in clay." -Arthur Machen


  • Member since
    November 2009
  • From: SW Virginia
Posted by Gamera on Sunday, February 9, 2020 11:01 PM

AND WE HAVE BADGES!!!


Big thanks to Rock Baker and Jack/Jgeratic!!!! I decided this being number nine to go with a kitsune, the supernatural Japanese fox of legend with nine tails and the ability to take the form of a beautiful woman. Thanks guys for doing such a beautiful job transforming my idea into a reality!

https://rock-baker.blogspot.com/

Sorry they're a little late- I let the date slip up on me and Rock has been busy with a series of comic books. But he did his usual superlative job!

And Jack/Jgeratic did his usual super work on getting the thing coloured up and lettered. I love the fox mask on the side!!! 

Anyway here she is!!!

And part of reason for being late is the first pictures I submitted to Rock had the figure in a dress that looked more like a qipao or cheongsam which is a more Chinese sort of dress. I asked Rock if he could redraw the picture with a kimono and he nicely agreed to make up for my mistake. I'd already sent the picture out to Jack and he'd already whipped it into shape. So just for the heck of it I'm going to throw the other badge up here in case anyone would rather use it instead:

"I dream in fire but work in clay." -Arthur Machen


  • Member since
    March 2017
Posted by Armor_Aficionado on Monday, February 10, 2020 3:50 AM
Badges? Badges? We don't need no stinking BADGES! (sorry, couldn't resist!)

  • Member since
    November 2003
  • From: Naples, FL
Posted by tempestjohnny on Monday, February 10, 2020 7:39 AM
What a great looking badge


  • Member since
    October 2008
  • From: italy
Posted by bsyamato on Monday, February 10, 2020 11:24 AM

Good updates there Yes

Lately IBG covered almost all ww2 jap tanks included Chi-ha in 72 scale, i'll get em all asap Eats

Nice badge!!


More updates on the truck:

After mig primer i made a mix of various colors to get the japanese kaki color, protected after with glossy clear, also painted minor details and some washing


not all glued , just to show the whole thing


At the next!


  • Member since
    November 2009
  • From: SW Virginia
Posted by Gamera on Monday, February 10, 2020 12:05 PM

Bsyamato: That looks good. The colour is spot on and nice work on getting all the tiny parts in the suspension together- can't be much left now. 

AA: Lol, I haven't seen that movie in ages. I need to watch it again- it's so quotable!!! 


And gotta say the guys knocked it out of the park with the badges. Buy one of Rock Baker's comics at Amazon and thank Jack/Jgeratic next time you see one of his posts! 

"I dream in fire but work in clay." -Arthur Machen


  • Member since
    March 2019
  • From: Post Falls, Idaho
Posted by Sigep Ziggy on Monday, February 10, 2020 8:54 PM

Bsyamato, the truck is looking good!

Gamera, both the F51 and the Zero are coming along, what did you use for the blue-green color?

Clean and waiting for paint.

your shipmate,

Ziggy


  • Member since
    November 2009
  • From: SW Virginia
Posted by Gamera on Tuesday, February 11, 2020 7:43 AM

Ziggy: Looks like you're ready to dig in there! 


The blue-green is just Tamiya clear yellow and blue mixed and sprayed over the NM finish in the landing gear bays. It SHOULD have been more bluish. I sprayed a straight clear blue overcoat over top of this but the colour didn't want to shift so I just left it this way.

The aotake the Japanese used as a protective coating started off blue and gradually turned more greenish due to time and weather. As a new aircraft I wanted it more blue but I guess she's now an older plane... Tongue Tied

"I dream in fire but work in clay." -Arthur Machen


  • Member since
    December 2002
  • From: Northern California
Posted by jeaton01 on Tuesday, February 11, 2020 2:37 PM

Super badge!

John

To see build logs for my models:  http://goldeneramodel.com/mymodels/mymodels.html


  • Member since
    March 2017
Posted by Armor_Aficionado on Wednesday, February 12, 2020 12:23 AM

Latest progress - got the camouflage scheme cmpleted:


  • Member since
    November 2009
  • From: SW Virginia
Posted by Gamera on Wednesday, February 12, 2020 10:18 AM

AA: Ohhhhhhhh, looks cool! 

"I dream in fire but work in clay." -Arthur Machen


  • Member since
    August 2014
  • From: Willamette Valley, Oregon
Posted by goldhammer on Wednesday, February 12, 2020 10:21 PM

Nice camo AA.

Ordered out canopy masks for the Myrt today, so the interior paint is on hold till it gets here next week.

My lady saw the RoG beetle kit at HL tonight....she had a'68 back in the day so will be starting it at the club tomorrow night.


Gamera- love the badges, give my congrats to your helpers.  Well deservedBow Down

  • Member since
    October 2008
  • From: italy
Posted by bsyamato on Thursday, February 13, 2020 9:59 AM

Armor_Aficionado

Latest progress - got the camouflage scheme cmpleted:


Well done with the camo Yes Yes Yes


I broke my speed record :)


Wheels painted drybrushed and washed, also black border to the clear parts 


After glossy put the few decals


Then last night glued all pieces togheter , matt cote and and last retouches.. Finished :)


theres two little bottles under the cargo box


Asap under sun pictures


  • Member since
    April 2006
  • From: ON, Canada
Posted by jgeratic on Thursday, February 13, 2020 11:42 AM

Thought some might be interested in this Zero tail fairing posted on another forum.   Reveals portions of original paint not exposed to sun, along with good example of Atoke:

More photos/info here:

https://www.britmodeller.com/forums/index.php?/topic/235032785-mitsubishi-zero-type-21-colours/page/2/#comments


regards,

Jack

  • Member since
    November 2009
  • From: SW Virginia
Posted by Gamera on Thursday, February 13, 2020 2:11 PM

Bsyamato: That looks good!!! Nice work!! I'll wait till you get the outside photos up to post her, I'm assuming that's the one you want to use?

Jack: Very cool, thanks for posting! It's always helpful to look at the real thing. 

And I assume you read though the comments- we all love your badges! Heart

"I dream in fire but work in clay." -Arthur Machen


  • Member since
    April 2006
  • From: ON, Canada
Posted by jgeratic on Thursday, February 13, 2020 6:33 PM

Hi Cliff, and yes thanks everyone for the comments concerning this year's badge. Beer


regards,

Jack

GAF
  • Member since
    June 2012
  • From: Anniston, AL
Posted by GAF on Saturday, February 15, 2020 7:50 PM

Jack> I agree that the badge looks great!  Nice work.

AA> That Chi-ha is looking splendid.

Bsyamato> That's a good looking truck.  You don't see many Japanese WWII vehicle models.

Gamera> The aotake looks fine.  It could vary widely as I understand.

As for me, progress is glacial.  I've finished the pit in a desultory fashion, and installed it in the fuselage. I didn't have instrument decals, so I just hit them with a white prismacolor pencil and some dabs of black, red and yellow paint. I can get the wings on now and start putting on some base coats.

Take care!

Gary

  • Member since
    April 2006
  • From: ON, Canada
Posted by jgeratic on Saturday, February 15, 2020 10:26 PM

Thanks Gary.

From what I remember reading, the rear 'deck' behind the pilot's seat would be black like the cowl.


regards,

Jack

GAF
  • Member since
    June 2012
  • From: Anniston, AL
Posted by GAF on Saturday, February 15, 2020 11:53 PM

You're welcome!  Always some good artwork from you.  Smile

As for the rear deck, the instructions call out for Mitsubishi cockpit color, and I think I read that in doing research (which I've forgotten where).  Somewhere along the line they changed.  I do know that the A6M2b I did previously had a black rear deck.  Anyway, that's the reason it's green.

Thanks!

Gary

  • Member since
    March 2019
  • From: Post Falls, Idaho
Posted by Sigep Ziggy on Sunday, February 16, 2020 12:39 AM

I have to say...

Great Badges!

A.A., Outstanding Camo on the Chi-ha.

Bsyamato, the truck looks fantastic!

Gary, Your Zero looks Great!  It make me realize how small my Zero really is.

Started using some paint.

And some washes.

Maybe some glue next!

your shipmate,

Ziggy


  • Member since
    April 2006
  • From: ON, Canada
Posted by jgeratic on Sunday, February 16, 2020 12:54 AM

Ziggy, glad you like the badge, thanks!

Gary, it's possible my notes are outdated on Japanese particulars.  There is a 2013 post from  Nick Millman (Aviation of Japan) concerning A6M5 Type 52 colours:

https://www.britmodeller.com/forums/index.php?/topic/234951399-a6m5-type-52-colours-inetrior-and-exterior/


regards,

Jack


GAF
  • Member since
    June 2012
  • From: Anniston, AL
Posted by GAF on Sunday, February 16, 2020 12:36 PM

It's rather uncertain.

Posted By: Ryan Toews <mailto:ritoews@mb.sympatico.ca?subject=Re: Mitsubishi Zero Cockpit Deck Color>
Date: Monday, 19 November 2001, at 3:35 p.m.
 
In Response To: Re: Mitsubishi Zero Cockpit Deck Color (Don Marsh)
 
Thanks Don,
I was fairly sure about the Nakajima use of black, but I have a nagging uncertainty about Mitsubishi. Although the NASM Zero was incorrectly painted in a Nakajima scheme there still was some solid research done as to paint details. And the conclusion they came up with was it had the decking in the same color as the exterior. Now, I understand that the paint had been stripped from the plane when it was examined by the Army, but I doubt all the paint was removed and the remnants that were found were held to be green. But it would be nice to get other evidence to support this.
Ryan
 
I think it will remain "green" even if it is incorrect.  The color controversy is full of theory and speculation, based on old color photos and suspect remnants of pieces of crashed aircraft.  For example, recently Aviation of Japan posted an article on the supposed "tan" interior colors of the A6M3 cockpit sections.  After a bit of buffing, it was found that they were actually green!  I guess this just goes to show that sometimes eyeballing colors can be misleading. Smile
 
Meanwhile, it's possible my interior color is probably totally wrong anyway.  It seems most A6M5s were made at the Nakajima plant, so its possible all of it is way off.Oh, well!  In the words of a famous Scottish Chief Engineer, "It's green!"
 
Gary

  • Member since
    November 2009
  • From: SW Virginia
Posted by Gamera on Sunday, February 16, 2020 5:30 PM

Gary: Looks good, nice work there in the cockpit!

Ziggy: Nice start!


About the turtle deck, I dunno. I painted mine the cockpit interior colour. Maybe I should repaint it black, I'll have to look around some more... Dunce

"I dream in fire but work in clay." -Arthur Machen


GAF
  • Member since
    June 2012
  • From: Anniston, AL
Posted by GAF on Sunday, February 16, 2020 8:45 PM

Gamera> Thanks!  The cockpit's only so-so.  I'm no Lawdog! Smile

After some consideration, I may go ahead and paint the rear-deck a blackish color (since even the black is not exactly black).  Instead, I'll leave it up to the participants here (and anyone who might like to chime in).

"What do you think would look better?  A black rear deck or an interior green rear deck"

Doesn't matter about historical accuracy.  This question is about what you think looks better!  No comments about "Well, it's up to you!"  This is your chance to show off your superior color coordination skills.  Big Smile

Gary

  • Member since
    November 2009
  • From: SW Virginia
Posted by Gamera on Monday, February 17, 2020 7:37 AM

Gary: Considering how little you can see of the cockpit down inside there it looks good enough! Wink

"I dream in fire but work in clay." -Arthur Machen


  • Member since
    March 2019
  • From: Post Falls, Idaho
Posted by Sigep Ziggy on Monday, February 17, 2020 9:04 PM

Small update on my Zero, I tried drilling the holes in the seat but the plastic was too thick, so I cut the center section out and replaced it with .005 inch thick styrene. I will mark the holes and drill them next.

Also, I started on the engine. The front seven cylinders has been removed from sprue and trimed. Just waiting for the back seven to catch up.

your shipmate,

Ziggy


  • Member since
    December 2002
  • From: Northern California
Posted by jeaton01 on Monday, February 17, 2020 10:16 PM

I painted the area behind the seat Mitsubishi cockpit green on the A6M1 and the two A6M2's I've built, as I think they were all early enough to be built only by Mitsubishi.

John

To see build logs for my models:  http://goldeneramodel.com/mymodels/mymodels.html


  • Member since
    November 2003
  • From: Naples, FL
Posted by tempestjohnny on Tuesday, February 18, 2020 6:11 AM
In my research on Zeros. Mitsubishi used the green interior color for turtle deck but Nakajima, which built quite a number of the Zeros, used flat black. So it all depends on the manufacturer. Also the exterior grey's were different too.


  • Member since
    April 2006
  • From: ON, Canada
Posted by jgeratic on Tuesday, February 18, 2020 9:54 AM

Should post a link when quoting research ...

I find the link below interesting.  Even though almost 20 years old,  but fact is that references are made to physical findings regarding the decking colour :

http://www.j-aircraft.com/faq/A6M_pt4.htm#Mitsubishi%20Zero%20Cockpit%20Deck%20Color


Cool photo here,  supposedly of an A6M3 in 1943.   Although severely chalked and weathered,  the decking and cowl do look to be the same tone of grey.


Another quote from Nick Millman (from 2013), he too gives black decking for both Zero manufacturers:

https://www.britmodeller.com/forums/index.php?/topic/234947758-zero-detail-colours/

"The cockpit decking wasn't black as such but the same anti-glare blue black as the cowling. It was to a standard IJN specification of four parts carbon black to one part ultramarine pigment (similar to RAF 'Night') and most of the differences attributed to MItsubishi and Nakajima cowlings arose from the way the procured paints weathered and degraded.

Whilst the cowlings got regular maintenance the decking rarely, if ever, did so on in service machines it often ended up looking flatter and greyer over time."


regards,  

Jack

  • Member since
    November 2009
  • From: SW Virginia
Posted by Gamera on Tuesday, February 18, 2020 12:37 PM

Thanks Jack, that's evidence enough for me. I'm going to go back and repaint the back deck of my Zero black. 


Guys, I found out this morning that my dad has passed away. I'm going to be off the forum for a bit till things clear up. Please keep at it as always, I'll try to be back early next week. Any thoughts and prayers are welcome... 

"I dream in fire but work in clay." -Arthur Machen


  • Member since
    August 2014
  • From: Willamette Valley, Oregon
Posted by goldhammer on Tuesday, February 18, 2020 2:26 PM

Cliff...  Sorry to hear that, as always, our thoughts are in your corner

GAF
  • Member since
    June 2012
  • From: Anniston, AL
Posted by GAF on Tuesday, February 18, 2020 2:38 PM

Cliff,

That's sad news concerning your father.  My condolences.  Hope you'll be back with us soon.  Prayers for your family and you.

Gary

GAF
  • Member since
    June 2012
  • From: Anniston, AL
Posted by GAF on Tuesday, February 18, 2020 2:59 PM

Jack,

Well, you've almost convinced me, though I feel very uneasy about relying upon one authority (Nick).  I'll take your word that this is not a "colorized" photo. Here's another more recent article upon A6M colors from Imodeler.

https://imodeler.com/2019/04/japanese-a6m-zero-colors-part-1/

Note that the article contains almost the same photo Jack posted, but with a soldier standing beside the wreck.  Someone had a very steady hand, or the camera was on a tripod!

Might want to hold off on the "black" and paint the rear decking "Navy Dark Blue".

Still, there are some photos of wrecked Japanese aircraft at the end of the war that make me go "hmmmm..."

Are these colorized photos?  I don't know.  The rear deck in both photos does appear to be lighter than the cowling.  Could it be oxidation?  Maybe.  That is what makes me go "hmmmm..."

Thanks for your information!

Gary


  • Member since
    December 2002
  • From: Northern California
Posted by jeaton01 on Wednesday, February 19, 2020 12:07 AM

So sorry to hear that Cliff.  Godspeed.

John

To see build logs for my models:  http://goldeneramodel.com/mymodels/mymodels.html


  • Member since
    April 2006
  • From: ON, Canada
Posted by jgeratic on Wednesday, February 19, 2020 8:06 AM

Dear Cliff,

Sorry about the passing of your father, my thoughts and prayers go out to you and your family.


regards,

Jack

  • Member since
    June 2014
Posted by BrandonK on Wednesday, February 19, 2020 10:57 AM

My deepest condolences, Cliff. We lost my father-in-law this last september and it just isn't easy. Our hearts go out to you and your family.

BK

On the bench:

A lot !! And I mean A LOT!!

2024 Kits on deck / in process / completed   

                         14 / 5 / 2  

                              Tongue Tied

  • Member since
    April 2006
  • From: ON, Canada
Posted by jgeratic on Wednesday, February 19, 2020 11:43 AM

Hi Gary, thank you for the Imodeller link, lots of info presented there, and 'all under one roof.'   Have it bookmarked for a future build.

In my last post, I quoted both Nick (Aviation of Japan) as well as linked J-Aircraft.  These are two different entities not affiliated with each other, but both talk about the black decking.

Concerning the last two photos crammed with aircraft, going to assume not colourized.  To be fair though, we are trying to judge a colour through the glass canopy that has the sun glaring off the surface.  The headrest area definitely has a blue hue, so took a reading of the area:

https://i.imgur.com/WsTetJd.jpg

So the above is GIMP software (available free).  What I like about it's eyedropper tool is you can adjust the size for reading a colour, so that it averages the result instead of just reading one pixel.  The white square with pointer indicates the area and size measured.

Over the resulting find, have pasted a screen shot of FS 36164 from the Colorserver.net for ease of comparison.  Not that dissimilar from the Imodeler link, where they describe the weathering of anti-glare black would shift into light blue grey.  Not stating this is conclusive, just interesting.


regards,

Jack

  • Member since
    June 2014
Posted by BrandonK on Friday, February 21, 2020 9:42 AM

I'm jumping in on this topic late, but I did a ton of research when I built my Zero and I can't find my links for it, but it was determined that the rear deck and engine cowl are painted the same color. There are pics out there of surviving parts that never saw the light of day that prove they are the same black with blue tinge. Gunze Mr Color makes the perfect color for it, Cowling Color, Mr Color 125. I'll see if I can find those references as they sealed the deal when I was given them.

BK

On the bench:

A lot !! And I mean A LOT!!

2024 Kits on deck / in process / completed   

                         14 / 5 / 2  

                              Tongue Tied

  • Member since
    April 2014
  • From: Australia
Posted by lostagain on Saturday, February 22, 2020 2:25 AM

Hi Cliff,

Sorry to hear about your father, my condolences.

Thinking of you, take care of yourself and your loved ones.

Piers

  • Member since
    March 2019
  • From: Post Falls, Idaho
Posted by Sigep Ziggy on Saturday, February 22, 2020 6:08 AM

I'm going paint my tiny one 'black'. I makes more sense to me that part of the should be black.

your shipmate,

Ziggy


  • Member since
    November 2003
  • From: Naples, FL
Posted by tempestjohnny on Saturday, February 22, 2020 7:19 AM
Cliff. Just reading through the last few posts. So sorry to hear of your father. My condolences


  • Member since
    March 2017
Posted by Armor_Aficionado on Sunday, February 23, 2020 8:19 AM

Latest progress on the Chi-Ha:  the tank itself is done, just working on the commander figure now.  The decals for this were a real pain in the a$$!  I don't what it is with Tamiya, if they changed how they mae their decals, or if they went to a new outside supplier or what, but the last two Tamiya kits I have built, both purchased within the last year, have had absolute shite decals.  I'vee always used the same method - gloss clear coat, then apply decals and settle them down using Micro-Set/Micro-Sol, then matt clear coat - and usually have no problem, but the last two Tamiya kits have had the decls silver horribly, to the point they were (on this kit) completely opaque white!  I ended up having to hand paint the markings.


  • Member since
    April 2006
  • From: ON, Canada
Posted by jgeratic on Sunday, February 23, 2020 9:22 AM

Hello AA, that is great looking camou work on the Chi-Ha.

Is there any date printed on the box or instructions?  Even though you purchased recently, it may have been on the store shelf for a number of years.  This Tamyia subject was first tooled in 1975, with a re-box in 1987 containing an 'improved' turret.


regards,

Jack

  • Member since
    November 2009
  • From: SW Virginia
Posted by Gamera on Monday, February 24, 2020 7:28 AM

Hey thanks guys! Sorry between all the stuff with the funeral and I really didn't feel like posting anything. Guess I'm back now. In any case I could use something to keep my mind occupied. 

AA: Great job there on the Chi-Ha, I agree the camo looks spot on and great job there on the commander. 

And thanks everyone for the discussion on the rear cockpit deck. Still haven't repainted mine yet. 

"I dream in fire but work in clay." -Arthur Machen


  • Member since
    November 2008
  • From: Central Florida
Posted by plasticjunkie on Monday, February 24, 2020 8:49 AM

Hi Gamera! Been wanting to do this Hasegawa 1/32 Oscar for a while so plese sign me up in this GB.

 GIFMaker.org_jy_Ayj_O


Too many models to build, not enough time in a lifetime!!

  • Member since
    November 2009
  • From: SW Virginia
Posted by Gamera on Monday, February 24, 2020 8:51 AM

Hey PJ that looks cool, will go put you down now! 

"I dream in fire but work in clay." -Arthur Machen


  • Member since
    November 2008
  • From: Central Florida
Posted by plasticjunkie on Monday, February 24, 2020 10:04 AM

Thanks gamera. Hey sorry for your loss. I read about it over Bish's GB.

 GIFMaker.org_jy_Ayj_O


Too many models to build, not enough time in a lifetime!!

  • Member since
    November 2009
  • From: SW Virginia
Posted by Gamera on Monday, February 24, 2020 11:40 AM

Thanks PJ and welcome to the GB! 

"I dream in fire but work in clay." -Arthur Machen


  • Member since
    November 2008
  • From: Central Florida
Posted by plasticjunkie on Monday, February 24, 2020 11:42 AM

Gamera

Thanks PJ and welcome to the GB! 


Yes

 GIFMaker.org_jy_Ayj_O


Too many models to build, not enough time in a lifetime!!

  • Member since
    August 2014
  • From: Willamette Valley, Oregon
Posted by goldhammer on Monday, February 24, 2020 8:19 PM

PJ-  The only airworthy Oscar is at the Erickson Collection, about 120 miles from me.  It is US powered though, just barely fits in the cowling .

Will be watching it come together in your capable hands.

  • Member since
    November 2008
  • From: Central Florida
Posted by plasticjunkie on Tuesday, February 25, 2020 7:13 AM

Thanks GH. I'm doing some research before starting. Was hoping to get some decals with colorful markings but  there's not a good selection of them for this subject in this scale. The kit decals appear to be in usable condition so I just may go with them.

 GIFMaker.org_jy_Ayj_O


Too many models to build, not enough time in a lifetime!!

  • Member since
    November 2009
  • From: SW Virginia
Posted by Gamera on Tuesday, February 25, 2020 8:29 AM

PJ: Just for kicks I looked on Ebay and there's a couple of sets of decals for your Ki-43. Japanese, Indonesian, Thai, and Chinese Nationalist, Communist, and Manchukuo (Japanese collaborator government). To be anal captured Japanese aircraft aren't within the GB but I'd be more than willing to let things slide just to see you get her built. 

BTW: None of them are cheap though. Twenty-five bucks including shipping for a set of decals is rather on the steep side for me. 

https://www.ebay.com/sch/i.html?_from=R40&_trksid=m570.l1313&_nkw=1%2F32nd+Ki-43+decal&_sacat=0

"I dream in fire but work in clay." -Arthur Machen


  • Member since
    November 2008
  • From: Central Florida
Posted by plasticjunkie on Tuesday, February 25, 2020 9:24 AM

Gamera

PJ: Just for kicks I looked on Ebay and there's a couple of sets of decals for your Ki-43. Japanese, Indonesian, Thai, and Chinese Nationalist, Communist, and Manchukuo (Japanese collaborator government). To be anal captured Japanese aircraft aren't within the GB but I'd be more than willing to let things slide just to see you get her built. 

BTW: None of them are cheap though. Twenty-five bucks including shipping for a set of decals is rather on the steep side for me. 

https://www.ebay.com/sch/i.html?_from=R40&_trksid=m570.l1313&_nkw=1%2F32nd+Ki-43+decal&_sacat=0


Thanks for looking. I saw them too but they are not exactly what I was looking for. The kit decals have two versions I'm liking. I can always paint the markings if the decals are bad. 

 GIFMaker.org_jy_Ayj_O


Too many models to build, not enough time in a lifetime!!

  • Member since
    November 2009
  • From: SW Virginia
Posted by Gamera on Tuesday, February 25, 2020 10:50 AM

plasticjunkie


Gamera

PJ: Just for kicks I looked on Ebay and there's a couple of sets of decals for your Ki-43. Japanese, Indonesian, Thai, and Chinese Nationalist, Communist, and Manchukuo (Japanese collaborator government). To be anal captured Japanese aircraft aren't within the GB but I'd be more than willing to let things slide just to see you get her built. 

BTW: None of them are cheap though. Twenty-five bucks including shipping for a set of decals is rather on the steep side for me. 

https://www.ebay.com/sch/i.html?_from=R40&_trksid=m570.l1313&_nkw=1%2F32nd+Ki-43+decal&_sacat=0


Thanks for looking. I saw them too but they are not exactly what I was looking for. The kit decals have two versions I'm liking. I can always paint the markings if the decals are bad. 


Sure! Just thought I'd point it out. Looking forward to seeing how the markings come out. 

"I dream in fire but work in clay." -Arthur Machen


  • Member since
    November 2008
  • From: Central Florida
Posted by plasticjunkie on Tuesday, February 25, 2020 4:06 PM

Gamera


plasticjunkie


Gamera

PJ: Just for kicks I looked on Ebay and there's a couple of sets of decals for your Ki-43. Japanese, Indonesian, Thai, and Chinese Nationalist, Communist, and Manchukuo (Japanese collaborator government). To be anal captured Japanese aircraft aren't within the GB but I'd be more than willing to let things slide just to see you get her built. 

BTW: None of them are cheap though. Twenty-five bucks including shipping for a set of decals is rather on the steep side for me. 

https://www.ebay.com/sch/i.html?_from=R40&_trksid=m570.l1313&_nkw=1%2F32nd+Ki-43+decal&_sacat=0


Thanks for looking. I saw them too but they are not exactly what I was looking for. The kit decals have two versions I'm liking. I can always paint the markings if the decals are bad. 


Sure! Just thought I'd point it out. Looking forward to seeing how the markings come out. 


Yes


 GIFMaker.org_jy_Ayj_O


Too many models to build, not enough time in a lifetime!!

  • Member since
    November 2008
  • From: Central Florida
Posted by plasticjunkie on Wednesday, February 26, 2020 7:12 AM

Started las night gluing up some parts like the wheels and tanks. The wings came next and here we go.......why in the heck did Hasegawa do this goofy fit??


The upper wing skins don't match the bottom part along the leading egdges, extending just a hair and the trailing bottom wings have an ugly join line running along the bottom of the flaps and all along the ailerons that are fabric textured. This means lots of filling in with stretched sprue sanding and then re scribing all that fabric texteure on the trailing bottom wing and lots of sanding and re scribing along the wing LE.

I like the display plate Hasegawa included and will look cool done in metalizers.


The kit markings I like and hope the decals  are ok and will not fracture in water. I will test one of the ones I won't  be using but if they fracture then some Microsol Superfilm will save them. I can always paint them on but just trying to keep the extra work away. These markings belonged to Sentai Commander Maj. Torashiro Aizawa of the 204th Sentai operating from Akyab air base, Burma. The aircraft is a KI-43 Type II made in 1943 and it had a heavy mottled dark green paint over NMF and undersides were NMF.

The kit color guide call for sollid green upper with chipping but I don't trust the info starting with Hasegawa calling this Hayabusa as a Type 1 which is wrong. This is a type II and can be made into a Type III. The Type I had a different cowl undersides and the VERY prominent long tubular gunsight thru the front windscreen. This kit has the Type II Cowl and windscreen with more modern gunsight.

These Lifelike decals are a great reference source but unfortunately only come in 1/48 scale. The first plane is a Type I, the second one is a Type II and my subject . The differences can be clearly seen.


Upper view showing the heavy mottling and solid black top fuselage stripe.

I will be using my hoarded supply of Floquil Old, Bright and Platinum Silver paints for the NMF of this project. These paints IMO are pretty close to an Alclad finish.

 GIFMaker.org_jy_Ayj_O


Too many models to build, not enough time in a lifetime!!

  • Member since
    November 2003
  • From: Naples, FL
Posted by tempestjohnny on Wednesday, February 26, 2020 7:22 AM

plasticjunkie

Started las night gluing up some parts like the wheels and tanks. The wings came next and here we go.......why in the heck did Hasegawa do this goofy fit??


The upper wing skins don't match the bottom part along the leading egdges, extending just a hair and the trailing bottom wings have an ugly join line running along the bottom of the flaps and all along the ailerons that are fabric textured. This means lots of filling in with stretched sprue sanding and then re scribing all that fabric texteure on the trailing bottom wing and lots of sanding and re scribing along the wing LE.

I like the display plate Hasegawa included and will look cool done in metalizers.


The kit markings I like and hope the decals  are ok and will not fracture in water. I will test one of the ones I won't  be using but if they fracture then some Microsol Superfilm will save them. I can always paint them on but just trying to keep the extra work away. These markings belonged to Sentai Commander Maj. Torashiro Aizawa of the 204th Sentai operating from Akyab air base, Burma. The aircraft is a KI-43 Type II made in 1943 and it had a heavy mottled dark green paint over NMF and undersides were NMF.

The kit color guide call for sollid green upper with chipping but I don't trust the info starting with Hasegawa calling this Hayabusa as a Type 1 which is wrong. This is a type II and can be made into a Type III. The Type I had a different cowl undersides and the VERY prominent long tubular gunsight thru the front windscreen. This kit has the Type II Cowl and windscreen with more modern gunsight.

These Lifelike decals are a great reference source but unfortunately only come in 1/48 scale. The first plane is a Type I, the second one is a Type II and my subject . The differences can be clearly seen.


Upper view showing the heavy mottling and solid black top fuselage stripe.

I will be using my hoarded supply of Floquil Old, Bright and Platinum Silver paints for the NMF of this project. These paints IMO are pretty close to an Alclad finish.


Most of the Type 1 also had a 2 blade prop


  • Member since
    November 2009
  • From: SW Virginia
Posted by Gamera on Wednesday, February 26, 2020 7:25 AM

Wow, the name Hasegawa means quality today but back then they had some hit or miss kits. Good luck, thankfully it's not that big a plane so even in 1/32nd it makes it a little easier. Looking forward to how you knock her into shape. 

"I dream in fire but work in clay." -Arthur Machen


  • Member since
    November 2008
  • From: Central Florida
Posted by plasticjunkie on Wednesday, February 26, 2020 7:34 AM

Right TJ, forgot to list the 2 blade prop of the Type I and 3 bladed Type II and III.

 GIFMaker.org_jy_Ayj_O


Too many models to build, not enough time in a lifetime!!

  • Member since
    November 2008
  • From: Central Florida
Posted by plasticjunkie on Wednesday, February 26, 2020 7:38 AM

Gamera

Wow, the name Hasegawa means quality today but back then they had some hit or miss kits. Good luck, thankfully it's not that big a plane so even in 1/32nd it makes it a little easier. Looking forward to how you knock her into shape. 


Yep, very surpised to find this type of misalignment and bad join lines in a Hasegawa kit that for the most part are very well made. Heck not long ago I built a 1/72 Monogram F-105D from the early 70's and it had outstanding fit and details.

 GIFMaker.org_jy_Ayj_O


Too many models to build, not enough time in a lifetime!!

  • Member since
    March 2017
Posted by Armor_Aficionado on Wednesday, February 26, 2020 3:46 PM

Okay, final reveal time, the Chi-Ha is finally done.  Gamera, you can use the first pic in this series as the front page gallery pic:


  • Member since
    March 2019
  • From: Post Falls, Idaho
Posted by Sigep Ziggy on Thursday, February 27, 2020 7:01 AM

Just experimenting with my pounce wheel.

your shipmate,

Ziggy


  • Member since
    November 2009
  • From: SW Virginia
Posted by Gamera on Thursday, February 27, 2020 8:00 AM

AA: Nice work! Heart Camo looks great!!! And the figure ain't half-bad either! Will try to get you posted at lunchtime today. 

Ziggy: Cool, please let us know how it goes. I've got one of the cheap plastic ones, your metal ones look like they'd work much better. 

"I dream in fire but work in clay." -Arthur Machen


  • Member since
    November 2008
  • From: Central Florida
Posted by plasticjunkie on Thursday, February 27, 2020 11:14 AM

Looks good Ziggy. I have a set from RB and it's a time saver at adding rivets.

Been working on the Oscar's pit and at 1/32 scale the scratch building is a lot easier than the smaller scales. I stretched some sprue and created the aileron rods for the foot pedals, longer handles for the floor mounted instruments and the seat back turbular piece. The Eduard PE set adds tons of details. After I figure out any more added thingies from my junk pile, the pit will get some Nakajima interior green and then all the wires and plumbing in several colors will be attached to busy things up.

Same for the sides.

 The IP will be next. Need to make a HL run to get some Testors flat black.

The crappy join lines on the bottom rear of the wings were filled in with stretched sprue and Tenax, then sanded. I spent several hours yesterday sanding, filling, checking and sanding. A dark silver grey line can be seen along the seam but there is no trace of a gap. The fabric texture was re scribed along the aileron bottoms.


The front LE section that had the top skin extending out sanded out nice too. It's flush and even now.

Cant wait to detail the 14 cylinder radial engine!


 GIFMaker.org_jy_Ayj_O


Too many models to build, not enough time in a lifetime!!

  • Member since
    November 2009
  • From: SW Virginia
Posted by Gamera on Thursday, February 27, 2020 11:23 AM

AA: You got you posted sir! Grab your badge, you've earned it. 

PJ: Wow that looks good! I love the look of the brass PE, almost a shame to paint over it... 

"I dream in fire but work in clay." -Arthur Machen


  • Member since
    November 2009
  • From: SW Virginia
Posted by Gamera on Thursday, February 27, 2020 11:35 AM

The Zero is mostly painted. I had some Mitsubishi green I tried to use for the upper surfaces and it was partly dried and made a big mess. So I went back and sprayed her with the deeper green, which is closer to a Kawanishi green but what the heck, it's on and just going to go with it.

I normally spray the leading edge yellow ID stripes first, mask, and then spray the upper and lower wings. Since I went with the hairspray it would have been more work to do it this way so I sprayed the lower surfaces, masked, sprayed the upper, masked and then sprayed the ID stripes. I was really lucky, it came out with very little paint bleed that was easy to clean up. 

Still need to repaint the aft cockpit decking. 

"I dream in fire but work in clay." -Arthur Machen


  • Member since
    November 2008
  • From: Central Florida
Posted by plasticjunkie on Sunday, March 1, 2020 7:55 AM

Looks great Gamera. The hair spray trick is the best method by far for creating realistic chipping. Can't wait to see what you do with it.

Well this Hasegawa kit keeps throwing surprises at me. The engine, exhaust and cowling took several hours of careful fitting, carving and sanding to get a decent fit.

The exhaust pipes were way too thick to begin with extending past the firewall center part so that was sanded off along with removal of some of the center firewall thickness. Both parts created a large ugly gap between the cowl and the fuselage.

Here are the parts after heavy sanding and removal of the side plastic on the fuselage for the exhaust pipe clearance.

I used my thin razor saw to remove the plastic in between the open cowl flaps. The Eduard pe set includes brass flaps as a wrap around part but they cover up the separation detail so I won't be using them. I have a rule about using pe, just because the pe parts are there doesn't mean I will use ALL of them. I only use them if they give better details than the original plastic parts otherwise they go to the junk pile for future scratch building. 

Here are the parts after sanding and fitting giving 120% better fit.

I also drilled out the nose gun depressions and added some brass pipes for the 12.7 guns.

The radial engine went together without an issue.


The engine will get painted and dressed up with brass wires from my junk box so that will be coming up soon.

 GIFMaker.org_jy_Ayj_O


Too many models to build, not enough time in a lifetime!!

  • Member since
    November 2009
  • From: SW Virginia
Posted by Gamera on Monday, March 2, 2020 11:31 AM

PJ: Thanks! 

Nice work all around but I love the cowl flaps- huge improvement!!! Yes

"I dream in fire but work in clay." -Arthur Machen


  • Member since
    November 2008
  • From: Central Florida
Posted by plasticjunkie on Tuesday, March 3, 2020 9:08 AM

Thanks Gamera. I kept looking at the cowl flaps and noticed something missing and finally the bulb lit up Idea, so the cut outs for both cowl flaps over the exhaust stacks were carefully cut so they can close, another goof by Hasegawa.

Speaking of goofs, no spinner back plate provided by Hasegawa either! I punched one out from those plastic cards that come in the junk mail.


 Plate fitted

main gears OOB

scissors were thinned a bit and holes drilled. Eduard provides pe parts for this but they look too thin and flimsy. I will add some copper wires as brake lines once mounted.


Now I have to wait for the Nakajima Interior Green paint for the pit to arrive from Scale Hobbyist. I thought I had some but none to be found in my paint stash. 

 GIFMaker.org_jy_Ayj_O


Too many models to build, not enough time in a lifetime!!

  • Member since
    November 2009
  • From: SW Virginia
Posted by Gamera on Tuesday, March 3, 2020 11:49 AM

Ah hah! Guess I should have seen the need for the cut-out looking at your previous photo! 

Anyway she's coming along splendidly! 

"I dream in fire but work in clay." -Arthur Machen


  • Member since
    November 2008
  • From: Central Florida
Posted by plasticjunkie on Wednesday, March 4, 2020 7:28 AM

Finished the IP last night.

the kit's IP


The completed Eduard IP is a beauty, what a difference!!

 GIFMaker.org_jy_Ayj_O


Too many models to build, not enough time in a lifetime!!

  • Member since
    November 2009
  • From: SW Virginia
Posted by Gamera on Wednesday, March 4, 2020 11:31 AM

Oh gosh, that's a MASSIVE improvement! 

"I dream in fire but work in clay." -Arthur Machen


  • Member since
    November 2008
  • From: Central Florida
Posted by plasticjunkie on Thursday, March 5, 2020 7:24 PM

Spent most of the day wiring up the Ha115 fourteen cylinder radial engine. It was quite a time consuming task but adds tons of detail.

 GIFMaker.org_jy_Ayj_O


Too many models to build, not enough time in a lifetime!!

  • Member since
    November 2009
  • From: SW Virginia
Posted by Gamera on Friday, March 6, 2020 8:24 AM

Now that is MILLIONFOLD improvement! Heart

"I dream in fire but work in clay." -Arthur Machen


  • Member since
    November 2008
  • From: Central Florida
Posted by plasticjunkie on Friday, March 6, 2020 9:51 AM

Gamera

Now that is MILLIONFOLD improvement! Heart


Yes

 GIFMaker.org_jy_Ayj_O


Too many models to build, not enough time in a lifetime!!

  • Member since
    November 2008
  • From: Central Florida
Posted by plasticjunkie on Tuesday, March 10, 2020 6:25 PM

The pit is done.  I was gonna add more wiring but once the fuselage is closed up most of the details including the beautiful IP get hidden so I stopped here.


 GIFMaker.org_jy_Ayj_O


Too many models to build, not enough time in a lifetime!!

  • Member since
    November 2009
  • From: SW Virginia
Posted by Gamera on Tuesday, March 10, 2020 9:03 PM

That looks good, really good! Probably more work than I'd have done considering how little you'll be able to see down in there! Yes

"I dream in fire but work in clay." -Arthur Machen


  • Member since
    November 2008
  • From: Central Florida
Posted by plasticjunkie on Tuesday, March 10, 2020 9:36 PM

Gamera

That looks good, really good! Probably more work than I'd have done considering how little you'll be able to see down in there! Yes


Yep I know what you mean. The side panels are very hard to see.


 GIFMaker.org_jy_Ayj_O


Too many models to build, not enough time in a lifetime!!

  • Member since
    November 2009
  • From: SW Virginia
Posted by Gamera on Wednesday, March 11, 2020 11:37 AM

Does look good down in there though! 

"I dream in fire but work in clay." -Arthur Machen


  • Member since
    November 2008
  • From: Central Florida
Posted by plasticjunkie on Saturday, March 14, 2020 2:10 PM

I have been plugging away at this model and I must say that I have never had so many issues with a Hasegawa kit as with this one. After many hours of fiddling, sanding and carving the cowl and engine fit properly. I'm pretty happy how things are fitting up front so now I can move to other issues.

The wing to fuselage gap was filled with stretched sprue and melted with Tenax. The bottom fuselage to rear wing join was terrible too requiring stretched sprue as filler and TONS of sanding to get things to line up. An RB Riveter was used to replace all the details lost to the sanding.

I made my own brew of Aotake paint using Tamiya metallic blue and clear green

That radial engine looks perfect in there

I also put together the tanks and both bombs. I will have the wing tanks on the Oscar and thinking of a simple dio setting with both bombs close by as if they were ready to be attached to a plane. The join lines were discolored by the Tenax but the fit is perfectly smooth and solid. Something about old silver plastic that does that.

 GIFMaker.org_jy_Ayj_O


Too many models to build, not enough time in a lifetime!!

GAF
  • Member since
    June 2012
  • From: Anniston, AL
Posted by GAF on Saturday, March 14, 2020 8:26 PM

AA> That is one fine looking Chi Ha!  Well done, sir!  Well done!

PJ> The Ki-43 is really going great.  I've found the Hasegawa 1/48th kits to be relatively easy to assemble.  Sorry to hear 1/32 kit is giving you problems.  That aotake color looks very good!

I have nothing to report on the A6M5.  The weather for the past month or more has been atrocious (we're around 16+ inches of rain for the year), which limits my ability to give the model a base coat.  I have the engine assembled and ready, but want to paint the fuselage first before attaching the engine and cowling so I don't have to mask them.  Hoping for warmer and drier days!

Gary

  • Member since
    November 2008
  • From: Central Florida
Posted by plasticjunkie on Sunday, March 15, 2020 7:43 AM

Thanks Gary. I was reading that Aotake was bluish and would turn greenish after a while. It looks a bit more greenish than in the picture.

I guess being a kit from 1973 the technology has improved but yet I have built old Monograms from that period and the fit was 100% better.

 GIFMaker.org_jy_Ayj_O


Too many models to build, not enough time in a lifetime!!

GAF
  • Member since
    June 2012
  • From: Anniston, AL
Posted by GAF on Sunday, March 15, 2020 8:31 AM

PJ> Aotake seems to have been a variety of colors, if these samples are any indication.  I'm not so sure about this changing color over time, especially on internal parts.  Here's a page with samples.

https://colesaircraft.blogspot.com/2014/08/japanese-wwii-aircraft-aotake-primer.html

As for the Ki-43, it's possible it hasn't been stored well and warped a bit over time.  You would have to have another kit of the same vintage to tell.  Keep plugging along!

And it's raining again today, and there's a 50% chance all week.  I really need an airbrush so I can do something inside.  *sigh*

Gary

  • Member since
    November 2008
  • From: Central Florida
Posted by plasticjunkie on Sunday, March 15, 2020 10:55 AM

Thanks Gary for the very imformative link. No warpage on the parts just a lousy fit on some of them. And that kit IP was atrocious.

 GIFMaker.org_jy_Ayj_O


Too many models to build, not enough time in a lifetime!!

  • Member since
    July 2014
Posted by modelcrazy on Sunday, March 15, 2020 8:55 PM

Hey Gam,

Getting back to the Nick, just a little touch up and decals. Not a bad kit for an old Revell

Steve

Building a kit from your stash is like cutting a head off a Hydra, two more take it's place.


http://www.spamodeler.com/forum/

  • Member since
    December 2002
  • From: Northern California
Posted by jeaton01 on Sunday, March 15, 2020 9:23 PM

The Japanese had some graceful designs in WW II, didn't they.  This and the Dinah are my favorites, along with the Irving.

John

To see build logs for my models:  http://goldeneramodel.com/mymodels/mymodels.html


  • Member since
    July 2014
Posted by modelcrazy on Sunday, March 15, 2020 9:38 PM

Yes, the Dinah is a beautiful bird. Have one in the stash.

Steve

Building a kit from your stash is like cutting a head off a Hydra, two more take it's place.


http://www.spamodeler.com/forum/

  • Member since
    August 2014
  • From: Willamette Valley, Oregon
Posted by goldhammer on Sunday, March 15, 2020 9:45 PM

The Nick looks alot like the post war F7 Tigercat, just have to wonder if the ironworks got their hands on an example.

  • Member since
    November 2009
  • From: SW Virginia
Posted by Gamera on Monday, March 16, 2020 11:21 AM

PJ: She's looking great! I built a few of Hasegawa's 1/32nd kits back in the early '80s- two FW-190s and a ME-262. As I remember they fit pretty well but the detail was kinda soft. I tried super-detailing them but wasn't all that great at it back then. 

Gary: Good luck, hope the weather improves. Been crazy warm around here, raining off and on. 

Steve: Nice work! Love that NM, it looks perfect! 

"I dream in fire but work in clay." -Arthur Machen


  • Member since
    July 2014
Posted by modelcrazy on Monday, March 16, 2020 10:13 PM

Thanks Gam,

She's done, stick her on the wall!

Steve

Building a kit from your stash is like cutting a head off a Hydra, two more take it's place.


http://www.spamodeler.com/forum/

  • Member since
    December 2002
  • From: Northern California
Posted by jeaton01 on Monday, March 16, 2020 11:10 PM

She's a beauty, Steve.

John

To see build logs for my models:  http://goldeneramodel.com/mymodels/mymodels.html


GAF
  • Member since
    June 2012
  • From: Anniston, AL
Posted by GAF on Tuesday, March 17, 2020 9:36 AM

Nice, Steve!  She turned out fine. Smile

Gary

  • Member since
    November 2008
  • From: Central Florida
Posted by plasticjunkie on Tuesday, March 17, 2020 10:34 AM

Nice and shiny Steve.Beer

 GIFMaker.org_jy_Ayj_O


Too many models to build, not enough time in a lifetime!!

  • Member since
    November 2009
  • From: SW Virginia
Posted by Gamera on Tuesday, March 17, 2020 11:32 AM

Steve: Again beautiful work and you sir are now posted!!! Heart

"I dream in fire but work in clay." -Arthur Machen


  • Member since
    July 2014
Posted by modelcrazy on Tuesday, March 17, 2020 9:07 PM

Thanks guys.

Steve

Building a kit from your stash is like cutting a head off a Hydra, two more take it's place.


http://www.spamodeler.com/forum/

  • Member since
    November 2008
  • From: Central Florida
Posted by plasticjunkie on Friday, March 20, 2020 9:56 PM

Ok slight change in plans. I decided to go with a scheme i like better from the 2nd Chutai, 54th Sentai stationed in the Philipines. I did the Jap Army Green mottle scheme and then chipped it. The hinomarus and unit markings will be masked and sprayed since decals are slim pickings in this scale for the Ki43. The black antiglare panel and control surfaces also need to be sprayed.


 GIFMaker.org_jy_Ayj_O


Too many models to build, not enough time in a lifetime!!

  • Member since
    July 2014
Posted by modelcrazy on Saturday, March 21, 2020 10:19 AM

Excelent PJ Yes

Steve

Building a kit from your stash is like cutting a head off a Hydra, two more take it's place.


http://www.spamodeler.com/forum/

  • Member since
    November 2009
  • From: SW Virginia
Posted by Gamera on Saturday, March 21, 2020 12:25 PM

Looks awesome PJ, the spraying and wear on the paint looks perfect!

"I dream in fire but work in clay." -Arthur Machen


  • Member since
    November 2008
  • From: Central Florida
Posted by plasticjunkie on Saturday, March 21, 2020 4:29 PM

Thanks guys.

 GIFMaker.org_jy_Ayj_O


Too many models to build, not enough time in a lifetime!!

GAF
  • Member since
    June 2012
  • From: Anniston, AL
Posted by GAF on Monday, March 23, 2020 8:40 AM

PJ> Quite a weathered bird!  It looks quite good!

The weather turned slightly better last week for a few hours (it is raining again this Monday morning to give you an idea of the situation).  I hurriedly tried to get a gray base coat on the A6M5 and ran into disaster.  I tried placing it on a stand, which as soon as my attention was diverted, proceeded to fall over and the Zero crashed into the concrete (mistaking it for an American aircraft carrier I suppose).

I feared the worst, but the damage was only slight.  The wings had become detached on one side, and the "kokpit" had come loose.  I pushed the wings back into position and proceeded to spray since I knew the weather would not cooperate for long.  I did pick the fuselage up before it was completely dry leaving a fingerprint on the side.  Well, I can sand that out and it's going to be painted over with IJN green anyway.

After it was completely dry, I went ahead and removed the wings so I could fix the pit.  I then reglued the fuselage and wings, leaving some nice gaps.  Guess I'll work on fixing seams and small parts for awhile.

That's the way my modeling goes.  One step forward, two steps back.  All this rain might be telling me I need to work on the CCB for Steve's American ship GB. (17+ inches so far this year).

Take care!

Gary


  • Member since
    December 2002
  • From: NYC, USA
Posted by waikong on Monday, March 23, 2020 11:02 AM
PJ - beautiful painting job there!

My website: http://waihobbies.wkhc.net


  • Member since
    November 2009
  • From: SW Virginia
Posted by Gamera on Monday, March 23, 2020 11:25 AM

Gary: Ouch!!! I know what you mean, I dropped my Han Solo figure for Bish's last Star Wars GB about three times and broke him in half at the waist... Tongue Tied

Still, looks like you have the matter in hand, a little putty and hopefully she'll be back up and ready for paint. 


BTW: I started stripping the paint and hairspray off the wings of my Zero this weekend. Photos when I get the fuselage done. Sadly she's not coming out anywhere near as nice as PJ's Ki-43... 

"I dream in fire but work in clay." -Arthur Machen


  • Member since
    November 2008
  • From: Central Florida
Posted by plasticjunkie on Tuesday, March 24, 2020 10:21 AM

Gary looks like you got things under control and looking good by the way.


I've been working on this to keep sane with all that's going on. I really never noticed that the canopy was in the closed position and would further block all my added details in the pit so I did some VERY careful surgery using the UMM saw to slice off the frame.

Surgery was a success!!!

The prop and spinner were painted and chipped

The hinoramus were sprayed 

I did the halo effect around the fuselage hinoramus

The lower surfaces of the ailerons and elevators were sprayed Japanese Army Grey lightened with some white for fading. The tail unit markings still need to be masked and prayed so that will be next.

 GIFMaker.org_jy_Ayj_O


Too many models to build, not enough time in a lifetime!!

  • Member since
    November 2009
  • From: SW Virginia
Posted by Gamera on Tuesday, March 24, 2020 10:36 AM

Oh wow that is a fantastic job there PJ. 

The canopy cut perfectly and the prop and the hinomaru look perfect! Heart 

"I dream in fire but work in clay." -Arthur Machen


GAF
  • Member since
    June 2012
  • From: Anniston, AL
Posted by GAF on Tuesday, March 24, 2020 12:06 PM

PJ> That is great work.  Everything looks so crisp and even.

Gary

  • Member since
    November 2008
  • From: Central Florida
Posted by plasticjunkie on Tuesday, March 24, 2020 12:31 PM

Gamera

Oh wow that is a fantastic job there PJ. 

The canopy cut perfectly and the prop and the hinomaru look perfect! Heart 

Thanks Gamera. The UMM saw is incredibly accurate for such an application. It's thin enough to get ito the tightest spot very easily.

 GIFMaker.org_jy_Ayj_O


Too many models to build, not enough time in a lifetime!!

  • Member since
    November 2008
  • From: Central Florida
Posted by plasticjunkie on Tuesday, March 24, 2020 12:37 PM

Thanks Gary. I used some leftover clear book covers I've had stored away for many years for the masking material. It's sort of like Frisket. 

Regular masking tape will be used for the tail unit markings.

 GIFMaker.org_jy_Ayj_O


Too many models to build, not enough time in a lifetime!!

  • Member since
    December 2002
  • From: Northern California
Posted by jeaton01 on Tuesday, March 24, 2020 12:44 PM

"Sharp" work, PJ.

John

To see build logs for my models:  http://goldeneramodel.com/mymodels/mymodels.html


  • Member since
    November 2009
  • From: SW Virginia
Posted by Gamera on Wednesday, March 25, 2020 11:22 AM

Ohhhhhhhhh, I've got to pick up one of those UMM saws sometime. I've been using a cheap Atlas snap-saw from the model railroad section of the hobby shop. 


"I dream in fire but work in clay." -Arthur Machen


  • Member since
    November 2008
  • From: Central Florida
Posted by plasticjunkie on Wednesday, March 25, 2020 11:39 AM

Gamera

Ohhhhhhhhh, I've got to pick up one of those UMM saws sometime. I've been using a cheap Atlas snap-saw from the model railroad section of the hobby shop. 


Highly recommend them. I use them a lot specially to slice off clear parts from their trees eliminating potential cracks and even cleanup.

 GIFMaker.org_jy_Ayj_O


Too many models to build, not enough time in a lifetime!!

  • Member since
    November 2008
  • From: Central Florida
Posted by plasticjunkie on Friday, March 27, 2020 8:08 PM

Ok so I kept looking at things and something was off while looking at reference photos. I goofed and separated the clear parts but the actul canopy was a one piece long part and not separated from the rear glass as I thought. Well thanks to the thickness of the UMM saw, I was able to rejoin the canopy frames together for a perfect fit. 

All the markings were sprayed and most of the small parts are attached. The next pictures I post will be of the completed plane. 

 GIFMaker.org_jy_Ayj_O


Too many models to build, not enough time in a lifetime!!

  • Member since
    February 2006
  • From: Cincinnati Ohio
Posted by DantheMan85 on Friday, March 27, 2020 9:23 PM

Hello everyone, Gamera I would like to enter my Tamiya 1/48 Mitsubishi A6M3/3a Zero.  Not sure when I'll start the Zero. Stick out tongue

 IMG_0116 by Daniel Smith, on Flickr

On my Work Bench: Tamiya Ford GT 1/24

Up Coming: ?


  • Member since
    April 2014
  • From: Australia
Posted by lostagain on Saturday, March 28, 2020 7:15 AM

Hi Cliff,

Like to join in this year too.

The model is a Tamiya /48 Komatsu G40 Tractor. The yellow is the colour of the civvy version that I will be doing in a snow diorama.

PJ great work on the Oscar, very steady hand on the canopy there.

  • Member since
    November 2008
  • From: Central Florida
Posted by plasticjunkie on Saturday, March 28, 2020 10:30 AM

Thanks lost!

 GIFMaker.org_jy_Ayj_O


Too many models to build, not enough time in a lifetime!!

  • Member since
    November 2009
  • From: SW Virginia
Posted by Gamera on Sunday, March 29, 2020 5:00 PM

PJ: Ouch! Good to hear that alls well that ends well.

Piers and Dan: Just put you guys down!

"I dream in fire but work in clay." -Arthur Machen


  • Member since
    November 2008
  • From: Central Florida
Posted by plasticjunkie on Monday, March 30, 2020 11:05 AM

The Oscar is finally done. Here are what went into the build:

Eduard pe set used for the pit.

Brake lines made from wire. 

Copper wire used to wire the radial engine.

Cockpit detail enhanced with scratched built parts made from stretched sprue.

Landing light lens made from stretched sprue, and chrome chip bag punched out disc for the reflector.

Brass tubes used for 12.7 nose guns.

All markings were masked and sprayed, no decals used.

EZ line used for radio wire and stretched hollow QTip handle used for wire insulators.

Paints used were Floquil and MM enamels. Flory dark grime washes used and oil paints for streaks and exhaust staining.


 GIFMaker.org_jy_Ayj_O


Too many models to build, not enough time in a lifetime!!

  • Member since
    November 2009
  • From: SW Virginia
Posted by Gamera on Monday, March 30, 2020 11:54 AM

OH WOW!!! That looks superb PJ!!! Talk about making a silk purse out of a sow's ear! 

I'll get you posted ASAP!!! Heart

"I dream in fire but work in clay." -Arthur Machen


GAF
  • Member since
    June 2012
  • From: Anniston, AL
Posted by GAF on Monday, March 30, 2020 2:54 PM

PJ> Wonderful work!  She does look good.

Gary

  • Member since
    November 2008
  • From: Central Florida
Posted by plasticjunkie on Monday, March 30, 2020 4:59 PM

Thaks guys!

 GIFMaker.org_jy_Ayj_O


Too many models to build, not enough time in a lifetime!!

  • Member since
    November 2009
  • From: SW Virginia
Posted by Gamera on Tuesday, March 31, 2020 11:56 AM

PJ: Just put you up and thanks for joining us!!! 

"I dream in fire but work in clay." -Arthur Machen


  • Member since
    November 2008
  • From: Central Florida
Posted by plasticjunkie on Tuesday, March 31, 2020 12:01 PM

Gamera

PJ: Just put you up and thanks for joining us!!! 


Thanks for hosting and having me here.

 GIFMaker.org_jy_Ayj_O


Too many models to build, not enough time in a lifetime!!

  • Member since
    December 2002
  • From: Northern California
Posted by jeaton01 on Tuesday, March 31, 2020 12:56 PM

Outstanding, PJ.

John

To see build logs for my models:  http://goldeneramodel.com/mymodels/mymodels.html


  • Member since
    November 2008
  • From: Central Florida
Posted by plasticjunkie on Tuesday, March 31, 2020 12:58 PM

jeaton01

Outstanding, PJ.


Thanks John

 GIFMaker.org_jy_Ayj_O


Too many models to build, not enough time in a lifetime!!

  • Member since
    December 2002
  • From: Northern California
Posted by jeaton01 on Sunday, April 5, 2020 6:55 PM

Ckiff, can you add another for me?  It's the Hasegawa 1/48 J2M6 Raiden.

John

To see build logs for my models:  http://goldeneramodel.com/mymodels/mymodels.html


  • Member since
    December 2002
  • From: NYC, USA
Posted by waikong on Sunday, April 5, 2020 7:13 PM
SUPERB finish, PJ!

My website: http://waihobbies.wkhc.net


  • Member since
    November 2008
  • From: Central Florida
Posted by plasticjunkie on Sunday, April 5, 2020 8:09 PM

waikong
SUPERB finish, PJ!
 

Yes

 GIFMaker.org_jy_Ayj_O


Too many models to build, not enough time in a lifetime!!

  • Member since
    November 2009
  • From: SW Virginia
Posted by Gamera on Monday, April 6, 2020 7:24 AM

jeaton01

Ckiff, can you add another for me?  It's the Hasegawa 1/48 J2M6 Raiden.


Sure John, just put you down. 

"I dream in fire but work in clay." -Arthur Machen


  • Member since
    April 2014
  • From: Australia
Posted by lostagain on Tuesday, April 7, 2020 5:34 AM

Excellent work on the Oscar there PJ, very impressive.

The tractor is building pretty quickly:

  • Member since
    November 2009
  • From: SW Virginia
Posted by Gamera on Tuesday, April 7, 2020 8:20 PM

Piers: I'm back to not being to see your photos again. Sad

"I dream in fire but work in clay." -Arthur Machen


  • Member since
    April 2014
  • From: Australia
Posted by lostagain on Tuesday, April 7, 2020 10:40 PM
That's annoying, back to remember what I did last time...

  • Member since
    March 2019
  • From: Post Falls, Idaho
Posted by Sigep Ziggy on Wednesday, April 8, 2020 6:50 PM

PJ> Fantasic Job on the Oscar, I love the finish/paint.

Still working out the interior of my Zero and trying to get up the nerve to try out my airbrush, never used one before!?!

your shipmate,

Ziggy


  • Member since
    November 2008
  • From: Central Florida
Posted by plasticjunkie on Wednesday, April 8, 2020 9:32 PM

lostagain

Excellent work on the Oscar there PJ, very impressive.

The tractor is building pretty quickly:


Thanks lost. Hey that's a really nice model and a prime candidate for some dirty and grimey  weathering.

 GIFMaker.org_jy_Ayj_O


Too many models to build, not enough time in a lifetime!!

  • Member since
    November 2008
  • From: Central Florida
Posted by plasticjunkie on Wednesday, April 8, 2020 9:36 PM

Sigep Ziggy

PJ> Fantasic Job on the Oscar, I love the finish/paint.

Still working out the interior of my Zero and trying to get up the nerve to try out my airbrush, never used one before!?!


Thanks Zig. Best advice I can give you is to watch several tutorials on youtube and practice on a piece of cardboard or plastic to get the hang of it first. Which AB do you have? 

 GIFMaker.org_jy_Ayj_O


Too many models to build, not enough time in a lifetime!!

  • Member since
    December 2002
  • From: Northern California
Posted by jeaton01 on Wednesday, April 8, 2020 10:05 PM

Here's my first post on the Raiden.  It's the last version, the J2M6 which had some canopy changes to improve pilot vision.  The only addition to the kit is Eduard seat belts.  The instrument panel decal yielded well to Mr Mark Softer, and due to unusual luck the decal detail lined up very well with the raised detal on the molding.  Construction is going very rapidly due to really good fits.  Sometimes I wonder why I build anything but Tamiya and Hasegawa kits.


http://goldeneramodel.com/mymodels/j2m/1j2m/0011j2m.jpg


http://goldeneramodel.com/mymodels/j2m/1j2m/0051j2m.jpg


http://goldeneramodel.com/mymodels/j2m/1j2m/0071j2m.jpg


http://goldeneramodel.com/mymodels/j2m/1j2m/0091j2m.jpg

The insert in front of the cockpit was a tad narrow, this was my fix.


http://goldeneramodel.com/mymodels/j2m/1j2m/0101j2m.jpg

John

To see build logs for my models:  http://goldeneramodel.com/mymodels/mymodels.html


  • Member since
    November 2009
  • From: SW Virginia
Posted by Gamera on Thursday, April 9, 2020 8:51 AM

Piers: I don't know what you did but I can see your photo fine now! Nice work! Cool looking tractor and she's coming right along. 

John: That cockpit looks friggin' perfect- great job! And I have to like the c-clamp on there- if all else fails break out the giant hammer!!! 

"I dream in fire but work in clay." -Arthur Machen


  • Member since
    November 2009
  • From: SW Virginia
Posted by Gamera on Friday, April 10, 2020 11:27 AM

Well, here's where the Zero is. I'm not totally happy with the chipping- I ended accidently  concentrating most of the scrubbing toward the center of the wings and tail so I ended up taking most of the paint off there. Not sure I should try putting some back or not... 

And I haven't found many photos of the undersides of Japanese aircraft of that era so I'm not totally sure how to chip it. I mean it is out of the sun, but it's going to whacked by all kinds of rocks and dust kicked up by the landing gear. 

"I dream in fire but work in clay." -Arthur Machen


  • Member since
    November 2008
  • From: Central Florida
Posted by plasticjunkie on Friday, April 10, 2020 1:12 PM

I like it! The chipping looks very good but will you paint the meat balls or use decals? The chipping line may show up under the decals or paint so I would lightly sand the cipped areas to feather the edges and even shoot some touchups where the markings and hinomarus will go. From what I have seen Japanese planes had very little chipping on the hinomarus and read somewhere that due to pride they touched up most of the chipiing in those areas.

As far as the underside chipping, I would do some along the LE and just behind the main gear area as rocks would be kicked up and nick the paint. Also chipping along the bottom fuselage from rocks and junk kicked up.

 GIFMaker.org_jy_Ayj_O


Too many models to build, not enough time in a lifetime!!

  • Member since
    November 2009
  • From: SW Virginia
Posted by Gamera on Monday, April 13, 2020 7:47 AM

Thanks PJ! The chipping from junk kicked up makes perfect sense! 

And I never thought about sanding down the areas where the decals go, I'll give that a try! 

"I dream in fire but work in clay." -Arthur Machen


GAF
  • Member since
    June 2012
  • From: Anniston, AL
Posted by GAF on Tuesday, April 14, 2020 5:00 PM

Just checking in.  I've been dealing with a lot of things.  Quarantine, my sister's death, and what is (I hope) an ulcer.  Haven't touched anything for awhile.

ZIggy>  Good luck with the airbrush!  I'm sure there's a learning curve, especially on getting the mixture right.

Piers> That's a neat little tractor!  Would fit nicely into a diorama.

John> Is that aircraft related to the Shiden?

Gamera> It looks "war-weary".  As for the bottom, some dings and mud should take care of that.  Smile

Take care, everyone!

Gary

  • Member since
    November 2008
  • From: Central Florida
Posted by plasticjunkie on Tuesday, April 14, 2020 5:48 PM

My condolences Gary. I'm so sorry about your sister.  

 GIFMaker.org_jy_Ayj_O


Too many models to build, not enough time in a lifetime!!

  • Member since
    November 2009
  • From: SW Virginia
Posted by Gamera on Tuesday, April 14, 2020 8:54 PM

Yeah, so sorry to hear about your sister and your health issues Gary. You're in my prayers now. And we're here for you if you want to vent.

"I dream in fire but work in clay." -Arthur Machen


  • Member since
    December 2002
  • From: Northern California
Posted by jeaton01 on Tuesday, April 14, 2020 11:19 PM

Gary, the main connection is they were both used against the B-29, but there was no design connection.


The Raiden is completed, here are some photos, the last with an A6M2 Zero built as a Pearl Harbor attacker.  A pleasant build, though I wish there was an open canopy option, neither the Tamiya or the Hasegawa kits offer that.  This is a J2M6, which has the enlarged canopy of the J2M5 but the same engine as the J2M3, owing to a shortage of the higher horsepower engines of the J2M5.  Gunze enamels for most of the colors.


John

To see build logs for my models:  http://goldeneramodel.com/mymodels/mymodels.html


GAF
  • Member since
    June 2012
  • From: Anniston, AL
Posted by GAF on Tuesday, April 14, 2020 11:33 PM

Thanks, guys!  I know Gamera lost his father not long ago.  It's just a part of life that we deal with.  My only regret is that because of the lockdown we didn't get to see her before she passed.

John> That is an outstanding build!  Both models look great.

Gary

  • Member since
    November 2009
  • From: SW Virginia
Posted by Gamera on Thursday, April 16, 2020 11:29 AM

John(Jeaton): The Raiden looks fantastic!!! Just posted her on the top page. Beautiful work!!! 

Gary(GAF): If you ever need to someone to talk to send me a message. Not that I can help but you know sometimes it helps just to talk to someone. 


Edit: Sorry Gary, didn't mean to call you John- that's what I get from trying to post fifty things at work on the boss's computer before he gets back from lunch... Embarrassed

"I dream in fire but work in clay." -Arthur Machen


  • Member since
    December 2002
  • From: Northern California
Posted by jeaton01 on Thursday, April 16, 2020 12:50 PM

Thanks, Cliff, and John who is not a Gary, sorry about that.

John

To see build logs for my models:  http://goldeneramodel.com/mymodels/mymodels.html


GAF
  • Member since
    June 2012
  • From: Anniston, AL
Posted by GAF on Thursday, April 23, 2020 6:44 PM

Thought I would check in with a little progress.  I managed to get the bottom of the Zero masked and then tried out the spray can color "Hunters Green" to see what it looked like.  It's... It's... It's green!

I can't say how close it is to IJN green, or IJA green for that matter.  All I can say is that it is enamel and it is shiny!  As a base, I think it will be okay as I intend to give it a wash of actual IJN green.  I do need to be careful as I'm not sure what a wash of Tamiya IJN green color will do to this enamel.  Needs testing.

The Hunters Green appears rather dark in the above photo, but is actually lighter as seen in this image.

I hope by the time the wash is applied, some weathering and chipping done, and a matte finished applied it will be somewhat close.  I have to say that I'm just experimenting now.

In case you're curious, the mask is still on the bottom of the model, so the grey-green is not showing through.

Hope everyone is doing okay in their concentration camps!

Gary

  • Member since
    November 2009
  • From: SW Virginia
Posted by Gamera on Friday, April 24, 2020 8:11 AM

Gary: Hmmmm, Hunter Green wouldn't have been my first choice but it looks pretty darn close to me. Looking forward to more! 

"I dream in fire but work in clay." -Arthur Machen


  • Member since
    December 2002
  • From: Northern California
Posted by jeaton01 on Friday, April 24, 2020 4:37 PM

Hey, Cliff, can I add my A7M here?  Sorry, I should have posted it here first.

John

To see build logs for my models:  http://goldeneramodel.com/mymodels/mymodels.html


  • Member since
    November 2009
  • From: SW Virginia
Posted by Gamera on Friday, April 24, 2020 5:22 PM

jeaton01

Hey, Cliff, can I add my A7M here?  Sorry, I should have posted it here first.


Well, you've finished it but I guess it's okay.

"I dream in fire but work in clay." -Arthur Machen


  • Member since
    December 2002
  • From: Northern California
Posted by jeaton01 on Saturday, April 25, 2020 6:38 PM

No, that's OK.  Can you put me in for the Fine Molds A5M4 instead, 1/48.  Just got it today.

John

To see build logs for my models:  http://goldeneramodel.com/mymodels/mymodels.html


  • Member since
    December 2002
  • From: Northern California
Posted by jeaton01 on Sunday, April 26, 2020 6:05 PM

Here's the box art and some of the contents for the Fine Molds A5M4 Claude.  I'm going to use the markings for the Soryu, which participated in the Java Sea campaign at the same time as the G4M1 I built here.  The last markings in the instructions with the legend in the fuselage Hinomaru.


John

To see build logs for my models:  http://goldeneramodel.com/mymodels/mymodels.html


  • Member since
    November 2009
  • From: SW Virginia
Posted by Gamera on Monday, April 27, 2020 5:10 PM

Looks cool John, going to put the Claude down now.

"I dream in fire but work in clay." -Arthur Machen


  • Member since
    April 2014
  • From: Australia
Posted by lostagain on Tuesday, April 28, 2020 7:46 AM

Cliff, the Zero is coming along well, I think the chipping is looking great there. I like the sound of the markings being painted.
Gary, sorry to hear about your sister, not being able to see her must have been really hard.The Zero colour looks better in the second photo, looking forward to seeing how it ends up.
John, the Raiden looks great. Sadly I can’t see your photos, just the one Cliff has on the front page. I don't know what it is, but it has been the same for a while - I remember it being the same when we were on the Fleet Air Arm GB.
The tractor is coming along slowly, plenty of other things seem to be taking my time at the moment. It’s now got a brown undercoat in preparation for some heavy weathering. It will end up in a diorama by the end.

  • Member since
    November 2009
  • From: SW Virginia
Posted by Gamera on Tuesday, April 28, 2020 11:26 AM

Piers: Thanks and your dozer looks good!!! 

"I dream in fire but work in clay." -Arthur Machen


  • Member since
    December 2002
  • From: Northern California
Posted by jeaton01 on Wednesday, April 29, 2020 12:06 AM

Piers, PM me your ip number, you can get it by going to whatsmyip on google.  I'll see if I can get you fixed up with my gurus.  I wish there were more tractors in 1/48.

I started on the A5M, it is really going together well, a great kit.  My luck may have run out on the instrument panel decals on this one, jury's still out.  They are still drying.

The floor of the cockpit is on the top of the one piece upper wing so the wing is the starting point.  The engine has great detail and fit, very easy to assemble and paint.  I made masks for the windscreen and it is all painted up.  As you can see, I'm not exactly following the order of the instructions, that way I can keep making progress when paint or decals are drying.


John

To see build logs for my models:  http://goldeneramodel.com/mymodels/mymodels.html


  • Member since
    November 2009
  • From: SW Virginia
Posted by Gamera on Wednesday, April 29, 2020 11:47 AM

That looks great John! Love the prop! 

"I dream in fire but work in clay." -Arthur Machen


  • Member since
    December 2002
  • From: Northern California
Posted by jeaton01 on Saturday, May 2, 2020 12:46 AM

Edited 5/4/2020, Carrier names corrected.

The A5M4 is done. I did some research on the A5M4 whose markings I chose, and am quite sure but not positive that it was on the Hosho, a light carrier in the 3rd carrier division during the battle of Midway, June 4-7, 1942, where it played only a peripheral role.  This would most likely be the last carrier combat assignment for the A5M, and in contrast to what I have read before that there were no carrier based A5M's after December 7, 1941.  The Shoho was also carrying A5M's when she was sunk at the battle of the Coral Sea on May7 1942.

The interior built up easily with lots of detail, although I have done better work on instrument panel decals.  The rest of the model had great fit.  I painted it with Alclad II ALC 101, interior is Gunze Mr Color 126 Mitsubishi Interior Green, with details done with Tamiya acrylics.  Eduard seat belts. 


http://goldeneramodel.com/mymodels/a5m/1a5m/0161a5m.jpg


With an A6M2 Zero in Suburo Sakai's markings.

John

To see build logs for my models:  http://goldeneramodel.com/mymodels/mymodels.html


  • Member since
    December 2002
  • From: NYC, USA
Posted by waikong on Sunday, May 3, 2020 12:26 AM
Beautiful claude!

My website: http://waihobbies.wkhc.net


GAF
  • Member since
    June 2012
  • From: Anniston, AL
Posted by GAF on Sunday, May 3, 2020 2:26 AM

John, your speed amazes me!  Nice work on the Claude, sir!

Gary

  • Member since
    November 2009
  • From: SW Virginia
Posted by Gamera on Sunday, May 3, 2020 12:34 PM

John: Beautiful job there! The NM finish is flawless! Just put you up on the front page.

Heart

"I dream in fire but work in clay." -Arthur Machen


  • Member since
    April 2006
  • From: ON, Canada
Posted by jgeratic on Sunday, May 3, 2020 12:48 PM

Hello John, great looking Claude! Yes

I believe CII tail code would be Zuiho, while CI are of the Hosho (up until April 1941 they had been G).  The red stripe along the length of the fuselage may be a marking of the Home (Reserve) Fleet - opinion varies.  Not sure what the script within the Hinomaru means.  Info compliments of Nick Millman replies from a few years back.

http://pacific.valka.cz/planes/ijnaf_marking.htm

Wingsy Kits has it as one of their options too:


regards,

Jack

  • Member since
    December 2002
  • From: Northern California
Posted by jeaton01 on Sunday, May 3, 2020 2:31 PM

Thanks everyone.  This one would probably go together quick for most anyone, it's just a great kit.  I do wish I could read Japanese, I'm sure there's a lot of good information in the first few pages of the instructions.

Jack, thank you for the reference.   I see the Wingsy instructions would have the straps on the tank in black.  Only the attach fittings are indicated black in the Fine Mold instructions.  Likewise, no red on the wheelpants.

I have an A5M2b on the way, with the closed canopy, and the Ka-14 is actually in the workshop but I may build something else first.

John

To see build logs for my models:  http://goldeneramodel.com/mymodels/mymodels.html


  • Member since
    April 2006
  • From: ON, Canada
Posted by jgeratic on Sunday, May 3, 2020 10:24 PM

Shoho was sunk at Coral Sea, which was the lone sister ship of the Zuiho. 

The Hosho was a single class carrier, and only ventured out in a secondary supportive role for Pearl Harbour and Midway.  Can't find anything about Coral Sea.

regards,

Jack

  • Member since
    July 2014
Posted by modelcrazy on Sunday, May 3, 2020 11:20 PM

Gam,

If I may, I would like to enter my 1/350 Akagi. If it's OK, it will take me well into next year. I will be starting it anyway but would like to throw it in on this GB. I want to finish it before the Nationals in Vegas next year so I don't want to wait until My Japanese GB Aug 2021.

Steve

Building a kit from your stash is like cutting a head off a Hydra, two more take it's place.


http://www.spamodeler.com/forum/

  • Member since
    November 2009
  • From: SW Virginia
Posted by Gamera on Monday, May 4, 2020 7:35 AM

Sure Steve, and OMG that's gonna be awesome!!! Heart

"I dream in fire but work in clay." -Arthur Machen


  • Member since
    July 2014
Posted by modelcrazy on Monday, May 4, 2020 8:31 AM

Thanks Clif. It might have to suffice for next years Japanese GB X.

I'll start on it tonight, along with much research, most of which has already been done.

Steve

Building a kit from your stash is like cutting a head off a Hydra, two more take it's place.


http://www.spamodeler.com/forum/

  • Member since
    December 2002
  • From: Northern California
Posted by jeaton01 on Monday, May 4, 2020 11:05 AM

I think I will never get the names right, Jack.  You are correct, of course.  Hosho, Shoho, my brain interchanges them.  Just give them CV numbers and be done with it!


I've corrected (I hope) the original posts.

John

To see build logs for my models:  http://goldeneramodel.com/mymodels/mymodels.html


  • Member since
    April 2006
  • From: ON, Canada
Posted by jgeratic on Tuesday, May 5, 2020 10:54 AM

Hi John, no problem.   For the Hosho at Midaway (according to wiki), there is only mention of 8 obsolete bi-plane bombers, but I think we can assume it still had some fighters since it had a capacity for a total of 15 planes.   Of interest, it is one of their bombers that was resposible for photographing the abandoned and burning Hiryu:


regards,

Jack

  • Member since
    November 2009
  • From: SW Virginia
Posted by Gamera on Wednesday, May 6, 2020 7:36 AM

Hey John and Jack that's interesting! And John the A5M2b sounds cool, will be happy to put you down whenever you want. 

Steve: Personally that'd be a project for me for the next twenty years!!! 


BTW: Got my copy of the 2019 'Midway' the other day. No it's not the perfect movie but still somehow watching it on my TV at my own pace I think I enjoy it more than the big screen. 

"I dream in fire but work in clay." -Arthur Machen


  • Member since
    July 2014
Posted by modelcrazy on Wednesday, May 6, 2020 9:24 AM

I started on this monster last night. The past two night were me trying to make heads or tails of the PE and relationship to the kit. Unlike Eduard and others who tell you which part to replace in lew of the PE part. I surmise that Hasegawa built the kit and added the PE as add-ons. There doesn't seem to be any "replacement parts" per say other than the girders in the "Super Set", everything else looks to be an enhancement to the kit. One just needs to keep an eye on all 8 sheets of PE to make sure you don't miss anything.

After making the 3x searchlights, 3 tiny parts each, and setting them aside so I didn't lose them, I when ahead and installed the bulkheads. Be aware that one of the stern bulkheads has an additional part attached and must be installed a certain way so you can attach the rudders, as if I was going to install rudders….pfft

Steve

Building a kit from your stash is like cutting a head off a Hydra, two more take it's place.


http://www.spamodeler.com/forum/

  • Member since
    November 2009
  • From: SW Virginia
Posted by Gamera on Wednesday, May 6, 2020 11:14 AM

Oh wow Steve! Oh wow oh WOW!!! 

"I dream in fire but work in clay." -Arthur Machen


  • Member since
    December 2002
  • From: Northern California
Posted by jeaton01 on Wednesday, May 6, 2020 3:15 PM

Cliff, I'm still waithing for the A5M2b.  In the meantime I'm going to start on the Ka-14, the prototype for the A5M series, also Fine Molds 1/48.  There was another airplane in The Wind Rises, but it was an airplane Horikoshi dreamed of as a child, I built it last year, I think.


The "dream airplane":

John

To see build logs for my models:  http://goldeneramodel.com/mymodels/mymodels.html


  • Member since
    November 2009
  • From: SW Virginia
Posted by Gamera on Thursday, May 7, 2020 7:43 AM

John: Sure! Going to put the Ka-14 down now! 

And that dream airplane is cool, nice job on her!!! Heart

"I dream in fire but work in clay." -Arthur Machen


  • Member since
    April 2014
  • From: Australia
Posted by lostagain on Friday, May 8, 2020 3:02 AM

Steve, Agaki looks like a massive kit, I can see it keeping you going for a year! I am going to enjoy watching this build unfolding.

John, looking forward to seeing the photos, I enjoyed 'The wind rises' too along with many other Ghibli movies.

The Komatsu is coming along slowly, plenty of other things going on at the moment. Finally got a coat of yellow on over hairspray, then scrubbed it back.

Had to do a bit of touch up, but happy with how bad it looks.

  • Member since
    November 2009
  • From: SW Virginia
Posted by Gamera on Friday, May 8, 2020 9:23 AM

Piers: That rust looks perfect!!! Yes

"I dream in fire but work in clay." -Arthur Machen


  • Member since
    December 2002
  • From: Northern California
Posted by jeaton01 on Saturday, May 9, 2020 7:55 PM

Looking good, Piers!

John

To see build logs for my models:  http://goldeneramodel.com/mymodels/mymodels.html


  • Member since
    December 2002
  • From: Northern California
Posted by jeaton01 on Saturday, May 9, 2020 8:20 PM

I don't know what it is, but somehow these Fine Molds kits are just sucking me in.  Such fun to build, it feels like any little effort has lots of payback.

Eduard seatbelts, Gunze Mr Color 126 Mitsubishi interior green.


The kit gives you a flat faced instrument panel part for the decal, but I put it on the second part that had relief. The decal settled well just with MicroSol. 
 
 
I used Mr Color interior blue green for the magazine, much better than the acrylic I used on the A5M4.  Take a good look at the pressure bottles, you'll never see them once the fuselage is assembled.
 

 Superb fit.

 
Picture was taken with the camera's HDR mode, high dynamic range, where it takes two different exposures and brightens dark areas and darkens light areas.  Not a large cockpit opening.
 
 
The main wheels were grooved to allow installation after final painting, same as the wheels were molded in the A5M4 kit.  All the engine parts were painted on the sprue.  The ignition wires were painted rust before the engine was assembled.  Touch up will be needed on the cowl after assembly.  Masks were made for the windscreen with the Cameo vinyl cutter.
 
 
Almost a shame to put the cowl on.


The markings were painted, including the propeller stripes.  Still have to do a matte clear coat, paint on the position lights, add the pitot tube that looks like a stork sitting on the wing, and install the main wheels.


John

To see build logs for my models:  http://goldeneramodel.com/mymodels/mymodels.html


  • Member since
    December 2002
  • From: Northern California
Posted by jeaton01 on Sunday, May 10, 2020 2:25 PM

The Ka-14 finished itself while I was sleeping, I think.   No unit markings as this airplane was a one off prototype.  A second prototype was built without the gull wing, and that wing made its way on to the the A5M4 Claude.  What a shame, the gull wing is so graceful.

Tamiya XF-14 is the overall color, Gunze Mr Color 128 is supposed to be equivalent but I didn't have any of that.  Tamiya X-7 Red and X-1 Black for the trim, and Gunze Mr Color Cowling Color for the cowl.  Hinomarus are XF-7 Flat Red.  Alclad II Matte clear coat.


Ka-14, A5M4, A6M2b.

John

To see build logs for my models:  http://goldeneramodel.com/mymodels/mymodels.html


  • Member since
    November 2009
  • From: SW Virginia
Posted by Gamera on Sunday, May 10, 2020 9:53 PM

John: That looks beautiful!!! Just put you down on the front page.

And maybe I should box my Zero up and send it to you, I worked on two non-GB projects over Fri. and Sat. - I haven't touched the Zero for a couple weeks now. You might actually get her finished!

"I dream in fire but work in clay." -Arthur Machen


  • Member since
    December 2002
  • From: Northern California
Posted by jeaton01 on Sunday, May 10, 2020 11:33 PM

Ha ha, Cliff.  I'll put it on the list but I have to warn you I still have 31 more Zeros in the stash ahead of it.   Well, at some price I might move it up a few....

If you remember back to the Betty with the torpedo and the mention of a cart for it, I did just finish some wheels for the cart molded using as a master a wheel from the Tamiya 1/48 N1K1 Kyofu's dolly, so I'll get that done soon.  I'm also starting on the Monogram T-6 but that's another topic as it won't be a Hollywood Zero.

John

To see build logs for my models:  http://goldeneramodel.com/mymodels/mymodels.html


  • Member since
    November 2009
  • From: SW Virginia
Posted by Gamera on Monday, May 11, 2020 7:35 AM

John: Lol, just having a little fun with you. After spending friggin' two days working on three tow cables on two tanks I have to have a little sillyness! 

I just ordered a Hasegawa A6M7 and an A6M8 from Ebay- they're the last two Zero varients I didn't have. 


And looking forward to seeing the torpedo cart done!!! 

"I dream in fire but work in clay." -Arthur Machen


  • Member since
    July 2014
Posted by modelcrazy on Monday, May 11, 2020 9:07 AM

Awesome job on the Ka-14 John. I beilieve you have a few more Zeeks in the stash than I do, unless you count 1/350 scale Huh?

Massive amount of work on the Akagi this weekend, well not so much yesterday. I've been loging hours since I started and I'm up to 21. I'm afraid to find out just how many hours of my life will be spent building this thing.Tongue Tied

I spent about 2 of thoss hours working on the two 13m special landing craft boats, adding PE, weathering, drybrushing, just to find out one will probably never be seen and the other can barrly be seen through the aft port section of the hull. Oh well, at least I know they are there. I also started black basing and spraying the base coat grey to areas that I won't be able to get to with the AB. I know it doesn't look like much work but it is. Most of the work is looking through the three sets of PE instructions to see if I'm suposed to add or replace any parts. I wish the instructions were as clear as Eduard PE, however I'm very impressed with the quallity of the PE itself. You can not see what PE was installed, most of it is so tiny my camera didn't pick it up at this distance. The bow and stern arreas is where most of the detail work will be I suspect.

The area where the landing craft will be installed....on the rail you can't see.

BTW, here are the 3 PE trees for the bow and stern deck girders.

Steve

Building a kit from your stash is like cutting a head off a Hydra, two more take it's place.


http://www.spamodeler.com/forum/

  • Member since
    November 2009
  • From: SW Virginia
Posted by Gamera on Monday, May 11, 2020 11:37 AM

Yeah that's a pile of time and money Steve- but you're going to end up with a museum quality model. 


Assuming it doesn't kill you... Wink

But you've done stuff nearly that epic before so I'm betting on you! 

"I dream in fire but work in clay." -Arthur Machen


  • Member since
    December 2002
  • From: Northern California
Posted by jeaton01 on Monday, May 11, 2020 12:07 PM

Gamera

I just ordered a Hasegawa A6M7 and an A6M8 from Ebay- they're the last two Zero varients I didn't have. 

I've been on that quest for awhile and have those two.  If I remember right there is some white metal in the A6M8, and maybe a different cowl.  I haven't looked at it in awhile.  How about the A6M2-K?  It's Hasegawa kit 07372.

John

To see build logs for my models:  http://goldeneramodel.com/mymodels/mymodels.html


  • Member since
    November 2009
  • From: SW Virginia
Posted by Gamera on Tuesday, May 12, 2020 7:27 AM

From what the seller showed on Ebay the A6M8 did have a resin cowl, I didn't see any white metal in the photos he posted, guess I'll find out when it gets here. 

I think I have an A6M2-K, I do have a two-seat trainer model. I didn't pull out the box to check. 

As I look around there are a couple of sub-types I don't have. Not that big a deal though. 

My stash there isn't as extensive as yours John! 

"I dream in fire but work in clay." -Arthur Machen


  • Member since
    July 2014
Posted by modelcrazy on Tuesday, May 12, 2020 8:21 AM
Just a small update. I just got 3 hours on the Akagi last night. I black based and sprayed the linoleum at the bow, most of which you won't really see once the hanger overhang is installed, and stern deck. I then proceeded to work on the stern girder system. Wow, what a delicate interlocking puzzle that is. I first had thought that it attached to the deck while one constructed it....nope. There's no reference. So, to be able to place the deck correctly, aligning with the massive posts, the assembly needs to be built on the bench first. Another issue I see is the deck at the stern is curved on the actual ship, not on the kit. I need to add some curvature to the deck to match the curvature of the delicate mass of PE. Others have done it, so can I. It's going to take a while and I'll work on it while other things are drying.
There are areas of the deck that will be masked and sprayed Sasebo Arsenal Grey A, at least that's what Hasegawa says to paint it, even though she was built in Kure. Whatever Confused It was their ship after all, what do I know.

Steve

Building a kit from your stash is like cutting a head off a Hydra, two more take it's place.


http://www.spamodeler.com/forum/

  • Member since
    November 2009
  • From: SW Virginia
Posted by Gamera on Tuesday, May 12, 2020 11:54 AM

I love that Steve!!! 

"I dream in fire but work in clay." -Arthur Machen


  • Member since
    July 2014
Posted by modelcrazy on Wednesday, May 13, 2020 8:04 AM

Thanks Gam

I put in about 4 hours last night. I masked and sprayed the grey and did some fading since this area will be impossible to get to later. I'll add some weathering tonight for the same reason and then continue to add the hanger overhang at the bow. I also worked on the girder system some. something to get my wound up before bed.

This is one of the most fun kits I've done.

Steve

Building a kit from your stash is like cutting a head off a Hydra, two more take it's place.


http://www.spamodeler.com/forum/

  • Member since
    December 2002
  • From: Northern California
Posted by jeaton01 on Wednesday, May 13, 2020 3:09 PM

Proof your hands are much steadier than mine, Steve.

John

To see build logs for my models:  http://goldeneramodel.com/mymodels/mymodels.html


  • Member since
    November 2009
  • From: SW Virginia
Posted by Gamera on Thursday, May 14, 2020 8:42 AM

Fun Steve!?! Well to each his own! Wink

Great job so far, I love the decking. 

"I dream in fire but work in clay." -Arthur Machen


  • Member since
    July 2014
Posted by modelcrazy on Friday, May 15, 2020 8:37 AM

I got the hanger on and am waiting for a few other items to come in before proceding on the hull. I'm working on the girders at the time being.

Steve

Building a kit from your stash is like cutting a head off a Hydra, two more take it's place.


http://www.spamodeler.com/forum/

  • Member since
    November 2009
  • From: SW Virginia
Posted by Gamera on Friday, May 15, 2020 8:53 AM

Oh wow! Can you see down into the hangers? Looks like bulkhead detail there but it's hard for me to tell from the angle. 

"I dream in fire but work in clay." -Arthur Machen


  • Member since
    July 2014
Posted by modelcrazy on Friday, May 15, 2020 9:17 AM

No, just Hase's way of conecting everything and keeping it all sturdy. It's heavy, maybe 1 1/2 to 2 lbs so far!

Steve

Building a kit from your stash is like cutting a head off a Hydra, two more take it's place.


http://www.spamodeler.com/forum/

  • Member since
    November 2009
  • From: SW Virginia
Posted by Gamera on Friday, May 15, 2020 10:10 AM

modelcrazy

No, just Hase's way of conecting everything and keeping it all sturdy. It's heavy, maybe 1 1/2 to 2 lbs so far!


Good to hear that! With that much weight you really want a good sturdy framework.

"I dream in fire but work in clay." -Arthur Machen


  • Member since
    July 2014
Posted by modelcrazy on Monday, May 18, 2020 10:05 AM

Much done this weekend. PE girders and dry fitting to the hull to make sure all is streight. I apperently didn't take a picture of bow work. Too bad because that took most of Sunday to do.

Stern girders just about done

A little addition to the fore deck.

All that work covered. used filler to smoothe out the join

The stern girders, not attached. I need to smooth the filler. Also there is a smaller section just aft of this section. I'll work on that then install the pillers. After test fitting, all of this will need to be painted. Again, it's to bad I didn't take a pic of the bow work

Steve

Building a kit from your stash is like cutting a head off a Hydra, two more take it's place.


http://www.spamodeler.com/forum/

  • Member since
    November 2009
  • From: SW Virginia
Posted by Gamera on Monday, May 18, 2020 6:01 PM

WOW! Those girders look crazy intricate Steve!

"I dream in fire but work in clay." -Arthur Machen


  • Member since
    December 2002
  • From: Northern California
Posted by jeaton01 on Tuesday, May 19, 2020 1:49 AM

Steve, you're making me crazy!

John

To see build logs for my models:  http://goldeneramodel.com/mymodels/mymodels.html


  • Member since
    November 2003
  • From: Naples, FL
Posted by tempestjohnny on Tuesday, May 19, 2020 5:50 AM

jeaton01

Steve, you're making me crazy!


I don't know about crazy but I'm dizzy just looking at that framework


  • Member since
    November 2003
  • From: Naples, FL
Posted by tempestjohnny on Tuesday, May 19, 2020 5:52 AM
John what is your approximate mixing ratio for the Mr Color paints. I've got a few bottles and will be using some soon. Thanks


  • Member since
    July 2014
Posted by modelcrazy on Tuesday, May 19, 2020 7:49 AM

Thanks guys.

I received a few things last night. I was so busy playing with them that I didn't get a whole lot done. I did get an hour on some more of the stern girder framework. I'm planning on finishing it up with, hopefully, the pillars, or at least get them made. I'm not sure I want to attach them until I fit the deck on just yet. We'll see, I may dry fit the deck, attach the pillars to the framework, then paint it all. I think it would be more difficult masking and painting with everything together.

The pic of the bow girders

The laser cut paper set from South Korea. 12 page instructions and 6 "trees".

Some other items that arrived including the aircraft PE set.

Steve

Building a kit from your stash is like cutting a head off a Hydra, two more take it's place.


http://www.spamodeler.com/forum/

  • Member since
    November 2009
  • From: SW Virginia
Posted by Gamera on Tuesday, May 19, 2020 8:42 AM

Wow those bow girders look crazy! Crazy in a good way though! 

And I've seen the laser cut paper aftermarket parts but so far haven't tried any. I'm curious how they work out. 

"I dream in fire but work in clay." -Arthur Machen


  • Member since
    July 2014
Posted by modelcrazy on Wednesday, May 20, 2020 8:52 AM

Thanks Gam, I was thinking about what glue to use. I'm thinking just a dab of white glue but not sure about that.

Almost complete with the stern girders. Just some pillars and what look to be walkways(?) then on to the mid section. The deck is just dry fitted to the hull. Hase supplied some huge aligling pins to set everything correctly.

Steve

Building a kit from your stash is like cutting a head off a Hydra, two more take it's place.


http://www.spamodeler.com/forum/

  • Member since
    December 2002
  • From: Northern California
Posted by jeaton01 on Wednesday, May 20, 2020 11:31 AM

tempestjohnny
John what is your approximate mixing ratio for the Mr Color paints. I've got a few bottles and will be using some soon. Thanks


About like Model Master.  With a new bottle I add thinner until it reaches the bottom of the neck, 2/3 lacquer thinner, 1/3 Mr Color Leveling Thinner.  My usual method of testing is to look at the rate and size of the drops off of a mixing stick lifted out of the bottle.

John

To see build logs for my models:  http://goldeneramodel.com/mymodels/mymodels.html


  • Member since
    November 2009
  • From: SW Virginia
Posted by Gamera on Wednesday, May 20, 2020 11:46 AM

Steve: I feel like I've been on the actual ship after looking at all that work on the deck supports! 

"I dream in fire but work in clay." -Arthur Machen


  • Member since
    December 2002
  • From: NYC, USA
Posted by waikong on Wednesday, May 20, 2020 1:41 PM
Steve, that's just a crazy amount of PE work, looks great, hat off to you for sure. Used CA to attach them all ?

My website: http://waihobbies.wkhc.net


  • Member since
    July 2014
Posted by modelcrazy on Wednesday, May 20, 2020 1:52 PM

Thanks Gam and Waikong

Steve

Building a kit from your stash is like cutting a head off a Hydra, two more take it's place.


http://www.spamodeler.com/forum/

  • Member since
    July 2014
Posted by modelcrazy on Wednesday, May 20, 2020 2:57 PM

Sorry, yes thin CA

Steve

Building a kit from your stash is like cutting a head off a Hydra, two more take it's place.


http://www.spamodeler.com/forum/

  • Member since
    April 2014
  • From: Australia
Posted by lostagain on Friday, May 22, 2020 6:01 AM

Wow Steve, total masterclass.

Quick question, when you glue it all up, what do you have it sitting on? I have had issues before with gluing the PE to my cutting board... maybe I just need more practice.

I have got the tractor together, now I will have to work on the diorama.

  • Member since
    July 2014
Posted by modelcrazy on Friday, May 22, 2020 7:14 AM

Thaks lost, I glue it on a piece of plactic bag that comes with the kit. CA doesn't stick to that very well but I also apply the slightest amount using a piece of streached sprue.

Steve

Building a kit from your stash is like cutting a head off a Hydra, two more take it's place.


http://www.spamodeler.com/forum/

  • Member since
    November 2009
  • From: SW Virginia
Posted by Gamera on Friday, May 22, 2020 8:40 AM

Piers: Ohhhh, that looks really nasty, worn, and filty. I love it! 

Steve: Interesting, I'd not thought of using a plastic bag. Going to keep that in mind. 

"I dream in fire but work in clay." -Arthur Machen


  • Member since
    July 2014
Posted by modelcrazy on Tuesday, May 26, 2020 8:01 AM

OK this weekends data dump. I worked on and off. I have 79 hours into it now. The Zero took 9 of those hours, but now that I did one, I get faster as I go. Not that I have any complaints with the detail kit but I do wish they added drop tanks for the Zeks.

The canopy was more difficult that I thought it woule be. Cutting out for the interior and the canopy/antenna were to toughist and too the longest. Now time to paint but I'll do that when I have the AB out for other things. The wheels are turned brass.

Moving on the she ship. I completed the pillars and added the crane tracks. I dry fit the deck to check the fit. Looks good. Now I need to add the cable stays but am also continuing on to the kits instructions and the additional paper detail set. Theres still some girders needed to add to the fore/aft sides and the mid deck.

Also, I didn't like some pillars hard molded on the kit so I am replacing those.

That's all I got done this weekend.

Steve

Building a kit from your stash is like cutting a head off a Hydra, two more take it's place.


http://www.spamodeler.com/forum/

  • Member since
    November 2009
  • From: SW Virginia
Posted by Gamera on Tuesday, May 26, 2020 11:34 AM

Oh wow Steve! That lattice work support structure for the deck looks friggin' amazing. But I love that Zero! I'd guess in 1/350th scale they've got a wingspan of about an inch/3cm? That canopy and landing gear are insane! And I love the spinning prop!!

"I dream in fire but work in clay." -Arthur Machen


  • Member since
    July 2014
Posted by modelcrazy on Tuesday, May 26, 2020 12:38 PM

Yeah Gam, perhaps I can enter the Zeek as another GB build. Wink

Steve

Building a kit from your stash is like cutting a head off a Hydra, two more take it's place.


http://www.spamodeler.com/forum/

  • Member since
    December 2002
  • From: NYC, USA
Posted by waikong on Tuesday, May 26, 2020 2:45 PM
Love that weathering on that tractor!

My website: http://waihobbies.wkhc.net


  • Member since
    November 2009
  • From: SW Virginia
Posted by Gamera on Wednesday, May 27, 2020 11:32 AM

modelcrazy

Yeah Gam, perhaps I can enter the Zeek as another GB build. Wink


With that level of detail you could! 

"I dream in fire but work in clay." -Arthur Machen


  • Member since
    July 2014
Posted by modelcrazy on Tuesday, June 2, 2020 9:09 AM

Some more progress, slow, but progress. I worked on the AM paper braces and finally got the process down. Now I'm starting to get some things done again. A 25mm AA gun platform is shown here. The other platforms shown also have the paper braces. Once I touch them with thin CA, they become as hard as plastic. I need to attach the bracing posts and makes up some AA guns from PE. There are also 2 ladders that will be attached from the small hull opening to the platform.

Steve

Building a kit from your stash is like cutting a head off a Hydra, two more take it's place.


http://www.spamodeler.com/forum/

  • Member since
    December 2002
  • From: Northern California
Posted by jeaton01 on Tuesday, June 2, 2020 12:02 PM

The spiders are going to love this model.  Better start thinking about an airtight display case.  Lovely detail!

John

To see build logs for my models:  http://goldeneramodel.com/mymodels/mymodels.html


  • Member since
    July 2014
Posted by modelcrazy on Tuesday, June 2, 2020 12:16 PM

Absolutly John. I'll make my own since something that big off the shelf would pay for the Kaga.

Steve

Building a kit from your stash is like cutting a head off a Hydra, two more take it's place.


http://www.spamodeler.com/forum/

  • Member since
    December 2002
  • From: Northern California
Posted by jeaton01 on Tuesday, June 2, 2020 1:39 PM

Maybe even a real Kaga!

John

To see build logs for my models:  http://goldeneramodel.com/mymodels/mymodels.html


  • Member since
    November 2009
  • From: SW Virginia
Posted by Gamera on Thursday, June 4, 2020 8:25 AM

Steve: Again, looks good! Never thought of soaking paper parts with thin liquid superglue but it makes perfect sense. 

"I dream in fire but work in clay." -Arthur Machen


  • Member since
    July 2014
Posted by modelcrazy on Thursday, June 4, 2020 10:21 AM

Thanks guys.

Here the gun is finished and next to a kit gun. It took me around 3 hours but now I know the sequence. They should take about and hour each and have 13 more to do....unless I loose parts.

Steve

Building a kit from your stash is like cutting a head off a Hydra, two more take it's place.


http://www.spamodeler.com/forum/

  • Member since
    November 2009
  • From: SW Virginia
Posted by Gamera on Thursday, June 4, 2020 11:12 AM

modelcrazy

Thanks guys.

Here the gun is finished and next to a kit gun. It took me around 3 hours but now I know the sequence. They should take about and hour each and have 13 more to do....unless I loose parts.


Steve: I'm beginning to wonder if you have a fake giant rubber finger you use for photos... Stick out tongue

All joking aside that's friggin' incredible! Fourteen of them? I'd end up in a straitjacket! 

"I dream in fire but work in clay." -Arthur Machen


  • Member since
    December 2002
  • From: Northern California
Posted by jeaton01 on Thursday, June 4, 2020 6:13 PM

He's using Waldoes and an Electron microscope!

John

To see build logs for my models:  http://goldeneramodel.com/mymodels/mymodels.html


GAF
  • Member since
    June 2012
  • From: Anniston, AL
Posted by GAF on Thursday, June 4, 2020 9:08 PM

modelcrazy


Gary

  • Member since
    July 2014
Posted by modelcrazy on Friday, June 5, 2020 8:01 AM

LOL thanks GAF, Jean and Cliff. I didn't drive myself nuts last night by working on the guns or planes but instead I worked in the paper framework under other platforms. I'm almost halfway around the port side.

Steve

Building a kit from your stash is like cutting a head off a Hydra, two more take it's place.


http://www.spamodeler.com/forum/

  • Member since
    July 2014
Posted by modelcrazy on Friday, June 12, 2020 8:05 AM

I have been working dillegently every night on the Akagi. I have been replacing the bracing parts with the laser cut paper parts. Each one takes me about an evening each and still have several parts left to do. After this do I work on the AA guns or planes or do I go back to finishing the hull? 

Steve

Building a kit from your stash is like cutting a head off a Hydra, two more take it's place.


http://www.spamodeler.com/forum/

  • Member since
    November 2009
  • From: SW Virginia
Posted by Gamera on Friday, June 12, 2020 9:59 AM

Steve: That is amazing. You're really going to have a museum quality model when you're finished. 

I swear if you drop and break her after adding all that detail I'm going to break down and cry... 

"I dream in fire but work in clay." -Arthur Machen


  • Member since
    July 2014
Posted by modelcrazy on Friday, June 12, 2020 10:03 AM

Gamera
I swear if you drop and break her after adding all that detail I'm going to break down and cry... 

So will I Gam, so will I.

Steve

Building a kit from your stash is like cutting a head off a Hydra, two more take it's place.


http://www.spamodeler.com/forum/

  • Member since
    July 2014
Posted by modelcrazy on Friday, June 19, 2020 8:06 AM

OK guys, I completed this section, at least until I get the IJN ladders from B&A in Australia and attach the deck, but I'm moving on. The black paint under the 25mm AA gun platform is where I'm checking if I need to add some filler. I also need to add the railing before I spray the black base.

I added some detail interest to the area under the deck but can't find any pictures of it to really know what was in there. Probably no one will see them anyway. This is the area where the three AM (Alliance Model Works) 1.2cm twin AA guns go. I glued the bracing on the AA platforms and set them aside to dry before attaching them to the hull. This area is going to need to be repainted. Lots of dust in there No

Steve

Building a kit from your stash is like cutting a head off a Hydra, two more take it's place.


http://www.spamodeler.com/forum/

  • Member since
    November 2009
  • From: SW Virginia
Posted by Gamera on Friday, June 19, 2020 8:18 AM

That's friggin' epic Steve!!! 

"I dream in fire but work in clay." -Arthur Machen


  • Member since
    July 2014
Posted by modelcrazy on Friday, June 19, 2020 8:21 AM

I'm hoping so Cliff.

Steve

Building a kit from your stash is like cutting a head off a Hydra, two more take it's place.


http://www.spamodeler.com/forum/

  • Member since
    July 2014
Posted by modelcrazy on Monday, June 22, 2020 8:43 AM


After working several days on the Akagi I have most of the port side completed. I installed most of the railing, some I should have waited on but, they're on now. The Hasegawa PE is very thin and extremely easy to bend and break so with my fat thumbs this will no doubt cause problems. Hasegawa does not provide holes in the bracing, so everything had to be drilled. I'm waiting for the ladders from Australia and I'm not sure when those will be arriving. I really need them at this point.


25mm AA gun platforms
12cm AA gun platforms
25 mm AA gun platform

Steve

Building a kit from your stash is like cutting a head off a Hydra, two more take it's place.


http://www.spamodeler.com/forum/

  • Member since
    November 2009
  • From: SW Virginia
Posted by Gamera on Monday, June 22, 2020 11:04 AM

Again, that's just friggin' amazing! Bow Down

"I dream in fire but work in clay." -Arthur Machen


  • Member since
    July 2014
Posted by modelcrazy on Wednesday, June 24, 2020 8:20 AM

Thanks Cliff,

Here's some pics of Alliance's 12.7 cm type 89 AA gun conversion to a reasonable facsimile of the 12 cm type 10 which the Akagi had, using some kit parts. The guns were to be replaced after Midway.

Steve

Building a kit from your stash is like cutting a head off a Hydra, two more take it's place.


http://www.spamodeler.com/forum/

  • Member since
    May 2011
  • From: Honolulu, Hawaii
Posted by Real G on Wednesday, June 24, 2020 12:50 PM

See, THIS is why I avoid ship models - the rabbit hole just keeps getting deeper and deeper, until you black out from lack of oxygen due to the weight of the aftermarket pressing down on you.  Your wallet is screaming in agony because it is suffering from the bends (it's decompressing at an alrming rate), all the while hallucinations make you want to add even more detail to your model.  Stick out tongue

That is some crazy modeling Modelcrazy!  Big Smile  Switch to an oxygen-helium mix and dive deeper!

“Ya ya ya, unicorn papoi!”

  • Member since
    November 2009
  • From: SW Virginia
Posted by Gamera on Thursday, June 25, 2020 11:29 AM

Yeah, that much PE just makes my poor head hurt. 

Great show again Steve! 

"I dream in fire but work in clay." -Arthur Machen


  • Member since
    February 2011
Posted by GreySnake on Tuesday, June 30, 2020 12:26 PM
Mind if I join up with a Tamiya 1/35 Type 61? Should be getting one in the mail today and planning to start on it this week.
  • Member since
    November 2009
  • From: SW Virginia
Posted by Gamera on Tuesday, June 30, 2020 12:37 PM

GreySnake
Mind if I join up with a Tamiya 1/35 Type 61? Should be getting one in the mail today and planning to start on it this week.
 

Sure! It's one of those kits I've looked at so many times but never picked one up. I'd love to see how yours goes. 

"I dream in fire but work in clay." -Arthur Machen


  • Member since
    February 2011
Posted by GreySnake on Thursday, July 2, 2020 10:55 AM
Thank you for adding me.
 
The Type 61 is defiantly a model you don’t see that often. I’ve been trying to get my hands on one for about two years now.
 
Anyway here’s my entry.

Not a lot of sprues to this kit. The original kit came out in 1970 and Tamiya then added a new sprue to it in 1993.
 
The lower hull doesn’t look very happy. Of course like most Tamiya armor kits back then it was motorized.
 
The new sprue Tamiya added in 1993.
 
The upper hull has the engine deck handles molded in and those will need replaced.
 
Decals still look pretty good, it’s going to be hard to decide what marking to put on the turret.
 
The most disappointing part of the kit the tracks. I really wish they would have added better tracks like they did with Type 74 Winter Version that came out in the same year.  
It’s going to be an easy build and pretty much straight from the box. I’ll probably replace the .50 cal as the kit one is pretty soft in detail.
  • Member since
    November 2009
  • From: SW Virginia
Posted by Gamera on Thursday, July 2, 2020 11:42 AM

Oh that's cool! I like the green and tan camo scheme- are you going to do that? It's more interesting than the bland OD green. And some cool looking markings for the turret, dragons, tigers, lions! 

Are you going to replace the kit tracks? I don't normally do so but in that case I'd be sorely tempted. 

"I dream in fire but work in clay." -Arthur Machen


  • Member since
    February 2011
Posted by GreySnake on Thursday, July 2, 2020 5:41 PM
Gamera, I will be going the two tone camouflage. Give my cold war armor shelf a little variety since it will be among green Soviet tanks.
 
 
Unfortunately I’m stuck with the kit tracks. Modelkasten made a replacement set but I can’t find them available anywhere at all. I’ll keep looking on eBay and maybe one will show up. Otherwise I’ll mud up the lower hull or not worry about it all. I really just want to have fun with this kit and finally get one built.
 
 
Going to fill in the holes on the bottom of the hull this evening and start building tomorrow.  
  • Member since
    November 2009
  • From: SW Virginia
Posted by Gamera on Friday, July 3, 2020 8:42 AM

Sounds good! Always nice to do a good 'decompression' build and not worry too much about getting detail happy. Did the same on my Tamiya Type 74 a couple years ago.  

"I dream in fire but work in clay." -Arthur Machen


  • Member since
    December 2002
  • From: NYC, USA
Posted by waikong on Monday, July 6, 2020 4:11 PM
I've been watching this one for months, and can no longer resist in joining now that this pandemic thing has given me more bench time. Please put me down for a Tamiya 1/48 hyakushiki shitei III recon aircraft.

My website: http://waihobbies.wkhc.net


  • Member since
    November 2009
  • From: SW Virginia
Posted by Gamera on Tuesday, July 7, 2020 7:26 AM

Sure Waikong, good to have you aboard! I'll go put her down now. 

"I dream in fire but work in clay." -Arthur Machen


  • Member since
    August 2014
  • From: Willamette Valley, Oregon
Posted by goldhammer on Friday, July 10, 2020 12:36 PM

Finally getting back to the Myrt.....got my Eduard canopy masks and spent three evenings doing the massive greenhouse.

Now ready to spray the interior Nakajima Green inside and on the canopy frames.  Pics coming after I get the ofice painted up and ready to install.

  • Member since
    February 2011
Posted by GreySnake on Monday, July 13, 2020 5:18 PM
Been pretty busy lately and finally got done fighting a sinus infection. Finally sat down Friday and started working on the Type 61. This is by far my least favorite kit from Tamiya that I’ve built. Granted the kit was first molded in 1970 and can’t be expected to be top of the line.
 
The motorization holes on the bottom of the hull were filled with putty and rather than using a lot of putty to fill a few of the bigger holes I cut some styrene to look like panels. Not accurate but it gets the job done.
The turret fitted together rather badly and needed some putty.
After sanding it came out much better. There were also some welds on the rear that needed replaced that were lost in sanding.
 
The wheels, sprocket and idler didn’t give me any trouble just some bad seams. The tracks can be glued and with a quick test fit everything looks good.
 
The Type 61 has a lot of welds and the welds at least on the bottom of the hull weren’t great. A #11 blade and Tamiya Extra thin cement fixed the problem. At this point I realized I placed the two front tow hooks upside down, they have been cut off and need placed back correctly.
 
Test fit of the upper and lower hull and it fits fine with no need for filling. Without the turret the tank looks like an APC

The tool box of the rear of the turret is hollow on the inside. You can’t really tell without looking closely however I went ahead and cover it up with sheet styrene. Didn’t worry about making it look pretty as you can hardly see it once glued to the back of the turret. I’ll spray some black on the inside of it and the rear of the turret before gluing it in; rather than trying to airbrush it glued on.
 
 
The model doesn’t have sponsons and more styrene was used.
 
 
That is all for me right now. Unless you really want a Type 61 I can’t recommend this model it’s really rough all around.  
  • Member since
    February 2011
Posted by GreySnake on Thursday, July 16, 2020 10:34 AM
This model is not the easy build that was planned. Still working away at it and getting closer to the finish line as far as building. The molds are just so old almost every part has a noticeable seam line that needs cleaned apart from the sprue from 1993.
 
 
The kit gives you the choice of either a covered or uncovered mantlet. The covered one is from the newer sprue and looks better than the original one so I’m going with that, I’ll attach the mantlet later on once the tank has been painted rather than going through the hastle of masking out the tank.
  
 
The hull is almost finished other then the headlight guards. The seams are pretty pronounced and still need need cleaned up.


Turret has been taking a fair amount of work to look adequate. The rails on the side of took a lot of cleanup to knock down seams and the smoke grenade dischargers were a pain to line up. Still have a few more parts here and there to add such as one lifting hook I snapped while sanding that needs glued back together.
  
  
Here’s what it looks like right now and it’s not too bad. From reading about the Type 61 the Japanese based it on the M36 Jackson and you can see it in the profile.  
  
They also went with a 90mm main gun as it was decided this was the upper limit of what an average Japanese soldier could handle. Compared to Soviet tanks at the time that it would likely face in the event of a war such as the T-54/55 with a 100mm gun it was at a disadvantage at long range.  However it was decided that the 90mm was adequate due to the mountainous terrain of Japan and long range engagements were unlikely.
GAF
  • Member since
    June 2012
  • From: Anniston, AL
Posted by GAF on Thursday, July 16, 2020 5:56 PM

Greysnake>  She's coming along nicely!  You can see the resemblance to the M36 once its all put together.

Gary

  • Member since
    February 2011
Posted by GreySnake on Monday, July 20, 2020 6:33 AM
Thank you, Gary. Maybe I’ll finally get to the painting stage this week at last.
  • Member since
    November 2009
  • From: SW Virginia
Posted by Gamera on Friday, July 24, 2020 7:49 AM

Hello this is Gamera. Guys, sorry I haven't been around. But I've been locked out of my account for the last two weeks. I've contacted tech support four times and they're unable to get me back onto my original account. So I've created a new one here. Of course I can't edit the front page with this new one. But at least I'm on. 

BTW: Great job there Greysnake, you're doing a great job on her. 

"I dream in fire but work in clay." -Arthur Machen


  • Member since
    February 2011
Posted by GreySnake on Wednesday, July 29, 2020 12:03 PM
Gamera, I was wondering what happened glad to have you back. Sorry about getting locked out of the account.
 
I haven’t done any work on the Type 61 other then shooting it with primer and cleaning up some areas that needed attention. My airbrush setup is in my garage and right now it’s been way too hot to paint most of the time. I have a narrow window in the morning that I can do some painting but I have a commission build I’m working on that needs to get painted and finished pretty quickly. I also have to replace the roof on my garage next week so it’s going to be another week or so before I can finally get some paint on this tank.
  • Member since
    July 2014
Posted by modelcrazy on Thursday, July 30, 2020 8:03 AM

Good to have you back boss Big Smile

I arrived at the place I wanted to stop and take a break on the big ole Akagi. I ordered some ladder rungs to replace the pi#@ poor plastic lines that were molded on however, until that time arrives.....I'm putting hes asside and working on something else in the que....not Japanese.

BTW cliff, did you see that groovy Betty I got? Sorry for the 70's throw back but that's when it was molded. Hase just changed the color of the plastic and printed new decals and called it new kit Huh?. Now I have 2 old Base Bettys Sleep At least now I can make one in 1941 markings and the other the surrender plane "Bataan 2", Oh and I can keep the baca bomb as a bonus prize!

Heres the Akagi. Ignore any missing ladders and such. They were removed to easily facilitate the removal of the plastic handholds and instalation of the new PE. Those will all be taken care of once I get the rungs in.

I know it doesn't look like much but it constitutes many hours of magnyfying light work

Steve

Building a kit from your stash is like cutting a head off a Hydra, two more take it's place.


http://www.spamodeler.com/forum/

  • Member since
    November 2009
  • From: SW Virginia
Posted by Gamera on Thursday, July 30, 2020 9:03 AM

Again that looks fantastic Steve!!! 

Sucks that I won't be able to post you, Greysnake, or anyone else to the front page though unless I can get back into my old account though... Bang Head


Love that Betty, sorry I saw her but Real G's giant mach distracted me... 

"I dream in fire but work in clay." -Arthur Machen


  • Member since
    January 2013
  • From: Athens, Greece
Posted by Zvezda1980 on Friday, July 31, 2020 1:52 AM

Sensei Gamera

I would like to also have a place under the rising sun, with this (scale 1 /48).


  • Member since
    November 2009
  • From: SW Virginia
Posted by Gamera on Friday, July 31, 2020 8:29 AM

Zvezda: Sure! I'd love to see you build her. 

But as I said I can't edit the front page with this new account so I can't add you to the roster there or post a photo of your finished build. 

But still I'd love to have you add her. 

"I dream in fire but work in clay." -Arthur Machen


GAF
  • Member since
    June 2012
  • From: Anniston, AL
Posted by GAF on Friday, July 31, 2020 6:17 PM

Gamera977

Zvezda: Sure! I'd love to see you build her. 

But as I said I can't edit the front page with this new account so I can't add you to the roster there or post a photo of your finished build. 

But still I'd love to have you add her. 

Glad to see you back, Gamera (sort of)!  I would suggest just making a new GB thread (Japanese Group Build IX-A or something like that) and transferring pictures and text over to the new thread, with a link back to this one.  No one will object, I'm sure.

Anyway, hope you can recover your old profile soon.

Gary

  • Member since
    July 2014
Posted by modelcrazy on Friday, July 31, 2020 6:43 PM

GAF
I would suggest just making a new GB thread (Japanese Group Build IX-A or something like that) and transferring pictures and text over to the new thread, with a link back to this one.  No one will object, I'm sure.

I had to do that once to continue the ground attack GB a few years ago when Matt Joachim disappeared off the forums.

Steve

Building a kit from your stash is like cutting a head off a Hydra, two more take it's place.


http://www.spamodeler.com/forum/

GAF
  • Member since
    June 2012
  • From: Anniston, AL
Posted by GAF on Friday, July 31, 2020 7:31 PM

Make it so.


  • Member since
    January 2013
  • From: Athens, Greece
Posted by Zvezda1980 on Sunday, August 2, 2020 4:00 AM

Gamera977

Zvezda: Sure! I'd love to see you build her. 

But as I said I can't edit the front page with this new account so I can't add you to the roster there or post a photo of your finished build. 

But still I'd love to have you add her. 


No worries boss, I roll up my sleeves and build it no matter what.

  • Member since
    January 2013
  • From: Athens, Greece
Posted by Zvezda1980 on Sunday, August 2, 2020 4:23 AM

construction started yesterday.

I had this PE set in the stash. Some parts will be used and some not (such as the IP, radio, etc which to my eye is better covered by the kit's decals

The relief details of the IP were sanded down. Detail was excellent and I felt some remorse when I obliterated all. If I get another Kate, I will proceed straight to painting the IP.

The numerous ejection marks on the cockpit sidewalls and crew seats were covered with tamiya tape, cut in each panel's dimensions. First PE parts were also added.

After the phase 1 of the assembly, everything was sprayed with a 50:50 mix of Tamiya XF-71 and a random light grey, in order to reach the Nakajima cockpit green. Various details were brush painted.

Decals and PE instruments were applied.

After that, a seal with floor finish and a black wash.

Seat belts were included in the PE set, placed and painted a random tan color.

And finally some paint chipping. The contrast will be toned down with a flat coat and some slight dry pastels.

I apologize for the long post, but the hellish heat that prevails here for the last week, had the positive effect of reducing drying times to a phenomenal rate, thus all the above were done within a day.


  • Member since
    February 2011
Posted by GreySnake on Sunday, August 2, 2020 7:27 AM
Steve, that’s amazing work on the Akagi.
 
 
Zvezda, the Kate is coming along nicely. Both of us seem to be dealing with very hot environments. I haven’t been able to airbrush for almost three months now because of the heat. It’s still going to be around 103 degrees or 39 Celsius during the day for the next two weeks.   
  • Member since
    July 2014
Posted by modelcrazy on Sunday, August 2, 2020 12:33 PM

Thanks GS, I'm taking a break while waiting for more AM

Steve

Building a kit from your stash is like cutting a head off a Hydra, two more take it's place.


http://www.spamodeler.com/forum/

GAF
  • Member since
    June 2012
  • From: Anniston, AL
Posted by GAF on Sunday, August 2, 2020 11:42 PM

Steve,

Everytime I look at the work on the Akagi I have to wonder about your mental health!  I know that sailing ship builders are certifiable, but this...  Wink

Zvezda> That is great work on the cockpit!  Wish mine had turned out so good.

Gary

  • Member since
    July 2014
Posted by modelcrazy on Monday, August 3, 2020 2:40 PM

GAF
Steve, Everytime I look at the work on the Akagi I have to wonder about your mental health!  I know that sailing ship builders are certifiable, but this... 

Thanks Gary.

Steve

Building a kit from your stash is like cutting a head off a Hydra, two more take it's place.


http://www.spamodeler.com/forum/

  • Member since
    January 2013
  • From: Athens, Greece
Posted by Zvezda1980 on Monday, August 3, 2020 3:51 PM

Steve , I took my time studying your pictures. Woaw!!! I think even the guys at Kure naval yards who built the original would be impressed! I am really looking forward to the next phases of this epicus metallicus.

  • Member since
    January 2013
  • From: Athens, Greece
Posted by Zvezda1980 on Monday, August 3, 2020 4:14 PM

GraySnake, we must build a couple of winter snow dioramas to cool off a bit. Last week I destroyed a perfectly applied (until then) painting on a Hellcat, with heavy drops of sweat suddenly unleashed from my - apparently overheated - head.

I love your Type61, this seems like a very nice classic kit and your interventions are to the point.

GAF, thank you , most of it will not be visible inside the Kate's deep fuselage, but I enjoyed the whole procedure.

I finally put everything together, and started test fitting it into the fuselage. For the moment I quit everything and head off to air conditioning and cold beer.


  • Member since
    November 2009
  • From: SW Virginia
Posted by Gamera on Monday, August 3, 2020 5:19 PM

Zvezda: Thanks for going ahead. Your results look great!!!


I know what you mean, it's been pretty hot here too, running 90F/33C lately.

Sorry my posting is going to be a little off for this week. I'm on vacation/holiday and the wi-fi here is pretty bad.

The last email I got from the mods is that things are a little crazy for them due to the whole Corona Chan mess. I'll give them a few weeks to see if I can get back on with my original handle before I relaunch this GB with another post. Thanks for the ideas and support guys!!!

"I dream in fire but work in clay." -Arthur Machen


  • Member since
    February 2011
Posted by GreySnake on Monday, August 3, 2020 5:26 PM
Zvezda, I like the idea of building some winter dioramas to cool off.
 
 
Glad you like the Type 61. I’ll be glad once it becomes a little cooler and I can finally start airbrushing. It’s still going to be hot for another two weeks the forecast shows so I’m stuck right now. Probably start another model or paint some figures.
 
 
The Kate is coming along very nicely. The detail painting came out really well.
 
 
Gamera, hope you have a good vacation.  
  • Member since
    July 2014
Posted by modelcrazy on Monday, August 3, 2020 6:57 PM

Thank you Zvezda

Steve

Building a kit from your stash is like cutting a head off a Hydra, two more take it's place.


http://www.spamodeler.com/forum/

GAF
  • Member since
    June 2012
  • From: Anniston, AL
Posted by GAF on Monday, August 3, 2020 11:27 PM

Steve,

Hey! You're welcome!  Always happy to impune someone's mental health!  Wink

I haven't posted an update on my A6M5a since April, so I guess it's time to show my progress (if any).  I've only gotten back to it for the last month or so, and there really has been no unusual or difficult problems to mention.  It's been going together fairly smoothly.

Here's where I left off in April:

And here's where she stands now:

I think this image gives a better idea of what the color looks like in person.

At the moment, I'm trying to cobble together enough decals to finish her.  My efforts to print my own have not been very successful, so I'm scavenging a few from other kits.

You will notice the base coat is on, and I've skipped the "chipping" techniques and just used silver paint applied with a toothpick to indicate loss of paint.  I didn't go too overboard with the "chipping", just enough to give it a less than new look.  I probably will add some more around the cowling and prop before I finish up the decals and give it a coat of dullcoat.

The only technique worth mentioning is the canopy frame.  I sprayed a piece of clear decal paper with the base coat (Hunter's Green) and then cut thin strips (of slightly varying widths) to lay across the frame lines.  This has worked out fairly well.  On the front wind screen I used some vinyl tape (lighter green stuff).  I'll paint over that when I finish it up in the base color.  After the dullcoat, I'll attach the canopy and add the bottom edge framing next to the fuselage.  Still need to add all the fiddly bits, but they go on last!  I've learned my lesson about breaking parts off.

Probably won't be another update until she's finished.  Thanks for looking!

Gary

  • Member since
    December 2002
  • From: Northern California
Posted by jeaton01 on Monday, August 3, 2020 11:35 PM

Gary, I have a ton of Hinomaru decals because I always paint them anymore, is that what you need, or is it tail markings of some kind.

John

To see build logs for my models:  http://goldeneramodel.com/mymodels/mymodels.html


  • Member since
    February 2011
Posted by GreySnake on Tuesday, August 4, 2020 10:34 AM

The Zero is looking good. 

GAF
  • Member since
    June 2012
  • From: Anniston, AL
Posted by GAF on Tuesday, August 4, 2020 1:15 PM

Greysnake, 

Thanks!  She's coming along.

John,

The hinomaru are fine.  I have those.  It's some smaller Japanese labels that I need.  I'll get by.  Smile

Note to everyone.  I'm unable to log in from my main computer.  First Firefox went out, and today Opera.  I'm  logging in on my tablet now which is not ideal.  If you don't hear from me in a few days it means I'm locked out.  Send word to Enash!  

Gary

GAF
  • Member since
    June 2012
  • From: Anniston, AL
Posted by GAF on Thursday, August 6, 2020 10:54 AM

Well, you know how things are going along smoothly, and you're making great progress on a project, and you think everything will proceed according to a plan, and then the gods laugh in your face and something happens that screws up all your work and you're left holding a disaster of epic proportions?

WELCOME TO MODELING!  Sad

I must admit I didn't see this coming.  I (in my blessed ignorance) thought things were going along swimmingly.  I had finished up the weathering on my A6M5 Zero and had set it aside for the night, thinking I might think of something else I needed to do in the morning.  When morning came, I could not think of anything else to do before applying dullcoat (except NOT attaching the canopy as I had done before on another project), so I grabbed a can of Testor's dullcoat, set the model up and gave it a good coat.  No problem there and it seemed to be working fine.  However, when I went back to check on it about half an hour later, to my horror I found that the paint for the Zero had crazed on the wings!  WTH!  Apparently, Testor's dullcoat and the Krylon brand of paint I had used for the base coat did not agree, though suprisingly the fuselage was fine and only the top of the wings had undergone this strange reaction.

I must admit, I thought about throwing it in the trash, but the frugal part of me said no.  I tried sanding, but the paint still looked like alligator skin.  I thought about just accepting it and claiming "Well, of course the paint is crazing!  It's a Japanese Zero!" but decided that was out of the question.  So I began the laborious task of separating the wings, removing the landing gear and using an X-acto knife separating the top half of the wings from the bottom half (which was fine).

Right now the top half of the wings are soaking in purple stuff and I'm going to try to get that paint off and try redoing them from scratch.  Not sure how it will turn out, but I'll give it my best shot.  I admit this is a lot of work that I sure didn't want or need.

It does mean, however, that I will need some hinomaru (1/48th scale), so if that offer still stands I will take you up on it.  I'll send you a PM if the offer is still good.

MODELING IS FUN!  Ick!

Gary


  • Member since
    December 2002
  • From: Northern California
Posted by jeaton01 on Thursday, August 6, 2020 1:17 PM

Of course, Gary.

John

To see build logs for my models:  http://goldeneramodel.com/mymodels/mymodels.html


GAF
  • Member since
    June 2012
  • From: Anniston, AL
Posted by GAF on Thursday, August 6, 2020 2:50 PM

Thanks, John!  PM on the way.

The wings have been stripped of the Krylon paint, although the "Purple Stuff" didn't even scratch the primer.  Go figure!  When I can, I intend to re-prime and paint them.  Heat and humidity being the main hold-up there.  Meanwhile, I'm starting on another GB project that I've been putting off for awhile.

Gary

  • Member since
    February 2011
Posted by GreySnake on Thursday, August 6, 2020 6:35 PM
Oh dear sorry to hear about the Zero. I admire the fact you are continuing along with the model and fixing it. I’ve had a couple builds mess up when they are about finished and ended up boxing them for almost a year.
 
 
Finally started back work on the Type-61 this morning. It was cool enough outside at 0530 that I could finally airbrush before it got to hot. Sprayed the tank with Tamiya XF-69 NATO black as a shadow coat and tomorrow if the weather plays fair I’ll spray white on some of the panels. Not very thrilling to look at but here it is.

GAF
  • Member since
    June 2012
  • From: Anniston, AL
Posted by GAF on Friday, August 7, 2020 7:19 AM

GS,

Thanks!  I'm too stubborn (or full of *hit) to give up so easily.  Luckily, the parts separated well enough, and it gives me a chance to correct some minor things that I was ignoring till now.

The 61 is looking splendid.  I did want to ask if the Japanese had a camo scheme at this time?  Not knowing much about Japanese armor, I've assumed that the post-war tanks were merely a OD like the Americans.

NOTE: Checking back earlier, I see you're going with the two-tone scheme.

Gary

  • Member since
    February 2011
Posted by GreySnake on Friday, August 7, 2020 12:20 PM
Originally the Type 61’s were painted in what I guess is OD and at some point the JGDSF switched to a two tone camouflage I’m going to guess around the late eighties early nineties. I could have built an OD colored one out of the box but it would have been less interesting looking since it wouldn’t have had the upgrades that the later variants had such as the smoke grenade launchers.
 
I woke up at 0600 much later than usual since I had a rather late night and somehow managed to get some more painting done. I only got six hours of sleep last night and feel like taking a nap before long. Guess I’m not young anymore where I can function all day with only a few hours of sleep. Here’s the model now with the white sprayed on to highlight the panels before the base camouflage. Not that interesting to look at tomorrow I’ll start on the camouflage.
  • Member since
    November 2009
  • From: SW Virginia
Posted by Gamera on Saturday, August 8, 2020 6:23 PM

Greysnake: That looks fantastic. Really looking forward to how the camo comes out. It's more trouble to paint but I like the look much more than the plain jane OD green.

Gary: OUCH!!! That blows. I've been there, done that, got the t-shirt- yet it's really annoying when you're basically DONE and that happens. Kudos to you for not flinging the model across the room, I really need to work on anger management issues. Best of luck on getting her repaired.


And WHOA, looks like the IT guys fixed my account- just posted you to the front page Zvezda!!! Balloons

"I dream in fire but work in clay." -Arthur Machen


GAF
  • Member since
    June 2012
  • From: Anniston, AL
Posted by GAF on Saturday, August 8, 2020 11:25 PM

GS> I'm retired so my sleep patterns are a mess.  Up all night, sleep during the day.  Of course, there's the bathroom runs...  Sad

I see the white over-spray came out well.  Nice work!

Gamera> Glad to see you back, and your account restored.  Hope you had a great vacation!

As for the Zero, I managed to get the wings re-sprayed early this morning.  They're fine and are curing at the moment.  When they've dried sufficiently, I intend to run a test on one.  The "Hunter's Green" is actually Rust-O-Leum paint (not Krylon).  I have a can of Matte Clear Rust-O-Leum so I'll give it a try and see if it reacts better than the Testor's dullcoat. Keeping my fingers crossed!

Gary

  • Member since
    December 2002
  • From: Northern California
Posted by jeaton01 on Sunday, August 9, 2020 12:00 PM

Gary, I haven't seen a PM from you about the decals yet,

John

To see build logs for my models:  http://goldeneramodel.com/mymodels/mymodels.html


GAF
  • Member since
    June 2012
  • From: Anniston, AL
Posted by GAF on Sunday, August 9, 2020 12:26 PM

jeaton01

Gary, I haven't seen a PM from you about the decals yet,

Hmmm, I sent one two days ago.  I wonder what's wrong now?  I'll send it again, and send one to the e-mail address you have listed under your profile.

Gary

  • Member since
    November 2009
  • From: SW Virginia
Posted by Gamera on Sunday, August 9, 2020 6:53 PM

Sounds good Gary, looking forward to more photos of your Zero.

"I dream in fire but work in clay." -Arthur Machen


  • Member since
    February 2011
Posted by GreySnake on Monday, August 10, 2020 11:41 AM
Got the two tone camouflage painted over the weekend. Forget to take a few pictures of the kit with just the base color of Tamiya XF-52 as weekend was pretty busy and slipped my mind. The second color sprayed on was Tamiya XF-65 Field Grey. I was glad to finish up yesterday as it was getting pretty warm and I felt like I’d been out in the bush for hours already. When I got everything cleaned and put away at 0730 the temperature was already close to 90 degrees or 32 Celsius. I’m really ready for summer to end. I’ll stop rambling show you the pictures.

 
I’m rather happy with how the camouflage turned out. There is some very subtle variation in the paint thanks to the black and white paint underneath its not coming out great in the photos yet you can tell in person. On the lower part of the hull I lightly sprayed the XF-52 and left a lot of the black showing to create fake shadows. Again hard to tell in the photos however in person you can see it. This is probably the best camouflage I’ve done in all my years in the hobby.  
 
While doing the second color I did come to the conclusion that I do need to start looking at getting another airbrush. While the Badger 150 I have is very good I can’t help but feel it’s starting to hold me back as the color cup or the larger jar attachment really gets in my way when trying to do fine detail work. So I’m going to start looking at gravity feed airbrushes.
 
Tomorrow I’ll give the model a glosscote and then look at painting the canvas cover on the mantlet. Not sure what extent I’ll weather the model from looking at photos of the real thing Japanese crews took very good care of the tanks.   
  • Member since
    November 2009
  • From: SW Virginia
Posted by Gamera on Monday, August 10, 2020 11:57 AM

Greysnake: Ohhhhhhh, that looks good!!! BTW I switched to a gravity feed airbrush with a colour cup years ago and I'd never switch back. The jar on the bottom just seemed way more finickly on getting the paint mixed perfectly to get the siphon tube to work.  

"I dream in fire but work in clay." -Arthur Machen


  • Member since
    February 2011
Posted by GreySnake on Monday, August 10, 2020 12:41 PM
Thanks Gamera! I’ll definitely be getting a gravity feed airbrush before long like you did I’m having problems getting the paint mixed so the siphon tube works. It’s going to feel weird using some thing other than the 150 since that’s been the only one I’ve used for two decades.
  • Member since
    November 2009
  • From: SW Virginia
Posted by Gamera on Monday, August 10, 2020 4:47 PM

One of the other nice things about the colour cup is if using something already fomulated for airbrush use like ModelAir you can just squeeze a few drops into the cup and spray if you only want to spray something small. With the jar I always had to make up more paint than I needed just to give the tube something to pick up. 

"I dream in fire but work in clay." -Arthur Machen


  • Member since
    May 2011
  • From: Honolulu, Hawaii
Posted by Real G on Monday, August 10, 2020 5:58 PM

GreySnake,

The Type 61 is coming along very nicely!  You are doing justice to an old kit.

The weather here in Hawaii has been hot, but not like last year.   I think the humidity is not as bad, because while the temperature in my room has gotten up to 87 F (30 C), it doesn't feel crazy-crazy-crazy hot.

“Ya ya ya, unicorn papoi!”

  • Member since
    December 2002
  • From: Northern California
Posted by jeaton01 on Monday, August 10, 2020 8:43 PM

I have two gravity feeds, both Badgers.  One has a small cup, the other has a large one.  I like that they are very easy to clean.  I also like that they handle low air pressures better than suction feed.  The suction feed 150's are mostly in the drawer, bless their long lasting hearts.

John

To see build logs for my models:  http://goldeneramodel.com/mymodels/mymodels.html


  • Member since
    December 2002
  • From: NYC, USA
Posted by waikong on Friday, August 14, 2020 1:07 PM

Graysnake, that's looking nice! I'm not familiar with that vehicle at all.

Ok, so I've been slowy but surely making progress on my Mitsubushi ki-45, starting with the cockpit of course.  Seeing Steve's crazy PE adventure, I was inspired to use the complete Eduard PE interior set - I usually just use major pieces, but this time i went all out even with those extremely small handles.  Thankfully, they are starting to put a few extras pieces in the fret

Of course, once you go down this rabbit hole, all those panels looks strangely 'naked' and screams for piping and wiring.  Way too much empty space, especially behind the recon camera, it's a rats nest of hoses/wiring back there. Even though you can't really see that too well once closed up, but is a sickness right ?

Misc copper wiring and solder was used, The 'netting' in the middle is actually a piece of pe grill from a Revell Stealth Fighter cut up and a piece of plastic card thinned and shaped will stand in for a cloth covering underneath.  The recon camera was just a plain blob, so misc left of PE and some old reheat brand panels were added.

Finally, painted up:

Ok, you have to STOP sometime, because you can always add more stuff.  Some more dirt and weathering on the floor and I'll close this up this weekend.

My website: http://waihobbies.wkhc.net


GAF
  • Member since
    June 2012
  • From: Anniston, AL
Posted by GAF on Friday, August 14, 2020 7:22 PM

Waikong>  That is impressive!  My cockpits always look so... messy.  Can't wait to see the rest!

Gary

  • Member since
    November 2009
  • From: SW Virginia
Posted by Gamera on Saturday, August 15, 2020 8:20 AM

Waikong: Oh WOW! As Gary said what a clean beautiful job on the cockpit! And I love the extra detail you've added. 

"I dream in fire but work in clay." -Arthur Machen


GAF
  • Member since
    June 2012
  • From: Anniston, AL
Posted by GAF on Saturday, August 15, 2020 10:34 PM

I wasn't going to post another WIP image, but that was before I had to disassemble the aircraft and redo the wings.  Here's a shot of where she stands now.

Taken with my camera, I think this image gives the best idea of the color of the model so far.  Still not finished, but much closer.  I need to finish framing the canopy, adding small bits (guns, pitot tube, weights, antenna wire).  First I want to do some touch-ups and some additional weathering.  Then I'll try finishing up the pilot model.  I'm not so enamored of that suit color, so that will probably come off.

Anyway, getting closer to being finished (God willing!).

Thanks for looking!

Gary

  • Member since
    December 2002
  • From: NYC, USA
Posted by waikong on Saturday, August 15, 2020 11:50 PM

Thanks Gamera, I think detailing cockpits is starting to be a sickness. :) GAF - oh, a figure, I've desperately been trying to improve my figure painting, can't wait to see yours.

My website: http://waihobbies.wkhc.net


  • Member since
    November 2009
  • From: SW Virginia
Posted by Gamera on Sunday, August 16, 2020 8:29 AM

Gary: That looks great! You've made an excellent recovery there. And the figure looks good. The colour of the suit looks fine. If you want it lighter you can always just add highlights, if you want it darker you can add shadows to the recesses. 

"I dream in fire but work in clay." -Arthur Machen


  • Member since
    February 2011
Posted by GreySnake on Wednesday, August 19, 2020 10:20 AM
Thank you, RG and waikong.
 
 
waikong, the KI-45 is looking great.
 
 
GAF, nice save on the Zero it’s looking nice.
 
 
The Type 61 is coming along slowly, not enough time in the day it seems to make much progress. Found a nasty surprise while putting the road wheels back on for a glosscote. The middle section of the road wheel is made out of a softer plastic after putting them on I noticed a few have noticeable cracks apI’m not sure what has happened.pearing.Ruling out a paint reaction as only six of the wheels have this issue.
I’ll probably avoid using any enamel washes now around the wheels. Just because the plastic has made it known it’s fragile.  
 
After giving the model a glosscote the decals were applied.
The decals junk to say the least. Every decal was very thick and even with numerous applications of Micro Sol they still wouldn’t settle.
Another glosscote after applying the decals did help correct the issue somewhat. I’m hoping a dullcote will help out when it’s time to spray it. The markings are for JGSDF 10th Division. The division was raised in 1962 and is headquartered in Nagoya.
 
Annoyingly I forgot to paint the pioneer tools for the model. Spent more time cleaning the airbrush then I did painting the tools.
 
The horrid tracks were painted Tamiya XF-84 Dark Iron.
 
The commanders M2 that is included with the kit is very poor. Found a much better one in the spare parts box.
 

  • Member since
    November 2009
  • From: SW Virginia
Posted by Gamera on Wednesday, August 19, 2020 10:53 AM

Greysnake: Love the camo, she's turning out great! Yes

Weird about the wheels though, I've never had an issue with poor quality plastic in a Tamiya kit. In a few old Warsaw Pact kits but never anything Japanese esp Tamiya. 

"I dream in fire but work in clay." -Arthur Machen


GAF
  • Member since
    June 2012
  • From: Anniston, AL
Posted by GAF on Wednesday, August 19, 2020 7:16 PM

Waikong> Thanks!  You'll probably not learn much about figure painting from me.  I'm of the old "wargaming" school of figure painting where you slap on the base colors and call them done!  Still, I'm trying to give the pilot figure a bit more attention.  Here's where he stands now with the base colors on.  Still needs a lot of detail work.

Gamera> The A6M5a is finished, except for the aerial wire which is being glued into position.  I just have to wait for one end to dry before gluing the other end, which can take hours.  Should be ready tomorrow unless I screw it up (as I already have done once).

Greysnake> You've done some great work on the 61 so far.  The cracks shouldn't be a problem, though it is strange for that to happen.

Gary


  • Member since
    November 2009
  • From: SW Virginia
Posted by Gamera on Wednesday, August 19, 2020 7:53 PM

Gary: The pilot looks fine to me. Looking forward to the finished result!

"I dream in fire but work in clay." -Arthur Machen


GAF
  • Member since
    June 2012
  • From: Anniston, AL
Posted by GAF on Thursday, August 20, 2020 7:13 AM

Strike up the Gunkan March! I am happy to report that the A6M5a Type 52 is finished!  That heavy rushing of air you hear is me sighing in relief!

After the aerial wire (which is nylon thread) dried overnight, I cut the end at the pole.  I had jammed a toothpick between the canopy and the pole to force it back a little while the glue dried.  When I removed the toothpick the pole moved forward a little and kept the aerial wire taut.  Success!  I might want to add some insulators on the wire, but I won't press my luck today.

Gamera, I'll post up finished photos later when the pilot figure is complete so I can include both.

Thanks for looking!

Gary

  • Member since
    February 2011
Posted by GreySnake on Thursday, August 20, 2020 9:40 AM
Thanks, Gamera.
 
 
I’ve only ever had one other part to a Tamiya kit fail and it wasn’t even plastic. A 1/20 Formula 1 car I built a number of years ago had the front rubber tires split sideways five years after being finished.  Built a number of other cars by them around the same time and never had the same issue show up. I also have a T-34/76 by Tamiya that uses the same type of method to secure the road wheels as the Type 61 built and didn’t have the parts split after painting.
 
 
GAF, Amazing work on the Zero!  
GAF
  • Member since
    June 2012
  • From: Anniston, AL
Posted by GAF on Sunday, August 23, 2020 12:21 PM

Greysnake>  Thank you!  Considering all the disassembling, it turned out better than I expected.

I'll call the A6M5a Zero done.  The kit went together without many problems, but I created a few just to make sure I was still modeling!  Big Smile

The pilot figure is from the Hasegawa A6M2b kit.

Nothing special to report.  I painted the upper with Rust-O-Leum "Hunters Green" that, once you knock the shine off, is a fair representation of IJN green.  YMMV.  The bottom color was Testors "Flat Light Aircraft Gray" with a wash of "Sage".  I did repaint the rear canopy deck as black, but used "Gunmetal Grey".  You can hardly see it under all those canopies!  I did manage to cobble together enough decals to finish her, in addition to using painted clear decal paper to frame the canopy.  Chipping is just silver paint, and weathering was a Model Master black wash.

You will note the wheel-wells and gear doors were NOT done in aotake, as the latest research seems to indicate Mitsubishi aircraft had these painted in the bottom color.  This is a choice, and anyone who paints theirs in aotake (especially later war) will not be laughed at!

The pilot was done in Tamiya XF-72 Brown JGSDF.  The life vest is khaki, and the ribbons are sage.  The skin tone is Testors "Flat Tan".  Japanese pilots are not very colorful!  I tried detailing the face, but it's just so-so.  A black wash was applied, and then using a white prismacolor pencil highlighted the raised areas a bit.  The goggles were edged in silver and Future was applied to the lenses.

I still need to finalize the figure as I seem to have misplaced my bag of terrain grass.  I also need to add some insulators on the Zero's aerial wire, but that's not a big concern.

Anyway, here's the final images for you to study and snicker at.

And that's it for the Japanese!  Thanks to Gamera for running this GB!

Tenno Heika Banzai!

Gary

PS> Gamera, I'll leave it up to you on what photo you wish to place on the front page. Smile

  • Member since
    November 2009
  • From: SW Virginia
Posted by Gamera on Monday, August 24, 2020 6:22 PM

Gary: That turned out spectacular!!!

Love your pilot but I liked the photo without him a little better so I used it. But overall great job!


Sorry guys my schedule is going to be little off for the next few weeks. One of the guys at work just had a hernia operation and I'm working to cover for him.

"I dream in fire but work in clay." -Arthur Machen


  • Member since
    December 2002
  • From: NYC, USA
Posted by waikong on Thursday, August 27, 2020 2:31 PM

Gary, that zero came out looking great!  That pilot looks really angry :)

So I made progress, got most of it closed up, started putting the clear parts on

And this disaster strikes, while trying to put on the front 'lense' which is concave in shape, it popped off never to be found again.  I tried to use some testor clear glue to fill it in, but I guess it was too thick, as the innards dried white and cloudy.  Now I'm not sure what to do, got some bondic UV 'glue'. going to test to see if that will work. Happy to take any suggestions (sorry about the blurry pic)

My website: http://waihobbies.wkhc.net


GAF
  • Member since
    June 2012
  • From: Anniston, AL
Posted by GAF on Thursday, August 27, 2020 3:43 PM

Waikong> Thanks!  I've done a little work on the pilot since then so maybe he's not as angry.  Big Smile

The Dinah is looking good.  It has such sleek lines it reminds me of an early jet.

As for the lense, if you have a HobbyLobby nearby or a crafts store, you might try looking for a bead to use as a replacement.  I've used them in a C-47 for landing lights and they look pretty good.  Maybe the lense will turn up when you least expect it.

Gary

  • Member since
    November 2009
  • From: SW Virginia
Posted by Gamera on Thursday, August 27, 2020 9:29 PM

Waikong: That looks good! If the glue is anything like the MicroScale stuff it will dry clear. It just takes awhile. It might even take a few days or even a week.

Gary: Please post more photos of your pilot when you get him done.


I got a little more done on my Zero. The decals really annoyed the krap out of me. I ended up airbrushing the upper wing ones since I couldn't get them to lay down completly over the airlon hinges.

"I dream in fire but work in clay." -Arthur Machen


  • Member since
    February 2011
Posted by GreySnake on Friday, August 28, 2020 8:46 PM
Wonderful work on the Zero GAF, never would guessed you had trouble with it now.
 
 
That’s one beat up looking Zero Gamera I like it!
 
Waikong, the Dinah is looking good. The missing part will probably show up right as you finish the kit like always happens to me.
 
As for me started work on the commander figure on Monday.
Here he is finished apart from his goggles.
 
Can’t say I’m the best figure painter in the world I’m trying to improve my skills. Right now I’m slowly switching over to Vallejo paints and still trying to figure them out. The next figures I’ll do will have some shading on the skin as this figure looks very bland.  
Tools were painted and given some weathering.
 
Tools were then glued on the model.
 
While looking over the model something looked wrong. Somehow I placed the left air intake? too far forward.
 
At this point I was rather worried if I could get the intake off without damaging the kit and with a little help from a blade it popped right off. Glad I used the regular Tamiya extra thin and not the orange cap.
 
Took the airbrush out and sprayed the bare plastic NATO black, Flat Earth and then Field Grey try to match the tone of the original paint. The next day I gave the spot a gloss cote and once the model is given dullcote you’ll never know there was a mistake.
 
Then went ahead and picked some of the panels and details with a dark wash just to bring some life to the model. Tamiya includes a nylon string for the tow cable and I decided to replace it with a spare cable from a Dragon kit. This was a mistake as I soon found out as its smaller then the attachment points that hold the cable and also stiff and doesn’t look very realistic. I did my best to glue down the cable but at one point it wouldn’t hold and took some paint with it.
 
Gave the model a spray of dullcote earlier this morning and decided to call it good enough. 
I could have done a lot better on this model and there are a few mistakes that show. My T-55 from eariler this year was much better. The figure should have gone to the parts box as he doesn't really fit great at all. I should not work on models while stressed out. Lesson learned. I’m happy with the kit nonetheless and will strive to make my next model much better. Apologies for the pictures not being great I don’t have a great place to take photos and it's been overcast today. 
 
Gamera go with this picture if you don’t mind.  
  • Member since
    November 2009
  • From: SW Virginia
Posted by Gamera on Saturday, August 29, 2020 7:48 AM

Greysnake: Despite the issues you had with the decals, air intake, and tow cables that's a beautiful piece of work there! Great job!!! Heart

Just put you down and thanks for joining us!!! 


PS: Now I want to build a Type 61... Hmm

"I dream in fire but work in clay." -Arthur Machen


GAF
  • Member since
    June 2012
  • From: Anniston, AL
Posted by GAF on Saturday, August 29, 2020 12:45 PM

Gamera> The hinomaru turned out nice.  Good work!  That aircraft has seen better days! Big Smile

GS> The Type 61 turned out very well.  I like the two tone camo.  The commander figure does seem very relaxed.

Better keep it away from Gamera though, as he will have Godzilla stepping on it!  Surprise

Gary

  • Member since
    February 2011
Posted by GreySnake on Tuesday, September 1, 2020 11:08 AM
Thanks Gamera. I’d suggest looking for the Fine Molds Type 61 over the Tamiya one. There are two different versions an early version and a later version with various upgrades such as a searchlight. Not to mention the engine deck screens are PE and the tracks look much better. I was looking at them online and the kits are more expensive then I’m willing to pay.
 
 
If there will be another Japanese GB next year I’ll do one of the two Type 74’s that are in the stash.
 
 
GAF, thank you!
  • Member since
    November 2009
  • From: SW Virginia
Posted by Gamera on Wednesday, September 2, 2020 7:55 AM

Hmm, I'll do that Greysnake- thanks!!! 


And yes I'm planning on a JGB X next year. Not sure about XI, ten is a nice round number though. Anyone have any suggestions on a badge? The kitsune I thought fit well with nine being a nine-tailed fox. I'm not sure what would work with ten though. 

"I dream in fire but work in clay." -Arthur Machen


GAF
  • Member since
    June 2012
  • From: Anniston, AL
Posted by GAF on Friday, September 4, 2020 9:04 PM

Ten?  How about "Operation Ten Go"?  A battleship Yamato with a beautiful Japanese Sailor Suited girl?  If it is the end...  Big Smile

https://en.wikipedia.org/wiki/Operation_Ten-Go

Gary

  • Member since
    December 2002
  • From: NYC, USA
Posted by waikong on Tuesday, September 8, 2020 3:26 PM

GS - I think that's a great job on the figure camo, that tank came out very nice.


Gamera - that is some nice weathering/paint work.  I always find peeling camo paint tough to pull off realistically for myself.  

My website: http://waihobbies.wkhc.net


  • Member since
    November 2009
  • From: SW Virginia
Posted by Gamera on Wednesday, September 9, 2020 7:27 AM

Thanks Waikong. I'm not totally happy but it's another I'm chalking up as a learning exercise. 

Gary: My apologies, somehow I missed your post. I like your idea but we already had the Japanese lady dressed in a sailor suit with a battleship- I think it was JGB four or five? All my older stuff is back on Photo Bucket and hard to get to now. 

I dunno- maybe a flight attendant this time with a civilion jetliner? 

"I dream in fire but work in clay." -Arthur Machen


  • Member since
    December 2002
  • From: NYC, USA
Posted by waikong on Thursday, September 10, 2020 4:10 PM

Made some progress on my Dinah.  First, using Bondic, a clear resin that is cured in a few seconds with UV light, I fixed my missing nose lense issue.  This is great stuff, and the instant cure is wonderful for people like me that are impatient - I know, bad trait for a modeler.  Definitely will use it in the future for headlights, landing lights, etc...

Did some priming and I try to learn a new skill with each model and inspired by Gamera, decided to try chipping fluid. I've always done chipping by just apply silver paint with a brush or sponge.  For this one, I laid down metallic aluminum coat and then Vallejo chipping fluid. This is a pretty good technique, I find that it gives me more control than using a sponge and you can create much more subtle fading effects with light scrubbing with a stiff brush. More to learn of course.

My website: http://waihobbies.wkhc.net


  • Member since
    September 2011
  • From: Milaca, Minnesota
Posted by falconmod on Friday, September 11, 2020 7:12 AM

waikong

Made some progress on my Dinah.  First, using Bondic, a clear resin that is cured in a few seconds with UV light, I fixed my missing nose lense issue.  This is great stuff, and the instant cure is wonderful for people like me that are impatient - I know, bad trait for a modeler.  Definitely will use it in the future for headlights, landing lights, etc...

Did some priming and I try to learn a new skill with each model and inspired by Gamera, decided to try chipping fluid. I've always done chipping by just apply silver paint with a brush or sponge.  For this one, I laid down metallic aluminum coat and then Vallejo chipping fluid. This is a pretty good technique, I find that it gives me more control than using a sponge and you can create much more subtle fading effects with light scrubbing with a stiff brush. More to learn of course.


Where can you get UV glue?

On the Bench: 1/72 Ki-67, 1/48 T-38

1/144 AC-130, 1/72 AV-8A Harrier

  • Member since
    November 2009
  • From: SW Virginia
Posted by Gamera on Friday, September 11, 2020 8:18 AM

Waikong: That looks good!!! Love the UV glue lens. And the chipping looks great! Frankly I think it looks better than mine. I have some chipping fluid but since I was just going to do the whole thing I just hosed it with 2-3 coats of hairspray. I've got less and less use for hairspray with every passing year so might as well use the stuff.

I put down several coats of paint and let it sit for a few days before I started chipping. Which I think was a mistake, should have went with one coat of paint and chipped it right away. I mean it did come off as you can see in the photos but I had to use more force than probably was a good idea. 

"I dream in fire but work in clay." -Arthur Machen


  • Member since
    December 2002
  • From: NYC, USA
Posted by waikong on Friday, September 11, 2020 10:08 AM

Gamera, interesting you said that.  I put yellow on top of the brown, and those areas I couldn't really scrap off.  I guess I could use more force and with a tougher brush, but didnt' want to ruin the whole masking/painting of the yellow.  So I will put it to good maintanence by the ground crew :)

Falconmd - you can get it on Amazon or Ebay.  Just search for Bondic, that's the named brand, there other generic brands that make the same thing, but since I haven't tried them, can't say they work just as well.


My website: http://waihobbies.wkhc.net


  • Member since
    November 2009
  • From: SW Virginia
Posted by Gamera on Friday, September 11, 2020 10:12 AM

Yeah I think the ground crews did touch up the leading edges, hinomaru etc. So it all looks good from here! Yes

"I dream in fire but work in clay." -Arthur Machen


GAF
  • Member since
    June 2012
  • From: Anniston, AL
Posted by GAF on Friday, September 11, 2020 4:31 PM

waikong> Nice work!  Like Gamera, I think I read the ground crews kept the hinomaru touched up, so I didn't do much with mine.  One thing I did do is that after posting the pictures of my completed A6M5 I found a silver sharpie I had forgotten about and used it to add a few more chip spots on the leading edges, plus ran it along the aerial wire.  Worked great!  So if you finish her up and want to add a few more dings, I suggest getting a silver colored Sharpie pen.  It has many uses so is a good investment.

Gamera> No problem!  Maybe that is why I was thinking of the Yamato because I had seen the previous GB badge.  Well, there's always Tenchi...  Big Smile

Gary

  • Member since
    April 2014
  • From: Australia
Posted by lostagain on Saturday, September 12, 2020 6:53 AM


Hi guys, I am back after a work induced absence. I have progressed minimally until the last couple of weeks, hoping to push on a bit more now. Looking back I last posted in May, time flies when you are having fun!


A lot has happened since then, on and off this GB, so….


Steve, the girder work under the deck looks crazy difficult. And Zeros small enough to lose anywhere, my eyeballs would be spinning trying to see that fine a detail – that is seriously bonkers. And when you said ‘ I know it doesn’t look like much’ – It looks like more time than I spend on an entire model…


GreySnake, The 61 hull reminded me of a Cyberman! 32 degrees at 7:30? That is crazy hot! Cool and raining down here to welcome spring in. It really came together well with the two tone scheme but that thing with the wheels was really strange – never remember anything like that before. Yep, Tamiya’s moulding of the commander is weird, posed like he’s a few beers into the bbq.


Zvezda, serious detail work in the Kate there, and beautifully finished.


GAF, Nice work on the chipping and the result you achieved with the canopy framing is super. Going to pinch that one. And then the crazy crazing – what a pain in the rear. The finished result including the pilot is great.


Waikong – your interior looks fantastic – the extra effort was worth it, and yes it is a sickness, so I find an OOB build every now and then is mentally valuable. That front lens is a pain, but looks like you had a good solution. The weathering has come up well.


Cliff, the weathering on your Zero is well done – I am still finding it difficult to make extreme weathering look realistic.


GAF, I like your idea of a Tenchi GB badge…


GAF
  • Member since
    June 2012
  • From: Anniston, AL
Posted by GAF on Sunday, September 13, 2020 3:06 PM

Lostagain> Welcome back!  Was wondering where you had wandered off to.  Nothing like work to get in the way of... work?  Anyway, thanks!  I find the decal framing is a lot easier than freehanding or masking.  Just need some clear decal paper, a straight edge and a sharp Xacto knife.  Of course, some canopies are easier than others.

Gary

  • Member since
    November 2009
  • From: SW Virginia
Posted by Gamera on Sunday, September 13, 2020 7:32 PM

Piers: Good to see you again. I hope everything is okay now.

Gary: Hmmm, Tenchi is interesting. Something to think about.

"I dream in fire but work in clay." -Arthur Machen


  • Member since
    December 2002
  • From: NYC, USA
Posted by waikong on Monday, September 14, 2020 2:11 PM
Making good progress on my ki46, decals, wash, chipping, flat coat, exhaust stains are done. Is it me, or is taking off the canopy masking one of the best part of building aircraft models? (assuming no bleed of course)

My website: http://waihobbies.wkhc.net


GAF
  • Member since
    June 2012
  • From: Anniston, AL
Posted by GAF on Monday, September 14, 2020 9:14 PM

I don't know.  I've never masked!  Big Smile

Gary

  • Member since
    April 2014
  • From: Australia
Posted by lostagain on Tuesday, September 15, 2020 6:25 AM

 Okay, here is what has happened since I last posted.

The tractor is all together:

And I started the base, my third ever, so...

Plaster over xps, a bit of sandpaper for the road, split peas for the stones in the wall.

Painted up, with some Tamiya snow texture paint out the front


Then more Tamiya snow and some of the Deluxe material's snow

Then my driver got long trousers and a jacket.

ANd then seated so I can work out how to do his shoulder reconstruction

  • Member since
    November 2009
  • From: SW Virginia
Posted by Gamera on Tuesday, September 15, 2020 7:25 AM

Piers: Looks great! Love the wall and the mods on the figure. 

Waikong: Sounds good. I friggin' hate masking canopies. Taking the masks off is good if everything looks clean.  

"I dream in fire but work in clay." -Arthur Machen


  • Member since
    February 2011
Posted by GreySnake on Tuesday, September 15, 2020 7:39 PM
Thanks waikong and nice work on the Dinah!
 
lostagrain, thank you! Nice weathering on the tractor and fixing the driver.
GAF
  • Member since
    June 2012
  • From: Anniston, AL
Posted by GAF on Tuesday, September 15, 2020 11:27 PM

Piers>  The tractor and driver are looking great!  I do have to admit some doubt on using split peas as a wall.  That organic material may not hold up.  I would have used some lead birdshot, but then someone would grouse about lead poisoning...  Wink

Still looks good!

Gary

  • Member since
    July 2014
Posted by modelcrazy on Wednesday, September 30, 2020 11:46 AM

The Akagi saga.

First off I finished all the handholds, then decided to replace the individual ladder rungs on the hull. So I orders the rungs and waited. While installing the rungs and cleaning off the original plastic blobs, I found some of the porthole eyebrows were removed during the process of removing the rungs and handholds, so I orders some portholes. I received the rungs sometime back and the porthold the other day but thought I should catch up here.

So, here she is with the handholds. Forgive if you've already see this pic.

next is the ladder rungs, They are very small and will be streighted better before paint.

Unfortunatly, I keep breaking off the railings so I had to order new generic IJN railings Sad

Anyway, on to the portholes. I'll need more of them since there's about 300 per side Tongue Tied

Steve

Building a kit from your stash is like cutting a head off a Hydra, two more take it's place.


http://www.spamodeler.com/forum/

  • Member since
    November 2009
  • From: SW Virginia
Posted by Gamera on Thursday, October 1, 2020 11:54 AM

Steve: You're madman! In a good way of course! Those handholes would send me off to the funny farm for sure!!! 

"I dream in fire but work in clay." -Arthur Machen


  • Member since
    July 2014
Posted by modelcrazy on Friday, October 2, 2020 10:42 AM

Thanks Gam.

I started to install the portholes and sealed covers. The portholes with just the sealed cover will be getting the porthole PE as well. I think maybe while most portholes were closed during the pre emptive wind up to the attack there may have been a few open. I need to get a few more sheets of PE to finish. I also continued on the 25mm AA guns. With building attrition due to lost or broken pieces, I need to get another pack of these as well. There are still a few pieces to add to the guns as well.

Steve

Building a kit from your stash is like cutting a head off a Hydra, two more take it's place.


http://www.spamodeler.com/forum/

  • Member since
    August 2014
  • From: Willamette Valley, Oregon
Posted by goldhammer on Friday, October 2, 2020 9:03 PM

I'm with G on the PE on it.  I wouldn't even try all that detailed on a 1/200 or bigger.


Getting more done on the Myrt, got the fuselage glued up and seams sanded.  Fitting the wing is now nightmare.  Going to have to do even more trimming and try to clamp and glue one side at a time.

  • Member since
    February 2011
Posted by GreySnake on Saturday, October 3, 2020 7:25 AM
That’s too much PE for me Steve! Very impressive work!
  • Member since
    November 2009
  • From: SW Virginia
Posted by Gamera on Tuesday, October 6, 2020 7:24 AM

Steve: That's insane! I LOVE those AA guns!!! 

GH: Sounds good, looking forward to the photos. 

"I dream in fire but work in clay." -Arthur Machen


  • Member since
    November 2003
  • From: Naples, FL
Posted by tempestjohnny on Wednesday, October 7, 2020 7:12 AM

Finally started my build 


  • Member since
    November 2009
  • From: SW Virginia
Posted by Gamera on Wednesday, October 7, 2020 9:34 AM

You're off to a great start! The pilots look esp good! 

"I dream in fire but work in clay." -Arthur Machen


  • Member since
    November 2003
  • From: Naples, FL
Posted by tempestjohnny on Thursday, October 8, 2020 4:19 AM
I don't usually use pilots but I wasn't crazy about the seats. Pilots covered the seats


GAF
  • Member since
    June 2012
  • From: Anniston, AL
Posted by GAF on Thursday, October 8, 2020 2:57 PM

TJ> The F-2B is looking good.  I had to look up the F-2B just to find out what it was!  Interesting aircraft.

Gary

  • Member since
    July 2014
Posted by modelcrazy on Friday, October 9, 2020 11:33 AM

An Akagi update, sort of. Still drilling and installing porthole covers.

Many many more to do.

Steve

Building a kit from your stash is like cutting a head off a Hydra, two more take it's place.


http://www.spamodeler.com/forum/

  • Member since
    November 2003
  • From: Naples, FL
Posted by tempestjohnny on Friday, October 9, 2020 6:51 PM

GAF

TJ> The F-2B is looking good.  I had to look up the F-2B just to find out what it was!  Interesting aircraft.

Gary


Kind of like the F-16's step brother


GAF
  • Member since
    June 2012
  • From: Anniston, AL
Posted by GAF on Friday, October 9, 2020 7:42 PM

tempestjohnny
GAF

TJ> The F-2B is looking good.  I had to look up the F-2B just to find out what it was!  Interesting aircraft.

Gary


Kind of like the F-16's step brother

Yep!  It was the two-seat version that was throwing me off.  Smile

  • Member since
    November 2009
  • From: SW Virginia
Posted by Gamera on Monday, October 12, 2020 11:34 AM

TB: Well, in this case I'm glad you had to use the pilots! They came out so well!

Steve: Ahhhhhgggggggggggghhhhhhhhh, porthole covers!!! I would be in a straitjacket bouncing off the walls!  

"I dream in fire but work in clay." -Arthur Machen


  • Member since
    March 2006
Posted by simpilot34 on Tuesday, October 13, 2020 1:32 AM
GAM!!!!! OMG it's been so long!! !VERY glad to see the GB still going!! WOW some amazing builds going on and finished!! I am currently working on a '65 Impala so not suitable for here but will TRY and keep up to date. Soooooooo wish FSM had an App for the forums as it would mean sooooo much more coverage and convenience. WHOA LMAO was heading towards a rant. All the best guys, will try my best to keep checking up. I have been sucked into PS4 and have been neglecting my bench but also .....well we know. Ithink I will be more than ready for JGB X!!!!
Cheers, Lt. Cmdr. Richie "To be prepared for war, is one of the most effectual means of preserving the peace."-George Washington
  • Member since
    November 2009
  • From: SW Virginia
Posted by Gamera on Tuesday, October 13, 2020 11:46 AM

simpilot34
GAM!!!!! OMG it's been so long!! !VERY glad to see the GB still going!! WOW some amazing builds going on and finished!! I am currently working on a '65 Impala so not suitable for here but will TRY and keep up to date. Soooooooo wish FSM had an App for the forums as it would mean sooooo much more coverage and convenience. WHOA LMAO was heading towards a rant. All the best guys, will try my best to keep checking up. I have been sucked into PS4 and have been neglecting my bench but also .....well we know. Ithink I will be more than ready for JGB X!!!!
 

Oh hey Simpilot! It seems like ages since I talked to you! Good to see you again!!! Of course you're welcome to join JGB X!!! Gosh are we already to ten!?! 

"I dream in fire but work in clay." -Arthur Machen


  • Member since
    December 2002
  • From: NYC, USA
Posted by waikong on Friday, October 16, 2020 10:24 AM

Ok, finished my Dinah a few weeks ago, and finally got around to doing the pictures. Thanks everyone for the inspiration to get this one finished.

Complete build log with more pics are here https://waihobbies.wkhc.net/index.php/35-models/sky/world-war-2/160-mitsubishi-hyakushiki-ki-46

My website: http://waihobbies.wkhc.net


  • Member since
    November 2009
  • From: SW Virginia
Posted by Gamera on Friday, October 16, 2020 10:39 AM

Waikong: Oh wow! Great job! I love the restrained chipping and wear. Just posted you on the front page! As usual if you'd rather a different photo just lemme know and I'll change it out. 

Again thanks for joining us as good show!!! 

"I dream in fire but work in clay." -Arthur Machen


  • Member since
    February 2011
Posted by GreySnake on Friday, October 16, 2020 12:08 PM
Wonderful work on the Dinah! I agree with Gamera the chipping and wear is very well done.
  • Member since
    November 2008
  • From: Far Northern CA
Posted by mrmike on Friday, October 16, 2020 2:54 PM

Waikong that is one outstanding Dinah! We're used to seeing so much extreme weathering - it's refreshing to see an example of an in service aircraft with (IMHO) normal wear and tear. Well done!

  • Member since
    December 2002
  • From: NYC, USA
Posted by waikong on Friday, October 16, 2020 4:35 PM

Thanks everyone for their comments, these group builds really help me to get stuff done and finished. The general lockdown also helps :) the most modeling I have done in years. When's the next one ?? The picture chosen is fine, thank you. As for the weathering, I like to see the extreme weathering once in a while, but in general I like mine used but not abused. 

My website: http://waihobbies.wkhc.net


GAF
  • Member since
    June 2012
  • From: Anniston, AL
Posted by GAF on Friday, October 16, 2020 5:01 PM

Waikong>  I'll add my congratulations on a superb job.  The Dinah looks great!  It's nice to see a Japanese aircraft in such a different color.

Gary

  • Member since
    December 2002
  • From: Northern California
Posted by jeaton01 on Friday, October 16, 2020 8:49 PM

Well done, Waikong.

John

To see build logs for my models:  http://goldeneramodel.com/mymodels/mymodels.html


  • Member since
    December 2002
  • From: NYC, USA
Posted by waikong on Sunday, October 18, 2020 12:34 AM
Thanks John, appreciate it.

My website: http://waihobbies.wkhc.net


  • Member since
    November 2003
  • From: Naples, FL
Posted by tempestjohnny on Sunday, October 18, 2020 7:54 AM
Waikong very subtle on the weathering. Great job


  • Member since
    November 2003
  • From: Naples, FL
Posted by tempestjohnny on Sunday, October 18, 2020 7:57 AM

Some more work on the F-2. Starting to look airworthy 


  • Member since
    November 2009
  • From: SW Virginia
Posted by Gamera on Sunday, October 18, 2020 5:42 PM

TJ: Great job there on the F-2. She looks almost ready to mask and paint!

"I dream in fire but work in clay." -Arthur Machen


  • Member since
    February 2011
Posted by GreySnake on Saturday, October 24, 2020 5:59 PM

Looking good TJ! 

  • Member since
    December 2002
  • From: NYC, USA
Posted by waikong on Saturday, October 24, 2020 9:18 PM
Thank you TJ, and your F2 is looking good!

My website: http://waihobbies.wkhc.net


  • Member since
    April 2014
  • From: Australia
Posted by lostagain on Thursday, October 29, 2020 5:26 AM


Steve, that Akagi certainly is a saga. Just looking at the detail work hurts my eyes. Everything is sooo small it is ridiculous.


TJ, Also not familiar with the F2-B and looked it up, looking forward to see which scheme you choose. Off to a great start, ready for dome colour soon!


Waikong, great work on the Dinah. That is a great and unusual finish, nice restrained weathering.


The dozer diorama is coming along slowly. I have been working out how to get the look I was after for the different types of snow. Also I have been frankensteining figures.


Had a bit of a play with different ways of making snow.


This is the result so far:


Started making some skis too:
Next are the figures, more on them later.


  • Member since
    November 2009
  • From: SW Virginia
Posted by Gamera on Thursday, October 29, 2020 7:37 AM

Piers: That's nice looking snow and the skis look pretty darn fine too! 

"I dream in fire but work in clay." -Arthur Machen


  • Member since
    December 2002
  • From: NYC, USA
Posted by waikong on Thursday, October 29, 2020 8:34 AM
Skis! LOVE THOSE SKIS!

My website: http://waihobbies.wkhc.net


  • Member since
    April 2014
  • From: Australia
Posted by lostagain on Friday, November 6, 2020 4:02 AM

Encouraged by Waikong, I have finished the skis - remember this is 60s style:

Then I thought maybe do a bit more work on the skiers and driver

1/48 figures look a bit rough at this magnification, but okay in real life!

Blocked them in with the base colours to get a feel of it all.

  • Member since
    November 2009
  • From: SW Virginia
Posted by Gamera on Friday, November 6, 2020 9:11 AM

Piers: Those look cool, nice work!!! Looking forward to more!!! 

"I dream in fire but work in clay." -Arthur Machen


  • Member since
    January 2013
  • From: Athens, Greece
Posted by Zvezda1980 on Monday, November 16, 2020 4:49 PM

There are a lot of awesome stuff going on in this GB! 

I am sorry for the long absence, but I had to crash-land on 'UpToMy Ears In Work'-Jima.

My wing root joins were shattered and I had to fill and sand for weekends.  Not HASEGAWA, only me to blame.

A coat of Humbrol Aluminum 27002 was applied overall and then the bottom surfaces with Tamiya XF-12, (mixed with a drop of green). Wheel wells were painted with a metallic blue-green.

Blotches of maskol were applied with a toothpick, for my first attempt of serious (or very funny) paint chipping. After some XF-12 touch-ups, the Nakajima green will be sprayed on the top.

All the fellow modellers and their work in this GB inspired me to go on and I am hell-bent on completing this. 

GAF: your Zero is excellent, you pulled through despite your 'chemical' incidents.

GraySnake: This is one helluva beautiful painting work.

Waikong: Very nice built of one of my favorite planes ever.

Steve: Stick out tongue. I doubt I could do this even on the real Akagi...

Piers: I am very curious to see the result. Add some scarves, cause these guys are cold!

Gamera: Perfect build, but your painting, ts, ts.. look,all your paint has chipped off Bow Down

  • Member since
    November 2009
  • From: SW Virginia
Posted by Gamera on Monday, November 16, 2020 5:58 PM

Zvezda:Ouch!! That's horrible!!! Looks like you've got things under control now though. Nice work!!!

"I dream in fire but work in clay." -Arthur Machen


GAF
  • Member since
    June 2012
  • From: Anniston, AL
Posted by GAF on Monday, November 16, 2020 7:28 PM

Zvezda> It wouldn't be a Hasegawa model if it didn't require major rework!  Big Smile

Looks good!

Gary

  • Member since
    February 2011
Posted by GreySnake on Saturday, November 21, 2020 8:41 AM
Lostagain, nice work.
 
Zvezda, glad you were able to save the model and thanks!  
  • Member since
    January 2013
  • From: Athens, Greece
Posted by Zvezda1980 on Sunday, November 22, 2020 4:13 AM

thanks for the kind words folks.

After masking the bottom surfaces, my own mix of Nakajima green was sprayed (80% Gunze H59 IJN Green + 20% H422 RLM82).


  • Member since
    July 2014
Posted by modelcrazy on Sunday, November 22, 2020 11:34 AM

Gam, Are you going to hast another Japanese GB next year?

Steve

Building a kit from your stash is like cutting a head off a Hydra, two more take it's place.


http://www.spamodeler.com/forum/

  • Member since
    November 2009
  • From: SW Virginia
Posted by Gamera on Sunday, November 22, 2020 6:41 PM

Zvezda: Nice work! You're making great progress there!!!


Steve: Yeah, if there's enough interest. I'll see about putting up the JGB X thread after Thanksgiving. Sorry, just spent five hours on the road driving home and I'm a bit zonked out right now... Sleep

"I dream in fire but work in clay." -Arthur Machen


  • Member since
    July 2014
Posted by modelcrazy on Sunday, November 22, 2020 7:30 PM

Enough intrest! LOL, this GB is a staple of FSM's fourms.

Steve

Building a kit from your stash is like cutting a head off a Hydra, two more take it's place.


http://www.spamodeler.com/forum/

  • Member since
    November 2009
  • From: SW Virginia
Posted by Gamera on Monday, November 23, 2020 11:28 AM

modelcrazy

Enough intrest! LOL, this GB is a staple of FSM's fourms.


So it would seem. I keep wondering if people are going to get bored with it though. Stick out tongue

Were you intending on entering your new Yamato turret? I really want to see that too! 

"I dream in fire but work in clay." -Arthur Machen


  • Member since
    July 2014
Posted by modelcrazy on Monday, November 23, 2020 4:47 PM

Well let's discuss this. As of now I have the Akagi on carryover from this year and the Japanese Ships starting in August. I was going to enter a Betty but now not so sure. Let's carryover the Akagi and enter the turret. I won't start it though until August. 

Steve

Building a kit from your stash is like cutting a head off a Hydra, two more take it's place.


http://www.spamodeler.com/forum/

  • Member since
    November 2009
  • From: SW Virginia
Posted by Gamera on Monday, November 23, 2020 9:33 PM

They all sound cool to me Steve. I've got to work Thanksgiving so I'll probably throw up the thread then while I'm at work bored. Take your time, you've got plenty of time to decide on which you want to go with.

"I dream in fire but work in clay." -Arthur Machen


  • Member since
    November 2003
  • From: Naples, FL
Posted by tempestjohnny on Tuesday, November 24, 2020 5:39 AM
I'd definitely be ready for X. I've missed a few years but really like this overall


  • Member since
    November 2008
  • From: Far Northern CA
Posted by mrmike on Tuesday, November 24, 2020 12:25 PM

Same here. I've has a bunch of life issues past couple years, but I'd like to get back to my Tamiya Gekko build from JGB7. Bring on JGB10, and thanks for taking the time time to host one the most popular Group Builds in the Forum.

  • Member since
    November 2009
  • From: SW Virginia
Posted by Gamera on Wednesday, November 25, 2020 11:41 AM

Thanks guys for the vote of confidence! I'll see about getting the new thread posted tomorrow. 

Sorry, I wasn't on yesterday. I went to the eye doctor and they dilated the krap outta my eyes. Anything with a screen on it was just a a big honkin' white blur... 

"I dream in fire but work in clay." -Arthur Machen


  • Member since
    April 2014
  • From: Australia
Posted by lostagain on Wednesday, November 25, 2020 8:08 PM


Cliff, you know I will be in for the next round of the GB. Already thinking about which kit...
Zvezda, looks like a great save with a lot of work there! The colours on the Kate have come up well – and I am looking forward to seeing how your natural metal chipping process works. I have not been happy with my efforts so far, so always happy to learn more.
My tractor driver is finished, and sitting pretty in his seat. Added a bit of snow around the tracks as well.


And I have the tractor placed as well.


GAF
  • Member since
    June 2012
  • From: Anniston, AL
Posted by GAF on Wednesday, November 25, 2020 8:15 PM

Lostagain> That's looking nice!

Gamera> I'm up for X, although I only have another Zero in the stash.  Sad

Well, at least its not a Hasegawa!

Gary

  • Member since
    July 2014
Posted by modelcrazy on Wednesday, November 25, 2020 9:24 PM

Oh yeah, I have tons of Japanese subjects.

Steve

Building a kit from your stash is like cutting a head off a Hydra, two more take it's place.


http://www.spamodeler.com/forum/

  • Member since
    November 2009
  • From: SW Virginia
Posted by Gamera on Thursday, November 26, 2020 11:31 AM

Thanks guys for the interest, I just put up JGB X. 

Piers: Nice work there on the dozer. And I love the snow being pushed off the base! 

"I dream in fire but work in clay." -Arthur Machen


  • Member since
    January 2013
  • From: Athens, Greece
Posted by Zvezda1980 on Sunday, November 29, 2020 5:00 PM

Piers: Very nice idea and execution. The snow turned out perfect.

My natural metal chipping turned out a total (and very unnatural) failure. Masking fluid could not be removed, nor seen beneath the paint.

I rubbed it off with alcohol and coated it over with a fresh layer of paint.

In order to calm down, I masked and painted the hinomarus (meat balls), with a set of Montex masks I had in the stash. Much better than decals.

The elliptical section of the nose anti-glare was painted (rest of the nose will be painted later) flat black. An oval ruler was used to cut the masking tape.


GAF
  • Member since
    June 2012
  • From: Anniston, AL
Posted by GAF on Monday, November 30, 2020 10:55 AM

That's looking sweet, Zvezda!  Good job on the hinomaru.

Gary

  • Member since
    November 2009
  • From: SW Virginia
Posted by Gamera on Monday, November 30, 2020 11:26 AM

Zvezda: Despite your problems she looks fine now. I think my next Zero I'm going with a pretty close to new paint job.  The hinomaru turned out perfect. 

"I dream in fire but work in clay." -Arthur Machen


  • Member since
    April 2014
  • From: Australia
Posted by lostagain on Monday, November 30, 2020 9:24 PM


Zvezda, the Kate is looking great. The hinomarus have come up really well, I haven’t been brave enough to try painting my markings yet. The detail painting is looking good too.


I am calling the tractor done. My two skiers are now installed so they are posed talking to the tractor driver. The tractor does have a canopy to keep the snow off the driver, it was off and on during the photoshoot because it makes the driver disappear and gets in the way generally. It is on permanently now the photos are done.


  • Member since
    December 2002
  • From: NYC, USA
Posted by waikong on Monday, November 30, 2020 10:11 PM
the tractor, the skis, a dio you just dont see everyday. I am loving it. Great job.

My website: http://waihobbies.wkhc.net


  • Member since
    April 2014
  • From: Australia
Posted by lostagain on Tuesday, December 1, 2020 5:43 AM

Thanks very much Waikong, I wanted to try something different, I'm glad you like it.

And thank you Cliff for running the group build again. You have inspired me to run my first GB next year - an RAAF centenary GB.

I will be back next year for Japan GB X

Cheers

Piers

  • Member since
    November 2009
  • From: SW Virginia
Posted by Gamera on Tuesday, December 1, 2020 11:24 AM

Looks great Piers! I love the snow and the overall posing of the dozer and figures! 

But isn't the middle of summer where you are? 

Thanks for joining us and looking forward to what you have for JGBX! 

"I dream in fire but work in clay." -Arthur Machen


GAF
  • Member since
    June 2012
  • From: Anniston, AL
Posted by GAF on Tuesday, December 1, 2020 11:33 AM

Lostagain> Congrats!  It reminds me of going out to shovel snow.  Luckily, I live where there's not much chance of that now, but you've certainly captured the feel!  Well done!

Gary

  • Member since
    April 2014
  • From: Australia
Posted by lostagain on Tuesday, December 1, 2020 6:33 PM

Thanks guys, yep definitely no snow where I am, but a chance to capture a bit of my ski trips, including Japan. 

See you back in 2021!

  • Member since
    November 2009
  • From: SW Virginia
Posted by Gamera on Thursday, December 3, 2020 9:27 AM

Sorry Piers, I know it took awhile but I just posted you to the front page- thanks again for joining us. 

"I dream in fire but work in clay." -Arthur Machen


  • Member since
    November 2003
  • From: Naples, FL
Posted by tempestjohnny on Saturday, December 5, 2020 7:20 PM

Now we're cookin


  • Member since
    February 2011
Posted by GreySnake on Sunday, December 6, 2020 8:28 AM
great work on the tractor and diorama.  Really like how the snow turned out.
 
 
Coming along nicely tempest.
  • Member since
    November 2009
  • From: SW Virginia
Posted by Gamera on Sunday, December 6, 2020 8:00 PM

Yeah great job there TJ, really like the camo on the top there!

Well, coming down to the wire, I'm having issues on the Zero's prop but I started on a base today.

"I dream in fire but work in clay." -Arthur Machen


  • Member since
    April 2014
  • From: Australia
Posted by lostagain on Tuesday, December 8, 2020 5:29 AM

Thanks GreySnake, it was fun.

TJ, I do like the blue/grey scheme.


  • Member since
    January 2013
  • From: Athens, Greece
Posted by Zvezda1980 on Sunday, December 13, 2020 3:13 PM

Piers I stare at your photos for quite some time. The dio gives out a feeling of tranquility. And the painting/weathering of the tractor is outstanding!


  • Member since
    January 2013
  • From: Athens, Greece
Posted by Zvezda1980 on Sunday, December 13, 2020 3:21 PM

Small touch ups , gloss coat and (the few) decals on.

Also engine, prop and rear machine gunner's toy were put together. For the M.G a couple of Eduard's PE components were used and I liked the result. The alignment of the PE parts is a bit flimsy, I don't think the gunner will be able to shoot much straight, but that was the best I could achieve.

  • Member since
    November 2009
  • From: SW Virginia
Posted by Gamera on Sunday, December 13, 2020 5:38 PM

Zvezda: Looks good! Looking forward to seeing you finish up.

"I dream in fire but work in clay." -Arthur Machen


  • Member since
    November 2009
  • From: SW Virginia
Posted by Gamera on Sunday, December 13, 2020 5:45 PM

I'm hoping to get done before the end date. I got the landing gear and drop tank on:

The prop blades vanished from the box. So I replaced them with a second set from another kit and the paint went down rough. So I put them in some thinner to strip the paint. And the thinner melted them... Bang Head

So I bought these 'spinning' props. I'm still trying to get them right. They're interesting but I made a bit of mess painting them:

"I dream in fire but work in clay." -Arthur Machen


  • Member since
    September 2011
  • From: Milaca, Minnesota
Posted by falconmod on Monday, December 14, 2020 7:07 AM

Finally got the pictures of my A5M2 Claude

John

On the Bench: 1/72 Ki-67, 1/48 T-38

1/144 AC-130, 1/72 AV-8A Harrier

  • Member since
    November 2009
  • From: SW Virginia
Posted by Gamera on Monday, December 14, 2020 11:38 AM

John: Just got you posted, great job!!! Love the NM, the red trim, and the decals! Heart


I hope the mix-up is resolved now, if there's anything else please just yell at me again. 

"I dream in fire but work in clay." -Arthur Machen


GAF
  • Member since
    June 2012
  • From: Anniston, AL
Posted by GAF on Monday, December 14, 2020 3:31 PM

Zvezda> It amazes me how light shift colors.  Good work!

Falconmod>  That's nice work!  Good one.

Gamera>  You seem to be having more trouble than I had!  Keep plugging away, you'll get her done!

  • Member since
    November 2003
  • From: Naples, FL
Posted by tempestjohnny on Tuesday, December 15, 2020 4:40 AM
Started the decalling process and. Holy moly does this thing have decals


  • Member since
    November 2009
  • From: SW Virginia
Posted by Gamera on Tuesday, December 15, 2020 8:02 PM

tempestjohnny
Started the decalling process and. Holy moly does this thing have decals
 

Yeap, one of those things I love about kits of modern aircraft- all that stenciling... Bang Head

Good luck!!!

"I dream in fire but work in clay." -Arthur Machen


  • Member since
    April 2014
  • From: Australia
Posted by lostagain on Wednesday, December 16, 2020 5:49 AM


Zvezda, thanks very much for the kind words.


The Kate is looking sharp, I like the MG details too.


Cliff, the zero is coming along well, the first propellor does not look so good though.


John, the Claude looks fantastic.


TJ, they do love those stencils…


  • Member since
    February 2011
Posted by GreySnake on Wednesday, December 16, 2020 7:19 AM
Zvezda you are making good progress.
 
 
Falconmod the Claude looks great!
 
 
Gamera, looks like you gotten some of my bad luck. I always seem to run into problems right as I’m nearing completion of a project.    
  • Member since
    November 2009
  • From: SW Virginia
Posted by Gamera on Wednesday, December 16, 2020 11:17 AM

Thanks guys, though I've pretty much chalked this Zero up as a learning experience. At this point I just want to finish her up and move on to something else.  

"I dream in fire but work in clay." -Arthur Machen


  • Member since
    February 2005
  • From: Nashotah, WI
Posted by Glamdring on Thursday, December 17, 2020 8:55 PM

Good evening, Gents.  I am probably making a mistake, but since I have a week of vacation coming up, I am going to try and bang out the Seiran by 12/31.  I have to cash in on that sweet fox badge! 

Here is my proof it has not been started yet:

There is not much to it, just 2 part trees and the canopy sprue!

Robert 

"I can't get ahead no matter how hard I try, I'm gettin' really good at barely gettin' by"

  • Member since
    November 2009
  • From: SW Virginia
Posted by Gamera on Friday, December 18, 2020 9:18 AM

Robert: Well it is a pretty simple kit but still best of luck!! I want to see you pull this off! I'm cheering you on!!! 

"I dream in fire but work in clay." -Arthur Machen


  • Member since
    December 2007
  • From: Beavercreek, Ohio
Posted by Wrinkledm on Sunday, December 20, 2020 4:34 PM

Boy...  Another year and a lot of great work again to look at.  Thx for posting gents.   Although I have finished much closer to the deadline in a previous GB, I'm leaving a solid week & a half this year. :)     I opted to build the Bandai "Model 0 Type 52 Space Carrier Fighter" from the Anime Space Battleship Yamamato 2199.    Well, she is done. :)  The fit of this kit is pretty much, shake the box, with only a couple of exceptions.   I've also included a pic of the resin kit from E2046 of this Zero's pilot: Yamamoto Akira.  The Yamamoto-san figure is 1/8 scale and stands about 23cm tall.   Enjoy!!!


  • Member since
    February 2005
  • From: Nashotah, WI
Posted by Glamdring on Sunday, December 20, 2020 8:51 PM

That is a very impressive figure Wrinkledm!

I made great progress on my Seiran this weekend. 

Cockpit:


Wings:

Panama Canal buster:

It hit a roadblock because the instructions call for weight in the nose, and my tackle box is MIA.  Fortunately a family member works in a big box store with a fishind section, so she grabbed some this afternoon.  Unfortunately she works the late shift today.  Will get them glued in place and the fuselage sealed up tomorrow, after a little more cockpit detailing.  There are 2 decals for the dials on the pilot and navigators panel.  I may add them, I may not.  I don't think they add much more than my drybrushing did.

So far, so good!

Robert 

"I can't get ahead no matter how hard I try, I'm gettin' really good at barely gettin' by"

  • Member since
    November 2009
  • From: SW Virginia
Posted by Gamera on Monday, December 21, 2020 11:47 AM

WrinkledM: OMG! That's awesome!!! Love how the fighter and the figure come out!!! 

Will get you posted tonight or tomorrow! 

Robert: Looks good, you've got a great start on her! 

"I dream in fire but work in clay." -Arthur Machen


  • Member since
    December 2002
  • From: NYC, USA
Posted by waikong on Monday, December 21, 2020 12:59 PM

John, very nice a5m there with the kanji on the wing

WrinkledM: what can one say, fantastic paint job

My website: http://waihobbies.wkhc.net


  • Member since
    November 2009
  • From: SW Virginia
Posted by Gamera on Monday, December 21, 2020 8:54 PM

WrinkledM: Just posted you, great job! Thanks for joining us!

"I dream in fire but work in clay." -Arthur Machen


  • Member since
    November 2009
  • From: SW Virginia
Posted by Gamera on Monday, December 21, 2020 8:57 PM

Well, here I am. Few more little details to add then a matte varnish overcoat. Add the prop and the canopy and hopefully done. There's some small stuff that I should correct but I'm just burnt out on this one, I'm ready to stick a fork in it and be done.

"I dream in fire but work in clay." -Arthur Machen


GAF
  • Member since
    June 2012
  • From: Anniston, AL
Posted by GAF on Tuesday, December 22, 2020 1:12 PM

Hey!  Nice work all around.

Wrinkledm> I'm impressed by the fighter and the figure!  Nice work.

Glamdring> Good work on the Seiran.

Gamera> That an impressive looking A6M3.  Just about finished.

Gary

  • Member since
    November 2009
  • From: SW Virginia
Posted by Gamera on Tuesday, December 22, 2020 9:44 PM

Gary: Thanks! Did a little more work today- hopefully close to finishing up.

"I dream in fire but work in clay." -Arthur Machen


  • Member since
    April 2014
  • From: Australia
Posted by lostagain on Wednesday, December 23, 2020 6:13 AM

WrinkledM, that looks fantastic. Great finish on the type 52, and Yamamoto San is a great figure.

Glamdring, the seiran is coming together quickly and neatly.

Cliff, it is going well, not much to do before you can put it all behind you....


  • Member since
    February 2005
  • From: Nashotah, WI
Posted by Glamdring on Wednesday, December 23, 2020 10:06 PM

Minor progress: weights are installed, I added the cockpit decals, including the terrible seat belts.   Fuselage sealed and seams sanded.

Running into an issue with the wing assembly and fuselage not aligning  at the rear causing a little space.  I have been attacking the spot with sanding film for an hour, but it still won't go flush.  About to tear my hair out!

Robert 

"I can't get ahead no matter how hard I try, I'm gettin' really good at barely gettin' by"

  • Member since
    November 2009
  • From: SW Virginia
Posted by Gamera on Thursday, December 24, 2020 8:33 AM

Robert: Nice work, she's really coming along fine. Really cheering for you to get this finished by the end of the year. 

And Merry Christmas guys!!! It's been great hanging out with you over the last year. 

"I dream in fire but work in clay." -Arthur Machen


GAF
  • Member since
    June 2012
  • From: Anniston, AL
Posted by GAF on Friday, December 25, 2020 9:01 PM

Glamdring>  Nice work!  Pardon me for asking, but the C ockpit color appears to be grey?

Is this correct?

Gary 

  • Member since
    January 2013
  • From: Athens, Greece
Posted by Zvezda1980 on Saturday, December 26, 2020 7:17 AM

John: Terrific painting, the Claude came out very impressive.

Wrinkledm: Very nice paintwork, I like the dagger-like, agressive look of this ship. I also can't stop admiring Ms. Yamamoto's... fighter pilot skills.

Robert: Good luck on your fast-track target.

Cliff: The paint chipping is an eye-catcher!. This is what I had fantasized doing but never made it. Awesome Zero.

  • Member since
    January 2013
  • From: Athens, Greece
Posted by Zvezda1980 on Saturday, December 26, 2020 7:41 AM

Yesterday I spent several hours masking, painting & assembling the canopy and observation windows. The rear sections of the glasshouse was a bit tricky to assemble, since 3 x movable parts are drawn inside & on top of 1 x stationary.

Lading gear, arresting hook, MG, propeller and rest of various bits where put in place and aligned.

The two 250kg bombs were painted with the green and blue bands , as per a photo I had found on the net. Tips were 'touched' with a small drop of copper.

Limited use of pastels (gray/brown) were applied at the bottom surfaces and thinned black was sprayed on the exhaust gases path.

Limited chipping was applied, mostly on leading edges of wings. Since I cannot paint-chip properly, I shall assume that when Ryujo carrier moved from the Aleutians to south Pacific, it made a replenishment stop at Truk and boarded some replacement Kates, still in relatively good condition. This is one of them, loaded up for an attack on Henderson Field, on August 24th, 1942.

When it returns, the crew will find Ryujo a burning & sinking wreck.

One last overall inspection and... it's finished.


  • Member since
    December 2002
  • From: Northern California
Posted by jeaton01 on Saturday, December 26, 2020 12:24 PM

Well done, well done!  Great finish work.

John

To see build logs for my models:  http://goldeneramodel.com/mymodels/mymodels.html


  • Member since
    February 2005
  • From: Nashotah, WI
Posted by Glamdring on Saturday, December 26, 2020 9:52 PM

That is a great plane!

All the major assemblies are done on the Seiran, and 2 initial layers of paint laid down today.  

Brush painting with Vallejo Air is a different experiance, not sure if I like it or not yet.  Hoping that two coats tomorrow more should solidify that dark green coat.


Robert 

"I can't get ahead no matter how hard I try, I'm gettin' really good at barely gettin' by"

  • Member since
    November 2009
  • From: SW Virginia
Posted by Gamera on Sunday, December 27, 2020 7:07 PM

Zvezda: Beautiful job there!!! Just got you posted! Thanks for joining us.

Robert: Looks good, you're making some solid progress there. Isn't Model Air a little thin for hand-brushing? I haven't tried it though so I'm interested in your thoughts.

"I dream in fire but work in clay." -Arthur Machen


  • Member since
    February 2005
  • From: Nashotah, WI
Posted by Glamdring on Sunday, December 27, 2020 10:13 PM

It took 5 coats of the Vallejo Air IJN Deep Dark Green to finall cover all the spots, but it otherwise took to brushing just fine.  All the 1/72 panel lines are still clearly visible and not obscurred at all.

Tomorrow the plan is to finish the pontoons with their 5 coats of green, finish the cart, and lay some washes and minor weathering on the plane.  I need to dream up a solution to painting the canopy frame, as I will be freehanding it, doing so 5 times to build up the paint coat is not an option!

If all goes well, I want to have decalled by Tuesday, and done by Wednesday.

Robert 

"I can't get ahead no matter how hard I try, I'm gettin' really good at barely gettin' by"

  • Member since
    November 2009
  • From: SW Virginia
Posted by Gamera on Monday, December 28, 2020 11:36 AM

Robert: Ohhhhhhh that looks good! No idea about how to do the canopy but good luck with it! Maybe someone else has an idea? 

"I dream in fire but work in clay." -Arthur Machen


  • Member since
    November 2003
  • From: Naples, FL
Posted by tempestjohnny on Wednesday, December 30, 2020 6:32 PM
Cliff I have an issue. The F-2 is 95% done but I'm currently unable to get into my hobby room. Don't ask? I'll have it done by the 10 day Grace period. Hehe


  • Member since
    February 2005
  • From: Nashotah, WI
Posted by Glamdring on Wednesday, December 30, 2020 9:56 PM

I ended up coming down with a head cold that has really taken a toll on me the last couple days, but I am endevouring on with the 1/31 deadline.   Painting is more or less done, with the exception of a few touch ups that I notice now thanks to HD cameras, and decals are on. 

This is the fun little cart it sits on.  

It has been sealed and will dry overnight.  All I need to do is glue the canopy and the antenna, touch up paint, and call 'er done.  Not going for a heavy weather look because these didn't much action, from my understanding.


Robert 

"I can't get ahead no matter how hard I try, I'm gettin' really good at barely gettin' by"

  • Member since
    November 2009
  • From: SW Virginia
Posted by Gamera on Thursday, December 31, 2020 8:11 AM

TJ: Can't get into your hobby room? That sounds serious! No, no problem here, you need an extra ten days go ahead- you've got your extension. We're not going anywhere here. 

Robert: She looks good!!! Hope you can get the canopy in place and the other odds and ends done by this evening. 

I'm pretty much done here, just need some exhaust stains on the Zero and cross your fingers she should be done. 

"I dream in fire but work in clay." -Arthur Machen


  • Member since
    November 2009
  • From: SW Virginia
Posted by Gamera on Thursday, December 31, 2020 5:11 PM

Am I done- mostly yes.

Am I happy with it- mostly no.

Anyway I learned a lot about chipping even if not happy about a lot of the other stuff with the kit. Sorry about the bad lighting, the sun's gone down- I'll see about getting some better ones up this weekend.


"I dream in fire but work in clay." -Arthur Machen


  • Member since
    February 2005
  • From: Nashotah, WI
Posted by Glamdring on Thursday, December 31, 2020 9:56 PM

I don't know Gamera, looks good to me!  

The Seiran has been completed tonight, I even have a quick proof shot:

I will post better pictures tomorrow when I have my photo background set up, I will do a two for one session with my build for the Korean War GB to save some time.

Robert 

"I can't get ahead no matter how hard I try, I'm gettin' really good at barely gettin' by"

  • Member since
    January 2013
  • From: Athens, Greece
Posted by Zvezda1980 on Friday, January 1, 2021 4:00 AM

Robert: This is a beautiful plane. I am curious to see some more pics from various angles.

Cliff: Masterfull painting and weathering. I am also impressed by the look of the metal primer on the wheel wells.

I also want to thank you for hosting another inspiring GB. I will of course join No.X

Happy, healthy and prosperous new year to everybody

  • Member since
    November 2009
  • From: SW Virginia
Posted by Gamera on Friday, January 1, 2021 8:06 AM

Guys thanks!!! 

Robert: You're good, grab your badge! 

I too am going to wait till this weekend and hopefully better lighting to take a picture for the finished page. 

As soon as TJ can get back into his hobby room and finish up we're off to JGB X! 

Happy New Year guys! And hope and pray it's better than 2020... 

"I dream in fire but work in clay." -Arthur Machen


  • Member since
    February 2005
  • From: Nashotah, WI
Posted by Glamdring on Friday, January 1, 2021 7:20 PM

Sorry about these bad shots, cloudy and snowing out so I had to rely on the ceiling lamp for light.  My 2021 resolution is to invest in a photography lightbox.

This is the best of the lot in my opinion:

Thanks for the GB, Gamera!  I promise not to wait until the 11th hour with the Japanese Group Build X.  (Yeah, right!) 

Robert 

"I can't get ahead no matter how hard I try, I'm gettin' really good at barely gettin' by"

  • Member since
    November 2009
  • From: SW Virginia
Posted by Gamera on Sunday, January 3, 2021 6:03 PM

Robert: Fantastic job there, congrads on being so quick and great work! I did crop your photo a little, hope that's okay by you.

Thinking I need to invest in a light box too now...

"I dream in fire but work in clay." -Arthur Machen


  • Member since
    November 2009
  • From: SW Virginia
Posted by Gamera on Sunday, January 3, 2021 6:06 PM

More photos in the natural sunlight but it was cloudy- I'm not sure they turned out much better.

"I dream in fire but work in clay." -Arthur Machen


  • Member since
    November 2003
  • From: Naples, FL
Posted by tempestjohnny on Thursday, January 7, 2021 3:18 PM

Cliff thanks again for giving me the extra days. I tested positive for you know what. So I'm not going to the second floor of my house which is where my bench is.  My wife was kind enough to bring down the F-2 and some tools to finish it up to the area of the house I'm exiled to.  Calling this done. May have some very minor touch ups but that's for later. Thanks for running another great Japanese GB


  • Member since
    November 2009
  • From: SW Virginia
Posted by Gamera on Thursday, January 7, 2021 4:26 PM

Oh ouch TJ! That blows!

Take all the time you need. It's just a friggin' model, no need to put your health at risk.

God bless you and hope you're over this soon.

"I dream in fire but work in clay." -Arthur Machen


  • Member since
    November 2003
  • From: Naples, FL
Posted by tempestjohnny on Thursday, January 7, 2021 4:56 PM

Gamera

Oh ouch TJ! That blows!

Take all the time you need. It's just a friggin' model, no need to put your health at risk.

God bless you and hope you're over this soon.


thank you. At this point I can barely tell I have it. Mild cold


  • Member since
    November 2009
  • From: SW Virginia
Posted by Gamera on Friday, January 8, 2021 8:27 AM

My brother in law and sister had it. Wasn't much worse than a slight cold. Then again a guy I follow on YouTube said he felt like his lungs were full of broken glass and he could hardly breathe. I hope yours continues to be the mild variety. 

"I dream in fire but work in clay." -Arthur Machen


JOIN OUR COMMUNITY!

Our community is FREE to join. To participate you must either login or register for an account.

SEARCH FORUMS
FREE NEWSLETTER
By signing up you may also receive reader surveys and occasional special offers. We do not sell, rent or trade our email lists. View our Privacy Policy.