SEARCH FINESCALE.COM

Enter keywords or a search phrase below:

AIRCRAFT - On The Warpath: The Curtiss P-40

57718 views
729 replies
1 rating 2 rating 3 rating 4 rating 5 rating
  • Member since
    November 2005
Posted by Anonymous on Wednesday, September 14, 2005 4:44 PM
Hello all!! Back from the dead again. I haven't had too much luck the last couple months. But I will sum it up quickly.

Shortly after my Hard Drive on my comp failed, I lost my job and my Wireless modem fried for some reason. So it took me a little while to get enough money aside to pay for those. Oh and then we decided to move to Arizona. So I used up all of my savings to move out here (But my car didn't make it....) On top of all of that excitement, we were already planning on getting married, which we did on Sept 4th.

So finally, here I am with everything all situated and getting in order. We just permanently set up camp here in Dewey, AZ Sunday, and finally got internet and everything worked out. Phew.

There are a lot of posts here I gotta go through I see. BTW I had to tear apart my booth, and bench, and they ended up in the trash in CA. Now I am back to square one on those, but I have a LOT of workspace now. Time is always against me, I swear...lol I should have my model room unpacked by this weekend and a good idea of where I left off.

No models were damaged in the move. It was a HUGE success!!
  • Member since
    August 2004
  • From: Buffalo NY
Posted by Thehannaman2 on Saturday, September 17, 2005 8:39 AM
Heath, welcome back and congratulations on getting your nuptules tied! Smile,Wink, & Grin [swg]

Also glad to here that no models were harmed in the move. Tough luck on your ride and computer. Glad to have ya back and can't wait to see some progress.

Justen

"The distance between genius and insanity is measured only by success."

Member IPMS Niagara Frontier. "The BuffCon Boys."

IPMSUSA Member 45680 

  • Member since
    February 2003
  • From: A Spartan in the Wolverine State
Posted by rjkplasticmod on Saturday, September 17, 2005 9:31 AM
Welcome back Heath. Congrats on the move & marriage.

Regards, Rick
RICK At My Age, I've Seen It All, Done It All, But I Don't Remember It All...
  • Member since
    November 2005
Posted by Anonymous on Friday, September 23, 2005 3:11 AM
G'day Folk's,

I've got 2 kits in progress to add to this GB.

First:-
The older AMT P-40f in 48 scale is an OOB assembly, but will have 3 Sqn RAAF markings on it.

Second:-
The newer Academy P-40b also a 48 scale assembled OOB, but with 112 Sqn RAF [Nth Africa], in the markings of Clive Cladwell, who flew this bird on several missions and scored 2 kills with it.


  • Member since
    April 2005
  • From: Piscataway, NJ!
Posted by wing_nut on Friday, September 23, 2005 8:11 AM
Fine looking progress Lobbie.

Marc  

  • Member since
    February 2003
  • From: A Spartan in the Wolverine State
Posted by rjkplasticmod on Friday, September 23, 2005 9:44 AM
Looking good so far Rob. Keep us posted.

Regards, Rick
RICK At My Age, I've Seen It All, Done It All, But I Don't Remember It All...
  • Member since
    September 2003
  • From: N.E. Ohio
Posted by dragonfly on Friday, September 23, 2005 11:30 AM
Looks great from here, can't wait to see some decals.

Jerry
  • Member since
    February 2003
  • From: A Spartan in the Wolverine State
Posted by rjkplasticmod on Saturday, September 24, 2005 10:15 AM
BTW, anyone heard from Steve (blackwolf) ? He seems to have been MIA for a while.

Regards, Rick
RICK At My Age, I've Seen It All, Done It All, But I Don't Remember It All...
  • Member since
    September 2003
  • From: N.E. Ohio
Posted by dragonfly on Saturday, September 24, 2005 11:55 AM
Sorry....haven't heard anything from Steve. ......Steve?......Steve?.....STEVE!! Where are you man?

Jerry
  • Member since
    December 2002
  • From: Pominville, NY
Posted by BlackWolf3945 on Saturday, October 1, 2005 5:46 AM
I am back... I'll wait for the applause to die down though...

I'm seriously out of touch with this GB as well as other things modeling at the moment so I needs'da doosum ketchin-up...


Fade to Black...
  • Member since
    February 2003
  • From: A Spartan in the Wolverine State
Posted by rjkplasticmod on Saturday, October 1, 2005 5:44 PM
WElcome back Steve. Been on a vacation ?

Regards, Rick
RICK At My Age, I've Seen It All, Done It All, But I Don't Remember It All...
  • Member since
    August 2004
  • From: Buffalo NY
Posted by Thehannaman2 on Saturday, October 1, 2005 7:50 PM
Steve-O..... Good to have you back. (You are back aren't you?)

Much has happen while you were away shuckin' Bubba. Lot's 'O completed models and such. I'll try to get you those pics you requested as soon as I get a chance.

What'd you think of ROCON?

Justen

"The distance between genius and insanity is measured only by success."

Member IPMS Niagara Frontier. "The BuffCon Boys."

IPMSUSA Member 45680 

  • Member since
    November 2005
Posted by Anonymous on Friday, October 7, 2005 2:43 AM
Thank you all, I appreciate it. I was able to build up my modeling loft very quickly, and even made a new spray booth that works very well. The last couple days I was able to join the fuselage halves together, put in the panel, and the seat/floor area. Right now I am getting ready to attach the lower wings, and then snap some pics tomm.

The biggest problem I am having is the forward air intakes, as the piece that came with the eduards kit was all screwed up. I have been building it up from putty because according to my references the " Y " divider piece in the front is formed so it flows into the cowling smoothly. Rather than behind the cowling as it was sitting the other day. So slowly but surely I am building it up. BTW the kit pieces are a pain to get to fit correctly. So seams galore for me...... YAY!! Stay Tuned.....Pics tomm.

edit: spelling
  • Member since
    February 2003
  • From: A Spartan in the Wolverine State
Posted by rjkplasticmod on Friday, October 7, 2005 9:25 AM
Looking forward to the pics Heath. The Eduard, X Mauve, kit does have a few seam problems, but so does the new Hasegawa.

Regards, Rick
RICK At My Age, I've Seen It All, Done It All, But I Don't Remember It All...
  • Member since
    November 2005
Posted by Anonymous on Friday, October 7, 2005 12:48 PM
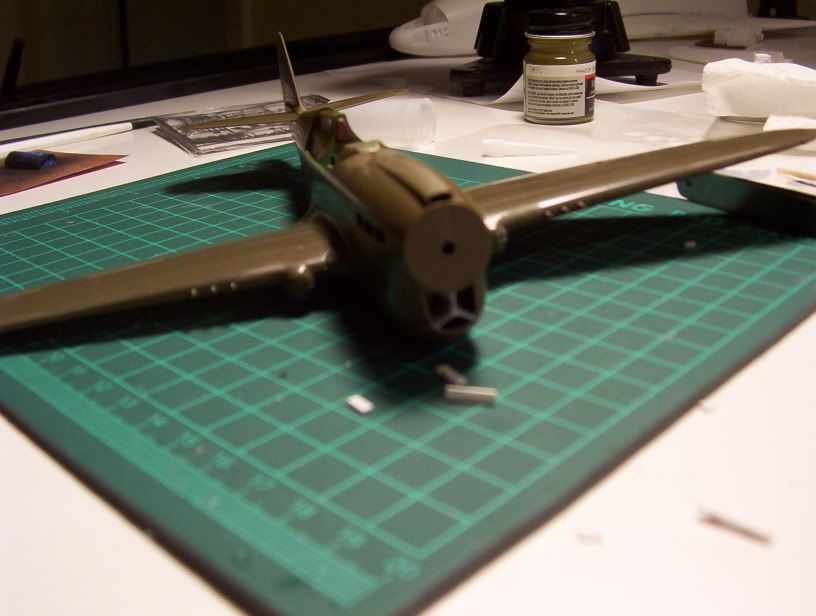
Ok, here are the pics I promised. This first one is of the " Y " Intake divider I was referring too. Sorry for the blurry pic..lol This little pain was sitting almost an 1/8" aft of the cowling, and I am almost at the point where it meets the cowling, and blends in smoothly.


Here is a great shot of the wing joint seams I have to deal with. As you can see there just isn't enough material on the inboards to mate well with the Fuselage joint. The wings fit perfect on the outside edges (ie I didn't move it over too far..lol), and I did not sand the edges that are supposed to meet the fuselage. Planning my seam attack as I speak.


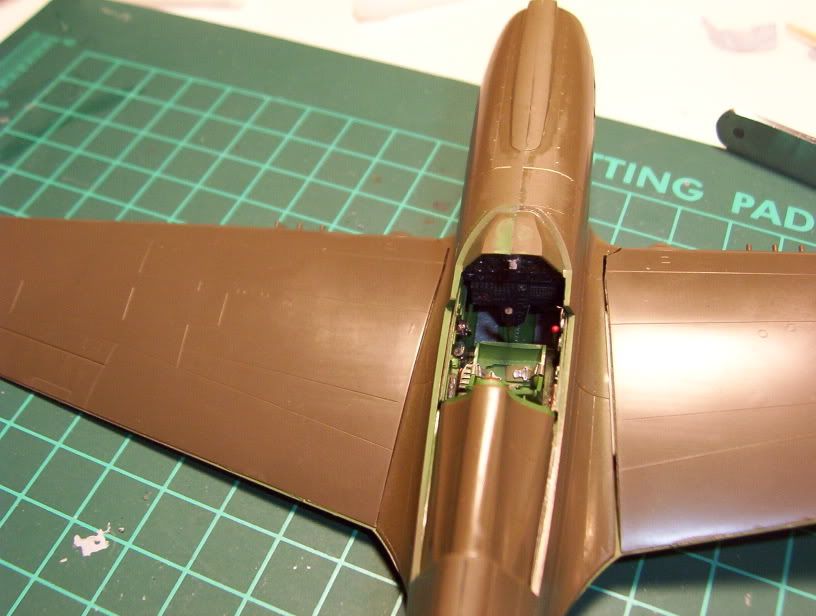
And here is an ok shot of the cockpit. Again you can see that nice fat gap at the wingroot. I had no complaints of the cockpit other than those PE panels are really tough to glue in...lol


And a quick panel shot, even though I sure wish it was a bit clearer. Gonna have to take some photographing lessons from Pix...lol


Right now I am waiting on some paint I had to order from squadron (my new LHS is too weak, they don't even stock decent paint!). So I will have a few days to knock out the seams. I am thinking plastic stock for the wingroots. The rest just fill and sand, fill and sand, fill and sand...lol
  • Member since
    April 2005
  • From: Piscataway, NJ!
Posted by wing_nut on Friday, October 7, 2005 1:24 PM
Good job so far... nice looking pit. Good luck with the wing roots.

Marc  

  • Member since
    February 2003
  • From: A Spartan in the Wolverine State
Posted by rjkplasticmod on Friday, October 7, 2005 3:14 PM
Heath, I think plastic stock is your best bet for correcting the wing root problem. I've built 3 of the Mauve kits & never encountered that much gap. I wonder if the molds are wearing out or if Eduard's molding process is having problems.

Regards, Rick
RICK At My Age, I've Seen It All, Done It All, But I Don't Remember It All...
  • Member since
    March 2004
  • From: Placerville, CA USA
Posted by Mark Joyce on Friday, October 7, 2005 9:13 PM
I've built two of the Eduard P-40Ns, including the one for this group build, and on both I've encountered problems with that wing root gap. I haven't built the similar Mauve kits, so can't comment on how they go together. I thought, especially with my entry for the group build, that the problem was caused by the resin cockpit, but I'm not positive about this. On my first build, done years ago, I didn't find out about the gap until after the fuselage was done, and I simply filled the gaps with lots of putty. On my most recent build, expecting the problem, I used 'spreader bars' to overcome the problem. I got the idea here:

http://www.modelingmadness.com/scotts/allies/us/48p40n.htm

It worked, but on mine the floor of the cockpit sat a bit low.

That Y piece for the radiator is a real pain, and takes a lot of dry fitting to get to fit with any semblance of normal.

Keep at it, Heath! Looks great so far.

Mark

Ignorance is bliss
  • Member since
    April 2005
  • From: Piscataway, NJ!
Posted by wing_nut on Saturday, October 8, 2005 12:25 AM
Just started #2 for this GB. Hasegawa 1/48 P-40 E with the Eduard PE detail set... WOW that's a lot of little pieces. Currently working on folding up seat and getting some of the kit detail chiseled out and the PE stiff in its place. Hopefully I will remember to install the cockpit this timeBig Smile [:D]

Marc  

  • Member since
    March 2004
  • From: Placerville, CA USA
Posted by Mark Joyce on Saturday, October 8, 2005 9:04 AM
QUOTE: Originally posted by wing_nut
Hopefully I will remember to install the cockpit this timeBig Smile [:D]


If you forget it this time, Marc, then something is definitely wrong! Do you have a post-it note or something by your work station to remind you?Wink [;)] How is that Eduard PE set? The Hasegawa kit seem pretty nice OOB, so does it seem the PE kit is worth the cost?

Well, I hadn't really planned on doing a second build for this, but since there is no end date, others are doing second builds, and I've started another P-40, I guess I might as well throw my hat into the ring again. I'm working on AMtech's P-40K with the resin tail. I have the new tail on and primed the area the other day to look for flaws. I was surprised by how well the tail blended into the fuselage. However, I was not so surprised about my rescribing--it leaves a bit to be desired. Not terrible, but one can tell which panel lines I worked on. I probable won't redo it but might try touching it up a bit.

Mark
Ignorance is bliss
  • Member since
    April 2005
  • From: Piscataway, NJ!
Posted by wing_nut on Saturday, October 8, 2005 1:47 PM
Mark,

That is always the big question… is it worth the cost. Considering the amount of detail that this will add to the overall finished product… I say yes. 2 frets with a lot of painted stuff and 6 pages of nicely drawn instructions, covering the whole airframe. Cockpit, LG, tail wheel, gear doors, wheel wells fuselage details…all get some sort of treatment. If you saw the progress pics Pixilater posted not too long ago, it is the same set. I will post some pics when I get more of the cockpit done… too many sub-assemblies at the moments. Also have Ultra Cast exhausts and wheels too.

Marc  

  • Member since
    April 2005
  • From: Piscataway, NJ!
Posted by wing_nut on Monday, October 10, 2005 12:19 AM
Some progress pics of #2 build. The Eduard set is really just gorgeous. Clear instructions of easy bending…. Opti-Visor is a must though. Same one Pixilater posted a short while back so it should look familiar. My IP had some of the same whitish spotting his did but not nearly as bad. There is a bad reflection in the pic here… it is fairly black.
I got into a discussion with a friend who does not build models anymore but did as a kid, and even though he’s a couple of years younger than me… we are going back… trust me. He could not believe the level of detail that can be attained with these sets but argued that it was cheating, that this stuff should be scratched, like the old days. I told him that’s exactly the point….. Those were the old days. There are many that still super detail and it’s all scratched. This, to me, is merely an extension of the kit being a kit itself. To which I am also making enhancements, like 12 individual stretched sprue switches about 1/32” long on the IP. The pit alone, OOB would be 9 parts. With the detail set, some extra added cables etc. to bring the parts total to about 60 and about 6 hours, these sets are a kit all by themselves. The model manufacturer just did not put it in the same box. He started to come around by the end of the discussion so we had a beer and stayed friends.


Marc  

  • Member since
    February 2003
  • From: A Spartan in the Wolverine State
Posted by rjkplasticmod on Monday, October 10, 2005 9:50 AM
Very nice work Marc. That Eduard PE set is about the best one they have done IMHO. I don't consider it cheating to use AM detail sets, but I do consider it expensive Smile [:)].

Regards, Rick
RICK At My Age, I've Seen It All, Done It All, But I Don't Remember It All...
  • Member since
    December 2002
  • From: NYC, USA
Posted by waikong on Monday, October 10, 2005 12:45 PM
totally agree with you about AM stuff, put in what you want and buld what you want. Great looking build so far, especially those landing gears.

My website: http://waihobbies.wkhc.net


  • Member since
    September 2003
  • From: N.E. Ohio
Posted by dragonfly on Monday, October 10, 2005 3:30 PM
Very very nice work Matt....the PE parts look fantastic.

Jerry
  • Member since
    August 2004
  • From: Buffalo NY
Posted by Thehannaman2 on Tuesday, October 11, 2005 9:01 PM
Great work Matt. Can't wait to see more.

Justen

"The distance between genius and insanity is measured only by success."

Member IPMS Niagara Frontier. "The BuffCon Boys."

IPMSUSA Member 45680 

  • Member since
    March 2004
  • From: Placerville, CA USA
Posted by Mark Joyce on Wednesday, October 12, 2005 12:30 AM
Great work so far, Marc! As Rick said, aftermarket isn't cheating just rather on the expensive side. I'm whittling down my use to things such as Ultracast seats and exhausts.

Mark
Ignorance is bliss
  • Member since
    April 2005
  • From: Piscataway, NJ!
Posted by wing_nut on Friday, October 21, 2005 12:55 AM
Besides the fact this thread needed a serious BUMP... here is entry #2

Hasegawa 1/48 P-40E, Eduard detail set, Eagle Strike decals, Ultra Cast tires and exhausts, MM enamels. First time using an Eduard mask for the canopy… really liked how well that worked. Wash is made from ground pastels mixed with water and a drop of dish soap. Works great and will be my method of choice from now on.

A few of the tiny stuff to add but basically done.


More pics here:
http://photobucket.com/albums/y269/wing_nut_5o/P-40E/

Marc  

  • Member since
    February 2003
  • From: A Spartan in the Wolverine State
Posted by rjkplasticmod on Friday, October 21, 2005 9:43 AM
Very nice build Mark Thumbs Up [tup]. A real beauty.

Regards, Rick
RICK At My Age, I've Seen It All, Done It All, But I Don't Remember It All...
  • Member since
    July 2013
Posted by DURR on Friday, October 21, 2005 9:55 AM
my fav fighter of all time
also under rated
put in the hands of a GREAT pilot it could out do MANY though not all "better planes"
JOIN OUR COMMUNITY!

Our community is FREE to join. To participate you must either login or register for an account.

SEARCH FORUMS
FREE NEWSLETTER
By signing up you may also receive reader surveys and occasional special offers. We do not sell, rent or trade our email lists. View our Privacy Policy.