SEARCH FINESCALE.COM

Enter keywords or a search phrase below:

Meng FT-17 French Light Tank Riveted Turret

21556 views
137 replies
1 rating 2 rating 3 rating 4 rating 5 rating
  • Member since
    January 2006
  • From: California
Posted by SprueOne on Sunday, September 21, 2014 8:24 PM

Here Eats 

Hmmm, interior, can paint everything behind the driver seat flat black or go "curb side" with this one 

Anyone with a good car don't need to be justified - Hazel Motes


Iron Rails 2015 by Wayne Cassell Weekend Madness sprueone

  • Member since
    January 2013
Posted by jibber on Monday, September 22, 2014 8:29 AM

Bill timing is everything, I picked up this kit for the WWI GB a bit ago but haven't started it yet. The kit is so well detailed and Meng does a great job in engineering I can't wait to get started on it. I think I'm going to pass on painting the interior, even with the hatches open not much will be visible, but like you I'm still not sure. I love the paint schemes on these old guys and how about those rivets…Terry

  • Member since
    March 2003
  • From: Western North Carolina
Posted by Tojo72 on Monday, September 22, 2014 9:44 AM

looking forward to this one

  • Member since
    September 2006
  • From: Dripping Springs, TX, USA
Posted by RBaer on Monday, September 22, 2014 10:21 AM

A ship, and now something French? Wow.......

Apprentice rivet counter.

  • Member since
    July 2004
  • From: Texas
Posted by wbill76 on Monday, September 22, 2014 11:07 AM

SP1

I'm contemplating something along those lines perhaps, have to think on it a bit! Wink

Terry

agree with you on the appeal of all those rivets and angular sides! It's about time the WWI subjects got their due and I figured this one was just right for a little centenary-acknowledging project.

Anthony

glad to have you along!

BeerRuss

got to keep things interesting every now and then you know! This one will be French-American since the kit includes markings for a US vehicle in 1918.
  • Member since
    March 2012
  • From: Corpus Christi, Tx
Posted by mustang1989 on Monday, September 22, 2014 1:33 PM

Lookin' forward to peepin' in on this one Bill.


 Forum | Modelers Social Club Forum (proboards.com) 

  • Member since
    July 2004
  • From: Texas
Posted by wbill76 on Monday, September 22, 2014 5:42 PM

Glad to have you onboard Mustang! Wink

  • Member since
    July 2003
  • From: On my kitchen counter top somewhere in North Carolina.
Posted by disastermaster on Tuesday, September 23, 2014 3:40 AM

wbill76

After spending the last few weeks down in the Ships forum building a 1/350 HMS Dreadnought.....

So http://rpgmaker.net/media/content/users/27827/locker/HEADSHAKING_SMILEY.gif THAT'S where you've been.

Sherman-Jumbo-1945

"I never know what to expect here anymore."


  • Member since
    July 2004
  • From: Texas
Posted by wbill76 on Tuesday, September 23, 2014 10:04 AM
disastermaster

wbill76

After spending the last few weeks down in the Ships forum building a 1/350 HMS Dreadnought.....

So http://rpgmaker.net/media/content/users/27827/locker/HEADSHAKING_SMILEY.gif THAT'S where you've been.

You caught me Steve! It's not cheating though...it was armored, had turrets, and some big guns! Big Smile
  • Member since
    July 2006
  • From: New Jersey
Posted by redleg12 on Tuesday, September 23, 2014 7:09 PM

First you cheat on us and go to ships (still waiting for you to do a car...nice German staff car), now you screw with our heads and go French. What is this world coming to...first legalized pot, same sex marriage, Bill builds a ship, now he goes French!!! OMG

Rounds Complete!!

"The Moral High Ground....A Great Place to Emplace Artillery."

  • Member since
    July 2004
  • From: Texas
Posted by wbill76 on Tuesday, September 23, 2014 7:41 PM
redleg12

First you cheat on us and go to ships (still waiting for you to do a car...nice German staff car), now you screw with our heads and go French. What is this world coming to...first legalized pot, same sex marriage, Bill builds a ship, now he goes French!!! OMG

Rounds Complete!!

But at least I will finish it in the American markings for 1918... Wink As for the staff car, you may have to wait a while for that one. Big Smile
  • Member since
    January 2007
Posted by the doog on Tuesday, September 23, 2014 7:42 PM

Cripes, but you don't slow down for a minute, Bill!

Cool beans--didn't even realize they released this!

I'm going to start the Takom Mark IV Male soon! It'll be a WWI party!

  • Member since
    July 2003
  • From: On my kitchen counter top somewhere in North Carolina.
Posted by disastermaster on Tuesday, September 23, 2014 11:01 PM

wbill76
disastermaster

wbill76

After spending the last few weeks down in the Ships forum building a 1/350 HMS Dreadnought.....

So http://rpgmaker.net/media/content/users/27827/locker/HEADSHAKING_SMILEY.gif THAT'S where you've been.

You caught me Steve! It's not cheating though...it was armored, had turrets, and some big guns! Big Smile

Yeah, yeah, yeah, but it ain't got no dad burn-tracks, darn it.

http://heathersanimations.com/military/edpanz3.gifhttp://heathersanimations.com/military/edsherm4.gif


http://z5.ifrm.com/30179/46/0/e5148760/e5148760.gif Next thing I know, you'll be

       building flying saucers..........http://dhammawheel.com/images/smilies/saucer.gif http://www.allempires.com/forum/smileys/smiley29.gif

                                      (like some other guy I know here)

Sherman-Jumbo-1945

"I never know what to expect here anymore."


  • Member since
    January 2010
Posted by CrashTestDummy on Wednesday, September 24, 2014 8:40 AM

I've read good reviews on this kit, and picked one up on sale.  When I opened the kit up when it arrived, I almost started on it right then.  It's a very nice kit.  I have too many other half-started projects, though, so I'm working through those first.  

I'll be watching this build, though.  

G. Beaird,

Pearland, Texas

  • Member since
    July 2004
  • From: Texas
Posted by wbill76 on Wednesday, September 24, 2014 11:41 AM

Steve

I don't know what you're talking about...Wink

CTD

I got mine for a good price as well so figured why not? Very impressed with the fit and detail so far on this little guy. Glad to have you along! Beer
  • Member since
    July 2003
  • From: On my kitchen counter top somewhere in North Carolina.
Posted by disastermaster on Wednesday, September 24, 2014 2:18 PM

wbill76

Steve

I don't know what you're talking about...Wink

http://images.yuku.com.s3.amazonaws.com/image/gif/1b5251a4b65a7bc83cbd612cee9209dd1887f5f.gif  Ahh, get outt'a here http://www.armywivesforums.com/forums/images/smilies/new2012/kicked-out-smiley.gif

                                      http://vladsokolovsky.com/forums/public/style_emoticons/aaa/laugh1-smiley.gif


Sherman-Jumbo-1945

"I never know what to expect here anymore."


  • Member since
    June 2006
  • From: Michigan
Posted by ps1scw on Thursday, September 25, 2014 12:38 PM

Very cool subject.  Gotta love all the WWI subjects coming out.

  • Member since
    July 2004
  • From: Texas
Posted by wbill76 on Thursday, September 25, 2014 4:45 PM

Glad to have you on board ps1! Wink

  • Member since
    July 2004
  • From: Texas
Posted by wbill76 on Sunday, September 28, 2014 2:49 PM

After some back and forth I decided ultimately to go ahead and button up this little guy and not display the driver's hatches open. So with that decided, I set about assembling the hull. Since it's all separate panels, I used regular glue on the hull sides so they could have some stability and then followed that up with careful applications of liquid glue where needed along the bottom edges.

Then I added the roof plate next so I could use it to get the hull sides lined up square and the small driver's area side plates lined up with the view port hatch hinge and the top edges of the roof plate. This all requires some careful use of finger pressure and glue as the areas involved are tiny and rubber bands or clamps can't do the job. Then I added the angled top plate for the nose and the driver's access hatches since all three need to line up just so with each other to avoid issues or gaps. Last but not least, I added the driver's visor in the closed position.

That got a chance to set up nice and solid overnight and attention turned to the engine deck area under Step 6. It's important to note (as the instructions do) that the sledgehammer is trapped in place by the little vent cover, B9, so that means it will have to be detailed in place later on. To help make that easier, I didn't glue the sledgehammer down, just placed it and am allowing B9 to hold it in place for now. In Step 7, the instructions would have you place part B11 and then add the engine bay hatches in Step 14. I found it easier to add them all together at the same time as B11 needs to be lined up very precisely in relation to the hatches for everything to play nice with each other here. This isn't a kit flaw or an engineering issue, quite the contrary...the engineering is very well done for these parts but since the vehicle itself is so small, fractions of a mm do matter in getting everything lined up correctly with all the plates/parts involved.

In preparation for working on the turret, I opted for the 37mm cannon version in Step 15. I assembled the gun as directed and used a drill bit to open up the cannon muzzle a bit more. The molding on the end of my barrel wasn't perfect, so some careful sanding and trimming was needed to get it into shape. I also installed it into the turret faceplate so that its all one module now and ready to go into the turret.

Since the turret assembles as a series of plates onto an octagonal base, that's going to require some careful attention to get all the plates together and lined up between the roof and base, so that will be what's on deck for the next round of effort

  • Member since
    August 2006
  • From: Oromocto, Canada
Posted by Gun Tech on Sunday, September 28, 2014 9:54 PM

Nice!  

I wanted to see one built up for a little while now.

I'll gladly follow!

Jean-Michel    "Arte et Marte"

  • Member since
    March 2012
  • From: Corpus Christi, Tx
Posted by mustang1989 on Monday, September 29, 2014 5:13 AM

wbill76
Since the turret assembles as a series of plates onto an octagonal base, that's going to require some careful attention to get all the plates together and lined up between the roof and base

That sounds like a PIA! ..............and intense!


 Forum | Modelers Social Club Forum (proboards.com) 

  • Member since
    July 2004
  • From: Texas
Posted by wbill76 on Monday, September 29, 2014 11:58 AM

J-M

glad to have you along for the ride! Wink

Mustang

I can understand why Meng went this route since that's how the actual turret was constructed...a series of octagonal riveted plates on a frame. It also allows them to mold detail on both sides of the plates for greater realism on the interior if you choose to have the rear turret hatch open as well. It does make for a more intricate assembly though, no question about that! Smile
  • Member since
    December 2002
  • From: Bury St Edmunds, Suffolk, England
Posted by Bish on Monday, September 29, 2014 12:31 PM

Damn, missed the start of this one. But then its hard to keep up with your builds. Nice subject, its good to see something different, even if it is French Zip it!

I am a Norfolk man and i glory in being so


On the bench: Airfix 1/72nd Harrier GR.3/Fujimi 1/72nd Ju 87D-3

  • Member since
    July 2004
  • From: Texas
Posted by wbill76 on Monday, September 29, 2014 1:20 PM

Bish

Glad to have you along! This one will serve to scratch my WWI itch just about right I think! Wink

  • Member since
    January 2013
Posted by jibber on Monday, September 29, 2014 2:05 PM

Bill I was going to start my FT-17 for the next WWI GB but I think I'll ride this one out and pickup some tips along the way, I hope you don't mind. Its a little like watching another golfer putting the same line and you sneak a peek to see what its going to do, anyway are you going to use the provided base? I looked at it, and just by itself it should make a very nice presentation. Terry

  • Member since
    July 2004
  • From: Texas
Posted by wbill76 on Tuesday, September 30, 2014 11:55 AM

Works for me Terry! No harm in following along to see how this one builds up and avoiding any pitfalls that might pop. Happy to be the guinea pig. Big Smile I haven't yet decided if I'm going to use the base or not...it's kind of a 'dio in a box' arrangement which I think is neat but may not fit inside my available display cabinet space, so that may end up being the ultimate deciding factor on that front.

  • Member since
    January 2013
Posted by jibber on Tuesday, September 30, 2014 7:09 PM

Thanks Bill.

  • Member since
    January 2010
Posted by CrashTestDummy on Wednesday, October 1, 2014 12:36 PM

wbill76

J-M

glad to have you along for the ride! Wink

Mustang

I can understand why Meng went this route since that's how the actual turret was constructed...a series of octagonal riveted plates on a frame. It also allows them to mold detail on both sides of the plates for greater realism on the interior if you choose to have the rear turret hatch open as well. It does make for a more intricate assembly though, no question about that! Smile

Yeah, but on the actual tank, I'm sure they had templates, and stabilizing brackets to help with assembly. 

Sad to see you're not opening it up, but I understand fully.  It'll speed up the assembly, and cut down on the 'how much additional detail do I add to this one?' decisions.  Wink

G. Beaird,

Pearland, Texas

  • Member since
    July 2004
  • From: Texas
Posted by wbill76 on Wednesday, October 1, 2014 3:05 PM

That's true CTD! Meng does offer the full interior version in a different FT-17 kit and if I had that one, it would've been worth it. In this one there's so much that's not there that closing it up made life a lot easier.

  • Member since
    January 2003
  • From: Washington State
Posted by leemitcheltree on Thursday, October 2, 2014 7:28 PM

WBill....I like your logical steps and the way you attack the small problems you've found.

Additionally - one thing that often really lets down a WIP build is the pics.

The use of the that wooden mount, and your care with taking the pics is excellent - possibly running only a close second to ChukW.

Keep up the great work, mate - I'm looking forward (a great deal) to seeing this one progress.

Thanks for your efforts to edumacate us all as you move forward.  Good deal!

This is what this website is all about - people like you sharing.  Awesome.

Cheers, LeeTree
Remember, Safety Fast!!!

  • Member since
    July 2004
  • From: Texas
Posted by wbill76 on Thursday, October 2, 2014 8:04 PM

Thanks Lee! Glad to have you along and good to hear you find the blogs helpful. Always happy to share the good, bad, or ugly when it comes to a build. Beer Wink

  • Member since
    July 2004
  • From: Texas
Posted by wbill76 on Friday, October 3, 2014 4:23 PM

Made some great progress on this little guy in the turret department. Steps 16 and 17 cover the assembly and it's important to note that the base of the turret is an octagonal ring with notches for tabs at the bottoms of each of the plates. You can start wherever you want, but once you commit to the position of the front plate with the gun, you need to place all the other plates as the instructions point out. In anticipation of that, I removed each of the panels from the sprue, cleaned them up, and marked their part number on the inside face so I didn't accidentally place a plate in the wrong spot.

I opted for regular glue on the bases of the plates so they had a good grip, placed the front plate and gun first, then added the plates to either side, and so on until I had all the plates in position. I deliberately did not apply any glue to the areas where the plates met each other though until I was ready to install the turret roof plate. This made it possible for me to use the roof plate to help ensure all the side plates leaned in at the right angle and matched up as needed. I was impressed with the fit/engineering of all these parts...they all lined up nicely and only needed some slight finger pressure in a couple of spots to help the liquid glue grip and seal up the plate joins.

With all the plates in place, I added the rear turret hatches in the closed position. Then the three part cupola came next to round out things for the turret.

The turret base ring fits snugly into the hull roof opening, a nice friction fit that still allows the turret to rotate, so I'll have to be mindful of that when painting to ensure it stays that way.

Next up will be tackling the suspension components, lots of small parts there so will take my time there as well.

  • Member since
    March 2012
  • From: Corpus Christi, Tx
Posted by mustang1989 on Saturday, October 4, 2014 7:16 AM

Looks like its coming together nicely Bill.


 Forum | Modelers Social Club Forum (proboards.com) 

  • Member since
    December 2002
  • From: Bury St Edmunds, Suffolk, England
Posted by Bish on Saturday, October 4, 2014 9:12 AM

Looking really nice Bill. And a great idea to mark those turret panels, that would be so easy to get wrong if your not careful. A great tip.

I am a Norfolk man and i glory in being so


On the bench: Airfix 1/72nd Harrier GR.3/Fujimi 1/72nd Ju 87D-3

  • Member since
    July 2004
  • From: Texas
Posted by wbill76 on Saturday, October 4, 2014 9:54 AM

Thanks Mustang! Wink

Bish

thanks as well! Happy to pass along the idea, there's really only one way all the plates can line up together but when they are sitting on the bench together waiting for assembly this just keeps it simpler especially once you start adding glue to the mix. Beer
  • Member since
    July 2004
  • From: Texas
Posted by wbill76 on Wednesday, October 8, 2014 7:01 PM

Made some more progress on the little FT-17, this time in the suspension department. I decided to build up the suspension units one side at a time since the elements that you construct in Step 8 are 'handed' between the left and right side and I didn't want to cause any confusion there. I started with the A and B components needed for the left side and also assembled the return roller frame. Lots of care is needed when gluing the frame halves together so that the rollers remain free to rotate. Adding the metal pin and frame supports at the front is also a little challenging but works out in the end with a little patience. When assembling the road wheel elements, I found it easiest to assemble the frame halves and wheels together first, then add the top support arm portion before the glue had set up. This way you could flex the tops open to accept the pins without having the whole thing come apart in the process. The biggest time-consuming element in this step is cleaning up the two sprue connection points per road wheel and return roller as they have very delicate rims that intersect with the connection points.

Step 9 assembles the full suspension unit using the components from the previous step. It's possible to assemble it and leave the suspension fully workable if you use the top part of the unit to help hold the sides together. Again, a very tricky assembly process that will leave you wishing you had another hand to help out but the end result produces a very nicely detailed assembly. Once the top and sides were firmly together, I added the support base for the return roller frame and used the kit-supplied steel spring and some CA glue to ensure it sat at the right height and angle to match up with the large idler.

Once I'd figured out the little tricks and traps by doing the first unit, the second one for the right side took only half as long to pull it together.

Given how complex this all is and how the suspension relates to the hull, I'm seriously considering leaving them separate for painting to make it easier to get everything covered and also make life simpler in terms of applying a camo pattern. Next up are the exterior details for the hull!

  • Member since
    July 2003
  • From: On my kitchen counter top somewhere in North Carolina.
Posted by disastermaster on Wednesday, October 8, 2014 10:18 PM

Well, this should be interesting....... http://www.animateit.net/data/media/august2009/th_zombie3.gif

Sherman-Jumbo-1945

"I never know what to expect here anymore."


  • Member since
    January 2013
Posted by jibber on Thursday, October 9, 2014 8:10 AM

This is great stuff, I'm planning mine for December and this is my "GoTo" tutorial for sure. Again this is a great little vehicle and maybe the coolest suspension ever. I still love those large rivets.

Bill do you think it may be better to paint ahead the suspension parts, at least a primer, or would it make it troublesome for assembly?

Terry

  • Member since
    July 2004
  • From: Texas
Posted by wbill76 on Thursday, October 9, 2014 10:16 AM

Steve

can't argue with you there! Big Smile

Terry

it's definitely interesting to see how these early tank designs tackled different challenges particularly in the suspension department. This particular arrangement almost has a Rube Goldberg feel to it IMHO! Wink

I am thinking that it will be better to paint the suspension as separate 'modules' from the hull and then attach simply because of all the tight corners and spaces. The suspension attaches to the hull at the rear via some solid connection points but at the front only has the struts for the main suspension spring to hold it in place, so those would probably have to be masked off so they have a clean attachment point since the struts are metal.

  • Member since
    March 2012
  • From: Corpus Christi, Tx
Posted by mustang1989 on Thursday, October 9, 2014 11:15 AM

Now that's some in depth suspension parts Bill. Cant wait to see em painted up and weathered!


 Forum | Modelers Social Club Forum (proboards.com) 

  • Member since
    May 2014
Posted by Sackgasse on Thursday, October 9, 2014 11:56 AM

Hi Mr. Bill,

Never thought that I would want to build a French AFV until now :)

Interesting trick with the live springs, I think Bronco has done something similar on their SdKfz. 221.

Happy Modelling!

Zack

Happy Modeling! Cool

  • Member since
    July 2004
  • From: Texas
Posted by wbill76 on Thursday, October 9, 2014 11:57 AM

Thanks Mustang! There's 45 different parts that go into each side of those suspension elements, so a lot going on with them for sure. Beer

  • Member since
    July 2004
  • From: Texas
Posted by wbill76 on Thursday, October 9, 2014 11:59 AM
Sackgasse

Hi Mr. Bill,

Never thought that I would want to build a French AFV until now :)

Interesting trick with the live springs, I think Bronco has done something similar on their SdKfz. 221.

Happy Modelling!

Zack

I hear you there Zack! Something about this early/industrialized approach to the design and all those rivets I imagine creates a special appeal. Smile I'm glad Meng supplied real springs for the suspension, there's really no other way to accurately model that IMHO.
  • Member since
    January 2013
Posted by jibber on Thursday, October 9, 2014 5:06 PM

I agree with you on painting them separate and masking off those connection points is always a good thing. Thats really going to be a nice model, Meng goes way beyond the norm with their detail, I've just found their plastic a little "soft" but I plan on building more of them, maybe their D9R. Thanks Bill.

Terry

  • Member since
    July 2004
  • From: Texas
Posted by wbill76 on Saturday, October 11, 2014 4:45 PM

Returning to the hull details, I went all the way back to Step 3 and added the details required for the left side of the hull. The kit includes a metal strut and spring for the front part of the suspension and the key to getting this in at the right height is the spring itself and the 'cap' styrene part that sits on top, D11. D11 doesn't sit snugly on top of the strut, so I glued the strut and spring into the housing with CA first and then added D11 to the top after to ensure it lined up correctly with the suspension module and wouldn't cause any fit issues along the way. Tow hooks and large box and rack were also added to round things out.

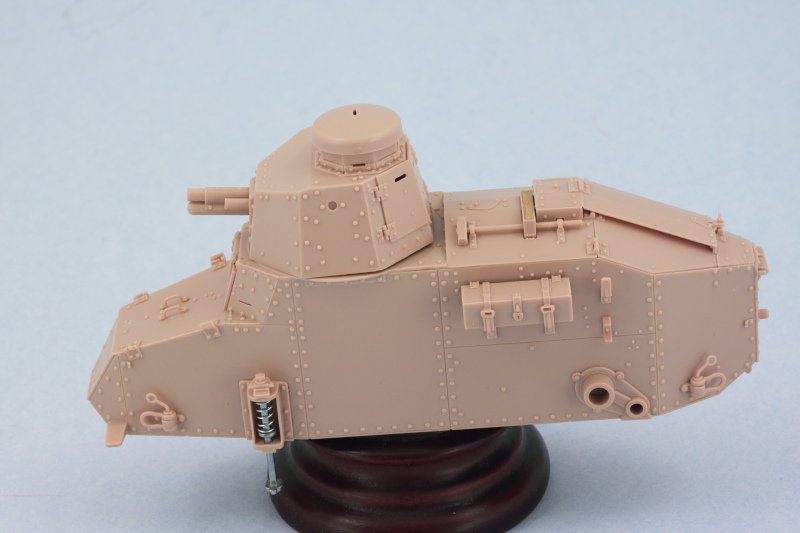
Process was repeated for the right side in Step 5 but I left off the exhaust muffler for the time being as that will be detailed and installed after painting.

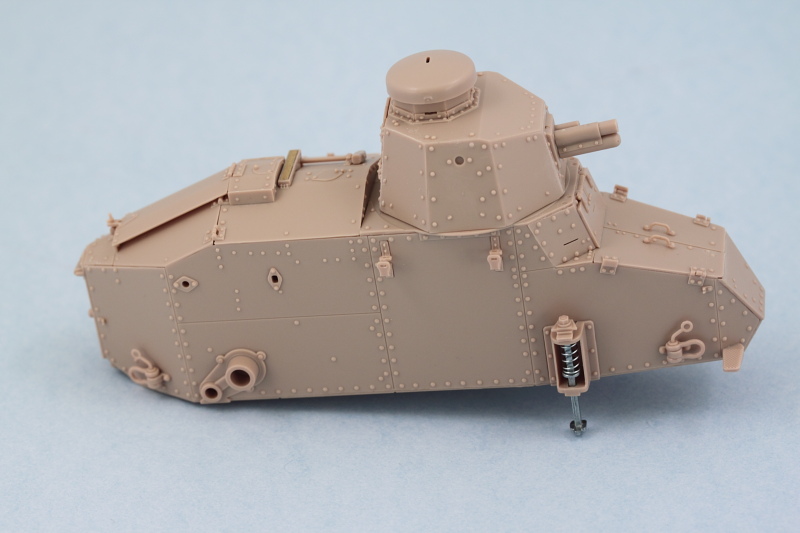
And just to be sure that 'stumpy' here would sit properly with the suspension modules in place, a dry-fit was in order! The test fit shows that when the time comes to glue the modules in place I'm going to have to be a little careful that they sit level as there's a slight tendency for the top to want to bow in slightly since there really isn't anything on the top side to prevent that by way of connection points.

The next item of interest were the tracks which are dealt with in Step 12. The kit provides click-able individual tracks that will produce workable tracks of 32 links per side. I found in the assembly process though that I had to keep a sharp eye out for tiny amounts of flash around the hinge points as if those weren't caught the links would fit together almost rigidly or require too much force that could snap off the small pins. Fortunately the kit provides plenty of extra links so it wasn't a huge deal when a couple got sacrificed in this learning step.

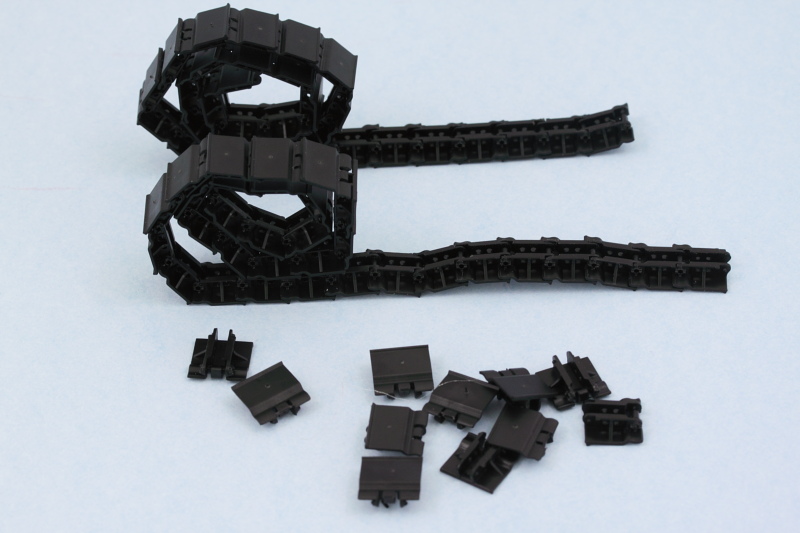
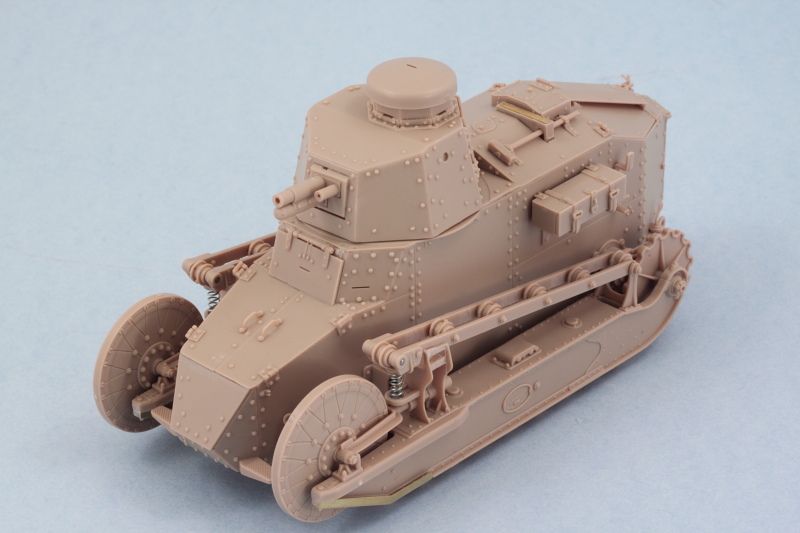
A quick test fit with the suspension modules showed everything playing nice and 32 links working out perfectly. Connecting up the ends of the runs once the tracks have been painted and weathered may be a little challenging...I may just remove one or both of the pins on those final links and just rely on gluing the links together to secure the runs, have to see when the time comes.

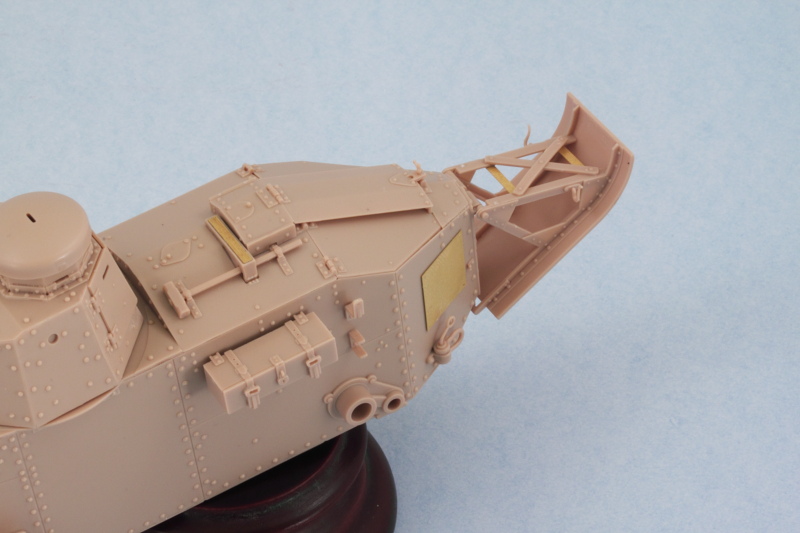
The last remaining area needing attention was the rear hull and the un-ditching tail covered in Step 11. I'm not 100% sure, but I think the PE placards (parts W5) should be placed only if you're doing the American WW1 version of this kit so be mindful of that as the instructions don't make any kind of distinction there.  Since I am doing the American version, these were installed with Gator Grip glue so I could have some work time to get them properly positioned/straight relative to the areas they install into. The folded up tarp that installs over the X brace on the tail is left off for now and will be added after painting.

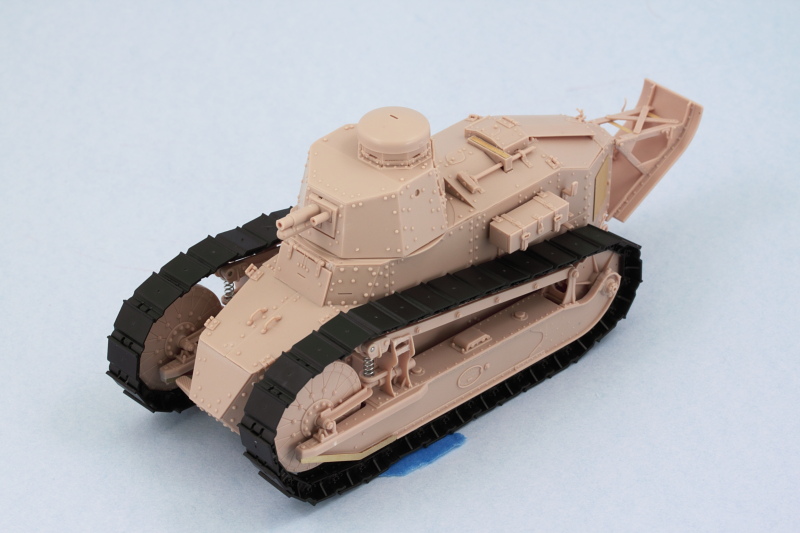
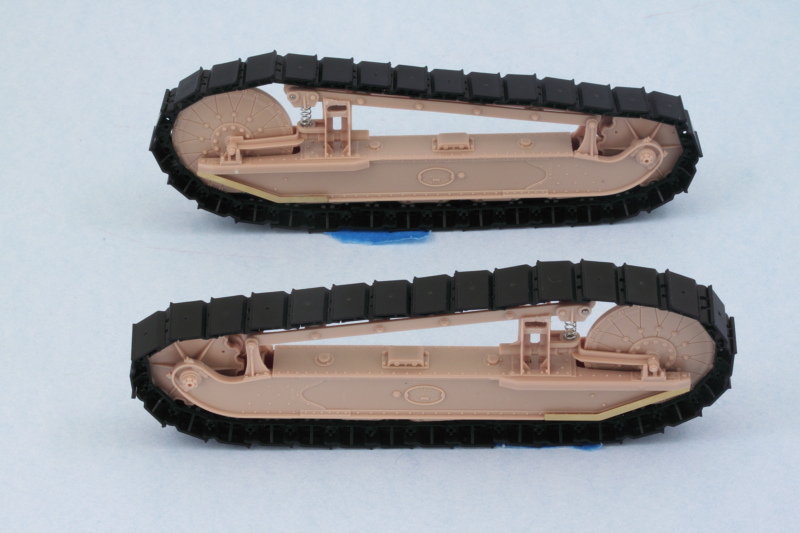
Just to satisfy my curiosity, I did a full mock-up with the suspension elements and tracks and I'm now 100% convinced that painting the suspension separately and installing after is the right way to go on this little guy.

  • Member since
    August 2007
  • From: back country of SO-CAL, at the birth place of Naval Aviation
Posted by DUSTER on Monday, October 13, 2014 12:25 AM

DANG you can just hear the clank-ity, clank, Good work nice to see it coming together Yes.

Steve

Building the perfect model---just not quite yet  Confused

  • Member since
    March 2012
  • From: Corpus Christi, Tx
Posted by mustang1989 on Monday, October 13, 2014 3:24 AM

This is coming together fast Bill. Looks good from here.


 Forum | Modelers Social Club Forum (proboards.com) 

  • Member since
    January 2013
Posted by jibber on Monday, October 13, 2014 9:25 AM

Wow nice Bill, I thought those track pieces may have been a bit of a problem, it looks like they lay in there real nice. Unlike others, you surely couldn't go 31 or 33. As usual, nice and clean.

  • Member since
    July 2004
  • From: Texas
Posted by wbill76 on Monday, October 13, 2014 11:39 AM

Duster

I hear you there! These things had a very low top speed at 8 km/h and were powered by a 4-cylinder engine, so the clanking would've been in slow-motion! Wink

Mustang

thanks as always!

BeerJibber

you're right on the link count. This vehicle had tensioned tracks so 32 is exactly what is needed on both sides, no more, no less! Wink The only small drawback to the track links is Meng's decision to mold them in black styrene. This makes it very hard to spot any small amounts of flash that could interfere with the fit, so I just took the standard precaution of cleaning up all the contact points on each link to ensure a good fit. A little tedious, but pays off in the end.  
  • Member since
    December 2002
  • From: Bury St Edmunds, Suffolk, England
Posted by Bish on Monday, October 13, 2014 12:02 PM

Really coming to life now Bill, looking great.

I am a Norfolk man and i glory in being so


On the bench: Airfix 1/72nd Harrier GR.3/Fujimi 1/72nd Ju 87D-3

  • Member since
    July 2004
  • From: Texas
Posted by wbill76 on Monday, October 13, 2014 12:45 PM

Thanks Bish! Wink Now the fun begins in the painting department.

  • Member since
    March 2012
  • From: Corpus Christi, Tx
Posted by mustang1989 on Monday, October 13, 2014 2:36 PM

This and the weathering is what separates the men from the boyz here. Looking forward to this part.


 Forum | Modelers Social Club Forum (proboards.com) 

  • Member since
    January 2006
  • From: California
Posted by SprueOne on Monday, October 13, 2014 8:44 PM

Progress flowing together nicely. The suspension sub-assemblies looked a little gnarly but handled well 

Anyone with a good car don't need to be justified - Hazel Motes


Iron Rails 2015 by Wayne Cassell Weekend Madness sprueone

  • Member since
    July 2004
  • From: Texas
Posted by wbill76 on Tuesday, October 14, 2014 10:00 AM

Thanks Sprue! I'm very impressed with what Meng came up with in terms of both fit/engineering and quality of detail on this kit. Beer

  • Member since
    December 2002
  • From: Fort Knox
Posted by Rob Gronovius on Tuesday, October 14, 2014 10:20 AM

.

  • Member since
    July 2004
  • From: Texas
Posted by wbill76 on Tuesday, October 14, 2014 11:39 AM

Sorry to tempt you Rob! I applaud you for your discipline in sticking with the RPM kit...maybe for Christmas you can get yourself a little treat...these Riveted Turret kits often go for substantially less than the full interior kits if you catch a sale just right. Wink Thanks for the comments and support on this build. Beer

  • Member since
    July 2004
  • From: Texas
Posted by wbill76 on Wednesday, October 15, 2014 4:29 PM

I've started in on the painting process and the first order of business was laying down a primer coat of Testors Model Master enamel Italian Dark Brown via airbrush.

I let that set up overnight and then, since I'm applying a three tone camo and the yellow part of the pattern seems to be the most dominant, I applied the yellow portion as a base coat to work off of. I used a 50-50 mix of MM enamel Dunkelgelb/Light Gray as it will not doubt darken during the weathering process.

This will get the chance to set up just like the primer as I don't want to take any chances with paint lifting when I mask off the areas for the brown and green areas of the scheme. In the meantime, I decided to give the kit-included base a try. It assembles pretty easily and has a nice cross brace at the bottom that helps hold everything together and give it some rigidity. I did have to employ small amounts of putty in a couple of spots on some of the joins and of course sanding was called for to smooth everything down on all four sides but nothing major.

Since I had the airbrush out, I decided to also paint the base. A primer coat of Italian Dark Brown came first, then some highlights using MM enamel Afrikabraun, and an overall filter/mist coat of MM enamel Raw Sienna. It's a little hard for the camera to pick up all the subtleties but it produced a nice starting point to work from that will get further refinement with pigments and dry brushing later on. I will admit to a sudden craving for chocolate cake though...can't imagine why!

That's where things stand at the moment, next up of course will be getting that camo pattern on the vehicle and then finalizing the suspension installation.

  • Member since
    July 2006
  • From: New Jersey
Posted by redleg12 on Wednesday, October 15, 2014 7:47 PM

As always it is great to watch a master at work. Still.....strange its not German.....but looks great

Rounds Complete!!

"The Moral High Ground....A Great Place to Emplace Artillery."

  • Member since
    July 2004
  • From: Texas
Posted by wbill76 on Thursday, October 16, 2014 12:02 PM

Thanks Mike! I agree it feels a little odd not working on a German tank but it's just a momentary diversion! Big Smile

  • Member since
    July 2004
  • From: Texas
Posted by wbill76 on Thursday, October 16, 2014 5:16 PM

First stage in applying the camo pattern is complete! I'm using the kit's finishing guide for an American tank at Verdun in October 1918 that sports a hard-edged three-tone scheme, so the first order of business was marking out the green areas. I used some 'worms' of poster blue tack putty rolled out and pressed down with a wooden toothpick to create the masks.

Some Model Master enamel Khaki was airbrushed at low pressure using a fine detail tip. After sitting for a couple of hours to touch dry, I removed the blue-tack to see how it turned out.

So far, so good, just some tiny areas that might need touch-up later on. Next up will be the red-brown portion.

  • Member since
    July 2004
  • From: Texas
Posted by wbill76 on Friday, October 17, 2014 5:00 PM

Got the rest of the camo pattern on today with the red-brown portions. Same drill as with the green, I used the blue-tack approach to mask off the appropriate areas first.

Out with the airbrush and a mix of 50-50 MM enamel Military Brown and Leather did the trick in no time.

After doing some light touch-ups here and there with the base coat, I sprayed a mist/filter coat of heavily thinned base coat color to tie the scheme all together and fade the scheme a bit.

Once the tracks are on it will help break up the pattern some as well and provide some additional visual contrast.

  • Member since
    July 2004
  • From: Texas
Posted by wbill76 on Saturday, October 18, 2014 2:42 PM

Just a quick little update albeit an important one. Tracks received their base coat treatment by airbrushing some MM enamel Burnt Umber over the black plastic and will get some additional detailing/weathering attention later on. That doesn't mean they aren't still useful as it was time to go ahead and permanently fix the suspension elements in place to the hull. It was necessary to scrape some paint that had accumulated inside the drive sprocket and final drive mount holes as well as the mount pins themselves as the fit was too tight otherwise...something I had thought to prevent by masking those areas off with blue tack but forgot to do until it was too late. Liquid glue did the trick for those areas along with some CA for the metal struts at the front of the hull. The track runs were dry fit once more to ensure I had a level set top and bottom for the suspensions on both sides.

As you can see, having the tracks on totally changes the visual perception of the camo pattern as well, so that works out nicely. Just for fun, I also checked to see how it would look on the kit's dio base.

I'll let the suspension set up nice and solid before the next steps deal with the remaining details prior to getting the weathering process started.

  • Member since
    March 2012
  • From: Corpus Christi, Tx
Posted by mustang1989 on Saturday, October 18, 2014 2:46 PM

This is gonna get intense! Can't wait for you to bring it home with the weathering. Awesome paintwork Bill.


 Forum | Modelers Social Club Forum (proboards.com) 

  • Member since
    December 2002
  • From: Fort Knox
Posted by Rob Gronovius on Saturday, October 18, 2014 9:44 PM

.

  • Member since
    December 2002
  • From: Bury St Edmunds, Suffolk, England
Posted by Bish on Sunday, October 19, 2014 1:32 AM

Looking great there Bill. Is this a WW1 scheme or later.

I recall reading some where that these were still is use in the late 40's by Egypt during the Arad Israeli war, not sure if that's true or not though.

I am a Norfolk man and i glory in being so


On the bench: Airfix 1/72nd Harrier GR.3/Fujimi 1/72nd Ju 87D-3

  • Member since
    July 2004
  • From: Texas
Posted by wbill76 on Sunday, October 19, 2014 11:58 AM

Thanks Mustang!

Rob

that's true. There were about 500 of these vehicle still in active service with the French army in 1939. The Germans made use of them in a variety of different capacities including airfield security up until 1945! Talk about a long service life... Wink

Bish

this one's a WW1 scheme for a vehicle at Verdun in October 1918 with an American unit. Wouldn't surprise me if some of these were still kicking around in 1948 for the Arab-Israeli conflict...that time period was really interesting in terms of the sheer variety of hodge-podge gear used on both sides! Beer
  • Member since
    December 2002
  • From: Bury St Edmunds, Suffolk, England
Posted by Bish on Sunday, October 19, 2014 12:19 PM

I would not have thought of schemes like this in WW1. Its rather forward thinking, I am sure I am not the only one who see's the similarity to the late war German schemes.

I am a Norfolk man and i glory in being so


On the bench: Airfix 1/72nd Harrier GR.3/Fujimi 1/72nd Ju 87D-3

  • Member since
    July 2004
  • From: Texas
Posted by wbill76 on Sunday, October 19, 2014 2:24 PM
Bish

I would not have thought of schemes like this in WW1. Its rather forward thinking, I am sure I am not the only one who see's the similarity to the late war German schemes.

Funny thing about camo schemes is the more they change, the more they stay the same over time! Big Smile The French and Germans were using three-tone schemes at the end of WW1, the Germans actually used three-tone again in the interim pre-war period for several years in the early thirties before shifting to the German Grey/Dark Brown scheme...then in 1943 the three-tone returns and does its evolution to hard-edge factory schemes that we know and love so much. All of it depended on when/where the units were fighting and under what conditions!
  • Member since
    July 2004
  • From: Texas
Posted by wbill76 on Monday, October 27, 2014 4:57 PM

After giving it some thought I decided to go ahead and continue work on the base area first before I start weathering the vehicle. This way I can treat them all as elements of the same end result more or less instead of working on them independently. To that end, I turned to Step 21 which deals with the trench details (sandbags, wooden frames/braces, etc.)

The sandbags that go in along the top edge consist of 5 different pieces, 4 of which you can assemble together to create one large unit with the 5th piece, K4, needing to be dealt with separately. I had to enlarge a couple of the slot openings in this area to take the tabs on the underside of the sandbags but nothing major. I also cleaned up and test fit all of the L sprue parts that make up the frames/braces for the trench to see how they would all play together.

In Step 20, the instructions would have you add the angled frame plates of the base individually but I found it easier to attach them separately to create a single frame as some sanding/putty was needed at the joins to create a seamless result. I also had to sand down a couple of the tabs as they were slightly too wide to fit the slots in the base frames.

So with that done, it was time to give the airbrush a workout to 'block in' the colors I needed for the trench detail elements. I used Testors Model Master enamel Afrika Grunbraun for the canvas on the sand bags and used my 50/50 custom mix of Dunkelgelb/Light Gray for the wood frames/braces. That may seem like an odd choice but it's just a foundational color that's going to undergo some significant changes before its all said and done! While I was at it, I also applied some MM enamel Flat Black to the base frame.

This will all get a chance to cure before moving on to the next steps but it is moving ahead!

  • Member since
    July 2003
  • From: On my kitchen counter top somewhere in North Carolina.
Posted by disastermaster on Monday, October 27, 2014 6:56 PM

 http://forum.star-conflict.com/public/style_emoticons/default/storm.gifLooks good enough to bomb......

                         http://forums.insidelacrosse.com/images/smilies/naughty.gif Mighty fine Bill.

Sherman-Jumbo-1945

"I never know what to expect here anymore."


  • Member since
    December 2002
  • From: Fort Knox
Posted by Rob Gronovius on Tuesday, October 28, 2014 11:48 AM

.

  • Member since
    July 2004
  • From: Texas
Posted by wbill76 on Tuesday, October 28, 2014 11:58 AM

Thanks Steve! Bombs away! Big Smile

Rob

Thanks as well! Meng provided a nice touch with this little base IMHO. Yes
  • Member since
    July 2004
  • From: Texas
Posted by wbill76 on Tuesday, October 28, 2014 5:33 PM

More progress on the base to report. I applied some weathering to the sand bags in the form of some black artist pastels and some dry brushing to create some shadows and highlights.

For the wood braces/planks, things turned out a little more interestingly. I originally started out planning to finish them as relatively 'new' wood and applied a wash of MM enamel Leather over the previous paint base color. This worked out fine by themselves but when I placed them on the base I didn't like the tonal contrast, so I switched gears and decided to go aged wood instead. Rather than strip it and start over, I decided to keep what I'd already done and build on it instead. So I applied another wash, this time using MM enamel Gunmetal, and then dry brushed some MM enamel Light Gray to bring out the wood grain pattern. Some strategic use of black artist pastels also helped add some definition here and there.

I'm fairly happy with the direction this one's heading in so far especially since it's sort of uncharted territory as I don't usually do bases for my builds.

  • Member since
    March 2012
  • From: Corpus Christi, Tx
Posted by mustang1989 on Tuesday, October 28, 2014 5:58 PM

One these days I'll brave dioramas and figure painting. Great work! Yes


 Forum | Modelers Social Club Forum (proboards.com) 

  • Member since
    January 2007
Posted by the doog on Tuesday, October 28, 2014 8:19 PM

Totally cool beans, Bill! I love the idea of a trench!

  • Member since
    December 2012
Posted by Ixion on Wednesday, October 29, 2014 11:35 AM

Cue The Lego Movie theme song; "Everything is Awesome". Headphones

But you've thrown me a curve here, why wash the wood grain with Gunmetal? Doesn't that give it a metallic sheen, especially in a groove that would normally be in shadow? 

  • Member since
    July 2004
  • From: Texas
Posted by wbill76 on Wednesday, October 29, 2014 4:11 PM

Thanks Mustang!

Karl

I thought it was kind of fitting and since it was included with the kit, figured why not? Wink

Ixion

thanks for the comments as well! I chose Gunmetal (the enamel version, not the metalizer version) for two reasons. 1) I already had some of it mixed up and use it regularly for different things and 2) it's the perfect dark gray for my purposes particularly with the lighter dry brushing that followed. The enamel version doesn't have a metallic quality but is in the gray spectrum which is what I wanted to convey with the 'aged' wood look. It fit perfectly for what I needed it to do despite the slightly misleading title on the paint bottle. Big Smile
  • Member since
    August 2007
  • From: back country of SO-CAL, at the birth place of Naval Aviation
Posted by DUSTER on Wednesday, October 29, 2014 4:35 PM

Bill,  Great job on the base. I like how you handled the sand bags and the 2nd color wood choice seems to be in keeping with the "breakage" shown,.

 If I may be so bold, to suggest that some earth/dirt clumps and staining on portions of the wood ; may help convey the idea they were in close contact with the dirt of the trench before being broken/shattered. Also, the ends of the wood would be new wood color(s) as they are broken./split apart.

  All that said, should your plans already have covered this and doubtless other further enhancements, I apologize and will go sit in a corner until allowed the come back out to view the post.  

ps the tank is no slouch either    

Steve

Building the perfect model---just not quite yet  Confused

  • Member since
    July 2004
  • From: Texas
Posted by wbill76 on Wednesday, October 29, 2014 5:10 PM

Thanks Steve! No need to go sit in the corner...it's all good! Big Smile There will be more work done on the whole base to tie things together and make it all look more integrated. Right now the wood pieces are just dry-fit into their slots so I could 'see' if they were all looking like they belonged together vs. working on them as individual pieces. I had the same thought as you on the broken wood pieces...the trick here I guess is whether they were recently broken or just older scrap wood used for some of he braces, they all have jagged ends of one type or another as molded. I may do some one way and leave some as-is, not sure. The ones at the top at least will look like they were broken by the tank once it's posed, so those will probably get a different look at a minimum. I've also been playing around a little with some pigments to help make the painted plastic look a little more 'earthy' too, it's all still a work in progress though, so stay tuned! Wink

  • Member since
    January 2006
  • From: California
Posted by SprueOne on Wednesday, October 29, 2014 7:31 PM

Silly putty camo looking good and that wood grain effect, real real.

Anyone with a good car don't need to be justified - Hazel Motes


Iron Rails 2015 by Wayne Cassell Weekend Madness sprueone

  • Member since
    December 2012
Posted by Ixion on Wednesday, October 29, 2014 9:22 PM

Bill..... Sorry, but I'm still confused here. I have a jar of Model Master Enamel Gunmetal #1795, (not the Metalizer), in my hand. I stirred it up and looked at my stir-stick. I see flakes of metallic aluminum floating around in the paint.  Are we actually talking about the same paint here? If so,  my original question still stands. I can understand using a dark blue-gray for shading purposes, but I can't get past the metal sheen.

  • Member since
    July 2004
  • From: Texas
Posted by wbill76 on Wednesday, October 29, 2014 9:48 PM
Ixion

Bill..... Sorry, but I'm still confused here. I have a jar of Model Master Enamel Gunmetal #1795, (not the Metalizer), in my hand. I stirred it up and looked at my stir-stick. I see flakes of metallic aluminum floating around in the paint.  Are we actually talking about the same paint here? If so,  my original question still stands. I can understand using a dark blue-gray for shading purposes, but I can't get past the metal sheen.

#1795 is the same paint I use, just checked the numbers on the bottles. It's also the same color I use for road wheel tires/rubber in fact (usually airbrushed). There may be tiny metal flakes in the paint that would appear under certain circumstances, but normally when the paint is fully mixed in my experience it doesn't have any metallic qualities. When applied as a wash it's the dark blue-gray that shows through, no metallic elements are present. Unless Testors has changed the formulation recently? I've had these particular bottles for quite a while as I typically buy and stock the paint colors I use regularly to avoid unexpected shortages when working on a project. Smile
  • Member since
    July 2004
  • From: Texas
Posted by wbill76 on Wednesday, October 29, 2014 9:49 PM
SprueOne

Silly putty camo looking good and that wood grain effect, real real.

Sneaked one in on me SP, thanks as always! Beer
  • Member since
    September 2006
  • From: Dripping Springs, TX, USA
Posted by RBaer on Thursday, October 30, 2014 10:25 AM

It's jus' cute as a little puppy......

Yes

Apprentice rivet counter.

  • Member since
    July 2004
  • From: Texas
Posted by wbill76 on Saturday, November 1, 2014 1:35 PM

Thanks Russ! It's the 'grand-daddy' of modern tanks in terms of the rotating turret and such so it might as well have a cuteness factor built in to go with it. Big Smile

  • Member since
    July 2004
  • From: Texas
Posted by wbill76 on Saturday, November 1, 2014 4:11 PM

Continuing on with the base work, I decided the trench area needed some help in the pigments department. I used a combination of Mig Dark Mud and Dry Mud applied as dry powders with stiff bristled brushes and worked it around until I was happy with the depth/shading it was giving me.

Then the wood braces were permanently installed along with the sand bags and the glue allowed to set. Once that was solid, I blended them in where appropriate using more of the pigments.

Shifting gears a bit, I went back to the vehicle and did some of the detail work there. The sledgehammer, shovel, and pick were hand detailed and installed where needed. Leather straps were painted and detailed and the muffler/exhaust worked on and installed as well. The folded tarp was added to the tail to round things out in that department.

So here's where things stand at the moment as the little scene starts to come together.

  • Member since
    March 2012
  • From: Corpus Christi, Tx
Posted by mustang1989 on Sunday, November 2, 2014 6:02 AM

Things look like they are coming along nicelyon this one Bill. I like popping in on these WIP's like this with armor because I get to see the processes involved. Stuff like the details added on before the weathering process and all. With aircraft I add all that stuff last but can see where the details added before the weathering takes place benefits the outcome. Those MIG productions washes are tha bomb. I've been using those things religiously and havent been disappointed yet. This build here is a true blast to watch come together.


 Forum | Modelers Social Club Forum (proboards.com) 

  • Member since
    July 2004
  • From: Texas
Posted by wbill76 on Sunday, November 2, 2014 9:43 AM

Thanks Mustang! Lots of different ways to tackle things when it comes to armor builds, sometimes things are forced on you in terms of the order, other times you have a choice! Glad to hear you're having as much fun as I am in terms of following along. Beer

  • Member since
    December 2002
  • From: Bury St Edmunds, Suffolk, England
Posted by Bish on Sunday, November 2, 2014 10:11 AM

Looking great there Bill and looks really nice on that base.

I am a Norfolk man and i glory in being so


On the bench: Airfix 1/72nd Harrier GR.3/Fujimi 1/72nd Ju 87D-3

  • Member since
    January 2007
Posted by the doog on Sunday, November 2, 2014 12:19 PM

Perfunctory "attaboy" here, Bill. lol.

Seriousl--it's looking way cool. :)

  • Member since
    July 2004
  • From: Texas
Posted by wbill76 on Sunday, November 2, 2014 3:22 PM

Thanks Bish and Karl! Beer

  • Member since
    July 2004
  • From: Texas
Posted by wbill76 on Sunday, November 2, 2014 4:57 PM

With the trench portion of the base done, I turned my attention to the top side of the base. Once the vehicle is placed, most of it will be covered with the shell crater being the main point of focus. I added some Mig Russian Earth pigments to the inner rim of the crater and in various places where I wanted to create some deep shadows. Mig Dry Mud pigments helped create more variation in the top side look and feel.

I hand brushed some Future acrylic floor polish to the bottom of the crater to protect the paint work done earlier and let it dry. Then a thinned wash of Afrika Braun was added and built up through multiple doses to create some muddy water effects. More Future was carefully hand brushed over the Braun wash to round out the 'puddle' accumulation.

I think I've got the base where I want it now, so will let it sit and turn back to getting the FT17 to match up.

  • Member since
    August 2007
  • From: back country of SO-CAL, at the birth place of Naval Aviation
Posted by DUSTER on Wednesday, November 5, 2014 3:20 PM

  +   YOU'RE ON FIRE

Steve

Building the perfect model---just not quite yet  Confused

  • Member since
    September 2006
  • From: Dripping Springs, TX, USA
Posted by RBaer on Wednesday, November 5, 2014 5:04 PM

The base is looking good, and I have to say I like the idea of a base included in the kit.

Apprentice rivet counter.

  • Member since
    July 2004
  • From: Texas
Posted by wbill76 on Wednesday, November 5, 2014 6:19 PM

Thanks Steve!

Russ

I think it's a nice touch for Meng to include it especially given the relatively small size of the tank to begin with. That and of course it's a fitting little scene for it considering! Wink
  • Member since
    July 2004
  • From: Texas
Posted by wbill76 on Saturday, November 8, 2014 4:06 PM

Started in on the weathering for the actual tank itself. First order of business were the tracks, they received some dry-brushing using MM enamel Steel to add to the previous airbrushed base coat and give them a more metallic look.

The metal contact surfaces of the sprockets and idlers were detailed with some MM non-buffing metalizer Steel and then dry-brushed with MM enamel Burnt Umber. Using an old worn out brush,  I also stippled some of the Burnt Umber onto the suspension and lower hull areas as the first round of weathering to create some scuffing/scratching and wear and tear. More to come in this area of course before it's all said and done!

Next up will be a coat of Future to seal it all up and allow for the markings to go down.

  • Member since
    March 2012
  • From: Corpus Christi, Tx
Posted by mustang1989 on Sunday, November 9, 2014 6:05 AM

Good going Bill. This all has to be my favorite part of an armor build and one I hope to get alot better at. Without the weathering they look like brand new equipment on the battlefield.    


 Forum | Modelers Social Club Forum (proboards.com) 

  • Member since
    July 2004
  • From: Texas
Posted by wbill76 on Sunday, November 9, 2014 2:38 PM

Thanks Mustang! Weathering is always the fun part of a build IMHO as well! Beer

  • Member since
    July 2004
  • From: Texas
Posted by wbill76 on Sunday, November 9, 2014 7:10 PM

Markings are on! The kit-supplied decals are by Cartograf and the only modification I made was to separate the little '5' numerals for the turret from the heart insignia and applying them individually. Some Solvaset was applied to ensure they snugged down tight and once dry, a 2nd coat of Future was airbrushed over them to seal and protect for the washes and weathering to come.

  • Member since
    July 2004
  • From: Texas
Posted by wbill76 on Monday, November 17, 2014 5:23 PM

Weathering work continues on this little guy, first step was an overall application of thinned MM enamel Raw Umber. This inevitably darkens the finish but is meant to serve as a foundation for the dot filtering step that comes next and not an independent layer per se.

The dot filter application came next. I used small dots of MM enamel Raw Sienna, Light Gray, and the 50/50 base coat mid for the filter. The vehicle is fairly small to begin with, so I used different sized square-tip blender brushes where appropriate to get into some of the tighter spaces.

Will let that sit and the apply a pin wash to help pop out some of the detail as the next step.

  • Member since
    December 2002
  • From: Bury St Edmunds, Suffolk, England
Posted by Bish on Tuesday, November 18, 2014 11:58 AM

Nice work there as always Bill. I have been meaning to ask you about your pin washes. The first time I heard about these, people were using all sorts of colours, red, blue, yellow, white etc. But yours are rather restrained. Is this just a matter of taste or do you think they are for different effects.

I am a Norfolk man and i glory in being so


On the bench: Airfix 1/72nd Harrier GR.3/Fujimi 1/72nd Ju 87D-3

  • Member since
    July 2004
  • From: Texas
Posted by wbill76 on Tuesday, November 18, 2014 12:03 PM
Bish

Nice work there as always Bill. I have been meaning to ask you about your pin washes. The first time I heard about these, people were using all sorts of colours, red, blue, yellow, white etc. But yours are rather restrained. Is this just a matter of taste or do you think they are for different effects.

Thanks Bish! I assume you mean the dot filters vs. the pin wash? You're right in that dot filtering got its start with people using mostly primary colors as a way to add tonal variety and depth to a multi-color scheme. Nothing wrong with still doing that and you're right in that my choice of colors are aimed at a different effect. I use it more for dirt/dust streaking and weathering than altering the base colors and so my choice of 'dots' reflects that depending on the type of finish I'm after. The same principles of application hold regardless but the choice of colors definitely changes the end result. HTH! Beer
  • Member since
    December 2002
  • From: Bury St Edmunds, Suffolk, England
Posted by Bish on Tuesday, November 18, 2014 12:10 PM

Thanks. I had tried the other method in the past, including on my Marder, and I found it did give a darker result, which was fine for a more heavily weathered finish. But the inside of the 251 I followed your idea, but I didn't have raw sienna at the time and so used a different colour, but the effect was just what I have been looking for for ages, especially for a less weathered look. Its nice to get an insight into the reasons for the different methods, and its defiantly a method I really like.

And yes, sorry, I meant the dot filtering.

I am a Norfolk man and i glory in being so


On the bench: Airfix 1/72nd Harrier GR.3/Fujimi 1/72nd Ju 87D-3

  • Member since
    January 2007
Posted by the doog on Tuesday, November 18, 2014 3:46 PM

Looking appropriately grimy and gunky, Bill!

  • Member since
    January 2007
Posted by the doog on Tuesday, November 18, 2014 3:55 PM

Bish

Nice work there as always Bill. I have been meaning to ask you about your pin washes. The first time I heard about these, people were using all sorts of colours, red, blue, yellow, white etc. But yours are rather restrained. Is this just a matter of taste or do you think they are for different effects.

Bish, if Bill will forgive my intrusion on this thread... Wink

I was one of the first to use this "oil dot" method on my Hetzer here on FSM, if you remember that? I got the technique from a then-mostly-unknown Spanish modeler named Mig, who published in "Armor" Magazine, which was sold exclusively through Squadron. Mig came about the technique of using primary colors--red, blue, yellow, etc,-- as a means of simulating the effect of the bright Spanish sun on a vehicle, and the refraction from the brightly colored buildings and environment. (his explanation of it). Bill really rather pioneered the technique here of using more muted colors. I (being a purist Whistling) used to give him heck about it but at this point it has become a "standard" technique in its own right, and his "signature style" if you ask me. Smile

But I agree with you in that I think that the primary color method does lend a more "weathered" appearance whereas Bill's method is more restrained. Different methods for different results. What a wonderful modeling world. Big Smile

  • Member since
    December 2002
  • From: Bury St Edmunds, Suffolk, England
Posted by Bish on Tuesday, November 18, 2014 4:27 PM

Karl, indeed I do remember that and I believe it was your use of it that caught my attention. I think one of the problems I found with the method you used is that its easy to over do, I have found myself getting a rather over done finish, probably by using two many dots and dark colours. But with Bill's I found I got the exact result I wanted first time out. So, more practice, you can never have to many tools in the chest.

And thanks for the explanation. Knowing the history of these methods can helps explain their purpose.

I am a Norfolk man and i glory in being so


On the bench: Airfix 1/72nd Harrier GR.3/Fujimi 1/72nd Ju 87D-3

  • Member since
    July 2004
  • From: Texas
Posted by wbill76 on Tuesday, November 18, 2014 4:36 PM

Thanks Karl and of course no problem at all with adding to the discussion on the origins and purpose of dot filters. Always more than one way to skin the cat when it comes to weathering and finishes. Wink

  • Member since
    July 2004
  • From: Texas
Posted by wbill76 on Tuesday, November 18, 2014 5:02 PM

More progress on the weathering, this time it was the pin wash turn to make all those rivet details stand out. I used a pointed 10/0 brush and some highly thinned MM enamel Burnt Umber.

After the first pass, I used some clean thinner and the same brush to remove excess wash or adjusted it where needed to get the desired effect.

And just for fun, a quick check with the base to make sure things are still headed in the same direction.

  • Member since
    July 2003
  • From: On my kitchen counter top somewhere in North Carolina.
Posted by disastermaster on Wednesday, November 19, 2014 4:46 AM

http://i358.photobucket.com/albums/oo29/pigletmph/ztoohot.gif Really hot Bill.

I'm sure this is going to be one of your favorites. http://www.sherv.net/cm/emoticons/bye/waving-sad-bye-smiley-emoticon.gif

Sherman-Jumbo-1945

"I never know what to expect here anymore."


  • Member since
    July 2004
  • From: Texas
Posted by wbill76 on Wednesday, November 19, 2014 10:20 AM

Thanks Steve! Always a pleasure to have the smiley-king stamp of approval. Wink

  • Member since
    December 2002
  • From: Bury St Edmunds, Suffolk, England
Posted by Bish on Wednesday, November 19, 2014 12:27 PM

Looking great Bill and looks really nice on that base.

I am a Norfolk man and i glory in being so


On the bench: Airfix 1/72nd Harrier GR.3/Fujimi 1/72nd Ju 87D-3

  • Member since
    July 2004
  • From: Texas
Posted by wbill76 on Wednesday, November 19, 2014 1:19 PM

Thanks Bish! Almost home with this one.

  • Member since
    December 2002
  • From: Bury St Edmunds, Suffolk, England
Posted by Bish on Wednesday, November 19, 2014 1:46 PM

And then what's next me wonders.

I am a Norfolk man and i glory in being so


On the bench: Airfix 1/72nd Harrier GR.3/Fujimi 1/72nd Ju 87D-3

  • Member since
    July 2004
  • From: Texas
Posted by wbill76 on Wednesday, November 19, 2014 5:06 PM
Bish

And then what's next me wonders.

I'm thinking something relatively simple for a quick change of pace...might do the Bronco Seehund that's been in the stash for a little while! Wink
  • Member since
    March 2003
  • From: Western North Carolina
Posted by Tojo72 on Friday, November 21, 2014 8:04 AM

Washes toned it down real nice Bill

  • Member since
    December 2002
  • From: Bury St Edmunds, Suffolk, England
Posted by Bish on Friday, November 21, 2014 12:27 PM

That's a 35th kit isn't it? Now that would be interesting to see.

I am a Norfolk man and i glory in being so


On the bench: Airfix 1/72nd Harrier GR.3/Fujimi 1/72nd Ju 87D-3

  • Member since
    July 2004
  • From: Texas
Posted by wbill76 on Friday, November 21, 2014 1:03 PM

Thanks Anthony!

Bish

Yes, the Seehund is a 1/35 kit. Pretty good size but not very many parts since it's a midget sub.
  • Member since
    December 2002
  • From: Bury St Edmunds, Suffolk, England
Posted by Bish on Friday, November 21, 2014 1:07 PM

Ye, I have read a couple of reviews on it. I have a couple of 72nd U-Boats and I know there's a couple of Seehunds in 72nd, but I think I would rather have that in a larger scale. I have read its pretty good OOB but there's room for improvement if one wishes to.

Defiantly look forward to seeing it being built.

I am a Norfolk man and i glory in being so


On the bench: Airfix 1/72nd Harrier GR.3/Fujimi 1/72nd Ju 87D-3

  • Member since
    July 2004
  • From: Texas
Posted by wbill76 on Friday, November 21, 2014 1:18 PM

Every kit always has room for improvement depending on how far you want to go with it! Big Smile I'll probably do this one as an OOB effort depending, famous last words though! Wink

  • Member since
    March 2012
  • From: Corpus Christi, Tx
Posted by mustang1989 on Friday, November 21, 2014 9:52 PM

Man this build just took off and it's only been a couple of pages. The weathering is top notch Bill!


 Forum | Modelers Social Club Forum (proboards.com) 

  • Member since
    July 2004
  • From: Texas
Posted by wbill76 on Saturday, November 22, 2014 11:33 AM

Thanks Mustang! Beer

  • Member since
    January 2007
Posted by the doog on Saturday, November 22, 2014 2:25 PM

That is VERY cool, Bill. Shouldn't take up too much space in the display case! The model came out great!

  • Member since
    July 2004
  • From: Texas
Posted by wbill76 on Saturday, November 22, 2014 3:04 PM

Thanks Karl! Base measures 5.5"x4.5", so not a huge footprint when all said and done! Wink

  • Member since
    January 2006
  • From: California
Posted by SprueOne on Saturday, November 22, 2014 9:45 PM

Very close attention to detail on the weathering on this one. 

Anyone with a good car don't need to be justified - Hazel Motes


Iron Rails 2015 by Wayne Cassell Weekend Madness sprueone

  • Member since
    January 2013
Posted by jibber on Sunday, November 23, 2014 8:50 AM

Bill that was a great presentation of a very cool subject and I'm glad you used the base. Once again I'm on the learning end of your builds and I'm most appreciative. I still have the same kit waiting to start for the WWI GB and theres no doubt I'll use your WIP to help out, actually I've taken notes along the way, hope you don't mind if I borrow a few ideas. Thanks, Terry

  • Member since
    July 2004
  • From: Texas
Posted by wbill76 on Sunday, November 23, 2014 1:36 PM

Thanks SP1!

Terry

glad to hear the build is helpful for you! No worries on borrowing ideas, that's what WIP threads and forums are all about. Beer Wink
  • Member since
    December 2002
  • From: Fort Knox
Posted by Rob Gronovius on Sunday, November 23, 2014 1:47 PM

.

  • Member since
    July 2004
  • From: Texas
Posted by wbill76 on Sunday, November 23, 2014 3:28 PM

Thanks Rob! Just putting the finishing touches on this one in terms of pigments and the tracks and it will be all set. Wink

  • Member since
    July 2004
  • From: Texas
Posted by wbill76 on Sunday, November 23, 2014 5:49 PM

Latest round of efforts was all about the pigments. First order of business was applying a sealing dull coat using Testors Model Master Lusterless Flat in the spray can.

Lower hull and suspension areas were given a wet application of Mig Dark Mud. I used normal tap water with a touch of liquid dish washing soap to break the surface tension and a regular sable brush to apply the pigments.

Pigments are allowed to air dry, then the excess is removed with a series of stiff bristled brushes. More pigment is removed using wet and dry Q-tips to get the effect I'm after.

The end result builds nicely on the previous layers, creating a nice effect.

The tracks got a similar treatment but using Mig Dry Mud pigments.

Tracks were installed permanently onto the vehicle to complete the process.

Dry-fit onto the base shows that everything looks like it belongs.

The fit onto the base is a little tricky, will play with that a little bit more before I call this one fully done but it's 99% there.

  • Member since
    April 2005
  • From: Gothenburg
Posted by JohanT on Monday, November 24, 2014 12:41 PM

Hi Bill,

"Heute stehen wir am Abgrund,Morgen sind wir einen Schritt weiter"

Awesome build m8, and as always you gave me new hints about weathering, this time specially the undercarriage :)

Very Best Regards

Johan

  • Member since
    July 2004
  • From: Texas
Posted by wbill76 on Monday, November 24, 2014 1:14 PM

Thanks Johan! Glad to pass along some hints/tips whenever possible. Beer

  • Member since
    July 2004
  • From: Texas
Posted by wbill76 on Monday, November 24, 2014 1:44 PM

Made a few minor touch-ups here and there including a very light dusting of the Dry Mud pigment to the rest of the lower hull to tie it in a bit with the tracks. Then off to the photo booth for the final shots!

And at home on the base!

  • Member since
    August 2007
  • From: back country of SO-CAL, at the birth place of Naval Aviation
Posted by DUSTER on Wednesday, November 26, 2014 6:25 PM

  very nice. Looks great.

Steve

Building the perfect model---just not quite yet  Confused

  • Member since
    July 2004
  • From: Texas
Posted by wbill76 on Wednesday, November 26, 2014 8:24 PM

Thanks Steve! Glad you like how it turned out. Have a happy Thanksgiving!

  • Member since
    July 2003
  • From: On my kitchen counter top somewhere in North Carolina.
Posted by disastermaster on Friday, November 28, 2014 12:59 PM

http://www.freesmileys.org/smileys/smiley-basic/thumbsup.gif Wonderful outcome!

              .............next.......

                                            http://www.gifbin.com/bin/150638g68.gif

Sherman-Jumbo-1945

"I never know what to expect here anymore."


  • Member since
    July 2004
  • From: Texas
Posted by wbill76 on Friday, November 28, 2014 1:23 PM

Now that's got to be one of your best smiley renditions in a while Steve! Big Smile Thanks for the kind words as always my friend! Beer

  • Member since
    January 2012
Posted by catdude01 on Monday, April 25, 2016 1:25 PM
Fantastic Job Terry, I like what you did with the weathering on this little fella. (^^)/
JOIN OUR COMMUNITY!

Our community is FREE to join. To participate you must either login or register for an account.

SEARCH FORUMS
FREE NEWSLETTER
By signing up you may also receive reader surveys and occasional special offers. We do not sell, rent or trade our email lists. View our Privacy Policy.