SEARCH FINESCALE.COM

Enter keywords or a search phrase below:

FINISHED! Page 7-the doog's BEST? Sdkfz 251/17 Ausf. D w/2cm Schwebelafette

98059 views
181 replies
1 rating 2 rating 3 rating 4 rating 5 rating
  • Member since
    May 2005
  • From: Dublin Rep Of Ireland
Posted by terry35 on Saturday, February 7, 2009 2:04 PM

Karl, I must say that the interior work here so far has been second to none, outstanding work. The camo work , well I dont have words to describe what I'm seeing, looks just great so far, but knowing whats going to be in the in the wind with the weathering and finishing................. thats going to be a big OUCH..........

Keep up theh good work.

Terry.

  • Member since
    January 2007
Posted by the doog on Saturday, February 7, 2009 2:53 PM

Thnaks do much, terry! That's a nice thing to say; I appreciate it! Smile [:)]

dupes--maybe--but I don't think I'd much fancy doubling the tasks of posting and writing up two threads identically --and then having to respond to comments and questions from two diffrent groups of posters--YIKES! I'd never have any building time! Smile,Wink, & Grin [swg]

  • Member since
    October 2007
  • From: N.H.
Posted by panzerguy on Saturday, February 7, 2009 3:05 PM
 

   Hey doog gotta tell ya when I saw the way you did the cammo on the Hornisse I wasn't too sure what to thinkConfused [%-)]. But after the weathering and it was all blended together there was no arguing the results. So I'm really looking forward to seeing the final results with this guyBig Smile [:D].

"Happiness is a belt fed weapon"

  • Member since
    December 2005
  • From: DSM, Iowa
Posted by viper_mp on Sunday, February 8, 2009 12:07 AM
Lookin great, Karl.  Love the camo work.  although I nearly passed out when I saw you were using an AB that close.  Keep it up! Might have to get one of my 251's out and start workin.

Rob Folden

Secretary / Webmaster- IPMS Plastic Surgeons Member at Large-IPMS Hawkeye Modelers

  • Member since
    January 2007
Posted by the doog on Sunday, February 8, 2009 12:30 PM

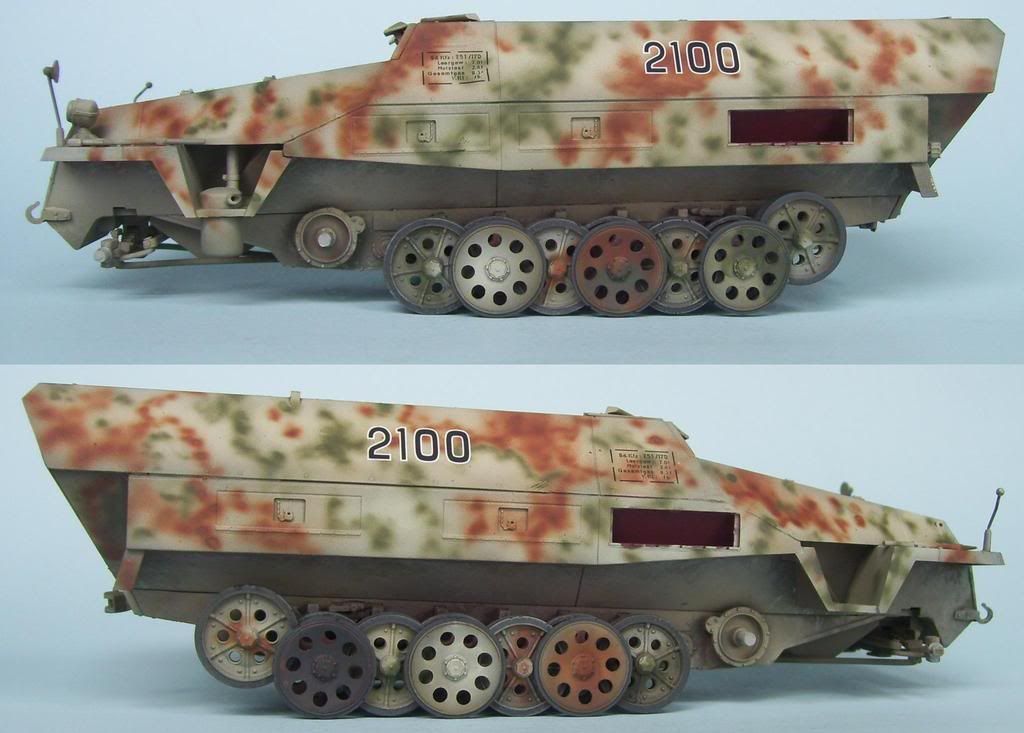
Thanks, panzerguy and viper!! Thanks for your comments! I have to say that after a little bit of research, you will be surprised at the weird variety of camo schemes that you'll find!

Well, here's a bit of a weathering update--we're definitely in the home stretch here....

So we start with the decals going on....

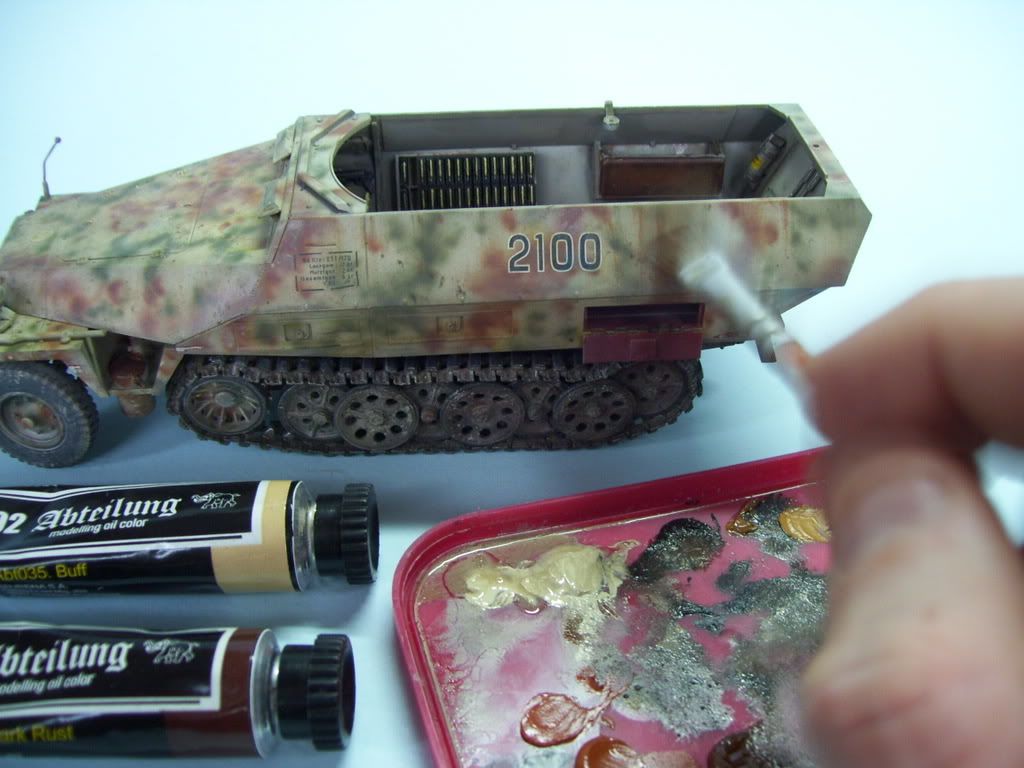
Then, I wanted to provide a little bit of chromatic background for the wheel bay weathering--see the little spots of MIG 502 oils "Wash Brown" right above the suspension bogeys? I put them in there first...

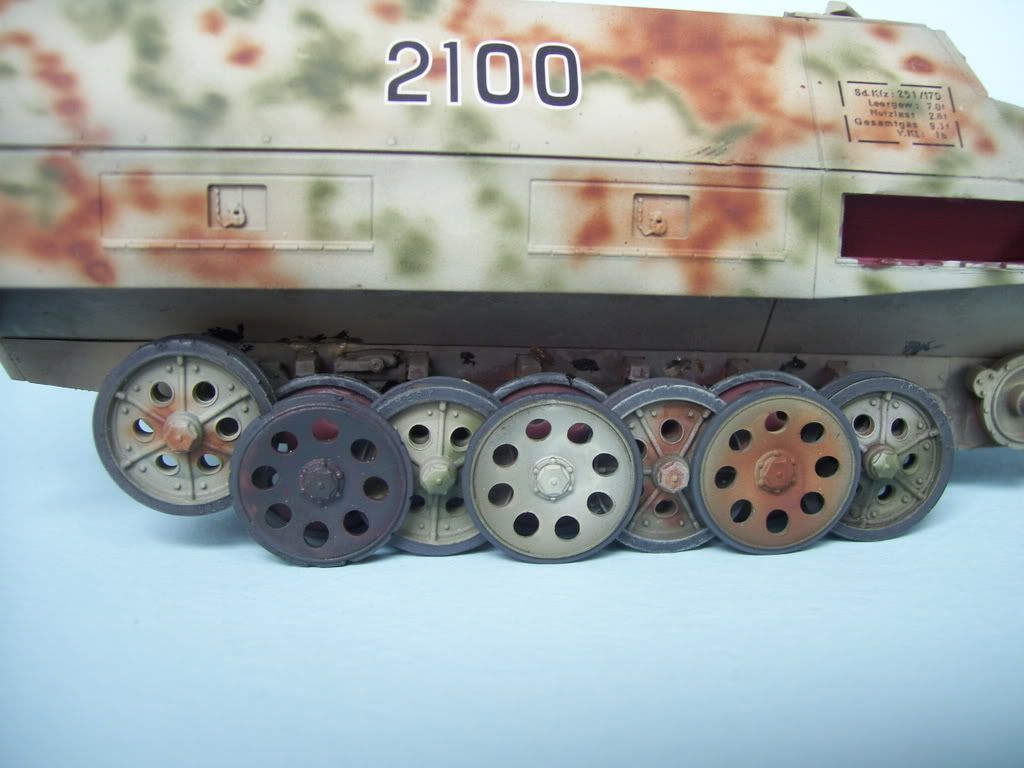
...and then pull them up, adding some 502 Buff and Earth Brown for some tonal variation...

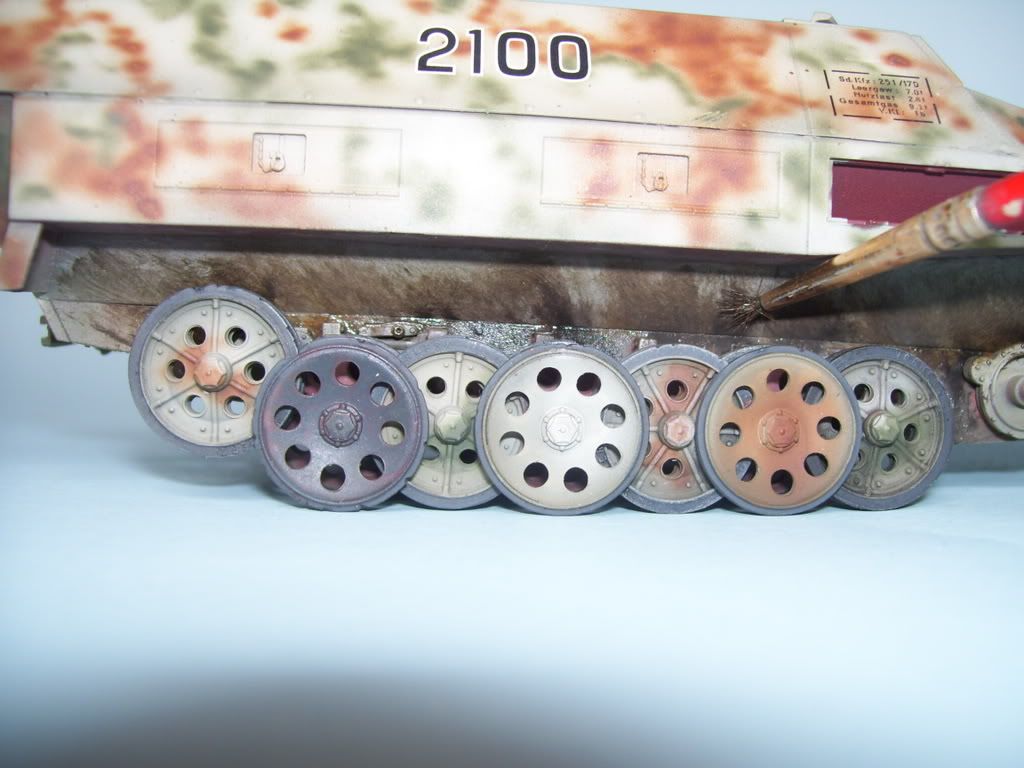
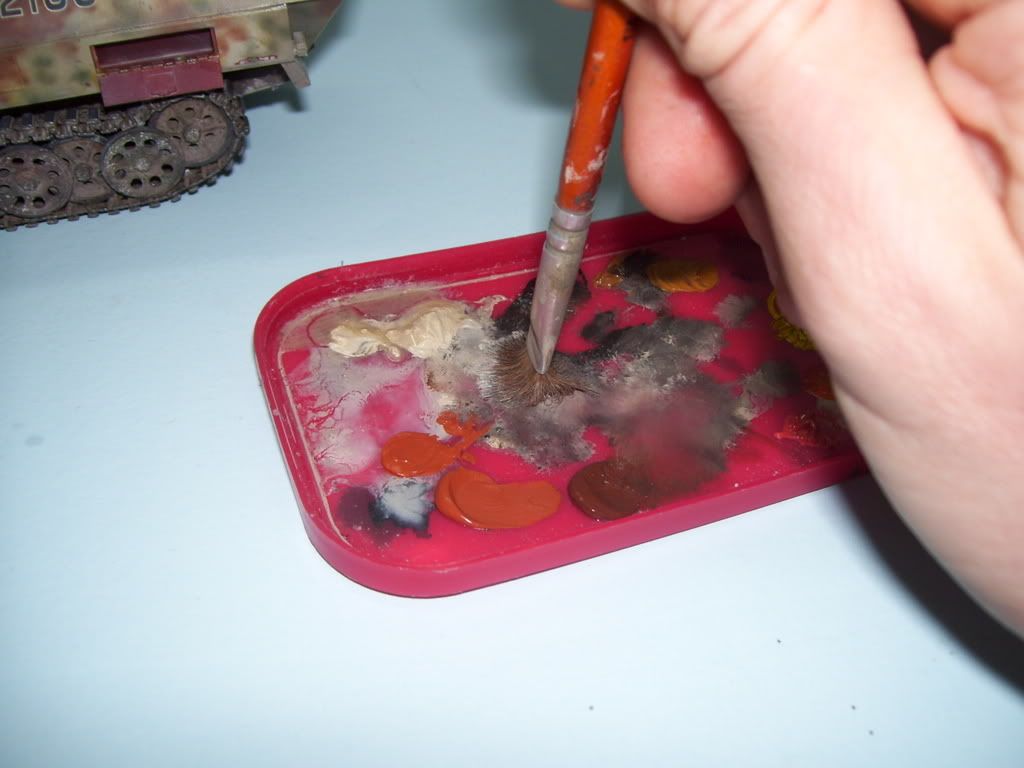
now, while the oils are still wet I sprinkle in some MIG pigments--Industrial City Earth, and Rubbel Dust...

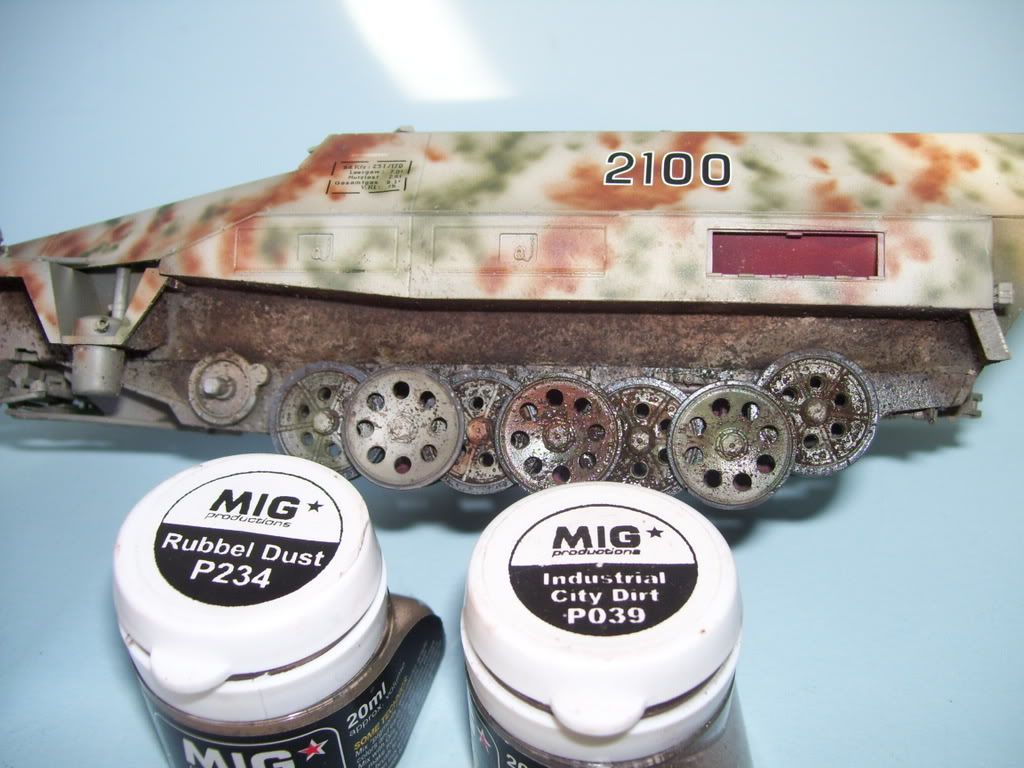
The whole hull gets the treatment...

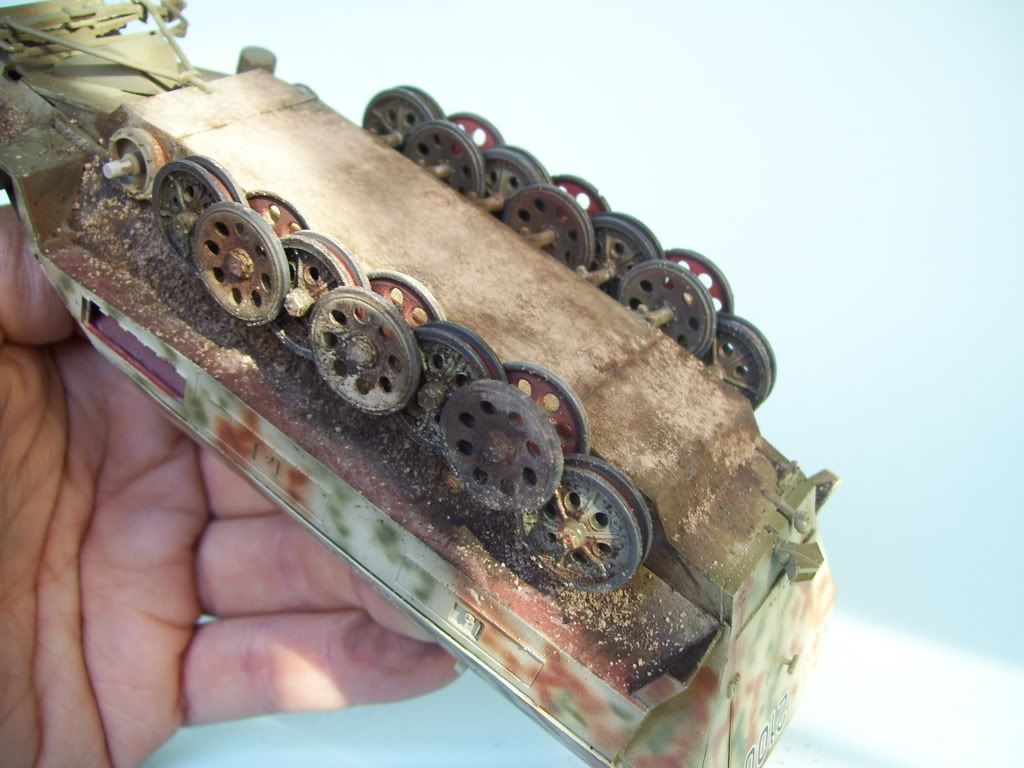
The tracks were first painted Tamiya Flat Earth, and then simply washed with a Black acrylic wash, drybrushed with Tamiya Metallic Grey, and Testor's Silver, and the pads painted in a light Black.


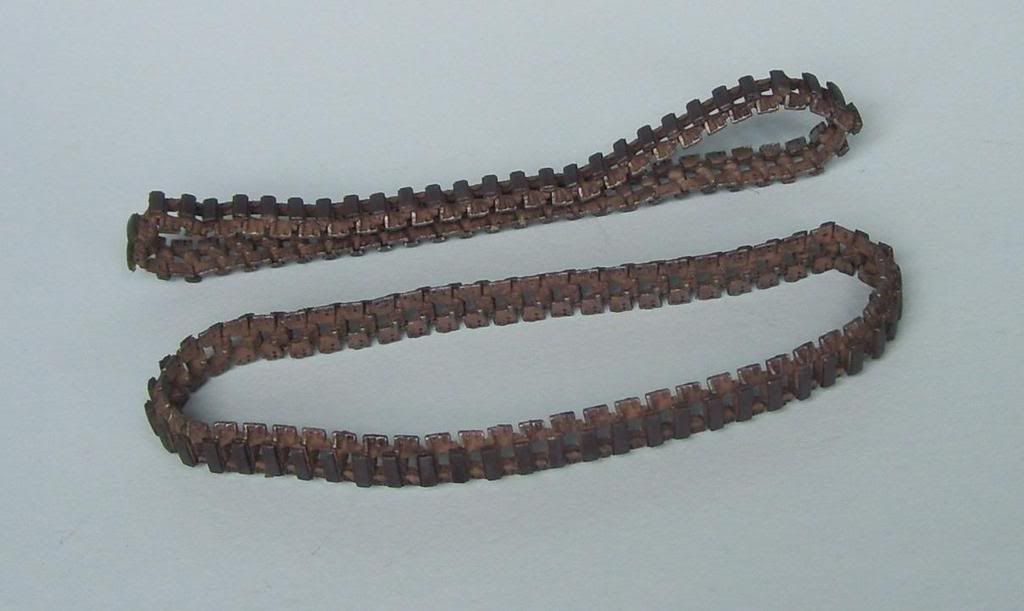
Check this out--I am seriously at a total loss to explain this--when Iput on this side of the tracks--after havig assembled them and seating them previously--the were two links too short. I am completely baffled as to what happened to my length?! It was a pain to sandwhich these in here, but I managed it...

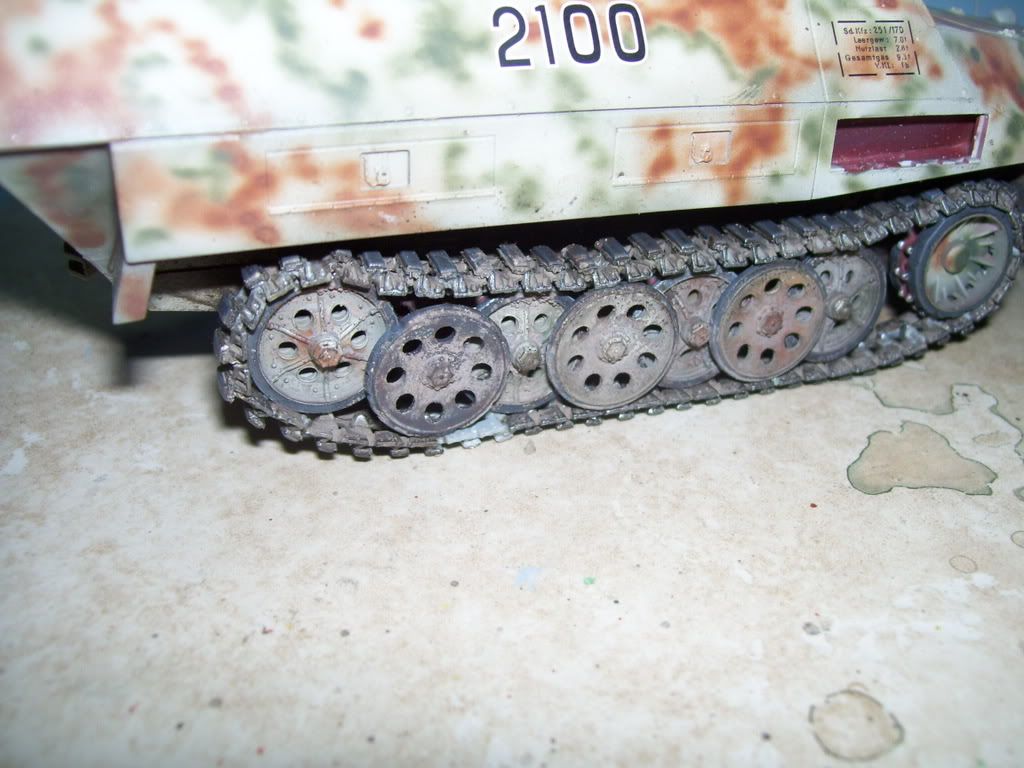
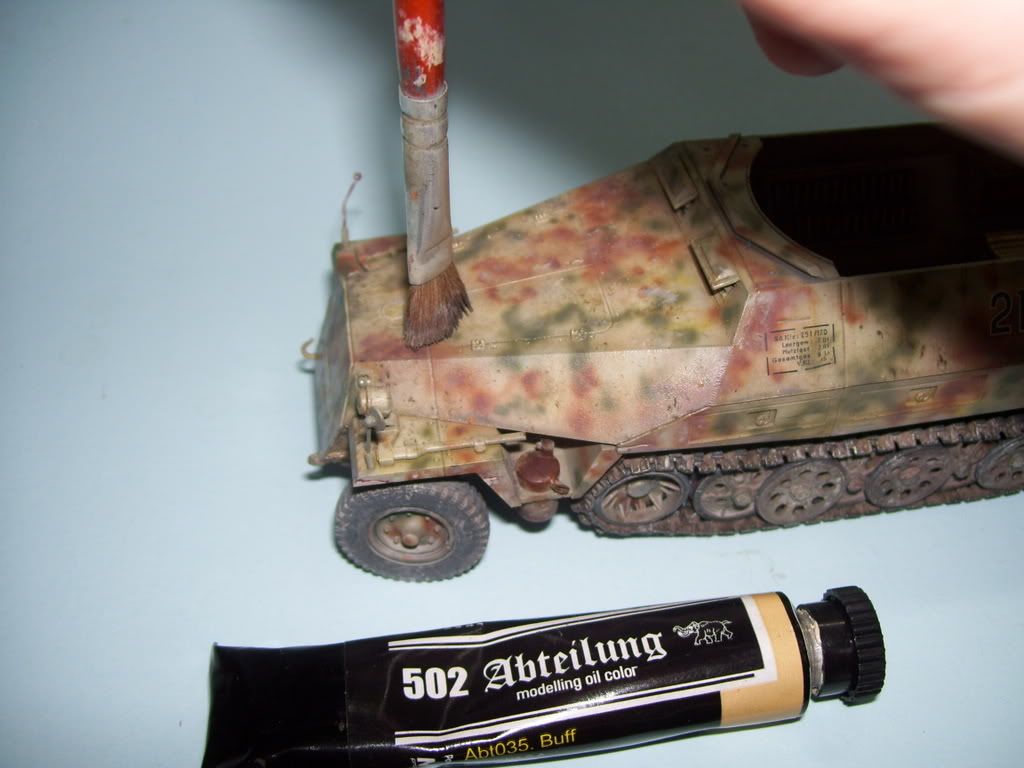
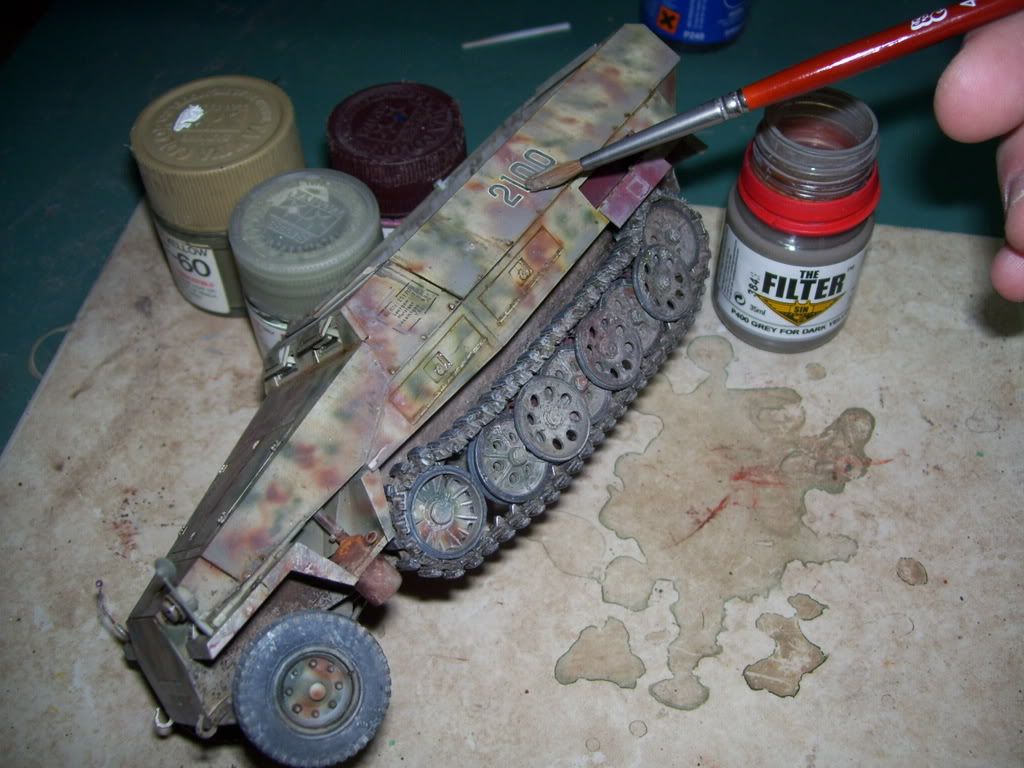
I first gave the model an overall coat of MIG "Gray for Dark Yellow" filter, and then it was time to streak! Shock [:O] I use some more 502 oils to plant some dots of color..

...and then pulll them down with a dry, wide brush.

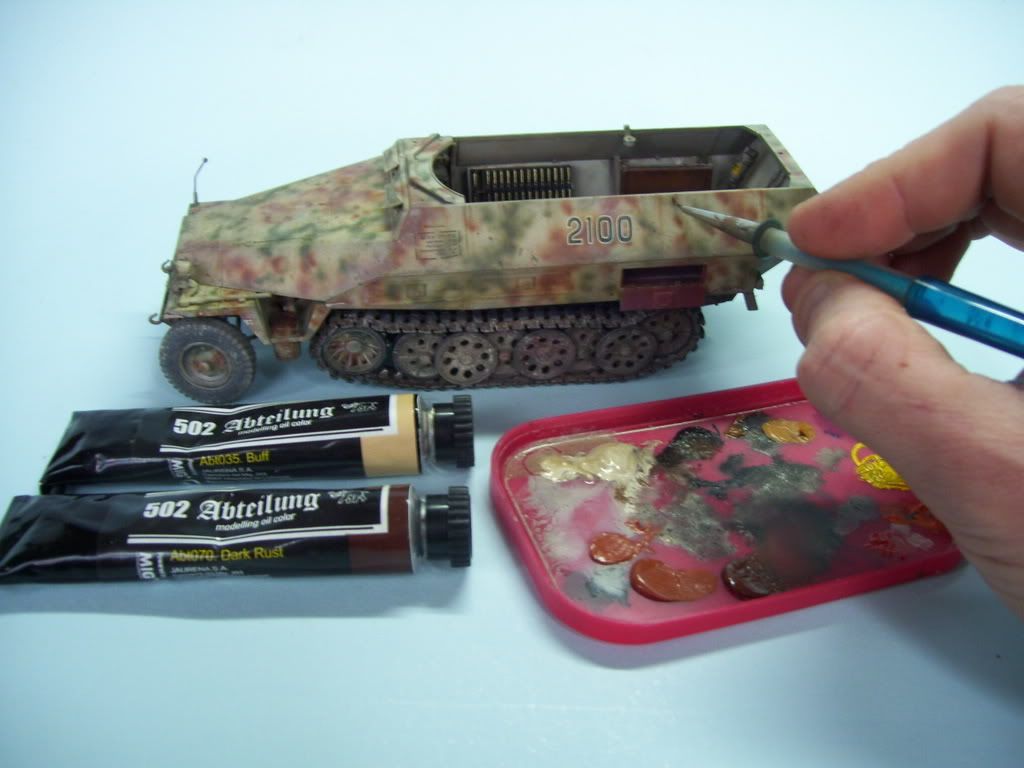
Now, I'm going to add some "color mapping" (Thanks for the term, Steve!--[SMJModeler!]) I take a wider brush and smush it down into a random mixture of several oil; predominantly Buff...I do this with a brush that has been wet with some MIG Thinner...

And then start dropping the brush on the model, transfering the color in haphazard patterns and dots...

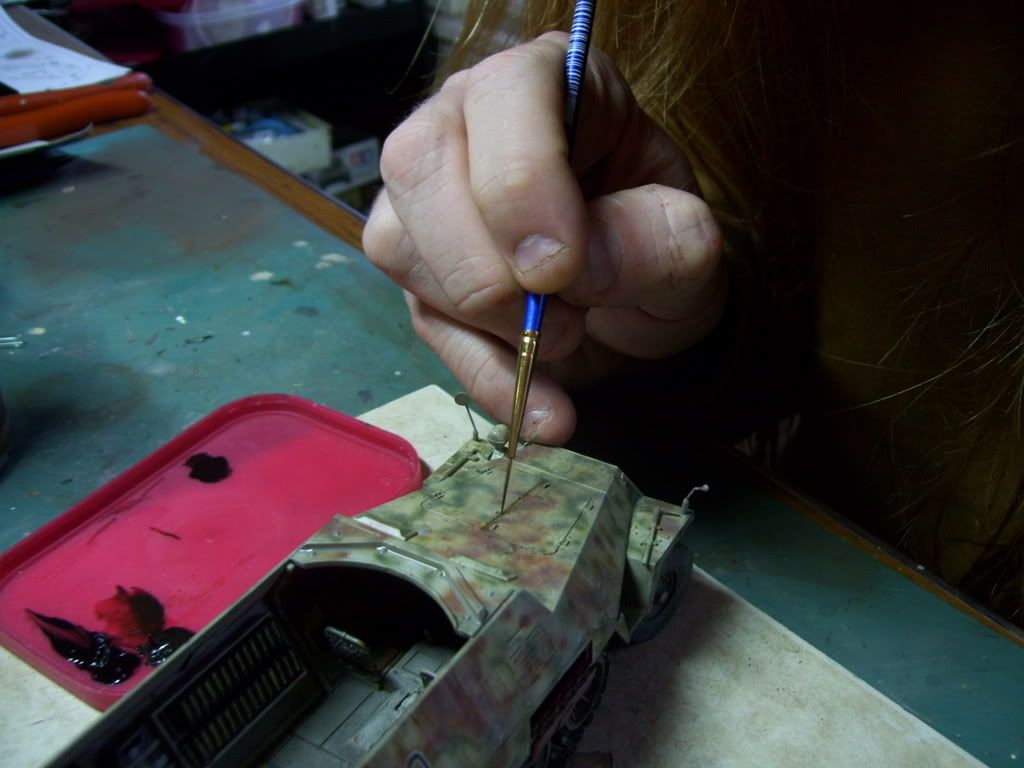
Pin washes are added with a fine brush and an Optivisor...


I let the model dry for a day, and then started adding some more Gray filter--in order to get a proper dispersion, I prop the model up on its side, and start adding blotches of the filter...I always keep plenty of these "Whittman's Chocolate Samplers" boxes around for modeling tasks like this--the fun is in acquiring them...Whistling [:-^].....Big Smile [:D]

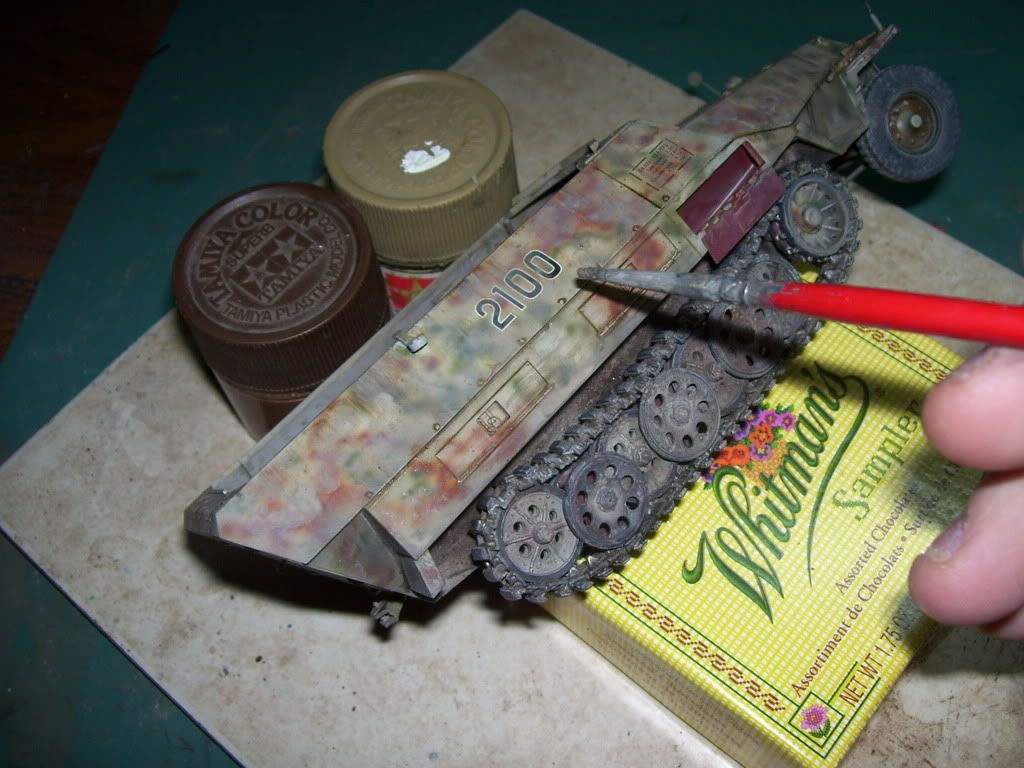
I've while this was drying, I also added i some Buff spots and blotches, to leach into the color as well...and here's where we are so far:

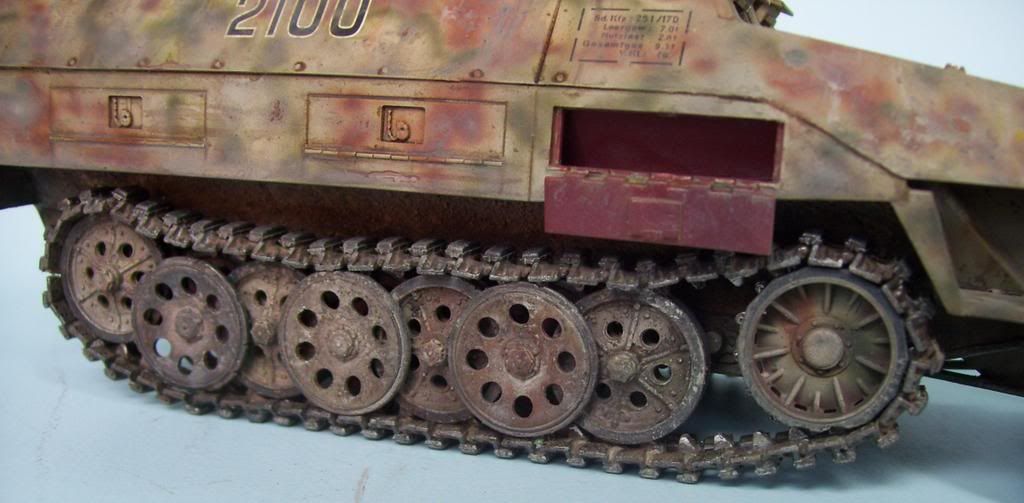
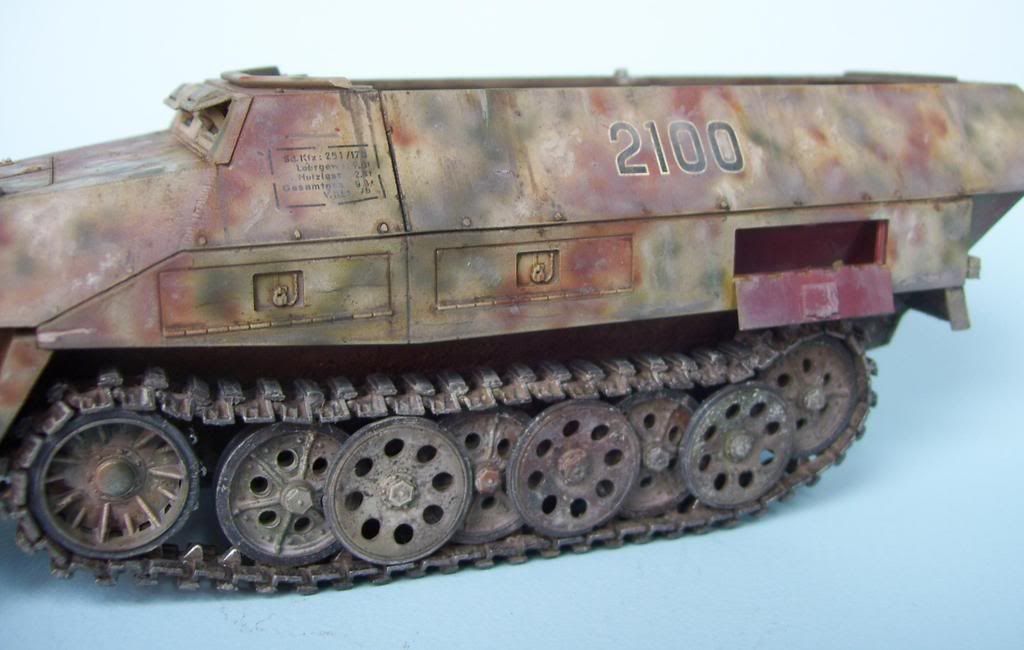
The muffler was done with pigments as well

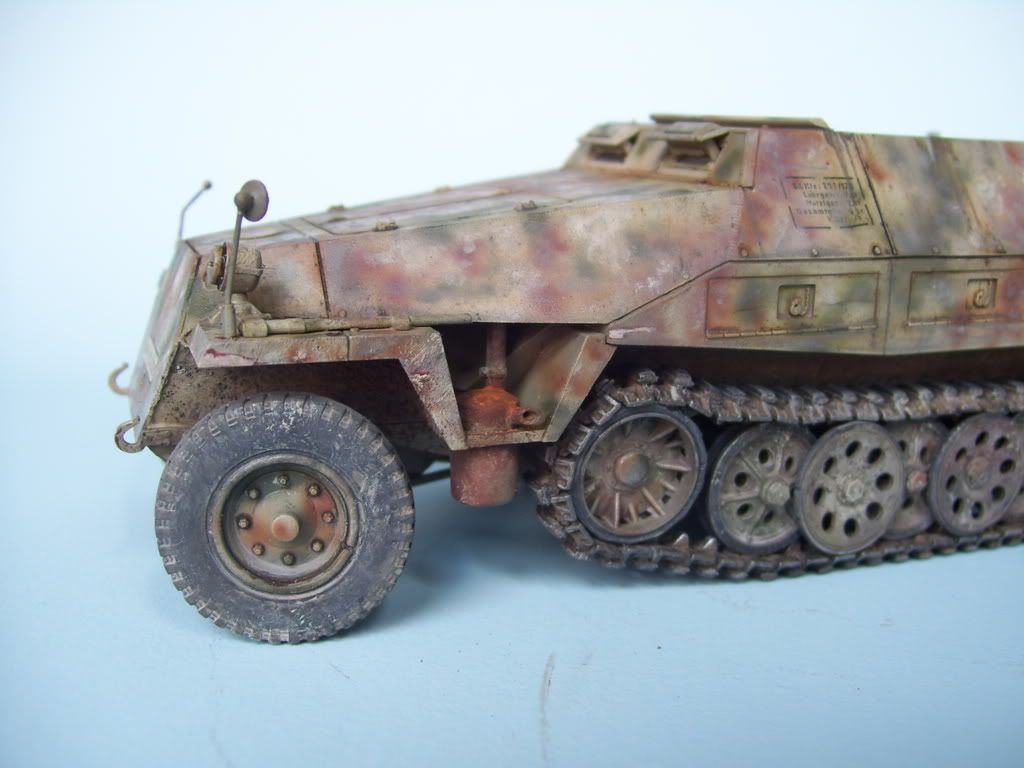
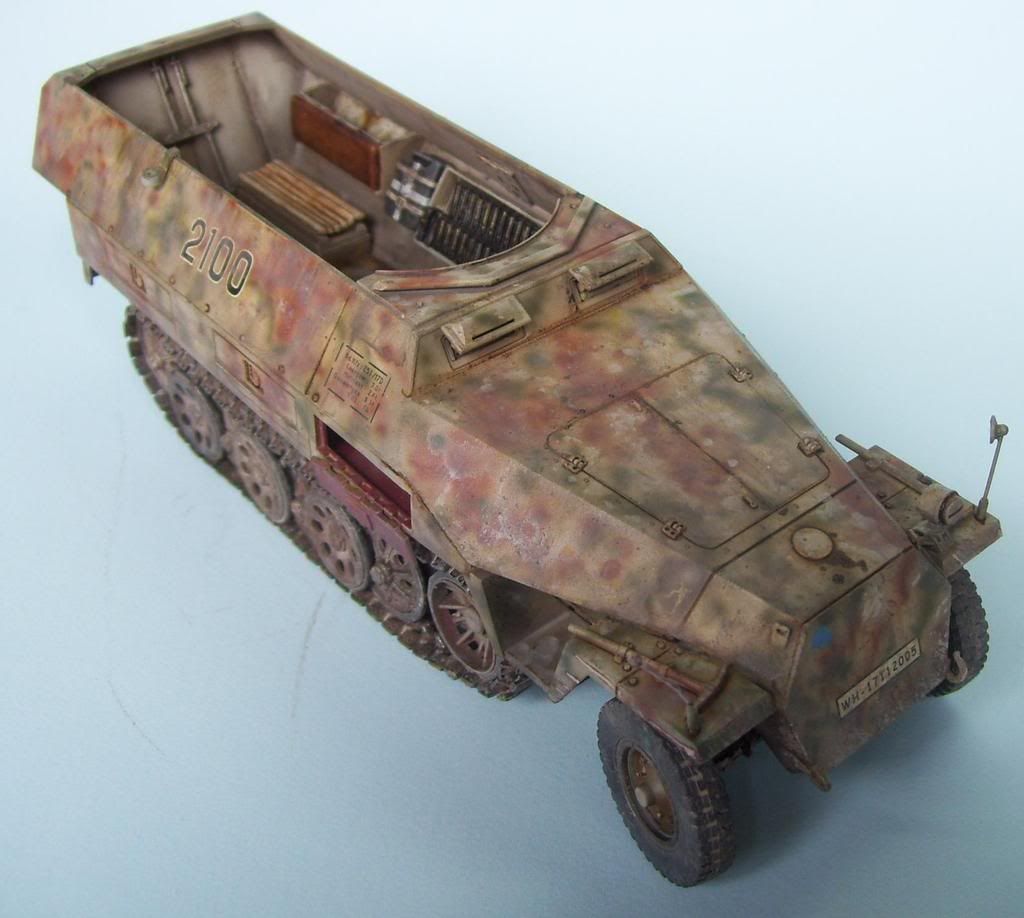
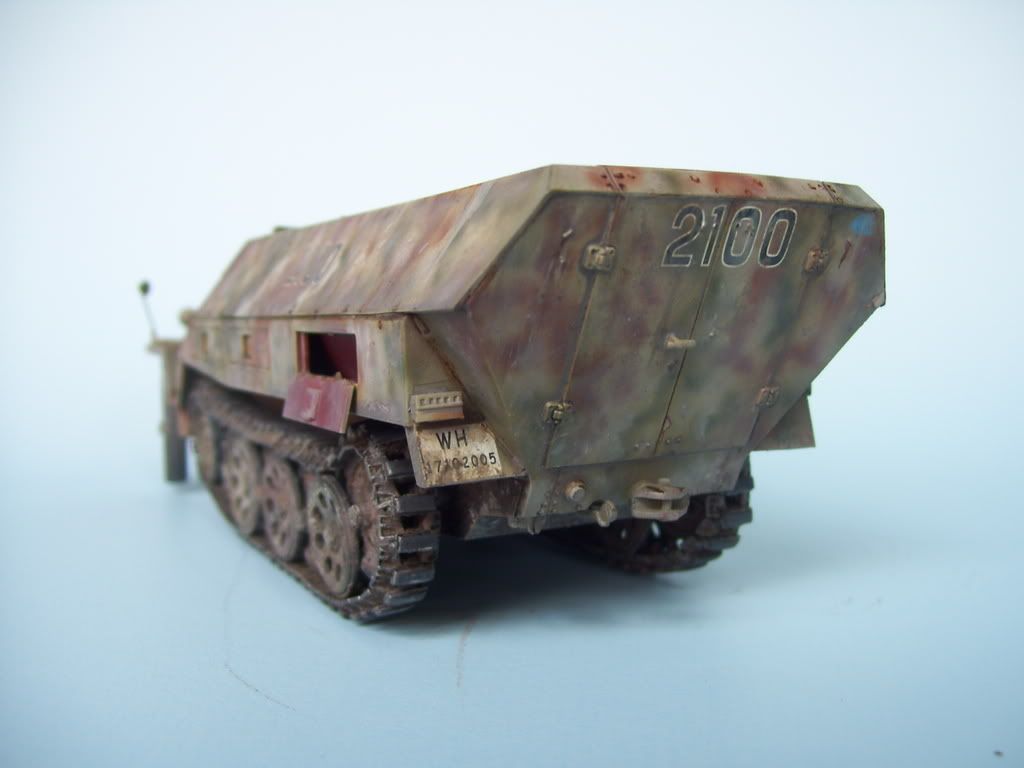
It's pretty "uber-weathered", but after studying many photos of these vehicles, I am satisfied that they DID get extremely dirty in many cases, so I'm not worrried that it's overdone. Please recognize that there has been NO SEALING COATS used throughout this build! I still have to paint the tools, add the tarp, paint some more details, and add chipping...then I'll put the gun in and we'll call it complete!

Questions and comments welcomed! Big Smile [:D]


  • Member since
    February 2008
  • From: ladner BC Canada
Posted by stick man on Sunday, February 8, 2009 12:44 PM

WOW GREAT work Doog!!!!

I'm realy lerning a lot from you amazing WIP threads.

Again GREAT job!!

Smile [:)]

I'm 15 and I model I sk8board and I drum what could be better.
  • Member since
    December 2002
  • From: Bury St Edmunds, Suffolk, England
Posted by Bish on Sunday, February 8, 2009 1:20 PM

the doog Might sound a bit silly, and don't mean to patronise, but when you assemebled the tracks, did you put in the same number of links for each side.

Am i correct in thinking that one of the techniques you are useing is dott filtering. It looks similar to what i saw on the Hetzer in a recent FSM. I've never done it before and am going to give it a try on my /17. Any tips or advice for a first timer. You thread is very timely for me, think my /17 will turn out better now than it would have done. Great work and thanks for shareing.

I am a Norfolk man and i glory in being so


On the bench: Airfix 1/72nd Harrier GR.3/Fujimi 1/72nd Ju 87D-3

  • Member since
    May 2005
  • From: Dublin Rep Of Ireland
Posted by terry35 on Sunday, February 8, 2009 1:21 PM

Hey Karl, looking good, I think your off a bit there, the Germans didn't finish their vehicles in "Blue Ray" or "HD" for that matter, brilliant work there. Stunning weathering going on here, this needs an article in the Mag.

With this, Bills Marder and Rons Maultier going on here, I just gotta get back to the bench.

Got stuck on Sci-Fi stuff recently and need to get back to Armour.

THanks to all you guys around here this is a great time to be a member of this Forum.

Terry.

  • Member since
    July 2004
  • From: Texas
Posted by wbill76 on Sunday, February 8, 2009 1:42 PM

As expected, the weathering has really blended in your previous paint work well Karl! Very nice all around. I can definitely see where you would get a bonus of enjoyment in regards to the "stand" used to prop up the model. Laugh [(-D]

As for your track issue, that's a bit of a mystery...if you left them workable there shouldn't have been any shrinkage due to glue drying (and certainly not enough to equate to two full links!). The only thing I can think of is if you created the runs with the same number of links...they aren't identical due to the way the torsion bars are staggered and so one side is longer than the other. Either way, looks like you were able to fix it without any problems. Thumbs Up [tup]

  • Member since
    January 2012
Posted by I make stuff on Sunday, February 8, 2009 2:02 PM

Wow Karl, you have done it again.  Realy amazing effects, equally amazing is your willingness to stop what you are doing, snap photos, then upload a coherent description.

You seem to have really taken to the Mig oils.

Another beautiful build for you, another "bookmarked" resource for me.

  • Member since
    April 2005
  • From: Piscataway, NJ!
Posted by wing_nut on Sunday, February 8, 2009 2:14 PM
That 251 has been beautifull "dooged up".  It all belnds together nicely.  I like the 1 grey wheel like it was picke up in the field somewhere..

Marc  

  • Member since
    December 2005
  • From: Syracuse, NY
Posted by lexesbenz on Sunday, February 8, 2009 2:28 PM
HA Another award winner at Syrcon!!!! that 251 looks amazing, I really need to get more MIG products.
The flying hamster of doom rains coconuts on your pitiful city!!!!
  • Member since
    May 2006
  • From: Queensbury,NY
Posted by panzer88 on Sunday, February 8, 2009 4:17 PM
All I can say is "Beautiful"!!! I love that camo.


  • Member since
    January 2007
Posted by the doog on Sunday, February 8, 2009 5:19 PM

Bish and Bill--AAAAARGHH!! That must be it--the same number of track links! YUP-that I did! Propeller [8-] LOL!

Thanks for your comments and for helping to unravel the mystery--mystery solved! Big Smile [:D]

Bish, I did use a bit of "Dot Filters"--I just remembered now--but I didn't photograph them, because I basically "undid" them with the addition of the gray filter. I did a light applicatoin of oil dots--I mean, a not-very-dense application. Nothing more I can add beyond what was in my Hetzer thread--here it is again if you lost it--/forums/832933/ShowPost.aspx

Make sure you use Tamiya acrylic paint for your base coats!

Thanks, too, terry, and stick man! And you too, Bill, Marc, Tony and Dave!

Marc, I'm glad that you noticed the grey wheel--I was wondering if anyone would pick up on that?!

"Another winner", Tony? We'll have to see--it SMJModeler comes out, it'll be a tough call! Black Eye [B)]...Big Smile [:D]


  • Member since
    April 2008
  • From: Kristiansund, Norway
Posted by Huxy on Sunday, February 8, 2009 5:47 PM

I got a question....  How!??


And then, Absolutely fabolous.. Love it!!!  Big Smile [:D] 

"Every War Starts And Ends With An Invasion".

  • Member since
    August 2008
  • From: Windsor Ontario Canada
Posted by Higgy on Sunday, February 8, 2009 6:04 PM

Looking great as usual Doog!

Whats next on the bench after this one?

-------

Born to land hard.

  • Member since
    December 2005
  • From: Syracuse, NY
Posted by lexesbenz on Monday, February 9, 2009 1:17 AM
Ooo competition eh? maybe I'll have an armor kit done by this October.
The flying hamster of doom rains coconuts on your pitiful city!!!!
  • Member since
    July 2006
  • From: New Jersey
Posted by redleg12 on Monday, February 9, 2009 5:56 AM

Karl - A MIG-nanomous weathering job. Filtering is excellent. As I have said, you are the king of finish. 

As far as your track question.....I sent Gino and Joe to help Hanz and Franz one night last week. They worked all night and thought you would like the way the tracks turned out!! Laugh [(-D]

Rounds Complete!!

"The Moral High Ground....A Great Place to Emplace Artillery."

  • Member since
    November 2005
Posted by Anonymous on Monday, February 9, 2009 7:06 AM
I really like the way this is looking...the finishing really toned down and blended the colors well...very cool camo pattern...gun clips look very nice inside with the shells peeking out...undercarriage mud/grime is about as good as it gets...very sweet...looks like you marked it like I did mine---and the box-art---as the one pictured outside Bastogne at the Battle of the Bulge...
  • Member since
    January 2006
  • From: Nevada, IA
Posted by LeopardMan on Monday, February 9, 2009 8:03 AM
Karl, a fantastic job you did there. The camo is outstanding. Keep it up. Just looking at your pics gives a lot to learn.
Never believe a statistic you haven't done yourself - Winston Churchill Member IMPS Pastic-Surgeons, West Des Moines, IA
  • Member since
    December 2002
  • From: Bury St Edmunds, Suffolk, England
Posted by Bish on Monday, February 9, 2009 10:42 AM
 the doog wrote:

Bish and Bill--AAAAARGHH!! That must be it--the same number of track links! YUP-that I did! Propeller [8-] LOL!

Thanks for your comments and for helping to unravel the mystery--mystery solved! Big Smile [:D]

Bish, I did use a bit of "Dot Filters"--I just remembered now--but I didn't photograph them, because I basically "undid" them with the addition of the gray filter. I did a light applicatoin of oil dots--I mean, a not-very-dense application. Nothing more I can add beyond what was in my Hetzer thread--here it is again if you lost it--/forums/832933/ShowPost.aspx

Make sure you use Tamiya acrylic paint for your base coats!

Thanks, too, terry, and stick man! And you too, Bill, Marc, Tony and Dave!

Marc, I'm glad that you noticed the grey wheel--I was wondering if anyone would pick up on that?!

"Another winner", Tony? We'll have to see--it SMJModeler comes out, it'll be a tough call! Black Eye [B)]...Big Smile [:D]


Didn't you say one track was 2 links to short, or was it just to short. Well, least you got it sorted, but a lesson for others doing 251's i think.

Thnkas for the info, i am useing Tamiya on my /17. Am i correct in thinking that if i use enamels, which is my usual paint of choice, i need to cover with future before applying an oil wash and that will prevent damage. You have given me some good ideas fvor when i get back to mine in a couplde of days. Thanks, and again, great work.

I am a Norfolk man and i glory in being so


On the bench: Airfix 1/72nd Harrier GR.3/Fujimi 1/72nd Ju 87D-3

  • Member since
    January 2007
Posted by the doog on Monday, February 9, 2009 11:23 AM

Huxy, Higgy, Tony, Mike, Manny, Joachim---thanks once again, guys, for your nice compliments. It's always a nice feeling to know I'm not letting ya's down! Blush [:I] Glad to hear that  some of you may be picking up some information and tips alog the way!

Higgy--that's a good question; what's next? I was thinking of doing the same one that biffa's currently doing, but I'd rather do something that's not currently going on in the furoms. I'll have to look through my stash? I have to finish doing some accessories for this one yet--it ain't "finished" til it's finished!

Manny--yup, I did the same markings. There are some good photos of it in Concord's "The Battle of the Bulge". I'm still not convinced I got the paint scheme correct; it's hard to tell exactly what's going on with it. I think that it actually has some mud used as the camo, or perhaps just as thrown-up dirt, but I'm happy with how this one came out. In general, however, I don't really go overboard in worrying about recreating "exact" camo schemes--unless it's like a certain style, like a "splinter" camo, or "ambush" scheme.

Bish--correct; if you're using enamels, you need a sealing coat before doing oil washes. I'm not sure I would recommend "Future"--I really don't recommend doing washes over such a slick, smoth surface. Plus, it's worthless if you're going to try to do "filters"--that paint willl just slide right off it, so don't even waste your time. I would recommend using Model MAster's acrylic flat. The stuff sprays on easily, and is a great product that I use frequently when I want a sealing coat.The bstt hing you could do for your finished, however, in my opinion, would be to switch to acrylics like Tamiya or Model Master, if you're going to get into heavy weathering. It's much easier to not have to worry about your base coat lifting.

BTW, it was "two links too short"! LOL! 


  • Member since
    December 2002
  • From: Bury St Edmunds, Suffolk, England
Posted by Bish on Monday, February 9, 2009 11:45 AM

the doog Thanks for the advice. Maybe i will keep the enamels for lightly weathered vehicles. Perhaps some experimenting is in order.

Seems odd you were two links short when there is only one link difference between the tracks. Think i need to check mine. I have put them together but not test fitted yet

Thanks again,

I am a Norfolk man and i glory in being so


On the bench: Airfix 1/72nd Harrier GR.3/Fujimi 1/72nd Ju 87D-3

  • Member since
    July 2004
  • From: Texas
Posted by wbill76 on Monday, February 9, 2009 1:36 PM
 the doog wrote:

Bish--correct; if you're using enamels, you need a sealing coat before doing oil washes. I'm not sure I would recommend "Future"--I really don't recommend doing washes over such a slick, smoth surface. Plus, it's worthless if you're going to try to do "filters"--that paint willl just slide right off it, so don't even waste your time. I would recommend using Model MAster's acrylic flat. The stuff sprays on easily, and is a great product that I use frequently when I want a sealing coat.The bstt hing you could do for your finished, however, in my opinion, would be to switch to acrylics like Tamiya or Model Master, if you're going to get into heavy weathering. It's much easier to not have to worry about your base coat lifting.

I have to differ with doog on this one...I use Future as my sealing/barrier on enamels all the time and have no problems with applying washes or filters over it. The key is to apply a very thin coat of Future and not a heavy thick coat. I use Model Master enamels for my base coat as well as for washes and filters and don't have any problems with it sliding off or not being manageable. I know Karl's pro-acrylic and anti-Future but you can achieve good effects with enamel and Future just as you can with acrylics and non-Future IMHO. Have to represent the other side of the equation here to some degree! Wink [;)] Laugh [(-D] 

  • Member since
    January 2007
Posted by the doog on Monday, February 9, 2009 1:45 PM
 wbill76 wrote:
 the doog wrote:

Bish--correct; if you're using enamels, you need a sealing coat before doing oil washes. I'm not sure I would recommend "Future"--I really don't recommend doing washes over such a slick, smoth surface. Plus, it's worthless if you're going to try to do "filters"--that paint willl just slide right off it, so don't even waste your time. I would recommend using Model MAster's acrylic flat. The stuff sprays on easily, and is a great product that I use frequently when I want a sealing coat.The bstt hing you could do for your finished, however, in my opinion, would be to switch to acrylics like Tamiya or Model Master, if you're going to get into heavy weathering. It's much easier to not have to worry about your base coat lifting.

I have to differ with doog on this one...I use Future as my sealing/barrier on enamels all the time and have no problems with applying washes or filters over it. The key is to apply a very thin coat of Future and not a heavy thick coat. I use Model Master enamels for my base coat as well as for washes and filters and don't have any problems with it sliding off or not being manageable. I know Karl's pro-acrylic and anti-Future but you can achieve good effects with enamel and Future just as you can with acrylics and non-Future IMHO. Have to represent the other side of the equation here to some degree! Wink [;)] Laugh [(-D] 

Well, Bill, I won't argue it with you; you do have the experience factor on your side on this one fer surea. I just know that a long time ago, I tried applying washes over a gloss coat, as rec'd by several modelers in some mags at the time, and I didn't at all like the results. It's one of the reasons I disdain it now.

Seeing how that Future is indeed a high-gloss product, I naturally assumed that its characteristcs would be the same. I would recommend that Bish try it out on different models, both ways, and then make a decision. Thanks for weighing in though--I do readily admit my bias, there's no such thing as "too much information" in these WIPs! Big Smile [:D]

  • Member since
    December 2002
  • From: Bury St Edmunds, Suffolk, England
Posted by Bish on Monday, February 9, 2009 3:37 PM

Thanks guys. We all have our own likes and dislikes. Its the end results that count and you guys, what ever method you use, really take some beating. I will try it out on an old peace and see what i think. Thnkas for the advice.

doog just one more question. I am right in thinking you apply your decals over a matt rather than gloss surface.

I am a Norfolk man and i glory in being so


On the bench: Airfix 1/72nd Harrier GR.3/Fujimi 1/72nd Ju 87D-3

  • Member since
    January 2007
Posted by the doog on Monday, February 9, 2009 6:46 PM
 Bish wrote:

Thanks guys. We all have our own likes and dislikes. Its the end results that count and you guys, what ever method you use, really take some beating. I will try it out on an old peace and see what i think. Thnkas for the advice.

doog just one more question. I am right in thinking you apply your decals over a matt rather than gloss surface.

I do it, Bish, but it can be a real bear to achieve. I wouldn't recommend it. I use a weird combination of techniques, that includes using Solvaset, pressing the decal into place with a wet, soft brush, and then either painting over silvering, or reaplying and pressing the decal until it "takes". It took me a long time to get the "feel" of working them that way--and I ruined a lot of decals that way. If you're interested, here's a mini-toot I did in my Jagdpz Kanone thread.

/forums/3/1007327/ShowPost.aspx#1007327

Best to just shoot a small patch of gloss and put the decals on that; then seal with MM flat.

  • Member since
    December 2002
  • From: Bury St Edmunds, Suffolk, England
Posted by Bish on Monday, February 9, 2009 6:53 PM
Ok, thanks. Problem here is that MM doesn't seem to be available in the UK and i have yet to find decent varnish, both gloss and flat. You have deffo given me a few ideas and some methods i will at least try.

I am a Norfolk man and i glory in being so


On the bench: Airfix 1/72nd Harrier GR.3/Fujimi 1/72nd Ju 87D-3

  • Member since
    July 2007
  • From: Ohio
Posted by Geist on Monday, February 9, 2009 6:53 PM

I'm loving the build Doog. I've got Dragon's 251 with the same gun.


Erik

On the bench: Italeri Leopard 1A2 correction build with Perfect Scale turret and Eduard PE

  • Member since
    June 2005
  • From: San Tan Valley,AZ
Posted by smokinguns3 on Monday, February 9, 2009 6:56 PM
Ok how did i miss this this. looking good Karl.
Rob I think i can I think i can
JOIN OUR COMMUNITY!

Our community is FREE to join. To participate you must either login or register for an account.

SEARCH FORUMS
FREE NEWSLETTER
By signing up you may also receive reader surveys and occasional special offers. We do not sell, rent or trade our email lists. View our Privacy Policy.