SEARCH FINESCALE.COM

Enter keywords or a search phrase below:

DML Pzkpfw III Ausf G Afrika Korp Blog COMPLETE 01-11-2010

49696 views
135 replies
1 rating 2 rating 3 rating 4 rating 5 rating
  • Member since
    October 2007
  • From: N.H.
Posted by panzerguy on Sunday, December 27, 2009 6:46 PM

   Bill this guy is really looking sharp! I'm so looking forward to breaking out my Imperial Ausf J thats in the stash, It will be my first pnzr III and second DAK build. Just two builds in front of itStick out tongue.

redleg12

Holy Excrement Bill....

I was just thinking I have not seen a Bill WIP in a while....with all the bovine scatology of the new and disproved FSM forums...I missed it. Now after going through the whole build to date......very nice as usual. Very nice details. I love the paint scheme.

Now.....this new fangled forum must have a Bill tickler somewhere.....I can't go this long without a Bill build.....well thank god I found it....who knows, if I missed the whole thing next cats and dogs would start living together!!

As always, it is a pleasure to see your work.

Rounds Complete!!

  Even though this site has gone through some dramatic changes one of the things that has made it a little easier to deal with is Bill's week end updates. And for that sir we thank youToast!


"Happiness is a belt fed weapon"

  • Member since
    July 2004
  • From: Texas
Posted by wbill76 on Sunday, December 27, 2009 6:49 PM

Mike,

Glad you finally found your way to this one, would hate to consider the possibility of canine-feline cohabitation become a universality! Wink I've found one of the neat features that ther forum has now is the one that emails you replies to certain threads, helps a lot if there's a particular thread you want to "follow" but that may not get updated on a regular basis. Since you and I are "friends" you should also be able to follow my "conversations" under the Friends area of your profile as well...that might help to spot new threads in the future and avoid any potential withdrawal syptoms.

Tony, the "Tropen" schemes are fun ones to play with, no question about it! Definitely give it a whirl when you get the chance. Wink

  • Member since
    July 2004
  • From: Texas
Posted by wbill76 on Sunday, December 27, 2009 7:57 PM

Steve, you sneaked this one in while I was replying to Mike and Tony...thanks for the comments and the kind words as well about the blog threads. Glad to do my part! The Imperial Series J was one of the first DML kits I ever built and even though there's a Smart Kit J out now it still can be built up nicely with just a little TLC along the way. Wink

  • Member since
    December 2008
  • From: Las Vegas, Nevada
Posted by model maniac 96 on Monday, December 28, 2009 2:02 AM

Wow, that is really cool, I do love the subtle camouflage that you have done there! nice job on those tools! 

"Veni, Vidi, Vici" Julius Caesar: I came, I saw, I conquered.
  • Member since
    May 2006
  • From: Queensbury,NY
Posted by panzer88 on Monday, December 28, 2009 7:34 AM

Moving right along Bill. Like the others said, very cool camo. The grey jerrycans are a nice touch,break up the colors. You have some very good attention to detail. Looking forward to the next update.


  • Member since
    February 2009
  • From: mass,USA
Posted by scratchmod on Monday, December 28, 2009 8:24 AM

That camo is too cool Bill, I know I've said it before but it is worth repeating. What always catches my eye are the tools. I hate that part of painting but you manage to paint them with ease, and they look great Yes.

As for those roadwheels, well we know how you do that. I will have to try that trick some day when I'm not building a wreck.

Rob

  • Member since
    July 2004
  • From: Texas
Posted by wbill76 on Monday, December 28, 2009 11:09 AM

MM96, thanks for the comments and glad you like the camo. The "Tropen" schemes certainly add a little bit of a wild card to the inaccurate "desert yellow" assumptions that developed over the years. I can easily understand why a 2-tone scheme would be used in a desert environment but the colors are so close together in tone it would be very very easy for them to disappear entirely under a dust coat in a b/w photograph for sure.

Steve, have to agree about the cans...it's one of the reasons I decided to mount the rack there on the fender even though I can't say for sure one way or the other if it really belongs there...it's plausible enough though considering the #1 priority in the desert was always water, water, water!

Rob, the tools method evolved over time and has become second nature now I guess. I have started using an Optivisor when dry brushing the Steel in order to get a more subtle look that way, it's helped a lot. In terms of the road wheels, using a circle template is a huge plus...I used to hand paint mine and thoroughly hated it but once I discovered the template I was sold on it as a technique. Give it a try when you aren't wrecking the hell out of your suspensions, you won't be disappointed! Wink

  • Member since
    June 2006
  • From: Michigan
Posted by ps1scw on Monday, December 28, 2009 12:18 PM

Bill, you have great skill using a template to paint road wheels.  I think it might be nice if you were able to submit a little "how to" video to FSM for inclusion in thier video help section.  It would be great if all the experts around here could share some of their knowledge via video. 

I can think of a great many topics I'd like to see on video.

The Pz.III looks great!

  • Member since
    July 2004
  • From: Texas
Posted by wbill76 on Monday, December 28, 2009 12:44 PM

Thanks ps1, appreciate the comments and vote of confidence regarding a video tutorial however I don't have a reliable means of creating video available to me unfortunately.

Using a circle template is pretty straightforward...just a matter of having the right sizes available to you more than anything else. I use a Pickett dratsman's template that I picked up here: http://www.draftingsteals.com/21318.html It's an indispensable tool in the arsenal, I've yet to find a set of road wheels I couldn't paint with it. All you do is mask off the appropriate circle, hold the wheel from the underside into the circle, then spray with the airbrush. I mount all my road wheels on toothpicks with small blobs of bluetack poster putty to provide a "handle" to work with and stick them into a piece of styrofoam while they dry. The plastic that the Pickett is made from is very durable and cleans up with regular paint thinner after the wheels are sprayed with no problem.

  • Member since
    July 2004
  • From: Texas
Posted by wbill76 on Thursday, December 31, 2009 8:00 PM

One of the downsides to being home on vacation this week was the need to take care of various non-model related things as well...which limited somewhat my time at the bench but just in time for the end of the year, I was able to make some good progress.

The tracks were the last major item needing attention and I duly set to work assembling the MK workable tracks. The MK set includes a jig that holds 9 links at a time and the pins are provided on separate handles with the pins handed inside vs. outside. Adding the pins is straightforward, just a touch of glue needed at the head, insert to join the links, then twist off the handle and voila! workable tracks. The hollow guide horns are provided as separate parts and these also have a handle. Once the horns are glued in place and the glue had set up after a few minutes, the handles were easily removed with sprue cutters and the top lightly sanded where needed.

The MK instructions recommend that 92-95 links are needed for a Pz III vehicle but I always take those recommendations with a grain of salt and test fit to be sure the count is right. I assembled two runs of 90 links each to get me in range.

The idler was dry fit onto the mount and the mount itself needed to be trimmed down a couple of mm to allow the idler to seat properly. The MK runs were test fit on either side and two more links added to get to 92 per side with the amount of sag I wanted.

The MK SK-26 set doesn't provide very many extra links but since I had used one of these sets before, I had some additional links available and used these to create the added armor runs for the superstructure front plate. I used the kit supplied links for the "cow catcher" run between the tow points that also holds the two extra road wheels. The kit links required a lot of clean up in terms of flash, ejector marks on the faces, etc. and I ended up using 16 links to get the right curve and angle needed. The tow pins are removable so that I can paint and detail the run separately and were used to help hold and shape the curve along with the spares while the glue set up.

Tomorrow, weather permitting, I should get the tracks painted and installed and then it's on to the decals!

  • Member since
    July 2004
  • From: Texas
Posted by wbill76 on Sunday, January 3, 2010 5:16 PM

Made more progress this weekend and am getting this one oh-so-close to the finish line. The first order of business was to prep the lower hull for the track installation. I dry brushed the contact teeth on the sprocket with Steel and stippled some Panzer Schwarzgrau on the lower hull to simulate some scuffing/scrapes there that would've exposed the original Panzer Gray paint a bit. I also did the same, very lightly, on the turret side hatches and commander's cupola.

The tracks were painted by airbrush with a primer coat of Flat Black laid down first to protect the bare plastic from the "hotter" lacquer based Non-buffing Metalizer Gunmetal main coat. The tracks were then heavily dry brushed with Steel and given a wash of enamel Raw Umber. Once the wash had dried, the tracks were installed along with the idlers on both sides. For the idler's contact surface, I gave it the same treatment as the tracks without the primer coat of Flat Black. The idler mount itself is still positionable since I haven't yet locked that down even though the idler itself is now glued to the mount.

The spare track run for the front hull as well as the added-armor tracks were also painted and installed. They were basecoated with the non-buffing Metalizer Gunmetal and lightly dry brushed with Steel before given a wash of enamel Raw Umber followed by a wash of enamel Rust. Once those had dried, I dry brushed some additional enamel Burnt Umber to deepen their look and tone before gluing them into position. There are a couple of points that are still a little too reddish for my taste, I'll add some artist pastels to them later on in the weathering stage to tone them down a bit more.

Those were the last details to add before proceeding to the markings, so the entire vehicle was given a sealing coat of Future applied by airbrush and allowed to dry overnight...mostly because I ran out of time yesterday than anything else.

The kit-supplied decals needed some work/modifications to be usable since the turret numbers are provided as one continuous detail with a large clear section between the middle 1 and the 4...and there's no way you could actually install it that way without some trimming and cutting. Using a pair of scissors, I carefully trimmed out all three numbers for each turret side set and also modified the rear turret bin number by removing the 4 and trimming down it's clear section to allow for a more contiguous look there. The kit-supplied crosses were also replaced since they were the white-outline only variety and the reference pic of #114 clearly shows a black-center-white-outline style of cross. The replacements came courtesy of some spares from a previous Tristar build that were the right size.

All of the decals were treated with Walther's Solvaset with the turret side numbers requiring multiple careful doses to get them to lie down and conform to the very complex turret side surfaces. Once the markings were dry, I applied a 2nd coat of Future to seal them in and protect them from the later weathering steps.

The weathering will have to wait until next weekend however as my extended Christmas/holiday vacation comes to a close today and it's back to the grindstone tomorrow!

  • Member since
    July 2006
  • From: New Jersey
Posted by redleg12 on Sunday, January 3, 2010 7:42 PM

Very nice work on the decals and getting them to sit just right on the turret. Of course the tracks are nice but when I hear the word "tracks" I am like a dog who hears a cat.....I know you understand.

Moving along, looking forward to the weathering

Rounds Complete!!

"The Moral High Ground....A Great Place to Emplace Artillery."

  • Member since
    March 2003
  • From: Rain USA, Vancouver WA
Posted by tigerman on Sunday, January 3, 2010 10:10 PM

Wow, you're fast Bill.

I've never worked with MK's before, so what are the purpose of the "handles"?

   http://i7.photobucket.com/albums/y269/wing_nut_5o/PANZERJAGERGB.jpg

 Eric 

  • Member since
    July 2004
  • From: Texas
Posted by wbill76 on Monday, January 4, 2010 9:11 AM

Thanks Mike, I can definitely understand why you'd be a bit sensitive these days about "tracks"! Still gives me shudders when I see your pic or think about it myself. Surprise

Eric,

Thanks for the comments as well. The handles are there to allow ease of well, handling, of the small parts. The pins and the guide horns would be a real nightmare if they didn't have them as they are tiny and there are lots of them. The MK design is very user friendly in this regard...but just to be safe, they do provide you with plenty of extra pins although the same isn't true generally for the guide horns. HTH!

  • Member since
    January 2007
Posted by the doog on Monday, January 4, 2010 2:54 PM

WOW, Bill--sheesh, you do work quickly!

Another good looking build happening!

  • Member since
    May 2005
  • From: Dublin Rep Of Ireland
Posted by terry35 on Monday, January 4, 2010 4:00 PM

Hi, Bill I've been popping in and out for a while and must say great progress. Another great build happening, I must admit that while I'm no fan of the African campaign this and your Mk.IV make for interesting subjects, especially with your approach of not over weathering. When I was a younger chap everybody done harsh "Desert Yelloy" over "Panzer Grey" because it wasbelieved/ accepted that every vehicle was in a sandstorm.

Regards,

Terry.

  • Member since
    October 2007
  • From: N.H.
Posted by panzerguy on Monday, January 4, 2010 4:49 PM


  Bill I have to say this just seems to have fallen together for you. Nothing wrong with that though rightWink? The cammo is an eye catcher. I looking forward to using this scheme on my pz III when I finally get to it.

  Don't ya just love how the Germans would put these nice cammo schemes on their vehicles and then paint those big bright numbers on the sidesHmm.

"Happiness is a belt fed weapon"

  • Member since
    July 2004
  • From: Texas
Posted by wbill76 on Monday, January 4, 2010 6:55 PM

Karl, thanks as always! I was able to work quickly on this one due to having a nice long vacation for the Christmas holidays...but now it's back to the "normal" schedule! We weren't able to travel anywhere this year so I made the most of the time I had with this one.

Terry, it's true that the tendency is to make every vehicle that ever served in N. Africa look like it's been thoroughly sandblasted...kind of like a very hot version of whitewash! Some vehicles did get beaten up and/or had poor paint jobs done in the field as evidenced by various photos but I prefer to keep the schemes relatively intact. The two-tone Tropen schems offer some very nice visual appeal as well IMHO. Thanks for the comments!

Steve, haven't really had any major problems with this one construction-wise...just the surgery on the fenders really. I too am looking forward to see what you do with it when you get to your Pz III. And yes, I do find it funny that the camo schemes would be designed so meticulously by theater and then those huge numbers get added...because you have to know which vehicle is which on the mobile battlefield! Wink

  • Member since
    July 2004
  • From: Texas
Posted by wbill76 on Monday, January 4, 2010 7:56 PM

I agree Wayne. Especially when you consider that the Tropen schemes were applied as a rule prior to the vehicles being shipped to N. Africa (or the other designated "Tropen" theaters such as southern Russia) and that those vehicles were typically painted at the factory in that scheme as well. Only the very first vehicles sent over in early 1941 would have been painted truly in the field in N. Africa. The reason being that they usually received other external modifications to equip them for a "Tropen" theater such as modified engine deck hatches as well as internal mods like special oil or air filtration systems.

  • Member since
    November 2005
Posted by Anonymous on Tuesday, January 5, 2010 12:46 PM

Wow, looking good, Bill.  Very rarely do you see the "official" Tunisian scheme modeled. Looking good.  Will look better once you get those turret numbers toned down a bit and some dust on her. Worse two things about German armor: zimmerit and turret numbers that cover hatches and viewports... 

  • Member since
    April 2009
  • From: Carmel, IN
Posted by deafpanzer on Tuesday, January 5, 2010 1:06 PM

Hi Bill,

Always looking great! Yes it is a must for me to visit your forum every time for an update. 

I am about to start a new kit Tamiya Stug III B and I have been looking for AM tracks to replace the rubber bands that came with the kit.  I just realized I may end up ordering the same tracks from Model Kasten that you ordered for this.  It is asking for $30.00... is it the best deal?  It's from rzm.com and the model is SK-26III.  Which vendor did you order from?  But I wanted to make sure that it will work well with Tamiya Stug III B too. 

http://www.bpmodels.net/Model/Pz3G/Step0.jpg

Thanks Bill!


Andy

  • Member since
    July 2004
  • From: Texas
Posted by wbill76 on Tuesday, January 5, 2010 1:07 PM

Thanks MR! Have to agree on the rarity of the "tropen" schemes and I blame that on two things. 1) The stubborn tendency of "desert yellow" introduced by Tamiya and deeply ingrained in the psyche of modelers as a result and 2) lack of appropriate colors in various paint manufacturer lines making it more difficult to apply the real scheme for those who do know about it!

The weathering process will definitely tone down those turret numbers...looking at the reference pic I'm not entirely convinced they should have a red center but that's what DML included so that's what I used. I lean more towards them being white outline only due to the way the color inside the lines matches up with the hull color outside the lines but don't have anything to back that up beyond my own visual interpretation. Since other units in N. Africa did use the red-with-white outline, DML's design isn't that far out there in the general scheme of things. As for the complex surfaces...totally agree with you there as it stacks up to zimmerit...no way it would be possible to get those markings on without an agressive setting solution for sure and even stencils would have a very very hard time due to the uneven surfaces they have to cover.

  • Member since
    November 2005
Posted by Anonymous on Tuesday, January 5, 2010 1:19 PM

wbill76

Thanks MR! Have to agree on the rarity of the "tropen" schemes and I blame that on two things. 1) The stubborn tendency of "desert yellow" introduced by Tamiya and deeply ingrained in the psyche of modelers as a result and 2) lack of appropriate colors in various paint manufacturer lines making it more difficult to apply the real scheme for those who do know about it!

And also the lack of many good pics of a very subtle scheme when photographed in B&W...

  • Member since
    July 2004
  • From: Texas
Posted by wbill76 on Tuesday, January 5, 2010 1:20 PM

Andy,

You sneaked this one in while I was posting my response to MR. RZM Imports is where I order most of my tracks from and if you order online they will discount the price a further 10% than the list price of $29.95 so that helps. It doesn't include shipping and they are the cheapest place I've found so far for MKs here in the US. One thing to be aware of though is that they have MKs on backorder right now for the most part but expect a shipment in mid-Jan (I know this because I have a few sets ordered but still pending from them) so if you need the tracks right away they may not be the best source at the moment.

As far as tracks for your StuG III B go, they did use the smaller 36cm tracks for a short while but the Tamiya kit has the wider 40cm sprocket so that set wouldn't work for that one. Instead what you need to get is the SK-24 or SK-18 set. The only differences between the two are the SK-18 has the spaces for the ice sprags to be fitted that was introduced in winter '41 so depending on which time period you want your StuG to occupy, that would drive which type of tracks you need.

MK puts out a handy little reference chart that shows all the different vehicles and years that match up with their various sets. It's not 100% accurate but it's pretty close.

  • Member since
    April 2009
  • From: Carmel, IN
Posted by deafpanzer on Tuesday, January 5, 2010 2:09 PM

Thank you Bill!  Knew I could count on you because I really don't know much about the tracks... I am still learning!  Placed an order for the SK-024 tracks from RMZ.com few minutes ago.  It will be for the Invasion of France so no ice sprags.  Thanks again!

Andy

  • Member since
    July 2004
  • From: Texas
Posted by wbill76 on Sunday, January 10, 2010 9:02 PM

I made a lot of progress with the weathering stages but didn't quite get this one across the finish line. Work started with an overall wash of enamel Raw Umber applied with a round 0 sable brush to the entire vehicle. This darkens the finish at first but provides a nice foundation for the additional steps and layers to follow.

The next step was the application of dot filters. I chose enamel Light Gray, Armor Sand, and Raw Sienna and applied small dots with a pointed brush to small sections at a time. The dots are then blended together with a square tip brush that is dampened with thinner, a condition achieved by dipping into clean thinner and then touching it several times to a paper towel to wick away the excess thinner and avoid "flooding" the surface where the dots are.

As a kind of "before and after", you can see in the pic below that the front part of the turret has received the filters while the cupola and storage bin are still in their unfiltered state. This process was applied to the entire model, working slowly one section at a time and all while wearing a breather mask due to the high concentration of thinner fumes.

Next up was the application of a pin wash of enamel Burnt Umber using a pointed detail brush. The pin wash was applied to all the raised detail and panel lines. I then went back over the same areas with the same brush and clean thinner and removed or adjusted any excess wash as needed.

At this stage I took a series of walk around photos looking for any problem areas or unblended dots from the filter stage. The camera sees things far more clearly than I can with the naked eye and a couple spots were cleared up and some adjustments made before I applied an overall coat of Testors Lusterless Flat in the spray can.

Once that had dried, I applied a wet mix of Mig Pigments Gulf War Sand using regular tap water mixed with a drop of liquid dish soap to break the surface tension. This was allowed to air dry and then the excess pigment carefully removed with stiff bristled brushes. I made further adjustments using wet and dry q-tips to get it to this point. I also used the dry q-tips that had accumulated pigment to apply a light dusting to the upper surfaces and fenders. I'm about 95% done with adjusting the pigments on the tracks and lower hull as I still see some spots where it's a little heavier than I would like...but will have to make those adjustments along with a few other small details later before I can say this one is done. Almost there!

  • Member since
    October 2007
  • From: Wisconsin
Posted by DD-557 on Sunday, January 10, 2010 9:28 PM

Bill,

Really appreciate you taking the time for your detailed finishing sbs. I’ll mark this for  reference for coming work of my own in hopes some of your knowledge and maybe talent will rub off. 

You have a splendid finish and it’s a joy to see. Marvelous top drawer work.  

Patrick Smile

  • Member since
    July 2006
  • From: New Jersey
Posted by redleg12 on Monday, January 11, 2010 5:35 AM

Bill

You always look good crossing the finish line. I like the color on this one....it's almost appealing to my OD senses Surprise

As always, very nice work

Rounds Complete!!

"The Moral High Ground....A Great Place to Emplace Artillery."

  • Member since
    January 2007
Posted by the doog on Monday, January 11, 2010 6:16 AM

Bill,

Spectacular finish on this model, as per your usual high standard, no doubt!

I hope you don't mind if I weigh in on something however. This may be just a matter of Semantics to some, but I think that although it is small, it might be an important distinction?

I've seen you use what you call the "Dot Filter" process on several of your latest builds, but I think that the way you apply it is a mischaracterization of what I understand the method to be? When I learned it--which was pretty near to when it was making its breakthrough in the "Spanish Armor School" (In "Armor" magazine) so to speak , it had a very definite purpose--to use what you would normally never consider to be "Armor weathering colors" in a widely-distributed application of "dots" in order to apply nearly imperceptible hues of mostly Primary Colors to a model in order to impart a rich patina of subtle tonal variations.

Adam Wilder explained to me that this came about because Spain is such a bright, warm country ( as opposed to the :Norwegian School which uses more neutral Blacks and Whites to impart contrast, as per the longer nights/shorter days and general grayness of season) and because this was the intention of the originators--to add that warmth to their models.

However, from how I've seen you doing YOUR technique, it seems to be more of a "color modulation" in form of altering the general base color in lights and dark hues which are always more related to the model's base color? Like how on the Pz38(t) you used appropriately-related colors of  Flat Sea Blue, Flat White, and Panzer Dunkelgelb. No real "contrasting" colors if you think of the Dunklegelb as imparting a "dust" hue. In contrast, the "Dot Filter" technique generally recommended to actually stay AWAY from "complimentary" hues and what you would consider "actual weathering" colors, as a matter of actual process.

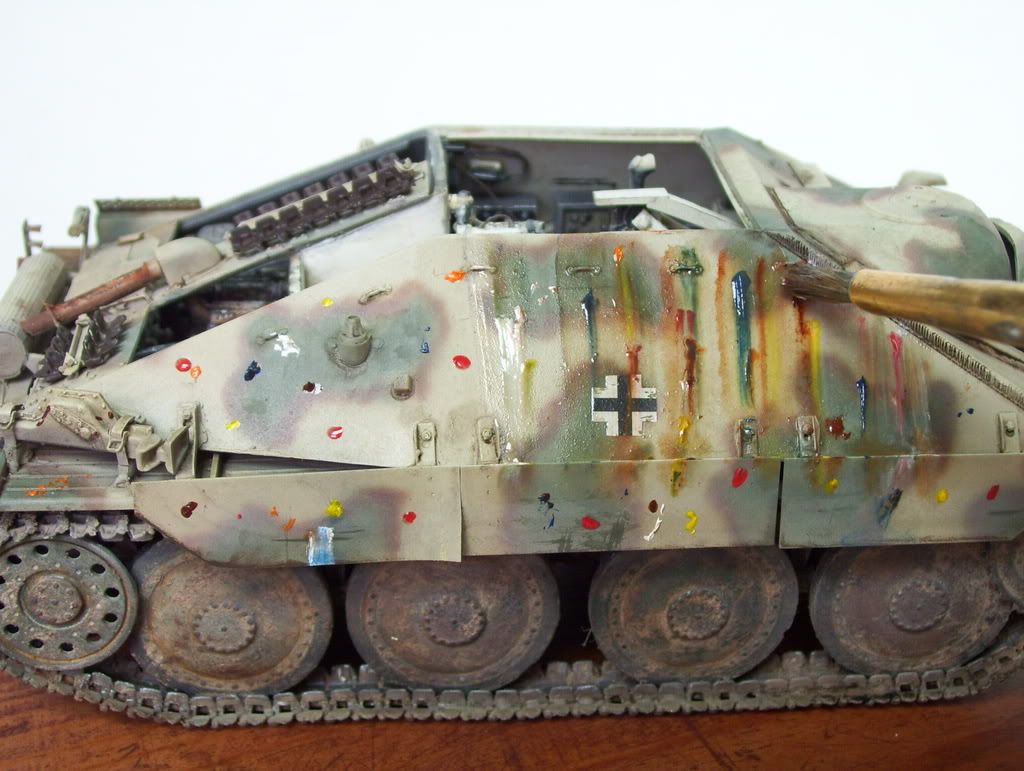
Also--and this may be a small detail, but--the process was usually drawn down in stokes, and in somewhat heavier concentration more so than merely being diluted, or drawn across the model as you did on that Tiger (P) Prototype. For instance, look at the distribution, colors, and process of how I was doing it on the Hetzer;

As such, I think that what you do is more aptly within the nature of what has come to be called "Color Modulation"--albeit you DO use "dots" to effect that result.

I hope this post doesn't come across as arrogant or petty Embarrassed --genuinely, neither is the intent; I think you know that! I just think that the difference in results of what I've seen between the application of the "Dot Filter" technique as it originally started and from where it gained popularity and what you achieve ( and NOT, BY ANY MEANS (!) judging that to be any less valid, or inferior) is noteworthy enough as to warrant the distinction? Your method of subtly modulating the base color is much more subtle and in a way, "User Friendly", where as the way that "Dot Filters" was employed in "Armor" magazine where it got its real "push" was much more extreme and contrasting in its results.

Thoughts? Smile Is it just a matter of Semantics? Or do you see the point that I'm trying to get across?

  • Member since
    July 2004
  • From: Texas
Posted by wbill76 on Monday, January 11, 2010 10:02 AM

Patrick, thanks for the kind words and glad the SBS is helpful!

Mike, thanks as well, getting this close to the finish line is always sooooo tempting but I have to remind myself not to rush just to get it done. Big Smile

Karl,

No worries my friend, always appreciate a discussion about terminology and semantics. Especially in our world, terminology can often be inexact at best and downright confusing at worst.

Like you, when I first read and saw "dot filtering" being used, the dots in question were always primary colors. I think that works well when you are working with three-tone or multi-color schemes and I employ primary colors on those types of schemes still as the case warrants. Other schemes however I take a different approach and my use of this technique has evolved over time and, like all good techniques, has undergone my own trial and error process to arrive at the way I use it today.

I don't think the use of the name is dependent on a rigid adherence to primary colors only and my interpretation of the intent of the technique is to impart subtle variations and hues to the finish that otherwise wouldn't be present. Whether that's done with primary colors, secondary colors, or complimentary colors is not something that I, personally, view as essential to the name of "dot filter" being accurate as a descriptor. I think the name "dot filter" is indicative instead of the way the technique is applied, namely in the form of dots of paint blended into the finish with repeated strokes until the dots virtually disappear...but still apply a "filter" and alter the underlying base colors in the process. My use of the technique achieves that in the manner described so I don't think I'm mis-characterizing things when I use the term "dot filter". I'm always careful to say which colors I'm using and never state that these are the "must use" colors to go with the technique. Wink While I may not follow the "original" formula of colors used, I view that more as an adaptive/evolutionary step in the use of the technique for my purposes vs. a true departure into something else entirely.

In terms of the direction of the strokes, I think you misunderstand how I actually do this. I do it exactly as you describe, repeated (often downward) strokes in a single direction. I don't draw it across the entire model as a dilute wash although I do work on the whole surface in sections at a time. How much of the paint is left behind is a matter of taste and style I think and the surfaces being worked in question.

I don't think what I do falls under the "color modulation" category at all...at least not as I understand what that term means. Color Modulation is the establishment of varying light/dark contrasts in order to present the natural "shadows" of the actual vehicle in terms of the finish tones. That's not what I'm after here at all, so as long as we are discussing semantics I think referring to this as a "color modulation" technique would be a mis-characterization! Wink

At the end of the day, I would agree with you that the types of colors that I apply have migrated away from the original technique's roots but I will continue to refer to this as applying a "dot filter" as I think that's the best descriptor available, at least at the time being, for what I'm essentially doing. That is, applying a filter over the base coat using several different "dots" of colors and blending those dotes into the base coat via repeated downward (or streak direction for horizontal surfaces) strokes using a thinner dampened square tip brush. That's my definition of what a "dot filter" is, others may view that differently but I'm always clear in my description of what I mean by the term. Wink

Thanks for taking the time to put your thoughts down on paper...and rest assured that no offense has been taken, it's all good! Yes 

JOIN OUR COMMUNITY!

Our community is FREE to join. To participate you must either login or register for an account.

SEARCH FORUMS
FREE NEWSLETTER
By signing up you may also receive reader surveys and occasional special offers. We do not sell, rent or trade our email lists. View our Privacy Policy.