SEARCH FINESCALE.COM

Enter keywords or a search phrase below:

Hobby Fan M667/M752 Lance Launcher,4/24/10 COMPLETE!!

49162 views
95 replies
1 rating 2 rating 3 rating 4 rating 5 rating
  • Member since
    January 2012
Posted by I make stuff on Sunday, April 25, 2010 2:46 AM

This is awesome, Redleg, very cool build, I missed it until I saw the "completed"tag.  I am going back right now and checking out this build, those headlight clusters look very cool, and the missile looks pretty menacing.

Bill

  • Member since
    July 2006
  • From: New Jersey
Posted by redleg12 on Saturday, April 24, 2010 11:08 PM

I finally had some time to finish up this build. The entire chassis was given two was coats of MIG Grey for Light Green wash. This was to try to get the “chaulky” effect the MERDOC paints always seemed to have.

I then pin washed the details with MIG Dark wash. Finally a mix of MIG Dried mud and Industrial debris was laid on with a Turponoid wash.  After it was dry, the excess was dusted off.  Finally, in and around the exhaust, the pipe was dusted with MIG Light Rust and inside with Smoke pigment.

Here is a closer shot showing the completed front with straps on the tools

Here is a closer shot with the launch cable running out of the vehicle and off a safe distance!!

Here is a close view of the cables inside the vehicle. Both cables are painted solder. The cable to the launcher, the tie downs were done with thin lead strip.

Here is a close up rear view. The bottom of the missile has a scratch made nozzle cover. Made with .020 and .010 sheet styrene cut into circles

Well that’s another one off to the motor pool. Now it is time to clean up the bench and get ready for my next build, the M50 Ontos.  

As always, all comments are welcome and thanks for stopping by.

Rounds Complete!!

EOM!!!

"The Moral High Ground....A Great Place to Emplace Artillery."

  • Member since
    July 2006
  • From: New Jersey
Posted by redleg12 on Monday, April 12, 2010 7:39 PM

Kevin - Thanks, I love the MV headlights, they have depth and pop the look. Yep, into washes and weathing, hope to finish soon.

Steve - Thanks.....ahhh..the M730.....its on the shelf for sometime in the future....but you know....so many models so little time.

My name is Mike...I'm OD Wink Beer

Rounds Complete!!

"The Moral High Ground....A Great Place to Emplace Artillery."

  • Member since
    October 2007
  • From: N.H.
Posted by panzerguy on Monday, April 12, 2010 7:04 PM

  Well this Germaholic would like to make a comment and that would be Freak-en Sweet there MikeStick out tongue! From the real wood benches to the extra work that you put into the missile and everything in between that's just an awesome piece of workBow Down!

You know what would be a great companion piece for this guy , a Chaparral.Those were our primary AD system back in the day.


My name is Steve and I'm a GermaholicWinkWhistlingDrinks.

"Happiness is a belt fed weapon"

  • Member since
    June 2005
  • From: Massachusetts
Posted by minimortar on Monday, April 12, 2010 6:06 PM

Man-o-man there Mike, lookin' just fantastic! Like mentioned prev, those lights are killer and well... just adds to the beauty of the rest of the beast. Hoping to see it finished up shortly.

Awesome job on this one as well! Bow Down

Thanks,
Kevin Keefe

Mortars in Miniature
A Scale Model (Plus!) Collection of the Infantryman's Artillery

  • Member since
    July 2006
  • From: New Jersey
Posted by redleg12 on Monday, April 12, 2010 3:30 PM

Bill - Thanks.....I am rounding the clubhouse turn on this one. Hoping to finish it up this weekend.....and hoping nothing else gets in the way!!

The Ferule's are well known for the German tracks The T130 tracks from them are fantastic...IMO. The time I saved cleaning up, assembling, painting and weathering styrene.....I can assemble and weather these with Blacken it and have plenty of time to leftover to work on other parts of the model. In that instance, the value of my time FAR outweighs the extra cost.

Rounds Complete!!

"The Moral High Ground....A Great Place to Emplace Artillery."

  • Member since
    July 2004
  • From: Texas
Posted by wbill76 on Monday, April 12, 2010 1:23 PM

Nice to see this one's getting some bench time Mike, nice work on the tracks, very nice! Yes

  • Member since
    July 2006
  • From: New Jersey
Posted by redleg12 on Sunday, April 11, 2010 4:47 PM

Well I am back after Misquitocon.

First I finished the tracks. They were weathered with a bath in Blacken-it then the rubber pads that will show were painted with a 50/50 mix of Tamiya Flat and NATO Black. The track wells were weathered with a wash of MIG Grey for light green, then a mix of MIG Dried Mud and Industrial Dirt pigments to give the area the dusty appearance. Bolt and details were pin washed with MIG Dark wash.  

Tracks were then measured to the right length and installed along with the drive gear and idler road wheel.

I completed the tools. The pick head is painted Tamiya Flat Black and wear is added using a #2 pencil. The shovel is Tamiya Flat Black and Tamiya Dark Yellow. The dark yellow was washed with MIG Brown wash and the metal was also weathered with the #2 pencil. The pick handle was done the same as the shovel wood sections. The breaker bar was done in Alclad Steel and then flat coated.  The only thing remaining is the straps.

Also note the tracks and rubber pads

There are interior panels which hang from the top of the cargo section, one on each side. The kit parts were badly warped so I made new panels from sheet styrene and used the kit supplied hooks on the top of the bead.

With the tracks on the side panels were next. The rubber section is painted with the 50/50 mix of Tamiya Flat and NATO black. The front, rear and attachment bar were painted to match the camo pattern on either side. After the panels were added the 4 large hooks on either side were added, also painted to match the pattern.

With that the chassis is complete except the rear door which will be attached when it is mounted on the base. Now it is time to begin the washes and pigment on the overall chassis.

As always, all comments are welcome and thanks for stopping by.

Rounds Complete!!

"The Moral High Ground....A Great Place to Emplace Artillery."

  • Member since
    July 2006
  • From: New Jersey
Posted by redleg12 on Monday, March 29, 2010 9:33 AM

Marc - Thanks.....I think???LOL

Nope, the Lance missile will still be on the bench come Saturday. I will be coming light with just the M40 155mm SP gun and the M1A1 75mm pack howitzer.

I am lloking forward to Saturday and seeing you and the other guys. It should be fun!!

Deefpanzer - Never feel guility. My builds are not the "mainstream" that the German and Sheman lovers are going to comment on (No offense to my Germaholic and Shemaholic friends) so I am accustomed to people looking but maybe not commenting.

With that said, everyone is welcome and I am glad you stopped in

The Army usaully has fire extingushers on board most vehicles. They are usaully in the crew compartment and may be hidden from view. The M667/M752 has such a small driver's area, the extingusher is in the cargo area.

Usaully the extingushers are buy out items and left their red color so they can be found quickly in an emergency. Most times they are not out where you can see them

Lastly, the Lance missile was a division/corps level asset. With its range it would have been well behind the lines and not as much of a "problem" of being shot at!!

Rounds Complete!!

"The Moral High Ground....A Great Place to Emplace Artillery."

  • Member since
    April 2009
  • From: Carmel, IN
Posted by deafpanzer on Monday, March 29, 2010 7:35 AM

I have been following your work since day one... me guilty of lurking but not anymore.  Wanted to say that I am loving your missile launcher. LOL

Please don't think I have fire extinguisher fetish but I love YOURS!  It looked SO REAL.  It made me wonder how come Army didn't paint those green or maybe black instead of red as it is screaming 'Shoot me!'.  Now I have to look around to buy AM decals for my kit as it didn't come with one. 

Andy

  • Member since
    April 2005
  • From: Piscataway, NJ!
Posted by wing_nut on Monday, March 29, 2010 6:39 AM

....just trying to keep "different" in everyones mind!!

Well having met you as many times as I have... I know how different you really areWhistlingStick out tongue

Wink Kidding of course buddy


That looks sweet Mike.  The missile is a real stand out.  Any chance to see the on Saturday?

Marc  

  • Member since
    July 2006
  • From: New Jersey
Posted by redleg12 on Monday, March 29, 2010 5:34 AM

Gino - Thanks, I have to admit the missile does look good with the decals. Thanks again

Tony - Thanks....just trying to keep "different" in everyones mind!!

Thanks guys

Rounds Complete!!

"The Moral High Ground....A Great Place to Emplace Artillery."

  • Member since
    August 2008
  • From: S.W. Missouri
Posted by Pvt Mutt on Sunday, March 28, 2010 9:26 PM

WOW that's impressive sir.YesCool

Tony LeeSmile

Shoot Low Boys They're Ridin Ponys

  • Member since
    December 2002
  • From: Valrico, FL
Posted by HeavyArty on Sunday, March 28, 2010 9:16 PM

Its looking great Mike.  The real wood troop seat slook good.  I also like the decals on the missile.  They really bring it to life.  Good job.

Gino P. Quintiliani - Field Artillery - The KING of BATTLE!!!

Check out my Gallery: https://app.photobucket.com/u/HeavyArty

"People sleep peaceably in their beds at night only because rough men stand ready to do violence on their behalf." -- George Orwell

  • Member since
    July 2006
  • From: New Jersey
Posted by redleg12 on Sunday, March 28, 2010 8:42 PM

Thanks Bill. The missile was a PITA with a pile of individual little decals....23 all together. Talk about eating up time!!!. The seats were fun....love working with real wood.

Just a few more odds and ends, then I can finish assemble and weather......sometime soon.

Thanks again

Rounds Complete!!

"The Moral High Ground....A Great Place to Emplace Artillery."

  • Member since
    July 2004
  • From: Texas
Posted by wbill76 on Sunday, March 28, 2010 8:27 PM

Very nice work on the seats Mike as well as the other details. Missile looks very imposing as well, can't wait to see this one done and ready to shoot! Wink Beer

  • Member since
    July 2006
  • From: New Jersey
Posted by redleg12 on Sunday, March 28, 2010 8:14 PM

I had a fairly good week at the bench working on the details. First the kit does not include troop seats. Many of the M752s had seats for the missile crew. I set off to scratch build the seats firs with .030 strips of bass wood cut to the proper width and length. I then used some evergreen .030 C channel strips cut to length for the C channel cross braces. Lastly I pinched some .010 sheet and countersunk the bolt heads which attach the wood to the C channel. Here are the raw finished seats.

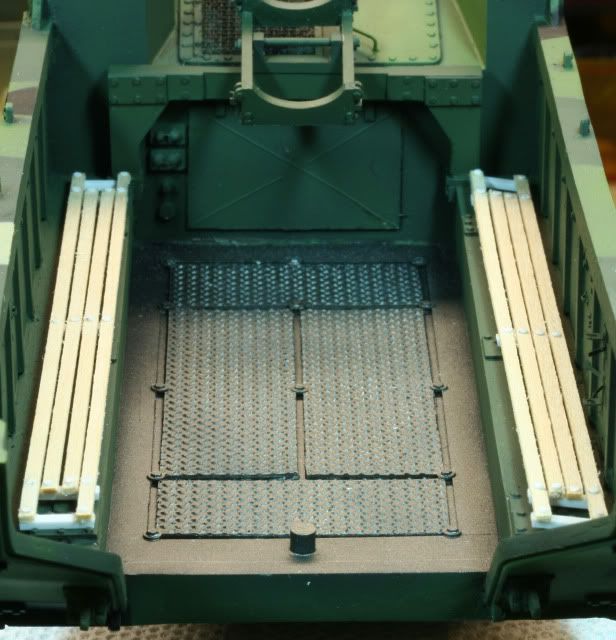
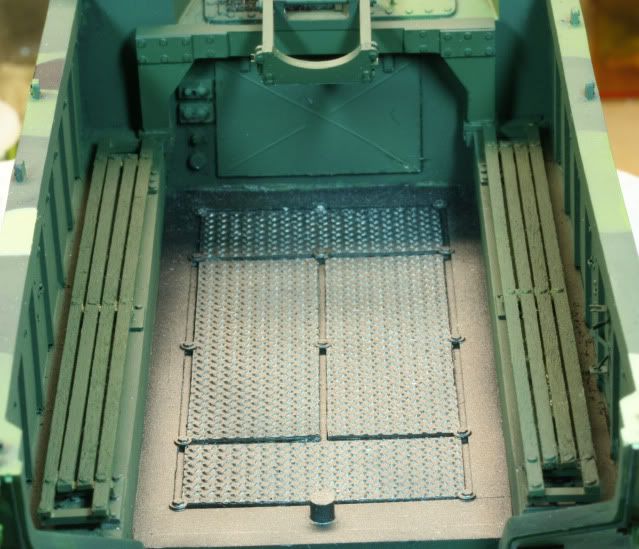
After sealing the bass wood with a clear coat, I sanded off the rough edges on the wood. Then after a thin second coat of clear, I painted the seats with Tamiya X13 JSDF Green.

I gave the tracks a bath in Blacken it and the removed a spare link from each track. I mounted the spares on the front fenders. I made the retaining bolts with punched .010 styrene and with a bologna slice from Evergreen hex rod to simulate the bolt and fender washer holding the track in place. The bolt and washer were painted with Alclad Aluminum.

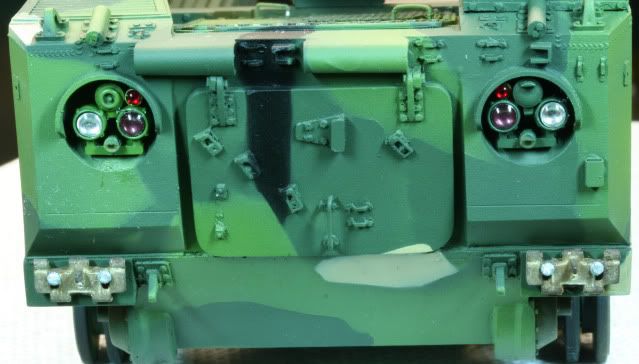
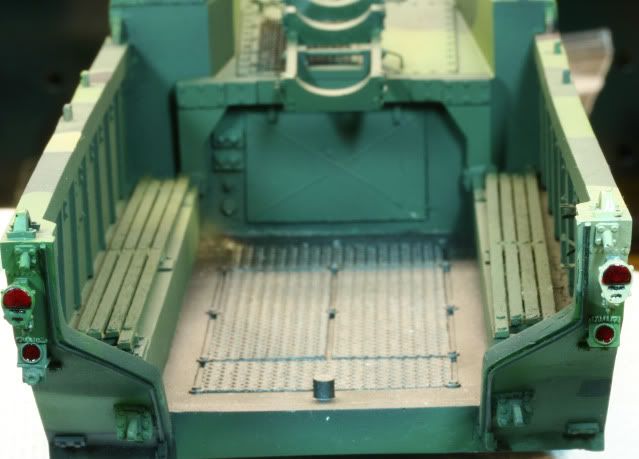
I took care of the tail lights and reflectors painting the lenses with Tamiya Clear Red and the BO lenses with Tamiya Smoke. I colored the rear door gasket with a .020 black marker.

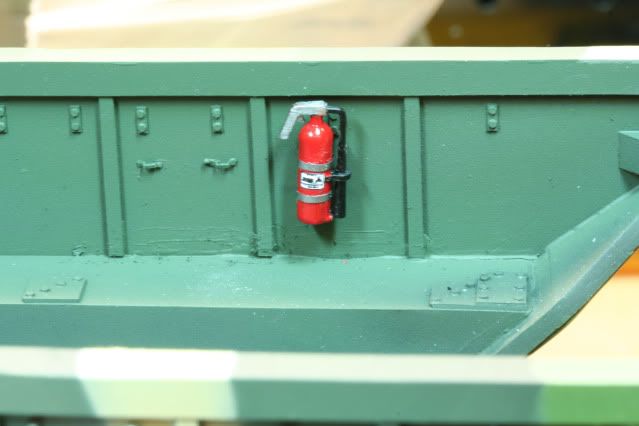
The fire extinguisher is Tamiya Red, Flat Black and Alclad Aluminum. I then decaled the extinguisher, mounted the PE retaining bands and the mounted the extinguisher in the holder on the wall of the vehicle.

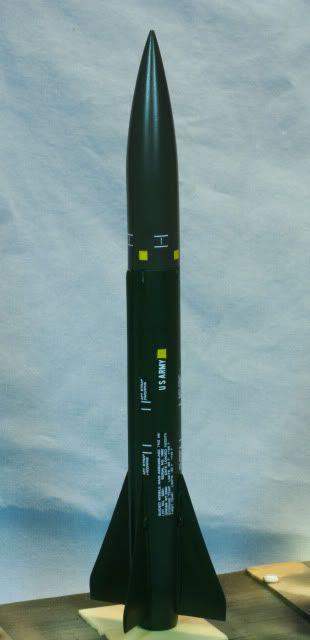
With all this going on I coated the missile with a coat of future and began the decals. The only problem with the kit decals is the do not include the US ARMY decal found on most missile. Into the old pile of decals and here is the completed missile, which still needs a seal coat of future after allowing the decals to totally set.

Well that’s it for this week. The remaining details are the tools and straps and two panels for the cargo area interior. Next week will be busy going to Misquitocon so I will see how far I can get in between the show!!

As always, all comments are welcome and thanks for stopping by.

Rounds Complete!!

"The Moral High Ground....A Great Place to Emplace Artillery."

  • Member since
    July 2006
  • From: New Jersey
Posted by redleg12 on Monday, March 22, 2010 7:00 PM

Brian - Thanks. I like using MV lenses. They have such depth to them, the look like the real thing.

Unique and different......thats me.....Wink

Rounds Complete!!

"The Moral High Ground....A Great Place to Emplace Artillery."

  • Member since
    December 2008
  • From: Goffstown, NH
Posted by New Hampshire on Monday, March 22, 2010 5:46 PM

Very cool Redleg!  I love unique and that thing sure is.  And those lenses just make everything pop beautifully!

Brian

  • Member since
    July 2006
  • From: New Jersey
Posted by redleg12 on Monday, March 22, 2010 2:57 PM

Karl -  Thanks, yep....you could haul a bunch of bikes almost......anywhere.....just drop the tail and drive off.

You know me....I love the details!!    ThanksWink

Steve - Thanks....yep, love my artillery. Only drawback is this would be in the same catagory as the M40....but it will be there.

Hopefully I can get in another build or two besides this one before AMPS......need to bring a whole battery of builds!!

Thanks again, glad you like the MERDOC camo....should bring back old memories.

Rounds Complete!!

"The Moral High Ground....A Great Place to Emplace Artillery."

  • Member since
    October 2007
  • From: N.H.
Posted by panzerguy on Monday, March 22, 2010 11:29 AM

   Mike nice job on the cammoYes. I'm looking forward to seeing that launcher set up in the back.

Man your going to have some serious ordnance for the AMPS show this year buddy!

"Happiness is a belt fed weapon"

  • Member since
    January 2007
Posted by the doog on Monday, March 22, 2010 9:36 AM

WOW, that's a cool-looking vehicle, Mike!

I'd love to have one of those to haul my bike in! lol!

Looks like a really nice project--I know you'll make it an "ultimate" thread on the matter!

  • Member since
    July 2006
  • From: New Jersey
Posted by redleg12 on Monday, March 22, 2010 5:28 AM

Gino - Thanks for stopping by

Psstoff - Thanks, those that know me know I build the different, strange and obtuse....glad you like it

Thanks again guys

Rounds Complete!!

"The Moral High Ground....A Great Place to Emplace Artillery."

  • Member since
    December 2003
  • From: Colorado
Posted by psstoff995 on Sunday, March 21, 2010 9:51 PM

Very nice work so far, your subjects are getting more and more one-off and interesting redleg

I also like that camo on this one, very nice work so far

-Chris

US Army Infantryman

  • Member since
    December 2002
  • From: Valrico, FL
Posted by HeavyArty on Sunday, March 21, 2010 9:12 PM

She's coming along great.  The headlights look really good.  Keep plugging away at her.  This one is going to be another show stopper.

Gino P. Quintiliani - Field Artillery - The KING of BATTLE!!!

Check out my Gallery: https://app.photobucket.com/u/HeavyArty

"People sleep peaceably in their beds at night only because rough men stand ready to do violence on their behalf." -- George Orwell

  • Member since
    July 2006
  • From: New Jersey
Posted by redleg12 on Sunday, March 21, 2010 8:05 PM

I was able to get some more work done this weekend. First I started with the road wheels. These are styrene from the one sprue in the kit. After removing all the road wheels from the sprue and cleaning them up, I gave them a rub down on the rubber section with a scotch-brite pad to give a wear effect. Then they were sprayed with my tire mix 50/50 Tamiya Flat Black and NATO Black.

After the black dried it was time for the circle stencil. Half the road wheels were painted with Poly Scale TAC Dark Green and the other half Poly Scale Light Int. Green. The drive sprockets are from the Fruiie tracks set and were also painted one of each color.

I attached the road wheels and left the drive sprocket and idler wheel off until I am ready to mount the tracks

Back to the chassis, the headlights set are also from the styrene sprue. I drilled the headlights out and replaced them with MV lenses clear L116 and black L118 headlights.  There are no turn signals supplied with the kit so I scratch built them using 2 mm tubing and MV lenses L601. The remaining styrene light assemblies were then also added.

The front of the M667 has a beam support and missile warhead cradle. These are resin parts supplied with the kit.

In between glue and paint drying I finished filling on the MGM-52 missile and after sanding I painted the motor section Tamiya X13 JSDF Green.

To finish the missile, the warhead section was painted with Tamiya Khaki Drab

That’s it for this week. Still have tools, fire extinguisher and some small detail plus finish the tracks for next week.

As always, all comments are welcome and thanks for stopping by.

Rounds Complete!!

"The Moral High Ground....A Great Place to Emplace Artillery."

  • Member since
    July 2006
  • From: New Jersey
Posted by redleg12 on Wednesday, March 17, 2010 7:22 PM

Bill - Not a problem.....we all miss some updates now and then. Yep.....it is always great to move to the paint booth....it's like getting near the end of a road march...now I can get down to buisness!! Wink

Marc - Thanks for stopping in.

Many moons ago I not only build plastic model but built and competed in model rocketry.....but that's a story for about two beers long BeerBeer

Thanks again guys.

Rounds Complete!!

"The Moral High Ground....A Great Place to Emplace Artillery."

  • Member since
    April 2005
  • From: Piscataway, NJ!
Posted by wing_nut on Wednesday, March 17, 2010 3:13 PM

Looks very cool Mike

the missile reminds me of when I used the glue fins and a balsa nose cone right on the Estees rocket engine.  Glue a tube on the side and launch.  Oh baby did they go high when not pushing a whole rocketWhistling

Marc  

  • Member since
    July 2004
  • From: Texas
Posted by wbill76 on Wednesday, March 17, 2010 1:32 PM

This update slipped past me somehow Mike, nice work on the camo pattern. Getting closer to the finish line with this one for sure. Yes

  • Member since
    July 2006
  • From: New Jersey
Posted by redleg12 on Wednesday, March 17, 2010 5:29 AM

Gary - Thanks for stopping by and for the comments.  Yep....I have the white and black pigments....going to give it a try this weekend. The paint pattern is fine, but the real deal always had that slightly faded...chalky look.

Again thats for the tip.

Rounds Complete!!

"The Moral High Ground....A Great Place to Emplace Artillery."

JOIN OUR COMMUNITY!

Our community is FREE to join. To participate you must either login or register for an account.

SEARCH FORUMS
FREE NEWSLETTER
By signing up you may also receive reader surveys and occasional special offers. We do not sell, rent or trade our email lists. View our Privacy Policy.