SEARCH FINESCALE.COM

Enter keywords or a search phrase below:

1/35 M561 Gamma Goat, WIP, 09/19/10, Weathering

51056 views
144 replies
1 rating 2 rating 3 rating 4 rating 5 rating
  • Member since
    June 2009
Posted by Guney on Thursday, June 24, 2010 6:36 PM

Hi Mike

I want to buy a Gama Goat....Sent e-mail to Commander Models for a private question.....But they never answer me....???

Do you know any special or another thing to help me contact them...?


Thank you.....Smile

  • Member since
    July 2006
  • From: New Jersey
Posted by redleg12 on Thursday, June 24, 2010 7:19 PM

Guney - I emailed Jon at CM to invite him to the thread for a peek and mentioned your email. He is at

ironship@vic.com or 888-476-6744.

Hope that helps!!

Rounds Complete!!

"The Moral High Ground....A Great Place to Emplace Artillery."

  • Member since
    October 2007
  • From: N.H.
Posted by panzerguy on Thursday, June 24, 2010 8:49 PM

redleg12

Steve - for you....

http://i177.photobucket.com/albums/w226/redleg12/15.jpg

  LOL These guys look like they forgot a very important piece of equipment for the Goat

We called them  EPD's (emergency propulsion devices)


"Happiness is a belt fed weapon"

  • Member since
    July 2006
  • From: New Jersey
Posted by redleg12 on Friday, June 25, 2010 5:14 AM

LMAO.....I don't see a stream from the bilge pump Surprise....they may have just floated their wat down river!!

Rounds Complete!!

"The Moral High Ground....A Great Place to Emplace Artillery."

  • Member since
    March 2007
  • From: Michigan
Posted by tonka on Friday, June 25, 2010 3:11 PM

Those had to be Marines!!! 

]

  • Member since
    April 2003
  • From: 41 Degrees 52.4 minutes North; 72 Degrees 7.3 minutes West
Posted by bbrowniii on Saturday, June 26, 2010 3:21 PM

Mike

You find all sorts of little gems, don't you!!!  

I never had the (mis)-fortune to cross paths with a Goat, though I heard plenty of stories.  Your little project should be fun to watch.  I certainly hope you get to set up the entire FDC.  That would warm my mortarman's heart...

Do I sense a best in show....?

'All that is necessary for the triumph of evil is for good men to do nothing' - Edmund Burke (1770 ??)


  • Member since
    July 2006
  • From: New Jersey
Posted by redleg12 on Sunday, June 27, 2010 7:12 AM

Boyd - Thanks for stopping in. You know me...I'm not a Tiger or Sherman (no offense guys)....I look at my modeling as helping to broaden everyones horizon Wink

As far as the Funny Duck Club.....leaning heavy to yes...I have all the items as I scratched together a "kit" that I made from scratch for someone a few years back....its time to dust it off and build it.

It is where I got my start using sticks & charts to calculate the ballistics....Eventually there was a computer called FADAC

A 300 lb calculator with tubes for numbersSurprise....

I won't do a FADAC but I will try to get the rest

Rounds Complete!!

"The Moral High Ground....A Great Place to Emplace Artillery."

  • Member since
    July 2006
  • From: New Jersey
Posted by redleg12 on Sunday, June 27, 2010 9:34 PM

Summer chores and other family outings take’s a toll on the bench time, but I found some time this week

I did a little more work on the power section. I mounted the bumper, then PE headlight supports which I upgraded by adding the 3 nut heads on each side using PE nuts. I also added the back support for the cab cover using .040 styrene coated wire.

The cargo section needs a lot of work. The kit does not come with bows and the cargo sides in resin are not the greatest.

First I made the cargo side railing using .060 styrene channel.  After gluing those in place, I fabricated the front cargo railing which is made from .040 styrene coated wire. The kit has the front the same as the sides but the actual Goat used channel for the sides and tubing for the front.

The bows were also fabricated from .040 styrene coated rod. These were all drilled and the glue into place. The “rod boxes” which is actually the bow holder on the full scale, were fabricated using some .060 channel.

 The reflectors are made using .020 punched styrene. First a lower layer circle then an upper layer circle with the center punched out. There are 4 reflectors. Two in the rear and two on the sides.

That’s it for now. More scratch work coming

As always, your comments either positive or negative are always welcome.

Rounds Complete!!

"The Moral High Ground....A Great Place to Emplace Artillery."

  • Member since
    March 2007
  • From: New york
Posted by JEFFB on Sunday, June 27, 2010 10:11 PM

I always hoped one of these would show up! During my days on FT.Hood, they had a Goat on display..always admired it.

Great work so far..I'm riding along on this one!

Jeff

  • Member since
    July 2006
  • From: New Jersey
Posted by redleg12 on Monday, June 28, 2010 5:28 AM

Jeff - Welcome aboard, enjoy the ride!!

Rounds Complete!!

"The Moral High Ground....A Great Place to Emplace Artillery."

  • Member since
    December 2002
  • From: Valrico, FL
Posted by HeavyArty on Monday, June 28, 2010 6:57 AM

The cargo bed looks awesome.  Great job on the bows and rails.

Gino P. Quintiliani - Field Artillery - The KING of BATTLE!!!

Check out my Gallery: https://app.photobucket.com/u/HeavyArty

"People sleep peaceably in their beds at night only because rough men stand ready to do violence on their behalf." -- George Orwell

  • Member since
    July 2004
  • From: Texas
Posted by wbill76 on Monday, June 28, 2010 9:18 AM

Ditto the comments on the cargo bed, outstanding work there Mike! Yes Yes

I hear you about things stealing bench time, we are having work done on the house and between riding herd on contractors and taking care of everything else, I haven't had any bench time at all this week so have to live vicariously for the moment through the build log threads here. Wink

  • Member since
    July 2006
  • From: New Jersey
Posted by redleg12 on Monday, June 28, 2010 9:39 AM

Gino - Thanks...I always love scratching..Surprise

Bill - Thanks, ahhhh......nothing like sucking up time like work on the house.....the almighty sponge!! Glad to supply you with a "fix"....hopefully you can get back soon. Happy contractingGeeked

Rounds Complete!!

"The Moral High Ground....A Great Place to Emplace Artillery."

  • Member since
    June 2008
  • From: Iowa
Posted by Hans von Hammer on Monday, June 28, 2010 9:48 AM

redleg12

Guney - I emailed Jon at CM to invite him to the thread for a peek and mentioned your email. He is at

ironship@vic.com or 888-476-6744.

Hope that helps!!

Rounds Complete!!

Just talked to Jon about buyin' one of those... YIKES!!!

BUT... I'm gonna break my $35.00 limit to get it if Household 6 goes for it...  (Gotta use her card, mines maxed-out after a buying spree on Ebay last week...)

Your work so far has sold me, Redleg... dammit...

  • Member since
    July 2006
  • From: New Jersey
Posted by redleg12 on Monday, June 28, 2010 10:52 AM

Hans - Jon is a great guy..... but WARNING This kit is not for the faint of heart. Much of the assembly must be figured out from reviewing actual 1 to 1 photos. It is a nice resin kit BUT the directions are essentially non existant.

What I am posting here will help but as you pull the lanyard this, the kit is a "modelers" kit not an "assemblers" kit

I know you are a modeler...just want to be sure you are not surprised!!

Rounds Complete!!

"The Moral High Ground....A Great Place to Emplace Artillery."

  • Member since
    June 2008
  • From: Iowa
Posted by Hans von Hammer on Monday, June 28, 2010 12:17 PM

What I'm surprised at is the fact that I'm gonna spend the money.. Now if we can just get the guy to do a freakin' CUCV...

  • Member since
    March 2007
  • From: Michigan
Posted by tonka on Monday, June 28, 2010 12:27 PM

Mike,,great job on the bows..

Can I ask a question??  You stated that the bows are "styrene covered rod"....How did you do that?

I am trying to bend regular styrene rod now for the bows on my GMC deuce and 1/2 and having no luck..thinking of inserting a wire into a hollow rod,,is that how you did it?

Any help is appreciated,,,, I really do learn a lot from your builds!

Thanks

Fire for effect!

Kevin

]

  • Member since
    June 2008
  • From: Iowa
Posted by Hans von Hammer on Monday, June 28, 2010 12:29 PM

You stated that the bows are "styrene covered rod"....How did you do that?

Styrene-covered rod is available from Evergreen or at your LHS... It's simply wire covered with styrene... It bends fairly  easily, holds its shape, and is gluable with regular modeled cement..

  • Member since
    April 2005
  • From: Piscataway, NJ!
Posted by wing_nut on Monday, June 28, 2010 12:56 PM

Mike that is some nice looking scratch work.

Marc  

  • Member since
    July 2006
  • From: New Jersey
Posted by redleg12 on Monday, June 28, 2010 1:07 PM

Kevin - My buddy Hans alredy gave you the message. Evergreen or Plastistruct, whatever flavor you LHS has or Plastistruct will take mail orders.

As Hans stated, it is gluable, holds paint  and for some items like bows, I prefer it. I have a round head needle nose and just hold and bend. The only thing is don't squeeze too hard where you are holding as it will dent the styrene coating.

Hans - Thanks for the message pick up.....As far as buying the kit.....your not cheap, just frugal!!

Marc - Thanks, love to be scratching....I think it is the engineer in me!

Rounds Complete!!

"The Moral High Ground....A Great Place to Emplace Artillery."

  • Member since
    June 2008
  • From: Iowa
Posted by Hans von Hammer on Monday, June 28, 2010 3:27 PM

Yeah... Frugal.. That's it.. That''ll work...

I'm afraid now that if I buy it, Tamiya will release an injection-molded one for 30.00 the day after I finish the resin Goat...

  • Member since
    April 2003
  • From: 41 Degrees 52.4 minutes North; 72 Degrees 7.3 minutes West
Posted by bbrowniii on Monday, June 28, 2010 6:08 PM

Hans von Hammer

I'm afraid now that if I buy it, Tamiya will release an injection-molded one for 30.00 the day after I finish the resin Goat...

No way Hans... they'd release it the day after you started your Goat!!! Stick out tongue

'All that is necessary for the triumph of evil is for good men to do nothing' - Edmund Burke (1770 ??)


  • Member since
    December 2008
  • From: Goffstown, NH
Posted by New Hampshire on Monday, June 28, 2010 6:59 PM

You have some top notch scratch building work going on there!  Your goat is looking damn fine so far!

Brian

  • Member since
    July 2006
  • From: New Jersey
Posted by redleg12 on Monday, June 28, 2010 7:17 PM

Boyd - It is a way of life... I still have a Hobby Fan resin Ontos on the shelf......I sold a resin M198 at a loss once the Trumpeter kit came our......that's why I am building my goat....

Then again, I could be scared, never had bought the model and no one makes it in styrene...by time I try to get it in resin it is OOP and I pay through the nose......

You cannot win.....if you are real lucky, on a good day you break even!

Brian - Thanks, having a ball scratching Surprise (humm better not reverse those words)

Thanks again

Rounds Complete!!


"The Moral High Ground....A Great Place to Emplace Artillery."

  • Member since
    March 2007
  • From: Michigan
Posted by tonka on Monday, June 28, 2010 9:29 PM

Hans and Mike,,Thanks for the info on the styrene rod,,will check the LHS this week,,,never saw it before,,or looked for it I should say!

Kevin

]

  • Member since
    June 2008
  • From: Iowa
Posted by Hans von Hammer on Tuesday, June 29, 2010 8:20 AM

No sweat... Scratchbuilding materials are my life, lol...  I've built a number of supprt equipment items from it and a few other details like truck bows with it... I used it for the support system of the TOC extentsion of an M577, truck bows, aircraft folding engine hoists, aircraft maintnence stands, even gun barrels.. The latter I did by cutting a piece of the rod, then removing a bit of the styrene (like stripping an electrical wire), then sliding the plastic forward a skoshi-bit to leave a hollow tube, and gluing the wire into a drilled hole. 

It's great stuff if you need to make something with a tubular frame that has a lot of strength, but don't want to solder brass rod...  I usually just stock up on various sizes of Evergreen rod & strip avery time I go the LHS... It's cheap, and you'll always find something you need it for...

Using it here to make the turret basket for a Panzer IV, along with a medicine-bottle cap and some screen for treadplate:

Ok... Done hijacking your thread, 'Leg...

  • Member since
    July 2006
  • From: New Jersey
Posted by redleg12 on Tuesday, June 29, 2010 11:06 AM

Hans....no problem, it was great for the little quick toot....besides fun, this is supposed to be a learning and exchage of ideas.

Thanks again for covering all 6400 mils Wink

Rounds Complete!!

"The Moral High Ground....A Great Place to Emplace Artillery."

  • Member since
    July 2006
  • From: New Jersey
Posted by redleg12 on Sunday, July 11, 2010 10:24 PM

I was off on vacation for the week of July 4, now I am trying to get back into the routine.

I was able to get some work done this weekend. First the trailer section was completed. This included mounting the kit supplied tail lights, PE bumpers and suspension system for the wheels. The suspension is quite a job and the instructions are absolutely NO help. I spent a bunch of time looking at the 1 to 1 photos to figure it out.

On the scratch side, I added the airborne lifting rings. There are two on each side and two in the back. These are .040 styrene rod with the loops made from 26 gauge wire. The rod is drilled and the wire mounted through the holes. I also added the canvas tie down hooks from some leftover PE, four on both sides and two in the back.

With the tow hitch mounted in the front the trailer is ready for priming

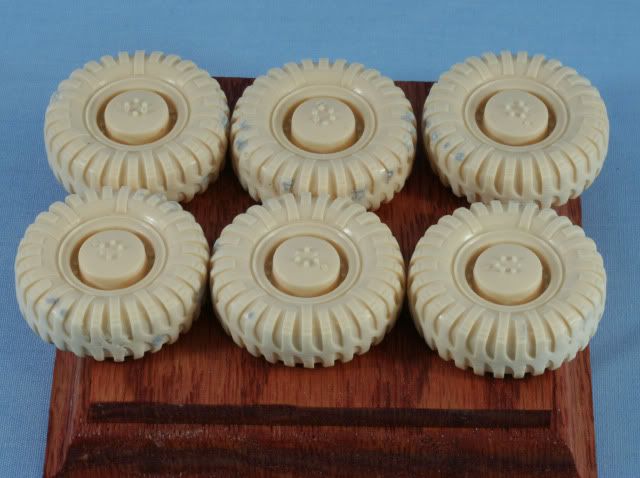
I worked on the tires which needed a bunch of sanding to get rid of the center mold seam and then to fill some small air bubble voids. The tires were a couple of hours just to get ready for the paint booth.

Back on the power section, I mounted the kit supplied wind shield and I am working on scratching the windshield supports. You can see the styrene coated wire on either side. I also mounted the kit supplied engine compartment latches and handles.

I added a lower access plate on the driver’s side using Archer surface details.

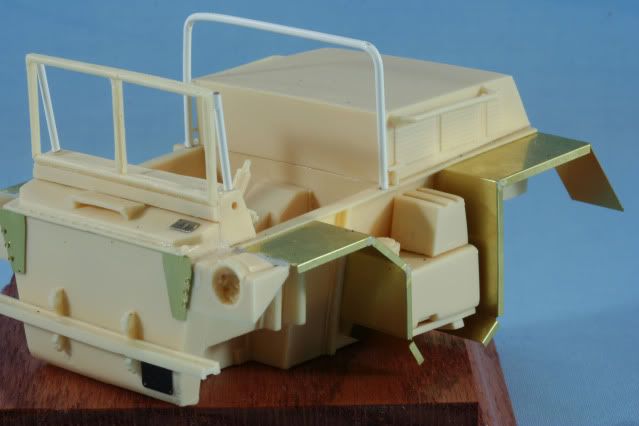
I still have all the front turn signals and BO lights to mount along with the suspension for the 4 power section wheels. That is where I am at for the moment.

As always, your comments either positive or negative are always welcome.

Rounds Complete!!

"The Moral High Ground....A Great Place to Emplace Artillery."

  • Member since
    June 2005
  • From: Massachusetts
Posted by minimortar on Monday, July 12, 2010 9:39 AM

Awesome work, awesome subject  (as usual!) Mike! Another woman swooner/show stopper for sure!

Had a mutual friend here yesterday for a short visit. Hoping the next time, that you'll be here as well. At least for a short visit, long enough for some old fashioned boot in the (my) *** motivation.

Thanks,
Kevin Keefe

Mortars in Miniature
A Scale Model (Plus!) Collection of the Infantryman's Artillery

  • Member since
    January 2007
Posted by the doog on Monday, July 12, 2010 9:51 AM

Mike,

HOLY @%#$!!!! Man, you have really gone to town on this baby since I've last looked in! This is a spectacular project thus far, and a real tour-de-force of resin modeling--NEVER easy--and detailing! The unpainted model looks formidable so far! Great work! Stick out tongue

I give you secondary and additional kudo's for prevailing over and through this resin build. I know how difficult these kits can sometimes be--and the lack of help form the instructions doesn't help!

JOIN OUR COMMUNITY!

Our community is FREE to join. To participate you must either login or register for an account.

SEARCH FORUMS
FREE NEWSLETTER
By signing up you may also receive reader surveys and occasional special offers. We do not sell, rent or trade our email lists. View our Privacy Policy.