SEARCH FINESCALE.COM

Enter keywords or a search phrase below:

M48 Patton FINISHED! Page 16

104017 views
278 replies
1 rating 2 rating 3 rating 4 rating 5 rating
  • Member since
    January 2007
M48 Patton FINISHED! Page 16
Posted by the doog on Saturday, September 4, 2010 9:16 PM

 Hi guys,

Remember me?!? Yeah, it's been a busy year, for sure, and I haven't had much time at the bench. Been traveling a lot, got engaged to Jenn, and I'm back out the door to Spain on Tuesday--but I managed to find some time to sit down and start a new WIP. I thought I'd throw you all for a bit of a loop by doing something in Olive Drab! lol!

I'm sure you're all familiar with the Tamiya M48 Patton. The Monogram "Patton tank" was actually the first tank I ever built,  so this one has a bit of nostalgia for me. I got some goodies to dress it up, and hope I still have what it takes to make a decent model these days!

Here's what I got;

The tracks are pretty much a necessity; the Legend kit there has a nice mantlet and accurate jerry cans and stowage; I'm going to put a dozer blade on it (unless someone tells me that it's not accurate for some reason--but I do have quite a few photos with it) and of course, I have some Verlinden figures to go in the hatches.

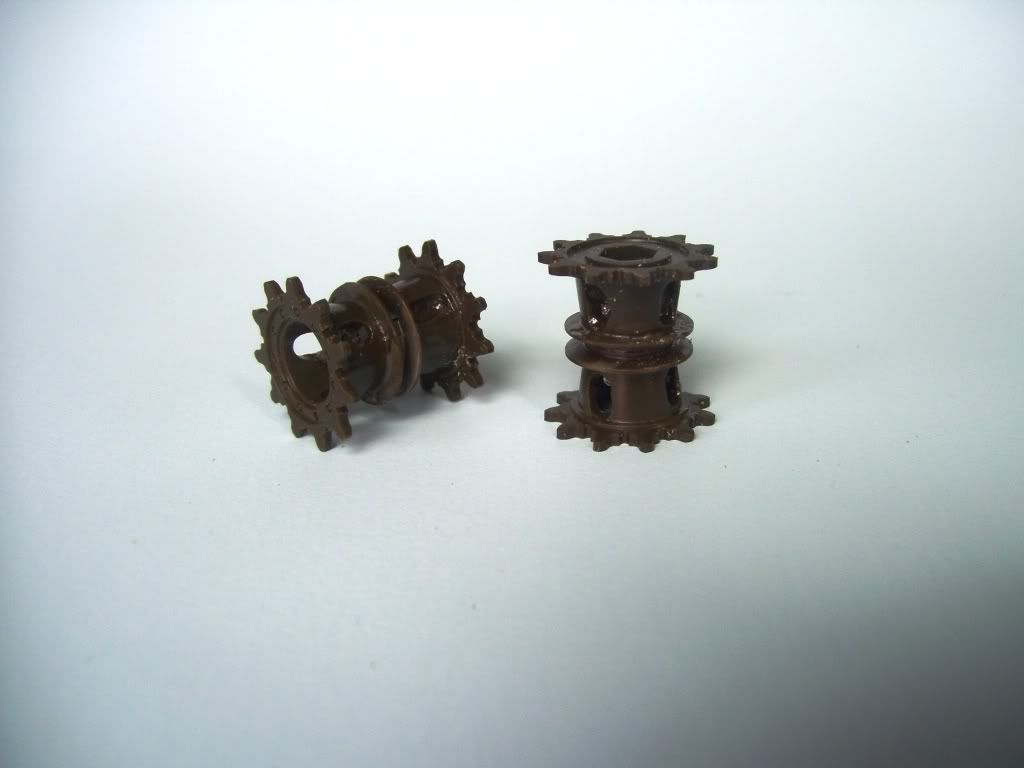
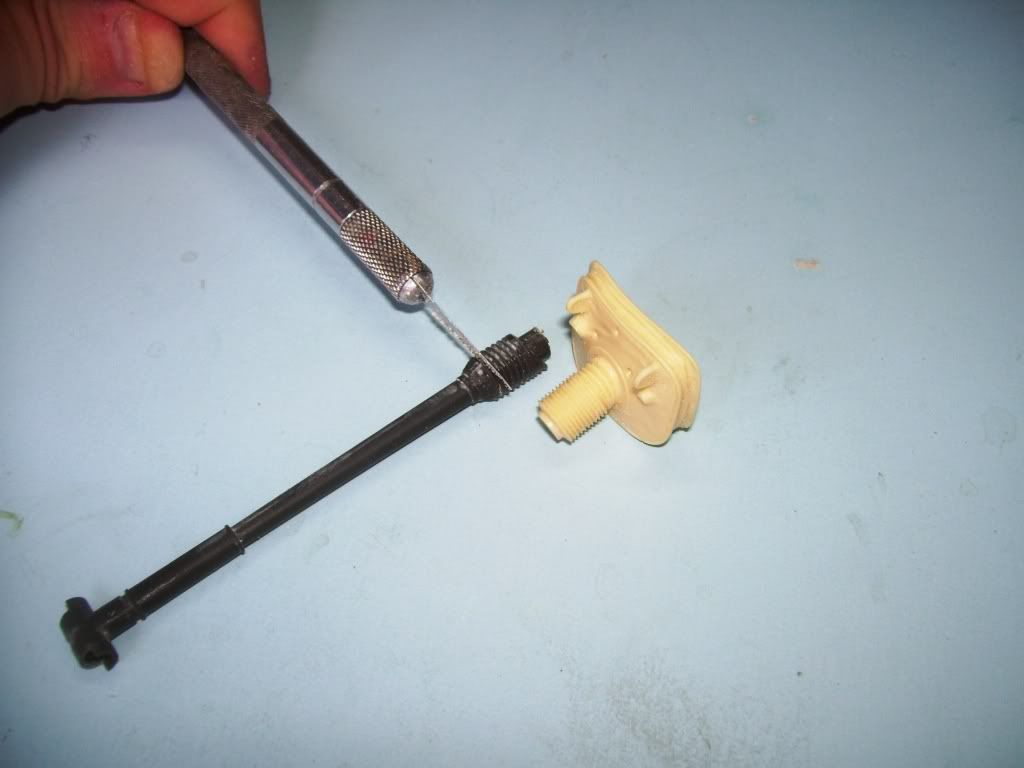
The first thing I did was to drill out the lightening holes in the sprockets. It's a tricky thing to get these even, but I'm happy with the results--thank God for Dremel tools, lol.

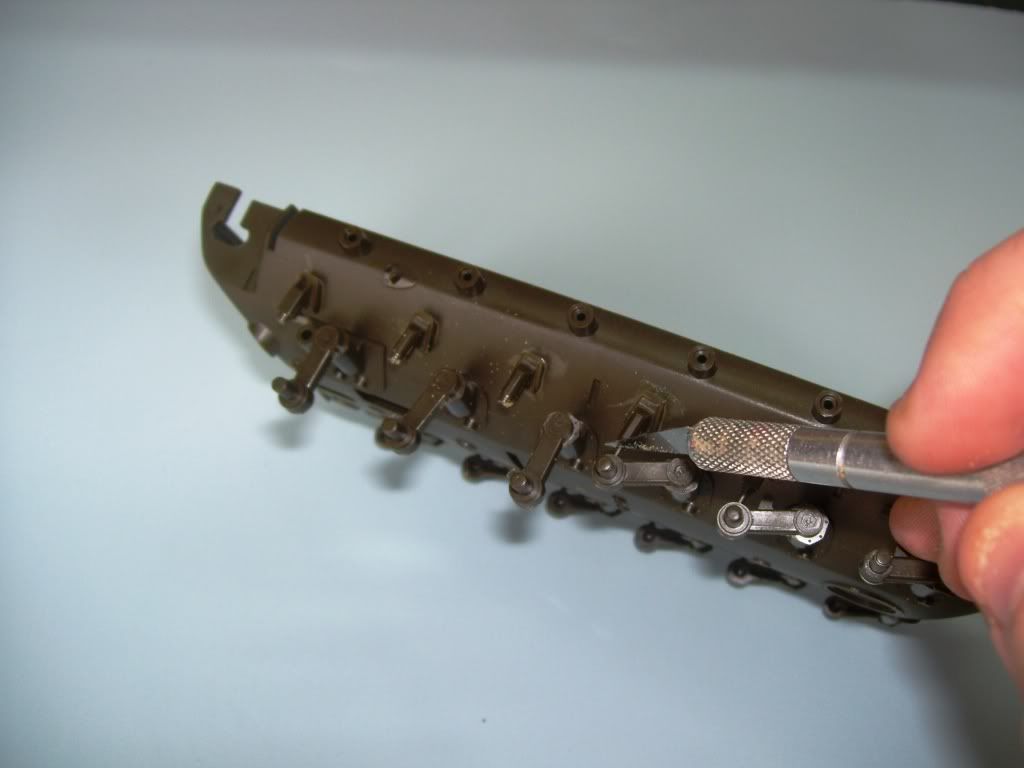
So now comes that suspension mod, because the model is based on one that had no engine in it, so it sits high. (Thanks to HeavyArty for providing the nice list of corrections and mods that are recommended!)

The way I did this was to glue ONLY the mounts for the suspension arms to the hull; the actual arms to which the wheels attach were left UN-glued. I decided that the easiest way to lower the suspension was to saw the little shock posts there--as I saw through them, the wheels fall away, as they aren't glued. They will be cleaned up and then glued at once, so that I can then position them all at the same height together.

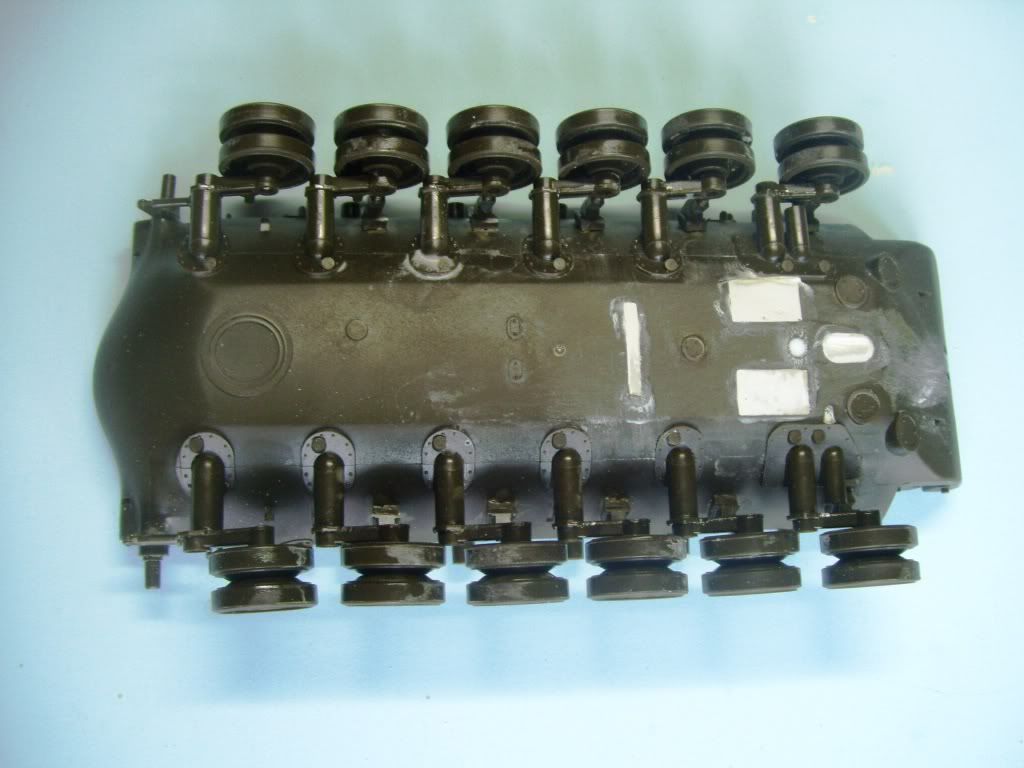
And when they were all snipped and cleaned up, I put the wheels on and glued to posts to the ends of the shocks now. I'm not sure if this was the best, or most accurate way to do this, but in my modeling book, it says "If it looks right, it's fine". Whistling.....Wink It DID lower the sit of the beast....

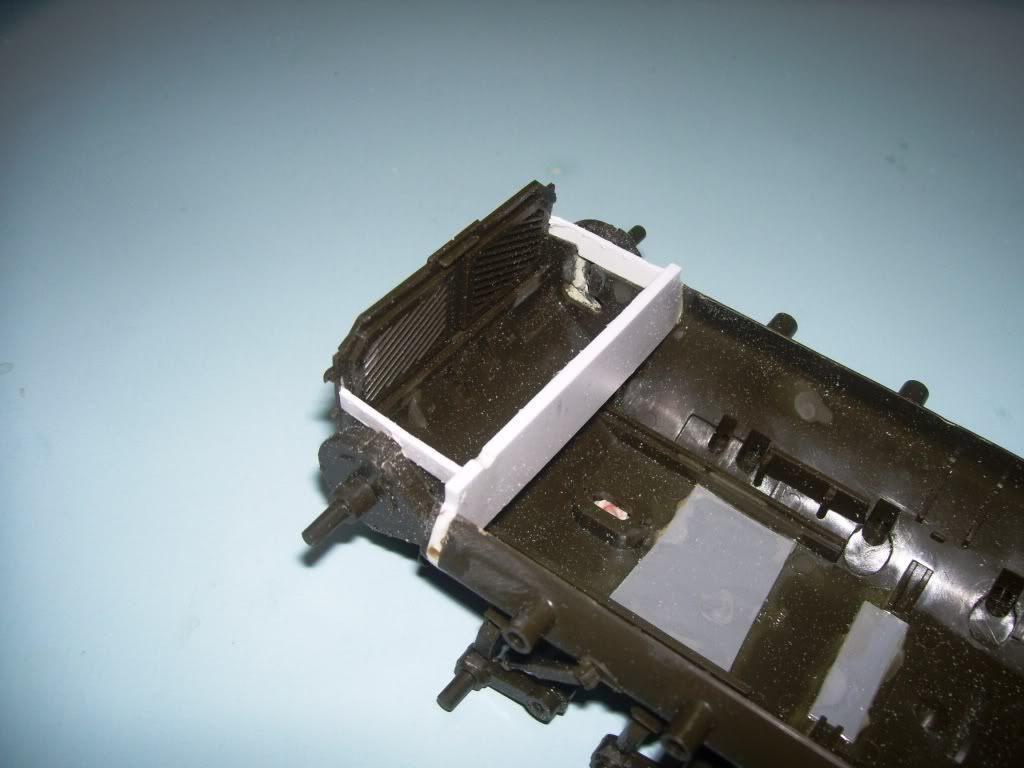
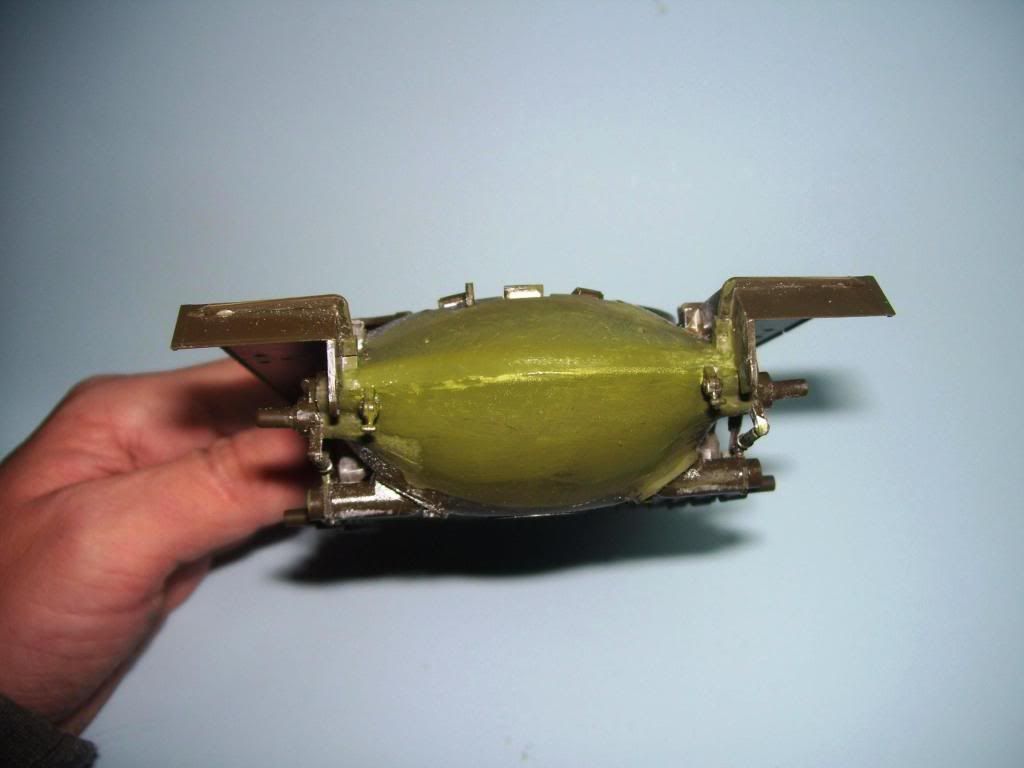
Next, you have to fill in the motorization holes;

...and the weird open area above the rear idlers, and there are also little slots by the front sprocket...

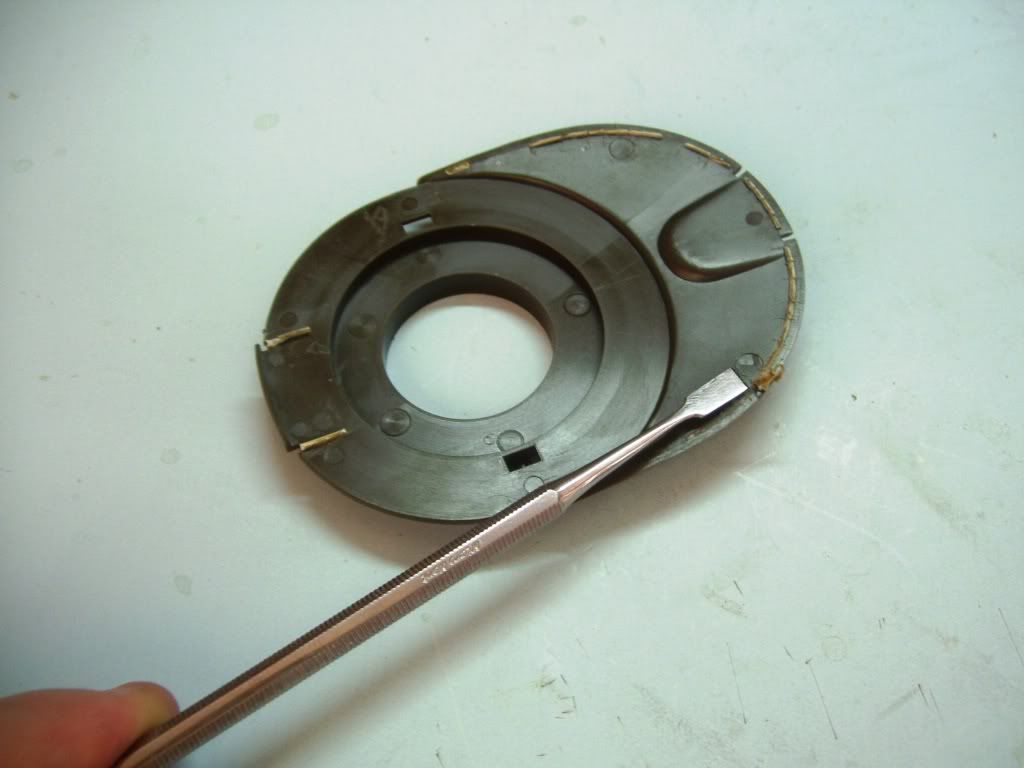
Next, you have to shim the turret to increase the turret height. Here's how I did it. First, with my MicroMark mini-chisels, I scrape away the line-up moldings inside the turret floor...

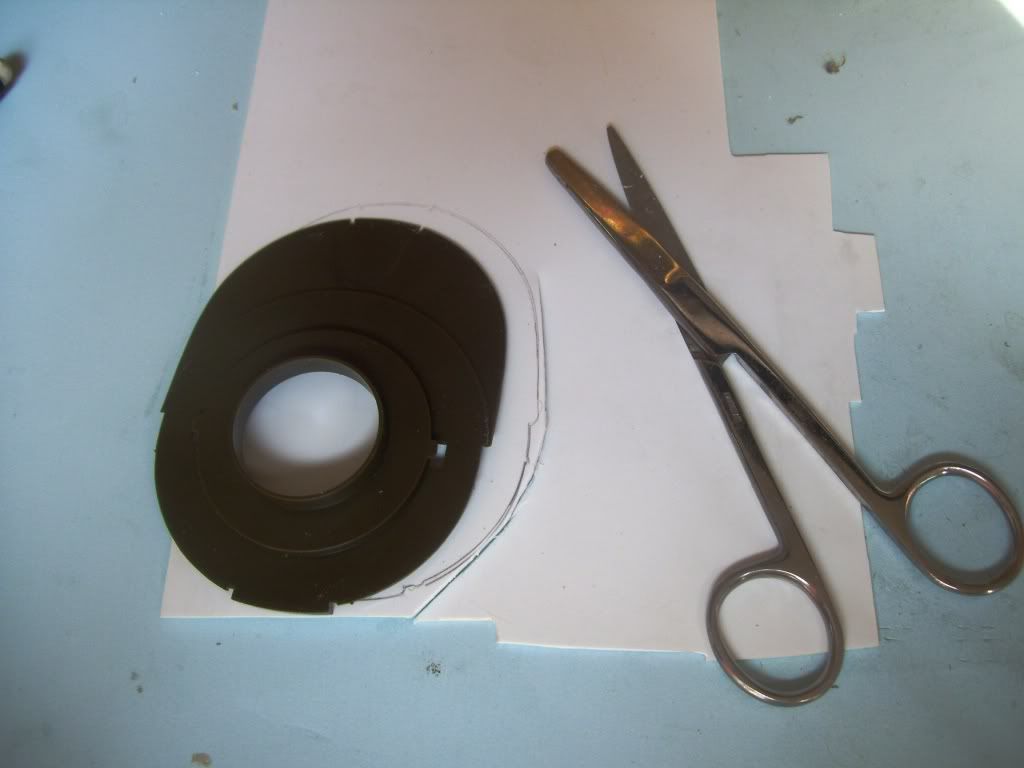
And then I trace the outline from a piece of plastic that is just shy of 1.5 mm thick--no, I don't know exactly the dimensions; this was a piece of scrap. I literally cut it out with these gnarly scissors.

And then sandwhiched another thinner piece of reddish styrene in order to bring it up to 1.5 mm. I clamped these and let them sit.

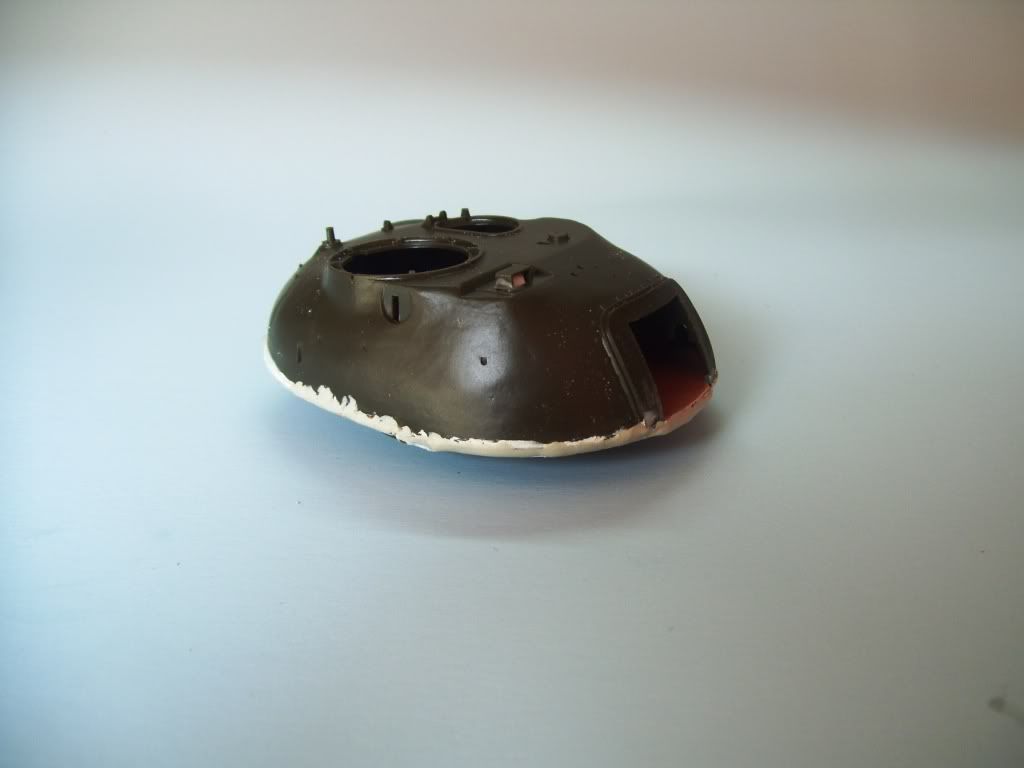
I needed to put some Squadron putty to smooth out the joint, which was eventually sanded and polished to shape.


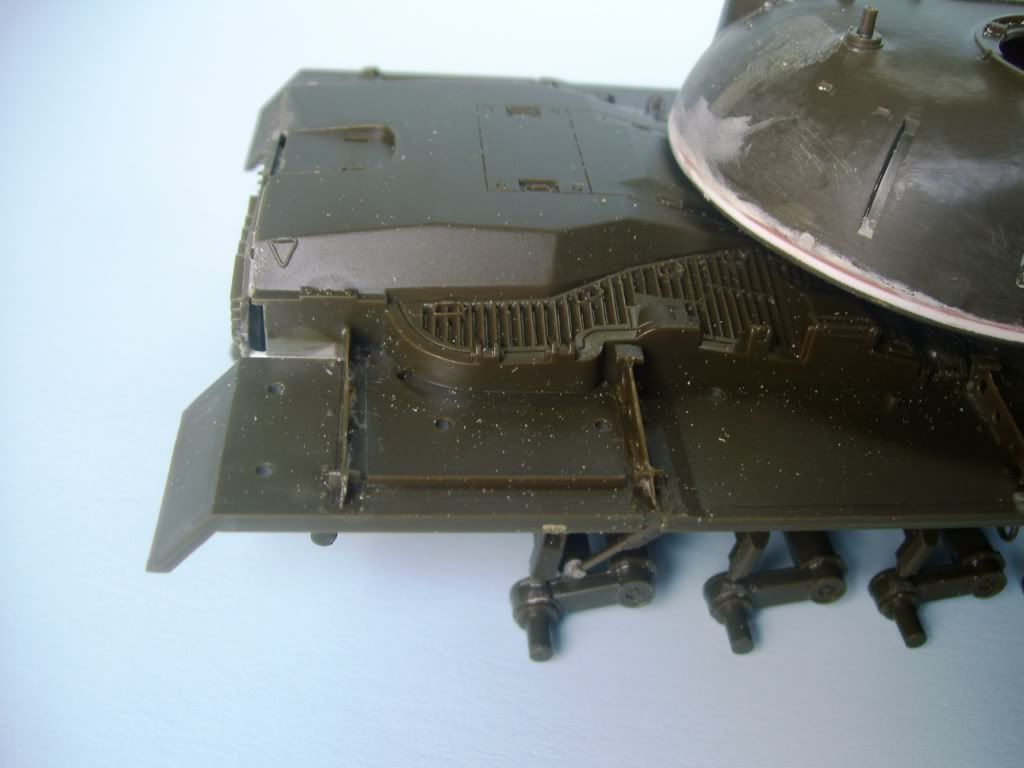
The "Tweaks list" says that the kit is known for the fender supports being overscale and rec's replacing them with either PE or scratched ones--I just spent some time thinning the kit parts with a good ol' #11 and some emery boards. I think they look fine.

Another fix--roughening up the casting.  Using my Most Valuable Modeling Tool--the Dremel--I bounce and swirtl a metal-gouging tip around.

Then coat it with some Testor's Liquid glue..

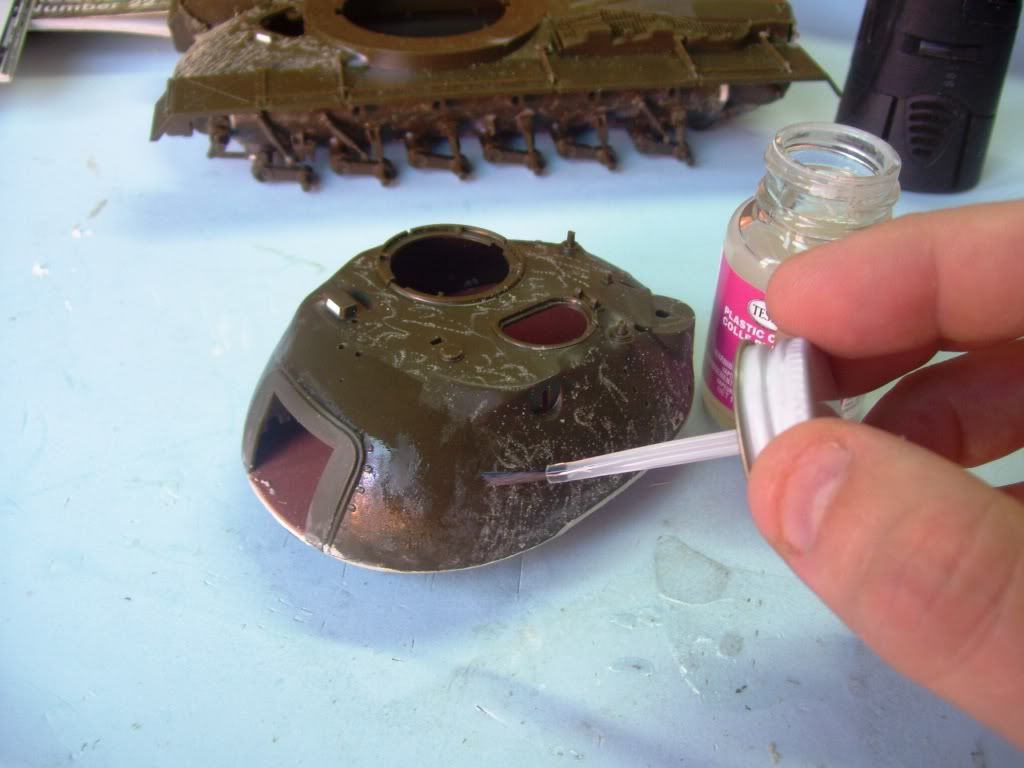
And this is what I got.

And the hull...

I dunno if I screwed this up, or if this is how the kit joins in front? Either way, it's not doog-worthy. The real tank had a sharp hull front, but not THAT sharp with the overhanging lip, lol.

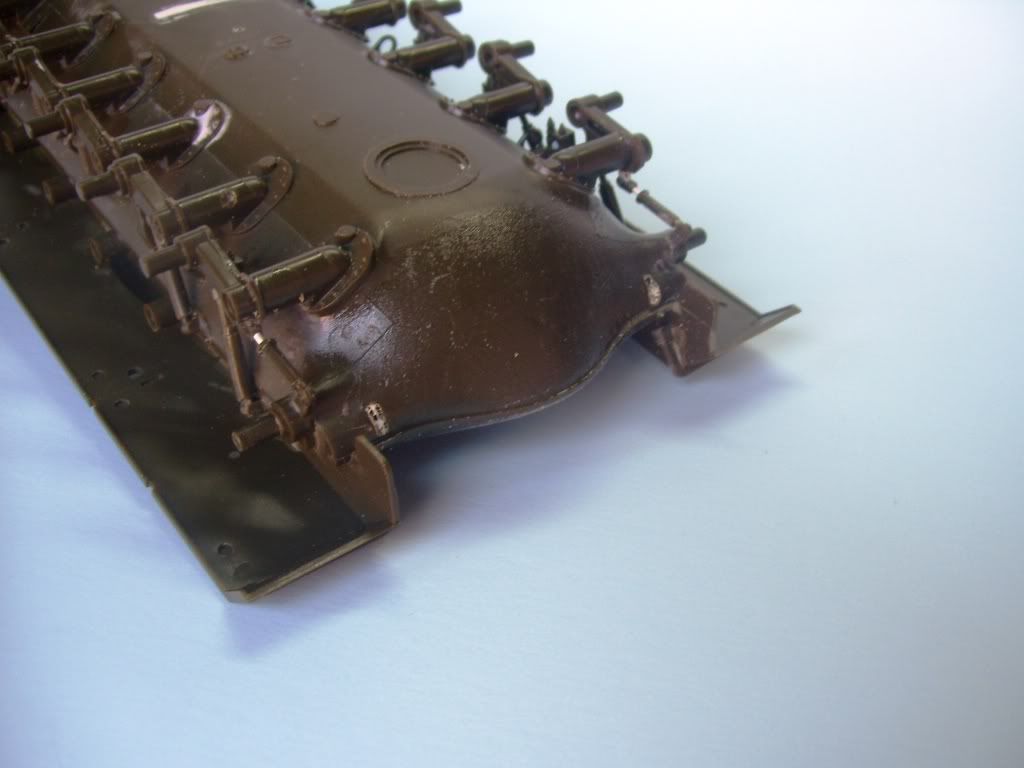
I put a .060 rod in that gap, and then sealed it in with White Putty. After it had dried a good 8 hours or so, I filed it into shape with a combination of sanding sticks, sandpaper, and my Dremel with a grinding stone head.

I threw a quick coat of paint on it to see how it'll look. Not bad; I'll take it...

To mount the gun, you have to cut here on the kit part to mate it to the LEGEND mantlet.

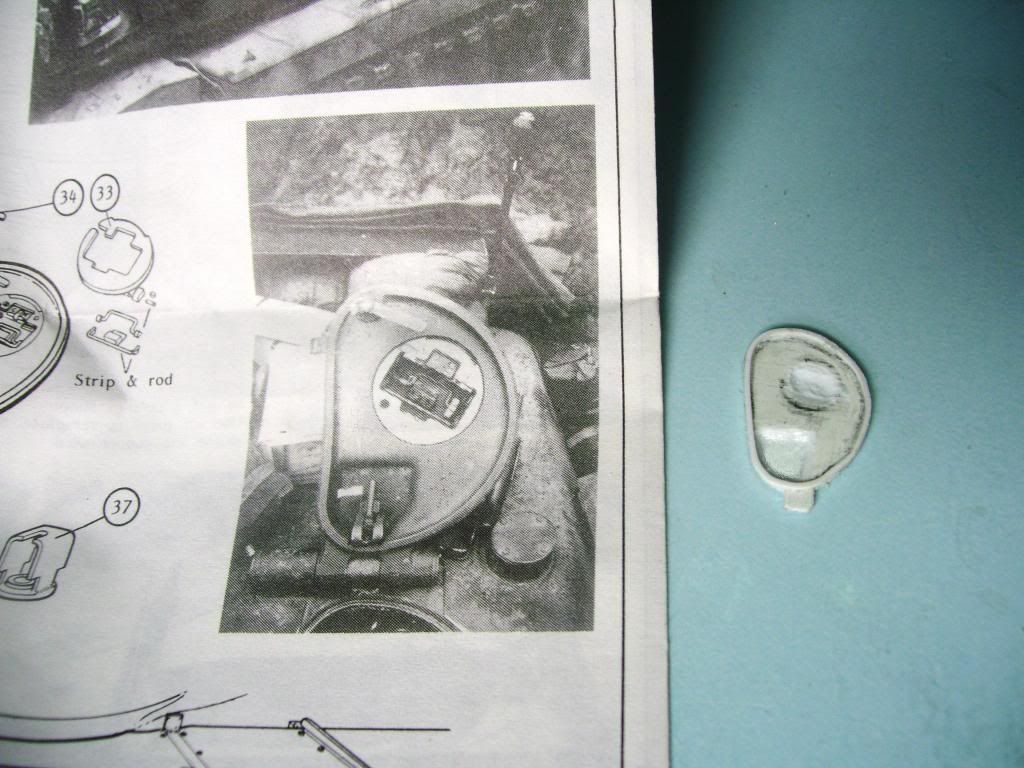
The loader's hatch--MOST un-doog-worthy--and not even accurate. You can see the part "opened" on the left, I decided to just make a new one. IN the middle the hatch is shown "closed; I cut out a blank from .040 plastic, and then checked the fit...

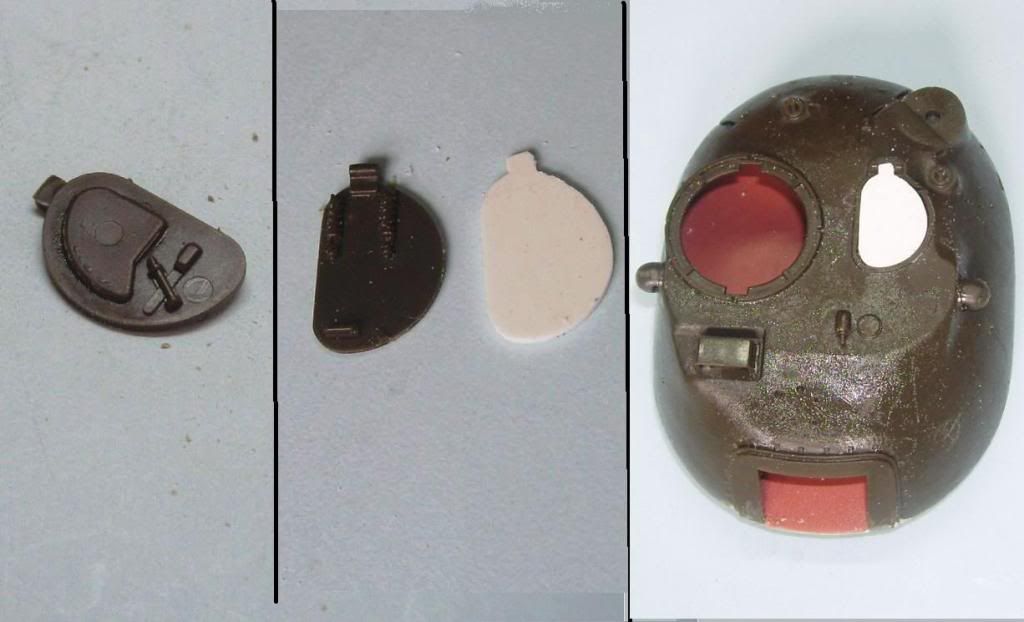
Using my ol' Dremel, I hollowed out some of the recesses in the hatch---you can see the real one there from a Verlinden M60-M48 update with PE that I remembered I had. I only am using a very few pieces from this. (The fender stays were inaccurate for an M48, by the way). I also put a .020 x .020 strip around the edges to simulate the sealing rim.

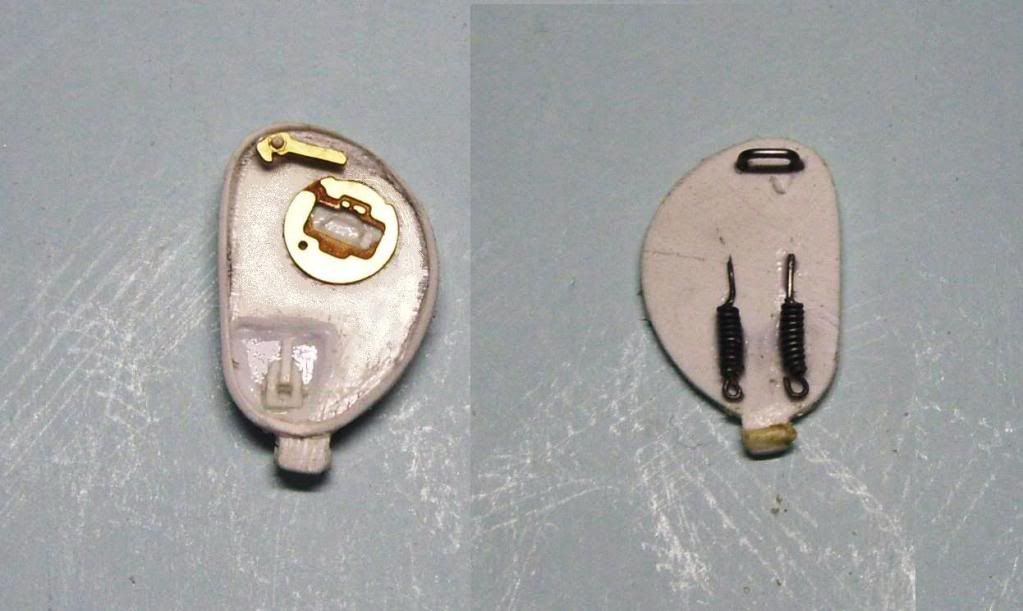
Add the PE periscope cover-thing, and a latch, and the rest was made from strip. The springs on the back were made by wrapping a piece of wire around a needle. The handle's a piece of wire.

And that's where I am so far. Like I said, I'm outta here for another three weeks or so on Tuesday, so I wanted to get this up before I leave.

ONE THING!!--- anyone who sees anything inaccurate, or any of you older guys who were in the 'Nam, PLEASE do not hesitate AT ALL to send your ideas, comments, and critiques my way. You guys who know me know that I SINCERELY appreciate critique and criticism--you guys made me the modeler I am, and I"m not going to start thinking I'm too good to learn. SO don't hold back because of the regrettable episode here just recently--LET'S HAVE IT! Big Smile

It's good to be back! CakeBeer


  • Member since
    October 2009
  • From: South Carolina
Posted by jetmodeler on Saturday, September 4, 2010 9:27 PM

Its good to see you back Doog. Looks like your off to a good start. Can't wait to see somemore progress on this beast.Toast


  • Member since
    March 2010
  • From: Buffalo, NY
Posted by macattack80 on Saturday, September 4, 2010 9:47 PM

Doog, first thing, Welcome Sign back!  I am by no means an expert on armor....or anything for that matter Big Smile  But I am a fan of your work and I look forward to seeing the Patton take shape.  Your skills in scratchbuilding and weathering are astounding.  Your Patton is looking great so far...for what its worth. 

Have a safe trip. 

Kevin

[


  • Member since
    March 2003
  • From: El Dorado Hills, CA
Posted by IBuild148 on Saturday, September 4, 2010 10:12 PM

doog,

First CONGRATULATIONS on the engagement.Toast

Remember this phrase, "yes dear, I was wrong and I am very sorry".

Since you are in the Majors when it comes to your builds I sit back and read, look and take more notes.

divertirse in Spain!


IBuildOne48

Teach modeling to youth!

Scalefinishes.com

http://i712.photobucket.com/albums/ww122/randysmodels/NMF%20Group%20build%20II/Group%20Badge/NMFIIGBbadgesmall.jpg


  • Member since
    May 2009
  • From: San Jose, CA
Posted by hedorah59 on Saturday, September 4, 2010 10:20 PM

Great start - I will be following along with this one!

Kirk

  • Member since
    December 2006
  • From: N. Georgia
Posted by Jester75 on Saturday, September 4, 2010 10:54 PM

Hey Karl, good to see a WIP from you. I think this is the same thing your building...

Photobucket

They have this and a Sherman parked outside a base just south of where I live in Calhoun. Didnt snap alot of pics of this one but got plenty of the ShermanYes

Eric


  • Member since
    July 2003
  • From: Toronto, Ontario, Canada
Posted by zokissima on Sunday, September 5, 2010 12:41 AM

Congrats on the engagement.

Good to see another armour build coming from you again.

  • Member since
    August 2010
  • From: Maine
Posted by Goodness180 on Sunday, September 5, 2010 12:52 AM

Looks amazing!!!!

  • Member since
    January 2006
  • From: California
Posted by SprueOne on Sunday, September 5, 2010 1:10 AM

Haha, I also built that Monogram Patton tank long ago. Looking good so-far. I'm watching this one. 

Anyone with a good car don't need to be justified - Hazel Motes


Iron Rails 2015 by Wayne Cassell Weekend Madness sprueone

  • Member since
    November 2004
  • From: Cat Central, NC
Posted by Bronto on Sunday, September 5, 2010 6:38 AM

Great job so far fixing up the Tamiya kit!  Unfortunately you can't use the Academy dozer blade on the M-48.  It is the M-9 used on the M-60 series tanks, not the M-8 used on the M-48 series.  Looking forward to seeing more progress that you have made on this.

  • Member since
    January 2007
Posted by the doog on Sunday, September 5, 2010 7:33 AM

THANKS, GUYS! It's good to be back at the bench and on the forums!! Big Smile I appreciate all the comments, and the congrats on my engagement! Thank you to all for taking the time to leave a comment!

Eric, (Jester)--thanks for that photo! If you scare any more up, send 'em along if you have the time! 

Bronto

Great job so far fixing up the Tamiya kit!  Unfortunately you can't use the Academy dozer blade on the M-48.  It is the M-9 used on the M-60 series tanks, not the M-8 used on the M-48 series.  Looking forward to seeing more progress that you have made on this.

Ah HA! THAT'S the kinda comment I especially love--one that makes the way a bit clearer. Well, that's what I suspected--and it's funnt, because I originally bought it for an M60 model. I guess it'll have to go back into the AM parts box! Thanks for sharing this pertinent knowledge!! Smile

I dunno if I"ll get much more done before I leave, but I'll be working...if not, watch this spot sometime in late September!  Travel

  • Member since
    August 2005
  • From: Sydney, Australia
Posted by Phil_H on Sunday, September 5, 2010 8:13 AM

Hey Karl,

Good to see you building again buddy. Smile

I like the M48, I think it was the second kit I ever built when I started doing 1/35 scale stuff way back when (in fact, when that kit was a new release). It will be good to see your take on it.

PS:  I believe the tank in Eric's pic is an M60 (easy enough to confuse the two from certain angles). I'm looking at the return rollers (3 vs 5), location of the bore evacuator on the barrel (which appears to be a 105mm M68, though these were fitted to some M48's as well), the length and shape (squared off) of the turret bustle and the angle of the turret sides (more vertical on the '60).

  • Member since
    August 2003
  • From: Connecticut, USA
Posted by Nachtflieger on Sunday, September 5, 2010 8:23 AM

Nice job as usual Karl! I particularly like how you created the casting effects with the Dremel, and liquid cement. That's a nice alternative to using Mr. Surfacer, and one I'll try on my next job that needs that effect. Looking forward to seeing more.

Nate


  • Member since
    December 2002
  • From: Fort Knox
Posted by Rob Gronovius on Sunday, September 5, 2010 8:35 AM

Phil is correct, Eric's photo is of an M60A3TTS tank (a 1980s US Army tank) and not an M48A3 (a Vietnam era tank). There's about a dozen differences even from this angle to include the mounting points for the smoke grenade launcher and stowage boxes, thermal shrouded gun tube, curved tail light housing (M48 had squared ones), curved rear fenders (M48 had angular ones), late style tracks, late style air cleaners, and the most obvious difference, the oblong turret of the M60A1/A3 series.

Doog, FYI sprocket lightening holes only occur on the outer half of the sprocket carrier, not on the inner half.


Note: My apologies if anyone is insulted by these observations. I will delete this post if anyone takes issues with any of my observations. I am in no way critiquing any model on this forum and am only posting photographic reference material that I personally took in order to make my own models more accurate. It is not my intention to impose my own personal preferences on any other modeler on this forum.

My apologies in advance if the above paragraph insults any reader.

  • Member since
    January 2007
Posted by the doog on Sunday, September 5, 2010 9:03 AM

Phil, thanks for the correction; you know, I thought that that tank looked maybe a little "off" but didn't quite recognize it. I know there are a lot of photos of M482AC's out there, and I thought maybe it was a variamt--thanks for the info!

Nate--yeah, the Dremel ROCKS! lol!

Rob Gronovius

Phil is correct, Eric's photo is of an M60A3TTS tank (a 1980s US Army tank) and not an M48A3 (a Vietnam era tank). There's about a dozen differences even from this angle to include the mounting points for the smoke grenade launcher and stowage boxes, thermal shrouded gun tube, curved tail light housing (M48 had squared ones), curved rear fenders (M48 had angular ones), late style tracks, late style air cleaners, and the most obvious difference, the oblong turret of the M60A1/A3 series.

Doog, FYI sprocket lightening holes only occur on the outer half of the sprocket carrier, not on the inner half.

http://www.armorama.com/modules/gallery/albums/album45/aag.jpg


Note: My apologies if anyone is insulted by these observations. I will delete this post if anyone takes issues with any of my observations. I am in no way critiquing any model on this forum and am only posting photographic reference material that I personally took in order to make my own models more accurate. It is not my intention to impose my own personal preferences on any other modeler on this forum.

My apologies in advance if the above paragraph insults any reader.

Ha ha! Rob, you're cracking me up! lol!

ARGH! I was afraid of that too! I couldn't see it in the pics I have, and should have waited or asked advice here. Well, that's what you do when you're eager and short on time--you screw up! lol!

Luckily, I have my Milliput fine white available, and I'll get to patching up those inner sprockets later today! Should be a relatively easy fix...

I hope the "lurkers" are learning the value of honest, fearless criticism in this thread....Wink

  • Member since
    September 2009
  • From: Rugby, England
Posted by Hinksy on Sunday, September 5, 2010 9:49 AM

Hey Karl,

Congratulations on the engagement buddy!

I love what you have done with the Dremel and casting effect. I'm a big fan of my Dremel and this tactic is perfect!

Looking forward to more!


ATVB

Ben Cool

On the Bench - Dragon Pz. IV Ausf. G (L.A.H.) Yes

Your image is loading...


  • Member since
    November 2005
Posted by Anonymous on Sunday, September 5, 2010 10:08 AM

Another eclectic build from doog, cool...I love seeing old kits given this kind of attention...Always thought this tank never got its "due"...a really "classic" look IMO...YesYes...

  • Member since
    December 2006
  • From: N. Georgia
Posted by Jester75 on Sunday, September 5, 2010 10:44 AM

Sorry doog, had my treads mixed hehe.Thanks for the info on the pic Phil and Rob, now I know what kinda tank it is! There is no doubt the other is a Sherman just not sure of the particular variant though...

Photobucket

Eric


  • Member since
    July 2004
  • From: Texas
Posted by wbill76 on Sunday, September 5, 2010 11:18 AM

Great to see you back at the bench building armor Karl! Yes Yes Definitely looks doog-worthy in terms of the work and detail you're putting in so far! Beer

  • Member since
    May 2009
  • From: Poland
Posted by Pawel on Sunday, September 5, 2010 11:32 AM

Dang, Karl it's so good to see you building again, and not only that,you are building some not-WWII stuff, and also my favourite time period - NAM! I like it and I'll be watching.

And now - watch the sprocket again. In the photo by rob you can also see the difference between later style sprockets (as in Tamiya kit) and the type most commonly seen in Vietnam, where the face of the sprocket is flat, only with screw openings in it, without the recessed ring, like in Tamiya kit. I hope it helps and I also hope I made myself clear here. Good luck with your build and have a nice day

Pawel

All comments and critique welcomed. Thanks for your honest opinions!

www.vietnam.net.pl

  • Member since
    November 2004
  • From: Essex England
Posted by spacepacker on Sunday, September 5, 2010 12:22 PM

Hello Doog, congratulations to both of you; I'm sure you are a lucky Guy.

Glad to see you back and love the build.

Regards to using the Burr in your Dremmel for roughing-up, if you put a very slight bend (so that it runs out of true)in the shank it will bounce very nicely; take great care when bending as these Burrs can be quite brittle. I'm sure you don't need me to tell you that!!!.

Finally, as I am not the best of modelers I never make suggestions of other peoples builds, therefore I don't have to make any Disclaimers ( Rob, you cracked me up ).

Good Luck to both of  you for the future...Cheers....Kenny

  • Member since
    July 2006
  • From: New Jersey
Posted by redleg12 on Sunday, September 5, 2010 12:42 PM

HOLY EXCREMENT......DOOG is Back!!.....Wait....Stop the presses....HE IS DOING OD.....my God look what happened to Bill when he heard

Stopped him dead in his tracks......

Karl, great to see you at the bench with armor again.....

Nice work with the treaks on the kit. Casting looks good.

PLEASE BE CAREFUL of the T97 tracks...those center pins on the styrene are fragile....remember my T80 tracks for my M40.

Enjoy...It is great to have you back.....and in OD

Rounds Complete!!


"The Moral High Ground....A Great Place to Emplace Artillery."

  • Member since
    May 2005
  • From: Dublin Rep Of Ireland
Posted by terry35 on Sunday, September 5, 2010 3:59 PM

Welcome Back Karl,glad to see you back. Congratulations on your engagement to Jenn, best of luck to you both.

Oh yeah the model is comming along well.


Terry.

  • Member since
    July 2003
  • From: On my kitchen counter top somewhere in North Carolina.
Posted by disastermaster on Sunday, September 5, 2010 4:23 PM

Here's a couple more from "back in the day".

http://showcase.netins.net/web/rradars/tank.jpghttp://showcase.netins.net/web/rradars/tankers.gif

Good to see 'ya back on track doog!

http://i20.photobucket.com/albums/b232/gluetank/Decorated%20images/th_T1-4-copy.jpg

Sherman-Jumbo-1945

"I was so much older then, I'm younger than that now"


  • Member since
    April 2003
  • From: 41 Degrees 52.4 minutes North; 72 Degrees 7.3 minutes West
Posted by bbrowniii on Monday, September 6, 2010 3:30 PM

Karl,

You had warned me that this WIP was coming!  WOW, you are making some great progress.  I have this kit in my stash, so I'll be following along and noting your modifications (note to self - NO lightening holes on inner surface! Wink)

Good to see you back at the bench.  Have a safe trip to Spain... In a plane... with rain...? Whistling

'All that is necessary for the triumph of evil is for good men to do nothing' - Edmund Burke (1770 ??)


  • Member since
    December 2002
  • From: Valrico, FL
Posted by HeavyArty on Monday, September 6, 2010 9:46 PM

Looking good so far.  Keep plugging away.  I was going to mention the mud relief holes as well, but Rob beat me to it.

Gino P. Quintiliani - Field Artillery - The KING of BATTLE!!!

Check out my Gallery: https://app.photobucket.com/u/HeavyArty

"People sleep peaceably in their beds at night only because rough men stand ready to do violence on their behalf." -- George Orwell

  • Member since
    January 2007
Posted by the doog on Monday, September 6, 2010 10:26 PM

Hi guys!

Thanks again for all the great input and kind words! I worked a little today on it, but most of my day was spent tidying up and packing before I leave tomorrow. I appreciate all of you replying and making me feel welcomed back; I've really missed the camaraderie here! Embarrassed Thanks, too, for the kudo's on my engagement to a great girl!

Just some reply comments before I hit the sack--gotta get up early tomorrow...

Eric-ya got me on that Sherman. The only two I really know by sight are either "Tamiya" or "DML", lol Thanks for the photos, again.

Pawel--I have to say that the observation about the sprocket is a BRILLIANT suggestion!!!! I'm working on that right now; well, today! I made a blank to put in the recess, and when I get back home, I'm going to finish modifying the kit sprocket into the more-common 'Nam one! Thanks for that fearless critique! Big Smile

Kenny--thanks for the idea on the Dremel bits, but I don't even want to try that--I'm sure I'd break the tip! I can see where that would work nicely though.

Mike--Note to self; watch the track assemblies! Thanks for that heads-up!

Steve--is that you in the photos you sent?!?! Cool shots! Thanks for posting them! Always looking for more pics from the field in Viet Nam!

Gino--thanks, man! Stick with me on this one, and call out when I get off-course. Your advice on this one will really be invaluable! Thanks again for the tweaks list, and for the help so far!

Manny, Bill, Kenny,Boyd, Terry, and Ben--thanks, guys, again for dropping in! If I can get online in Spain without a hassle, I'll have to look in on what you're doing. I'm sure at some point I'll check in. I'll be back in about 2.5 weeks, and I'll be back to the bench soon after that!

I'm off, in the rain Storm in a plane Travel to Spain! Music!!!!


  • Member since
    June 2005
  • From: Massachusetts
Posted by minimortar on Tuesday, September 7, 2010 9:18 AM

Do good with this (and I'm sure that you will!) as it is my favorite MBT series. Will be keeping an eye on this one for sure.

Thanks,
Kevin Keefe

Mortars in Miniature
A Scale Model (Plus!) Collection of the Infantryman's Artillery

  • Member since
    December 2002
  • From: Fort Knox
Posted by Rob Gronovius on Tuesday, September 7, 2010 9:25 AM

the doog

Ha ha! Rob, you're cracking me up! lol!

ARGH! I was afraid of that too! I couldn't see it in the pics I have, and should have waited or asked advice here. Well, that's what you do when you're eager and short on time--you screw up! lol!

Luckily, I have my Milliput fine white available, and I'll get to patching up those inner sprockets later today! Should be a relatively easy fix...

I hope the "lurkers" are learning the value of honest, fearless criticism in this thread....Wink

I've always found this site to be more PC than others. Hold your tongue lest the rank and file turn on you to defend the honor of another they deemed you've wronged by some comment you made. It is that attitude here that will forever prevent honest and fearless criticism.

I started tanking on a later version of this vehicle, the M48A5, back in the day, when dinosaurs ruled the Earth.

Note: My apologies if anyone is insulted by these observations. I will delete this post if anyone takes issues with any of my observations. I am in no way critiquing any model on this forum and am only posting photographic reference material that I personally took in order to make my own models more accurate. It is not my intention to impose my own personal preferences on any other modeler on this forum.

  • Member since
    May 2005
  • From: San Jose, California
Posted by toadmanstankpictures on Tuesday, September 7, 2010 11:20 AM

Nice work there Karl!  This is only the second time I've seen the turret shimmed.  Looks good.  BTW, you may want to check your loader's hatch again if you plan on keeping it open.  The reference photo you used looks like it's from a M60A1 turret. 

Keep up the good work!

And for Jester75, the Sherman in your photo is a M4A1.

JOIN OUR COMMUNITY!

Our community is FREE to join. To participate you must either login or register for an account.

SEARCH FORUMS
FREE NEWSLETTER
By signing up you may also receive reader surveys and occasional special offers. We do not sell, rent or trade our email lists. View our Privacy Policy.