SEARCH FINESCALE.COM

Enter keywords or a search phrase below:

M48 Patton FINISHED! Page 16

104088 views
278 replies
1 rating 2 rating 3 rating 4 rating 5 rating
  • Member since
    July 2003
  • From: On my kitchen counter top somewhere in North Carolina.
Posted by disastermaster on Wednesday, October 13, 2010 12:24 PM

..........http://i38.photobucket.com/albums/e105/CommentCrazyGirl/Smileys%20Emotions/Waiting%20Suspicious/thwaiting.gif

Sherman-Jumbo-1945

"I never know what to expect here anymore."


  • Member since
    October 2009
Posted by PANZERWAFFE on Wednesday, October 13, 2010 7:44 PM

Great job on everything  all looks outstanding to me.  I really like that casting effect on the turret and glacis.  I may try this on a future build.  Will be watching and learning.  Really enjoy how you explain things as you go.

Rob

Rob

  • Member since
    January 2007
Posted by the doog on Thursday, October 14, 2010 2:01 PM

redleg12

A generation thing!!! You are assuming I am an old gas passer (that's besides the point)....I thought of Aerosmith..and it is a classic.....but the Gene Autry song is like you "an Original Classic" Wink

Rounds Complete!!

Ha ha, Mike! I know that you meant well--hell, I prefer the "Original Classics" over the current spat of "remakes" too, any day!

Thanks again to all of you weighing in--sorry I haven't gotten around to answering, but I've been busy wrking to get an update--Steve, your "impatient smiley" cracked me up too! lol!

OK! 'NUFF TALK! Here we go---

It' ready for a base coat., pretty much...

Here's some of the details. here is the location of the lifting hooks that you should add to the cupola. I used small guage wire to put these into drilled holes. Note also, that I added some latches to the interior of the TC's hatch.

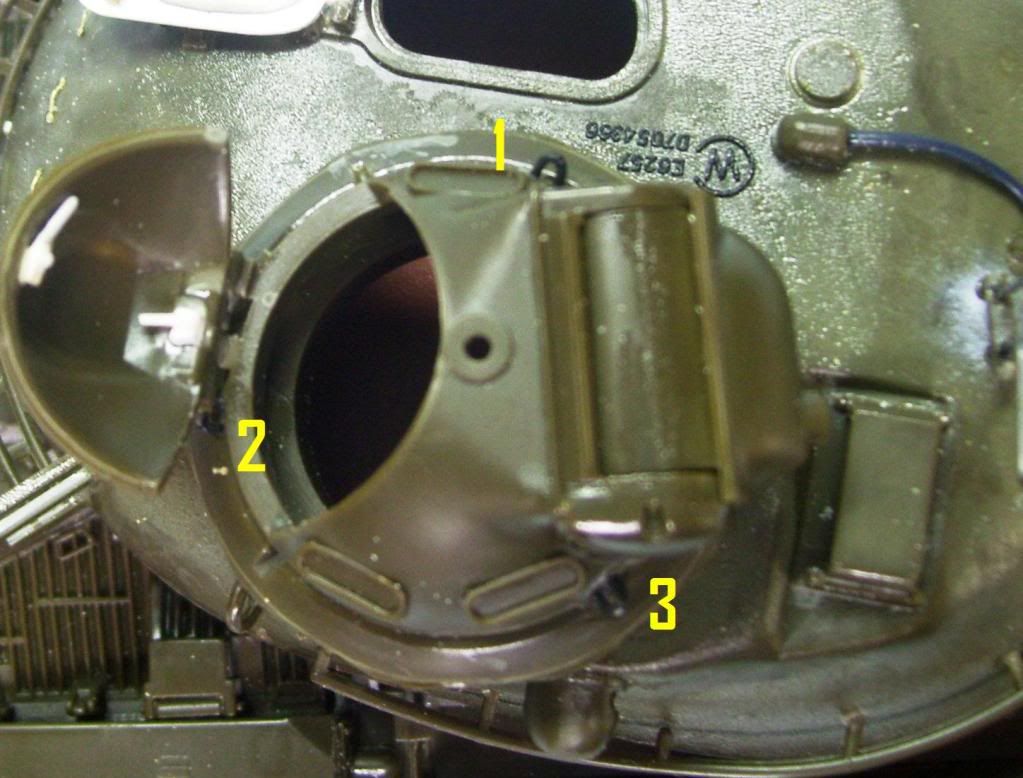
A word about that hatch--you'll see some photos of this hatch with two periscope cutouts in it, but Gino has assured me that both types existed--with, and without, Phew! I didn't know how I was going to pull that off! Also, the hatch can also be posed in "protective" position--it didn't always sit flat. There are numerous photographs to prove this, so no problem with interference from that antenna base...

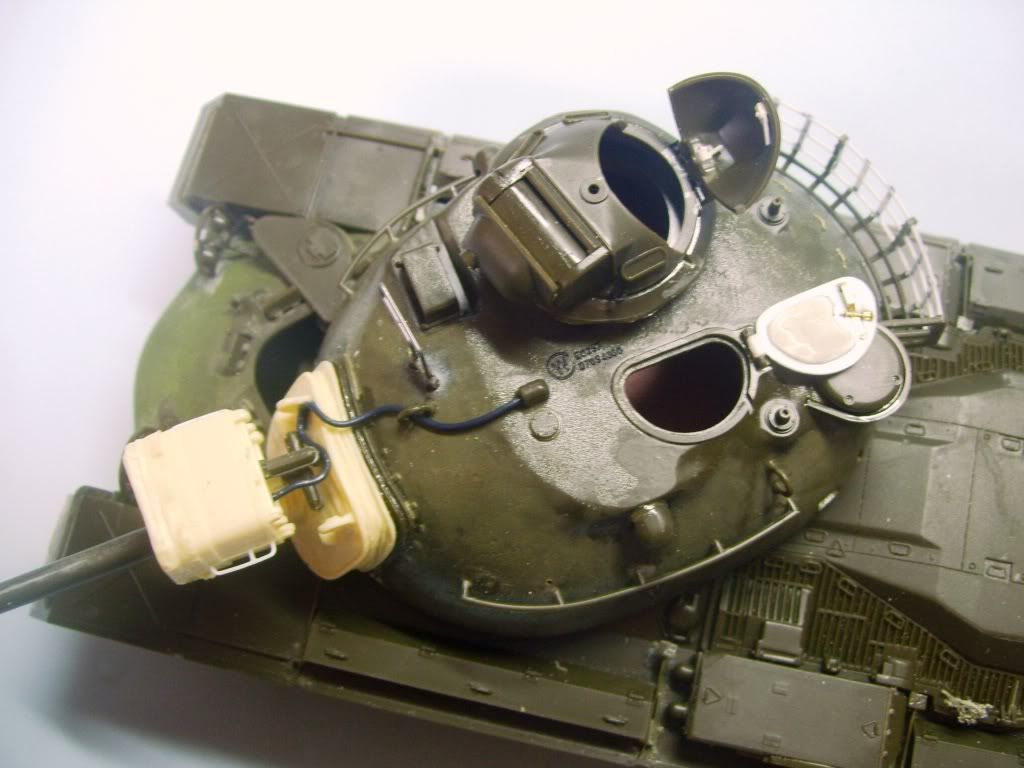
The resin searchlight needed some grab rails--I didn't like the ones from the kit; they were kinda poorly-molded, so I made some new ones out of /030 rod.

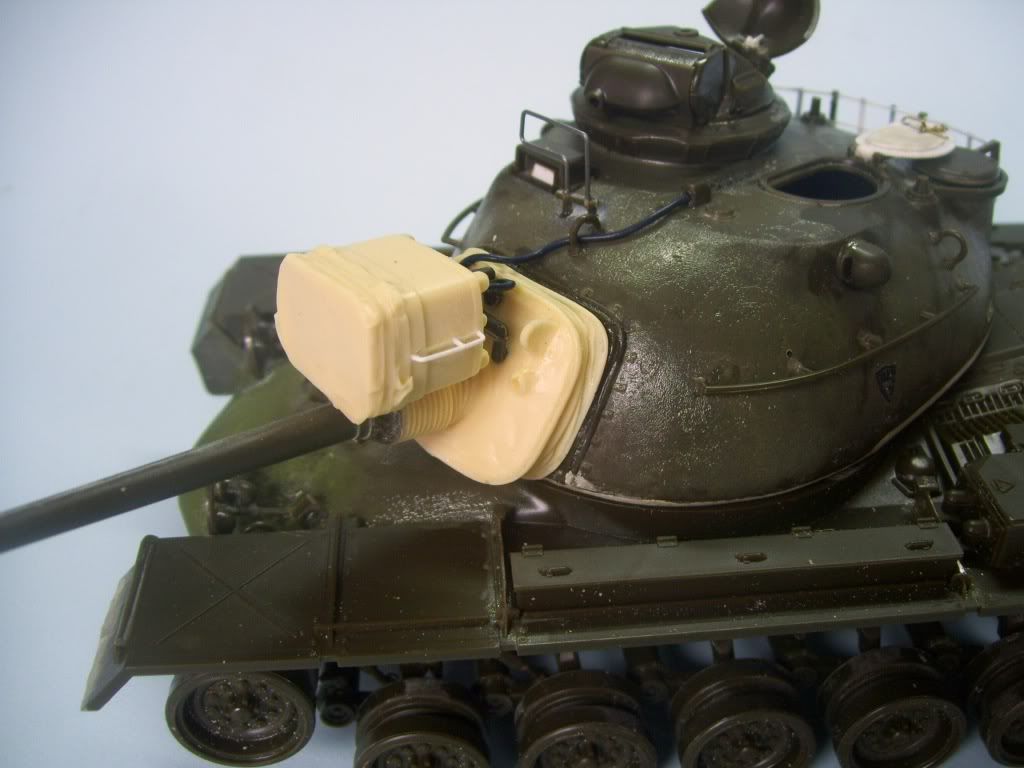
Ditto for that MG deflector-doodad on the top; I replaced that with music wire. Also, in this shot, I've added a bit of tissue to the top of the MG housing there, as a rain shroud seem to have been used in many cases.

And here's the wire to the light--this is actually "Detail Master heater hose" from my days spent working in the 1:24 garage....Whistling....gotta get back there soon, too--I've got a '69 Dodge Daytona calling me...Surprise

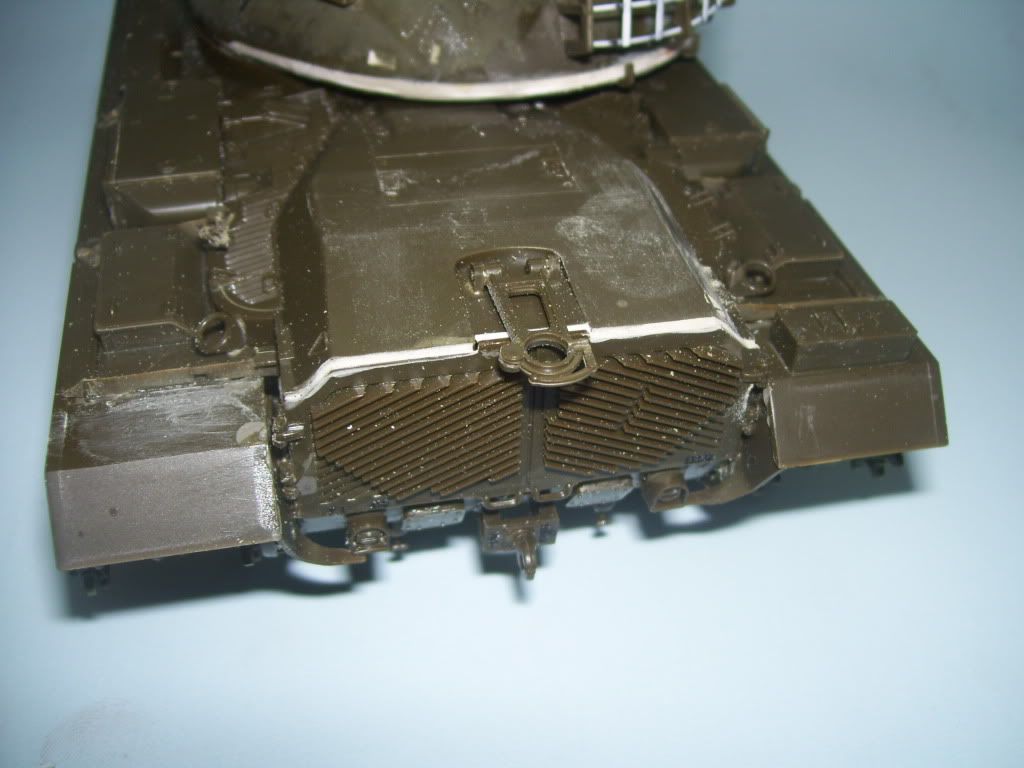
The rear of this tank was a bit of a mess--it's hard to get an accurate mating of the rear parts. I had some more filling and patching up to do. I actually wound up prying off the rear sprocket mounts and repositioning them, as I couldn't get the damned fenders to fit. As I had positioned them in the first place, the sprocket would have rode to high anyway--the track would have been hitting the bottoms of the fenders, so watch out for this when assembling yours. I honestly don't know how that happened--I followed the directions closely in this area? Thank god for Squadron White putty.

And the wheels got a good beating-up with a #11 blade, as the wheels seem to have taken a lot of abuse...

and, my "date" for tonight.....Sad

That's it so far....I'm going to paint it maybe tomorrow? I'm having one of my young guitar students (12 years old) sit in while I paint it. He's interested in modeling and recently got a new airbrush, and I want to give him a good start. It should be a fun day...

Give it to me, guys! See anything?


  • Member since
    August 2003
  • From: Connecticut, USA
Posted by Nachtflieger on Thursday, October 14, 2010 2:38 PM

Really looking forward to seeing this one painted. Also, good for you in helping out a new modeler!Yes

Nate


  • Member since
    December 2002
  • From: Valrico, FL
Posted by HeavyArty on Thursday, October 14, 2010 3:34 PM

Man, she's looking great Karl.  You have done some great work on it.  Can't wait to see it painted.

Gino P. Quintiliani - Field Artillery - The KING of BATTLE!!!

Check out my Gallery: https://app.photobucket.com/u/HeavyArty

"People sleep peaceably in their beds at night only because rough men stand ready to do violence on their behalf." -- George Orwell

  • Member since
    August 2008
  • From: S.W. Missouri
Posted by Pvt Mutt on Thursday, October 14, 2010 5:30 PM

Lots of neat details KarlYes

Roll that barrel of OD out.

Tony LeeSmile

Shoot Low Boys They're Ridin Ponys

  • Member since
    March 2003
  • From: Western North Carolina
Posted by Tojo72 on Thursday, October 14, 2010 6:34 PM

Looks good Karl,looking foward to you giving it the Doog weathering treatment.

  • Member since
    July 2006
  • From: New Jersey
Posted by redleg12 on Thursday, October 14, 2010 7:14 PM

Very nice work....that detail master hose is nice stuff.....can never have enough for hoses, cables, etc. Wish I could find something similar in rolls.

Love the nicked up rubbers (keep your minds clean)....some of those would be a bit too deep at 1 to 1 but at 1 35 it makes a statment. nice touch.

Keep your directions clos and your putty closer!!

Outstanding!!

Rounds Complete!!


"The Moral High Ground....A Great Place to Emplace Artillery."

  • Member since
    July 2003
  • From: Toronto, Ontario, Canada
Posted by zokissima on Thursday, October 14, 2010 8:22 PM

Can't wait to see what the painting will turn out like on this one. I can't recall seeing a modern-ish armor build from you yet.

  • Member since
    January 2007
Posted by the doog on Friday, October 15, 2010 1:30 PM

Hey, thanks for all the positivity, guys! I do appreciate it! Big Smile

I'm working on the tracks right now, and will be getting around to painting it tomorrow when my student comes over to learn how to use the airbrush.

Zokissima, I've done some modern stuff before; mostly Leopards. After this build, I have a definite "modern" piece I'll be building--something really different for me. Stay rtuned!!!

  • Member since
    June 2005
  • From: Massachusetts
Posted by minimortar on Friday, October 15, 2010 9:15 PM

Everything on this project looks great but, I really like the cast effect that you've done and I bet this is going to look real sweet once painted!


Thanks,
Kevin Keefe

Mortars in Miniature
A Scale Model (Plus!) Collection of the Infantryman's Artillery

  • Member since
    October 2004
  • From: Northern Virginia
Posted by ygmodeler4 on Friday, October 15, 2010 10:11 PM

the doog


Give it to me, guys! See anything?

I see a fantastic build, can't wait to see paint on this baby.

Josiah

-Josiah

  • Member since
    July 2003
  • From: On my kitchen counter top somewhere in North Carolina.
Posted by disastermaster on Friday, October 15, 2010 10:28 PM

the doog


http://i170.photobucket.com/albums/u244/heydoog/M48%20Patton/m484.jpg


'ya haven't even painted it yet and it already looks good enough to eat..............


the doog

and, my "date" for tonight.....Sad

http://i170.photobucket.com/albums/u244/heydoog/M48%20Patton/m488.jpg

Nice "Date".http://i38.photobucket.com/albums/e105/CommentCrazyGirl/Smileys%20Emotions/Snarky%20Mad/HlwnShck.gif http://myhighschoolguide.files.wordpress.com/2009/07/paranoid-paranoid-suspicious-doubt-smiley-emoticon-000669-design.gif?w=97&h=97        

http://i230.photobucket.com/albums/ee314/techman03/emoticons/thexhausted.gif     All night long, eh? 


http://i20.photobucket.com/albums/b232/gluetank/Decorated%20images/th_T1-4-copy.jpg

Sherman-Jumbo-1945

"I never know what to expect here anymore."


  • Member since
    June 2008
  • From: Iowa
Posted by Hans von Hammer on Sunday, October 17, 2010 2:14 AM

Needs some baking-soda texturing...Whistling

  • Member since
    April 2004
  • From: Boston MA
Posted by vespa boy on Sunday, October 17, 2010 10:32 AM

Karl, Glad those manuals come in useful. All the details add up. The texture looks good too, well done. You

Me on my soapbox for a sentence:Texture has to be one of the most important and overlooked aspects of a sureface. If the texture isn't right, no matter how accurate the colour, it will always look a bit off.


Keep up the great work.

http://public.fotki.com/nkhandekar

This ain't no Mudd Club, or C.B.G.B.,
I ain't got time for that now

  • Member since
    April 2005
  • From: Piscataway, NJ!
Posted by wing_nut on Sunday, October 17, 2010 3:56 PM

Is that thing made from Big Macs?  Because I'm lovin' it.

Marc  

  • Member since
    January 2007
Posted by the doog on Sunday, October 17, 2010 10:27 PM

Guys,

Thanks for all the comments, honestly. I feel like I didn't even work for them this weekend, lol.

Hans, that was pretty funny, if I do say so...

Narayan, thanks again for those manuals--lotsa great info in there! I'll be returning them this week; I'm pretty much done with them for now. I'm going to scan some of the details that are well-presented, and then you'll be seeing them soon!

Well, I have a small update. I didn't have the time, nor the proper paint to actually get the painting done-all I have now is a base coat of Tamiya Black Green--a really dark base coat. I've been doing my research, and apparently the green color in Vietnam used by the army was pretty "green"---much more so than the OD that we think of as WWII OD? I'm thinking of going with J.A. Green. It seems to match up with the colors I've seen in several photos. Of course, you know me--not really concerned with absolute color fidelity, as the weathering is going to change everything, but it's good to have a good starting point.

My student had a blast watching me airbrush and learning some tricks--cute kid, honestly, and asks a million questions...lol

Well, I sprayed the base coat....

I missed some darned knock-out marks here...gotta patch them up...

The tracks are a breeze to put together once you get all those stupid sinkholes out of them!

You just slide the links into the end connectors--I'm sure that Bill has covered this before? Sorry if it's redundant...

The hardest art is getting the row of other connectors onto all of the track link ends...just snip them off with a razor blade or exacto.

Cool. One length is done. Rinse, repeat...

I'll be getting to the painting of the color coat tomorrow...patience is a virtue.....Wink


  • Member since
    July 2006
  • From: New Jersey
Posted by redleg12 on Monday, October 18, 2010 6:15 AM

Karl - As far as the color.....yep, the VN era vehicles were a "darker" green and a good match is the  Tamiya JA Green. Also remember that vehicles of that era were not "dead flat" . A slight semi gloss would be closer.....at least before you weather.

OK.....the student looks great!! Nice to see a kid interested in our hobby

We prime so we can find.....better now than later.

As for the tracks......BEEEEEEE Careful.....they are delicate

Rounds Complete!!

"The Moral High Ground....A Great Place to Emplace Artillery."

  • Member since
    June 2008
  • From: Iowa
Posted by Hans von Hammer on Monday, October 18, 2010 8:18 AM

Concurr with You & Redleg, Doog.. The Vietnam -era OD  was indeed more of a dark green and a bit more "satin" than flat, and the JA Green ain't too far off...


  • Member since
    March 2004
  • From: Kincheloe Michigan
Posted by Mikeym_us on Monday, October 18, 2010 9:35 AM

Doog are those AFV Club tracks or Modelkasten? 

On the workbench: Dragon 1/350 scale Ticonderoga class USS BunkerHill 1/720 scale Italeri USS Harry S. Truman 1/72 scale Encore Yak-6

The 71st Tactical Fighter Squadron the only Squadron to get an Air to Air kill and an Air to Ground kill in the same week with only a F-15   http://photobucket.com/albums/v332/Mikeym_us/

  • Member since
    January 2007
Posted by the doog on Monday, October 18, 2010 6:21 PM

Mikeym_us

Doog are those AFV Club tracks or Modelkasten? 

Those are the AFV tracks, Mike!

  • Member since
    January 2007
Posted by the doog on Monday, October 18, 2010 6:24 PM

Hans von Hammer

Concurr with You & Redleg, Doog.. The Vietnam -era OD  was indeed more of a dark green and a bit more "satin" than flat, and the JA Green ain't too far off...


Thanks, Mike and Hans--I have hit a little snag--the base coat and the daylight has shown a couple of seams and blemishes that needed filling before I hit it with another coat of color here. Thanks for the input on the base color--I'm going to be doing a Marine Corps tank, actually--I hope I"m still in the ball park for their color?

Also--does anyone have a good photo of the "correct" style top for the Vietnam jerry can? I'm not sure what I'm supposed to have on mine? Hmm

  • Member since
    June 2008
  • From: Iowa
Posted by Hans von Hammer on Monday, October 18, 2010 6:57 PM

the doog

 Hans von Hammer:

Concurr with You & Redleg, Doog.. The Vietnam -era OD  was indeed more of a dark green and a bit more "satin" than flat, and the JA Green ain't too far off...


Thanks, Mike and Hans--I have hit a little snag--the base coat and the daylight has shown a couple of seams and blemishes that needed filling before I hit it with another coat of color here. Thanks for the input on the base color--I'm going to be doing a Marine Corps tank, actually--I hope I"m still in the ball park for their color?

Also--does anyone have a good photo of the "correct" style top for the Vietnam jerry can? I'm not sure what I'm supposed to have on mine? Hmm

The Marines had their own USMC Green color for AFVs during that era... It was lighter than the JA Green, but damned if I know the FS number off-hand..

As for the fuel cans, the standard three-handled metal jerrycans were used... Water cans were metal with three handles as well, but had a different filler-neck and were enameled on the inside...


Fuel can Left... Water, Right

  • Member since
    January 2007
Posted by the doog on Monday, October 18, 2010 7:06 PM

Hans von Hammer


As for the fuel cans, the standard three-handled metal jerrycans were used... Water cans were metal with three handles as well, but had a different filler-neck and were enameled on the inside...

Hans, thanks, but what I need to know is what did the top caps look like? Apparently there's some issue with the "wrong style caps" on the kit parts?

I can imagine you sitting there thinking "Who cares about the $#@^#%#'ed caps!" lol.

I read that the Marine Corps Green was "Forest Green".?!

  • Member since
    June 2008
  • From: Iowa
Posted by Hans von Hammer on Monday, October 18, 2010 7:08 PM

Gotcha covered with the cans, had to edit.. You replied too quick, lol..

"Forest Green" is actually the that satin-gloss green used used by the Army, close to JA Army Green.. This's about as close a photo as I can find to what I'm talking about for US Army

USMC Green is closer to a dark Olive or Olive Green. Can't find a decent pic anywhere, and I don't trust color chips on computer screens..

  • Member since
    January 2007
Posted by the doog on Monday, October 18, 2010 7:14 PM

Hans von Hammer


http://img.photobucket.com/albums/v233/HansvonHammer/Drawings/Waterandfuelcans.jpg?t=1287446689


Fuel can Left... Water, Right

Hans, you are THE MAN! Thank you for that photo! I owe ya! Smile

  • Member since
    June 2008
  • From: Iowa
Posted by Hans von Hammer on Monday, October 18, 2010 7:45 PM

It's what I do, Doog...Toast

  • Member since
    June 2008
  • From: Iowa
Posted by Hans von Hammer on Monday, October 18, 2010 7:57 PM

Oh yeah, one more thing.. Although not ALWAYS done,  many units stenciled
"DIESEL" on the cans that were carried on  vehicles with diesel engines.  A percentage of the others were stenciled with "MOGAS" (Mil-speak for MOtor GASoline)for generator fuel... Also, some water cans were stenciled with the word, "WATER" as well... Even though the difference is obvious, it has to be "Private-Proof" as well.. If fuel MIGHT be put in a water can, it WILL be...

Also, there's a small "dummy chain" connecting the fuel can cap to one of the handles.  Don't need 'em on water cans, they're "flip-top"... Also, as I said earlier, the water can is lined inside with an enamel to prevent rust. So is the inside of the cap.  It's about the color of Testor's Model Master "Radome Tan", in case you decide to model one of the cans "open".

  • Member since
    January 2007
Posted by the doog on Monday, October 18, 2010 8:08 PM

Hans von Hammer

Oh yeah, one more thing.. Although not ALWAYS done,  many units stenciled
"DIESEL" on the cans that were carried on  vehicles with diesel engines.  A percentage of the others were stenciled with "MOGAS" (Mil-speak for MOtor GASoline)for generator fuel... Also, some water cans were stenciled with the word, "WATER" as well... Even though the difference is obvious, it has to be "Private-Proof" as well.. If fuel MIGHT be put in a water can, it WILL be...

Also, there's a small "dummy chain" connecting the fuel can cap to one of the handles.  Don't need 'em on water cans, they're "flip-top"... Also, as I said earlier, the water can is lined inside with an enamel to prevent rust. So is the inside of the cap.  It's about the color of Testor's Model Master "Radome Tan", in case you decide to model one of the cans "open".

Thanks, Hans---all that stuff is priceless, great info for a detailer like me!

I'll have to see if I have any stencils or decals to model that. Luckily, I'm only going to have a few perfunctory ones around the tank, not a slew of them. Heck, I have to see if I even have any of the "correct" ones? I can probably stamp out those caps if I need to....much work to still be done...!

Thanks again, bud! Big Smile

  • Member since
    July 2006
  • From: New Jersey
Posted by redleg12 on Monday, October 18, 2010 8:10 PM

Sorry I could not get back sooner but my man Hans took good care of most things

The paint color is FS 34052 Marine Green...see the following website

http://www.paint4models.com/paintchart/paintconversionchart20100101a.html#

It will give you an FS # and the RLM colors and their model paint matches. Also has an on screen color chart, which is good for comparison

If you want straight from the jar....MM Acryl 4724 USMC Green....works great or mix your own

Rounds Complete!!

"The Moral High Ground....A Great Place to Emplace Artillery."

JOIN OUR COMMUNITY!

Our community is FREE to join. To participate you must either login or register for an account.

SEARCH FORUMS
FREE NEWSLETTER
By signing up you may also receive reader surveys and occasional special offers. We do not sell, rent or trade our email lists. View our Privacy Policy.