SEARCH FINESCALE.COM

Enter keywords or a search phrase below:

M48 Patton FINISHED! Page 16

104088 views
278 replies
1 rating 2 rating 3 rating 4 rating 5 rating
  • Member since
    July 2004
  • From: Texas
Posted by wbill76 on Thursday, October 21, 2010 8:39 PM

Sounds like it's powerful stuff if it also took your casting numbers along with the paint Doog! Big Smile

I'll add my kudos to the repaint, definitely looks better 2nd time around IMHO as a foundation for what's to come. Yes

  • Member since
    December 2002
  • From: Valrico, FL
Posted by HeavyArty on Thursday, October 21, 2010 8:43 PM

The new color looks much better.  Good job on it.

Gino P. Quintiliani - Field Artillery - The KING of BATTLE!!!

Check out my Gallery: https://app.photobucket.com/u/HeavyArty

"People sleep peaceably in their beds at night only because rough men stand ready to do violence on their behalf." -- George Orwell

  • Member since
    April 2008
  • From: Philadelphia PA
Posted by smeagol the vile on Thursday, October 21, 2010 9:05 PM

Lookin good Karl, cant believe I missed this build up to now. 

That simple green stuff is amazing, it doesn't go as fast for enamel, but after a day or so that stuff comes off easy.


  • Member since
    January 2007
Posted by the doog on Thursday, October 21, 2010 10:22 PM

wbill76

Sounds like it's powerful stuff if it also took your casting numbers along with the paint Doog! Big Smile

I'll add my kudos to the repaint, definitely looks better 2nd time around IMHO as a foundation for what's to come. Yes

Thanks, Bill--since the casting numbers were decals, they came right off. I'm actually glad I didn't think of that in advance, as I might have not actually stripped it. I'm glad though, that the new color seems to be getting good reviews!

Thanks, Gino--I feel better knowing that you concur with the color too! Big Smile

Stephen--yeah, Simple Green is a lifesaver when you've REALLY messed up, lol! I once striped a modified race car seven times because I kept having paint compatibility problems. IN the end, it worked out. I went through a lot of that stuff though--it was a pinch on the wallet though!

  • Member since
    November 2005
Posted by Anonymous on Thursday, October 21, 2010 10:45 PM

subfixer

 the doog:


My student had a blast watching me airbrush and learning some tricks--cute kid, honestly, and asks a million questions...lol

http://i170.photobucket.com/albums/u244/heydoog/M48%20Patton/100_1156.jpg

How is your young apprentice getting along? Did light any fires in his soul to become a modeler?


Very cool...teach him to build, THEN teach him guitar...priorities. By the way, didn't he play Ralph on Happy Days?

  • Member since
    June 2010
Posted by Levent on Friday, October 22, 2010 2:48 AM

Hi Karl,

It is sad to see that you had to strip the paint and re-do some things again. That happened to me couple of weeks ago when I had to strip the three tone camouflage work on a M113 APC. I did'nt like the sandy yellow color on mine so a sudden lightning pushed me to do the paint job again. I used Mr.Muscle oven cleaner sprey. It is very useful for that kind of purposes and it works so well. It is like a shaving foam and after waiting for a night, you can get rid of the paint with the help of an old tooth brush :)

Let me also congratulate you for training younglings as a modeler. This hobby is great for them to learn patience, have lots of different friends and to master new talents. Keep up the good work.

  • Member since
    January 2007
Posted by the doog on Friday, October 22, 2010 7:25 AM

Manstein's revenge


 subfixer:


 the doog:


My student had a blast watching me airbrush and learning some tricks--cute kid, honestly, and asks a million questions...lol

http://i170.photobucket.com/albums/u244/heydoog/M48%20Patton/100_1156.jpg

How is your young apprentice getting along? Did light any fires in his soul to become a modeler?


Very cool...teach him to build, THEN teach him guitar...priorities. By the way, didn't he play Ralph on Happy Days?


Manny, oh my god--you're SO RIGHT! He really does look like Ralph Malph! lol!

Seriously though, he's a good kid, and eager to learn how to model. Very interested in weathering and new techniques. Not a bad student either, but can be somewhat unfocused as today's kids seem to be...still, I have high hopes for him in both areas! Smile

  • Member since
    January 2007
Posted by the doog on Friday, October 22, 2010 7:27 AM

Nice to hear from you again, Levent; I am going to answer your email today as well. I apologize for being late on that matter. Sad

It was annoying to have to strip the paint again, but it was so easy that I really didn't mind. Sorry to hear about your M113. Unfortunately, this is sometimes the only way to learn. I am happy that I got a better shade of green this time around. Hopefully your experience is the same with your new coat of paint in your model?

  • Member since
    January 2007
Posted by the doog on Saturday, October 23, 2010 10:01 PM

Hi guys,

A bit of an update--it's been a laborious couple days.

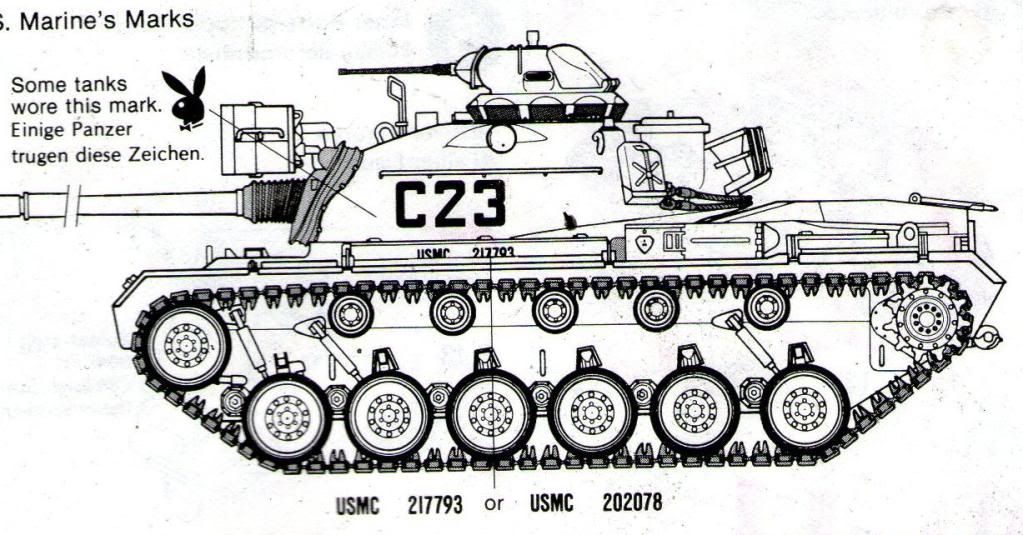
When I got to the decaling part, I had decided to make the Marine version--obviously, since I chose that green scheme--but when I looked at the decals, I realized that they were really just a fantasy. I couldn't find a tank in 5-6 reference books that matched the markings. Here's what they proposed:

The closest thing I could find to a Marine tank wearing "C-23" was this real tank, named "Disaster" depicted on the cover of Squadron's "M48 Patton in Action". It was from the 2nd Platoon, "C" Company, 1st Marine Tank Battalion.

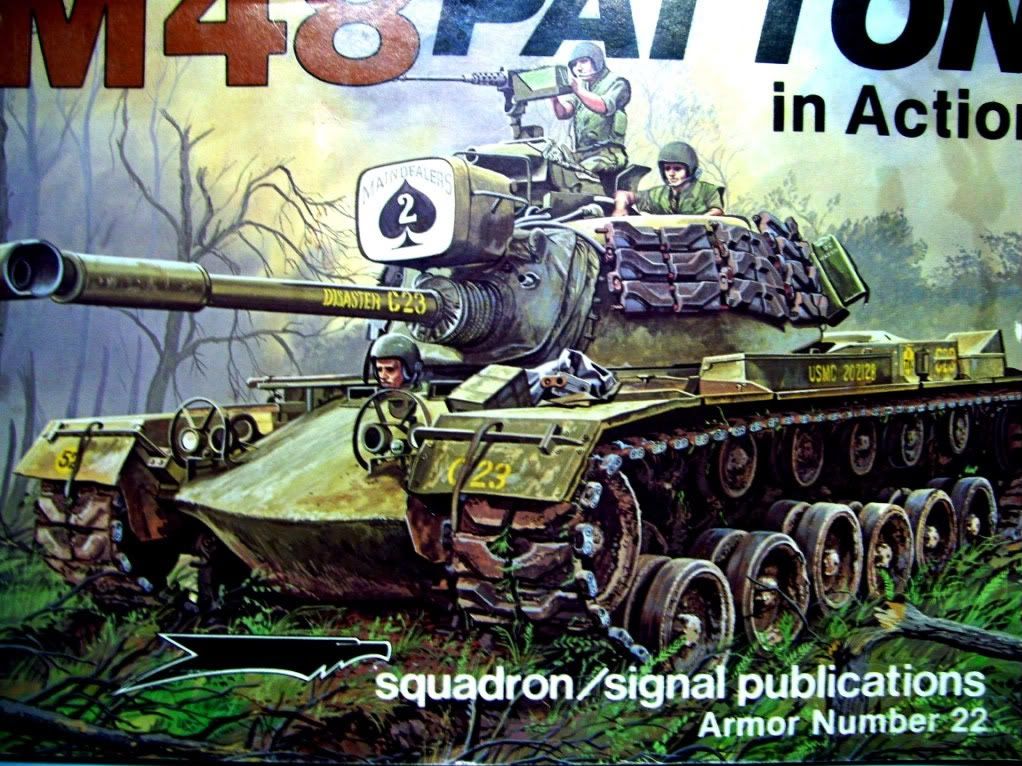
You can see that there are markings on the fenders (Tamiya omits these completely), numbers on the side stowage boxes (Tamiya's numbers are incorrect) and "C-23" and a shield marking on the muffler housings, with additional lettering on the gun barrel. Tamiya gives you only the shields and one--ONLY one "C-23". And of course, you don't get the searchlight cover markings.

There's a shot of the real tank in Osprey Vanguard #29 "The M47 & M48 Patton Tank". The Squadron artists did a good job capturing all the markings.

To put it mildly, it was a b**** trying to figure out how to convincingly and accurately mark this tank. I first tried hand-painting them all--forget that; I"m simply not that talented, lol. Then I tried making stencils. Again, it looked like crap. Finally, I searched diligently through my huge collection of decal sheets a second time, and finally found two additional M48 decal sheets hiding in the bottom from two previous M48s I'd built years ago. Here I was able to do some creative cutting and painting to get what I needed.

I needed a yellow circle with a "52" on it. I couldn't find one anywhere, so I had to make one. I used a circle template to spray yellow on top of an already-yellow circle decal from a German sheet--you can see the finished one to the left of the original marking there. Then I used numbers form the sheet to the right to get my "52".

I was able to find all the "C-23"s and numbers by cutting up the old sheets. Man, this was some tedious work, lemme tell you.

I hand-painted the "Disaster" on the barrel. Here's what I have so far. NOW I can start weathering.

Stowage? We got stowage! The crew is getting painted as well...anybody see anything out of place with the colors on the gear? I'm not sure of the "correct" colors for Vietnam-era gear. I'm going by what I can ascertain from photos, so I think I'm probably close?

All comments and critiques welcomed, guys! Big Smile

P.S.---this tank saw action south-east of Danang in Feb of 1970. Does anyone have any information on what kind of soil would have been in that area? Red clay? Or something more "normal"?


  • Member since
    March 2004
  • From: Spartanburg, SC
Posted by subfixer on Sunday, October 24, 2010 2:58 AM

Dang doog! That paint job really looks great! Your "DISASTER" is by no means a disaster. Well done!

Lee

ps When I spent my little R&R in Danang in 1973, all I saw was the sandy beach. But you can't go wrong with orange red. It is colored like that because of the iron oxide that is prevailent from the local mountain erosion. The Central Highlands aren't that far from Danang, if my memory serves me right.

I'm from the government and I'm here to help.

  • Member since
    December 2002
  • From: Valrico, FL
Posted by HeavyArty on Sunday, October 24, 2010 8:16 AM

Looking good Karl.  Good job on pieceing the decals together.  The gear looks good to me as well.  Pretty much all gear during vietnam was some shade of green, OD to dark green and everything in between.  I think you are on track.

Gino P. Quintiliani - Field Artillery - The KING of BATTLE!!!

Check out my Gallery: https://app.photobucket.com/u/HeavyArty

"People sleep peaceably in their beds at night only because rough men stand ready to do violence on their behalf." -- George Orwell

  • Member since
    May 2009
  • From: Poland
Posted by Pawel on Sunday, October 24, 2010 9:01 AM

Howdy Karl,

the new paint looks good, I like the markings too. They really stand out now, but I'm sure the weathering will take care of that. Now if the tank operated in the Da Nang area, from what I've seen on pictures, light sand would be the weathering here, but of course I can't tell you for sure. This picture could be some kind of a tip:

Marines Vietnam

Hope it helps, have a nice day

Paweł

All comments and critique welcomed. Thanks for your honest opinions!

www.vietnam.net.pl

  • Member since
    January 2006
  • From: California
Posted by SprueOne on Sunday, October 24, 2010 10:07 AM

the doog

http://i170.photobucket.com/albums/u244/heydoog/M48%20Patton/Copyof100_1368.jpg

All comments and critiques welcomed, guys! Big Smile


This is a crazy looking diorama! Like an anti-gravity planet scene, cool Smile 

_ JK


Wow, you have true dedication to accuracy. I wouldn't have had the heart to strip and start over with the paint at that stage like you did, but it's looking great as already stated...


Tags: Danang

Anyone with a good car don't need to be justified - Hazel Motes


Iron Rails 2015 by Wayne Cassell Weekend Madness sprueone

  • Member since
    January 2007
Posted by the doog on Sunday, October 24, 2010 10:16 AM

Lee---thanks for the Yes's on the "Disaster"! And for the info on the "local flavor" of the land. I never knew that red color was from the iron oxide form the mountains--good stuff to know if I write this up for an article submission! Smile Also--didn't know you were in 'Nam---RESPECT!

Gino--thanks, man! That's reassuring to know you're seeing things "on track". I know that for sure you'd tell me if I wasn't!

Pawel--for sure, the decals are screaming out right now, but yes, the weathering will bring them down a bit.Thanks too, for the input on the terrain possibilities! Thanks for your nice comments!

Wayne--again, respect for you and your service in Vietnam. I was born in '65, and vaguely remember this war on TV, with my mom worrying about my uncle, who served two tours, and would never talk about it. It's humbling to have veterans who were actually there weighing in on my project here. Thanks for your valuable input as well, and especially your detailed recollections of the gear colors! Also--the "Disaster" has "C-23" on the gun tube, near the mantlet, but I can't see any other visible markings on the turret so I don't want to just throw them up there, and one thing's for sure--the big, ostentatious markings that Tamiya included aren't anything close to any references I could find.

Thanks too, JK, for looking in!

Thanks again, all, for following this build and helping me out with your great hints and tips! Wink

Tags: Vietnam, M48
  • Member since
    July 2004
  • From: Texas
Posted by wbill76 on Sunday, October 24, 2010 11:20 AM

Nice work on the markings work-around Karl! Yes It's one of the reasons why I never, ever, throw out decals from a kit. I've got quite a stack of "spare" decals that I've had to call on from time to time, you never know when you'll need a quick replacement or have to improvise something! Wink

  • Member since
    March 2004
  • From: Kincheloe Michigan
Posted by Mikeym_us on Sunday, October 24, 2010 2:06 PM

One of these days we got to get the Doog to work on a PBR and Monitor boat for a real groovy dio to go with the M48. That way we can get his feet wet with the BWN (Brown Water Navy).

On the workbench: Dragon 1/350 scale Ticonderoga class USS BunkerHill 1/720 scale Italeri USS Harry S. Truman 1/72 scale Encore Yak-6

The 71st Tactical Fighter Squadron the only Squadron to get an Air to Air kill and an Air to Ground kill in the same week with only a F-15   http://photobucket.com/albums/v332/Mikeym_us/

  • Member since
    January 2007
Posted by the doog on Sunday, October 24, 2010 6:01 PM
 

Thanks, guys---Wayne, thanks again; I think I'll go with what I have here--it seems to fit the photographic evidence that I have for the period when the tank had these markings. I figure that if I just throw some turret numbers on it somewhere I'd be guessing, and I'd rather go with what evidence I have. Thanks for your input though, and please do continue to offer suggestions!

Bill--thanks, man--that stash of decals is worth as much as the actual models some times, eh? Thanks for looking in!

Mike--the aircraft guys would flay me alive if I built a boat before a plane--they've been trying to get me back over in the aircraft forum ever since I ruined that Stuka, lol!

Well, I used the somewhat-wet afternoon here to do some weathering.

I started off by applying a light, greenish-tan mixture of MIG's 502 Abteilung oils. I used #125 Light Mud with 040 Faded Green with a smidge of Wash Brown for the first pass, applying it in a thin consistency somewhere between a wash and a filter.

I laid it on all the highpoints first, and then added successive layers while laying with the tone and depth of the color modulation. I added some of both 080 Wash Brown and even 060 Light Rust Brown in places, especially on the lower hull, to simulate the red clay of Vietnam. This will give me a good base for the pigments.

After it had sat on the model and dried a bit, I began to pull it down with a clean dry brush.

I added a few more layers, adding more Light Mud, and more Rust Brown on the bottom. Here's where I am now--time to put it aside to dry a bit, and then look at it again tomorrow in natural light. I MUCH prefer to weather in natural, flat light, as incandescent light bulbs distort color, and even the florescent that I use casts harsh shadows.

Keep in mind, this is the first pass--in the morning I will look at it dry, and decide where to take it. I still have to paint that floodlight cover and marking, and the mantlet too. It all looks a bit garish in the flash of the camera right now, especially in the past photo. But I think it's going where I want it to go.

Hit me with the opinions! Be gentle! Surprise............Big Smile


  • Member since
    August 2008
  • From: S.W. Missouri
Posted by Pvt Mutt on Sunday, October 24, 2010 6:12 PM

Toast

Tony LeeSmile

Shoot Low Boys They're Ridin Ponys

  • Member since
    April 2009
  • From: Carmel, IN
Posted by deafpanzer on Sunday, October 24, 2010 7:26 PM

WOW!  Looking great already!  One thing made me wonder why you didn't put on the wheels before you do the weathering treatment.  I haven't thought about that earlier... normally I glue wheels on while it is still clean so it is easier that way but I see an advantage of weathering without the wheels.  ToastToast  That's two from me...

Andy

  • Member since
    July 2004
  • From: Texas
Posted by wbill76 on Sunday, October 24, 2010 7:44 PM

Looks like you're off to a good start so far Karl with the weathering. Choice of lighting and the camera flash may be making things look harsher than they are in terms of the contrasts shown in the pics but should all work out in the end with your layered approach. Looking forward to the next round of updates! Beer

  • Member since
    December 2002
  • From: Valrico, FL
Posted by HeavyArty on Sunday, October 24, 2010 8:41 PM

The weathering looks good so far.  I like how it is turning out.

Gino P. Quintiliani - Field Artillery - The KING of BATTLE!!!

Check out my Gallery: https://app.photobucket.com/u/HeavyArty

"People sleep peaceably in their beds at night only because rough men stand ready to do violence on their behalf." -- George Orwell

  • Member since
    July 2006
  • From: New Jersey
Posted by redleg12 on Sunday, October 24, 2010 11:09 PM

It is looking good. Nice work in the track area. Getting that nice Yucch look!!

Rounds Complete!!

"The Moral High Ground....A Great Place to Emplace Artillery."

  • Member since
    January 2007
Posted by the doog on Monday, October 25, 2010 9:00 AM

Tony, Bill, Gino, and Mike---thanks guys; I'm starting to believe that all that time spent building muscle cars hasn't affected my ability to get a tank nice and dirty! lol! I appreciate your positive remarks!

Andy, thanks too--I usually paint and weather the tracks and wheels separately on most vehicles. I like the versatility it give me, and also prevents inadvertently missing some spots behind the wheels. Tracks are a must to be weathered separately, in my opinion, because it's the only real way to get a proper weathering of the track inside and the guide horns. Thanks for following along here!

  • Member since
    October 2008
  • From: New Jersey
Posted by oddmanrush on Monday, October 25, 2010 9:35 AM

So, this is pretty awesome! Interesting the way you've used the light gray 'wash' to create random highlights or faded paint. That's what I like about your weathering, Doog, is that you can make it look very uniform, but very random at the same time, creating a piece that looks very realistic. When I weather, I tend to be very symmetrical, which may lend itself to aesthetics, but doesn't look as dynamic as what you can produce.

Jon

My Blog: The Combat Workshop 

  • Member since
    April 2004
  • From: Boston MA
Posted by vespa boy on Monday, October 25, 2010 12:44 PM

Karl, that is looking really good. I like how you use splotches of paint and draw them down and fan them out, it gives a very realistic effect.

On the subject of decals, I have made my own using an ink jet printer and either clear or white decal sheet. I use Adobe photoshop to do do simple lettering and shapes, or scan a drawing and use photoshop to fine tune it before printing. Below is one example:

http://images32.fotki.com/v1089/photos/6/698387/5069124/IMG_05712-vi.jpg 


http://public.fotki.com/nkhandekar

This ain't no Mudd Club, or C.B.G.B.,
I ain't got time for that now

  • Member since
    April 2009
  • From: Carmel, IN
Posted by deafpanzer on Monday, October 25, 2010 2:44 PM

Thanks Doog!  Makes sense... I should have done that earlier when I did my 234/1... those 8 big tires wasn't easy to weather while glued on.  I will give it a shot next time... Yes

Andy

  • Member since
    September 2006
  • From: Dripping Springs, TX, USA
Posted by RBaer on Monday, October 25, 2010 5:09 PM

Still likin' it......

Apprentice rivet counter.

  • Member since
    October 2007
  • From: N.H.
Posted by panzerguy on Monday, October 25, 2010 9:36 PM

  Karl you've really captured that 'rode hard and put away wet' with this oneUmbrella. I always get a kick out of some interesting techniques you incorporate into your builds like the weathering with liquid glue, but you sure can't argue with the results.  

"Happiness is a belt fed weapon"

  • Member since
    March 2004
  • From: Kincheloe Michigan
Posted by Mikeym_us on Monday, October 25, 2010 10:21 PM

Doog Italeri is releasing a 1/72 scale M48 with the exact same markings as you did on your 1/35 scale M48 and the box art is also a copy of the Squadron M48 in action cover art.

On the workbench: Dragon 1/350 scale Ticonderoga class USS BunkerHill 1/720 scale Italeri USS Harry S. Truman 1/72 scale Encore Yak-6

The 71st Tactical Fighter Squadron the only Squadron to get an Air to Air kill and an Air to Ground kill in the same week with only a F-15   http://photobucket.com/albums/v332/Mikeym_us/

  • Member since
    June 2008
  • From: Iowa
Posted by Hans von Hammer on Monday, October 25, 2010 11:50 PM

One thing.. Lose the boombox.. They didn't appear until the mid 70's.. Jugheads and Doggies had only the small, portable cassette player-recorders


or the big reel-to-reel players to blast some Jimi Hendrix Canned Heat  into Victor Charles' AO...  

The reel-to-reels needed external speakers as well, and didn't run on batteries, only 110 VAC


JOIN OUR COMMUNITY!

Our community is FREE to join. To participate you must either login or register for an account.

SEARCH FORUMS
FREE NEWSLETTER
By signing up you may also receive reader surveys and occasional special offers. We do not sell, rent or trade our email lists. View our Privacy Policy.