SEARCH FINESCALE.COM

Enter keywords or a search phrase below:

ICM IT-28 WWII Soviet Bridgelayer 1/35 WIP BLOG Finish

42605 views
113 replies
1 rating 2 rating 3 rating 4 rating 5 rating
  • Member since
    January 2006
  • From: California
ICM IT-28 WWII Soviet Bridgelayer 1/35 WIP BLOG Finish
Posted by SprueOne on Sunday, January 9, 2011 8:56 PM

WIP BLOG and Finish photos are here: https://imgur.com/a/2GfFk

This is ICM kit # 35081 Made in the Ukraine in 1/35 scale.

This will be an OOB build that I'll try to slam out by the end of January.

I started the kit on the local pier while fishing with friends.

This lower hull part was warped so I submerged it into hot (not boiling) water for one minute then tweaked it straight again once I got back home.

All of the parts in this kit had an incredible amount of sticky, greasy mold release agent used during manufacturing. I didn't get pictures of this in my kit but you can see examples of this shiny grody substance pictured by Ray Mehlberger here:

http://www.cybermodeler.com/hobby/kits/aer/images/aer_t-28_parts05.jpg 

http://www.cybermodeler.com/hobby/kits/aer/images/aer_t-28_parts08.jpg 

I tried soaking and scrubbing in warm soapy water but it did not dissolve this substance.

I had to use a solvent, Denatured Alcohol.

Each sprue was dunked then agitated vigerously for about a minute each. Then layed onto paper towel to air dry.

 WIP BLOG and Finish photos are here: https://imgur.com/a/2GfFk

Anyone with a good car don't need to be justified - Hazel Motes


Iron Rails 2015 by Wayne Cassell Weekend Madness sprueone

  • Member since
    January 2011
  • From: Springfield, MA
Posted by TigerEP1 on Sunday, January 9, 2011 9:02 PM

Looking forward to seeing this thing come together, tho i feel that radio may be a bit out of scale Stick out tongue


Sucks about the molding agent, can't believe companies would let that go unnoticed.  Glad you got it sorted tho.

Thanks,

Dave

On the bench:

1/35th Tamiya Willi's MB


  • Member since
    April 2009
  • From: Carmel, IN
Posted by deafpanzer on Sunday, January 9, 2011 9:18 PM

This should be fun to watch but please try not to be cruel by posting pictures from the deck by the water...Paradise everything is frozen and cold here!

Andy

  • Member since
    May 2003
  • From: Ft. Sill, OK
Posted by beav on Sunday, January 9, 2011 9:38 PM

Sweet!  I'm gunning to get one of my own off of Evilbay one of these days.  I've seen some really nicely built up ones in the past.

"First to Fire!"

Steven

  • Member since
    January 2006
  • From: California
Posted by SprueOne on Sunday, January 9, 2011 9:38 PM

> Dave < haha, that radio is a super cool solar powered unit that I got for my birthday last year. And the mold release is something I've never seen on a plastic kit until now. Weird though I find out, is that this same kit is notorious for this 

> Andy < Ok, but it's cold here too. It must be down to around upper 50's to lower 60's during the day.... brrrrrrr Smile   

>Steven < yup, that's where I got mine 


Tags: OOB build

Anyone with a good car don't need to be justified - Hazel Motes


Iron Rails 2015 by Wayne Cassell Weekend Madness sprueone

  • Member since
    July 2004
  • From: Texas
Posted by wbill76 on Monday, January 10, 2011 1:46 PM

The ICM kits are notorious for having a heavy/greasy mold release residue. I remember when I attempted the normal gun-tank version that I had to soak them overnight in a bath of hot water and Dawn dish-soap in order to just be able to handle them it was so thick and gooey!

So I have to ask...did you catch anything while at the pier? Big Smile

  • Member since
    October 2009
  • From: SURREY ,B.C.
Posted by krow113 on Monday, January 10, 2011 2:15 PM

My T-35 is all slimy as well, they look like good kits though .I will do it for later this year,in the mean time I will watch here. Good luck on your build.

Thank you ,Krow113

  • Member since
    January 2006
  • From: California
Posted by SprueOne on Monday, January 10, 2011 8:22 PM

WIP BLOG and Finish photos are here: https://imgur.com/a/2GfFk

Oh, ok, so I guess it's ICM kits and not just this specific kit model. This is the only ICM kit I have.

> Bill < Neither my buddies or I caught anything that day, not even a cold.

krow113 <Thanks for looking in and commenting. When you start your T-35, make a thread here in armor. I'd like to check it out.


The lower hull subassembly has been straightened out and is done for now.


The bridge parts have been cleaned and prepped. The tubular parts needed some sanding and the holes in the girder parts needed some slight enlarging to accept the other parts.


How do you suggest I paint this after assembly?

WIP BLOG and Finish photos are here: https://imgur.com/a/2GfFk

Anyone with a good car don't need to be justified - Hazel Motes


Iron Rails 2015 by Wayne Cassell Weekend Madness sprueone

  • Member since
    May 2003
  • From: Ft. Sill, OK
Posted by beav on Monday, January 10, 2011 9:29 PM

I'd say either go with an airbrush or a rattle can for the base color.  Rattle can would the quickest and most painless way to do it.

"First to Fire!"

Steven

  • Member since
    October 2009
Posted by PANZERWAFFE on Monday, January 10, 2011 10:20 PM

Great subject.  The older Russian AFV are very intresting and a bridge layer on top of that, Nice.  I have a few ICM kits that I still have not looked in yet, guess I no I'll have some cleaning to do.  You could always give those pieces a quick spray of paint before assembling to ensure you get some color on everything.

Rob

  • Member since
    February 2005
Posted by Kevleerey on Monday, January 10, 2011 11:32 PM

My uncle actually got me this kit a couple years ago, but I haven't built it yet. I had to wash my hands for a long time after handling the parts though. Those bridge parts look like a lot of sanding too.

  • Member since
    October 2009
  • From: SURREY ,B.C.
Posted by krow113 on Tuesday, January 11, 2011 1:00 AM

FSM issue April 2002 has a build of this kit. FSM issue Febuary 2005 has the T-28 build. Both are well worth a review on this subject.

Thank you ,Krow113

  • Member since
    May 2003
  • From: Ft. Sill, OK
Posted by beav on Tuesday, January 11, 2011 6:09 AM

Strangely I remember reading at least one of those issues...dang that was a long long time ago in a different life.

"First to Fire!"

Steven

  • Member since
    January 2006
  • From: California
Posted by SprueOne on Tuesday, January 11, 2011 7:56 PM

thanks for the comments and painting advice. I think I'll go with low pressure on my AB after assembly. Then I don't have to mask off anything 

krow113 < thanks for the heads up on that article. I dug through my past FSM issues and found that I have that issue and just finished reading it


Anyone with a good car don't need to be justified - Hazel Motes


Iron Rails 2015 by Wayne Cassell Weekend Madness sprueone

  • Member since
    November 2005
Posted by Anonymous on Tuesday, January 11, 2011 8:40 PM

I will be watching this one too. I did the Trump German version a cpl years ago, love all the off the wall stuff, I kinda get bored w/regular tanks. Can't wait to see what you do with it....Toast

  • Member since
    June 2005
  • From: Massachusetts
Posted by minimortar on Tuesday, January 11, 2011 10:25 PM

SprueOne
 

I started the kit on the local pier while fishing with friends 

Interesting place to build a model... Drop a part and it gets committed to...

 Never mind the Carpet Monster!

Thanks,
Kevin Keefe

Mortars in Miniature
A Scale Model (Plus!) Collection of the Infantryman's Artillery

  • Member since
    January 2006
  • From: California
Posted by SprueOne on Tuesday, January 11, 2011 10:40 PM

haha, could have been


> PANZERWAFFE < you're the builder of that outrageous Pinhead russian rivet tank model. Nice build is that 


Anyone with a good car don't need to be justified - Hazel Motes


Iron Rails 2015 by Wayne Cassell Weekend Madness sprueone

  • Member since
    May 2009
  • From: Poland
Posted by Pawel on Wednesday, January 12, 2011 5:10 AM

SprueOne, I've seen this tank completed a few years ago and it is really impressive when done. You might say the model covered itself with this funny stuff because it wanted to get alcohol - it's from eastern Europe you know Big Smile Good luck with your build and have a nice day

Paweł

All comments and critique welcomed. Thanks for your honest opinions!

www.vietnam.net.pl

  • Member since
    January 2006
  • From: California
Posted by SprueOne on Thursday, January 13, 2011 10:19 PM

haha, could be true 

yes, this kit has good fit and details. A few 'skinny' parts in my kit that I'll review with pictures later, but a really good kit actually 


Anyone with a good car don't need to be justified - Hazel Motes


Iron Rails 2015 by Wayne Cassell Weekend Madness sprueone

  • Member since
    January 2006
  • From: California
Posted by SprueOne on Sunday, January 16, 2011 1:37 PM

WIP BLOG and Finish photos are here: https://imgur.com/a/2GfFk

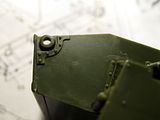
Back to the lower hull, idler wheel mount parts. The opening in the hull had to be enlarged to accept the peg on part L2, both sides 
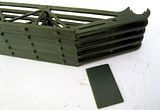
 

BRIDGE ASSEMBLY 

The bridge assembly was surprisingly well designed for assembly and fit.

surprisingly because of all the parts that had to line up and fit together, which they did 


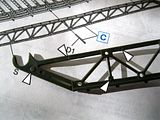
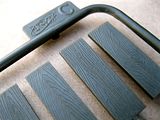
The girder truss parts of the bridge had ejector pin and other molding flaws on one side of each of the ten identical parts.

I didn't want to clean up all of this so I flipped the three of these with the clean side facing outward and two facing inward.

their final position is close enough to hide the flaws 


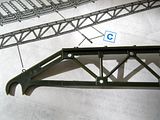
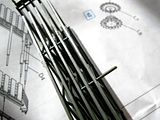
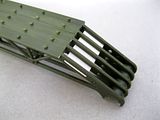
Starting with the half tubular end spacer pieces (parts D3), I began assembly with plastic liquid cement.

Once five were lined up and in place, I ran the brush charged with liquid cement across the top along the line where each were butted against each other.

I assembled both bridge subassembly sides at the same time  


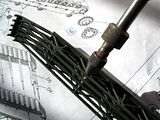
Next, each of the holes where the smaller poles (parts D1) were to be inserted had to be drilled out again.

This created an easy lined up fit. After all of the 24 were installed and equal spacing was 'eyeballed'.

Liquid cement was then touched to each contact point.

 WIP BLOG and Finish photos are here: https://imgur.com/a/2GfFk

The flat plate (part D2) was too thick to insert through all five slots and I found it too difficult to either sand evenly thinner or to enlarge the slots evenly


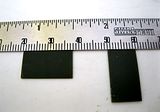
new parts (4X) were scratchbuilt to replace the kit parts. The kit parts were first measured, then duplicated with .023" styrene sheet material 


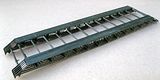
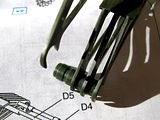
once each side was completed, the larger poles (parts D4, D5, D6) mated both sides then liquid cement touch at each contact point.

These holes had to be re-drilled too. At 15" (38 cm) in length, the bridge assembly is complete with exception to the wood boards that line up across the top of both sides.

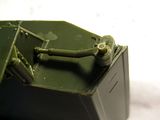
Some little parts here and there needed a little putty or super glue fill but again, the design of assembly and fit of this model kit is very good 


WIP BLOG and Finish photos are here: https://imgur.com/a/2GfFk

Tags: girder truss

Anyone with a good car don't need to be justified - Hazel Motes


Iron Rails 2015 by Wayne Cassell Weekend Madness sprueone

  • Member since
    July 2004
  • From: Texas
Posted by wbill76 on Monday, January 17, 2011 1:44 PM

Nice work getting all of those parts to play nice with each other. Beer

  • Member since
    January 2006
  • From: California
Posted by SprueOne on Monday, January 17, 2011 10:33 PM

haha, thanks 

it's a fun kit so-far 


Anyone with a good car don't need to be justified - Hazel Motes


Iron Rails 2015 by Wayne Cassell Weekend Madness sprueone

  • Member since
    August 2010
Posted by Jose_Luis_Lopez on Tuesday, January 18, 2011 10:19 AM

Such a monster! Such a huge kit! .... you´re a brave modeller!

I always loved engineering vehicles, and this one is not exception. I do not know if the kit is good or a fool, but the wood texture seems excellent! You´ll enjoy painting them!

Thanks for posting!


  • Member since
    January 2006
  • From: California
Posted by SprueOne on Tuesday, January 18, 2011 10:52 PM

yes, engineering vehicles are my favorite too. The only thing that I have to complain about is the lack of detailed information about this specific vehicle variant. Otherwise, a good kit 


Thanks for looking in 


Anyone with a good car don't need to be justified - Hazel Motes


Iron Rails 2015 by Wayne Cassell Weekend Madness sprueone

  • Member since
    January 2006
  • From: California
Posted by SprueOne on Sunday, January 23, 2011 5:07 PM

WIP BLOG and Finish photos are here: https://imgur.com/a/2GfFk


The boards are in place. I roughed up the ends and edges a little then glued them on.

Now onto the Upper Hull 


Starting with the rear side panels, parts G12 and G3, I noticed that part G12 was 'skinny' meaning that the cast material plastic didn't fully fill the mold and I guess QC didn't catch it before it was packed into the box.


the left tail light covers it enough to where I'm going forward with it. Which BTW, they need to be filled with putty in the back of the housings 


 WIP BLOG and Finish photos are here: https://imgur.com/a/2GfFk

Anyone with a good car don't need to be justified - Hazel Motes


Iron Rails 2015 by Wayne Cassell Weekend Madness sprueone

  • Member since
    July 2004
  • From: Texas
Posted by wbill76 on Monday, January 24, 2011 12:51 PM

I had to smile in regards to the reference on QC...I'm not sure this is such a thing with some of these companies. Wink

Like the added touch on the boards, coming along nicely! Yes

  • Member since
    January 2006
  • From: California
Posted by SprueOne on Monday, January 24, 2011 10:26 PM

WIP BLOG and Finish photos are here: https://imgur.com/a/2GfFk

Thanks, Bill. I also have a Maquette kit with 'skinny' track links but that's another thread topic...


The engine hatch part K10 didn't line up with the hinges on the upper hull part because the upper hull part hinges were 1mm off. Filing of part K10 on one side would remedy this and looks good in final position.


This part G4 (screen) had to be filed down before assembly with part H11(hood) so it will fit flush into the upper hull. The 'hood' part is probably suppose to be sheet metal which means this box stock part is way too thick.


The instructions directed the assembly of these door parts upside down and reverse but the hinges would not line up. I assembled them in this configuration instead because they fit better this way.


WIP BLOG and Finish photos are here: https://imgur.com/a/2GfFk

Anyone with a good car don't need to be justified - Hazel Motes


Iron Rails 2015 by Wayne Cassell Weekend Madness sprueone

  • Member since
    January 2006
  • From: California
Posted by SprueOne on Saturday, January 29, 2011 9:02 PM

WIP BLOG and Finish photos are here: https://imgur.com/a/2GfFk

A little more clean up and putty spots on the dual arm assemblies.

And after assembly, this will be on the outside facing surfaces 

 WIP BLOG and Finish photos are here: https://imgur.com/a/2GfFk

Anyone with a good car don't need to be justified - Hazel Motes


Iron Rails 2015 by Wayne Cassell Weekend Madness sprueone

  • Member since
    July 2003
  • From: On my kitchen counter top somewhere in North Carolina.
Posted by disastermaster on Saturday, January 29, 2011 9:08 PM

http://th210.photobucket.com/albums/bb252/Ronnies_Pets/smileys%20emoticons/th_good_post-sign.gifSome very good work here.


http://i20.photobucket.com/albums/b232/gluetank/Decorated%20images/th_Smileyavatar-bettereye.jpg?t=1294093447

Sherman-Jumbo-1945

"I was so much older then, I'm younger than that now"


  • Member since
    August 2003
  • From: Connecticut, USA
Posted by Nachtflieger on Sunday, January 30, 2011 4:05 AM

This one is looking really good. Excellent work!Yes

Nate


JOIN OUR COMMUNITY!

Our community is FREE to join. To participate you must either login or register for an account.

SEARCH FORUMS
FREE NEWSLETTER
By signing up you may also receive reader surveys and occasional special offers. We do not sell, rent or trade our email lists. View our Privacy Policy.