SEARCH FINESCALE.COM

Enter keywords or a search phrase below:

ICM IT-28 WWII Soviet Bridgelayer 1/35 WIP BLOG Finish

42628 views
113 replies
1 rating 2 rating 3 rating 4 rating 5 rating
  • Member since
    July 2003
  • From: Toronto, Ontario, Canada
Posted by zokissima on Sunday, January 30, 2011 10:42 AM

Love these big Russian beasts. I had both this, and the T-35 kit in my stash at one point, but found both to be very crude on the detail side. Do you have heavy weathering, or a factory finish in mind for this one?

  • Member since
    January 2006
  • From: California
Posted by SprueOne on Sunday, January 30, 2011 5:18 PM

WIP BLOG and Finish photos are here: https://imgur.com/a/2GfFk

Thanks for the comments fellas.

I'll probably do a medium weathering on this one. Dirty and worn up, but no mud.

The details are very soft if they exist at all. Some of my detail references are from the T-28 gun tank because they share the same hull, I think. 


Upper hull details and assembly

This (B10 - B11) part required putty and sanding all around. It's part of the bridge operation mechanism and is located on top.


The two arm towers needed a lot of work as well.


All the bow detailing and changes that I'm going to do to this model is finished.

The gap seam between the upper and lower hulls will be filled and sanded after gluing together. I'll do this after I get the track links cleaned up, assembled and glued into position to avoid trouble with the top fender being in the way.


and with that said...

Here we go with this 


Upon closer inspection, very little cleanup is required because the mold seams are in the right place.


Thanks for looking in 


WIP BLOG and Finish photos are here: https://imgur.com/a/2GfFk

Anyone with a good car don't need to be justified - Hazel Motes


Iron Rails 2015 by Wayne Cassell Weekend Madness sprueone

  • Member since
    July 2004
  • From: Texas
Posted by wbill76 on Sunday, January 30, 2011 7:01 PM

Making good progress with this one, it's going to be a massive beast when you're all said and done for sure. Nice putty work and seams!

  • Member since
    October 2009
Posted by PANZERWAFFE on Sunday, January 30, 2011 9:12 PM

Comeing along nicely Yes  Great job on all of your fits through out.  What are you using for the added bolts?  I like them.

Rob

  • Member since
    January 2006
  • From: California
Posted by SprueOne on Sunday, January 30, 2011 11:12 PM

thanks guys 

the white bolt heads are sliced from hex rod by Plastruct.The smaller rivets on the fender supports are sliced stretched sprue.

the two on the hull bow are from the jack part (L3). They were registration pins to line up with jack part (L4) but the little holes weren't big enough so I sliced them and they looked like clean rivets so I kept the the four and used two 


Anyone with a good car don't need to be justified - Hazel Motes


Iron Rails 2015 by Wayne Cassell Weekend Madness sprueone

  • Member since
    January 2006
  • From: California
Posted by SprueOne on Saturday, February 5, 2011 4:15 PM

WIP BLOG and Finish photos are here: https://imgur.com/a/2GfFk

Track links coming together for my first time ever, BTW.

Heads up on these handle parts (E14 and E15) . The i-sheets do not call these out correctly. 

While installing this part (H5), 

The i-sheet call out to use both handles parts (E15). But I already used one of them as per instructions on a previous step on another engine access part (K10),

The kit only provides two (E15) and two (E14). So I advise you to use handle part (E14) on engine access hatch part (K10) instead of (E15). Then you and I would have had two (E15) handles to install on the rear engine access hatch because the holes on part (H5) are designed to fit two (E15).

if you are a wire handle bender anyway, then disregard this post Smile

 WIP BLOG and Finish photos are here: https://imgur.com/a/2GfFk

Anyone with a good car don't need to be justified - Hazel Motes


Iron Rails 2015 by Wayne Cassell Weekend Madness sprueone

  • Member since
    May 2005
  • From: Dublin Rep Of Ireland
Posted by terry35 on Saturday, February 5, 2011 6:32 PM

Nice build I in no way envy the amount of work you must have had to do on those tracks.

Terry.

  • Member since
    January 2006
  • From: California
Posted by SprueOne on Sunday, February 6, 2011 12:44 PM

WIP BLOG and Finish photos are here: https://imgur.com/a/2GfFk

Thanks, Terry. The track links weren't really a problem to build. The fit was tight and casts were clean.

I just did it by gluing together ten links at a time until I had the whole run assembled (113 links per side). Then carefully put it around the wheels and connected the ends, let dry.

(edit: I originally wrote 75 links per side but corrected that to 113 links per side)

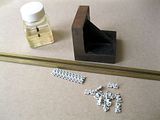
Supplies I used: two lengths brass square stock, weight, liquid cement, flat bench top.


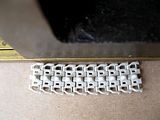
Dry assemble ten links at a time, then glue together by wiping a fully charged brush across the length on both sides of guide teeth of this surface.


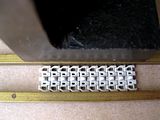
Straighten this length as I went along by placing weight onto one brass stock, then push the track against it and push the other brass stock against the other side to straighten.


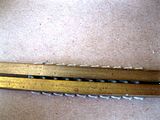
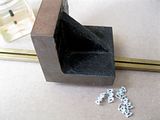
Once the length that I'm working with is straight, I flatten it by placing the brass stock on top like this. Then place weight on top of the whole thing.

I did this each ten link time for about one minute each, until I had the whole 113 link length complete. The glue didn't cure yet so was still able to articulate around the running gear.

(edit: I originally wrote 75 links per side but corrected that to 113 links per side)

 WIP BLOG and Finish photos are here: https://imgur.com/a/2GfFk

Anyone with a good car don't need to be justified - Hazel Motes


Iron Rails 2015 by Wayne Cassell Weekend Madness sprueone

  • Member since
    October 2009
  • From: SURREY ,B.C.
Posted by krow113 on Sunday, February 6, 2011 1:01 PM

Excellent! I had planned the tracks on my T-35 in much the same way. Good to see steady progress.

Thank you ,Krow113

  • Member since
    October 2009
Posted by PANZERWAFFE on Sunday, February 6, 2011 3:09 PM

Tracks do look really nice Yes The links do look very clean and a good set to work with thats always a plus.

Rob

  • Member since
    January 2006
  • From: California
Posted by SprueOne on Sunday, February 6, 2011 3:55 PM

WIP BLOG and Finish photos are here: https://imgur.com/a/2GfFk

Thanks fellas 

My first attempt at building indi track links was around 2002 while working on the Maquette T34/85 with Mineroller. About one quarter of the casts were 'skinny' because the styrene did not make it to that part of the mold during manufacturing. I haven't finished that kit yet 

This kit's links are indeed good.

Anyway, I was just diggin through my parts box for lenses that will fit. Found this clear sprue (H) but I don't know what kit it came from. Anyone recognize it? let me know, I'm curious 

Thanks for looking in

WIP BLOG and Finish photos are here: https://imgur.com/a/2GfFk

Anyone with a good car don't need to be justified - Hazel Motes


Iron Rails 2015 by Wayne Cassell Weekend Madness sprueone

  • Member since
    May 2003
  • From: Ft. Sill, OK
Posted by beav on Sunday, February 6, 2011 8:49 PM

Looks like a dragon sprue to me...

"First to Fire!"

Steven

  • Member since
    January 2007
Posted by the doog on Monday, February 7, 2011 1:12 AM

This is quite the monstrous beast!

I do my tracks exactly the same way.

Kudos to ya for doing something totally different; a nice change, and a good-looking WIP so far!

  • Member since
    July 2003
  • From: On my kitchen counter top somewhere in North Carolina.
Posted by disastermaster on Monday, February 7, 2011 1:16 AM

Be YOOT ti ful..........

http://i20.photobucket.com/albums/b232/gluetank/Animated/th_1-Animated-Disastermaster.gif?t=1296616998

Sherman-Jumbo-1945

"I was so much older then, I'm younger than that now"


  • Member since
    January 2006
  • From: California
Posted by SprueOne on Monday, February 7, 2011 6:44 PM

thanks, D ! 


beav

Looks like a dragon sprue to me...


ok, that's a start, thanks 


the doog

This is quite the monstrous beast!

I do my tracks exactly the same way.

Kudos to ya for doing something totally different; a nice change, and a good-looking WIP so far!


yeah, quite a beast for sure. I'm having fun with this one 

thanks for the WIP comment. I try to keep it clear and informative whenever possible 

Anyone with a good car don't need to be justified - Hazel Motes


Iron Rails 2015 by Wayne Cassell Weekend Madness sprueone

  • Member since
    January 2006
  • From: California
Posted by SprueOne on Wednesday, February 9, 2011 11:02 PM

WIP BLOG and Finish photos are here: https://imgur.com/a/2GfFk

This gap was filled using the "excessive plastic cement then squish" technique.

The sharp edge is actually rounded on ref photos of a 1/1 T-28 hull, so this was easy.

I was so excited about finally gluing the upper and lower hull halves together that  didn't get my clamps ready. First I dry fit and looked around at where the main contact points will be. Then I just applied liquid cement all around and squished them together and held them with my fingers for about three minutes.

After the plastic and glue cured for a few hours, a file and no. 11 blade was scraped across the seem to smooth it out. Totally worked with out any putty.

WIP BLOG and Finish photos are here: https://imgur.com/a/2GfFk

Tags: gap filling

Anyone with a good car don't need to be justified - Hazel Motes


Iron Rails 2015 by Wayne Cassell Weekend Madness sprueone

  • Member since
    January 2006
  • From: California
Posted by SprueOne on Thursday, February 10, 2011 7:05 PM

WIP BLOG and Finish photos are here: https://imgur.com/a/2GfFk

There is very little ref material on this vehicle so it's ok to engineer this project as the builder wants. There are no supports for the bridge in stowed transportation mode, so I dug into the parts box and got creative there.

The two arms included in the kit have a specific swoop shape to them. This was repeated in shape by using a couple parts from an old Tamiya Chieftain tank kit. These parts were glued just forward of the muffler onto the top deck and extending outward in length to the second to the last truss beam of the bridge.

WIP BLOG and Finish photos are here: https://imgur.com/a/2GfFk

Anyone with a good car don't need to be justified - Hazel Motes


Iron Rails 2015 by Wayne Cassell Weekend Madness sprueone

  • Member since
    April 2009
  • From: Carmel, IN
Posted by deafpanzer on Friday, February 11, 2011 10:05 AM

Looking great. Yes The idea of painting many wheels scares me! Tongue Tied  I like the color of primer... what did you use? 

Andy

  • Member since
    January 2006
  • From: California
Posted by SprueOne on Friday, February 11, 2011 12:07 PM

Thanks for looking in and commenting.

True, I haven't started painting the rubber part of the wheels yet Indifferent 

The primer is red primer enamel from an aerosol can. An inexpensive generic brand.


Tags: red primer

Anyone with a good car don't need to be justified - Hazel Motes


Iron Rails 2015 by Wayne Cassell Weekend Madness sprueone

  • Member since
    May 2005
  • From: Dublin Rep Of Ireland
Posted by terry35 on Saturday, February 12, 2011 8:03 PM

THats some really excellent modelling going on there, inspiring stuff!

Terry

  • Member since
    January 2006
  • From: California
Posted by SprueOne on Saturday, February 12, 2011 8:46 PM

Thank you. I've been watching your weathering master general style on your LWS build Cool 


Anyone with a good car don't need to be justified - Hazel Motes


Iron Rails 2015 by Wayne Cassell Weekend Madness sprueone

  • Member since
    September 2007
  • From: Truro Nova Scotia, Canada
Posted by SuppressionFire on Saturday, February 12, 2011 8:50 PM

Just read through the thread, excellent WIP's & posts.

Anyone attempting to build this (or a similar ICM kit) needs this bookmarked!

Looking forward to more, tanks for taking the time to post in detail SprueOne!Toast

http://i6.photobucket.com/albums/y211/razordws/GB%20Badges/WMIIIGBsmall.jpg


  • Member since
    January 2006
  • From: California
Posted by SprueOne on Saturday, February 12, 2011 9:47 PM

right on, right on, that's how I like to do it. And thanks for dropping in and taking a look Yes


Anyone with a good car don't need to be justified - Hazel Motes


Iron Rails 2015 by Wayne Cassell Weekend Madness sprueone

  • Member since
    May 2009
  • From: Poland
Posted by Pawel on Sunday, February 13, 2011 9:57 AM

Nice progress here! The machine is really something special. Good luck and have a nice day

Paweł

All comments and critique welcomed. Thanks for your honest opinions!

www.vietnam.net.pl

  • Member since
    January 2006
  • From: California
Posted by SprueOne on Sunday, February 13, 2011 10:55 AM

Thanks, Pawel. base coat and painting underway today 

Anyone with a good car don't need to be justified - Hazel Motes


Iron Rails 2015 by Wayne Cassell Weekend Madness sprueone

  • Member since
    January 2006
  • From: California
Posted by SprueOne on Monday, February 14, 2011 8:34 PM

WIP BLOG and Finish photos are here: https://imgur.com/a/2GfFk

Painting continues with the wood planks on the bridge.

I tried to make it look like it was originally painted russian tank green then it wore off to bare wood.

Comments, suggestions and technical advise are welcome

WIP BLOG and Finish photos are here: https://imgur.com/a/2GfFk

Anyone with a good car don't need to be justified - Hazel Motes


Iron Rails 2015 by Wayne Cassell Weekend Madness sprueone

  • Member since
    January 2006
  • From: California
Posted by SprueOne on Saturday, February 19, 2011 3:14 PM

WIP BLOG and Finish photos are here: https://imgur.com/a/2GfFk

The tow cable parts (H1 and K12) that were included in the kit are IM styrene and did not look good.

I cut the loop and sleeves off of each straight length and drilled the sleeve out.

Silk string now replaces the kit plastic cable which look a little better but now I have to deal with the fiber lint 


Thanks for looking

WIP BLOG and Finish photos are here: https://imgur.com/a/2GfFk

Tags: tow cables

Anyone with a good car don't need to be justified - Hazel Motes


Iron Rails 2015 by Wayne Cassell Weekend Madness sprueone

  • Member since
    April 2009
  • From: Carmel, IN
Posted by deafpanzer on Saturday, February 19, 2011 9:31 PM

A huge improvement... I rarely use styrene cables either.  Nice work on worn out wood planks which I missed earlier. Yes

Andy

  • Member since
    January 2006
  • From: California
Posted by SprueOne on Sunday, February 20, 2011 11:30 AM

Thanks, I think so too.

Last night I stripped some speaker wire and now I'm looking at that stuff as a better solution.

I might or might not do that today.

Tags: tow cable

Anyone with a good car don't need to be justified - Hazel Motes


Iron Rails 2015 by Wayne Cassell Weekend Madness sprueone

  • Member since
    May 2005
  • From: Eugene, Oregon
Posted by hughes2682 on Sunday, February 20, 2011 3:36 PM

I'm liking what you did with the cables.  Much improved.  Styrene cables ......... spitooooey. Yuck!Dead

That was some nice work on the hull join in the front.  Very nice closing of the gap and finish work of it.

Cheers

Dave

http://img.photobucket.com/albums/v317/Aaronw/Groupbuilds/ClassicAviationGB2010bomb.jpg

With enough thrust, pigs fly just fine.

JOIN OUR COMMUNITY!

Our community is FREE to join. To participate you must either login or register for an account.

SEARCH FORUMS
FREE NEWSLETTER
By signing up you may also receive reader surveys and occasional special offers. We do not sell, rent or trade our email lists. View our Privacy Policy.