SEARCH FINESCALE.COM

Enter keywords or a search phrase below:

Bronco Pzkpfw I Ausf. F VK 18.01

19490 views
141 replies
1 rating 2 rating 3 rating 4 rating 5 rating
  • Member since
    December 2002
  • From: Bury St Edmunds, Suffolk, England
Posted by Bish on Sunday, March 23, 2014 5:20 PM

Nice, I will be watching this. I would like to get this version of the Pz I and this looks like a nice kit so far.

I am a Norfolk man and i glory in being so


On the bench: Airfix 1/72nd Harrier GR.3/Fujimi 1/72nd Ju 87D-3

  • Member since
    July 2004
  • From: Texas
Posted by wbill76 on Sunday, March 23, 2014 7:49 PM

Thanks Bish! I'm very impressed with the quality that Bronco provides in the details and molding. The workable tracks included are another nice feature as well as they are quite sturdy/durable design and have the hollow guide horns molded on the links vs. separate parts, always a plus in terms of speeding the assembly process. Beer

  • Member since
    July 2006
  • From: San Francisco Bay Area
Posted by bufflehead on Sunday, March 23, 2014 9:48 PM

Nice to see you back here Bill!  I really like your kit choice....been eyeing several recent Bronco releases myself!  Nice work with the hull mock-up, makes it easier to get a good fit!

Ernest

Last Armor Build - 1/35 Dragon M-26A1, 1/35 Emhar Mk.IV Female


Last Aircraft Builds - Hobby Boss 1/72 F4F Wildcat & FW-190A8


  • Member since
    December 2002
  • From: Bury St Edmunds, Suffolk, England
Posted by Bish on Monday, March 24, 2014 3:37 AM

Sounds good. There's a few of there kits I rather like the look of, they have some interesting subjects, and I don't recall reading of many problems with their kits. I rather fancy the Pz I Bridgelayer and Pz II D myself.

I am a Norfolk man and i glory in being so


On the bench: Airfix 1/72nd Harrier GR.3/Fujimi 1/72nd Ju 87D-3

  • Member since
    December 2008
  • From: Goffstown, NH
Posted by New Hampshire on Monday, March 24, 2014 6:29 AM

Very cool, Bill!  I may take some good natured ribbing for saying it, but the Panzers I, II, II and IV series are by far more my favorites than the big V's and up.  This should be fun!  I assume you are doing it in the box shown tri-color?  That should look very nifty on this wee guy.

Brian

  • Member since
    July 2004
  • From: Texas
Posted by wbill76 on Monday, March 24, 2014 12:49 PM

Thanks Ernest! The hull mock-up made life easier especially as two hands could only take me so far! Big Smile

Bish, I also built their Marder II D last year and enjoyed it, so don't think you would have any issues with the standard II D or bridgelayer that they offer.

Brian, like you I'm partial to the 'workhose' models vs. the flashier 'big cats' and have been wanting to do this one for a while. I'm leaning towards a two-tone scheme since I've learned that one of the markings provided was for a unit originally planned for use in Crete and so had a 'Tropen' scheme...and some other modifications as well that could add some extra flavor to the build...have to see about that though as things unfold. Wink

  • Member since
    July 2004
  • From: Texas
Posted by wbill76 on Sunday, April 6, 2014 5:17 PM
Managed to get in some time on the interior bits and details on this pocket-Tiger. Bronco follows their usual penchant for tiny parts and there's a lot going on inside this little guy. First up were the 22 'standard' Gurtsack ammunition bags plus 2 'in use' bags for the twin MGs in the turret. These had 2 or 3 sprue contact points each that had to be cleaned up so was a case of '22 Gurtsacks on the sprue, 22 Gurtsacks on the sprue...cut one free and clean it up, 21 Gurtascks on the sprue!' type of effort. ;) Worth it though as they have very nice molded details and will be painted with the AB when the time comes to avoid smothering some of the finer details.  Next up were all the other different interior gear items that need to be painted/detailed separately before installation. The FE, the spare barrels case, the First Aid kit, crew mess kits and canteens (and also the gas mask containers, which I noticed I forgot while taking this pic!), the MP40 ammo case, the flare pistol and flare round holder, and the 'Gedore' tool box that goes on the compartment floor.  Little guy needs its comms gear as well, so the radio receiver and transmitter were assembled (special note, the back is hollow so if you plan to show the right side escape hatch open, this will need to be blanked off), and some holes drilled out with a #76 finger drill to take some wiring later on. Power transformer boxes and intercom box for the driver were also assembled and drilled out where appropriate.  Also took care of some other small details like the small box on the left side below the escape hatch and I assembled the driver's front hull plate. The gauge panel mounts underneath it but I'm keeping it separate for now to make it easier to detail/paint and also to be sure it's lined up properly since it has to fit just so between the transmission housing and the hull glacis plate. The hull roof plate was also prepped for paint although most of it won't be seen of course once installed in position.  Next up was the turret. Due to the size of the fully-detailed MGs, you have to install the base of the mantlet into the turret front and then install the MGs from behind through the base and into the mantlet. That's going to be real fun I can tell, but will deal with that later. Mounts and mantlet base were installed so that the guns can elevate. The fit is kind of loose so I suspect that I will be gluing that in place later on once the weight of the guns is added and the external mantlet installed. External mantlet portion was prepped for paint on its inner surface since some of it will still be visible through the open commander's hatch and I don't want bare plastic peeking in around the edges inside. Last but not least, the turret base was prepped for paint as well to round things out.  So that means next up is flinging some paint on the interior! :)
  • Member since
    March 2003
  • From: Western North Carolina
Posted by Tojo72 on Sunday, April 6, 2014 5:51 PM

Wow,thats small Bill,looking forward to that interior.What kind of tracks with the kit,or are you using MK ?

  • Member since
    July 2004
  • From: Texas
Posted by wbill76 on Sunday, April 6, 2014 5:54 PM
Tojo72

Wow,thats small Bill,looking forward to that interior.What kind of tracks with the kit,or are you using MK ?

Thanks Anthony! It's a small little guy for sure. The kit comes with workable tracks that are quite nice, so no need for replacements IMHO. I've been working on them in little bits and pieces here and there as well when I have a few minutes to spare. This is what they look like:
  • Member since
    January 2013
Posted by jibber on Sunday, April 6, 2014 9:22 PM

Hardly see many Bronco Kits, and never this one. It looks like really nice detail. Nice choice Bill.

  • Member since
    August 2006
  • From: Oromocto, Canada
Posted by Gun Tech on Sunday, April 6, 2014 9:47 PM

Hi Bill! Nice going so far!

I will be following this one really closely, it's a favorite of mine.  Smile

Jean-Michel    "Arte et Marte"

  • Member since
    December 2002
  • From: Bury St Edmunds, Suffolk, England
Posted by Bish on Monday, April 7, 2014 3:34 AM

Nice work bill, some nicely detailed items there, are some of those resin.

I am a Norfolk man and i glory in being so


On the bench: Airfix 1/72nd Harrier GR.3/Fujimi 1/72nd Ju 87D-3

  • Member since
    July 2004
  • From: Texas
Posted by wbill76 on Monday, April 7, 2014 10:18 AM

Thanks guys, glad to have you along for the ride!

Bish

, all styrene. One of the pics is a little darker than the others for some reason but it's all molded in the same tan styrene. Beer
  • Member since
    December 2002
  • From: Bury St Edmunds, Suffolk, England
Posted by Bish on Monday, April 7, 2014 10:28 AM

Really, some of those parts, especially the pic with the radio, do look like resin. And not just the colour, but the detail as well. Looks really nice.

I am a Norfolk man and i glory in being so


On the bench: Airfix 1/72nd Harrier GR.3/Fujimi 1/72nd Ju 87D-3

  • Member since
    February 2011
  • From: St louis
Posted by Raualduke on Monday, April 7, 2014 10:29 AM

Yeah,I thought resin too. Any way looks very well appointed

  • Member since
    January 2013
Posted by jibber on Monday, April 7, 2014 11:36 AM

I can see a couple Bronco kits on my shelf very soon, thats nice detail.

  • Member since
    April 2005
  • From: Gothenburg
Posted by JohanT on Monday, April 7, 2014 1:57 PM

Hi Bill,

What an amazing little kit, looking forward to see more of this :)

Very Best Regards

Johan

  • Member since
    July 2004
  • From: Texas
Posted by wbill76 on Monday, April 7, 2014 2:11 PM

I'm very impressed with the level of molded-on detail that Bronco has provided on this kit. The radios in particular. Glad to have you along for the ride Johan and jibber!

  • Member since
    February 2010
  • From: Maine
Posted by Stage_Left on Tuesday, April 8, 2014 3:01 PM

Hi Bill- I usually pop in on your WIPs but I need to get better at leaving a comment Embarrassed

Anyway, your treatment looks good as usual. I don't have any Bronco offerings in the stash and this'll provide me with a close look. Looking forward to more Yes

Dave

  • Member since
    July 2004
  • From: Texas
Posted by wbill76 on Wednesday, April 9, 2014 3:50 PM

Thanks Dave! Glad to have you stop by. Happy to provide you a sneak-peek into the wonders of Bronco kits. ;)

  • Member since
    July 2004
  • From: Texas
Posted by wbill76 on Sunday, April 13, 2014 5:43 PM
While the last update dealt with the interior parts, today's efforts focused on the workable tracks. Bronco provides an excellent set of workable tracks in the kit, so no need to resort to my usual trusty MK replacement strategy. The kit calls for 66 links per side but until I get the hull built and suspension in place, I only worked on 60 links to be safe. The pins for the links are molded a little funny...to save on total sprue space I guess, some of the pins are separate along the sides of the sprue while the middle run has pins in a double set. The tracks are handed, so it's important to keep track of which pins are which. Using the kit-provided jig, I assembled the runs one link at a time, cutting the pins free of the sprues and using the nub as a 'handle' to insert the pins then cutting it away after the glue had started to set on the head of the pin.  120 links later, we have two nice workable runs to play with in the future.  May not look like much, but this is a major step in the construction 95% complete until the suspension is available to test the number needed for the right sag/tension arrangement.
  • Member since
    December 2002
  • From: Bury St Edmunds, Suffolk, England
Posted by Bish on Sunday, April 13, 2014 6:34 PM

Nice work Bill. So I guess these go together in the same was as Fruils with the pins instead of wire. Does that little jig come with the kit.

I am a Norfolk man and i glory in being so


On the bench: Airfix 1/72nd Harrier GR.3/Fujimi 1/72nd Ju 87D-3

  • Member since
    July 2004
  • From: Texas
Posted by wbill76 on Sunday, April 13, 2014 6:57 PM

Thanks Bish! The pins are two per link (one per side) and yes, the jig is kit-supplied, definitely makes things go together smoothly. Wink

  • Member since
    August 2006
  • From: Oromocto, Canada
Posted by Gun Tech on Sunday, April 13, 2014 7:16 PM

Those tracks are kit supplied?

NICE!!!    

Bronco is fast becoming one of my favorite manufacturer!    

Jean-Michel    "Arte et Marte"

  • Member since
    July 2004
  • From: Texas
Posted by wbill76 on Monday, April 14, 2014 3:25 PM

Yes indeed J-M! I was very impressed by this as it saved me another $30 or so that I would normally spend on workables. Wink

  • Member since
    July 2003
  • From: On my kitchen counter top somewhere in North Carolina.
Posted by disastermaster on Tuesday, April 15, 2014 12:33 AM

 Finally managed to drag myself online......   http://www.animateit.net/data/media/smiley712/desertsmile.gif                             http://img.photobucket.com/albums/v481/ladyelle/Most%20used%20emots/shame.gif

       (been busy with problems in life).

Now, that's the most sensible and efficient appearing jig I've yet to see.

 It's gonna look great Bill!

http://www.bpmodels.net/Model/PzIF/Tracks.JPG

Sherman-Jumbo-1945

"I was so much older then, I'm younger than that now"


  • Member since
    July 2004
  • From: Texas
Posted by wbill76 on Tuesday, April 15, 2014 1:09 PM

Thanks Steve! It definitely makes it easier to assemble the tracks for sure! Beer

  • Member since
    July 2006
  • From: San Francisco Bay Area
Posted by bufflehead on Tuesday, April 15, 2014 11:01 PM

Sweeeeet tracks Bill!   Better watch out MK....Bronco's got your number!

Ernest

Last Armor Build - 1/35 Dragon M-26A1, 1/35 Emhar Mk.IV Female


Last Aircraft Builds - Hobby Boss 1/72 F4F Wildcat & FW-190A8


  • Member since
    July 2004
  • From: Texas
Posted by wbill76 on Sunday, April 20, 2014 5:12 PM
Ernest, your last comment slipped by me, apologies for that! I hear you about the quality of those tracks, very impressive. Beer Here's the latest: Spent the day working on the bulk interior painting to get things ready to move into the detail and assembly stage for that area. First up was an airbrush treatment of Model Master enamel Panzer Interior Buff to all the applicable hull areas and units. Because I hate to scrape paint, I used a combination of masking tape and poster blue-tack putty to mask off the hull floor and side joins to make life a little easier when the hull comes together down the road.  Ordinarily it's not worth the trouble to airbrush small detail parts but since the interior has so many, I decided this time around that the airbrush would be the better method vs. hand painting. The compartment floor was airbrushed with a custom mix of 'primer red' that I keep around but don't quite remember the exact mix ratio on...I do know it contains Insignia Red, Flat Black, and a touch of Light Gray...and a little bit goes a long way! Radio received some Gunship Gray, the seat mounts and other odd bits of gear were airbrushed with Khaki. The Gurtsacks and crew canteens are largely made of cloth or have cloth covers so I used a different shade for them, trying out some Faded Olive Drab as their base color, and have to say I was happy with the shade tone that produces.  This will all get the chance to cure before the next round of detail painting and the weathering process begins on the interior. Hope everyone had a Happy Easter!
  • Member since
    July 2006
  • From: San Francisco Bay Area
Posted by bufflehead on Tuesday, April 22, 2014 11:50 PM

Nice detail painting Bill!  Yep, sometimes its worth it to bust out the AB for work like that!  Like your color choices!

Ernest

Last Armor Build - 1/35 Dragon M-26A1, 1/35 Emhar Mk.IV Female


Last Aircraft Builds - Hobby Boss 1/72 F4F Wildcat & FW-190A8


  • Member since
    July 2004
  • From: Texas
Posted by wbill76 on Wednesday, April 23, 2014 5:30 PM

Thanks Ernest! Now the fun begins in terms of pulling all that interior together. Wink

  • Member since
    January 2007
Posted by the doog on Wednesday, April 23, 2014 7:40 PM

Very cool choice, Bill! I just saw one of these in Kubinka! I did an RPM or Alan ? version of this--something like that; a nice little kit, but nowhere near as crisp as this offering. A neat little panzer! I'm sure you'll do it proud!

  • Member since
    July 2004
  • From: Texas
Posted by wbill76 on Thursday, April 24, 2014 10:39 AM

Thanks Karl! Having fun with it so far. Beer

  • Member since
    July 2006
  • From: New Jersey
Posted by redleg12 on Thursday, April 24, 2014 8:16 PM

Holy Excrement.....I saw the posts on FB but i missed it here, that's what old age does to you, modelers dementia.  Up to your old tricks and looking good. Glad to see you back in armor...though I am still going to hold you to hitting the cycle Wink

Rounds Complete!!

"The Moral High Ground....A Great Place to Emplace Artillery."

  • Member since
    July 2004
  • From: Texas
Posted by wbill76 on Thursday, April 24, 2014 10:16 PM

No worries Mike, glad you found it! You never know about the full cycle...but for now I'm back on familiar ground at least for a little bit. Wink

  • Member since
    July 2004
  • From: Texas
Posted by wbill76 on Sunday, April 27, 2014 4:55 PM
The devil's always in the details and that's where this session's attention focused on. Continuing on from last week, I went to work hand detailing all the various bits of gear that go into the fighting compartment interior. First up were the 24 ammo sacks, the MP40 ammo pouch, the canteens, mess tins, and the first aid box for the floor. Bronco provides some excellent molded-in 'cloth' detail to the ammo sacks so I dry-brushed some of my 50-50 Light Gray/Panzer Dunkelgelb custom mix that I keep around for three-tone camo to highlight and add some depth to them.  Now comes the tricky part, getting all the stuff to install just right in all the different spots! I started with the rear firewall as it's the most densely populated spot and also interacts with stuff on the floor and the hull sides. I found that working from the bottom up was the best way to go and did the right side first, checking alignment with things on the floor and the hull side as I added each row of items.  That of course meant that I also worked on the hull sides at the same time. First up was the driver's side. Ammo sacks and canteen were installed along with the hand-detailed flare gun, flare cartridges and box, and driver's intercom box and headphones. I added the wiring for the intercom using 0.5mm solder installed in the hole I'd drilled out previously with some CA gel.  Opposite site received ammo sacks and canteen, gas mask containers, and the radio power transformer units.  With the firewall squared away, I also added the wiring details to the radios with 0.5mm solder wire and installed it in position along with the spare MG13 barrels case.  Floor received some weathering attention with a light wash of Raw Sienna applied to simulate some dirt accumulation. Virtually all of this will disappear once the drive-train is installed along with the commander's seat but enough will show through to add some color variety. I also installed the small tool box and first-aid kit along with the driver's seat and track control levers.  Rounding out the day's activities, the commander's seat was detailed along with the driver's instrument panel and periscope view sights.  There's still more to do weathering-wise before the interior is ready to be assembled but it's definitely closer to 'the day' than it was before!
  • Member since
    December 2002
  • From: Bury St Edmunds, Suffolk, England
Posted by Bish on Sunday, April 27, 2014 5:07 PM

Some realy nice work there Bill. Those ammo sacks do look really nice.

I am a Norfolk man and i glory in being so


On the bench: Airfix 1/72nd Harrier GR.3/Fujimi 1/72nd Ju 87D-3

  • Member since
    August 2012
  • From: Parker City, IN.
Posted by Rambo on Sunday, April 27, 2014 6:27 PM

Its hard to believe that they give you so much for the interior.

Clint

  • Member since
    December 2002
  • From: Bury St Edmunds, Suffolk, England
Posted by Bish on Sunday, April 27, 2014 6:42 PM

Rambo

Its hard to believe that they give you so much for the interior.

I was thinking that, I had to go and check that this wasn't an open topped vehicle.

I am a Norfolk man and i glory in being so


On the bench: Airfix 1/72nd Harrier GR.3/Fujimi 1/72nd Ju 87D-3

  • Member since
    July 2004
  • From: Texas
Posted by wbill76 on Sunday, April 27, 2014 6:48 PM

Thanks Bish! Bronco certainly packs a lot into this little guy. Wink

  • Member since
    July 2006
  • From: New Jersey
Posted by redleg12 on Monday, April 28, 2014 7:34 PM

I love all the little details. Nice work on the bags. Forming into an interesting interior.

Rounds Complete!!

"The Moral High Ground....A Great Place to Emplace Artillery."

  • Member since
    July 2004
  • From: Texas
Posted by wbill76 on Monday, April 28, 2014 8:01 PM

Thanks Mike! Details take a lot of time but well worth it on this little guy. Yes

  • Member since
    February 2010
  • From: Maine
Posted by Stage_Left on Monday, April 28, 2014 8:25 PM

Very nice work as usual Bill- I'm enjoying your progress! Yes

Dave

  • Member since
    July 2004
  • From: Texas
Posted by wbill76 on Tuesday, April 29, 2014 9:09 AM

Thanks Dave! Glad to have you along for the ride. Beer

  • Member since
    March 2003
  • From: El Dorado Hills, CA
Posted by IBuild148 on Wednesday, April 30, 2014 11:33 PM

Now that I'm caught up. As always, stellar!

IBuildOne48

Teach modeling to youth!

Scalefinishes.com

http://i712.photobucket.com/albums/ww122/randysmodels/NMF%20Group%20build%20II/Group%20Badge/NMFIIGBbadgesmall.jpg


  • Member since
    July 2004
  • From: Texas
Posted by wbill76 on Thursday, May 1, 2014 1:32 PM

Thanks IB! Wink

  • Member since
    January 2013
Posted by jibber on Thursday, May 1, 2014 3:22 PM

Bill the bags are real nice and the weathering on the seat too, so how much of the interior will actually show. I've often thought about a low wattage diffused LED light somewhere in the cabin that would really show off the nice work with the hatches open.

  • Member since
    July 2004
  • From: Texas
Posted by wbill76 on Thursday, May 1, 2014 8:10 PM
Thanks Jibber! Once the turret is on, the only way to view the interior is through the dime-sized hole in the hull side for the escape hatches. The commander's hatch in the turret won't show much of the fighting compartment because of the MGs and other gear that will be in the way there. The turret is designed to slide on/off though and a lot is viewable of the interior through the turret ring with it removed, so it's like a 'Russian Doll' in that respect I guess. Big Smile
  • Member since
    July 2003
  • From: On my kitchen counter top somewhere in North Carolina.
Posted by disastermaster on Thursday, May 1, 2014 8:56 PM

http://i.somethingawful.com/inserts/news/images/03-2003/thumbsup.gif Looking gorgeous Bill!

Sherman-Jumbo-1945

"I was so much older then, I'm younger than that now"


  • Member since
    July 2004
  • From: Texas
Posted by wbill76 on Friday, May 2, 2014 10:50 AM

Thanks Steve! Beer Hope to get that interior all buttoned up this weekend, fingers crossed! Wink

  • Member since
    July 2004
  • From: Texas
Posted by wbill76 on Sunday, May 4, 2014 4:43 PM
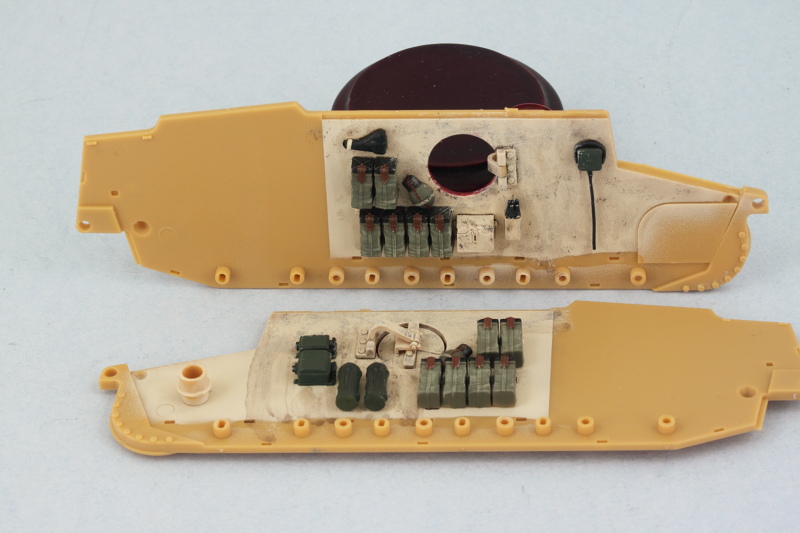
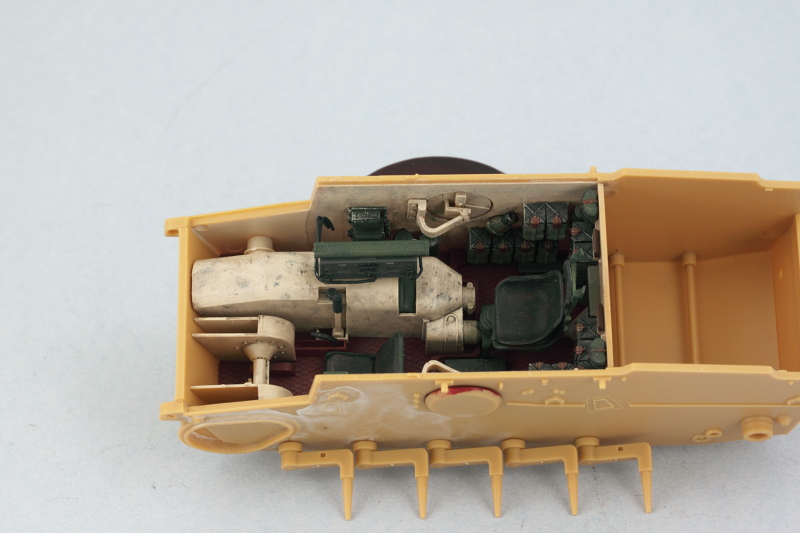
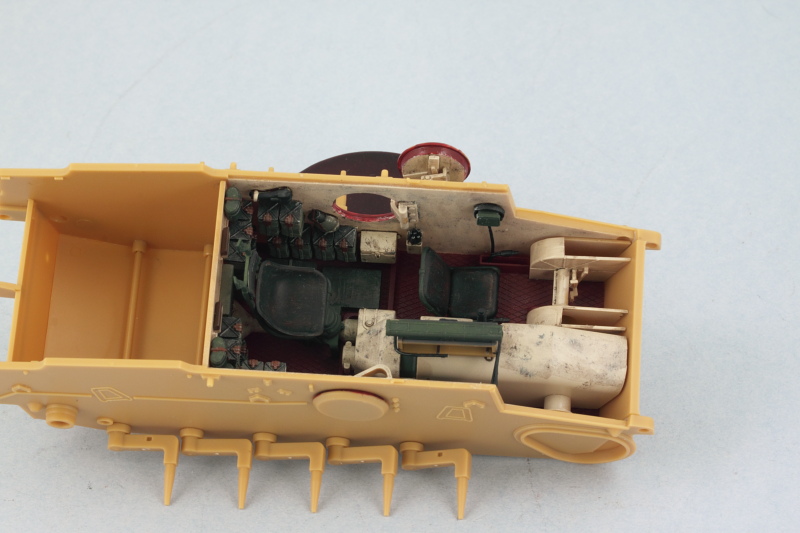
Work continued on the pocket Tiger by virtue of getting the interior weathering completed and the components ready for final assembly into the hull. I stippled some Burnt Umber to simulate scuffs/scrapes on the Panzer Interior Buff surfaces then applied a light wash of Raw Umber over that for general grime/dirt. Once that had dried, I dry-brushed more of the Panzer Interior Buff to blend things back in a bit and then joined the transmission housing and rear bulkhead with the floor and installed the commander's seat in position.  The hull sides got the same weathering treatment and I hand painted some of the primer red for the escape hatch opening rims as reference shots show a marked color contrast here which makes sense when you consider how the hatches closed.  Getting all the hull components together requires some careful thought due to the way the suspension installs. Each swing arm has its own torsion bar that has to fit into a socket on the opposing hull side, so I decided to install the fighting compartment floor and interior first so that it would help hold the hull sides together, then installed the torsion bars while I could still access them from the underside.  While the hull still had some flexibility to it, I added the hull bottom and rear plates, carefully slipping their tabs into position on one side and then gently flexing the other side until they slid into place.  
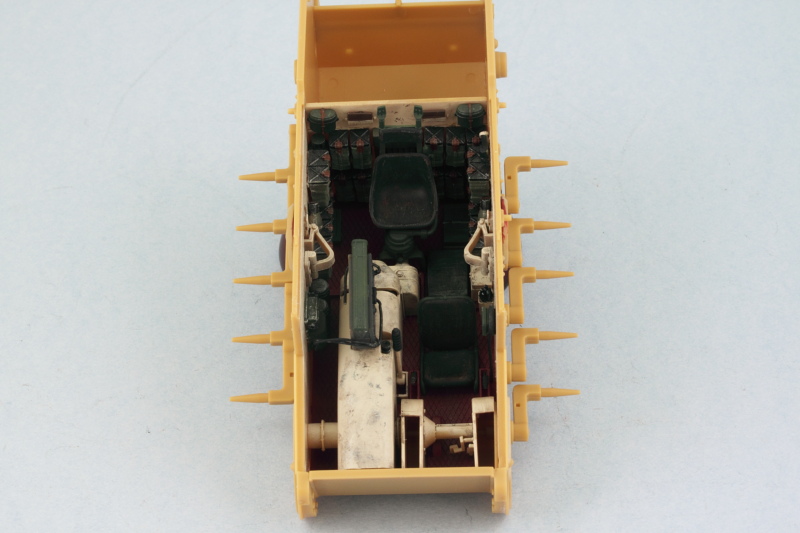
Not exactly spacious accommodations by any stretch!  And just for grins, I tested out the side escape hatch and it works flawlessly.  One key element of the working suspension is to ensure that they sit at the right height. Working quickly before the glue set from the previous effort, I added the shock absorbers and used the already assembled road wheels to ensure everything was playing nice in this department. I let that set up overnight to be sure there wouldn't be problems down the road.  
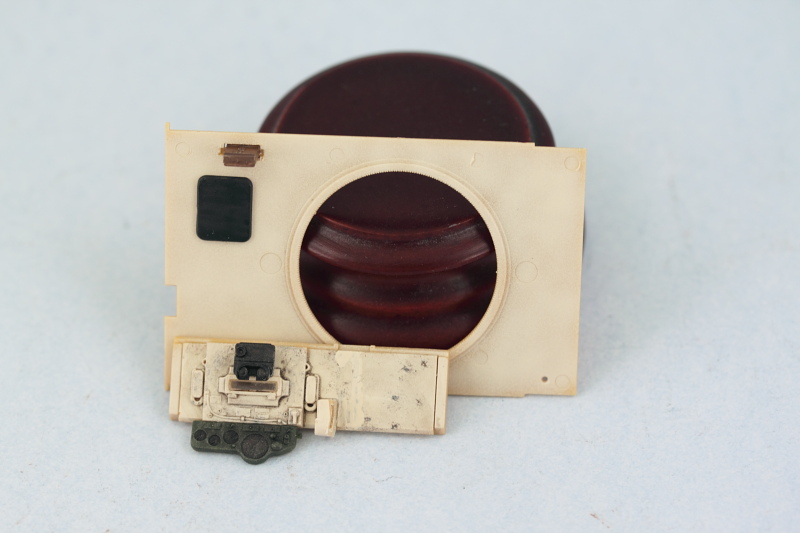
Returning back to the remaining interior bits, some test fits with the front compartment panel showed that the Bronco engineered tolerances were very tight. The added wiring on the radio that I put in interfered with the little side gauge on the driver's panel, so I had to sand it down a mm or two to adjust. The main instrument panel was also installed at this point and the compartment roof received the driver's head crash pad and side-facing periscope.  
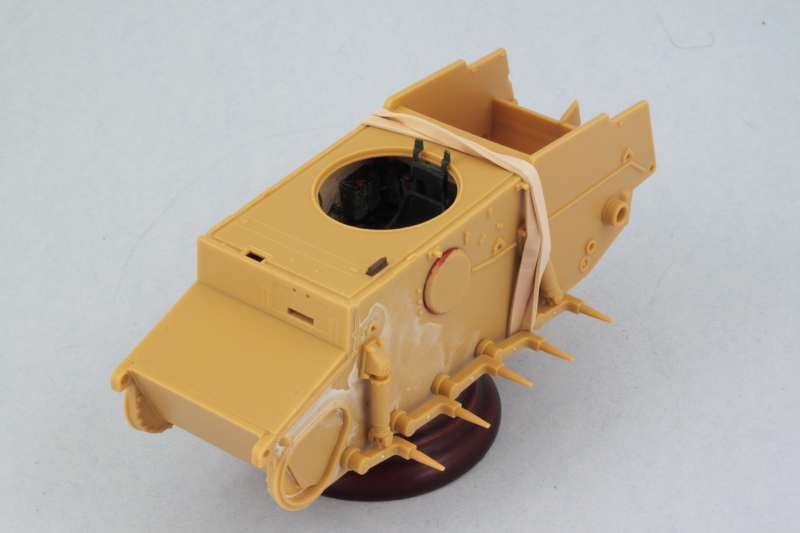
Then the moment of truth, the glacis, compartment front panel, and compartment roof were all installed. The rear part of the hull had a tendency to flex out a bit at the top so a rubber band was used to ensure that all set up nice and square.  
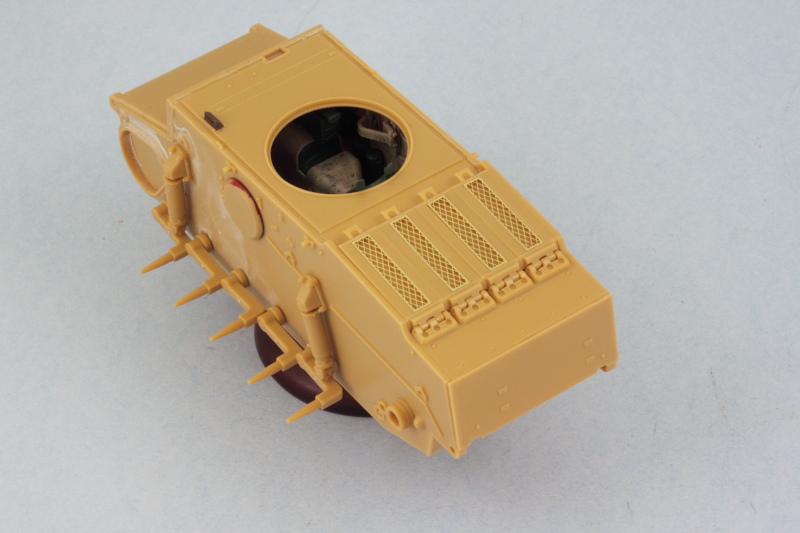
Once that had set up, I added the engine compartment access panels and rear hull top plate. I found it easiest to install the hinge plate part first so that it met up squarely with the rear hull plate and then added the 4 access hatches afterward. These all have to line up just so with each other between the hull sides with no gaps and again Bronco has this down pat with the engineering. The PE screens were installed using liquid glue around their edges to soften the kit plastic and give them something to grip onto.  
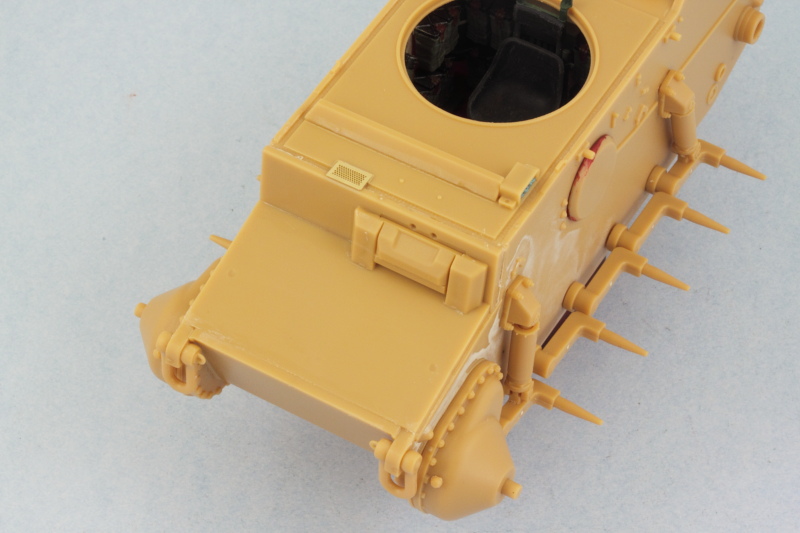
Rounding out this session, I returned to the hull front and added the tow shackles, final drive housings, and the armored visor for the driver's view port. The visor is shown here in the closed position but remains workable which will be handy for painting later on. I also added the little PE vent screen and the turret splash guard as well as the periscope guard for the driver's side periscope. The periscope itself received some blue-tack poster putty masking to protect its face later on in the painting stages.
  • Member since
    December 2002
  • From: Bury St Edmunds, Suffolk, England
Posted by Bish on Sunday, May 4, 2014 5:04 PM

And all that interior is par of the kit, is that right. I know its small, but I thin that has to be the best kit supplied interior I have yet seen. I have the Dragon Pz I in the stash, and I am sure its not as complete as this.

And I am damn glad I didn't drive one of these. At 6'1'' my knees would have been round my ears.

Its looking really nice by the way, great detailing and great paint work, a nice grubby look just like a good AFV should look like.

I am a Norfolk man and i glory in being so


On the bench: Airfix 1/72nd Harrier GR.3/Fujimi 1/72nd Ju 87D-3

  • Member since
    July 2004
  • From: Texas
Posted by wbill76 on Sunday, May 4, 2014 5:32 PM
Bish

And all that interior is par of the kit, is that right. I know its small, but I thin that has to be the best kit supplied interior I have yet seen. I have the Dragon Pz I in the stash, and I am sure its not as complete as this.

And I am damn glad I didn't drive one of these. At 6'1'' my knees would have been round my ears.

Its looking really nice by the way, great detailing and great paint work, a nice grubby look just like a good AFV should look like.

Yep, all included in the kit, no AM add-ons for it. Pretty amazing to me too on just how much they provided for it. I bet you would've had a hard time in this one for sure Bish! Big Smile
  • Member since
    March 2003
  • From: Western North Carolina
Posted by Tojo72 on Sunday, May 4, 2014 6:48 PM

As I said,great interior Bill,too bad it won't be seen fully,but we know it's there.

  • Member since
    December 2008
  • From: Goffstown, NH
Posted by New Hampshire on Sunday, May 4, 2014 6:51 PM

wbill76

I had to laugh a bit at this photo.  It kind of reminds me of a clown car. Big Smile

Seriously though, the little grasshopper looks to be coming together really nicely.  As always, I can't wait for the real paint to start flying!

Brian

  • Member since
    July 2004
  • From: Texas
Posted by wbill76 on Sunday, May 4, 2014 8:12 PM

Thanks Anthony! You're right but it is indeed all there...too bad there isn't more to the hull that would allow for a 'cut-away' type of approach. Wink

Brian

, clown car is about right...those two crewmen had to be very good comrades I think! Big Smile Shouldn't be too long before the paint flies on the outside, not a whole lot left there to do but we'll see...things on this one are often deceptive in terms of the amount of time required. Wink
  • Member since
    April 2005
  • From: Gothenburg
Posted by JohanT on Monday, May 5, 2014 1:45 PM

Bill,

This one, if anyone with all the work you have put in there would deserve a cutaway!

I remember you did one before, also amazing in detail Stick out tongue

But if you say this one is closed - so be it.

I have saved the thread Big Smile

Very Best Regards
Johan 


  • Member since
    July 2004
  • From: Texas
Posted by wbill76 on Monday, May 5, 2014 2:04 PM

Thanks Johan! Yes, unfortunately, no cut-away on this one...although I was really really tempted to try to do it somehow! Problem was really going to come down to having enough 'integrity' in the hull due to the way that Bronco designed it...so I decided to leave it visible through the turret opening and the side hatches only. Wasn't easy though! Wink Glad you like how it's coming along. Beer

  • Member since
    July 2004
  • From: Texas
Posted by wbill76 on Sunday, May 11, 2014 5:24 PM

Made some more progress today on the exterior details although, as usual, didn't get quite as far as I would have liked but that's the way the cookie crumbles.

Picking up from last week, I worked on the rear hull plate as called for in Step 6. The smoke grenade box is a multi-part affair that doesn't have any locating points provided for the different parts of the box so some careful work was needed here to assemble it square and then mount it on the hull. The kit-supplied PE spare track holders were mounted in position after using a couple of the workable tracks as a guide to get them in the right spot. The pair of locator lines molded onto the plate are too far apart, so I used some Gator Grip glue to give me some work time and the ability to adjust the position to the right separation. The exhaust and heat shield were also added at this point.

Next up were the fenders. In the instructions, Steps 13 through 17 deal with the fender sections and their relevant details. Bronco would have you install all the details onto the fenders first and then add them to the hull but that makes life pretty challenging especially for painting and detailing, so I made some adjustments. Starting with the front portions of the fenders, I installed the fenders themselves first to the hull and used a small bottle of paint to support the edges to keep them from sagging until the glue set. Then all the various details were added except the fire extinguisher and jack block which will come later.

While the front fenders set up, I also worked on the rear fenders. Same approach as the front, I added the fenders only to the hull and let them set up. The rear mud flaps were added and their PE stops installed along with the rear Notek light and brake light. The lights have very delicate PE mounts with tiny contact surfaces so hopefully they won't go missing between now and the finish!

Just a few small details to add to the hull sides around the crew escape hatches and then it will be time to tackle the turret and get it ready for painting.

MrT
  • Member since
    December 2010
Posted by MrT on Sunday, May 11, 2014 6:43 PM

I'm liking this little panzer.

Terry

  • Member since
    July 2006
  • From: New Jersey
Posted by redleg12 on Sunday, May 11, 2014 7:32 PM

All that great inside work and it will be so hard to see....sadness....nice to see the hull assembly moving along.

Rounds Complete!!

"The Moral High Ground....A Great Place to Emplace Artillery."

  • Member since
    January 2007
Posted by the doog on Monday, May 12, 2014 7:51 AM

That's gorgeous, BIll! All neat and tidy! A great start!

  • Member since
    July 2004
  • From: Texas
Posted by wbill76 on Monday, May 12, 2014 12:56 PM

Thanks Terry!

Mike

I hear you there...but if you pop the turret off and/or use a dental mirror through the side hatches, it's all there! Wink

Karl

thanks for the comments as well. Almost to the exterior paint stage! Beer
  • Member since
    July 2004
  • From: Texas
Posted by wbill76 on Sunday, May 18, 2014 4:40 PM

Made some solid headway on the remaining details on the pocket Tiger, although as usual I thought I would get further along than I did because this little kit is deceptive in the amount of time it takes to assemble all the little detail parts and get things just so. Part of that is the need to assemble a little bit, let the glue set, then come back and assemble some more. It means a lot of jumping around to different areas and I'm rapidly running out of those, so there was more 'wait' than 'hurry' this time around.

On to the fun! Progress continued on the fenders, I cleaned up all the necessary tools, assembled the boxes, and the jack. Bronco has you assemble two stowage boxes out of 6 parts each...4 sides, top, and bottom, and have to say I'm not a fan of that approach. I got the large one together pretty easily but the smaller one didn't play nice at all...and after checking references, it doesn't appear either of those boxes were commonly used in the field and only show up on the 'factory yard' photos...so I ditched them. This has the added benefit of also showing off the tools on the left side which otherwise would've been covered up by the larger box. The tools fit very tightly together on the left fender so I used the Bronco-supplied PE clamp handles and didn't replace the clamps completely as test fits showed that my Griffon clamps were larger and wouldn't work in the space available on this fender. Some putty filled the mount hole for the smaller box that I'm not using. Tools are only dry-fit for now and will be detailed separately.  

The right side fender got more attention. Bronco has the clamp for the shovel in the wrong spot according to the layout shown in Panzer Tracts 1-2, so I shaved down both it and the axe and replaced their clamps with Griffon PE clamps. The clamps are closed and the handles of both tools can be carefully slid in and out, so I can detail the tools separately off the vehicle and install permanently later.

The last little remaining details for the hull were added in the form of the PE hooks for the tow cable mounts, the side hatch grab handles, and the antenna base. The antenna base was drilled out to prep it for an RB brass antenna later on, the kit supplied item is too short for a standard German antenna. I had planned to fit tow cables since the kit doesn't provide them but the PE hooks don't appear to be sturdy enough for me to carry through on that. In hindsight, these would've been better off removed and some strip brass used to create a stronger hook but once the fenders were fitted, getting at the molded on ones to remove them is near impossible...so no cables for this baby.

Attention also turned to the turret details, I assembled the external mantlet's MG sleeves and their little guards. The kit instructions would have you add the guards to the sleeves first and then install the sleeves to the mantlet but I did the opposite to avoid damaging them as they are a little fragile until the glue sets up. The MGs were assembled and these babies are very nicely detailed...but that also means lots of little parts for them, so these were done in stages. The instructions would have you add the ammo bags to the guns and then install the guns into the mantlet from inside the turret, but after doing some tests it's possible to install the guns into the mantlet first, then install the mantlet and guns to the turret, and then add the ammo bags from below, so that's the way I will do it.

Last but not least for the day, the turret was weathered and the commander's periscopes detailed and installed.

Next up will be finishing the details on the guns and the turret bottom and then getting the turret together so exterior painting can commence.

  • Member since
    January 2007
Posted by the doog on Monday, May 19, 2014 10:24 AM

Oh man...nothin" I hate more than tool clamps that don't fit!I wish all these PE manoofacturers would get together and settle on a "standard" size already! Nothing is more annoying than trying to fit tools on a fender when the clamps are oversized!

Hang in there, Bill. It's looking really nice. Sitting here in a hotel room in Tel Aviv, I'm envying your time at the bench! :)

  • Member since
    July 2004
  • From: Texas
Posted by wbill76 on Monday, May 19, 2014 12:09 PM

Hey there world-traveler! Wink Thanks for the comments Karl, to be fair the Griffon clamps are a 'generic' set and not designed for a specific vehicle and they are generally speaking size accurate, it's just that the space dimensions available on the Bronco fender are very tight. Beer

  • Member since
    January 2007
Posted by the doog on Monday, May 19, 2014 2:29 PM

That's good to know, Bill. I think I have a sprag of them somewhere. There's quite a difference in some companies' offerings though.

I'll home in about 5 days. Trying not to get in trouble over here until we get business taken care of and get back home to the lawn care and painting that TAKOM Obiekt 279.

Hey, is this your tank, in Kubinka? I took these the last time I was there.

  • Member since
    July 2004
  • From: Texas
Posted by wbill76 on Monday, May 19, 2014 2:37 PM

Stay out of trouble! Big Smile Yep, that's the one! Beer

  • Member since
    January 2007
Posted by the doog on Monday, May 19, 2014 2:40 PM

Cool beans! Glad I had a few shots for ya!

  • Member since
    July 2004
  • From: Texas
Posted by wbill76 on Saturday, May 24, 2014 5:11 PM

The long holiday weekend means more bench time than usual and I'm taking full advantage of it! Of course it's more than a three-day weekend, this is also a chance to remember those who have given the ultimate in service to their country and I'd be remiss without acknowledging that and also extending my respect and admiration for all our men and women who serve in uniform.

The last remaining detail on my pocket Tiger is the turret. Earlier I'd mentioned that I was deviating a little bit from the Bronco instructions in terms of the assembly order and I elected to detail and install the twin MGs and sights into the mantlet first and then add the ammo bags after it was in place. This provide to be a good call as it made it much easier to detail them and install them properly into the mantlet while doing test fits along the way to make sure everything played nice with the rest of the turret interior. The MGs were detailed with Testors Model Master non-buffing Metalizer Gunmetal and then lightly dry-brushed with enamel Steel for their finish.

Here's the bottom up view of the turret after the mantlet was installed and the ammo bags added. I also need point out an instruction diagram-induced error that you can see in this pic. Notice that slight gap at the bottom of the mantlet? Turns out way back when I installed the rear part of the mantlet, part D44, into the turret, I used the instruction diagram as a guide and it shows the larger part of the piece on the bottom with the thinner piece on top. Problem is that the external mantlet is designed to fit that part the other way around...and the MG barrel sleeves are keyed as are the MG mounts on the inside to specific alignments...which will result in everything being upside down. Not a good thing...and once I realized the problem, it was no good trying to get the mounts out and flip it around...so I had to trim the part instead to allow it to fit correctly and remove the 'extra' that hung over the bottom...and produced that slight gap. Once painted it will look fine and of course will only be visible if the turret is off and flipped over...but a word of caution to anyone coming along behind!

The base of the turret came next. The elevation and traverse wheels and gears were assembled and installed...they are delicate multi-part assemblies and were actually done last weekend and left off to the side to fully dry before handling. They were detailed and installed and the underside given a dose of red-oxide primer. After the paint was dry, the turret floor was installed in place.

Moving back topside on the turret, I detailed the commander's hatch using a 50/50 mix of Light Gray/Panzer Dunkelgelb so it will match what eventually will be the vehicle's exterior color and detailed the head pad. Bronco designed the hatch to remain workable and relies on a tight friction fit on the hinge to achieve this. A small note, the hatch stops on the edge of the turret swiveled on the real vehicle but Bronco has you position them in the 'open' stance, so a word to the wise if you decide to pose your hatch closed. Mine will be left open on the final display but will be kept closed during painting to help protect the interior.

The add-on armor for the turret was also installed along with the lifting eyes to round things out.

The key to the add-on armor is that it only touches the actual turret at the top edges and where the angled front pieces meet the turret sides. Be careful with the fit at the back, reference photos showed this was smooth so after the glue set, I did some light sanding to remove the join line that is inevitable.

A quick test fit shows the turret sits properly in the hull and can be easily removed for painting and detailing...just have to remember that the commander's chair supports stick up slightly so you have to use the turret ring to push that forward slightly when you go to add the turret in place. The turret will rotate but not 360 degrees obviously because of interference with other detail items in the turret hull and the fact that the commander's chair itself doesn't rotate with the turret, so don't try to do too much here or you may knock something loose in the process!

Next up will be getting everything ready for paint!

  • Member since
    January 2013
Posted by jibber on Monday, May 26, 2014 11:28 PM

Bill those MG's and the mantlet turned out to be a real pain, nice job working out those problems. You really have to study these instructions and think them through because to many times they're just wrong and leaves us with a heck of mess to deal with. Coming along nicely.

Terry  

  • Member since
    July 2006
  • From: New Jersey
Posted by redleg12 on Tuesday, May 27, 2014 5:21 AM

Bill - All that turret detail....the most important thing is you know its there!! Keep it going.

Rounds Complete!!

"The Moral High Ground....A Great Place to Emplace Artillery."

  • Member since
    July 2004
  • From: Texas
Posted by wbill76 on Tuesday, May 27, 2014 11:43 AM

Thanks Terry! I suppose that's what makes the difference between building and just 'assembling'! Wink Always have to keep an eye out for the little pitfalls from time to time in the instructions!

BeerMike

I hear you there...but since the turret's easily removed for viewing, it's there to be seen for anyone who's curious down the road as well. Smile

  • Member since
    July 2004
  • From: Texas
Posted by wbill76 on Tuesday, May 27, 2014 1:53 PM
Made some more progress over the last couple of days in the paint-slinging department. First up was the usual prep work to get things ready...so some poster blue-tack was used to mask off the wheel mount points on the suspension and to create the ever-necessary 'wheels on a stick' for those components. I also used very small amounts of the blue-tack to mask the periscope faces on the turret and some painter's blue tape on the fighting compartment interior and it was time for paint.  First up was a primer coat of MM enamel Italian Dark Brown.  Then a base coat of a custom mix of 50/50 MM enamel Light Gray/Panzer Dunkelgelb.  Road wheels got their rubber rims done after the primer coat using MM enamel Gunmetal. The hubs were masked using a draftsman's circle template and the base coat airbrushed on the outer facing wheels while the inner surfaces were left in the primer color.  Next up will be applying the camo pattern.
  • Member since
    August 2012
  • From: Parker City, IN.
Posted by Rambo on Tuesday, May 27, 2014 2:01 PM

Looking great Bill glad to see the road wheels out of the way

Clint

  • Member since
    January 2007
Posted by the doog on Tuesday, May 27, 2014 4:20 PM

Geez, that's alot of detail packed into that turret---I couldn't imagine trying to actually fit in, an operate those guns in there!

  • Member since
    July 2004
  • From: Texas
Posted by wbill76 on Tuesday, May 27, 2014 7:01 PM

Thanks Clint! Road wheels are a necessary evil on these vehicles for sure. Wink

Karl

Pretty tight space between the guns and periscopes, not exactly a 'creature comfort' environment! Big Smile
  • Member since
    January 2013
Posted by jibber on Wednesday, May 28, 2014 3:24 PM

Bill when you spray MM, what are you thinning it with and at what ratio? I've always sprayed Tamiya but I like the shades you get and it's really going on nicely. I've sprayed enamels and maybe I didn't have the right mix but I never got it as smooth as what I see here. I know there are a lot of others using MM and I'd like to give it another try. Thanks, Terry

  • Member since
    July 2004
  • From: Texas
Posted by wbill76 on Wednesday, May 28, 2014 4:40 PM
jibber

Bill when you spray MM, what are you thinning it with and at what ratio? I've always sprayed Tamiya but I like the shades you get and it's really going on nicely. I've sprayed enamels and maybe I didn't have the right mix but I never got it as smooth as what I see here. I know there are a lot of others using MM and I'd like to give it another try. Thanks, Terry

I thin MM paints with their Universal Enamel Thinner. The ratio isn't an exact thing, I try to get it the consistency of skim milk and then adjust air pressure and work with my double-action Aztek where needed to adjust the needle settings, nozzle type, etc. for the result I'm after. HTH! Beer
  • Member since
    July 2004
  • From: Texas
Posted by wbill76 on Wednesday, May 28, 2014 4:54 PM

More paint progress to report today. Camo pattern is on. I applied it free-hand and used MM enamel Khaki for the green splotches first then added the brown splotches with a custom mix of 50/50 MM enamel Leather and Military Brown. Some adjustments with the basecoat mix here and there and then a light misting coat of highly thinned basecoat mix to tie it all together.

Next up will be getting the suspension installed and start work on the other remaining details.

  • Member since
    July 2004
  • From: Texas
Posted by wbill76 on Friday, May 30, 2014 2:02 PM

More progress to report, this time in the suspension and tracks department. I removed all the blue tack that had masked the mounting points and then did some 'pre-weathering' on the lower hull and suspension areas. I stippled some enamel MM Burnt Umber to create some scuffing/chipping given where the tracks would run and likely wear that would occur. Much of this area is going to be obscured by the road wheels but some of it will still be visible and of course more weathering will be applied later with pigments.

Next up where the road wheels, these were installed and the track runs used to ensure that the outermost wheels set up level since their attachment points to the inner hubs isn't very large and the wheels have a tendency to bow out slightly as a result. The contact surfaces on the sprocket teeth and idler wheel were treated with a base of non-buffing MM Metalizer Steel and then dry-brushed with enamel Burnt Umber to create their foundation for the later weathering. The sprockets were carefully glued in place on the rotating pins so that they could move freely to facilitate fitting the workable tracks. The idler wheels aren't adjustable in terms of their position so they weren't glued down and only dry fit to make sure everything lined up correctly.

Earlier when I was airbrushing the primer coat I got a little ahead of myself and also airbrushed the 60-link runs with some MM enamel Burnt Umber. I say I got ahead because they hadn't been test-fitted to the suspension yet and I knew I was going to need more links, just not sure how many...so these will get some more paint attention now that the runs are the right length. Bronco's instructions call for 66 links per side but I only needed 65 per side to get the right amount of sag. If you do use 66, then the idler will have to be modified to be adjustable to take up the extra slack of that added link...you can do that by removing the raised pin on the tension rod (part F28) that the idler attaches to. This will allow the idler to move in its mount but of course the rod won't adjust with it...not a big deal really but I didn't need to do this since the 65 links worked out just fine.

Tracks will get more weathering attention later as well before their final installation. Baby's got her shoes on now!

  • Member since
    December 2002
  • From: Bury St Edmunds, Suffolk, England
Posted by Bish on Friday, May 30, 2014 2:08 PM

Really nice work here Bill. I'll be following the weathering closely.

I am a Norfolk man and i glory in being so


On the bench: Airfix 1/72nd Harrier GR.3/Fujimi 1/72nd Ju 87D-3

  • Member since
    July 2006
  • From: New Jersey
Posted by redleg12 on Saturday, May 31, 2014 6:29 AM

Bill - You are having way too much fun. 3 updates in one week. Looking fine. always good to get the shoes on.

Rounds Complete!!

"The Moral High Ground....A Great Place to Emplace Artillery."

  • Member since
    August 2006
  • From: Oromocto, Canada
Posted by Gun Tech on Saturday, May 31, 2014 8:38 AM

Very nice all around Bill!

I'm going to pay a lot of attention to the next steps.......         

Cool


Jean-Michel    "Arte et Marte"

  • Member since
    July 2004
  • From: Texas
Posted by wbill76 on Saturday, May 31, 2014 10:35 AM

Thanks Bish and J-M!

Mike

it's one of those rare occasions where I have the closest thing to a 'vacation' available to me this week so making the most of it! Wink
  • Member since
    January 2006
  • From: California
Posted by SprueOne on Saturday, May 31, 2014 11:39 AM

Yes, a 'Stay-cation" at the bench is always time well spent. 

Steady progress on the panzer Yes

For some reason, the first thing I think of when I see this build is 'cute' Smile 

Anyone with a good car don't need to be justified - Hazel Motes


Iron Rails 2015 by Wayne Cassell Weekend Madness sprueone

  • Member since
    July 2004
  • From: Texas
Posted by wbill76 on Saturday, May 31, 2014 1:34 PM

Thanks SP! Have to agree with you there. It's definitely got a 'cute' pocket-size feel to it...but the real deal weighed in at 21 metric tons! Big Smile

  • Member since
    July 2003
  • From: On my kitchen counter top somewhere in North Carolina.
Posted by disastermaster on Saturday, May 31, 2014 2:33 PM

 Absolutely PAR for the course.

                                     http://www.picgifs.com/smileys/smileys-and-emoticons/golf/smileys-golf-883735.gif

Sherman-Jumbo-1945

"I was so much older then, I'm younger than that now"


  • Member since
    July 2004
  • From: Texas
Posted by wbill76 on Sunday, June 1, 2014 3:45 PM

Thank you kindly Steve! Beer

Today's 'regular' Sunday update isn't too heavy on pics but does cover an essential step, the install of the on-board tools and equipment. All of the tools were hand detailed using different methods. For the metal portions, these were base coated with MM non-buffing Metalizer Gunmetal and lightly dry-brushed with MM enamel Steel. For the wood portions, these were base coated with the 50/50 Dunkelgelb/Light Gray mix used earlier and then given a light wash of MM enamel Leather followed by a dusting of Burnt Umber artist pastels to create their look. On the jack block, I scribed in some wood-grain detail using the point of a needle file to add some extra detail. Bakelite handles on the wire cutters and the engine crank were done with MM enamel Italian Dark Brown. For the jack and fire extinguisher, I mixed up a slightly darker shade of Dunkelgelb/Light Gray to provide some contrast for those parts as they would've come from a different manufacturer/supplier so their shade would naturally be different from the vehicle itself. For good measure, I also detailed the turret MGs while I was at it.

So without further ado, here's where the pocket Tiger stands for now:

Next up will be working on the rear hull details like the spare tracks, exhaust, tail lights, etc. before this one's ready for the decals and the weathering process to begin.

cml
  • Member since
    March 2007
  • From: Brisbane, Australia
Posted by cml on Sunday, June 1, 2014 10:44 PM

Thanks for posting about this Bill.

I've always wondered whether it's best to try and detail them whilst on the tank or separately. I think i'll be following your method from now on and detailing individually before affixing to the tank.

Chris

  • Member since
    July 2004
  • From: Texas
Posted by wbill76 on Monday, June 2, 2014 3:03 PM

My pleasure Chris! I personally prefer to paint my tools off the vehicle and then install them because it provides more flexibility and then they get 'tied in' during the weathering process. Others prefer to do it the other way around, so whatever works best for you is all that counts! Wink

  • Member since
    July 2004
  • From: Texas
Posted by wbill76 on Sunday, June 8, 2014 3:52 PM

Another round of progress to report! Finished off the details that were left on the rear hull. I detailed the two spare links using a combination of dry-brushed Steel, a light wash of Rust, and then some artist pastel treatment using various hues before installing them in place in the rack. Brake lights were picked out with Tamiya Clear Red and the exhaust weathered up to finish things up using a similar approach as that used on the spare tracks minus the Steel dry-brushing.

I also did some work on the track runs. These were dry-brushed with Steel followed by a wash of thinned enamel Raw Umber. More weathering to follow later on with the pigments of course.

Then it was time to seal it all up with some Future to protect the foundation paint work and set the stage for the weathering. Airbrushed a Future coat and let that stand for an hour before applying the decal markings. Speaking of which, the kit-supplied decal sheet was a bit of a let-down. The sheet provides markings for three different vehicles but most of the crosses were printed off register...I was able to salvage enough from the different sets though to get a decent single set to apply to mine though it was a close thing.

Markings were applied along with some Solvaset to help them snug down. I'll apply a 2nd coat of Future tomorrow to seal that all in and let that set up for at least 24 hours before going any further. Markings are for a vehicle with Panzer Regiment 1 in Russia, 1943.

That's it for now, next up will begin the weathering adventure!

  • Member since
    January 2006
  • From: California
Posted by SprueOne on Sunday, June 8, 2014 8:25 PM

decals look clean and flat. Those tracks though, now those are just sexy  Cool 

Anyone with a good car don't need to be justified - Hazel Motes


Iron Rails 2015 by Wayne Cassell Weekend Madness sprueone

  • Member since
    April 2005
  • From: Gothenburg
Posted by JohanT on Monday, June 9, 2014 3:21 PM

Chilling out... ; )

  • Member since
    July 2004
  • From: Texas
Posted by wbill76 on Monday, June 9, 2014 3:26 PM

Thanks SP1! Can't argue with you on the tracks, they are such a prominent feature on this little guy after all.

Johan

glad to have you hanging out as well! Beer
MrT
  • Member since
    December 2010
Posted by MrT on Wednesday, June 11, 2014 12:25 PM

Very nice Bill!  As usual.

Terry

  • Member since
    February 2010
  • From: Maine
Posted by Stage_Left on Wednesday, June 11, 2014 12:56 PM

Still enjoying this build Bill. I have to agree with SprueOne about the tracks Yes

Dave

  • Member since
    July 2004
  • From: Texas
Posted by wbill76 on Friday, June 13, 2014 3:30 PM

Terry

and Dave I appreciate the comments and support gents! Beer
  • Member since
    July 2003
  • From: On my kitchen counter top somewhere in North Carolina.
Posted by disastermaster on Saturday, June 14, 2014 3:54 PM

    Just lookin' in.http://www.millan.net/anims/gifs/peek.gif

http://www.millan.net/anims/gifs/cowboy.gifLooking forward to seeing it all.  http://www.millan.net/anims/gifs/sample_bikini.gif

                Ya' gettin' there Bill.........   http://www.millan.net/anims/gifs/tute.gif

Sherman-Jumbo-1945

"I was so much older then, I'm younger than that now"


  • Member since
    January 2007
Posted by the doog on Saturday, June 14, 2014 4:57 PM

You're a modeling machine, Bill.

Looking good, as usual!

  • Member since
    July 2004
  • From: Texas
Posted by wbill76 on Saturday, June 14, 2014 5:02 PM

Thanks Steve and Karl! Beer

  • Member since
    April 2006
  • From: ON, Canada
Posted by jgeratic on Saturday, June 14, 2014 5:16 PM

Bill, looking good, and that top view is interesting.  The segmented fenders make it almost look like a Daimler armoured car.

regards,

Jack

  • Member since
    July 2004
  • From: Texas
Posted by wbill76 on Saturday, June 14, 2014 5:45 PM

Thanks Jack! The gapped fenders certainly give it a unique look. A buddy of mine keeps calling it the 'flying squirrel'! Wink

  • Member since
    July 2004
  • From: Texas
Posted by wbill76 on Sunday, June 15, 2014 3:07 PM

Picking up where I left off last time, I applied a second coat of Future over the decals once they had fully set and let that cure for a good 24 hours before starting in on the weathering process. First order of business was the application of a thinned MM enamel overall wash of Raw Umber (roughly 90/10 thinner-to-paint).

This inevitably darkens the overall finish but never fear, the next step addresses that using a dot filter approach. I applied small dots of MM enamel Light Gray, Raw Sienna, and the 50/50 base coat mix from earlier. The dots are blended together using a square brush lightly dampened with thinner to produce a nice filter and streaking result. I worked small sections at a time and wore a breather mask due to the high thinner exposure during this process starting at the front of the hull and working my way back.

After a couple hours, the dot filter was done on the hull and turret. Next up will be a pin wash to bring out some of the detail further and get things ready for the pigment weathering stage on the suspension and tracks.

  • Member since
    July 2006
  • From: New Jersey
Posted by redleg12 on Sunday, June 15, 2014 8:23 PM

I return from the great white north to find this....fantastic, always love your camo.

Rounds Complete!!

"The Moral High Ground....A Great Place to Emplace Artillery."

  • Member since
    July 2004
  • From: Texas
Posted by wbill76 on Monday, June 16, 2014 11:37 AM

Thanks Mike! Glad to hear you survived your trip and are back in somewhat warmer environment just in time for summer! Wink

  • Member since
    December 2002
  • From: Bury St Edmunds, Suffolk, England
Posted by Bish on Monday, June 16, 2014 11:46 AM

Really great work there as always. I like the markings, I have not seen that unit insignia before, I like it.

I am a Norfolk man and i glory in being so


On the bench: Airfix 1/72nd Harrier GR.3/Fujimi 1/72nd Ju 87D-3

  • Member since
    July 2004
  • From: Texas
Posted by wbill76 on Monday, June 16, 2014 12:53 PM

Thanks Bish! The markings were a new one to me too, but then the German unit insignia patterns often varied from unit to unit and time/place in the war as well.

  • Member since
    December 2002
  • From: Bury St Edmunds, Suffolk, England
Posted by Bish on Monday, June 16, 2014 1:02 PM

O don't they ever. A new one to me for the Pz Lehr popped up on a build a few days ago. At first I thought yours was the bear of the 3rd Pz Div, but they are different. Its little things like this I like.

I am a Norfolk man and i glory in being so


On the bench: Airfix 1/72nd Harrier GR.3/Fujimi 1/72nd Ju 87D-3

  • Member since
    July 2004
  • From: Texas
Posted by wbill76 on Tuesday, June 17, 2014 5:03 PM

Made some more progress on the weathering front. First up was the application of a pin wash using thinned MM enamel Burnt Umber and a pointed 10/0 brush to bring out the details. Excess wash was cleaned up here and there with clean thinner and the same brush to make adjustments where needed.

The lower hull got some pigment treatment using Mig Dark Mud pigments. This was applied as a wet mixture using tap water with a drop of liquid dishwashing soap added to break the surface tension and left to air dry. After removing excess pigment with stiff bristled brushes and some wet and dry Q-tips, the lower hull and suspension had the look I was after.

Next up will be the weathering on the tracks. Almost home on this one!

  • Member since
    March 2014
Posted by BarrettDuke on Wednesday, June 18, 2014 5:18 AM

Bill, This looks fantastic. Thanks for the step-by-step as well. Looking forward to seeing the finished product.

  • Member since
    January 2013
Posted by jibber on Wednesday, June 18, 2014 8:02 AM

Looks great Bill, love the weathering and camo pattern. You have a real steady hand on that brush.

  • Member since
    July 2004
  • From: Texas
Posted by wbill76 on Wednesday, June 18, 2014 10:41 AM

Thanks BD! Glad it's helpful, almost done with this little pocket tiger.

Jibber

I don't drink coffee so that's probably the secret! Big Smile Thanks for the kind words as well.
  • Member since
    March 2003
  • From: Western North Carolina
Posted by Tojo72 on Thursday, June 19, 2014 10:52 AM

weathering is looking good Bill

  • Member since
    July 2004
  • From: Texas
Posted by wbill76 on Thursday, June 19, 2014 12:30 PM

Thanks Anthony! Beer

  • Member since
    July 2004
  • From: Texas
Posted by wbill76 on Thursday, June 19, 2014 4:31 PM

Pigment weathering continued with the tracks. For these I used Mig Productions Dry Mud, applied it wet, let air dry, then removed the excess pigment with a large round stiff bristle brush until I was happy with the look.

Then it was time to finally fit baby with its shoes! After feeding the tracks in over the sprockets and idlers, I used a small amount of liquid glue to fix the idlers permanently in place but left the sprockets movable to allow for handling and small tension adjustments where needed.

Then under the 'minor detail' department I added some of the dried left-over pigment dust from the tracks and applied it to blend things in with the darker pigment weathering done earlier. I've found that the 'dried' pigment ends up being much finer and easier to work with vs. the straight dry powder in the container for this type of thing plus you use far less pigment in the process and achieve the same end. I also installed the RB Models 2m brass antenna and painted it up to round things out there.

Will let this sit overnight and give it a once over with fresh eyes tomorrow to see if there's anything I missed or need to fine tune before declaring this one 'done'!

  • Member since
    July 2004
  • From: Texas
Posted by wbill76 on Friday, June 20, 2014 1:03 PM
Calling this one done, was a great pleasure to build it over the last four months. Hope you enjoyed following along with me! Beer

  • Member since
    April 2014
Posted by r13b20 on Friday, June 20, 2014 2:38 PM

I'd call it "well done"! Too bad all the interior detail is hidden, but that's a modelers lot in life. Isn't it? Good job. Bob

  • Member since
    July 2004
  • From: Texas
Posted by wbill76 on Friday, June 20, 2014 3:06 PM

Thanks Bob! It's all still visible if the turret is lifted off so I can still peek inside from time to time. You're right though about the modeler's lot! Big Smile

  • Member since
    December 2002
  • From: Bury St Edmunds, Suffolk, England
Posted by Bish on Friday, June 20, 2014 3:23 PM

Well done in deed. As always, a pleasure watching one of your builds, some great how to posts there as well as a great build.

And it defiantly convinced me that I need to add a few Bronco kits to the collection. Until now I wasn't sure what to expect, but they look very nice kits.

I am a Norfolk man and i glory in being so


On the bench: Airfix 1/72nd Harrier GR.3/Fujimi 1/72nd Ju 87D-3

  • Member since
    July 2004
  • From: Texas
Posted by wbill76 on Friday, June 20, 2014 4:22 PM

Thanks Bish! As with any kit maker, some of their older kits are more of a challenge to build but their more recent stuff is very impressive IMHO. Just know that they love to do lots of tiny parts to produce some great detail which at times can create some intricate and delicate assemblies but in the end it's a nice result.

  • Member since
    December 2002
  • From: Bury St Edmunds, Suffolk, England
Posted by Bish on Friday, June 20, 2014 4:43 PM

I am sure its nothing any builder of modern Dragon kits won't be used to Wink

I've been eyeing up 3 of their kits. One of the landwesserschlepper's, Pz II D and Pz II bridgelayer. Still not sure which one I will get first, but I am defiantly going to add one soon.

I am a Norfolk man and i glory in being so


On the bench: Airfix 1/72nd Harrier GR.3/Fujimi 1/72nd Ju 87D-3

  • Member since
    December 2008
  • From: Goffstown, NH
Posted by New Hampshire on Friday, June 20, 2014 6:14 PM

Excellent job!  I would say this was probably one of my favorites of your builds.  Neat and obscure little guy!

Brian

  • Member since
    July 2004
  • From: Texas
Posted by wbill76 on Friday, June 20, 2014 9:20 PM

Bish

I've heard good things about all three of those kits so you should be in good shape no matter which ones you get. Wink

Brian

thanks for the kind words! I'd been wanting to build this one ever since Bronco initially announced they were going to do it, these 'beefy' little tanks have always had an appeal to me. Beer
  • Member since
    February 2010
  • From: Maine
Posted by Stage_Left on Friday, June 20, 2014 9:40 PM

Bill- as others have said, well done....as usual! Another informative WIP Yes

Dave

  • Member since
    July 2004
  • From: Texas
Posted by wbill76 on Saturday, June 21, 2014 10:09 AM

Thanks Dave, glad you enjoyed it along with me. Wink

  • Member since
    July 2003
  • From: On my kitchen counter top somewhere in North Carolina.
Posted by disastermaster on Saturday, June 21, 2014 4:08 PM

This is my favorite shot.

http://www.bpmodels.net/Model/PzIF/Finish/Finish2.JPG

Dusted http://www.sherv.net/cm/emoticons/housework/sweeping-with-broom-smiley-emoticon.gif

    not rusted.

      And as usual, looks great Bill.

Sherman-Jumbo-1945

"I was so much older then, I'm younger than that now"


  • Member since
    July 2004
  • From: Texas
Posted by wbill76 on Saturday, June 21, 2014 5:32 PM

Always glad to get the Smiley King's stamp of approval there Steve! Wink Yes

  • Member since
    January 2007
Posted by the doog on Monday, June 23, 2014 10:24 AM

Looking good, Bil. ANother great project up to your standards!

  • Member since
    July 2004
  • From: Texas
Posted by wbill76 on Monday, June 23, 2014 1:55 PM

Thanks Karl! Beer

  • Member since
    January 2013
Posted by jibber on Monday, June 23, 2014 9:22 PM

Bill this is one fine build, I've really enjoyed following along and thanks for the instructional commentary. I love the dusting, theres so much more to it than a simple "brush on" and "spatter".  One thing I think is sometimes overlooked are the tracks, I like your technique a lot. Thanks again, Terry.

  • Member since
    July 2004
  • From: Texas
Posted by wbill76 on Tuesday, June 24, 2014 12:13 PM

Thanks Terry, always good to hear that the comments on the build are helpful to other builders. It's how I learned (and continue to learn) about many of the things I use so I'm always happy to pass it along. Beer

  • Member since
    August 2006
  • From: Oromocto, Canada
Posted by Gun Tech on Sunday, July 20, 2014 12:33 AM

A fine job you did on this one my friend!  Yes  Beer  

Looks like you had a blast building it too!

Bronco seriously makes me reconsider my Alan kits stashed downstairs.....  So many tempting subjects I already own....      but way better!!!      

I better stick to them though, my wife already has a hard time tolerating my hobby expenses as it is! lol!  Wink 

Jean-Michel    "Arte et Marte"

  • Member since
    July 2004
  • From: Texas
Posted by wbill76 on Sunday, July 20, 2014 6:50 PM

Thanks J-M! It was a very enjoyable build. Bronco has seriously upped their game with their latest kit releases IMHO and they make the Alan kits look like stone-age relics by comparison. Still, I feel your pain about the 'expenses' end of things! Big Smile

  • Member since
    August 2006
  • From: Amherst, MA
Posted by M1 A1 A2 Tanker on Wednesday, July 23, 2014 7:46 PM

Agreed!!!


“Computers are like Old Testament gods; lots of rules and no mercy.”  ~ Joseph Campbell


  • Member since
    August 2006
  • From: Amherst, MA
Posted by M1 A1 A2 Tanker on Wednesday, July 23, 2014 7:49 PM

M1 A1 A2 Tanker

Agreed!!!


“Computers are like Old Testament gods; lots of rules and no mercy.”  ~ Joseph Campbell


  • Member since
    August 2006
  • From: Amherst, MA
Posted by M1 A1 A2 Tanker on Wednesday, July 23, 2014 7:50 PM

disastermaster

This is my favorite shot.

http://www.bpmodels.net/Model/PzIF/Finish/Finish2.JPG

Dusted http://www.sherv.net/cm/emoticons/housework/sweeping-with-broom-smiley-emoticon.gif

    not rusted.

      And as usual, looks great Bill.

Agreed!!!


“Computers are like Old Testament gods; lots of rules and no mercy.”  ~ Joseph Campbell


  • Member since
    May 2014
Posted by Sackgasse on Thursday, July 24, 2014 7:32 AM

Hi Mr. Bill,

I have no favorite - the build log is very good in every step.

Thank you for the effort put into sharing this - remarkable!

Zack

Happy Modeling! Cool

  • Member since
    July 2004
  • From: Texas
Posted by wbill76 on Thursday, July 24, 2014 10:19 AM

Thank you M1 and Zack!

  • Member since
    April 2005
  • From: Gothenburg
Posted by JohanT on Saturday, July 26, 2014 5:26 AM

Thanks Bill!

This is a little gem :)

The petite size is apparent but somehow you manage to make it look big and dangerous anyway.

Very nice!

Very Best Regards

Johan

  • Member since
    July 2004
  • From: Texas
Posted by wbill76 on Saturday, July 26, 2014 10:00 AM

Thanks Johan! I had a lot of fun building it. It's truly a 'pocket Tiger' as you can see from this side-by-side with its 'big brother' Wink

JOIN OUR COMMUNITY!

Our community is FREE to join. To participate you must either login or register for an account.

SEARCH FORUMS
FREE NEWSLETTER
By signing up you may also receive reader surveys and occasional special offers. We do not sell, rent or trade our email lists. View our Privacy Policy.