SEARCH FINESCALE.COM

Enter keywords or a search phrase below:

Bronco Pzkpfw I Ausf. F VK 18.01

19488 views
141 replies
1 rating 2 rating 3 rating 4 rating 5 rating
cml
  • Member since
    March 2007
  • From: Brisbane, Australia
Posted by cml on Sunday, June 1, 2014 10:44 PM

Thanks for posting about this Bill.

I've always wondered whether it's best to try and detail them whilst on the tank or separately. I think i'll be following your method from now on and detailing individually before affixing to the tank.

Chris

  • Member since
    July 2004
  • From: Texas
Posted by wbill76 on Monday, June 2, 2014 3:03 PM

My pleasure Chris! I personally prefer to paint my tools off the vehicle and then install them because it provides more flexibility and then they get 'tied in' during the weathering process. Others prefer to do it the other way around, so whatever works best for you is all that counts! Wink

  • Member since
    July 2004
  • From: Texas
Posted by wbill76 on Sunday, June 8, 2014 3:52 PM

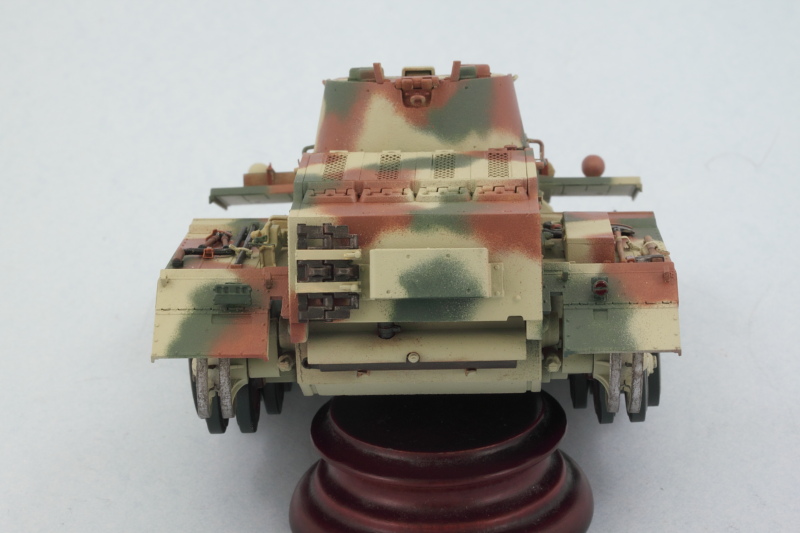
Another round of progress to report! Finished off the details that were left on the rear hull. I detailed the two spare links using a combination of dry-brushed Steel, a light wash of Rust, and then some artist pastel treatment using various hues before installing them in place in the rack. Brake lights were picked out with Tamiya Clear Red and the exhaust weathered up to finish things up using a similar approach as that used on the spare tracks minus the Steel dry-brushing.

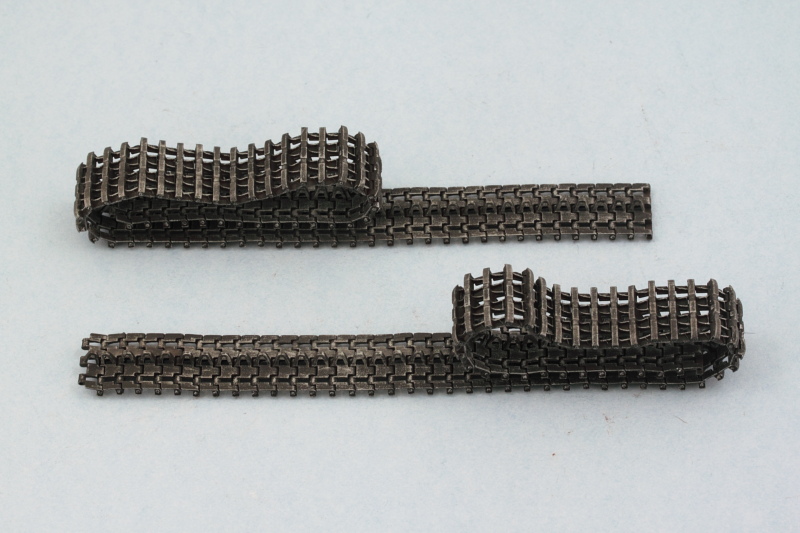
I also did some work on the track runs. These were dry-brushed with Steel followed by a wash of thinned enamel Raw Umber. More weathering to follow later on with the pigments of course.

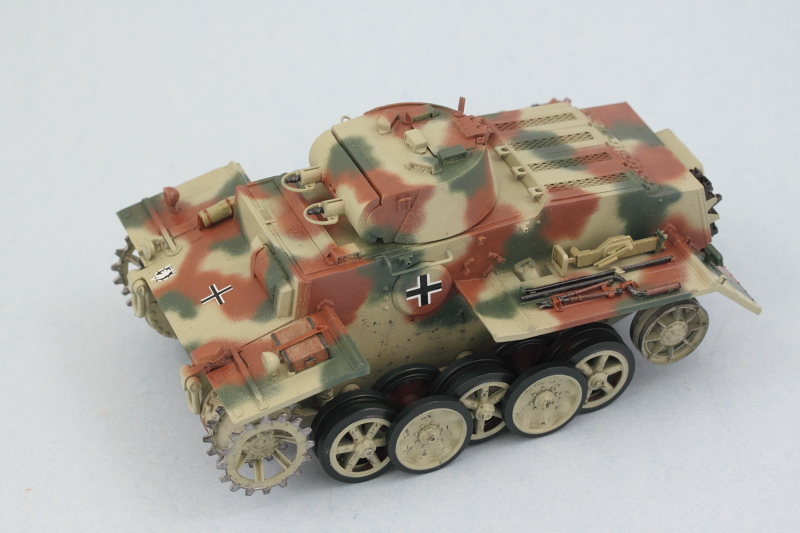
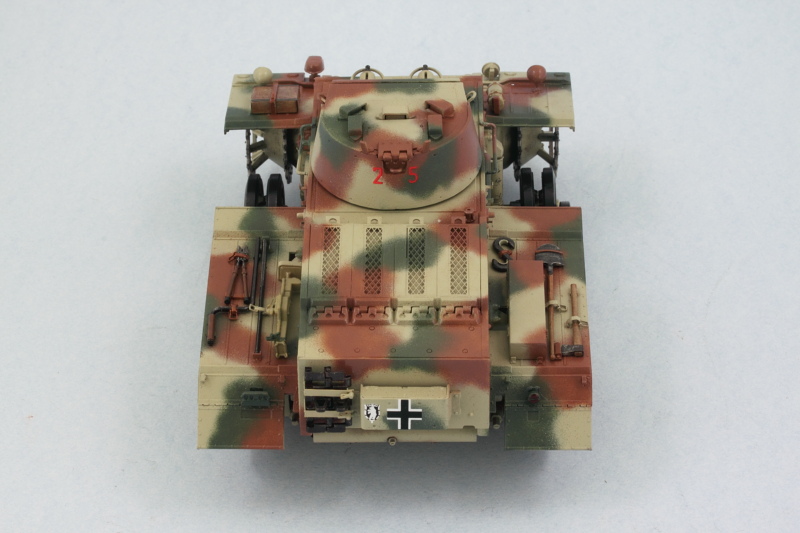
Then it was time to seal it all up with some Future to protect the foundation paint work and set the stage for the weathering. Airbrushed a Future coat and let that stand for an hour before applying the decal markings. Speaking of which, the kit-supplied decal sheet was a bit of a let-down. The sheet provides markings for three different vehicles but most of the crosses were printed off register...I was able to salvage enough from the different sets though to get a decent single set to apply to mine though it was a close thing.

Markings were applied along with some Solvaset to help them snug down. I'll apply a 2nd coat of Future tomorrow to seal that all in and let that set up for at least 24 hours before going any further. Markings are for a vehicle with Panzer Regiment 1 in Russia, 1943.

That's it for now, next up will begin the weathering adventure!

  • Member since
    January 2006
  • From: California
Posted by SprueOne on Sunday, June 8, 2014 8:25 PM

decals look clean and flat. Those tracks though, now those are just sexy  Cool 

Anyone with a good car don't need to be justified - Hazel Motes


Iron Rails 2015 by Wayne Cassell Weekend Madness sprueone

  • Member since
    April 2005
  • From: Gothenburg
Posted by JohanT on Monday, June 9, 2014 3:21 PM

Chilling out... ; )

  • Member since
    July 2004
  • From: Texas
Posted by wbill76 on Monday, June 9, 2014 3:26 PM

Thanks SP1! Can't argue with you on the tracks, they are such a prominent feature on this little guy after all.

Johan

glad to have you hanging out as well! Beer
MrT
  • Member since
    December 2010
Posted by MrT on Wednesday, June 11, 2014 12:25 PM

Very nice Bill!  As usual.

Terry

  • Member since
    February 2010
  • From: Maine
Posted by Stage_Left on Wednesday, June 11, 2014 12:56 PM

Still enjoying this build Bill. I have to agree with SprueOne about the tracks Yes

Dave

  • Member since
    July 2004
  • From: Texas
Posted by wbill76 on Friday, June 13, 2014 3:30 PM

Terry

and Dave I appreciate the comments and support gents! Beer
  • Member since
    July 2003
  • From: On my kitchen counter top somewhere in North Carolina.
Posted by disastermaster on Saturday, June 14, 2014 3:54 PM

    Just lookin' in.http://www.millan.net/anims/gifs/peek.gif

http://www.millan.net/anims/gifs/cowboy.gifLooking forward to seeing it all.  http://www.millan.net/anims/gifs/sample_bikini.gif

                Ya' gettin' there Bill.........   http://www.millan.net/anims/gifs/tute.gif

Sherman-Jumbo-1945

"I was so much older then, I'm younger than that now"


  • Member since
    January 2007
Posted by the doog on Saturday, June 14, 2014 4:57 PM

You're a modeling machine, Bill.

Looking good, as usual!

  • Member since
    July 2004
  • From: Texas
Posted by wbill76 on Saturday, June 14, 2014 5:02 PM

Thanks Steve and Karl! Beer

  • Member since
    April 2006
  • From: ON, Canada
Posted by jgeratic on Saturday, June 14, 2014 5:16 PM

Bill, looking good, and that top view is interesting.  The segmented fenders make it almost look like a Daimler armoured car.

regards,

Jack

  • Member since
    July 2004
  • From: Texas
Posted by wbill76 on Saturday, June 14, 2014 5:45 PM

Thanks Jack! The gapped fenders certainly give it a unique look. A buddy of mine keeps calling it the 'flying squirrel'! Wink

  • Member since
    July 2004
  • From: Texas
Posted by wbill76 on Sunday, June 15, 2014 3:07 PM

Picking up where I left off last time, I applied a second coat of Future over the decals once they had fully set and let that cure for a good 24 hours before starting in on the weathering process. First order of business was the application of a thinned MM enamel overall wash of Raw Umber (roughly 90/10 thinner-to-paint).

This inevitably darkens the overall finish but never fear, the next step addresses that using a dot filter approach. I applied small dots of MM enamel Light Gray, Raw Sienna, and the 50/50 base coat mix from earlier. The dots are blended together using a square brush lightly dampened with thinner to produce a nice filter and streaking result. I worked small sections at a time and wore a breather mask due to the high thinner exposure during this process starting at the front of the hull and working my way back.

After a couple hours, the dot filter was done on the hull and turret. Next up will be a pin wash to bring out some of the detail further and get things ready for the pigment weathering stage on the suspension and tracks.

  • Member since
    July 2006
  • From: New Jersey
Posted by redleg12 on Sunday, June 15, 2014 8:23 PM

I return from the great white north to find this....fantastic, always love your camo.

Rounds Complete!!

"The Moral High Ground....A Great Place to Emplace Artillery."

  • Member since
    July 2004
  • From: Texas
Posted by wbill76 on Monday, June 16, 2014 11:37 AM

Thanks Mike! Glad to hear you survived your trip and are back in somewhat warmer environment just in time for summer! Wink

  • Member since
    December 2002
  • From: Bury St Edmunds, Suffolk, England
Posted by Bish on Monday, June 16, 2014 11:46 AM

Really great work there as always. I like the markings, I have not seen that unit insignia before, I like it.

I am a Norfolk man and i glory in being so


On the bench: Airfix 1/72nd Harrier GR.3/Fujimi 1/72nd Ju 87D-3

  • Member since
    July 2004
  • From: Texas
Posted by wbill76 on Monday, June 16, 2014 12:53 PM

Thanks Bish! The markings were a new one to me too, but then the German unit insignia patterns often varied from unit to unit and time/place in the war as well.

  • Member since
    December 2002
  • From: Bury St Edmunds, Suffolk, England
Posted by Bish on Monday, June 16, 2014 1:02 PM

O don't they ever. A new one to me for the Pz Lehr popped up on a build a few days ago. At first I thought yours was the bear of the 3rd Pz Div, but they are different. Its little things like this I like.

I am a Norfolk man and i glory in being so


On the bench: Airfix 1/72nd Harrier GR.3/Fujimi 1/72nd Ju 87D-3

  • Member since
    July 2004
  • From: Texas
Posted by wbill76 on Tuesday, June 17, 2014 5:03 PM

Made some more progress on the weathering front. First up was the application of a pin wash using thinned MM enamel Burnt Umber and a pointed 10/0 brush to bring out the details. Excess wash was cleaned up here and there with clean thinner and the same brush to make adjustments where needed.

The lower hull got some pigment treatment using Mig Dark Mud pigments. This was applied as a wet mixture using tap water with a drop of liquid dishwashing soap added to break the surface tension and left to air dry. After removing excess pigment with stiff bristled brushes and some wet and dry Q-tips, the lower hull and suspension had the look I was after.

Next up will be the weathering on the tracks. Almost home on this one!

  • Member since
    March 2014
Posted by BarrettDuke on Wednesday, June 18, 2014 5:18 AM

Bill, This looks fantastic. Thanks for the step-by-step as well. Looking forward to seeing the finished product.

  • Member since
    January 2013
Posted by jibber on Wednesday, June 18, 2014 8:02 AM

Looks great Bill, love the weathering and camo pattern. You have a real steady hand on that brush.

  • Member since
    July 2004
  • From: Texas
Posted by wbill76 on Wednesday, June 18, 2014 10:41 AM

Thanks BD! Glad it's helpful, almost done with this little pocket tiger.

Jibber

I don't drink coffee so that's probably the secret! Big Smile Thanks for the kind words as well.
  • Member since
    March 2003
  • From: Western North Carolina
Posted by Tojo72 on Thursday, June 19, 2014 10:52 AM

weathering is looking good Bill

  • Member since
    July 2004
  • From: Texas
Posted by wbill76 on Thursday, June 19, 2014 12:30 PM

Thanks Anthony! Beer

  • Member since
    July 2004
  • From: Texas
Posted by wbill76 on Thursday, June 19, 2014 4:31 PM

Pigment weathering continued with the tracks. For these I used Mig Productions Dry Mud, applied it wet, let air dry, then removed the excess pigment with a large round stiff bristle brush until I was happy with the look.

Then it was time to finally fit baby with its shoes! After feeding the tracks in over the sprockets and idlers, I used a small amount of liquid glue to fix the idlers permanently in place but left the sprockets movable to allow for handling and small tension adjustments where needed.

Then under the 'minor detail' department I added some of the dried left-over pigment dust from the tracks and applied it to blend things in with the darker pigment weathering done earlier. I've found that the 'dried' pigment ends up being much finer and easier to work with vs. the straight dry powder in the container for this type of thing plus you use far less pigment in the process and achieve the same end. I also installed the RB Models 2m brass antenna and painted it up to round things out there.

Will let this sit overnight and give it a once over with fresh eyes tomorrow to see if there's anything I missed or need to fine tune before declaring this one 'done'!

  • Member since
    July 2004
  • From: Texas
Posted by wbill76 on Friday, June 20, 2014 1:03 PM
Calling this one done, was a great pleasure to build it over the last four months. Hope you enjoyed following along with me! Beer

  • Member since
    April 2014
Posted by r13b20 on Friday, June 20, 2014 2:38 PM

I'd call it "well done"! Too bad all the interior detail is hidden, but that's a modelers lot in life. Isn't it? Good job. Bob

  • Member since
    July 2004
  • From: Texas
Posted by wbill76 on Friday, June 20, 2014 3:06 PM

Thanks Bob! It's all still visible if the turret is lifted off so I can still peek inside from time to time. You're right though about the modeler's lot! Big Smile

JOIN OUR COMMUNITY!

Our community is FREE to join. To participate you must either login or register for an account.

SEARCH FORUMS
FREE NEWSLETTER
By signing up you may also receive reader surveys and occasional special offers. We do not sell, rent or trade our email lists. View our Privacy Policy.