SEARCH FINESCALE.COM

Enter keywords or a search phrase below:

Italaerei Fiat-Ansaldo M13/40 Italian “Medium” tank

6317 views
126 replies
1 rating 2 rating 3 rating 4 rating 5 rating
  • Member since
    July 2014
Posted by modelcrazy on Sunday, August 20, 2017 8:40 PM
Thanks mates!
Like Stick, said I was able to make a Margareta out of lemons. I'll enter it into Best Italian subject (an independent category up against my Mc. 202 Folgore) and 1/35 armor. Hopefully it'll get something.

Steve

Building a kit from your stash is like cutting a head off a Hydra, two more take it's place.


http://www.spamodeler.com/forum/

  • Member since
    December 2002
  • From: Bury St Edmunds, Suffolk, England
Posted by Bish on Sunday, August 20, 2017 12:58 PM

Thats a cracker Steve. Great job on the tank and the figures, but that base really gets full marks. Deffinetly going to be taking some ideas from that.

Yes

I am a Norfolk man and i glory in being so


On the bench: Airfix 1/72nd Harrier GR.3/Fujimi 1/72nd Ju 87D-3

  • Member since
    November 2008
  • From: Central Florida
Posted by plasticjunkie on Sunday, August 20, 2017 12:12 PM

Bravo Steve! That is a trophy winner for sure mi amigo! Great job!

 GIFMaker.org_jy_Ayj_O


Too many models to build, not enough time in a lifetime!!

  • Member since
    May 2015
Posted by Griffin25 on Sunday, August 20, 2017 9:49 AM

I missed the finished product till now. Good job bud. Everything looks great. Terrific scene. I love the base! A little elevation change really makes it pop. 


Griffin

  • Member since
    July 2004
  • From: Sonora Desert
Posted by stikpusher on Saturday, August 19, 2017 5:35 PM

Great finish MC! You took the track break lemon, added tequila and salt, and turned this into a fine shooter! (much more enjoyable than lemonade)

Best of luck to you with this project at the contest! You really did a sweet job for adjusting away from your original vision.


F is for FIRE, That burns down the whole town!

U is for URANIUM... BOMBS!

N is for NO SURVIVORS...

       - Plankton

LSM


  • Member since
    July 2014
Posted by modelcrazy on Saturday, August 19, 2017 5:02 PM

Thanks M1 and Hunter. I got water down and desert somewhat, now I need to work on everything in between. 

Steve

Building a kit from your stash is like cutting a head off a Hydra, two more take it's place.


http://www.spamodeler.com/forum/

  • Member since
    January 2016
  • From: A Galaxy Far, Far Away
Posted by Hunter on Saturday, August 19, 2017 4:56 PM

Hello Mr. Steve,

Your build is amazing!! I can't get over all the details. I am not surprised that you produced yet another excellent dio. You are going to do well at your show contest.

Wonderful Job Friend!! Bow DownBow Down

P.S. - Don't forget to show a photo of your 1st place trophy!!

Hunter 


  • Member since
    July 2014
  • From: Rifle, CO. USA
Posted by M1GarandFan on Saturday, August 19, 2017 12:27 PM

I think you've done great job on the whole project. It looks wonderful. Good luck at the contest.

  • Member since
    July 2014
Posted by modelcrazy on Saturday, August 19, 2017 12:16 PM

Gam, PJ and Bish, thank you.

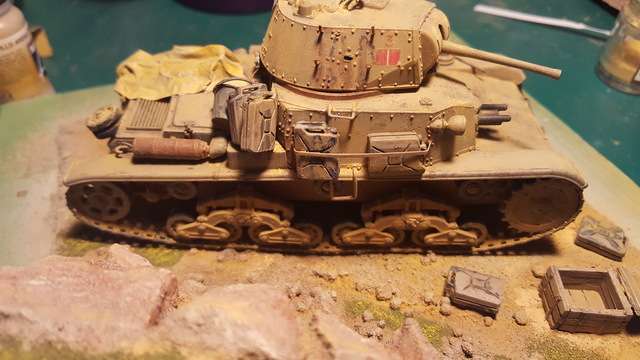
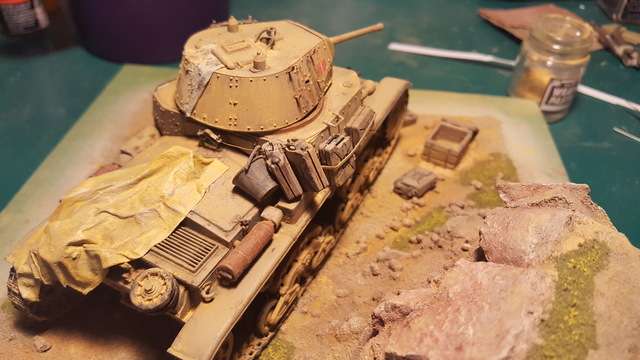
I completed the GIs last night. This build just kept going. From my first idea of just the tank by itself on a base, then wanting to add a desert scene, then breaking a track and having to show it tracked to what the final result is. This was a nice kit especially for its age. It begged for additional detail inside the turret and engine compartment. There is an engine for sale but I wasn't going to spend the money, backtrack and add it in.

Hopefully it will do well at the contest.

I hope you enjoyed this build and I will be starting another tank, either 1/72 or 1/35 soon. Maybe a SdKfz 9/18 halftrack towing a 105mm howitzer.

Steve

Building a kit from your stash is like cutting a head off a Hydra, two more take it's place.


http://www.spamodeler.com/forum/

  • Member since
    December 2002
  • From: Bury St Edmunds, Suffolk, England
Posted by Bish on Friday, August 18, 2017 4:45 PM

Coming on really well Steve.

I am a Norfolk man and i glory in being so


On the bench: Airfix 1/72nd Harrier GR.3/Fujimi 1/72nd Ju 87D-3

  • Member since
    November 2008
  • From: Central Florida
Posted by plasticjunkie on Friday, August 18, 2017 4:35 PM

Great progress Steve, almost there!

 GIFMaker.org_jy_Ayj_O


Too many models to build, not enough time in a lifetime!!

  • Member since
    November 2009
  • From: SW Virginia
Posted by Gamera on Friday, August 18, 2017 11:03 AM

Lookin' good. Great to see you in the home stretch. 

"I dream in fire but work in clay." -Arthur Machen


  • Member since
    February 2015
Posted by acctingman on Friday, August 18, 2017 10:12 AM

Thank you for sharing your knowledge! Bow Down

  • Member since
    July 2014
Posted by modelcrazy on Friday, August 18, 2017 9:28 AM

Thank you acctingman,

You'll pick it up quicker than you think. I just keep adding until layers until I'm happy with it.

I started with a black base coat then sprayed a Vallejo sand color. I kept adding light coats so I didn't cover the black entirely. I then added some areas of Panzer Grey for chipping using a torn off piece of foam.

Using oils, I added small areas of oil stains and a small amount of rust (doesn’t rain much in the desert). Areas such as mechanical joints for oil stains and areas where there may be rust forming.

I then added the tarp, rags and such using tissue paper wetted with thinned PVA glue.

I then added pigments using a wetted brush and pulled the pigments down for streaking. Finally, I applied pigments for the dusting that would happen in the desert and sprayed everything with dull lacquer.

I pretty much play it by ear and add layers. Some time I thing I messed it up but going back after a time it actually looked alright.

I have really learned a lot form watching various YouTubers and incorporating some of their techniques with mine.

Steve

Building a kit from your stash is like cutting a head off a Hydra, two more take it's place.


http://www.spamodeler.com/forum/

  • Member since
    February 2015
Posted by acctingman on Friday, August 18, 2017 8:57 AM

Hi modelcrazy

I come here often and I'm constantly amazed at the talent of all you pro's. Being a total noob myself and JUST starting out on a couple kits I'm just floored to see some of the weathering done here.

Your example here is breath taking. It begs me to "beg" you!

How did you do the weathering on this beauty? I'm trying to learn as much as I can from examples such as yours. I know it will take years of practice!

Thank you!

  • Member since
    July 2014
Posted by modelcrazy on Friday, August 18, 2017 7:58 AM

I've been a little sidetracked this week but have still been able toget some paint on the GIs. I have a few more things to do to them. I want to get everything done for our local contest in Sep.

Steve

Building a kit from your stash is like cutting a head off a Hydra, two more take it's place.


http://www.spamodeler.com/forum/

  • Member since
    July 2004
  • From: Sonora Desert
Posted by stikpusher on Saturday, August 12, 2017 12:05 AM

CapnMac82


stikpusher

think of these guys...


That scene (rather a lot of the Tatoine scenes) were shot in Tunisia, whic makes screen shots like this ferrtile ground for those modeling the north African deserts.

(Just remember that there's only the one sun in the sky over the north African desert Smile )


that portion was filmed in Death Valley, CA. Tunisia was the location for Mos Eisly and the moisture farm locales.


F is for FIRE, That burns down the whole town!

U is for URANIUM... BOMBS!

N is for NO SURVIVORS...

       - Plankton

LSM


  • Member since
    November 2005
  • From: Formerly Bryan, now Arlington, Texas
Posted by CapnMac82 on Friday, August 11, 2017 11:45 PM

stikpusher

think of these guys...

That scene (rather a lot of the Tatoine scenes) were shot in Tunisia, whic makes screen shots like this ferrtile ground for those modeling the north African deserts.

(Just remember that there's only the one sun in the sky over the north African desert Smile )


  • Member since
    July 2003
  • From: On my kitchen counter top somewhere in central North Carolina.
Posted by disastermaster on Friday, August 11, 2017 3:33 PM

OK,  think of THESE guys..........

https://media.tenor.com/images/8cb21b62ba9af93bc6d3f13b4d182f40/tenor.gif

Save

 https://i.imgur.com/LjRRaV1.png


  • Member since
    July 2014
Posted by modelcrazy on Friday, August 11, 2017 3:11 PM

Yeah, I think on one of the starting scenes in Patton, where the locals are looting the GI's at Kasserine and run away when Bradly arives.

Steve

Building a kit from your stash is like cutting a head off a Hydra, two more take it's place.


http://www.spamodeler.com/forum/

  • Member since
    July 2004
  • From: Sonora Desert
Posted by stikpusher on Friday, August 11, 2017 2:46 PM

MC, you are dead on target now! That looks perfect for a derelict vehicle that has been somewhat picked over...

think of these guys...


F is for FIRE, That burns down the whole town!

U is for URANIUM... BOMBS!

N is for NO SURVIVORS...

       - Plankton

LSM


  • Member since
    November 2009
  • From: SW Virginia
Posted by Gamera on Friday, August 11, 2017 9:13 AM

modelcrazy

Gam,

Yep, but it's the tied end of the bag. I knew that when I placed it but the vehicle has been there for a week or two, the site has been looted and the crew was working on it before they disappeared. So things may have shifted a bit, so I though what the heck....besides, it's hard now.

D,

Thanks, Stick is an invaluable source of info on just about anything I work on. Especially if you want to get it right.


Awesome! When you referred to painting them I'd assumed they'd dried and after all that work I really didn't want to point out that to you! I'd hate to see you pry them up and try to move them now. All's well that ends well! Big Smile  

"I dream in fire but work in clay." -Arthur Machen


  • Member since
    July 2014
Posted by modelcrazy on Friday, August 11, 2017 8:57 AM

Gam,

Yep, but it's the tied end of the bag. I knew that when I placed it but the vehicle has been there for a week or two, the site has been looted and the crew was working on it before they disappeared. So things may have shifted a bit, so I though what the heck....besides, it's hard now.

D,

Thanks, Stick is an invaluable source of info on just about anything I work on. Especially if you want to get it right.

Steve

Building a kit from your stash is like cutting a head off a Hydra, two more take it's place.


http://www.spamodeler.com/forum/

  • Member since
    September 2016
  • From: Albany, New York
Posted by ManCityFan on Friday, August 11, 2017 8:48 AM

That is looking GREAT.  It will be even better when you get the figures done.

I really appreciate when Stik lets me know that something "ain't quite right".  His level of knowledge is pretty remarkable.

Sounds like you are having fun with this dio.  I suspect there will be more 1/35 kits in your future.

D

Dwayne or Dman or just D.  All comments are welcome on my builds. 

  • Member since
    November 2009
  • From: SW Virginia
Posted by Gamera on Friday, August 11, 2017 8:48 AM

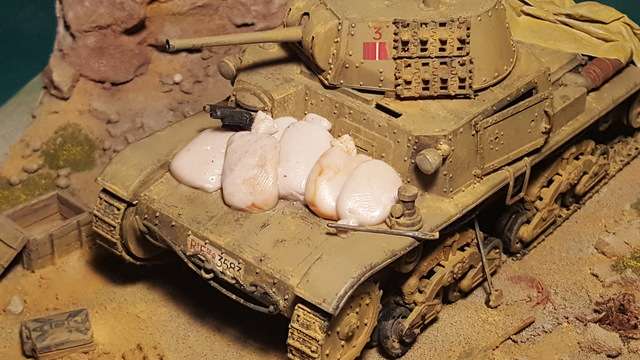
Hey Steve, hate to say this- you can yell at me if you want here. But in the bottom photo the second sandbag from the left side of the tank looks like it's partly blocking the driver's vision slit. Unless the idea is the driver ran over the mine because he couldn't see where he was going you might want to try to smoosh the sandbag down a little if it's still wet.

Sorry..... Embarrassed  

"I dream in fire but work in clay." -Arthur Machen


  • Member since
    July 2014
Posted by modelcrazy on Friday, August 11, 2017 8:12 AM

Thanks Chris. We'll see how the sandbags turn out after some paint.

Steve

Building a kit from your stash is like cutting a head off a Hydra, two more take it's place.


http://www.spamodeler.com/forum/

  • Member since
    August 2017
  • From: Lexington, KY.
Posted by Got Plastic? on Friday, August 11, 2017 8:03 AM

modelcrazy

I went with the welded on strap for the cans. I also hung a couple on the back as well as a bucket. I also hung some track on the left side of the turret and made brackets for the removed track on the right side. I made a few sandbags but not real happy with them. I think they are too big, but next to the GI figures they don't look too bad. They are my first try at making epoxy putty bags. I'll get better at it.

Tomorrow night I really need to get to the GIs as long as Stick dosn't point something else out LOL. I also need to work on something to toss in the create.

Seriously though, I want to thank you Stick for watching so closely and helping me to become a better armor modler Big Smile


Steve - 

With those little observations Stik pointed out your build is looking amazing. You have done a great job highlighting those items.

Chris


On The Bench: Coming Soon Big Smile

  • Member since
    July 2014
Posted by modelcrazy on Thursday, August 10, 2017 10:58 PM

I went with the welded on strap for the cans. I also hung a couple on the back as well as a bucket. I also hung some track on the left side of the turret and made brackets for the removed track on the right side. I made a few sandbags but not real happy with them. I think they are too big, but next to the GI figures they don't look too bad. They are my first try at making epoxy putty bags. I'll get better at it.

Tomorrow night I really need to get to the GIs as long as Stick dosn't point something else out LOL. I also need to work on something to toss in the create.

Seriously though, I want to thank you Stick for watching so closely and helping me to become a better armor modler Big Smile

Steve

Building a kit from your stash is like cutting a head off a Hydra, two more take it's place.


http://www.spamodeler.com/forum/

  • Member since
    July 2004
  • From: Sonora Desert
Posted by stikpusher on Thursday, August 10, 2017 5:25 PM

modelcrazy

I can move the cans no problem. They are only attached by the line and are hanging free. As far as the three handled ones there’s not much I can do baring scratching an extra handle. I'll leave them as they are for this build. There’s so much going on in the scene that most wouldn't notice. Do you have any ideas of what I can put in the create that would be left after looting?


Sandbags Oops I forgot sandbags! I bought some Milliput just for that. I'll make some tonight. I do have extra track I can slap on too.


Id say some ration cans and perhaps bottles, and magazines for the machine guns like in this photo... 


F is for FIRE, That burns down the whole town!

U is for URANIUM... BOMBS!

N is for NO SURVIVORS...

       - Plankton

LSM


JOIN OUR COMMUNITY!

Our community is FREE to join. To participate you must either login or register for an account.

SEARCH FORUMS
FREE NEWSLETTER
By signing up you may also receive reader surveys and occasional special offers. We do not sell, rent or trade our email lists. View our Privacy Policy.