SEARCH FINESCALE.COM

Enter keywords or a search phrase below:

Mack RW rebuild

2067989 views
239 replies
1 rating 2 rating 3 rating 4 rating 5 rating
  • Member since
    May 2009
  • From: Poland
Posted by Pawel on Wednesday, April 4, 2012 10:32 AM

Thanks for your kind words, Karl! I would just hate to post, for example, three pics of the fuel tank, like this is after one layer of gloss black - this is after two layers of gloss black - and so on Big Smile - even I would get bored, not to mention any readers. But I promise to post enough pictures when I build something interesting! Have a nice day

Paweł

All comments and critique welcomed. Thanks for your honest opinions!

www.vietnam.net.pl

  • Member since
    May 2009
  • From: Poland
Posted by Pawel on Tuesday, May 8, 2012 7:59 AM

And here I go again!

Finally I'm ready with the toolboxes. Here's one photo from when they were almost done alcladding:

1:24 Mack RW Superliner by Pawel Mroczkowski

One of the toolboxes has it's door not yet clearcoated, and the slam lock not yet covered with BMF - I wonder if you can spot this on this photo...

But then I completed it and I put on some PE from a UK company called KFS:

1:24 Mack RW Superliner by Pawel Mroczkowski

The boxes are alcladded, clear-coated, slam locks covered with BMF. The PE, Fuel Tank Steps, had to be cut down to fit, but that wasn't so hard. I have a second set that will go on the tanks, so that the steps match.

I also alcladded the bumper:

1:24 Mack RW Superliner by Pawel Mroczkowski

In the bottom of the photo you can see the Italeri kit part for comparison. There are also the headlight mounts I scratchbuilt.

I also noted how "empty" the bottoms of the cab and the sleeper looked like, so I browsed through some reference and added reinforcements. Here's what it looks like now:

1:24 Mack RW Superliner by Pawel Mroczkowski

And that would be it for now, but I hope for a next update soon! Thanks for reading and have a nice day

Paweł

All comments and critique welcomed. Thanks for your honest opinions!

www.vietnam.net.pl

  • Member since
    June 2010
  • From: Australia
Posted by OctaneOrange on Tuesday, May 8, 2012 9:46 PM

You sure have a good attention to detail. the model is all the more impressive because of it.

  • Member since
    May 2009
  • From: Poland
Posted by Pawel on Thursday, May 10, 2012 8:32 AM

OctaneOrange - thanks a lot for your kind words! I put in too much work to skip some minor things now!

But the good thing is I've got another update!

I installed the glass:

1:24 Mack RW Superliner by Pawel Mroczkowski

The windshield had to be narrowed together with the rest of the cab. Because the old side windows were not so usable, and the driver's side window was shown as open in the kit, and I didn't want that so as not to let the dust in, I made new windows out of an old casette box (anybody here remember MCs? That's for Magnetophone Casettes, look it up on wikipedia Geeked). I also made the silver frames for the vent windows and painted the weatherstriping.

After putting on the inner roof, the cab interior now looks like this:


1:24 Mack RW Superliner by Pawel Mroczkowski

even built the CB radio in - it just had to be.

Finally, I wanted to show you just how nice the test-fit of the headlights looked like:

1:24 Mack RW Superliner by Pawel Mroczkowski

And that'd be it for now, I hope for another update soon. Thanks for reading, have a nice day

Paweł

All comments and critique welcomed. Thanks for your honest opinions!

www.vietnam.net.pl

  • Member since
    May 2009
  • From: Poland
Posted by Pawel on Friday, June 1, 2012 7:31 AM

And I'm movin' on - I rebuilt the turn indicator lights from my old model:

1:24 Mack RW Superliner by Pawel Mroczkowski

They both had a rather large sinkhole in them, so as puttying a clear part rather is not practicable, I drilled the center of each light out and put a clear sprue peg in each hole. The silver paint is Gunze, the clear orange is Tamiya.

As the cab is coming together nicely, I decided to work on the frame, so it can meet the cab in the right shape. I finally glued the rear suspension to the frame and put on the suspension bars. I also started working on the air brake plumbing:

1:24 Mack RW Superliner by Pawel Mroczkowski

The flexible airlines are made from soldering wire. Lots of valves, fittings and such will have to be scratchbuilt. As always - if you have any photos of that area of this truck, that would help me greatly - please post them here. Thanks in advance, have a nice day

Paweł

All comments and critique welcomed. Thanks for your honest opinions!

www.vietnam.net.pl

  • Member since
    May 2009
  • From: Poland
Posted by Pawel on Wednesday, June 6, 2012 9:00 AM

I went on and finished plumbing the brakes. There are still some airlines to be added (sliding fifth wheel, trailer lines), but the painting of the frame gets closer and closer. Here's what the rear suspension looks like right now:

1:24 Mack RW Superliner by Pawel Mroczkowski

1:24 Mack RW Superliner by Pawel Mroczkowski

1:24 Mack RW Superliner by Pawel Mroczkowski

To be continued...

All comments and critique welcomed. Thanks for your honest opinions!

www.vietnam.net.pl

  • Member since
    May 2009
  • From: Poland
Posted by Pawel on Friday, June 22, 2012 6:21 AM

Truckin' on!

I added those small little bumpers (rubber on the real thing), that prevent the axles from striking the frame when suspension flexes really hard:

1:24 Mack RW Superliner by Pawel Mroczkowski

Then I moved on to the fifth wheel. I decided, after spending two years on this model, the OOB Italeri fifth wheel isn't good enough:

1:24 Mack RW Superliner by Pawel Mroczkowski

1:24 Mack RW Superliner by Pawel Mroczkowski

What we got here is some european-looking fifth wheel on a Holland air-slide bracket circa 1980. I decided to build it again, re-using what is practical from the Italeri parts. I started with the backplate:

1:24 Mack RW Superliner by Pawel Mroczkowski

On a truck with such unusually heavy rear suspension likeI have the plate needs some cut-outs to mount on the frame. I also started working on the bracket and correcting the shape of the fifth wheel:

1:24 Mack RW Superliner by Pawel Mroczkowski

I finished the backplate:

1:24 Mack RW Superliner by Pawel Mroczkowski

And I'm movin'on with the bracket:

1:24 Mack RW Superliner by Pawel Mroczkowski

I cleaned up the fifth wheel on it's underside and added the bracket-mounts:

1:24 Mack RW Superliner by Pawel Mroczkowski

Of course it has yet to be sanded and so on. I will also try to add the lock and the release linkage to it. I also need to add the slide release mechanism to the bracket, so the work isn't finished yet. To give you an idea what it all is going to look like, let me show you this photo:

1:24 Mack RW Superliner by Pawel Mroczkowski

And that would be it for now - thanks for reading and have a nice day

Paweł

All comments and critique welcomed. Thanks for your honest opinions!

www.vietnam.net.pl

  • Member since
    May 2009
  • From: Poland
Posted by Pawel on Thursday, June 28, 2012 8:03 AM

And another one. I built the locking mechanism on the fifth wheel bracket:

I also added the air dryer on the frame:

And finally I'm ready to paint the frame. Lika one well known celebrity says it - take a look at it, it's the last time you see it in this condition:

First I painted all the recesses black:

Then I lightly sprayed on some gold color - I wanted some of the black to be visible, to simulate the shadows and light dirt:

I wanted to have a "mostly clean, but used" look. What do you say?

Have a nice day

Paweł

All comments and critique welcomed. Thanks for your honest opinions!

www.vietnam.net.pl

  • Member since
    May 2009
  • From: Poland
Posted by Pawel on Thursday, July 26, 2012 9:34 AM

Hello!

I'm still workin' on the chassis. Here's the rear suspension with the flexible lines and other details painted:

1:24 Mack RW Superliner by Pawel Mroczkowski

Then I begun to tackle the complicated task of the fuel tank installation. First I glued them to the supports, that had to be supplemented with some white styrene strip:

1:24 Mack RW Superliner by Pawel Mroczkowski

Later I painted the support details:

1:24 Mack RW Superliner by Pawel Mroczkowski

1:24 Mack RW Superliner by Pawel Mroczkowski

Next, the time ccame for the fuel tank straps. They were made from silver self-adhesive foil. On the photo below you see a 2,5mm strip of the foil, cut from a sheet, a "tee" soldered using two pieces of 0,8mm silver plated copper wire, and a strap already awaiting installation:

1:24 Mack RW Superliner by Pawel Mroczkowski

After installing six such straps, the fuel tanks now look like on the following photos:

1:24 Mack RW Superliner by Pawel Mroczkowski

1:24 Mack RW Superliner by Pawel Mroczkowski

Unfortunately, on the bottom of the tanks, the "Alclad" has become somewhat spotty, that is worrying me. I'm contemplating putting some clear flat on the bottom of the tanks to simulate them just a little dirty, other means might also be necessary to correct that. Anyway, thanks for reading and have a nice day

Paweł

All comments and critique welcomed. Thanks for your honest opinions!

www.vietnam.net.pl

  • Member since
    May 2009
  • From: Poland
Posted by Pawel on Thursday, August 16, 2012 10:10 AM

Hello again!

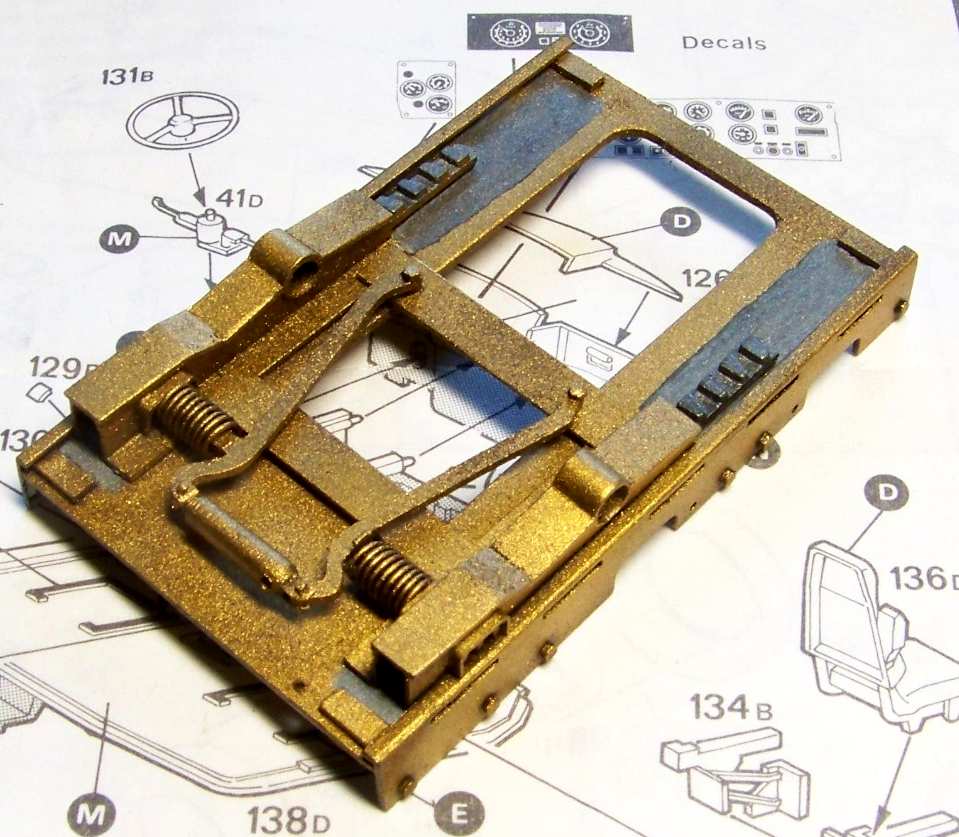
Today I wanted to show you, how I did the fifth wheel. First I painted the mount in the frame colour, then I painted the areas where the paint would wear off in Humbrol 53 - gun metal:

1:24 Mack RW Superliner by Pawel Mroczkowski

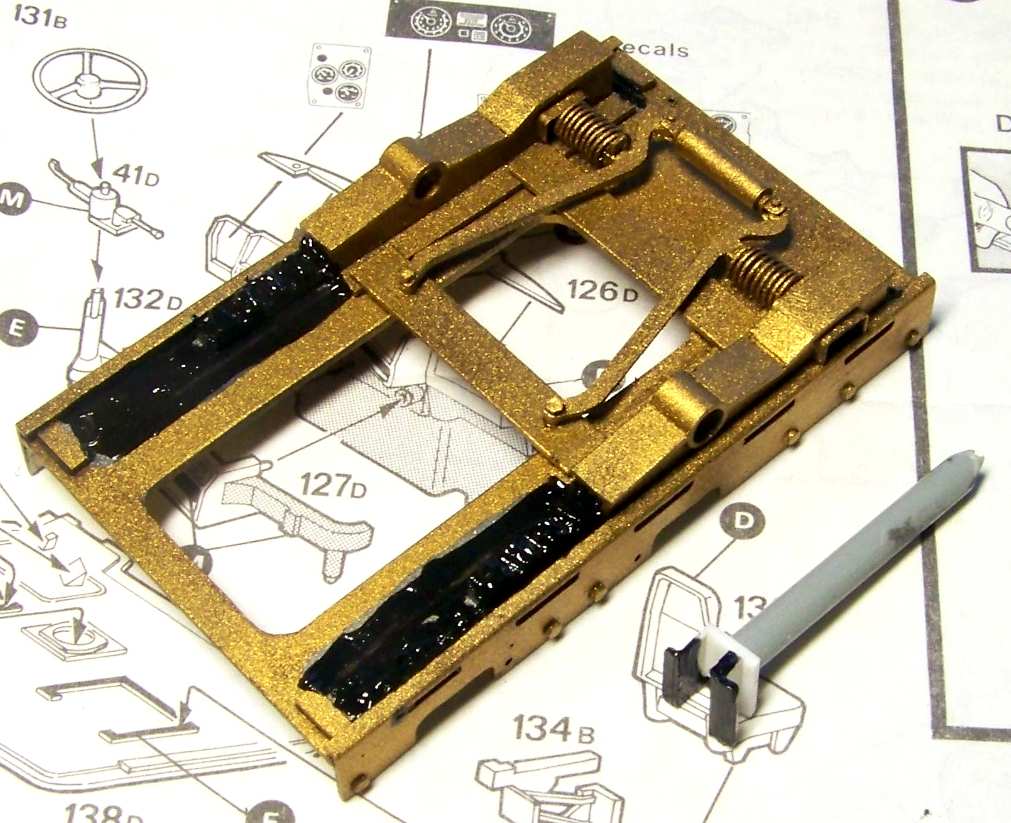
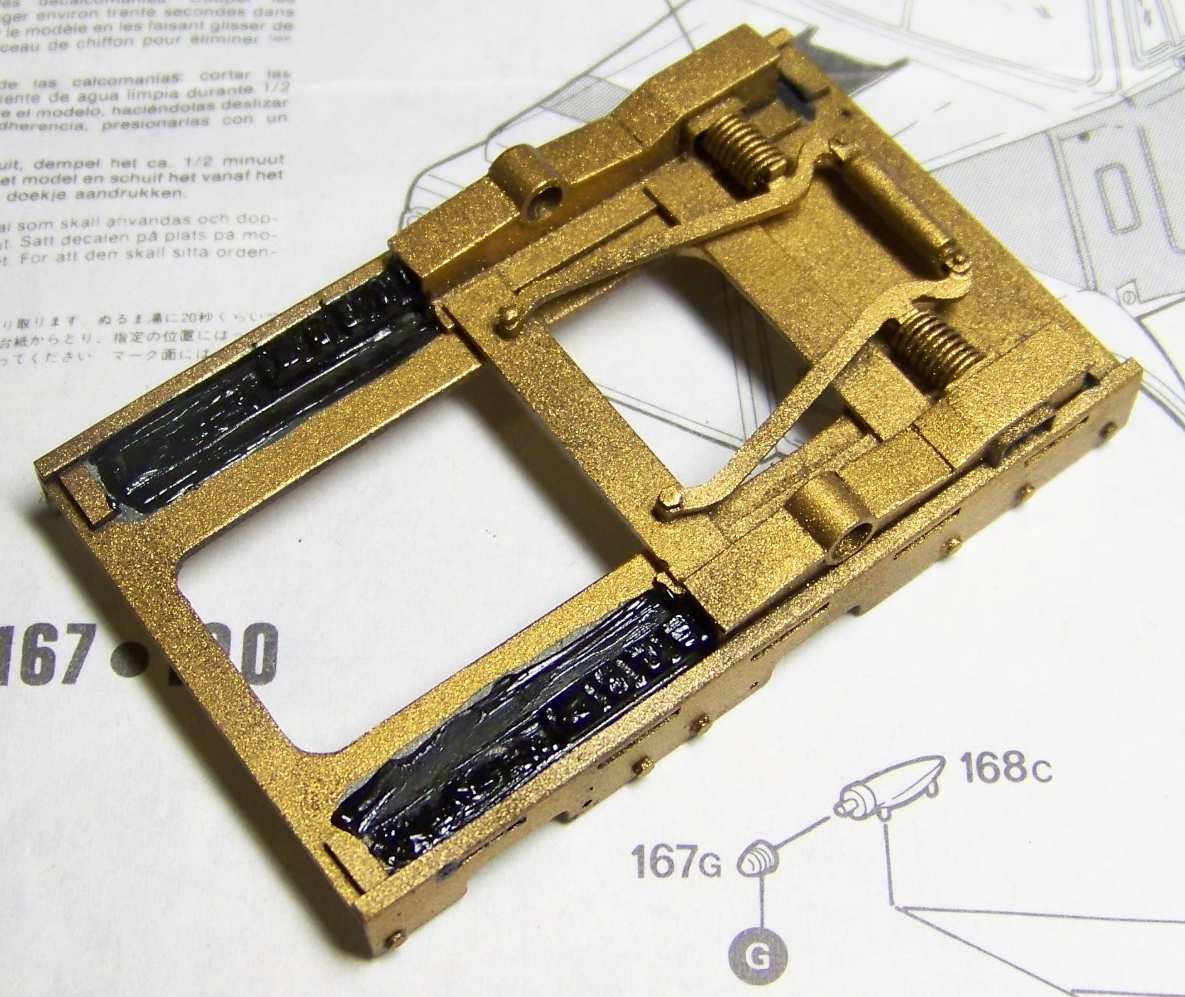
Then I applied black artist oil to simulate the grease. To spraed it, I used a purpose-built tool (pictured):

1:24 Mack RW Superliner by Pawel Mroczkowski

1:24 Mack RW Superliner by Pawel Mroczkowski

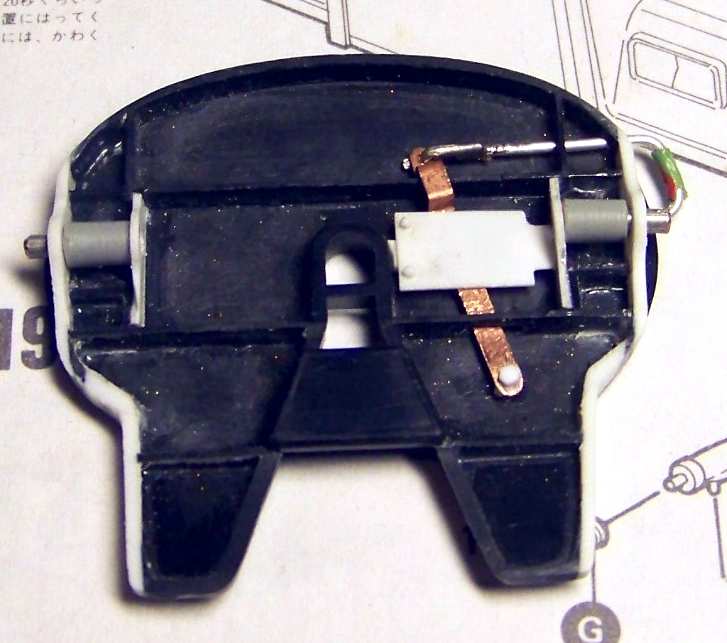
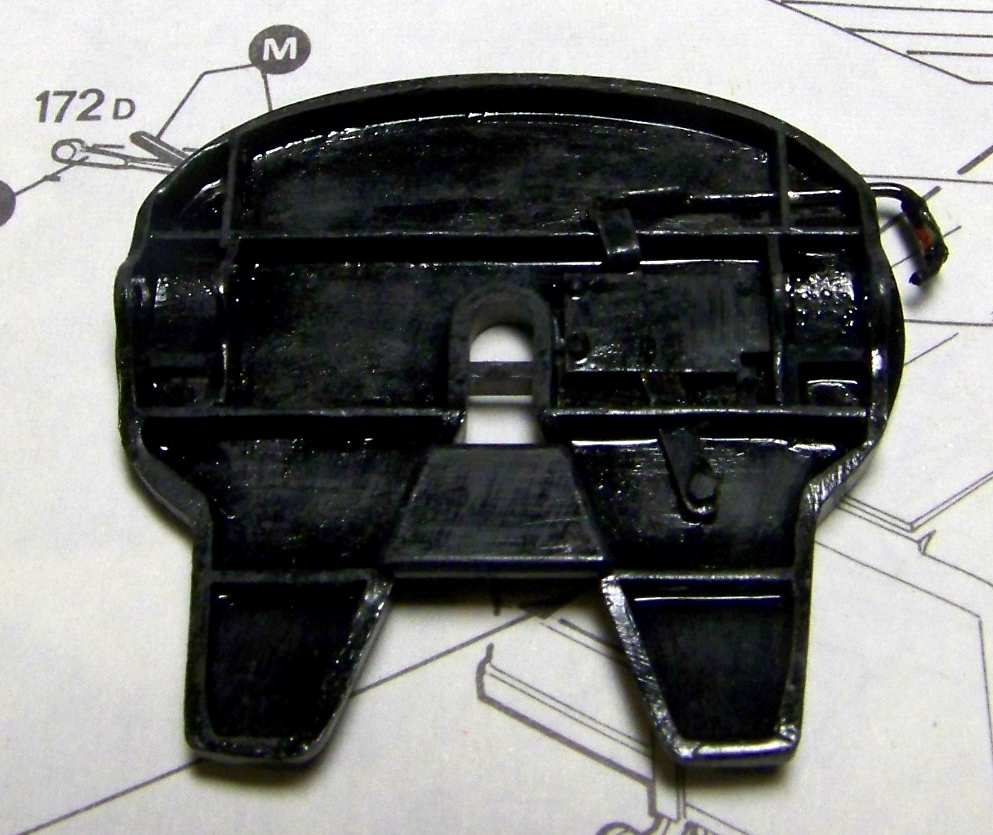
Next I went to do the fifth wheel itself. On the bottom of it I built parts of the locking mechanism and its release:

1:24 Mack RW Superliner by Pawel Mroczkowski

I painted the bottom side gloss black (Humbrol 21), dry brushed with dark gray (Humbrol 32):

1:24 Mack RW Superliner by Pawel Mroczkowski

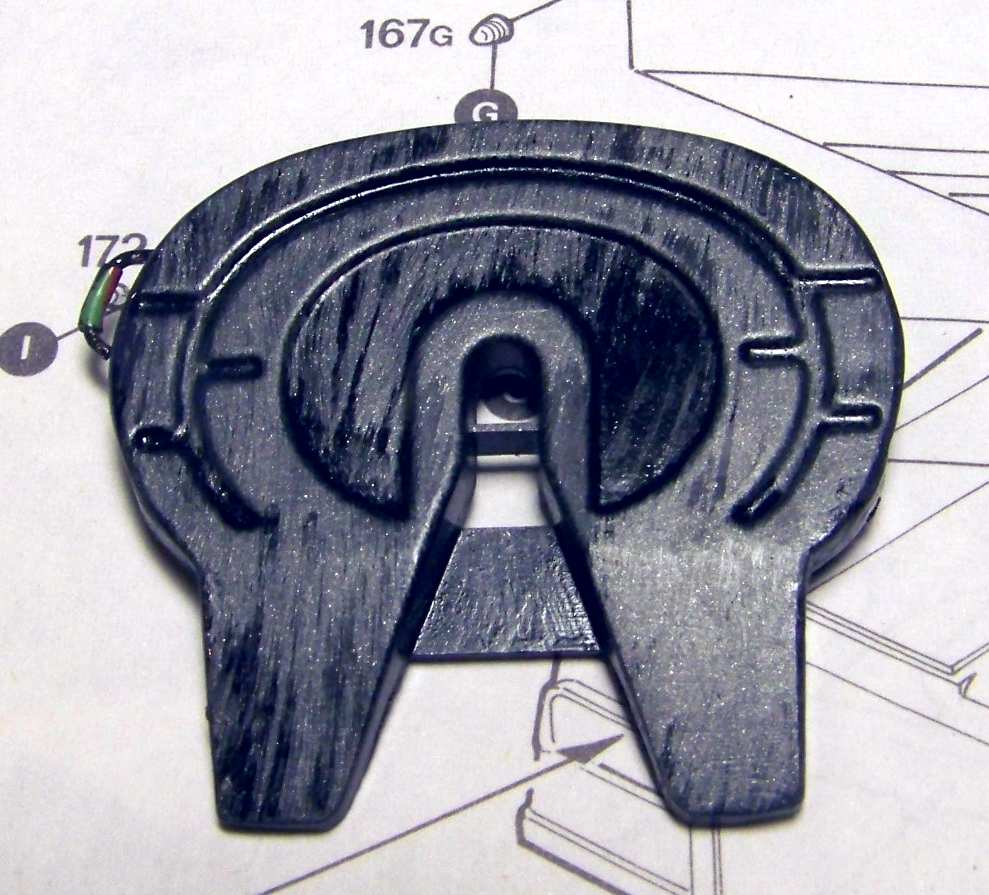
For the top of the fifth wheel again I used Humbrol gun-metal, sparsely brushed over a coat of gloss black:

1:24 Mack RW Superliner by Pawel Mroczkowski

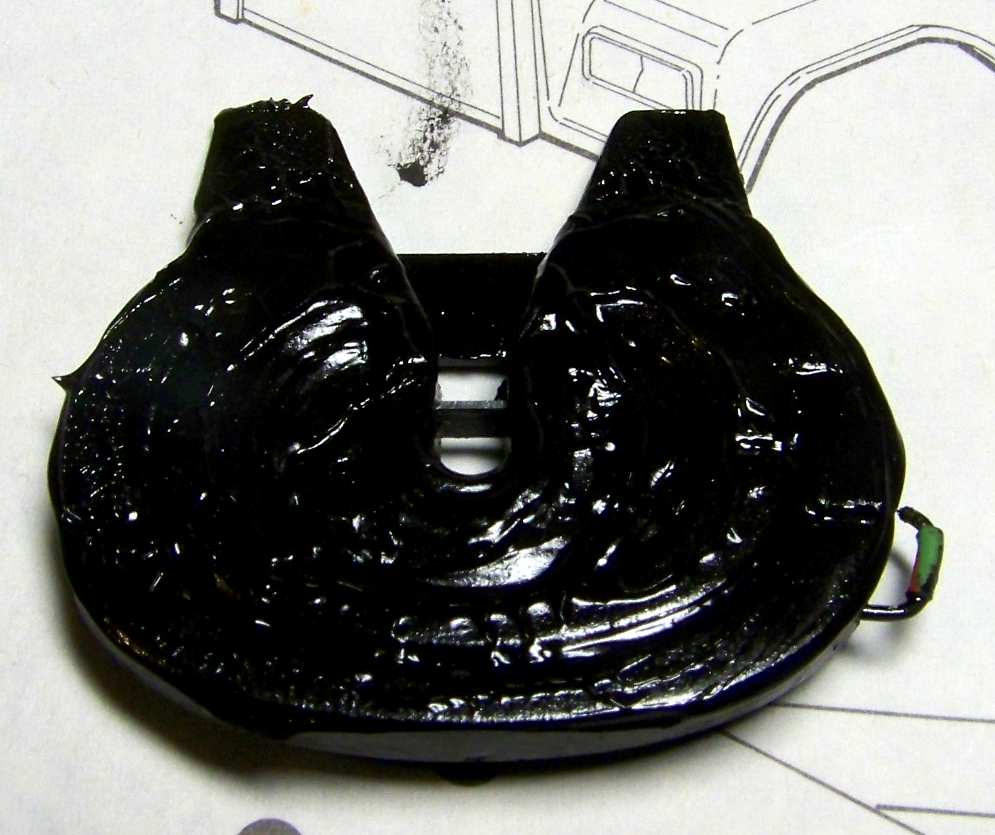
Finally I applied the "grease" - again, a black artist oil. To spread it I took a piece of sheet plastic with a pin to work as a trailer's king pin, and made several circular movements with it to spread the "grease":

1:24 Mack RW Superliner by Pawel Mroczkowski

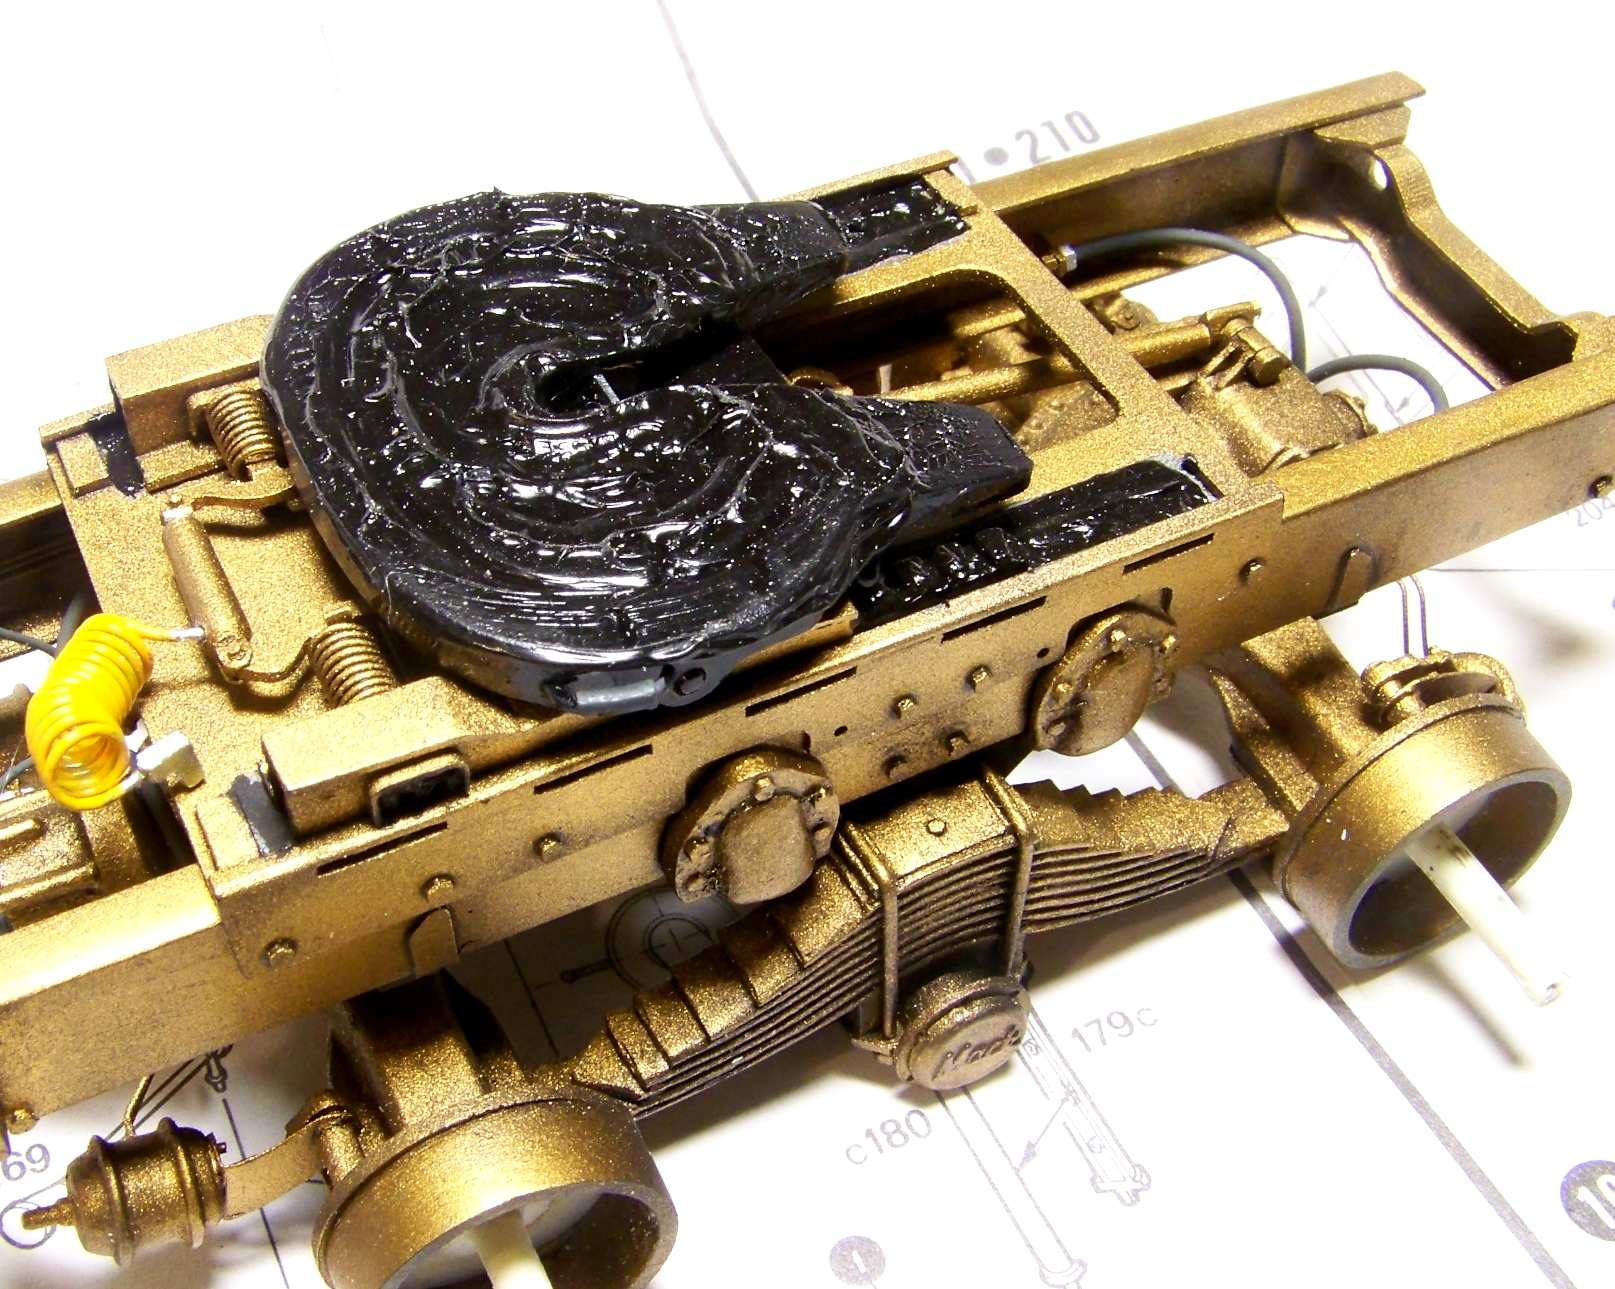
The oil paint took some five days to dry, then I put everything together. The air line to the actuator is made out of soldering wire painted with Gunze paint. the whole subassembly now looks like this:

<

1:24 Mack RW Superliner by Pawel Mroczkowski

Hope you like it, thanks for reading and have a nice day

Paweł

All comments and critique welcomed. Thanks for your honest opinions!

www.vietnam.net.pl

  • Member since
    August 2012
Posted by toncoequipment on Saturday, August 18, 2012 7:08 PM

-


  • Member since
    December 2010
  • From: T-34 Hunting
Posted by TheWildChild on Saturday, August 18, 2012 10:35 PM

Great work! that "grease" is a nice touch! i have never seen leaf spring like that either.... rather interesting.

1/35 XM77  "Sledgehammer", 1964 Chevy Impala Derby Car

Whats next? Aircraft for Ground Attack Group Build

"I dont just tackle to make a play, I tackle to break your will." -Ray Lewis

"In the end, we're all just chalk lines on the concrete, drawn only to be washed away"- 5 Finger Death Punch

"Ahh, my old enemy.......STAIRS"- Po, Kung Fu Panda

  • Member since
    May 2009
  • From: Poland
Posted by Pawel on Tuesday, August 21, 2012 10:10 AM

Anthony - thanks for stopping by, BTW, what happened to all of your posts?

TheWildChild - thanks for your kind words. The leaf spring is a resin part from AITM (American Industrial Truck Models), cleaned up a little by me (you can see that on previous pages).

Thanks a lot for your comments, have a nice day

Paweł

All comments and critique welcomed. Thanks for your honest opinions!

www.vietnam.net.pl

  • Member since
    May 2009
  • From: Poland
Posted by Pawel on Wednesday, September 5, 2012 8:13 AM

And some more updates - this time I finally managed to install the engine on the frame. Before that, I put on the battery boxes and the air tanks slung under them. And now the pictures:

And the front motor mount:

How do you like it?

Thanks for reading, have a nice day

Paweł

All comments and critique welcomed. Thanks for your honest opinions!

www.vietnam.net.pl

  • Member since
    May 2009
  • From: Poland
Posted by Pawel on Wednesday, September 12, 2012 9:08 AM

Well, allright...

I went on to build the drive shaft. Before painting it looked like this:

Then I painted the parts, glued them in place and after two layers of black wash, they now look like this:

Hope you like it - thanks for stopping by, have a nice day

Paweł

All comments and critique welcomed. Thanks for your honest opinions!

www.vietnam.net.pl

  • Member since
    March 2004
  • From: Spartanburg, SC
Posted by subfixer on Saturday, September 15, 2012 11:32 AM

Beautiful work, Pawel!

I'm from the government and I'm here to help.

  • Member since
    May 2009
  • From: Poland
Posted by Pawel on Saturday, September 15, 2012 5:29 PM

Well thanks a lot, Lee! I don't get too much comments on this one lately... So thanks again, have a nice day

Paweł

All comments and critique welcomed. Thanks for your honest opinions!

www.vietnam.net.pl

  • Member since
    January 2007
Posted by the doog on Saturday, September 15, 2012 6:33 PM

The work you're doing on this model is truly epic, Pavel. Don't feel bad about not getting comments in the middle of the build here--a lot more people tend to comment on the finished product. And you're building a rather obscure subject--not many people can give advice, I'm sure. But not that you need any--you're giving a true master's class here!

  • Member since
    May 2009
  • From: Poland
Posted by Pawel on Saturday, September 15, 2012 6:51 PM

Thanks a lot for your comment, Carl! Lack of comments won't get me down, but seeing some interest sure makes it more fun. So thanks a lot for your kind words and have a nice day

Paweł

PS. Also thanks a lot for reading for the people who didn't decide to leave a comment - it's been viewed over 30 000 times now! I appreciate your interest!

All comments and critique welcomed. Thanks for your honest opinions!

www.vietnam.net.pl

  • Member since
    August 2007
  • From: back country of SO-CAL, at the birth place of Naval Aviation
Posted by DUSTER on Saturday, September 15, 2012 11:25 PM

Heck Yeah,  I keep up with this one.

 it's a


You have the skill to both produce a great model and discribe how you did it so, I can learn lots of neat stuff

.....now get back to work;  I'm ready to watch

Steve

Building the perfect model---just not quite yet  Confused

  • Member since
    December 2002
  • From: Northern California
Posted by jeaton01 on Tuesday, September 18, 2012 3:44 PM

I'm keeping up too, Pawel.  Good looking driveshaft.

John

To see build logs for my models:  http://goldeneramodel.com/mymodels/mymodels.html


  • Member since
    May 2009
  • From: Poland
Posted by Pawel on Friday, September 21, 2012 5:04 PM

Steve - thanks for your kind words! If I can help you, or somebody else, with this WIP, it's a good feeling.

John - good to know that! Thanks for your continued interest!

Unfortunately they sent me for another business trip to Germany, so it's a little slow now, but I'll be back! Thanks for checking this one out, have a nice day

Paweł

All comments and critique welcomed. Thanks for your honest opinions!

www.vietnam.net.pl

  • Member since
    May 2009
  • From: Poland
Posted by Pawel on Wednesday, January 16, 2013 8:24 AM

Hello everybody!

This had been slow due to my business trips, and the next business trip is just around the corner, but I tried to use what little time I have and am working on an objective to put a radiator on this one. Well, the radiator is scratchbuilt in this model and it took some serious tweaking to get it to fit under the hood, but now it's done. I also did some scratchbuilding on the bottom of the radiator. I also scratchbuilt the fan clutch and made the lower radiator hose out of 2mm soldering wire. Here's what I got before painting:

Next thing will be painting it all. Thanks for reading, have a nice day

Paweł

All comments and critique welcomed. Thanks for your honest opinions!

www.vietnam.net.pl

  • Member since
    January 2007
Posted by the doog on Wednesday, January 16, 2013 10:47 AM

Pawel,

Trust me, when I tell you that I feel your pain. I"ve been away for a long time due to business and travel, and have missed the bench severely. But the important thing is to do what you can WHEN you can--and what you're doing is pure magic.

That fan is just pure genius! Stick out tongue

  • Member since
    May 2009
  • From: Poland
Posted by Pawel on Thursday, January 17, 2013 2:09 AM

Yeah, Karl, from what I see on the forum, you're on business trips a lot, too! But, as you see, I'm not letting go. That fan clutch sure is one mean little detail, and I'm glad you like it. It will be pretty visible when the hood is open. Thanks for your comment, have a nice day!

Paweł

All comments and critique welcomed. Thanks for your honest opinions!

www.vietnam.net.pl

  • Member since
    August 2007
  • From: back country of SO-CAL, at the birth place of Naval Aviation
Posted by DUSTER on Thursday, January 17, 2013 10:56 PM

Pawel

Just to let you know, because of your fine work and the amout to time it has taken- the amount of pop corn  I have had to eat has made me gain, **** lbs ( thats ++++ kgs to you).

But dont worry about me I'll stick it out with you......... no matter how fat I get


p.s. Out Standing work so far. A real pleasure to watch, Thank You.

Steve

Building the perfect model---just not quite yet  Confused

  • Member since
    October 2010
  • From: Hoodsport, WA
Posted by Dogfish_7 on Sunday, January 27, 2013 8:13 AM

Incredible detail work!

Bruce

  • Member since
    May 2009
  • From: Poland
Posted by Pawel on Monday, January 28, 2013 9:20 AM

Steve, Dogfish7 - thanks a lot for your comments, and for your kind words! As you can see, not many people comment this one - it has many views, awright, but I sure heartly welcome a comment between two updates Big Smile. So thanks again, please stay tuned and have a nice day

Paweł

All comments and critique welcomed. Thanks for your honest opinions!

www.vietnam.net.pl

  • Member since
    October 2010
  • From: Hoodsport, WA
Posted by Dogfish_7 on Wednesday, January 30, 2013 5:54 AM

Your attention to details is astounding!

Bruce

  • Member since
    October 2007
Posted by White_R34 on Wednesday, January 30, 2013 10:44 PM

Stunning detailed work here, just stunning!

Building the Impossible Is my main goal!!
JOIN OUR COMMUNITY!

Our community is FREE to join. To participate you must either login or register for an account.

SEARCH FORUMS
FREE NEWSLETTER
By signing up you may also receive reader surveys and occasional special offers. We do not sell, rent or trade our email lists. View our Privacy Policy.