SEARCH FINESCALE.COM

Enter keywords or a search phrase below:

AMT 67 Mustang Fastback-Completed-05/06

9483 views
100 replies
1 rating 2 rating 3 rating 4 rating 5 rating
  • Member since
    April 2003
  • From: USA
Posted by keavdog on Tuesday, December 7, 2021 9:54 PM

It's all about the details.  Are you going to put a 1/25 version of your self in the drivers seat? Stick out tongue

Thanks,

John

  • Member since
    March 2012
  • From: Corpus Christi, Tx
Posted by mustang1989 on Saturday, March 26, 2022 8:41 PM

keavdog

It's all about the details.  Are you going to put a 1/25 version of your self in the drivers seat? Stick out tongue


Been too long since I've been on this thread so I apologize for not posting any updates. My mom passed away in late January after a battle with Covid. She had pnuemonia in both lungs and it was just too much for her. I spent a week with dad afterwards which was a good thing. Lots of bonding and good times through it all. 

I'll catch everyone up to where I'm currently at with this build in the next few of my posts.

First off. The interior tub is now completed.

Wheels and tires are done as well:


 Forum | Modelers Social Club Forum (proboards.com) 

  • Member since
    August 2009
  • From: MOAB, UTAH
Posted by JOE RIX on Saturday, March 26, 2022 11:43 PM

I am so deeply sorry for your loss my friend. Very glad to hear that you spent that time with your father and help eachother heal. You are always in my thoughts and always available to you.

Now, that there stunning modeling is well worth the wait. That interior tub is right spectacular. Everything looks like the real live thing right down to the tires and wheels. And, I always your extra addition of fine reading material. 

Please share more soon. It is so worth seeing.

Joe 

"Not only do I not know what's going on, I wouldn't know what to do about it if I did". George Carlin

  • Member since
    August 2007
  • From: back country of SO-CAL, at the birth place of Naval Aviation
Posted by DUSTER on Sunday, March 27, 2022 1:01 AM

My condolences on your loss.  

Steve

Building the perfect model---just not quite yet  Confused

  • Member since
    August 2021
Posted by lurch on Sunday, March 27, 2022 1:35 AM

I am truely sorry for your loss. Hope your father is doing better. That is a great job you did and the magazine was a great addition. I like it.

  • Member since
    November 2018
Posted by oldermodelguy on Sunday, March 27, 2022 6:31 AM

I'm sorry for your loss, been there done that and it's never easy.

That interior is looking great ! I owned a 67 GT 390 fastback back in the 1970's.


  • Member since
    March 2012
  • From: Corpus Christi, Tx
Posted by mustang1989 on Sunday, March 27, 2022 6:57 AM

Thanks fellas. Really appreciate all the kind and encouraging words.

The nose to body fit was holding me up in moving forward in a timely fashion but.....this is a holy grail build of mine so have been taking my time with this one.

All of these AMT Mustang kits of this year model ( Fastback, GT-350 and the GT-500) have the exact same problem with the nose to body fit, particularly on the drivers side. A little TLC is all that's needed to fix the problem. 

This is the NASTY join on the drivers side of the car:

Image

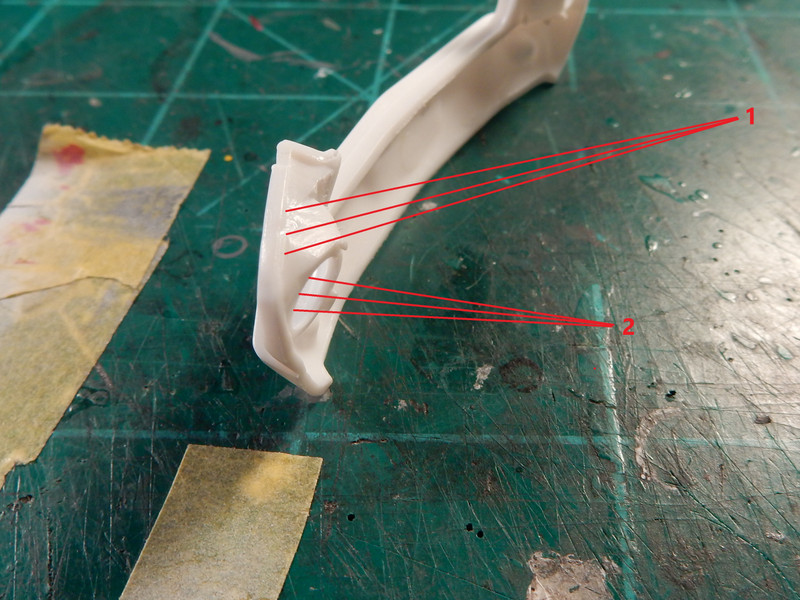
Sanding the front edge of the drivers side fender ALL THE WAY down from the top of the fender where the side contour of the fender is to the bottom helped the gap throught the top an d bottom edges of the fender/ nose seam. Once that was straightened out I noticed that there was a slight interference fit issue behind the headlight on the no se piece so I took a small file and trued the area where the headlight bucket meets the leading edge of the fender called out as area #1 in the photo below. After that I trimmed out the area behind the headlight called out as area #2 in the same photo. These couple of mods seemed to help things out alot.

Image

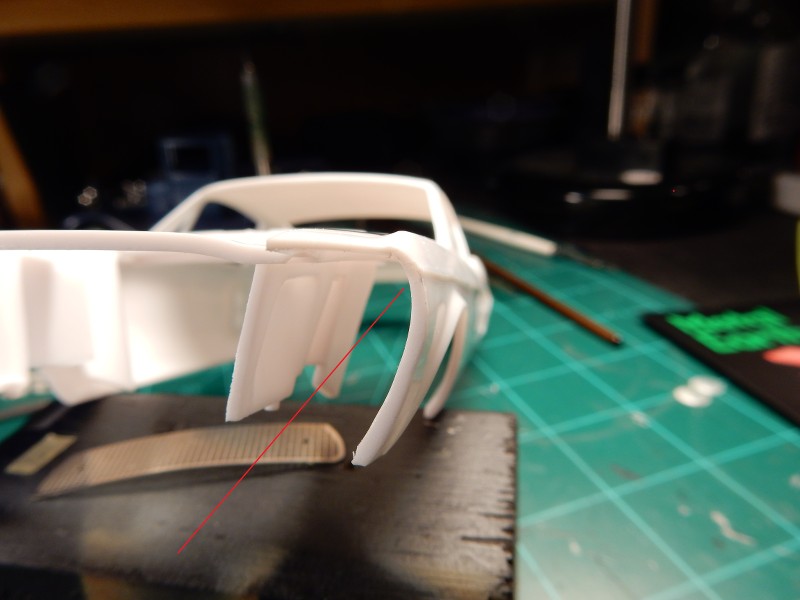
another thing that I did that seemed to help was that I used the back side of my X-Acto knife to carve out some of the "meat" out from the drivers side front fender where the backside of the headlight bucket meets the fender from the inside as pointed out here:

Image

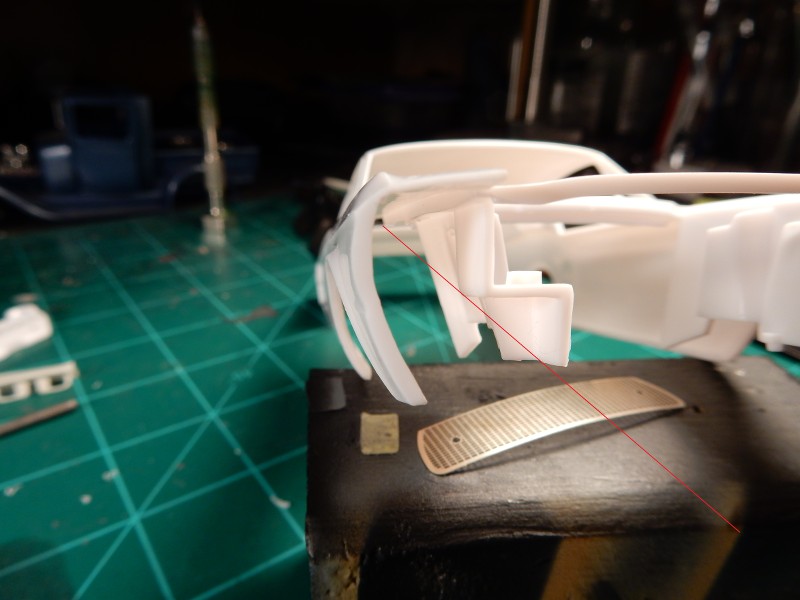
Although the passenger side doesn't seem to have the alignment & fit issues that the drivers side does you can see the difference of what I had to cut down on the drivers side as compared to the same area shown here untouched that's on the passenger side.

Image

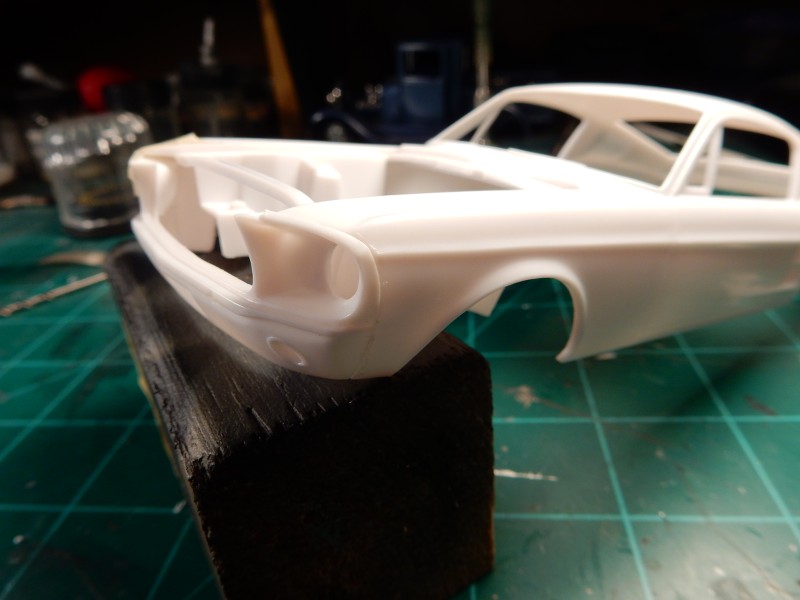
I'm still working through this issue some but I'm getting closer to the point that I can use a little filler in the gaps and sand it down some. You can see that the top of the headlight bucket is now flush with the fender at the top joint and the sides have a cleaner join between the nose piece and the fender all the way down the sides.

Image

This one area of the build is a true challenge to overcome but a little "lovin'" straightens it all out.


 Forum | Modelers Social Club Forum (proboards.com) 

  • Member since
    August 2009
  • From: MOAB, UTAH
Posted by JOE RIX on Sunday, March 27, 2022 10:29 AM

Well done Joe. Sure appreciate you taking the time to detail what steps you took to get that all lined up.

"Not only do I not know what's going on, I wouldn't know what to do about it if I did". George Carlin

  • Member since
    August 2007
  • From: back country of SO-CAL, at the birth place of Naval Aviation
Posted by DUSTER on Monday, March 28, 2022 12:16 AM
“well played”, as they say.Yes
I’m sure that AMT is totally embarrassed and having been called out on this will be repairing the molds as we speak------ OK, may have gone just a smidge over the top. But, at least they should be embarrassed.Embarrassed

Steve

Building the perfect model---just not quite yet  Confused

  • Member since
    March 2012
  • From: Corpus Christi, Tx
Posted by mustang1989 on Tuesday, March 29, 2022 11:33 AM

Thank Joe and Steve. Really appreciate the kind words fellas.

Another area that got some attention was the door handles. In these times of available AM there was just no room at all for these OOB door handles.

So off they came and after smoothing everything out some....here is the replacement resin handle from Fireball Models. Since I've put effort in elsewhere I saw it only fitting that I shouldn't start skimping now.


 Forum | Modelers Social Club Forum (proboards.com) 

  • Member since
    April 2003
  • From: USA
Posted by keavdog on Tuesday, March 29, 2022 12:41 PM

Those look great!  I assume there's PE door locks as well.  Nice detail

Thanks,

John

  • Member since
    July 2014
  • From: Franklin Wi
Posted by Bakster on Tuesday, March 29, 2022 10:14 PM

Incredible work, Joe. Your level of detailing blows me away. The interior looks amazing.

PS: Sorry to hear about your Mom. It is never easy. 

  • Member since
    March 2012
  • From: Corpus Christi, Tx
Posted by mustang1989 on Wednesday, March 30, 2022 12:49 PM

John: You know it man.Cool

Steve: Thank you bro. You're right about not being easy. Pretty tough deal but it's one of those things man........none of us make it out of here alive. It's getting better as time goes though.

Well.....I knew I was gonna need to have more room topside in the engine bay so that the air cleaner wouldn't contact the bottom of the hood so I got to thinkin.....:hmm:.....I've got the AMT GT-350 in the stash with a good factory hood scoop on it but the hood wouldn't interchange with the regular Mustang hood because the nose on the GT-350 is longer which means the hood on that car is longer. So...why not just use the scoop? I went to work and scribed the cut out area that I needed to start removing the scoop from the GT-350 hood.

Image

All cut out and ready for trimming up to all sides of the scoop:

Image

A slight bit of clean up remains but I just sanded and filed up to the sides and then sanded the front from the bottom till I was able to remove the areas right in front of the air intake.

Image

A little more clean up and I'll start working this onto the regular hood after I cut out the opening in the bottom of it for the air cleaner to sit up into.Wink

Image


 Forum | Modelers Social Club Forum (proboards.com) 

  • Member since
    March 2012
  • From: Corpus Christi, Tx
Posted by mustang1989 on Wednesday, March 30, 2022 12:50 PM

Still got a little more working in and a small amount of clean up left to do but the hood scoop is now on .......and I was able to cut the opening out for the air cleaner to sit up inside of on the bottom of the hood.


 Forum | Modelers Social Club Forum (proboards.com) 

  • Member since
    October 2019
  • From: New Braunfels, Texas
Posted by Tanker-Builder on Wednesday, March 30, 2022 2:00 PM

Wall' ya Know! If'n that ain't a slick move.I like it!

  • Member since
    August 2021
Posted by lurch on Wednesday, March 30, 2022 6:12 PM

All looks great. 

  • Member since
    March 2012
  • From: Corpus Christi, Tx
Posted by mustang1989 on Thursday, March 31, 2022 4:43 AM

Thanks TB and lurch. 

I've moved onto the firewall in which there's a definite problem with. I have had the floor mats installed into the interior tub for a while now but will need to slip the tub assy up into the body when it gets to the point of installing it. The problem with that is that I would've had to figure out how to get the floor mats on top of the foot boards of the interior as well as to slip the body around the firewall "wings".

Check it out:

Image

I decided to see if I could approach it from another angle by installing the firewall onto the front of the interior tub and slipping the whole thing up inside of the body in the final assembly stages. The problem with that is I would have to stretch the body around the firewall "wings" I was talking about. NOT something I really care to do.

Image

So I merely cut these off. I'll come back to this later when I have the body installed and figure something out for some covering on the outside of the firewall.

Image

Image

and here we are with the engine installed onto the chassis. Gonna run some brake lines from the mastercylinder, a vacuum line from the brake booster to the back of the carburetor baseplate and install the fan and we'll be pretty much done with this part.

Image


 Forum | Modelers Social Club Forum (proboards.com) 

  • Member since
    July 2014
  • From: Franklin Wi
Posted by Bakster on Thursday, March 31, 2022 10:52 AM

Egad, Joe. Car models can be a real challenge and I don't have to tell you. I love your solutions not only with your latest problem, but also the hood clearance. 

This project is looking awesome.

  • Member since
    July 2014
  • From: Franklin Wi
Posted by Bakster on Thursday, March 31, 2022 10:54 AM

mustang1989
Steve: Thank you bro. You're right about not being easy. Pretty tough deal but it's one of those things man........none of us make it out of here alive. It's getting better as time goes though.

Hang in there.

  • Member since
    October 2019
  • From: New Braunfels, Texas
Posted by Tanker-Builder on Thursday, March 31, 2022 1:12 PM

Aha!

 One of the things I do with this kit is build the interior and firewall assembly in the Body, Then Build the rest of the chassis and running gear.This idea came to me years ago and I just keep doing it that way.

  • Member since
    March 2012
  • From: Corpus Christi, Tx
Posted by mustang1989 on Friday, April 1, 2022 5:57 AM

Bakster

Egad, Joe. Car models can be a real challenge and I don't have to tell you. I love your solutions not only with your latest problem, but also the hood clearance. 

This project is looking awesome.


Thanks Steve. I've been on this one now for the last 8 months so I've definitely been going slow and taking my time with this one to avoid any mistakes. 

I appreciate the kind words on the other front and it is slowly getting better. Thanks bud.


 Forum | Modelers Social Club Forum (proboards.com) 

  • Member since
    March 2012
  • From: Corpus Christi, Tx
Posted by mustang1989 on Friday, April 1, 2022 5:59 AM

Thanks TB. I've built up cars before with the interior and then the chassis but what I didn't like was the constant handling of the body while doing so which put my gloss and paint finish on it at risk constantly. But....that's just me. Cool


 Forum | Modelers Social Club Forum (proboards.com) 

  • Member since
    June 2014
Posted by BrandonK on Friday, April 1, 2022 9:32 AM

Bakster

Egad, Joe. Car models can be a real challenge and I don't have to tell you. I love your solutions not only with your latest problem, but also the hood clearance. 

This project is looking awesome.


I completely agree.

BK

On the bench:

A lot !! And I mean A LOT!!

2024 Kits on deck / in process / completed   

                         14 / 5 / 2  

                              Tongue Tied

  • Member since
    March 2012
  • From: Corpus Christi, Tx
Posted by mustang1989 on Monday, April 4, 2022 2:51 PM

Thanks Brandon! 

Well.....................I had a nice little block of time so I spent a little over an hour prepping and applying the clear coat on this puppy.

No polishing or wet sanding yet and this is the turnout. To say that I am very pleased with this outcome would simply be a gross understatement.


Image

Image


 Forum | Modelers Social Club Forum (proboards.com) 

  • Member since
    July 2014
  • From: Franklin Wi
Posted by Bakster on Monday, April 4, 2022 6:05 PM

Very nice, Joe! Saaaweet!

The stars aligned for you. Surprise


  • Member since
    April 2003
  • From: USA
Posted by keavdog on Monday, April 4, 2022 6:10 PM

Very nice finish Joe.  Is that testors wetlook clear?

Thanks,

John

  • Member since
    August 2009
  • From: MOAB, UTAH
Posted by JOE RIX on Monday, April 4, 2022 10:29 PM

Flat out outstanding Joe. Bravo!

"Not only do I not know what's going on, I wouldn't know what to do about it if I did". George Carlin

  • Member since
    March 2012
  • From: Corpus Christi, Tx
Posted by mustang1989 on Wednesday, April 6, 2022 7:24 AM

Thanks Steve, John and Joe!!

I finally got around to installing the PE grill into place and adding the fog light system. I still have to touch the fog light chrome up but will wait until I've got everything on the car so I don't risk messing the touch ups up with excessive handling. 

Image


 Forum | Modelers Social Club Forum (proboards.com) 

  • Member since
    August 2009
  • From: MOAB, UTAH
Posted by JOE RIX on Wednesday, April 6, 2022 8:17 AM

Now that right there is what I call impressive. Fantastic work my friend.

"Not only do I not know what's going on, I wouldn't know what to do about it if I did". George Carlin

  • Member since
    June 2014
Posted by BrandonK on Wednesday, April 6, 2022 9:54 AM

It's amazing how just a simple grille can make a car look so much more life like. Very nice.

BK

On the bench:

A lot !! And I mean A LOT!!

2024 Kits on deck / in process / completed   

                         14 / 5 / 2  

                              Tongue Tied

JOIN OUR COMMUNITY!

Our community is FREE to join. To participate you must either login or register for an account.

SEARCH FORUMS
FREE NEWSLETTER
By signing up you may also receive reader surveys and occasional special offers. We do not sell, rent or trade our email lists. View our Privacy Policy.