SEARCH FINESCALE.COM

Enter keywords or a search phrase below:

AMT 67 Mustang Fastback-Completed-05/06

9484 views
100 replies
1 rating 2 rating 3 rating 4 rating 5 rating
  • Member since
    March 2012
  • From: Corpus Christi, Tx
Posted by mustang1989 on Wednesday, April 6, 2022 2:42 PM

Thanks Joe and Brandon. After seeing that PE grille there was just no way I could leave the molded in grille in there.


 Forum | Modelers Social Club Forum (proboards.com) 

  • Member since
    July 2014
  • From: Franklin Wi
Posted by Bakster on Wednesday, April 6, 2022 4:08 PM

mustang1989

Thanks Steve, John and Joe!!

I finally got around to installing the PE grill into place and adding the fog light system. I still have to touch the fog light chrome up but will wait until I've got everything on the car so I don't risk messing the touch ups up with excessive handling. 

Image


That looks Awesome!

  • Member since
    March 2012
  • From: Corpus Christi, Tx
Posted by mustang1989 on Thursday, April 7, 2022 4:46 PM

Thanks Steve!!

Concentrating some of my efforts on the rear panel now. I looked at the fuel cap fit on the panel and it was just waaaaaaaaaaaaaay too thick. Probably a scale 4-5 inches thick which is not the way it should be.
I mean look…here it is on mine:

image

the one one the right is how far it WOULD have stuck out. So I broke out the sandpaper and went to work. The one on the left is about how it SHOULD be…

and I’ve also got the tail light chrome bezels all cut out and formed.


 Forum | Modelers Social Club Forum (proboards.com) 

  • Member since
    March 2012
  • From: Corpus Christi, Tx
Posted by mustang1989 on Tuesday, April 12, 2022 2:11 PM

I completed the rear panel yesterday afternoon as I had off from work. I did NOT like those stupid little bumperettes that stem from the rear bumper down along side of the license plate. I never did like those things and sure as hell never had any on my 1:1 scale car. I cut those off, stripped the chrome from the bumper, cleaned the bumper up and re-chromed using the Alclad II method. I'm super happy with this outcome. 

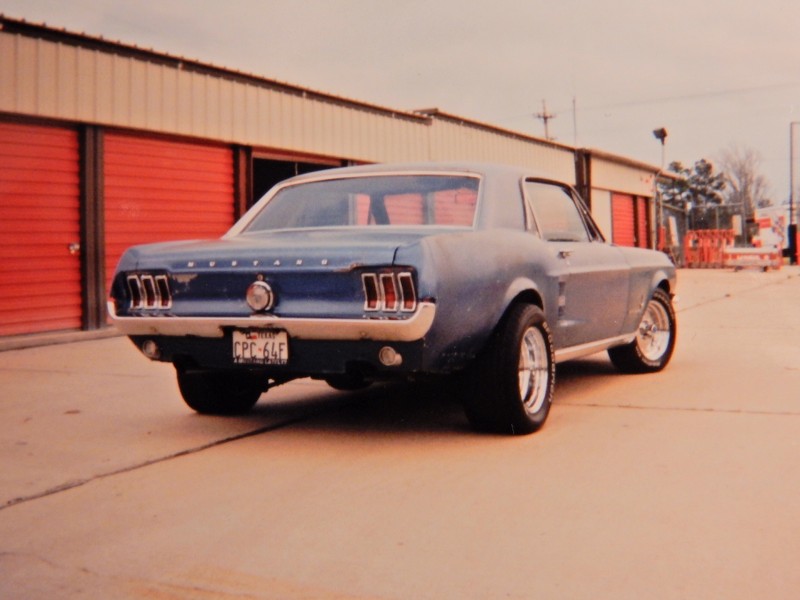
My old 1:1 car:

and the rear panel. License numbers and plate frame are carried over to this build:

spacer.png


 Forum | Modelers Social Club Forum (proboards.com) 

  • Member since
    April 2003
  • From: USA
Posted by keavdog on Tuesday, April 12, 2022 3:13 PM

Just perfect!


Thanks,

John

  • Member since
    August 2007
  • From: back country of SO-CAL, at the birth place of Naval Aviation
Posted by DUSTER on Tuesday, April 12, 2022 5:25 PM

This thing looks good commin' an' goin', an' the middle ain't nothin' to sneeze at either.

Oh, in case I wasn't clear, I really like how this is comming together.Bow Down

Steve

Building the perfect model---just not quite yet  Confused

fox
  • Member since
    January 2007
  • From: Narvon, Pa.
Posted by fox on Tuesday, April 12, 2022 10:28 PM

Absolutely fantastic work Mustang! I am green with envy. Couldn't do your quality of work if my life depended on it. Can't wait to see the finished car. I know it's going to be great. Bow Down Bow Down Bow Down

Jim Captain

Stay Safe.

 Main WIP: 

   On the Bench: Artesania Latina  (aka) Artists in the Latrine 1/75 Bluenose II

I keep hitting "escape", but I'm still here.

  • Member since
    July 2014
  • From: Franklin Wi
Posted by Bakster on Tuesday, April 12, 2022 11:11 PM

Looks awesome, Joe! You can't get any better than that.

  • Member since
    August 2009
  • From: MOAB, UTAH
Posted by JOE RIX on Tuesday, April 12, 2022 11:15 PM

Masterful work Joe. The bumper looks great and that license plate is a choice touch.

"Not only do I not know what's going on, I wouldn't know what to do about it if I did". George Carlin

  • Member since
    October 2019
  • From: New Braunfels, Texas
Posted by Tanker-Builder on Wednesday, April 13, 2022 7:26 AM

Sfunny!

 We Both had the same car! Only difference? My Wife's was that very Pale yellow! No Hanging Bumperettes on mine or hers either! My fastback was as I mentioned and the wifey wanted the Notchback.  So she got it!

  • Member since
    March 2003
  • From: Western North Carolina
Posted by Tojo72 on Wednesday, April 13, 2022 8:30 AM

I keep saying it,your work looks like the real thing

  • Member since
    June 2014
Posted by BrandonK on Wednesday, April 13, 2022 10:20 AM

Wow, that is nice. Your attention to details is amazing.

BK

On the bench:

A lot !! And I mean A LOT!!

2024 Kits on deck / in process / completed   

                         14 / 5 / 2  

                              Tongue Tied

  • Member since
    March 2012
  • From: Corpus Christi, Tx
Posted by mustang1989 on Saturday, April 16, 2022 8:31 AM

Thanks alot fellas. This has really been a fairly enjoyable build so far. Not just a whole lot of drama.

Well guys…this one is going to be coming to a close a little quicker than I thought. I had a block of time yesterday that I hadn’t planned on having and was able to get alot done. Here’s the final mock up before I go any further and will be the last pictures I’ll post in this thread until I’m either done or have a major catastrophe with the build.

I’ve still got a couple of things to do like:

  1. Scrub the tire tread on tires and touch up the rim edges and then install permanently onto the vehicle. Also the rear wheel isn’t “sucked” all the way down on the tire which makes the tire look like it’s not properly seated on the wheel so I’ll have to make that happen as well.
  2. Install all door handles and outside rear view mirrors (mirrors still need the Alclad II treatment)
  3. Add the metal coating to the windshield wiper arms
  4. Apply the PE M U S T A N G lettering to the trunk lid (although I am contemplating a complete repaint and clearing of the trunk lid because it doesn’t seem to be as dark a shade of blue as the rest of the car).
  5. Install the exhaust tips that I just got applying the Alclad Chrome treatment to
  6. Install radiator hoses and final details in the engine bay
  7. Paint the bottom side of the hood

Anyhow…here’s where we are right now. (Couldn’t resist throwing my “REMOVE BEFORE FLIGHT” tag from the mirror. I’ve had this tag on all my 1:1 scale rides for the last 32 years now. It was in Mustang #2 of mine, my blue #3 Mustang, my 89 LX Coupe and now in my Silverado truck.

Image

Image


 Forum | Modelers Social Club Forum (proboards.com) 

  • Member since
    May 2011
Posted by Mr Mike on Saturday, April 16, 2022 9:12 AM

This is looking really good, Joe!  The rear deck does look a shade lighter in color and maybe the rear panel as well, unless it's the lighting.

  • Member since
    July 2014
  • From: Franklin Wi
Posted by Bakster on Saturday, April 16, 2022 10:45 AM

I’ll post in this thread until I’m either done or have a major catastrophe with the build.


Isn't that the truth! I don't celebrate until the pictures are taken.

It looks great, Joe. Yes

  • Member since
    March 2012
  • From: Corpus Christi, Tx
Posted by mustang1989 on Saturday, April 16, 2022 12:37 PM

Mike: Thanks man. The rear panel I can live with in a slightly lighter shade because it's shadowed somewhat but that deck lid definitely has to be re-done. 

Steve: I appreciate you stoppin in and commenting as well brother. Right on.....I'm taking my sweet a$$ time in finishing this one up. I've got pretty close to 10 months involved in this build as it stands now so I'm not going to foul it all up by getting in a big hurry.


 Forum | Modelers Social Club Forum (proboards.com) 

  • Member since
    July 2014
  • From: Franklin Wi
Posted by Bakster on Saturday, April 16, 2022 2:30 PM

I'm taking my sweet a$$ time in finishing this one up. I've got pretty close to 10 months involved in this build as it stands now so I'm not going to foul it all up by getting in a big hurry.

Amen!

  • Member since
    June 2014
Posted by BrandonK on Sunday, April 17, 2022 10:10 AM

mustang1989

Thanks alot fellas. This has really been a fairly enjoyable build so far. Not just a whole lot of drama.

Well guys…this one is going to be coming to a close a little quicker than I thought. I had a block of time yesterday that I hadn’t planned on having and was able to get alot done. Here’s the final mock up before I go any further and will be the last pictures I’ll post in this thread until I’m either done or have a major catastrophe with the build.

I’ve still got a couple of things to do like:

  1. Scrub the tire tread on tires and touch up the rim edges and then install permanently onto the vehicle. Also the rear wheel isn’t “sucked” all the way down on the tire which makes the tire look like it’s not properly seated on the wheel so I’ll have to make that happen as well.
  2. Install all door handles and outside rear view mirrors (mirrors still need the Alclad II treatment)
  3. Add the metal coating to the windshield wiper arms
  4. Apply the PE M U S T A N G lettering to the trunk lid (although I am contemplating a complete repaint and clearing of the trunk lid because it doesn’t seem to be as dark a shade of blue as the rest of the car).
  5. Install the exhaust tips that I just got applying the Alclad Chrome treatment to
  6. Install radiator hoses and final details in the engine bay
  7. Paint the bottom side of the hood

Anyhow…here’s where we are right now. (Couldn’t resist throwing my “REMOVE BEFORE FLIGHT” tag from the mirror. I’ve had this tag on all my 1:1 scale rides for the last 32 years now. It was in Mustang #2 of mine, my blue #3 Mustang, my 89 LX Coupe and now in my Silverado truck.

Image

Image


That is really a beauty. I always preferred those wheels on the early Mustangs, they really were nice. Super nice work.

BK

On the bench:

A lot !! And I mean A LOT!!

2024 Kits on deck / in process / completed   

                         14 / 5 / 2  

                              Tongue Tied

  • Member since
    May 2013
  • From: Indiana, USA
Posted by Greg on Tuesday, April 19, 2022 8:00 AM

Your Mustang really came out great, Joe. YesYesYes

A few specific comments;

Love the blue color. Maybe because it is close to my old '73!

Keavdog asked if you used Testors Wet Look on this one, either you missed it or I missed your answer.....I'm curious too. One of these days I hope to see one of paint jobs in person.

How did you manage to have the same plates on the model as your 1:1??????

Great thread, sure glad you got back to it.

  • Member since
    August 2021
Posted by lurch on Tuesday, April 19, 2022 8:41 AM

Love the blue color. You did a great job.

  • Member since
    July 2015
Posted by MR TOM SCHRY on Tuesday, April 19, 2022 8:59 AM

mustang1989 this turned out great!  It's my favorite year/body style of Mustang and that blue paint is gorgeous on it!  Love the wheel/tire combination too!

tjs

TJS

  • Member since
    August 2009
  • From: MOAB, UTAH
Posted by JOE RIX on Tuesday, April 19, 2022 9:11 AM

What an all around gorgeous Mustang. Everything about this build smacks of awesome. You have captured the realsim with precision and skill. It truly is remarkable Joe. I see the difference in shade on the trunk lid and knowing you as well as I do, I know that that cannot stand. I know for certain that you will have that all straightened out impeccably. Beautiful work my friend.

"Not only do I not know what's going on, I wouldn't know what to do about it if I did". George Carlin

fox
  • Member since
    January 2007
  • From: Narvon, Pa.
Posted by fox on Tuesday, April 19, 2022 9:47 PM

Outstanding work Joe! Toast

Can I borrow the keys for the weekend? Pretty please?

Jim Captain

Stay Safe.

 Main WIP: 

   On the Bench: Artesania Latina  (aka) Artists in the Latrine 1/75 Bluenose II

I keep hitting "escape", but I'm still here.

  • Member since
    March 2012
  • From: Corpus Christi, Tx
Posted by mustang1989 on Friday, May 6, 2022 5:59 AM

Thank you guys for all the great comments. I'm still working on this but am nearing the completion. All that's left now is for the clear to dry on the deck lid, a little wet sanding and polish up and then lastly, applying the PE M-U-S-T-A-N-G lettering it. 


 Forum | Modelers Social Club Forum (proboards.com) 

  • Member since
    March 2012
  • From: Corpus Christi, Tx
Posted by mustang1989 on Friday, May 6, 2022 11:42 AM

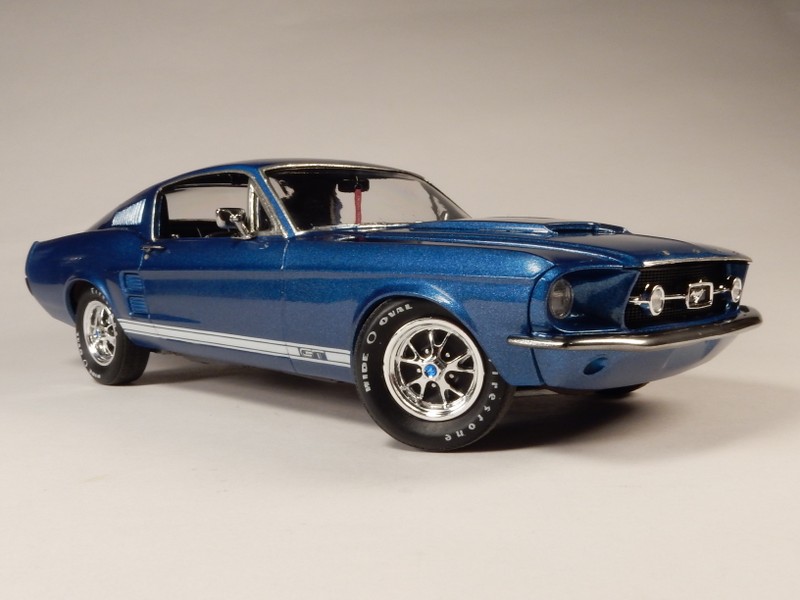
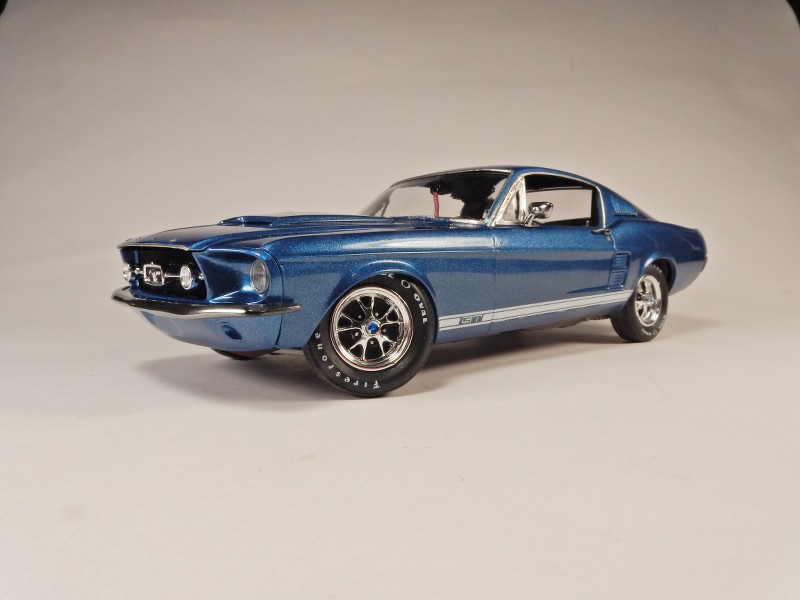
Ok gang. This build is finally coming to a close after right at 10 months. I kind of hate seeing this one end as my mom was following me on this one pretty closely before she passed a little over 3 months ago. With that being said....this one's for you momma. 

This whole build started last July after I saw the kit re-released by Round 2. I've had visions in my mind for years of building a 1967 Mustang Fastback model as it would have been if I had one. I've had the pleasure of owning three 67 coupes and always wanted a fastback in real life. My last Mustang was the best of the three because it was built from the first two cars and I had managed to score a 351W from a 69 Mach 1. She also had a 4spd manual transmission and 3.55 gears. 

The first car I had I managed to purchase from my home town. It had a 289 2bbl with an automatic tranny and 2.79 gears. It wasn't fast but it was a good lookin' car. On one of my many trips back to Ft. Hood from my home town in North Texas I hit a deer and destroyed the front end of the car. (going off into the ditch is the WRONG thing to do when dodging animals I found out). The deer was only the beginning of the damage....while dodging the deer I didn't look on the OTHER side of it and dove into a concrete drainage system. This car....was done.

Car #1: Acquired 1989-Decommissioned-1990
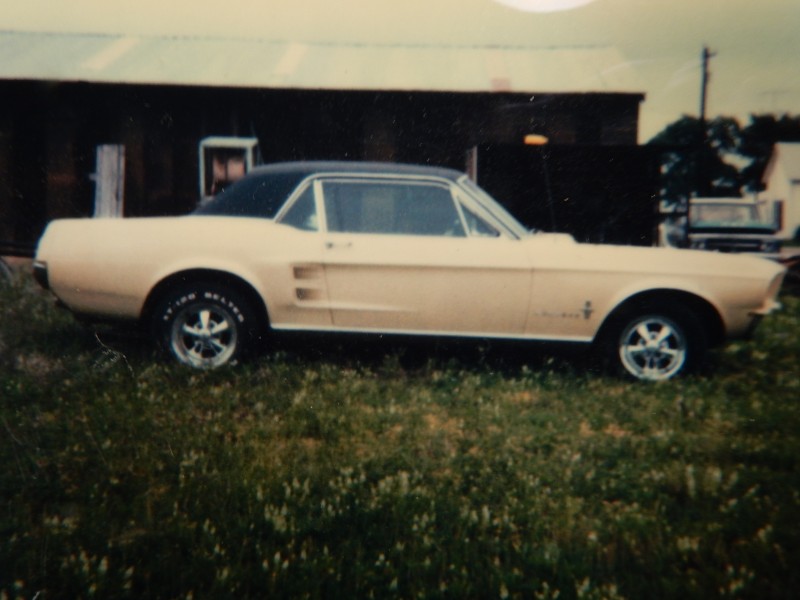
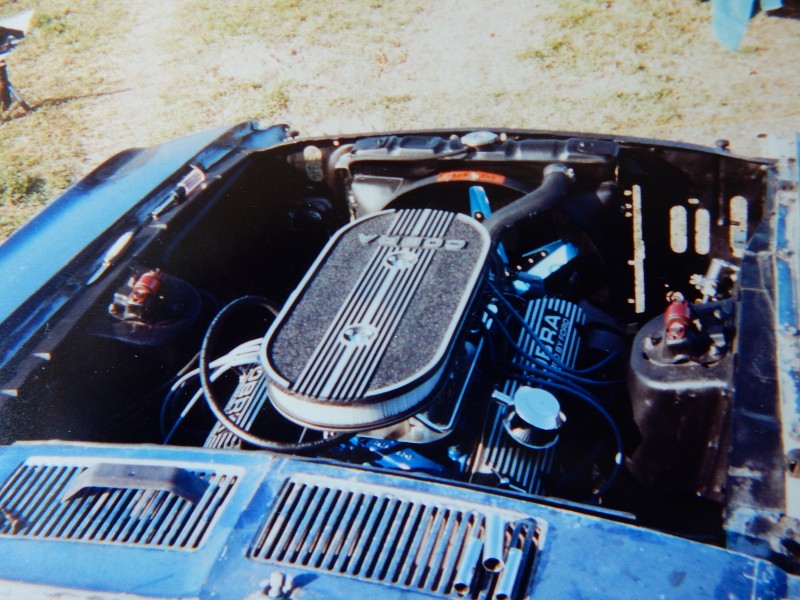
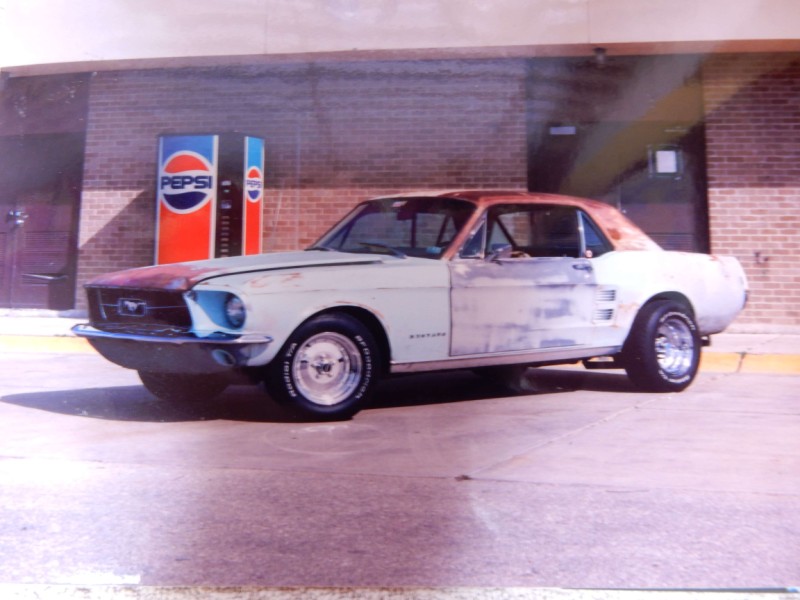
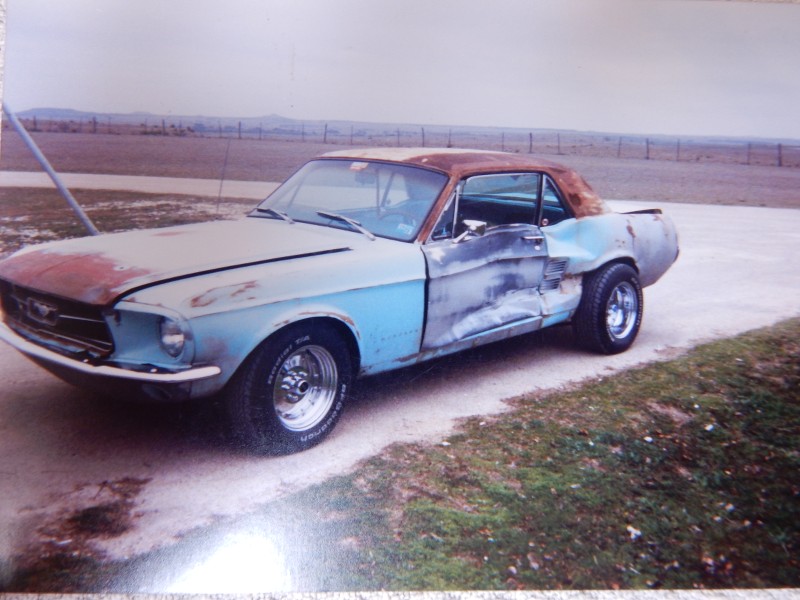
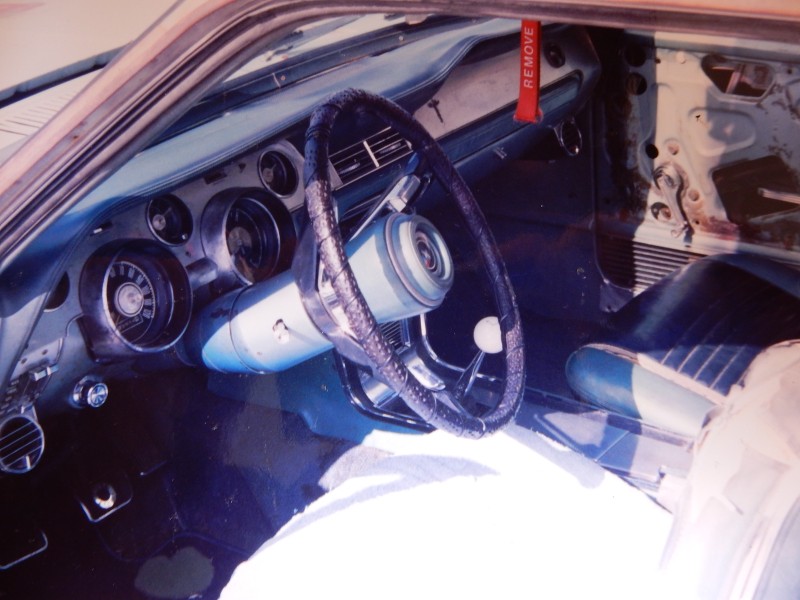
I found Car #2 in a wrecking yard and rescued it. Man.....that car was rough looking BUT.....it was a GT and had all the options to include tilt away steering which was a very weird option but definitly good on the cool factor. This car also had a standard transmission from the factory. No engine or tranny was in the car when I bought her for $100 but I quickly took care of that. The 289 was carried over from Car #1 and I got a close ratio 4 speed tranny for this one. Later on I bought the 351W I was talking about earlier and freshened it up and dropped it into this car and drove it for a few more years before somebody pulled out in front of me at Ft Hood. I dodged but not before I hit him with my drivers side door in a side skid. Jeez....

Car #2 before the wreck: Acquired 1990--Decommissioned 1991
and after:
The tilt way column that I was talking about. This was supposed to help with driver ingress and egress. Definitely different:
This is where Car #3 comes in. Acquired 1991--Sold 2002

I bought her for $600 at Fort Hood and towed her back home. I had two other parts cars now to draw parts from to make this one the best car out of the three and one that I would have for 11 years. Me and my best friend built this car over a course of 5 days from this at day one:
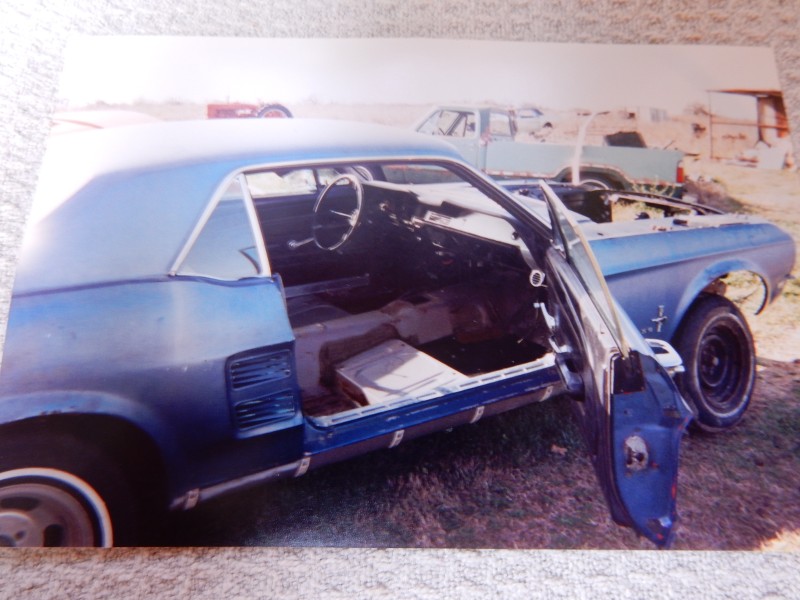
 

to this at Day 3 moving under her own power.
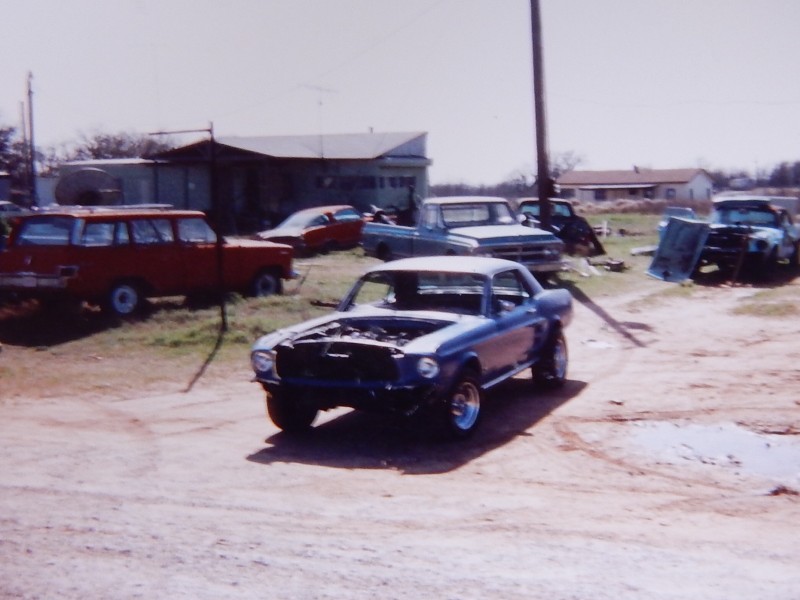
The next two days involved finish up...bumpers, trim, interior and all the cool stuff to make this car driveable.

The end result:
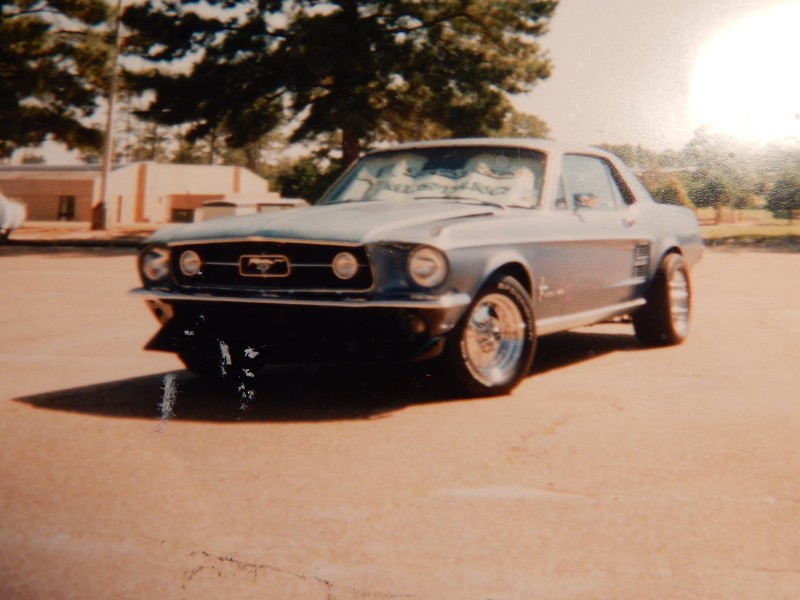
 

Now....all of this is where the inspiration for my build here came from. I wanted to build a fastback with all of the things that I had in this last car with the only difference being that I wanted factory style wheels on this one. And so, I set out on my venture.

I purchased this kit....and went for broke.
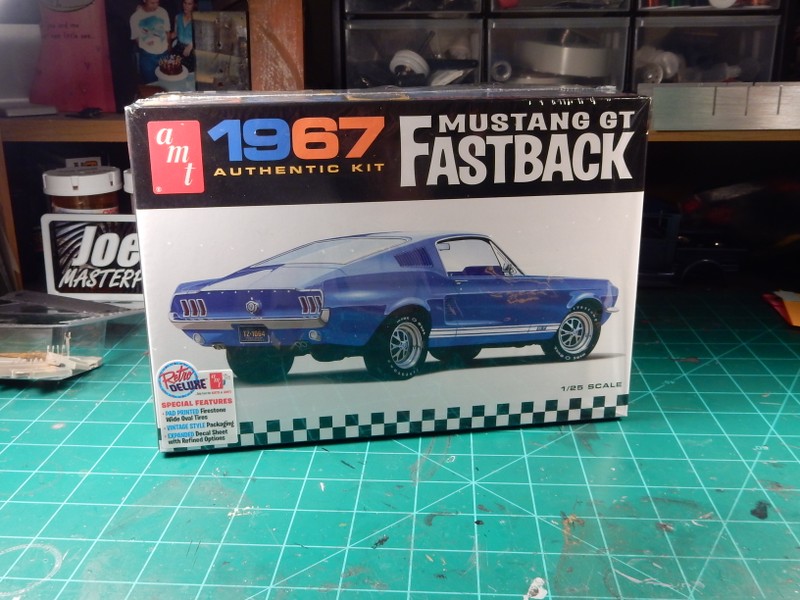
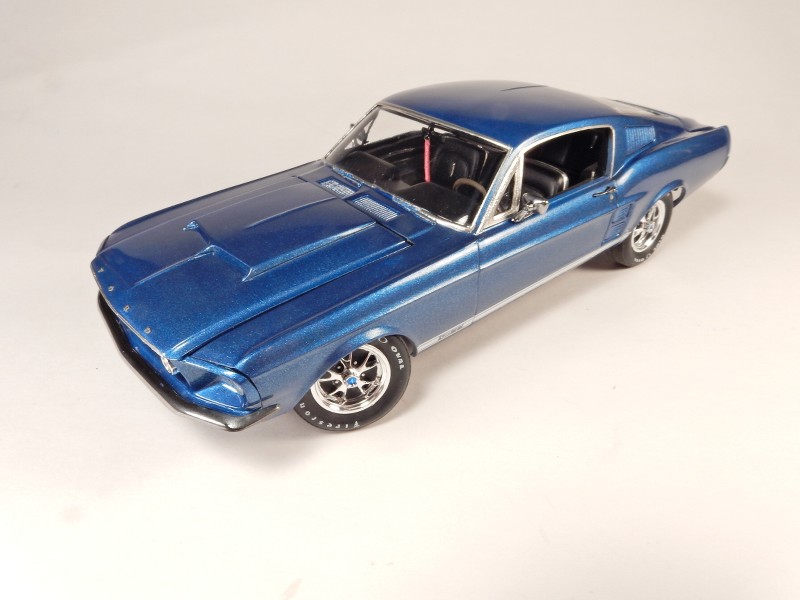
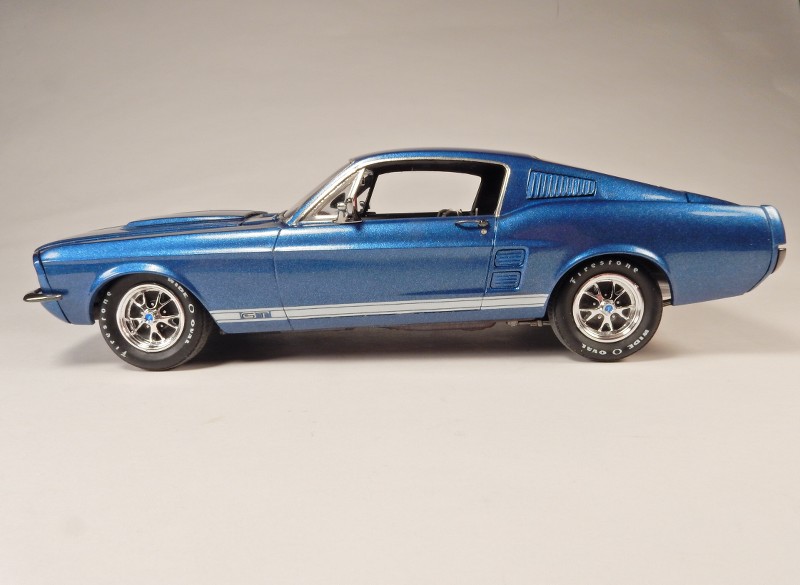
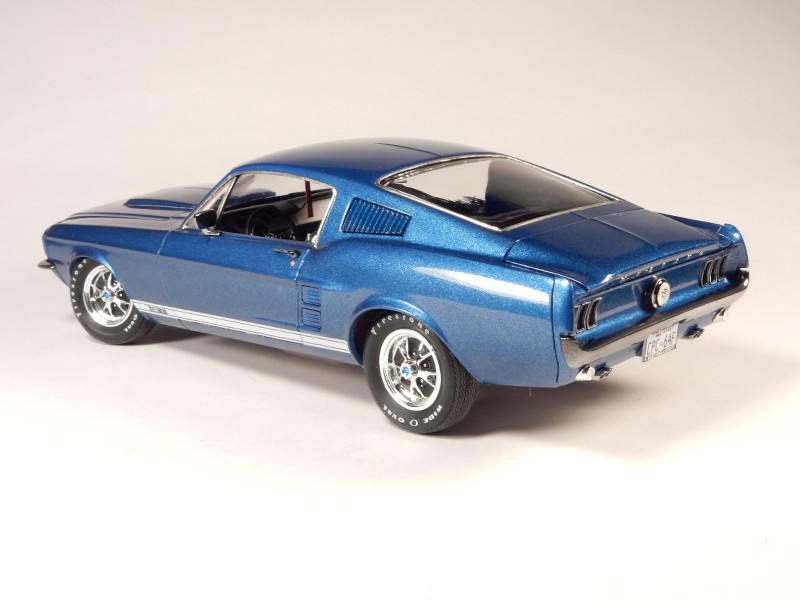
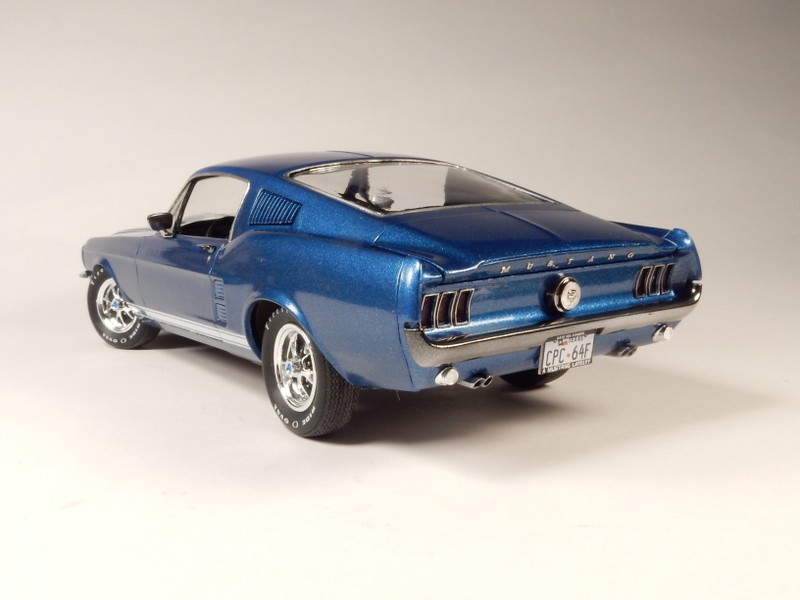
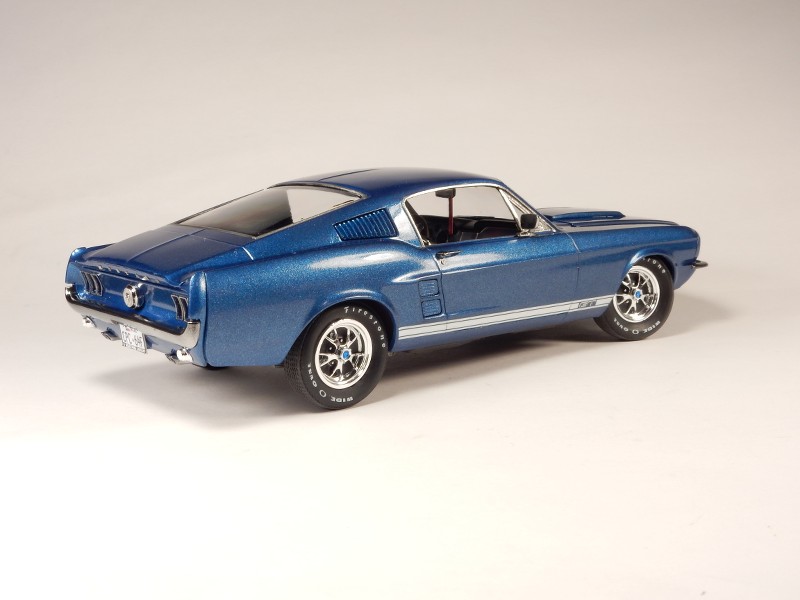
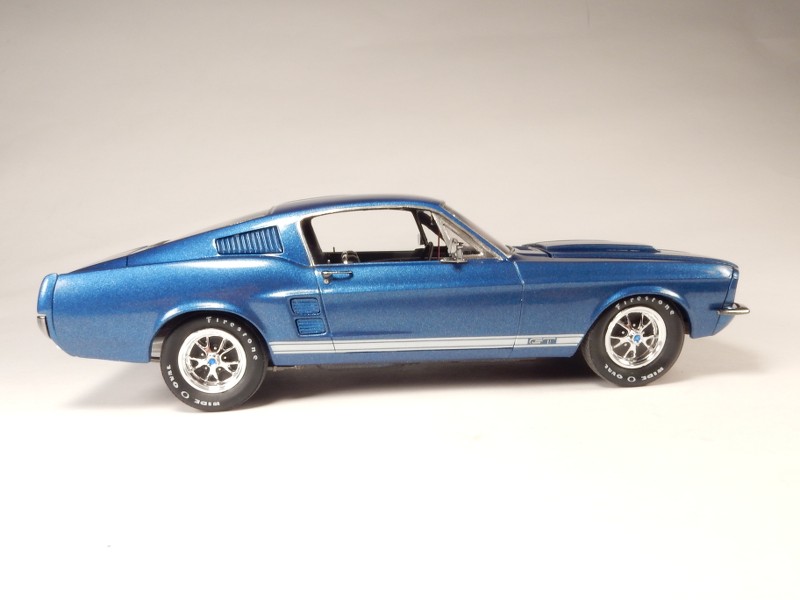
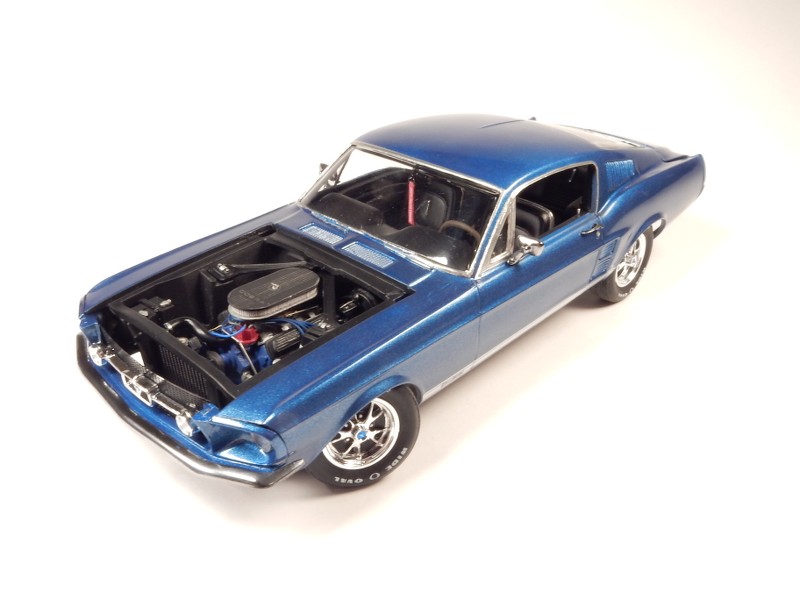
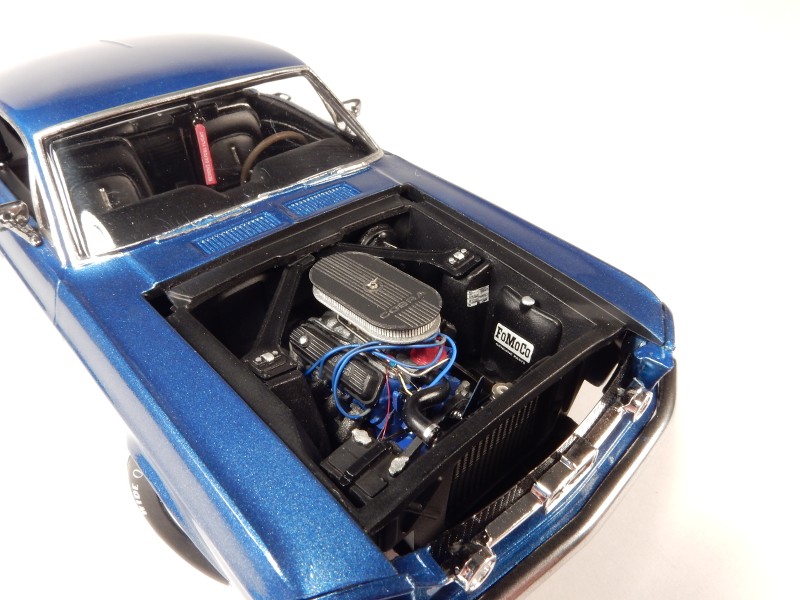
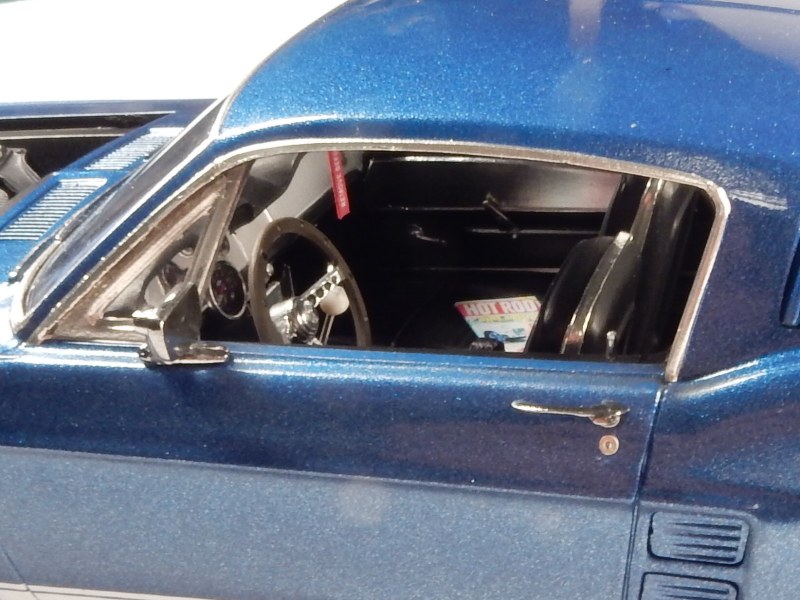
I finished her this morning. Color is Acapulco Blue from MCW Finishes, Wet Look covers the clear coat. The pad printed tires in this kit are a God send and thanks to Eric Oberhaufer at AMT the change out from the Firestone Super Stock tires that this kit came with got changed out to the Wide O Oval tires you see in the following pictures. Model Car Garage covered most of the PE items that you'll see on this car with PE kit # MCG-2032. Joel at Iceman Collections provided the Cobra air cleaner, HGW Models provided this 1/48 scale REMOVE BEFORE FLIGHT tag hanging from the rearview mirror and the CPC 64F (the same tag that was on Car #3) license plate and plate frame were provided by Thomas at Speedway decals. Throttle linkage, air cleaner wingnut & washer, fuel lines and brake lines were all either fabricated or drawn from PE parts bin. Throttle return spring is an element from an automotive turn signal bulb. Plug wires are from Lex's Scale Modeling and the 650 cfm Holley Double Pumper carburetor was from Shapeways.

The hood scoop is from the AMT GT-350 kit and was graphed onto the stock hood. I also cut out the area of the hood where the scoop was to allow the air cleaner to sit up inside of the scoop from proper hood closure/ seating.

Outside door handles are from Fireball Modelworks, Alclad applied to both and pinned in place.

  A good amount of work had to be done to get the front suspension lowered achieve the stance that I wanted and the front wheels had to be moved in ......significantly... to go inside of the wheel wells where they belonged. The rear suspension had to be raised so a light re-aching of the leaf springs is all that took. 

 This kit is a good kit overall but there are some notable areas that need mentioning. Firts off ...the good. The base engine was well represented with only a carburetor change out needed to spice things up a bit. The interior is also well represented with good detail. The aluminum plating on the dash face is a BEAR to replicate on this one as is the door panels. If anyone's interested in how I pulled that off let me know and I'll be happy to tell you how I managed to get through it. 

80% of this build was pretty straight forward BUT....the fit between the nose piece and the drivers front fender on these kits is very hard to get flush. I spent all KINDS of time trying to fix the issue and STILL ended up with a slight gap. Test fit--sand-test fit--file--test fit and MORE TEST FIT is required to get this part right. The fuel cap sticks out way too far because it's thicker than it needs to be. I took sandpaper and stuck it into the contours of the tail light panel and sanded it down to what I felt like was the proper thickness. The front and rear bumpers had little braces going down on either side of the license plate area and I don't care for those so I cut those off of both bumpers, stripped the chrome from them, cleaned 'em up and worked the Alclad magic on both.

 I'm pretty happy with the turnout overall as it's just the look I wanted to get from the build. Thank you guys for following along, encouraging me and helping me get through this one.

Finishing shots:
                   

 Forum | Modelers Social Club Forum (proboards.com) 

  • Member since
    April 2003
  • From: USA
Posted by keavdog on Friday, May 6, 2022 1:18 PM

Great build Joe.  Really nice and it's been fun following along.  I never had a fastback either, but I do love the Mustang.  

Thanks,

John

  • Member since
    October 2019
  • From: New Braunfels, Texas
Posted by Tanker-Builder on Friday, May 6, 2022 1:34 PM

Mustang1989;

      That grille photo was Bitchin Man! I always thought that body style for FORD was the "Cat's Meow" to the Automotive design world.( Here in the U.S.A.!!) You captured it for sure! Plus you used my fave Color, Blue! I like the "Remove Before Flight" flag on the Mirror. That's what it is right?

  • Member since
    May 2013
  • From: Indiana, USA
Posted by Greg on Friday, May 6, 2022 4:12 PM

A labor of love, quite literally, Joe.

A wonderful model. I really enjoyed the backstory about your 1:1(s), great closure to a great thread.

And most importantly, I'm sure Mom was watching you finish, my friend.

  • Member since
    July 2014
  • From: Franklin Wi
Posted by Bakster on Friday, May 6, 2022 5:38 PM

Hey Joe, what a beautiful thread. It is a fantastic dedication to your Mom, to nostalgia, and the attention to detail. The model is stunning!

I love the stance, the wheels, and the amazing detail you did all around, but particularly, the work you did on the interior. Some of which I don't know how you pulled off. All of it looks real. And yes, I am interested in the dash face if you are inclined. Also, how did you do the circular inserts on the steering wheel. That is cool and it adds hyper realism to it.

There is so much to praise. The paint looks awesome. It has a beautiful gloss to it. And I love how you turned the front wheels.  

I bet your Mom is looking from heaven and admiring this as well. I have no doubt about that!

Thanks for sharing this, Joe. I know how much work these WIPs can be.


YesYesYesYes

PS: Beautifully photographed too!


  • Member since
    March 2012
  • From: Corpus Christi, Tx
Posted by mustang1989 on Saturday, May 7, 2022 12:06 AM

Thank you John, Greg, TB and Steve. I appreciate all of your comments very much. 

Steve: I'll cover that with you on the steering wheel in a bit pal. 


 Forum | Modelers Social Club Forum (proboards.com) 

JOIN OUR COMMUNITY!

Our community is FREE to join. To participate you must either login or register for an account.

SEARCH FORUMS
FREE NEWSLETTER
By signing up you may also receive reader surveys and occasional special offers. We do not sell, rent or trade our email lists. View our Privacy Policy.