SEARCH FINESCALE.COM

Enter keywords or a search phrase below:

1:24 Volkswagen T1 Van (Beetle bus) dropped suspension

8739 views
39 replies
1 rating 2 rating 3 rating 4 rating 5 rating
  • Member since
    May 2009
  • From: Poland
Posted by Pawel on Monday, February 6, 2017 2:17 PM

Mike, Hunter, Max, Pat - thanks a lot for your comments and for your kind words!

Mike - I appreciate it, please drop by anytime you like!

Max - 1:1 cars sure take up some shop space! But it's fun to work on them if you got the right tools.

Thanks again and have a nice day

Paweł

All comments and critique welcomed. Thanks for your honest opinions!

www.vietnam.net.pl

  • Member since
    December 2008
  • From: UK
Posted by PatW on Sunday, February 5, 2017 4:23 PM
Superb Pawel, very well done, it looks just great!

Remember , common sense is not common.

  • Member since
    April 2016
  • From: Parsons Kansas
Posted by Hodakamax on Sunday, February 5, 2017 2:14 PM

Looks good Pawel. I used to mess with 1/1 old VWs and there's a place in my heart for them. Real VWs projects take up too much room in the shop (LOL) so I'm back to modeling and small motorcycles.

It looks almost ready to drive!

Max

  • Member since
    January 2016
  • From: A Galaxy Far, Far Away
Posted by Hunter on Sunday, February 5, 2017 1:04 PM

Pawel

Great looking build my friend. Well planned and executed!! YesYes

Hunter 


  • Member since
    November 2008
  • From: Far Northern CA
Posted by mrmike on Sunday, February 5, 2017 12:25 PM

That's a really cool bus Pawel; very interesting details and a great finished model. I always enjoy following your builds.

Mike

  • Member since
    May 2009
  • From: Poland
Posted by Pawel on Sunday, February 5, 2017 9:00 AM

Hello everybody!

I wanted to finish this one before the end of the year, but I was waiting for my custom decals. Those got delayed more than four weeks, but they finally got to me in the post:

Custom decals by Pawel

As you can see I'm also building an Army chopper in parallel. I slapped the decals on the VW and the model was done. I have also built a display base for it. An acrylic display case fits snugly around this base - you see I'm going to put that model at work, where we build 1:1 modern VWs. The Tarmac is made out of 800 grade sandpaper:

And that would be it - sure took longer than I expected! Thanks for looking and have a nice day

Paweł

All comments and critique welcomed. Thanks for your honest opinions!

www.vietnam.net.pl

  • Member since
    May 2009
  • From: Poland
Posted by Pawel on Monday, January 2, 2017 10:31 AM

SprueOne - thanks a lot for your kind words! Alclad Chrome sure is handy to have around, sometimes it's the only way to go. Thanks for your comment and have a nice day

Paweł

All comments and critique welcomed. Thanks for your honest opinions!

www.vietnam.net.pl

  • Member since
    January 2006
  • From: California
Posted by SprueOne on Sunday, January 1, 2017 5:17 PM

Nice touch with the interior detailing. That Alclad chrome is Boss! I gotta get some of that.


Anyone with a good car don't need to be justified - Hazel Motes


Iron Rails 2015 by Wayne Cassell Weekend Madness sprueone

  • Member since
    May 2009
  • From: Poland
Posted by Pawel on Monday, December 26, 2016 3:26 PM

Hello!

I have finally installed the engine and put on the wheels. I also installed my scratchbuilt schock absorbers - they are painted yellow:

1:24 Hasegawa Volkswagen Type 2 by Pawel

 In the photo below you can see the complete chassis with the wheels - only thing missing is the front cover - that will be installed after I mate the chassis to the body

1:24 Hasegawa Volkswagen Type 2 by Pawel

I have also installed the glass, the headliner and the interior. The headliner is made out of yoghurt can lid - it's this funny wrinkled aluminium foil. It can be embossed really well and has an interesting texture to it. It is painted with Motip primer gray - makes the interior a little brighter:

1:24 Hasegawa Volkswagen Type 2 by Pawel

I have also installed the scratchbuilt sun shades and interior handles. The air heating tube is also there. In process I discovered that I have lost the emergency brake handle, so I had to scratchbuild it one more time:

1:24 Hasegawa Volkswagen Type 2 by Pawel

1:24 Hasegawa Volkswagen Type 2 by Pawel

I have also finally re-chromed the bumpers - this time with Alclad 2. Much better now:

1:24 Hasegawa Volkswagen Type 2 by Pawel

So now I'm actually only waiting for my custom-printed decals to do the tags on this one. I hope to have this baby done before the end of the year! Thanks for looking and have a nice day

Paweł

All comments and critique welcomed. Thanks for your honest opinions!

www.vietnam.net.pl

  • Member since
    May 2009
  • From: Poland
Posted by Pawel on Monday, December 19, 2016 5:17 PM

Hello!

I started putting it all together - I have installed the glass and put on most of the chrome. Now it starts to look like a car:

1:24 Hasegawa Volkswagen Type 2 by Pawel

I have used white glue in places where spillage of other type of glue might mean a little disaster. I have managed to glue the door handles and winshield wipers (at their axles!) with CA glue, though. I removed the chrome from the contact points with a glass fibre pen. The next photo shows the model a little dusty - sorry about that:

1:24 Hasegawa Volkswagen Type 2 by Pawel

 Now - on to finish the interior! Thanks for lookin' and have a nice day

Paweł

All comments and critique welcomed. Thanks for your honest opinions!

www.vietnam.net.pl

  • Member since
    May 2009
  • From: Poland
Posted by Pawel on Sunday, December 4, 2016 3:40 PM

Hello everybody!

After days of silence here I almost lost hope, so thanks a lot gennulmen, for your kind comments!

Capn - I was hoping to do that - to get a finish nicer than factory on a custom! So thanks a lot. Ahh, the old days - when cars were repairable, isn't it so, Capn? Nowadays even if you can straighten the sheet metal, get all the hard-to-get parts including the electronics, you still have to get past all the coding to make everything work - or to make anything at all work... Thanks a lot for your comment!

Steve - thanks a lot! I'd like to hear "dobra robota" everyday!

Toshi - thank you very much! And please call me Paweł - Sir is way to official for me!

This is a good moment for a little update. Side mirrors - even though it is a Hasegawa kit, it was easier to scratchbuild new mirrors than to clean up (and rechrome!) the OOB mirrors. I made their posts out of wire and used my dremel to turn out the round parts. The mirrors themselves are BMF, and the chrome is a cheap spray paint:

1:24 Hasegawa Volkswagen Type 2 by Pawel

1:24 Hasegawa Volkswagen Type 2 by Pawel

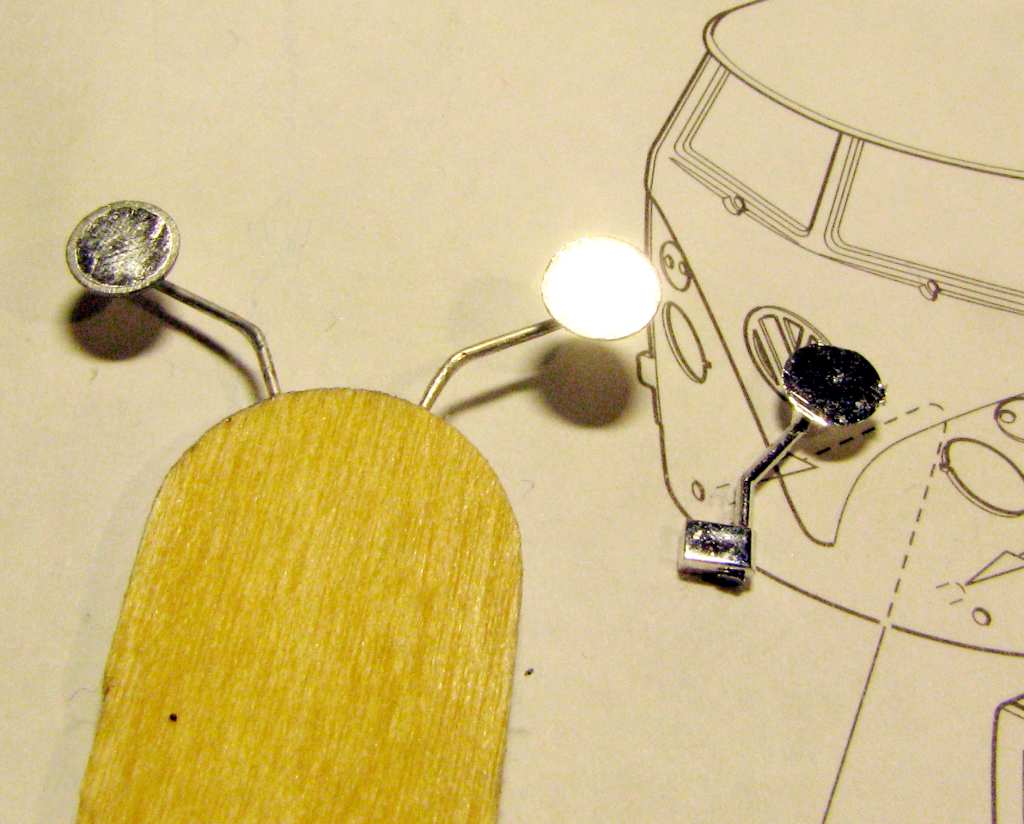
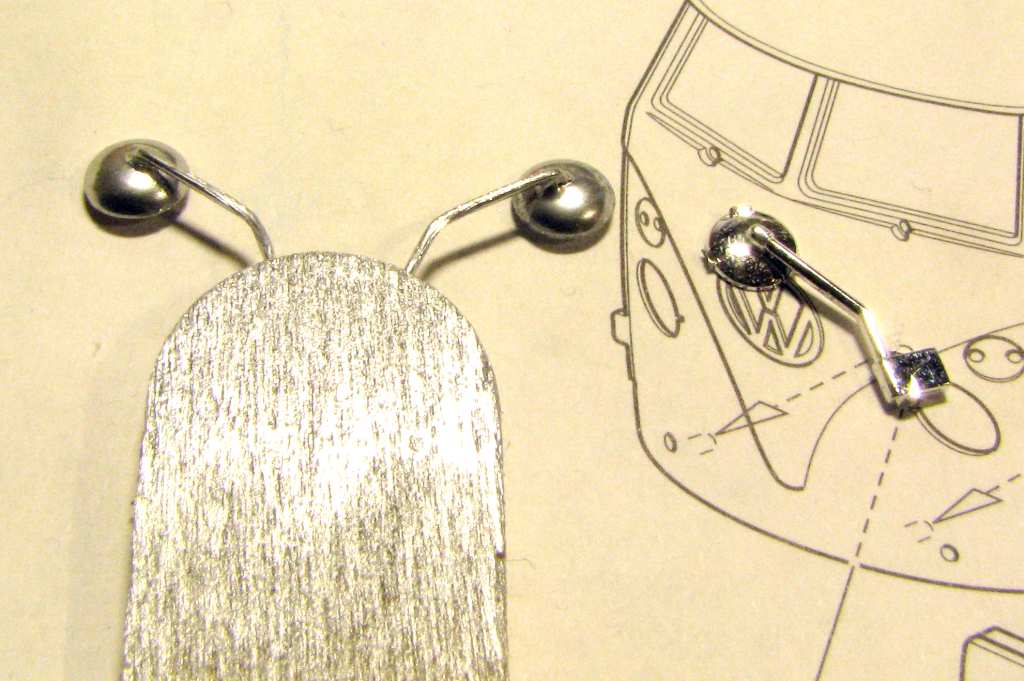
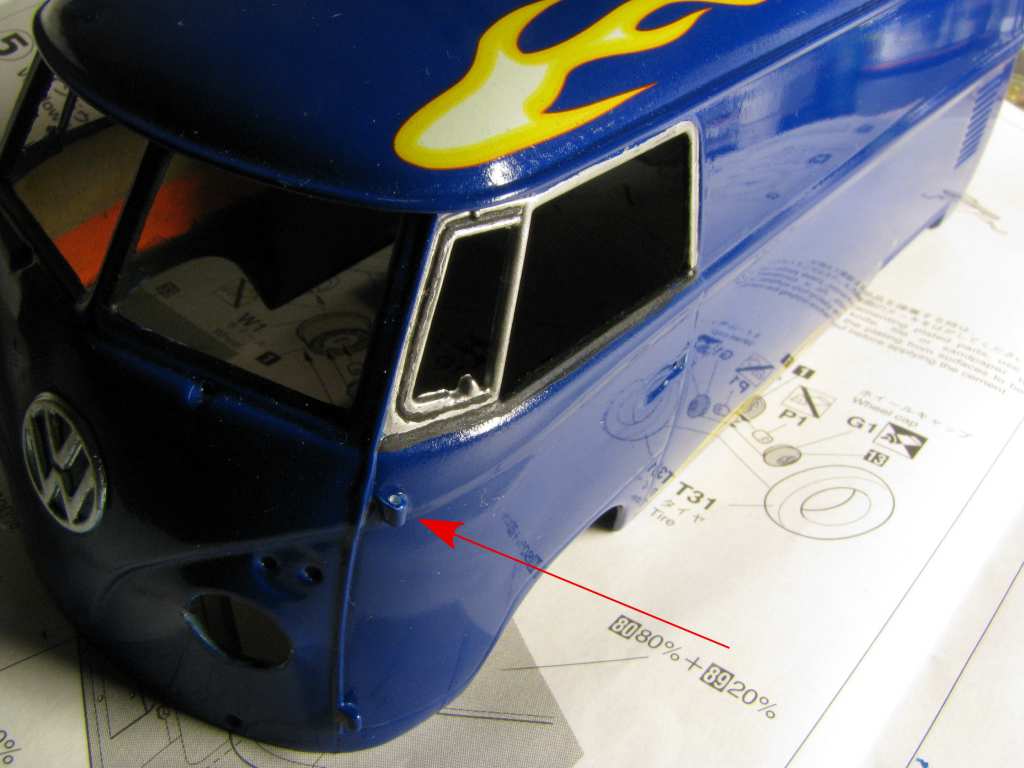
As you can see, the OOB mirror has a nasty sink mark, fairly large sprue attachment point and the worst - there is a hinge/mirror attachment point molded on. This little part should be body colour, not chrome. That's why I built the hinge out of 1,5mm styrene and painted it together with the body. It's pointed to in the picture below by the red arrow. On the same picture you can see the painted door window framing - that's Gunze Mr Metal Color chrome silver and Humbrol 33 black:

1:24 Hasegawa Volkswagen Type 2 by Pawel

I also finally made the exhaust, together with the final muffler. The muffler was painted with a mixture of Humbrol 53 Gun Metal and Humbrol 186 brown. The exhaust pipes are 2mm brass tubing painted with the same cheap spray:

1:24 Hasegawa Volkswagen Type 2 by Pawel

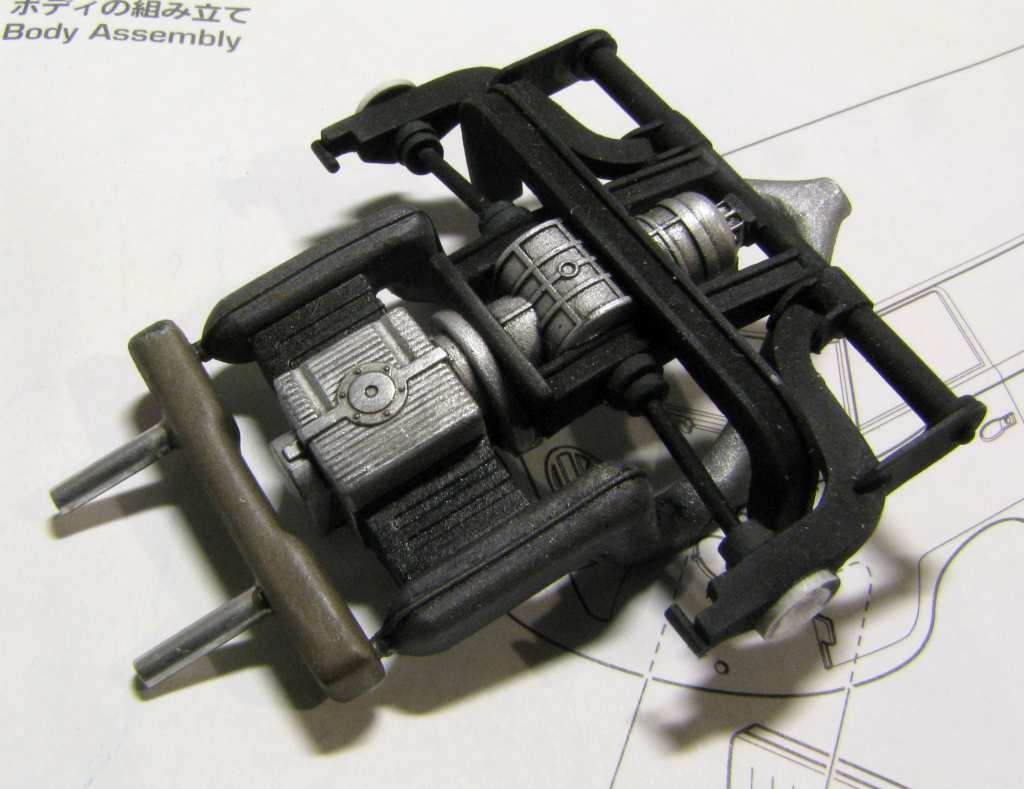
To mount it I had to modify the rear bumper. I didn't want to touch it because of the chrome, but I had to, anyway, because it had really nasty mold seams on its ends. It got the same cheap spray treatment the mirrors and the pipes got, but I think maybe I will have to redo it:

1:24 Hasegawa Volkswagen Type 2 by Pawel

And that's it for now - thanks a lot for reading and have a nice day

Paweł

All comments and critique welcomed. Thanks for your honest opinions!

www.vietnam.net.pl

  • Member since
    March 2015
  • From: Streetsboro, Ohio
Posted by Toshi on Sunday, December 4, 2016 8:01 AM

Nice coat of finish on her.  I especially love the flames.  Great job sir.

Toshi

On The Bench: Revell 1/48 B-25 Mitchell


Married to the most caring, loving, understanding, and beautiful wife in the world.  Mrs. Toshi


  • Member since
    August 2007
  • From: back country of SO-CAL, at the birth place of Naval Aviation
Posted by DUSTER on Sunday, December 4, 2016 12:21 AM

Bow Down WOW Pawel, what a sptacular job of "flamming"  and finishing the paint coat. 

Dobra robota     (per Google  )

Steve

Building the perfect model---just not quite yet  Confused

  • Member since
    November 2005
  • From: Formerly Bryan, now Arlington, Texas
Posted by CapnMac82 on Saturday, December 3, 2016 11:24 PM

Looks almost nicer than the factory finish.

That blue is spot on the factory color.  But, I do not remember that much clear coating on it Smile

Mind, I bought all my VW in junkyards, not dealerships, and that was more than 40 years agao, so, my recollections may be skewed.

  • Member since
    May 2009
  • From: Poland
Posted by Pawel on Sunday, November 27, 2016 2:11 PM

Thanks a lot for your kind words, Joe! Now I'm thrilled about putting it all together!

Paweł

All comments and critique welcomed. Thanks for your honest opinions!

www.vietnam.net.pl

  • Member since
    March 2012
  • From: Corpus Christi, Tx
Posted by mustang1989 on Sunday, November 27, 2016 6:12 AM

That looks pretty dang good Pawel. I like the flames on the topside. Nice work man! Yes


 Forum | Modelers Social Club Forum (proboards.com) 

  • Member since
    May 2009
  • From: Poland
Posted by Pawel on Sunday, November 27, 2016 5:35 AM

Hello everybody!

It's been a month since the last update - a time filled with thrill and adventure!

As I expected, putting on the decals (it's Hasegawa!) didn't go as smooth as I wished. I still don't know how to work with them, I'll have to make it my next research project. What I know is you can use MicroSet on those decals, sparingly, but what you can't do is to soak 'em up in decal solution and wait for the solution to do it's work. This causes Hasegawa decals to wrinkle up badly and then they stay this way. Want to know how I found out?

Here is my bus after putting the decals on:

1:24 Hasegawa Volkswagen Type 2 by Pawel

1:24 Hasegawa Volkswagen Type 2 by Pawel

 Looks quite nice from far away, but once you look closer... Plus the rear flame wrinkled beyound any repair from MicroSet alone:

1:24 Hasegawa Volkswagen Type 2 by Pawel

1:24 Hasegawa Volkswagen Type 2 by Pawel

Here's when the time came for tough decisions. I decided to remove the "middle" flames and just keep the top and bottom ones, because they went on best. I figured less is more here. I soaked the decals to be removed with solvaset and took them down with an old toothbrush.

After that I put on about four layers of Gunze Top Coat Gloss from a spray bottle, with some sanding with 2500 grit sandpaper between the coats, trying to blend the somewhat thick decals in. Lots of drying time between the coats, too - this is why it took me so long to post the next update. After the last coat had a few days to dry I sanded the orange peel with 2500 grit sandpaper, let it dry one day more and then I polished the scratches out with "Tempo" polishing compound - it's a very nice compound made in Czech republic. Here are the results:

1:24 Hasegawa Volkswagen Type 2 by Pawel

Nice sky reflection, eh?

1:24 Hasegawa Volkswagen Type 2 by Pawel

1:24 Hasegawa Volkswagen Type 2 by Pawel

1:24 Hasegawa Volkswagen Type 2 by Pawel

1:24 Hasegawa Volkswagen Type 2 by Pawel

Now I can finally fit the glass and put everything together. Thanks for looking and have a nice day

Paweł

All comments and critique welcomed. Thanks for your honest opinions!

www.vietnam.net.pl

  • Member since
    May 2009
  • From: Poland
Posted by Pawel on Friday, October 21, 2016 3:37 PM

Hello crown r n7!

Thanks a lot, glad you like it! After a week the paint should be more or less dry, now I will try to put the flames on, since nobody has any problem with that (maybe with the exceptions of my woman...). Then I want to clear-coat it.

Thanks for reading, have a nice day

Paweł

All comments and critique welcomed. Thanks for your honest opinions!

www.vietnam.net.pl

  • Member since
    August 2015
  • From: the redlands Fl
Posted by crown r n7 on Thursday, October 20, 2016 4:56 PM

Awesome job 


 Nick.

  • Member since
    May 2009
  • From: Poland
Posted by Pawel on Thursday, October 20, 2016 2:06 PM

Hello Aardvark - thanks a lot for your message!

Snow cat? Sure sounds surprising, but I have seen photos of people doing it 1:1...

The Revell model is much more detailed than the Hasegawa. Then again, Hasegawa has a solid, one-piece body that sometimes is better if you want to hack it up. Revell is better if you want to show open doors or something like that.

So good luck with your project and please be sure to post some photos! Thanks for your kind words and have a nice day

Paweł

All comments and critique welcomed. Thanks for your honest opinions!

www.vietnam.net.pl

  • Member since
    March 2016
Posted by ardvark002 on Wednesday, October 19, 2016 9:46 PM
Pawel I'm working on a revell VW T1 panel van, turning it into a snow cat. Using the tracks from a tv series , " lost in space" chariot loosing the front axle to shorten. Hope it will turn out good. Like your build, looks great. Aardvark
  • Member since
    May 2009
  • From: Poland
Posted by Pawel on Sunday, October 16, 2016 7:46 AM

Hello!

I've got the colour on - at last!

1:24 Hasegawa Volkswagen Type 2 by Pawel

1:24 Hasegawa Volkswagen Type 2 by Pawel

Now I plan to dry-fit all the chrome and put on the decals and clear-coat the whole body. I would just like to ask you - how do you like those decals??

Thanks for looking and have a nice day

Paweł

All comments and critique welcomed. Thanks for your honest opinions!

www.vietnam.net.pl

  • Member since
    May 2009
  • From: Poland
Posted by Pawel on Monday, October 10, 2016 5:32 PM

Joe, Steve - thanks a lot for your comments and for your kind words. I'm glad you like the wheels! The Motip FILLER seemed to do the trick. Took me a little longer than I have thought, but now I'm ready for the colour. Thanks for stopping by and have a nice day

Paweł

All comments and critique welcomed. Thanks for your honest opinions!

www.vietnam.net.pl

  • Member since
    August 2007
  • From: back country of SO-CAL, at the birth place of Naval Aviation
Posted by DUSTER on Sunday, October 9, 2016 8:27 PM

Great job on the roof Pawel. The wheels look amaizing.

Steve

Building the perfect model---just not quite yet  Confused

  • Member since
    March 2012
  • From: Corpus Christi, Tx
Posted by mustang1989 on Tuesday, October 4, 2016 3:50 PM

Verrrrrrrrrry nice build Pawel. I like the kit bashing idea and plans. Looks as though you're carrying them out quite well and that roof looks fantastic now. Great recovery!


 Forum | Modelers Social Club Forum (proboards.com) 

  • Member since
    May 2009
  • From: Poland
Posted by Pawel on Tuesday, October 4, 2016 2:22 PM

SprueOne - thanks a lot! The filler seems to do the trick. I have also found three other minor spots that need such treatment. But I hope to start putting the colour on at the end of this week.

Thanks for looking and have a nice day

Paweł

All comments and critique welcomed. Thanks for your honest opinions!

www.vietnam.net.pl

  • Member since
    January 2006
  • From: California
Posted by SprueOne on Saturday, October 1, 2016 9:22 PM

Nice recovery with the roof. This is gonna be an interesting project.


Anyone with a good car don't need to be justified - Hazel Motes


Iron Rails 2015 by Wayne Cassell Weekend Madness sprueone

  • Member since
    May 2009
  • From: Poland
Posted by Pawel on Saturday, October 1, 2016 12:15 PM

Hello!

DUSTER - thanks a lot for your kind words, glad to have you on my thread here! As for the roof - I think I made some progress. I have sprayed three light coats of Motip spray FILLER on the roof with drying, sanding and again some drying between the coats and the result is like on the photo below:

So thanks for all the ideas and I will start trying them out when this thing goes bad again - that is if the surface imperfections come up again.

Mike - good to see you here! Thanks a lot for your kind words! I just had to do something with the interior, it was so bare, even for an early VW!

During the time when paint was drying I started finishing the wheels. I painted the BMW rims with Alclad 2 prismatic paint. I also sanded out the seams on the slick tyres. I also painted the disc brakes with Gunze Stainless paint and painted the calipers red:

Now let's see how the further painting of the body goes - thanks for lookin' and I hope you liked it. Best greetings and have a nice day

Paweł

All comments and critique welcomed. Thanks for your honest opinions!

www.vietnam.net.pl

  • Member since
    January 2015
  • From: Tumwater, WA.
Posted by M. Brindos on Friday, September 30, 2016 11:05 PM

That fabrication work on the suspension is blowing my mind, Pawel! That is top notch!

I agree with Duster. Looks like a chem reaction. I think his idea is worth a try. Perhaps some Bondo Spot and Glazing putty would suffice?

- Mike Brindos "Lost Boy"

JOIN OUR COMMUNITY!

Our community is FREE to join. To participate you must either login or register for an account.

SEARCH FORUMS
FREE NEWSLETTER
By signing up you may also receive reader surveys and occasional special offers. We do not sell, rent or trade our email lists. View our Privacy Policy.