SEARCH FINESCALE.COM

Enter keywords or a search phrase below:

AMT Eagle --- FINISHED PICS!

10030 views
68 replies
1 rating 2 rating 3 rating 4 rating 5 rating
  • Member since
    January 2007
AMT Eagle --- FINISHED PICS!
Posted by the doog on Thursday, May 12, 2016 7:04 PM

Hello all.

Here I am again with another Eagle 1 from Moonbase Alpha! There has been a veritable renaissance of Space 1999 lately, especially with the release of Round 2's excellent 22-inch Eagle (which I will tackle in due time) so I've caught the bug again for another Eagle build. This time I'm using the base kit with some aftermarket goodies from Para Graphix (The PE set), WARP (Nuclear Waste Pod) and aftermarket decals from seller "mirrormaskman" on eBay. Nice stuff!

A quick look at the WARP kit---some pewter frames, resin nuclear pods and base. The resin is greeat quality, no pitting, and the cargo bed is completely flat. (WHEW!)And stickers for the pods.

I've already got a good start on a real "upgraded" Eagle. I'm hollowing out the cages. I tried a couple of ways to do this, and the easiest way I found was to use a small drill bit spun in a Dremel. It's better than a grinder tool. I basically do a bunch of small holes in a line and then literally burn through the plastic by dragging the bit sideways through them. It's tedious and potentially disastrous work, but if you're careful, it can work pretty efficiently.

It sure looks like hell when you're in the midst of it...Originally I thought about removing it all with the drill bit trick, but after consideration, it is easier on some parts like the door ends to just make a channel for a saw blade. I will use a small PE saw blade to cut through the rest of the plastic.

The worst part about this is that you have to then slean out the openings with either an Exacto #11 or a scalpel blade. THAT takes time, and it's easy to deform the actual tubes. Then you have to round the backs a bit to look like actual "tubes", and check them all for general similarity in size. This is after about 4 hours work; two evenings down. Not as hard as I thought it would be, but challenging to be sure.

It's going to look COOL when finished. I have to build the inside of the cages now. I'll not do too much more over the weekend but should be able to make some progress. Hopefully I'll have an update after Saturday or so. Thanks for looking in, and stay tuned! Smile


  • Member since
    July 2010
Posted by roony on Thursday, May 12, 2016 7:53 PM

I'll enjoy watching this build.  Have fun with it.

  • Member since
    January 2006
  • From: California
Posted by SprueOne on Friday, May 13, 2016 12:15 AM

Custom detail work is what this is all about YesIdea Good work so far. I'll be watching this build for sure

Anyone with a good car don't need to be justified - Hazel Motes


Iron Rails 2015 by Wayne Cassell Weekend Madness sprueone

  • Member since
    January 2007
Posted by the doog on Friday, May 13, 2016 6:52 AM

Thanks for looking in, guys! Glad to have you along for the ride! :)

  • Member since
    August 2005
  • From: Sydney, Australia
Posted by Phil_H on Friday, May 13, 2016 8:44 AM

Karl,

Your previous Eagle was awesome, but this one looks like it's going far beyond that. Looking forward to watching this come together.  Smile

  • Member since
    February 2014
  • From: Michigan
Posted by silentbob33 on Friday, May 13, 2016 9:59 AM
This looks really cool Karl! I have to confess Space 1999 was a bit before my time, but I've seen a few reruns and my dad has a couple of each of the original kits. I'm going to enjoy watching this come together.

On my bench: Academy 1/35 UH-60L Black Hawk

  • Member since
    November 2009
  • From: SW Virginia
Posted by Gamera on Friday, May 13, 2016 11:18 AM

Very cool Karl, lotsa work but the results will be worth it. 

"I dream in fire but work in clay." -Arthur Machen


  • Member since
    January 2007
Posted by the doog on Friday, May 13, 2016 10:12 PM

Phil_H

Karl,

Your previous Eagle was awesome, but this one looks like it's going far beyond that. Looking forward to watching this come together.  Smile


Hey, thanks, Phil; very kind of you to say! I am going to wish that I did all these mods on that one. lol. Thanks for looking in and taking a seat! :)

silentbob33
This looks really cool Karl! I have to confess Space 1999 was a bit before my time, but I've seen a few reruns and my dad has a couple of each of the original kits. I'm going to enjoy watching this come together.

Thanks too, Bob! Yeah, I was just a young turd when it was on but I remember it was my favorite show back then, mostly because of the Eagles and the Korean girl "Sandra"---she was my first crush, lol.  Thanks for coming along!

Gamera
Very cool Karl, lotsa work but the results will be worth it.

I sure hope so, Cliff! Thanks for checking in! :)

Update coming up!!

  • Member since
    January 2007
Posted by the doog on Friday, May 13, 2016 10:37 PM

Here's the next update: making good progress here!

I got an idea from another builder on Facebook who is in a group of Space 1999 fans, and so I followed his lead and decided to accurize the command module's mode of attachment. One of the worst things about this kit is the way that the CM attaches to a blank wall, basically. Here's my first Eagle build; look at the way the command module sits against that wall?

First, cut off the command module.

Next, trim off the plastic rim so you can use the glued frame for a template.

I divided the frame into lengths, which were then cut from .80 styrene rod and glued them together into a frame. This was a tedious, time-consuming chore.

This is how the pod will eventually look mounted--much more accurate!

That done, I turned my attention yet again to the cages. I have been hesitating cutting out the tops, as to do so would necessitate the "walkways" inside the cages. I decided that I just couldn't live with the terribly-inaccurate rendering of the top of the cage, so I went about removing the top one only. (I'n keeping the bottom "floor" for strength and rigidity; you won't really even notice it when I'm done.) So, I cut the top sides (left) and then used the Dremel cutter head to score across the side (middle), and then proceeded to add the framing tubes from .80 rod.

The frames basically finished exteriors---before I realized that I had to fit the ends, and the end-tubes needed to be added later...

So, on to adding the walkways and inner cage detail:

I had to add "shelves" on the sides of the cages. I did all the following calculating and fitting trial-n-error by using an index card first, cutting it and taping it together and making adjustments. Here are the final ballpark measurements that I came up with:

All of these were then fashioned from .20 plastic sheet.
Here is a look at two of the shelves, ready to be fit around the mounting boxes for the leg pods...

Here you can see that I made the inner walkway corridors, and have ground off the door detail with the Dremel and then added the ParaGraphix PE doors. Note they come in two pieces.

The two of them finished: these will look nice when they're visible behind the nuke pod legs.

And here is the other sides. One will go toward the engines (that's the engine end framing kit part hollowed out), the other will host the command module.

Note that the walkways aren't glued in yet; now I have to go about detailing the inner shelves and the sides of the walkway rectangles with small kit parts to give the impression of the myriad of odd details on the real Eagle ships, which were actually just odd kit parts from things like the Saturn 5 rocket and even Airfix 1/72 Panther tank decks and T34 wheels!

Well, that's it for today, and probably nothing more until Monday at least. Got plans tomorrow, and who knows what Sunday will bring--the weather is supposd to be nice, and I'll probably spend it with the wife and my lil bud Gerhardt...thanks for looking in, and taking the time to comment it you do! Big Smile

  • Member since
    February 2014
  • From: Michigan
Posted by silentbob33 on Saturday, May 14, 2016 7:47 AM
That's some really nice scratch building Karl, very impressive

On my bench: Academy 1/35 UH-60L Black Hawk

  • Member since
    February 2011
Posted by knox on Sunday, May 15, 2016 9:56 PM

Who needs tv when stuff like this is going on. Really nice work. 

  • Member since
    January 2007
Posted by the doog on Tuesday, May 17, 2016 11:04 AM

Thanks guys! I appreciate you following along!

I have another update...

The next step was to detail the tops of the corridors. I assembled a likely pile of old parts culled from a lot of extra DML and other sprues.

I used some Panzer IV bogey caps and some styrene rod to make a representation of the fuel lines inside the cages. It's important to note that what I'm going for here is a mere representation of details, not "accurate" necessarily down to the rivets, but just something to busy-up the interiors.

I think used an assortment of likely-looking parts to simulate shapes on the sides.

 For the tops, 1/35 scale German helmets were sanded down to create the half-spheres on the top of the roofs after the corridors were glued in.

The results.

Still left to do---join the CM to the cage. That should be next update...

Thanks for looking in, all!! Big Smile


  • Member since
    September 2009
Posted by Cobra 427 on Tuesday, May 17, 2016 3:50 PM

Impressive, most impressive! Oh, wrong movie.

Anyway....

This is BIG work for a tiny model! you'd think that the smaller the model the easier - right? WRONG!! This is why I don't build them anymore.  The greeblies for the inside are cool, and very creative. It takes a lot of imagination to bring these things to life, but very little materials, and tools to do it with. However, it takes a lot of work to get them to where you want them to be. I love to photo etch, and the details. I usually just punch a hole with my X-Acto blade where I need to remove excess plastic. Then I scrape it until I get to the edge. I know this isn't a help to since you already know how to do this. It's still very cool to see this, and the progress that you've made to it including the German "*** stomper" helmets that you've RECYCLED as a greeblie for the interior.

*** *** *** - how is K R A U T a dirty word? The stupid language filter deleted it!


~ Cobra Chris

Maybe a picture of a squirrel playing a harmonica will make you feel better?


  • Member since
    November 2009
  • From: SW Virginia
Posted by Gamera on Tuesday, May 17, 2016 7:10 PM

Super cool Karl, nice work with the greebies and the German helmets there!

"I dream in fire but work in clay." -Arthur Machen


  • Member since
    January 2007
Posted by the doog on Tuesday, May 17, 2016 9:57 PM

Cobra 427

Impressive, most impressive! Oh, wrong movie.

Anyway....

This is BIG work for a tiny model! you'd think that the smaller the model the easier - right? WRONG!! This is why I don't build them anymore.  The greeblies for the inside are cool, and very creative. It takes a lot of imagination to bring these things to life, but very little materials, and tools to do it with. However, it takes a lot of work to get them to where you want them to be. I love to photo etch, and the details. I usually just punch a hole with my X-Acto blade where I need to remove excess plastic. Then I scrape it until I get to the edge. I know this isn't a help to since you already know how to do this. It's still very cool to see this, and the progress that you've made to it including the German "*** stomper" helmets that you've RECYCLED as a greeblie for the interior.

*** *** *** - how is K R A U T a dirty word? The stupid language filter deleted it!


~ Cobra Chris


Thanks Chris! I'm sorry to hear that you don't make models any more. This one is a fun project; I actually forgot how fun it is to actually work on something that NEEDS improvement---so many of today's kits are "shake n bake" easy. Thank for your king words and for following along!

Gamera

Super cool Karl, nice work with the greebies and the German helmets there!


Thanks too, Cliff! Much appreciated, and thanks for following along! :)

  • Member since
    February 2014
  • From: Michigan
Posted by silentbob33 on Wednesday, May 18, 2016 7:58 AM
Very cool with all the greeblies and use of panzer parts and German helmets. That's why I love my spare parts boxes

On my bench: Academy 1/35 UH-60L Black Hawk

  • Member since
    May 2016
Posted by Xena on Wednesday, May 18, 2016 1:28 PM

Big Smile another masterpiece in production.  Well done, Karl!!

  • Member since
    January 2007
Posted by the doog on Thursday, May 19, 2016 6:27 PM

Xena

Big Smile another masterpiece in production.  Well done, Karl!!


Thank you, Xena! It's much appreciated!


Thanks too, SilentBob!!!!

  • Member since
    January 2007
Posted by the doog on Thursday, May 19, 2016 6:46 PM

Another update!

When we last left off, I was trying to figure out how to attach the CM to the body; I hit on this idea. I know that I needed a squarish cylinder to mimic the airlock corridor. So I came up with this: four pieces of 6mm tube, glued together and wrapped in a piece of .010x.250 strip which was then pared down to become the "wall" of the cylinder.

I check it for sizing...

I glued it to the CM...

And then attached it.

Next I constructed better attachment points from strip and sprue.

Here's the next part. I have to really think this through. The instructions for the PE set tell you to use aluminum tube. I got brass, but it's a chore to cut it so I may use styrene. But then I'll have to reinforce it perhaps. The photo shows the brass pieces and the leg pods and feet modified to accept them. Lots of work still to do here...

That's it for now. I have to run to the Hobby Store tomorrow for some sprue. Thanks for looking in and commenting, guys! :)

  • Member since
    November 2005
  • From: Formerly Bryan, now Arlington, Texas
Posted by CapnMac82 on Thursday, May 19, 2016 9:32 PM
After all that --quite excellent--work, did you have a moment where you went, "Dang, I should have made some casting moulds" moments? After all, you're on a roll now--you'll want to update the older ones soon enough as is :)
  • Member since
    December 2002
  • From: Bury St Edmunds, Suffolk, England
Posted by Bish on Friday, May 20, 2016 4:01 PM

Some impresive work there Karl.

One of the guys in the model club brought in the MPC 1/48th kit last month, that really brought back some memories. I used to love the series, those were the days when us Brits made proper telly, and had a metal (Dinky i am guessing) eagle which had a button on top which when pressed released the pod. I might have to get myself one of these, i am guessing your kit is closer to 72nd scale.

I am a Norfolk man and i glory in being so


On the bench: Airfix 1/72nd Harrier GR.3/Fujimi 1/72nd Ju 87D-3

  • Member since
    January 2007
Posted by the doog on Friday, May 20, 2016 5:27 PM

CapnMac82
After all that --quite excellent--work, did you have a moment where you went, "Dang, I should have made some casting moulds" moments? After all, you're on a roll now--you'll want to update the older ones soon enough as is :)
 

Thanks, Mac! Big Smile No, I don't do casting. Just too much to get into and I really don't have the work space to do something quite so involved. But it certainly would make things easier, but I don't mind working like this. I DO plan to do several more Eagles just like this---a cargo pod one, one with one of the gliders, a "regular" one...lots of fun!!!

  • Member since
    January 2007
Posted by the doog on Friday, May 20, 2016 5:35 PM

Bish

Some impresive work there Karl.

One of the guys in the model club brought in the MPC 1/48th kit last month, that really brought back some memories. I used to love the series, those were the days when us Brits made proper telly, and had a metal (Dinky i am guessing) eagle which had a button on top which when pressed released the pod. I might have to get myself one of these, i am guessing your kit is closer to 72nd scale.


Thanks so much, Bish! Yes, I believe these are referred to as the "1/72" Eagles. They're pretty rough, honestly, but can be made into decent representations. They used to command silly prices on eBay before MPC re-released them. The new ones come with much more complete decals and some fancy card stock printouts of Alan Carter the pilot.

The Round 2 1/48 kit is KILLER! I have one, and am getting the lighting kit for it and have a pod interior for it already. Not sure if I'll be able to do both of those things in one Eagle, so I may have to spring for another one. Big Smile

I also picked up a complete Mattel Eagle toy, and am currently refurbishing that too. Got bit by a Space 1999 bug I guess.... Surprise

  • Member since
    September 2006
  • From: Central Texas
Posted by NucMedTech on Saturday, May 21, 2016 5:59 AM

Karl, great work going on here and I am loving all the extra detail! Thanks for all the detailed photos too, it helps us less imaginative people get some ideas and see how things are accomplished.

- Stephen

Most barriers to your successes are man made. And most often you are the man who made them. -Frank Tyger

  • Member since
    February 2011
Posted by knox on Saturday, May 21, 2016 4:30 PM

It just continues to get better. This is fun. Thanks for posting.            gk

  • Member since
    January 2007
Posted by the doog on Sunday, May 22, 2016 9:53 AM

NucMedTech

Karl, great work going on here and I am loving all the extra detail! Thanks for all the detailed photos too, it helps us less imaginative people get some ideas and see how things are accomplished.

- Stephen


STephen, thanks for looking in and following along. I'm happy to share the information! :)

knox

It just continues to get better. This is fun. Thanks for posting.            gk


You too, knox! Thanks for looking in; trust me, I'm having as much fun building it as you are watching! :)


  • Member since
    January 2006
  • From: California
Posted by SprueOne on Sunday, May 22, 2016 11:10 AM

the doog

Another update!

When we last left off, I was trying to figure out how to attach the CM to the body; I hit on this idea. I know that I needed a squarish cylinder to mimic the airlock corridor. So I came up with this: four pieces of 6mm tube, glued together and wrapped in a piece of .010x.250 strip which was then pared down to become the "wall" of the cylinder.

I check it for sizing...

I glued it to the CM...

That's it for now. I have to run to the Hobby Store tomorrow for some sprue. Thanks for looking in and commenting, guys! :)


Thanks for sharing that solution Idea Yes

Anyone with a good car don't need to be justified - Hazel Motes


Iron Rails 2015 by Wayne Cassell Weekend Madness sprueone

  • Member since
    January 2007
Posted by the doog on Sunday, May 22, 2016 6:31 PM

Here's the latest installment guys--making good progress here.

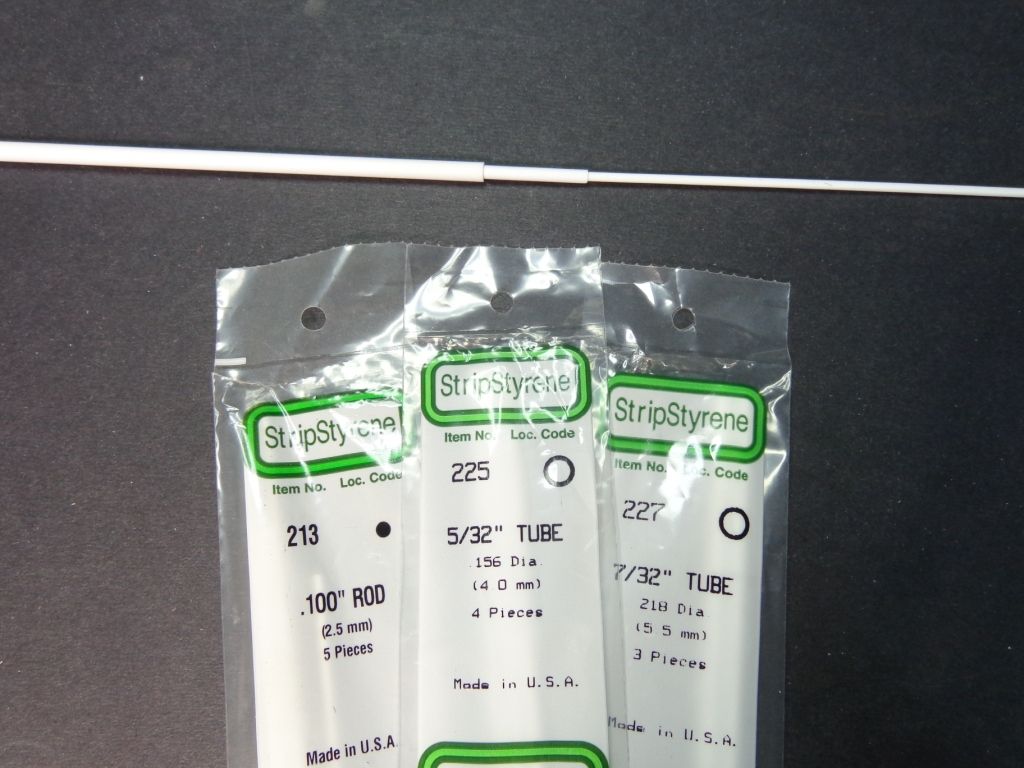
The installation of the legs presented a bit of a challenge: ParaGraphix does not include a "leg" per se and they suggest that you use different sizes of aluminum tubes, but I have NO experience with working with that, so I thought "well maybe brass", but then that brings up the problem of working with different adhesive complexities, so I figured that I would just try to make it work with styrene rod and tube.

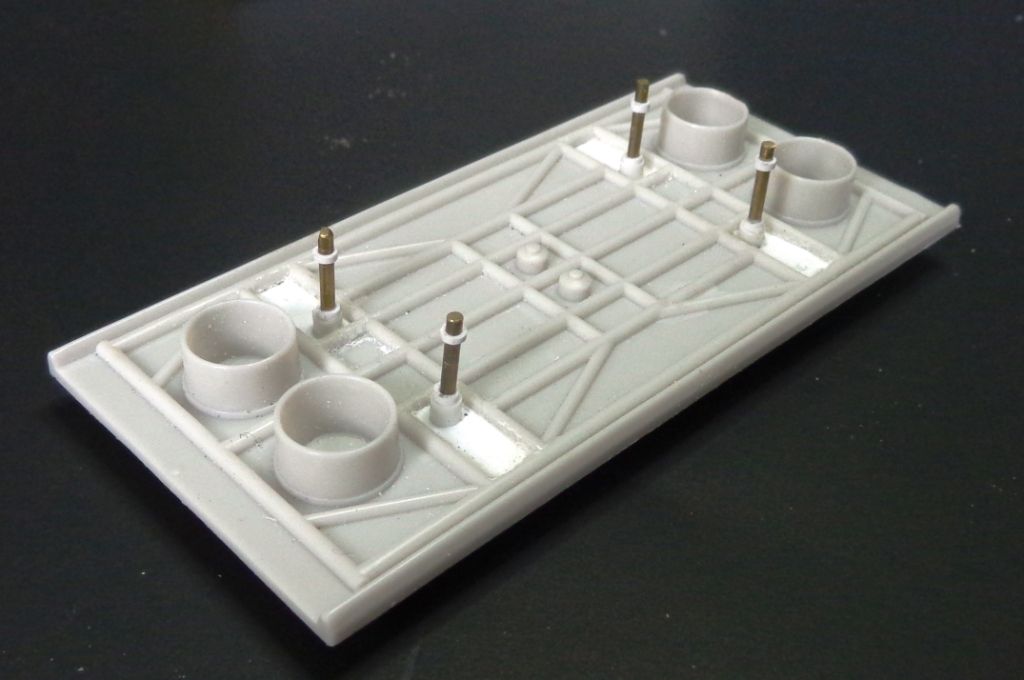
After a special trip to the only local hobby store still around (thank god) I was able to size and settle on three sizes that worked well: .100 mm rod for the actual leg, and two different "nesting" sizes -- 5/32 (4mm) and 7/32 (5.5mm) tube, which, when fit inside each other, would not only provide strength and stability, but also allow me to find the right "ride height" for the Eagle before cementing them in.

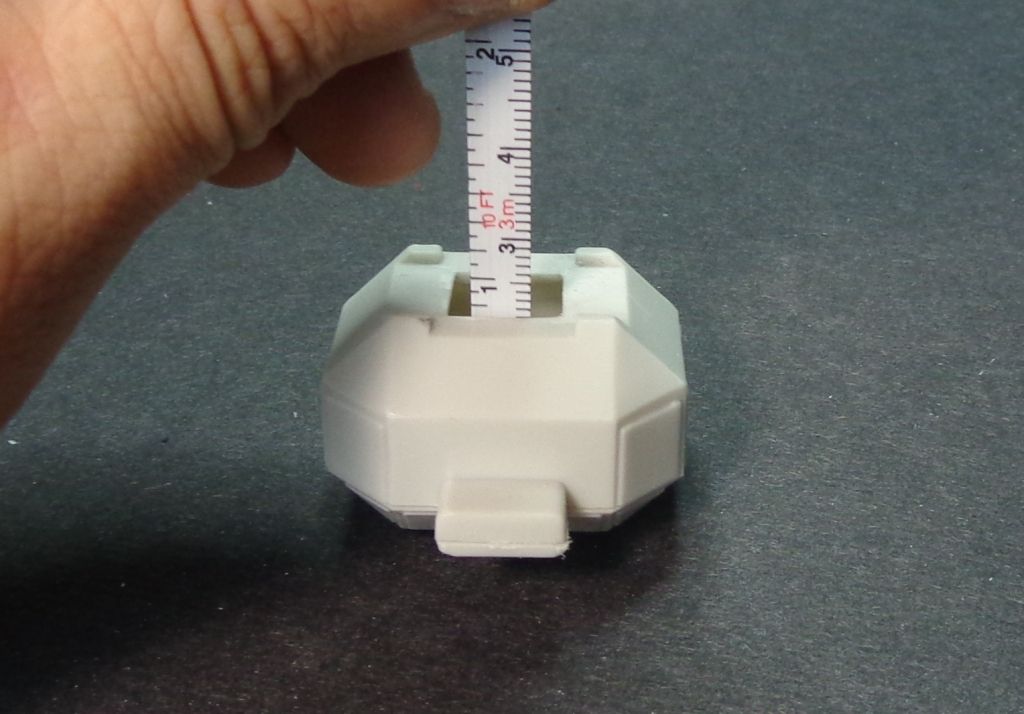
 First I measured the inside race of the pod: 26mm.

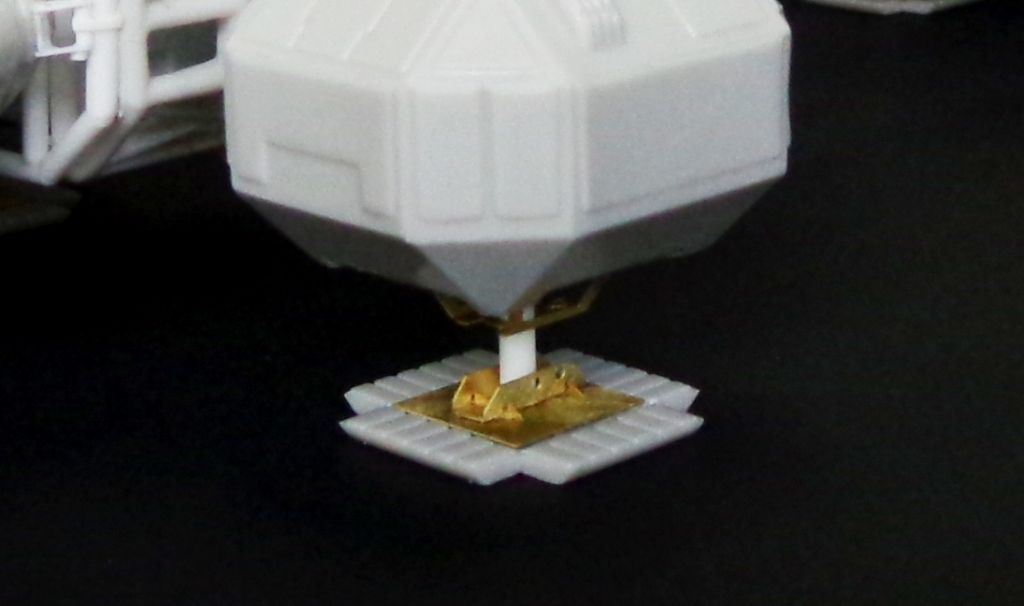
Nest, I cut 4 pieces of each tubing and fit them into each other (below right in the photo). Note the brass PE parts which form the base of the leg pods. MAKE SURE you put them together first because those spider-legs have tiny tabs which fit into cutouts which would be impossible to get into if the flat brass pad is glued on first.

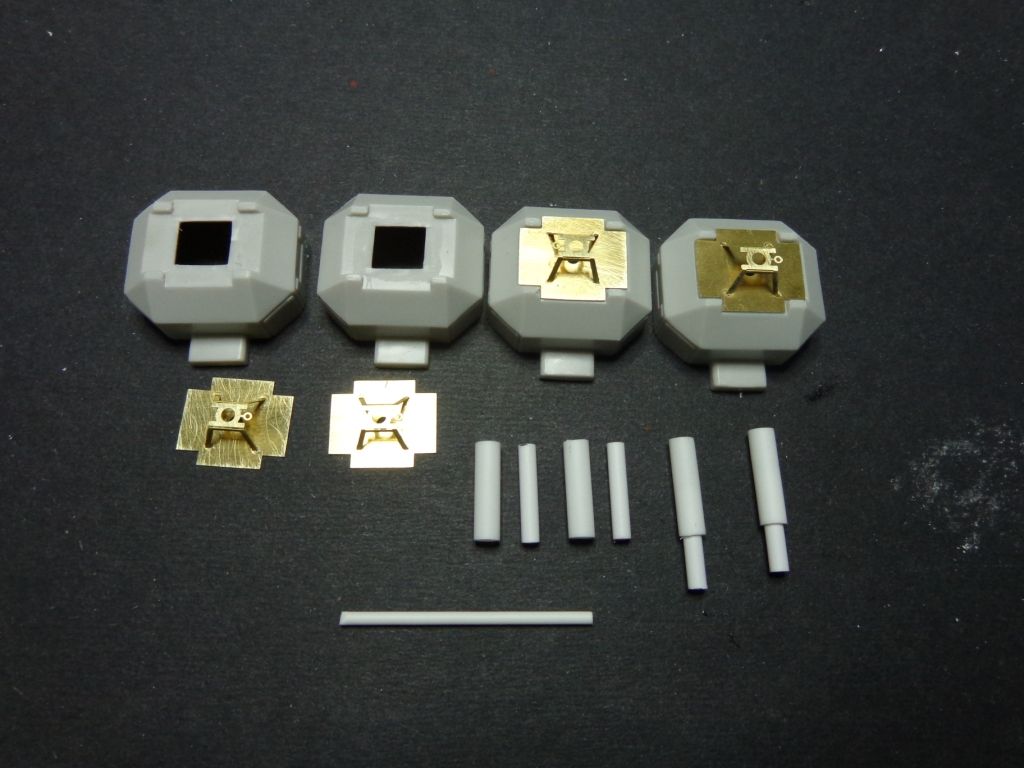
Make sure to position the pods as they will go on the model. I'm pretty sure they're all the same anyway, but the important thing is that the little tabs on the PE part face toward the rear of each pod.

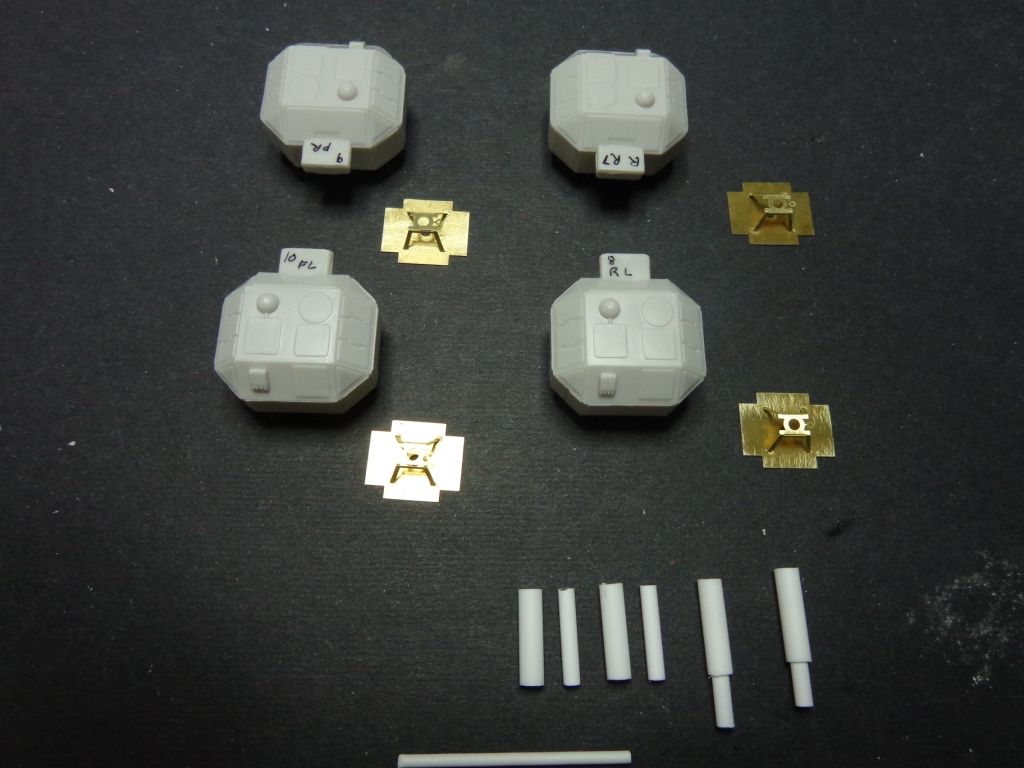
Next, I placed two of the 26mm nested tubes over the hole of the PE base and used a random length .100mm rod to locate it accurately in the dead-center. This is NOT GLUED at this point!!!

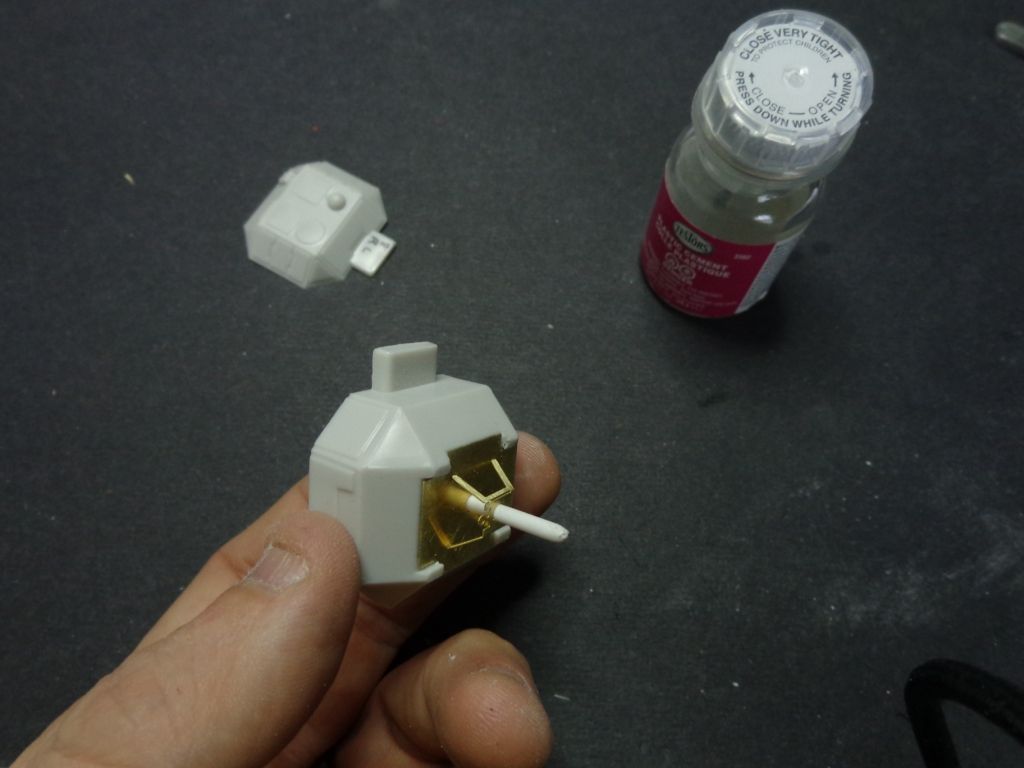
Hold the tubes carefully in place and glue them onto the inside of the brass base.

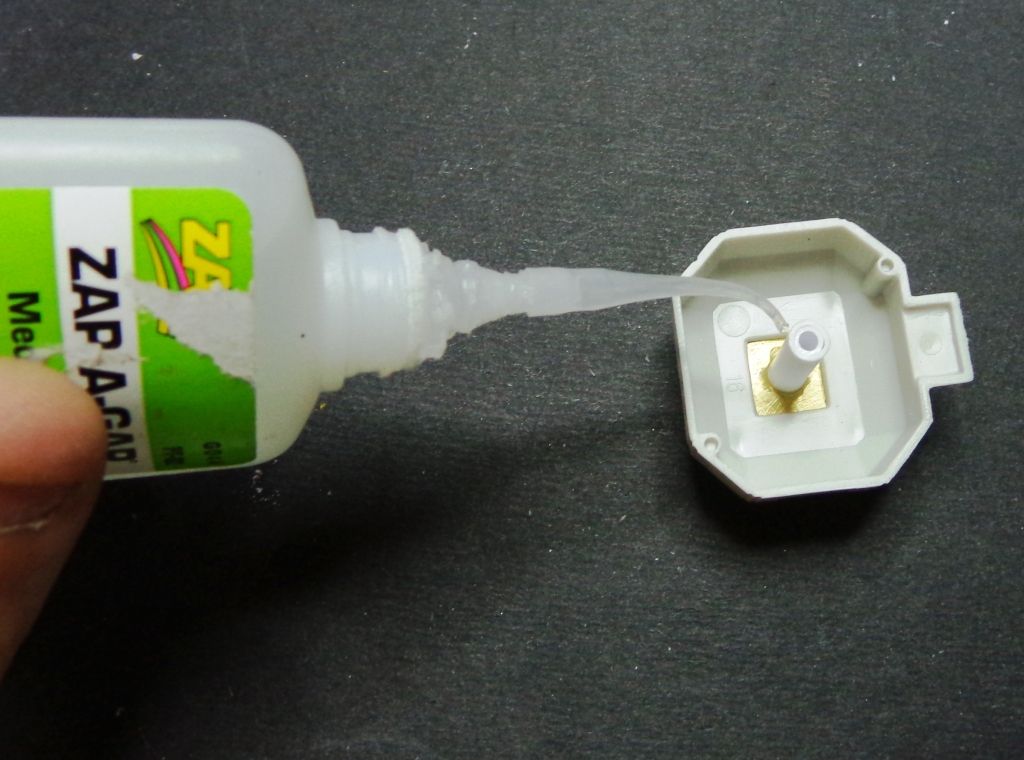
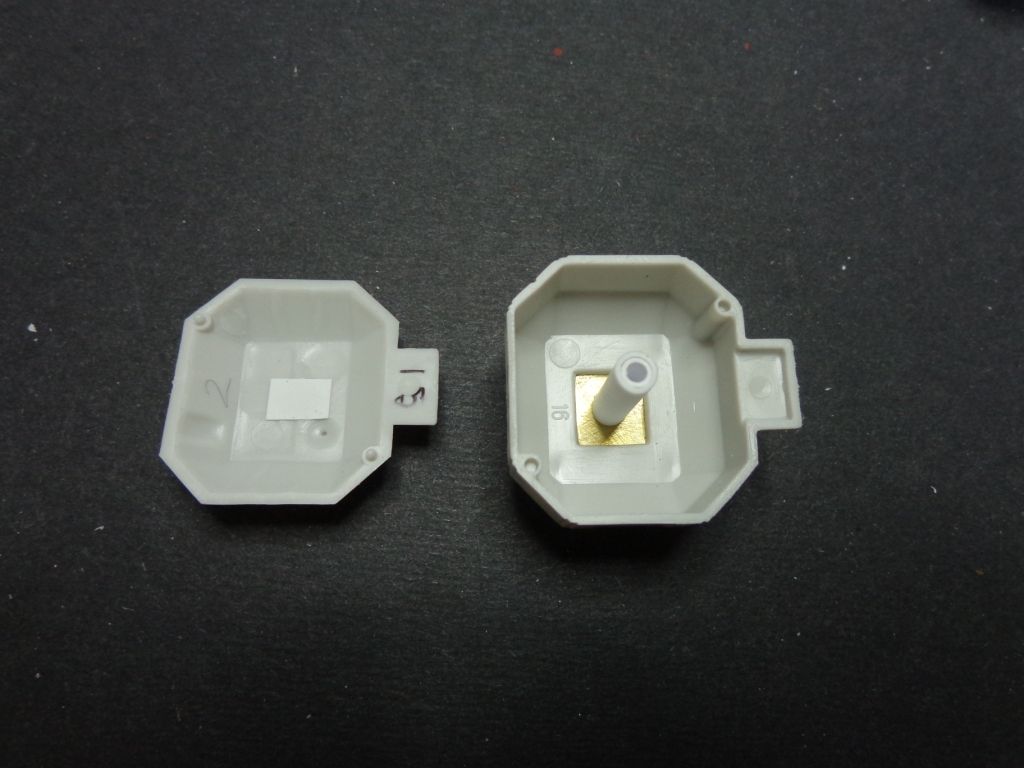
Now, to help make a dead-solid, strong tube column for the leg to fit into, I glued a small square of .010 plastic onto the inside-top of the leg pod. This is slightly uneven here, so this small piece helps to make a firm bond to the tube tops. Also, it provides a small degree of "interference fit" which adds strength to the whole assembly when you join the halves.

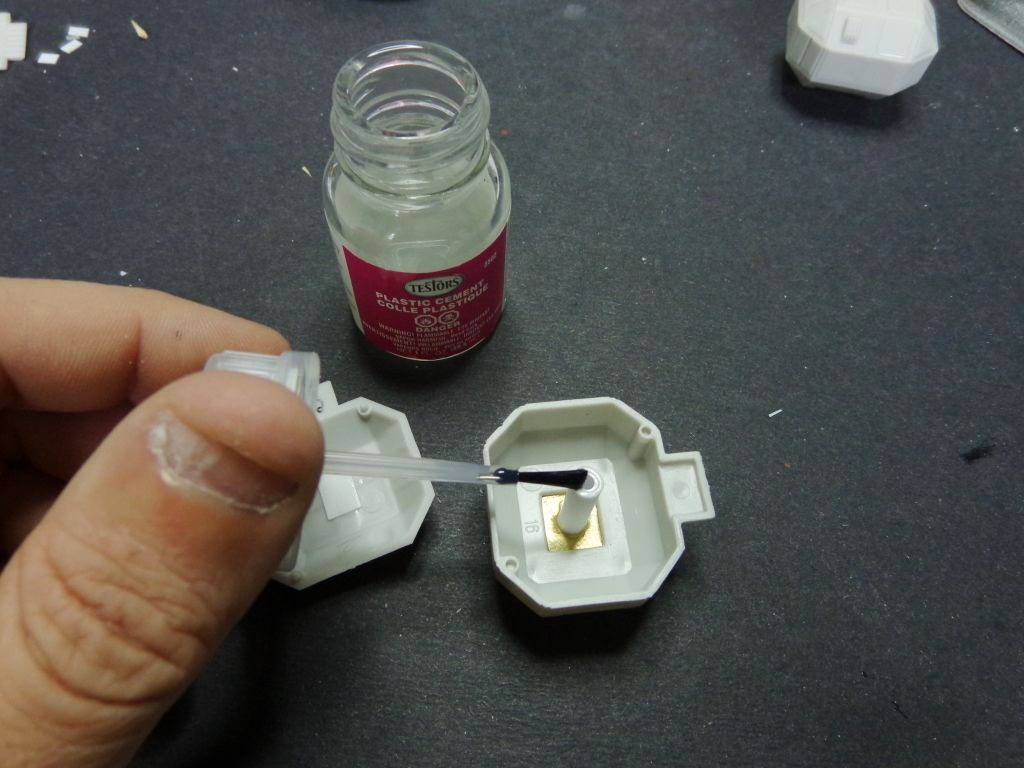
I add Testor's glue to the top of the tube and the square and sides of the pods, and join them together with some pressure for a minute or two. The glue on the top of the tube will "sink" into the soft styrene square and really set up with immoveable solidness.

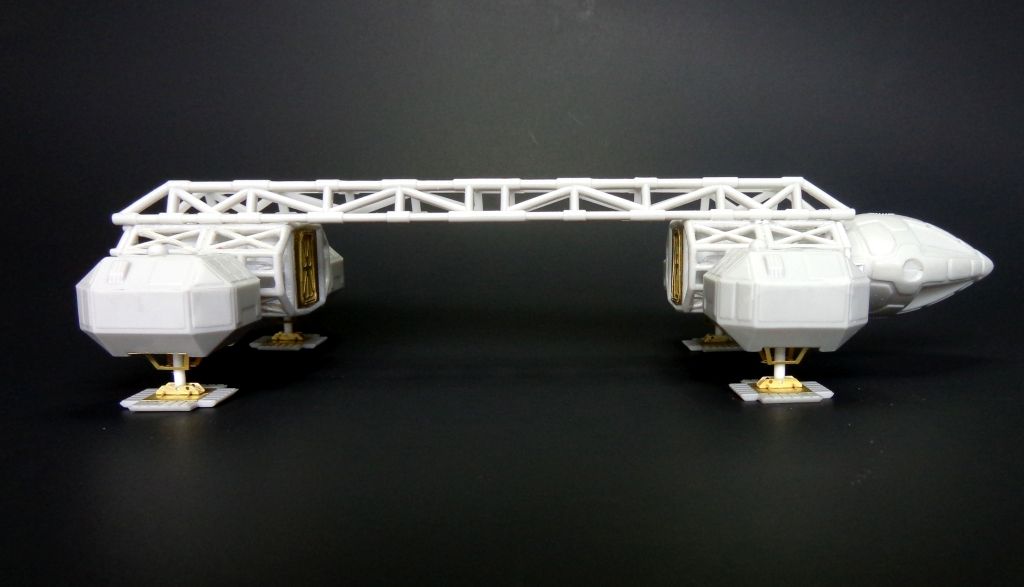
After allowing to dry for an hour or so, I went back and kept reducing a four pieces of .100mm rod until I settled on a height of 29mm rod which fit into the tubes extending into the pod. This gave me the "ride height" that I liked. (The 29mm measurement is just my note to measure each pod point to ensure even height after they all dried--this point is the line of the top of the side-thrusters panel where the black maltese cross decal will go)

You'll also notice the feet, modifed with PE. This involves the normal procedure of removing the molded-on details and sustituting the PE parts.

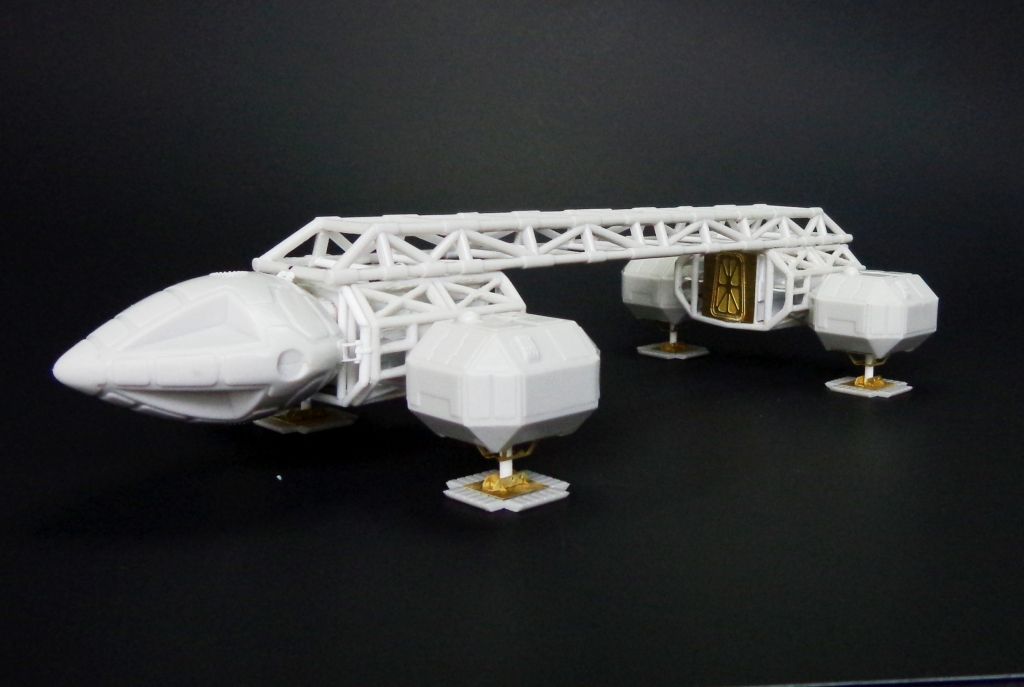
Here's where the Eagle stands now.

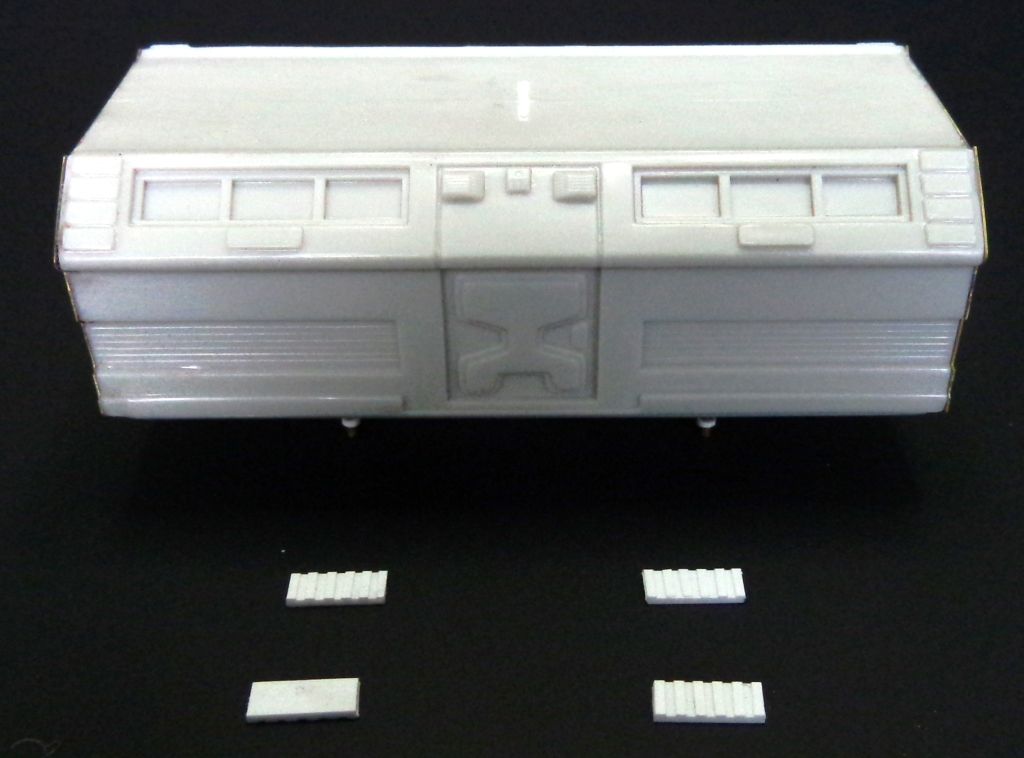
I remind you that I'm building the cargo version of the Eagle here, but it seems a waste to not build the passenger pod as well, given the nice PE endcaps in the ParaGraphix set.

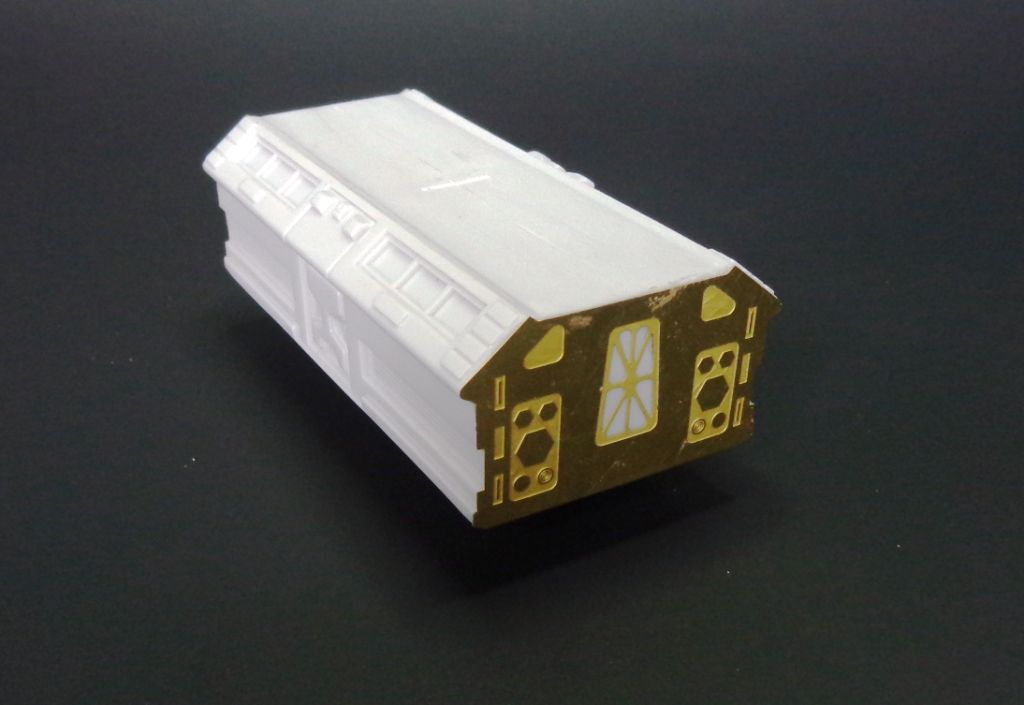
I'm going to display the pod next to this Eagle. In order to do that, I had to eliminate the molded-in legs for the pod and fashion new ones.

On this piece, I did use brass rods onto which small pieces of tube were slipped to simulate the hydraulics. I secured the brass inside the pod by building up some bulk styrene and drilling through it, making for a tight fit, but then also using epoxy to make sure the legs didn't slip and cause it to sit unevenly.

The feet are easy enough to make. I used .040 x .188 styrene strip with .010x.040 strips running broadly on them for the detail.

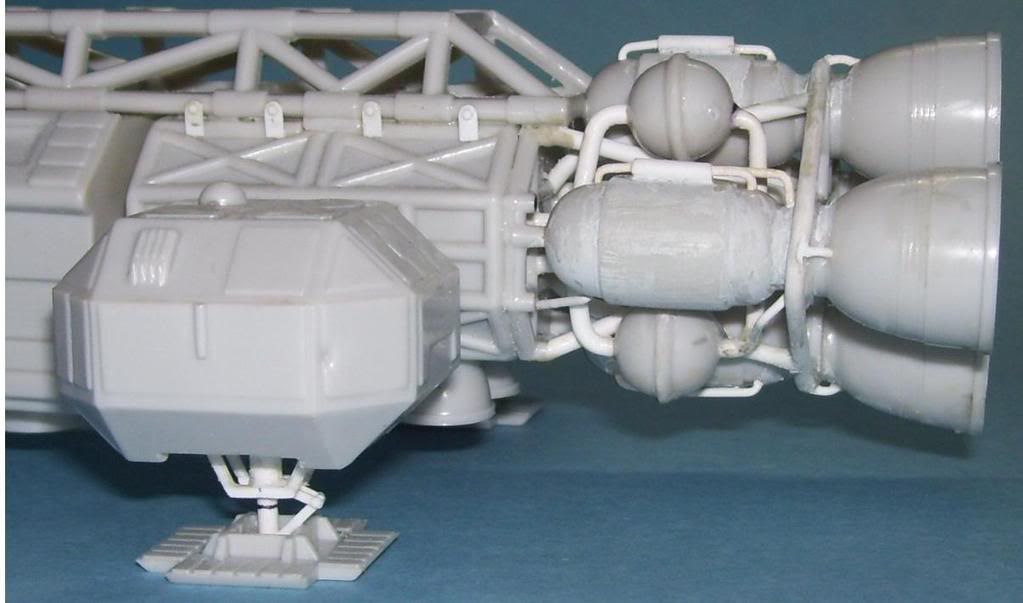
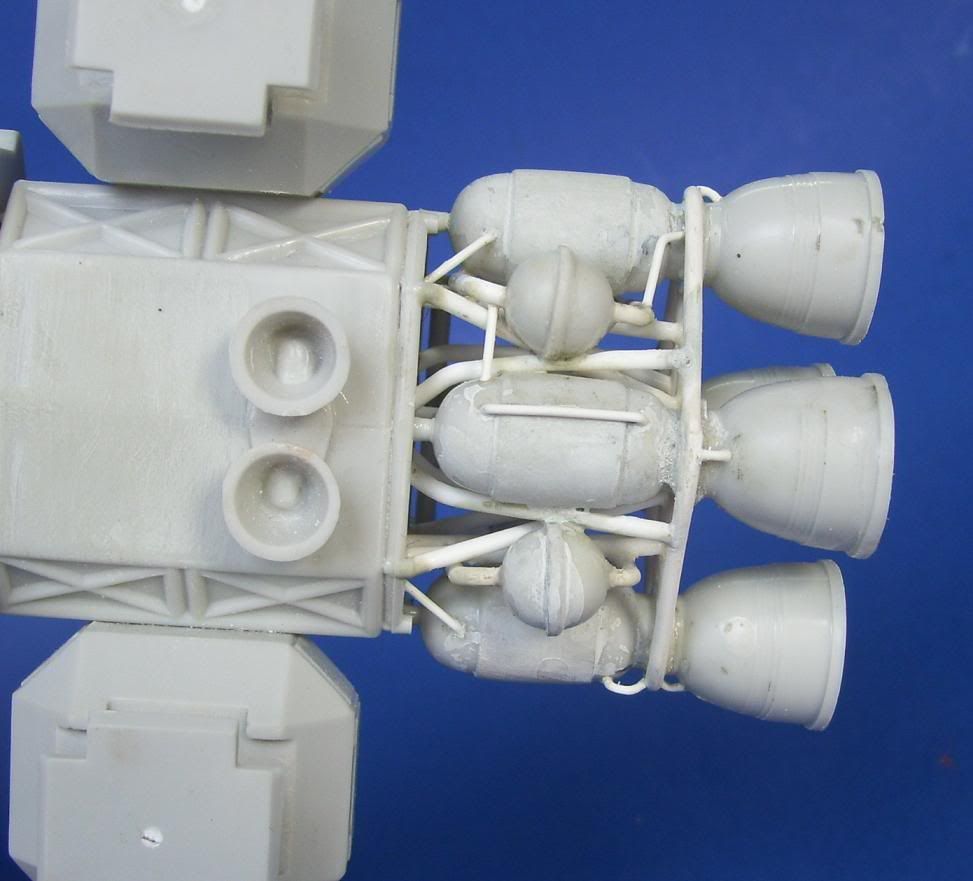
That's it for now. I'm probably going to tackle the engines next. And--EXCITING NEWS!!--I actually found a distributor for Raboesch Super Styrene rod, which is bendable styrene rod which is absolutely invaluable for fashioning the twisty engine plumbing. I used it on my previous Eagle, and it was just the thing to make the engines look more accurate. Here's a pic of the former engines before painting:

I'm waiting on the arrival of a shipment from Germany, and I also am looking into placing an order with the company itself which is in Holland. I will post detailss when I find out that latter, as the German company claims that it is no longer to be receiving shipments of this product very soon. Stay tuned! Comments appreciated and welcomed! Smile

  • Member since
    February 2014
  • From: Michigan
Posted by silentbob33 on Sunday, May 22, 2016 9:46 PM
I was wondering how you were going to do the feet with styrene and you did it pretty much how I thought you would. The PE is a really nice touch. That Raboesch super styrene rod looks really cool! When I saw how you used it on your other Eagle my mind started racing about all the different things I could do with something like that. I'm really looking forward to seeing how it works. Great work Karl.

On my bench: Academy 1/35 UH-60L Black Hawk

  • Member since
    November 2009
  • From: SW Virginia
Posted by Gamera on Monday, May 23, 2016 7:27 AM

Yeap, I'm with Bob here, neat work on the landing gear. And that Raboesch bendy styrene looks really useful. 

"I dream in fire but work in clay." -Arthur Machen


JOIN OUR COMMUNITY!

Our community is FREE to join. To participate you must either login or register for an account.

SEARCH FORUMS
FREE NEWSLETTER
By signing up you may also receive reader surveys and occasional special offers. We do not sell, rent or trade our email lists. View our Privacy Policy.